
Pathfinding is how the AI will maneuver around the level. For our AI package, we will be using two different kinds of pathfinding, NavMesh and waypoints. The waypoint system is a common approach to create paths for AI to move around the game level. To allow our AI to move through our level in an intelligent manner, we will use Unity's NavMesh component.
Using waypoints to create paths is a common practice in game design, and it's simple too. To sum it up, you place objects or set locations around the game world; these are your waypoints. In the code, you will place all of your waypoints that you created in a container of some kind, such as a list or an array. Then, starting at the first waypoint, you tell the AI to move to the next waypoint. Once that waypoint has been reached, you send the AI off to another one, ultimately creating a system that iterates through all of the waypoints, allowing the AI to move around the game world through the set paths. Although using the waypoint system will grant our AI movement in the world, at this point, it doesn't know how to avoid obstacles that it may come across. That is when you need to implement some sort of mesh navigation system so that the AI won't get stuck anywhere.
The next step in creating AI pathfinding is to create a way for our AI to navigate through the game world intelligently, meaning that it does not get stuck anywhere. In just about every game out there that has a 3D-based AI, the world it inhabits has all sorts of obstacles. These obstacles could be plants, stairs, ramps, boxes, holes, and so on. To get our AI to avoid these obstacles, we will use Unity's NavMesh system, which is built into Unity itself.
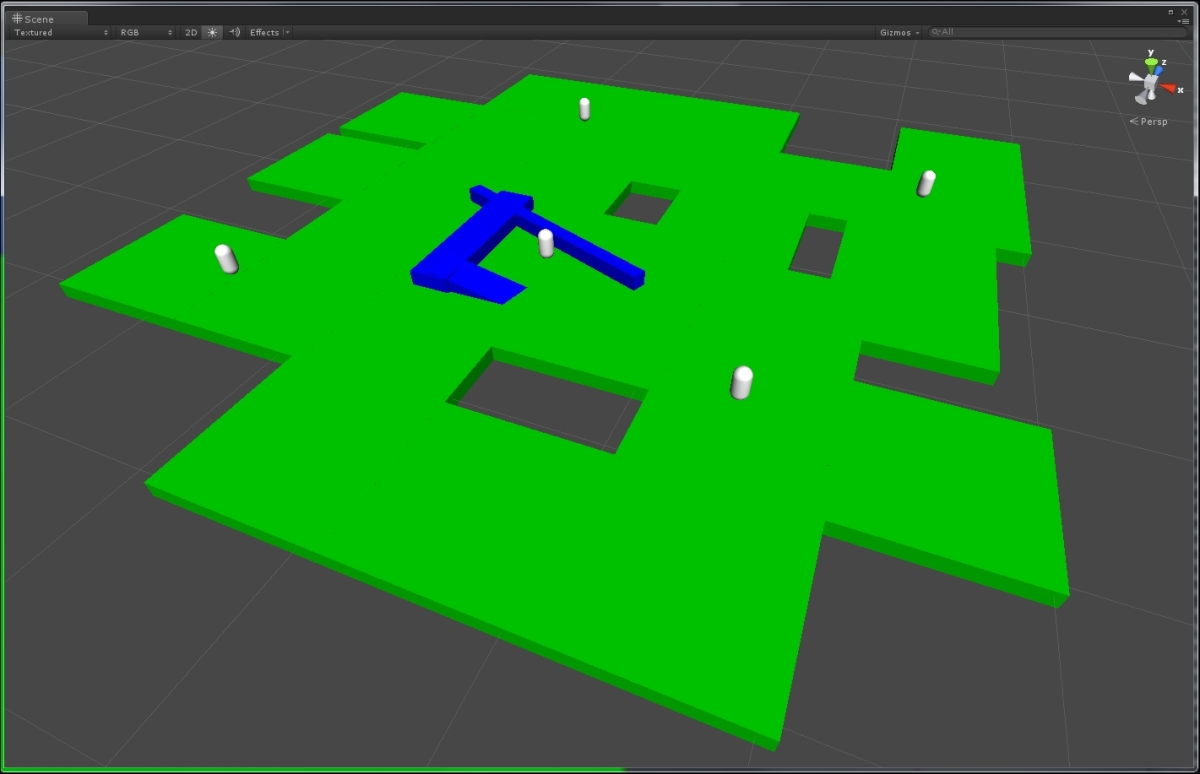
Before we can start creating our pathfinding system, we need to create a level for our AI to move around in. To do this, I am just using Unity primitive models such as cubes and capsules. For the floor, create a cube, stretch it out, and squish it to make a rectangle. From there, clone it several times so that you have a large floor made up of cubes.
Next, delete a bunch of the cubes and move some others around. This will create holes in our floor, which will be used and tested when we implement the NavMesh system. To make the floor easy to see, I've created a material in green and assigned it to the floor cubes.
After this, create a few more cubes, make one really long and one shorter than the previous one but thicker, and the last one will be used as a ramp. I've created an intersection of the really long cube and the thick cube. Then, place the ramp towards the end of the thick cube, giving access to the top of the cubes.
Our final step in creating our test environment is to add a few waypoints for our AI. For testing purposes, create five waypoints in this manner. Place one in each corner of the level and one in the middle. For the actual waypoints, use the capsule primitive. For each waypoint, add a rigid body component. Name the waypoints as Waypoint1, Waypoint2, Waypoint3, and so on. The name is not all that important for our code; it just makes it easier to distinguish between waypoints in the inspector. Here's what I made for my level:
Now, we will create the navigation mesh for our scene. The first thing we will do is select all of the floor cubes. In the menu tab in Unity, click on the Window option, and then click on the Navigation option at the bottom of the dropdown; this will open up the Navigation window. This is what you should be seeing right now:
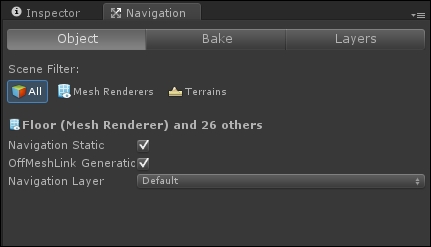
By default, the OffMeshLink Generation option is not checked; be sure to check it. What this does is create links at the edges of the mesh allowing it to communicate with any other OffMeshLink nearby, creating a singular mesh. This is a handy tool since game levels typically use more than one mesh as a floor.
The Scene filter will just show specific objects within the hierarchy view list. Selecting all the objects will show all of your GameObjects. Selecting mesh renderers will only show GameObjects that have the mesh renderer component. Then, finally, if you select terrains, only terrains will be shown in the Hierarchy view list.
The Navigation Layer dropdown will allow you to set the area as either walkable, not walkable, or jump accessible. Walkable areas typically refer to floors, ramps, and so on. Non-walkable areas refer to walls, rocks, and other various obstacles.
Next, click on the Bake tab next to the Object tab. You should see information that looks like this:
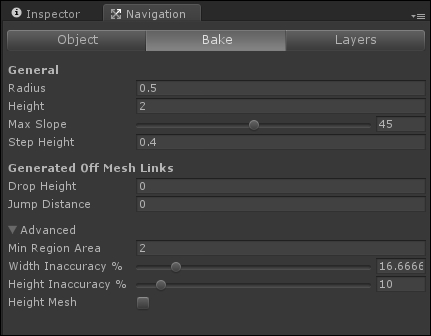
For this chapter, I am leaving all the values at their defaults. The Radius property is used to determine how close to the walls the navigation mesh will exist. Height determines how much vertical space is needed for the AI agent to be able to walk on the navigation mesh. Max Slope is the maximum angle that the AI is allowed to travel on for ramps, hills, and so on. The Step Height property is used to determine how high the AI can step up onto surfaces higher than the ground level.
For Generated Off Mesh Links, the properties are very similar to each other. The Drop Height value is the maximum amount of space the AI can intelligently drop down to another part of the navigation mesh. Jump Distance is the opposite of Height; it determines how high the AI can jump up to another part of the navigation mesh.
The Advanced options are to be used when you have a better understanding of the NavMesh component and want a little more out of it. Here, you can further tweak the accuracy of the NavMesh as well as create Height Mesh to coincide with the navigation mesh.
Now that you know all the basics of the Unity NavMesh, let's go ahead and create our navigation mesh. At the bottom-right corner of the Navigation tab in the Inspector window, you should see two buttons: one that says Clear and the other that says Bake. Click on the Bake button now to create your new navigation mesh.
Select the ramp and the thick cube that we created earlier. In the Navigation window, make sure that the OffMeshLink Generation option is not checked, and that Navigation Layer is set to Default. If the ramp and the thick cube are not selected, reselect the floor cubes so that you have the floors, ramp, and thick wall selected. Bake the navigation mesh again to create a new one. This is what my scene looks like now with the navigation mesh:
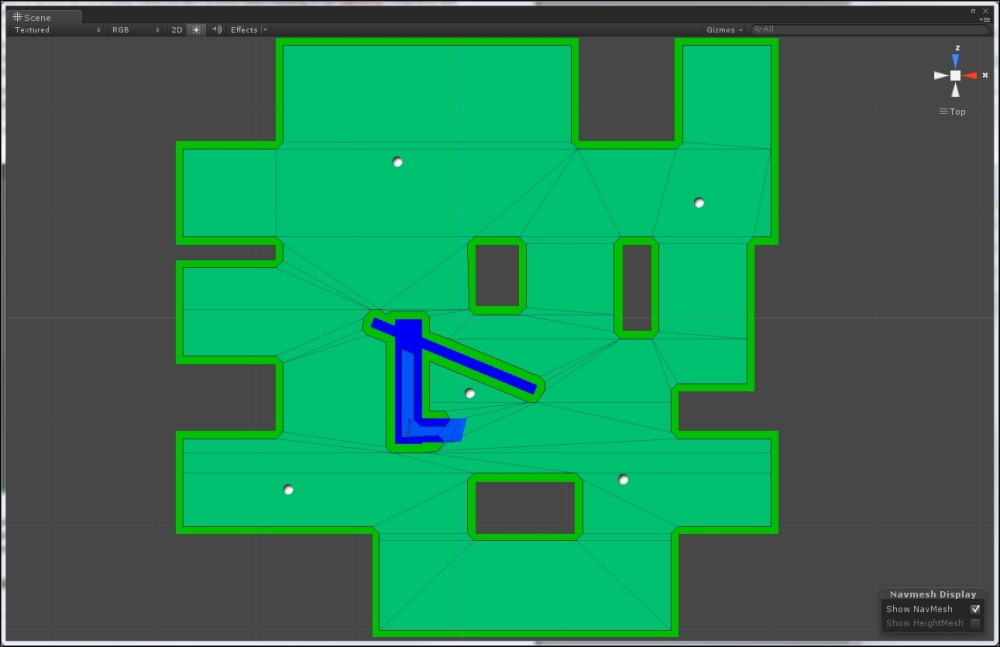
You should be able to see the newly generated navigation mesh overlaying the underlying mesh. This is what was created using the default Bake properties. Changing the Bake properties will give you different results, which will come down to what kind of navigation mesh you want the AI to use. Now that we have a navigation mesh, let's create the code for our AI to utilize. First, we will code the waypoint system, and then we will code what is needed for the NavMesh system.
To start our navigation system, we will need to add a few variables first. Place these with the rest of our variables:
public Transform[] Waypoints;
public int curWaypoint = 0;
bool ReversePath = false;
NavMeshAgent navAgent;
Vector3 Destination;
float Distance;
The first variable is an array of Transforms; this is what we will use to hold our waypoints. Next, we have an integer that is used to iterate through our Transform array. We have a bool variable, which will decide how we should navigate through the waypoints.
The next three variables are more oriented towards our navigation mesh that we created earlier. The NavMeshAgent object is what we will reference when we want to interact with the navigation mesh. The destination will be the location that we want the AI to move towards. The distance is what we will use to check how far away we are from that location.
Previously, we created many empty functions; some of these are dependent on pathfinding. Let's start with the Flee function. Add this code to replace the empty function:
void Flee()
{
  for(int fleePoint = 0; fleePoint < Waypoints.Length; fleePoint++)
  {
    Distance = Vector3.Distance(gameObject.transform.position, Waypoints[fleePoint].position);
    if(Distance > 10.00f)
    {
      Destination = Waypoints[curWaypoint].position;
      navAgent.SetDestination(Destination);
      break;
    }
    else if(Distance < 2.00f)
    {
      ChangeBehavior(Behaviors.Idle);
    }
  }
}
What this for loop does is pick a waypoint that has Distance of more than 10. If it does, then we set the Destination value to the current waypoint and move the AI accordingly. If the distance from the current waypoint is less than 2, we change the behavior to Idle.
The next function that we will adjust is the SearchForTarget function. Add the following code to it, replacing its previous emptiness:
void SearchForTarget()
{
  Destination = GameObject.FindGameObjectWithTag("Player").transform.position;
  navAgent.SetDestination(Destination);
  Distance = Vector3.Distance(gameObject.transform.position, Destination);
  if(Distance < 10)
    ChangeBehavior(Behaviors.Combat);
}
This function will now be able to search for a target, the Player target to be more specific. We set Destination to the player's current position, and then move the AI towards the player. When Distance is less than 10, we set the AI behavior to Combat.
Now that our AI can run from the player as well as chase them down, let's utilize the waypoints and create paths for the AI. Add this code to the empty Patrol function:
void Patrol()
{
  Distance = Vector3.Distance(gameObject.transform.position, Waypoints[curWaypoint].position);
  if(Distance > 2.00f)
  {
    Destination = Waypoints[curWaypoint].position;
    navAgent.SetDestination(Destination);
  }
  else
  {
    if(ReversePath)
    {
      if(curWaypoint <= 0)
      {
        ReversePath = false;
      }
      else
      {
        curWaypoint--;
        Destination = Waypoints[curWaypoint].position;
      }
    }
    else
    {
      if(curWaypoint >= Waypoints.Length - 1)
      {
        ReversePath = true;
      }
      else
      {
        curWaypoint++;
        Destination = Waypoints[curWaypoint].position;
      }
    }
  }
}
What Patrol will now do is check the Distance variable. If it is far from the current waypoint, we set that waypoint as the new destination of our AI. If the current waypoint is close to the AI, we check the ReversePath Boolean variable. When ReversePath is true, we tell the AI to go to the previous waypoint, going through the path in the reverse order. When ReversePath is false, the AI will go on to the next waypoint in the list of waypoints.
With all of this completed, you now have an AI with pathfinding abilities. The AI can also patrol a path set by waypoints and reverse the path when the end has been reached. We have also added abilities for the AI to search for the player as well as flee from the player.