
One of the first aspects of the game that we will be editing is the video configuration. When it comes to performance, the video settings are perhaps the most important. Changing something as simple as the shadows can greatly change how a player can smoothly play the game. So let's get started by creating a new C# script and naming it Video_Config.
Our first step in creating video configurations is to create a function that will set a default value for the video settings. For this, we will set the video settings to moderate values that aren't too low or too high. This will give the player a good idea of what they need to modify if they need or want to modify anything:
public void SetDefaults()
{
  SetSettings("Medium");
  ToggleShadows(1);
  SetFOV(90.00f);
  SetResolution(0, 1);
  SetAA(2);
  SetVsync(1);
}
What this function does is call all of the functions that we create, which will configure the video settings. The values that we send to each of the functions are default settings that aren't too high or too low.
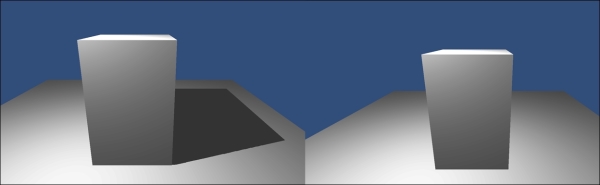
The first video settings that will be affected are the shadows and how they render. In Unity, there are three shadow settings: None, Hard, and Soft. For our game, we'll just use the None and Hard settings. When we set the shadows to None, the shadows will no longer be rendered. When the shadows are set to Hard, the shadows will have a hard edge to them; they won't have a fading edge. In the next screenshot, you will see the results of the effects that we used in our game. The image on the left shows the Hard shadows and the image on the right shows the shadows turned off.
Now that you've seen the resulting effects of our shadow options, let's code these options. Add this function to your script:
public void ToggleShadows(int newToggle)
{
  Light[] lights = GameObject.FindObjectsOfType<Light>();

  foreach(Light light in lights)
  {
    if(newToggle == 0)
      light.shadows = LightShadows.None;
    else
      light.shadows = LightShadows.Hard;
  }
}
This function takes an int value, which will be used to toggle the shadows on or off. Inside the function, we first grab all of the lights within the scene and assign them to an array. Then, for each of the lights, we toggle their shadow's value to None or Hard. This is how we turn the shadows on or off.
The field of view is a video setting that doesn't really affect performance that much, but it is an option that many PC gamers like to modify. The field of view literally means what it's called; it determines how big the view port is for the player to see the game. It's measured by angle degrees and can also be measured vertically, horizontally, or diagonally. Typically, the field of view is measured diagonally for video games.
Add this function to your script:
public void SetFOV(float newFOV)
{
  Camera.main.fieldOfView = newFOV;
}
The way that cameras in Unity measure the field of view is by using a float variable. So in the preceding function, we receive a float, which will be the new field of view. To change the field of view, we find the main camera, access it's fieldofView property, and assign it to the new field of the view variable.
Next, we'll allow the player to modify the resolution of the game as well as decide whether the game will be full screen or windowed. Add this function to your script:
public void SetResolution(int Res, int Full)
{
  bool fs = Convert.ToBoolean(Full);

  switch(Res)
  {
  case 0:
    Screen.SetResolution(1920, 1080, fs);
    break;
  case 1:
    Screen.SetResolution(1600, 900, fs);
    break;
  case 2:
    Screen.SetResolution(1280, 1024, fs);
    break;
  case 3:
    Screen.SetResolution(1280, 800, fs);
    break;
  case 4:
    Screen.SetResolution(640, 400, fs);
    break;
  }
}
For this function, we receive two values. The first int value decides which resolution we will use and the next int value determines whether the game will be full screen or not. Inside the function, we create a bool variable, which will be used to determine the fullscreen option. To use the int value we passed to the function, we convert the int value to a Boolean by using the Convert function.
Next, we use a switch statement to decide which resolution to set the game to. Which resolutions you want your game to support is up to you, but you should try to support various resolutions because everyone has their own preferences. To set the resolution, we access the SetResolution function on the screen, set the resolution values, and then set the fullscreen value.
The next video setting that we'll modify is the anti-aliasing property. Aliasing in a game is where the models being rendered have jagged edges. Anti-aliasing is what the game renderer does to smooth out those jagged edges. To do this, the renderer will blur the edges slightly to make them smooth. This is one of the options that will make your game look great, but will also slow down the performance. Add this function to your script:
public void SetAA(int Samples)
{
  if(Samples == 0 || Samples == 2 || Samples == 4 || Samples == 8)
    QualitySettings.antiAliasing = Samples;
}
The way anti-aliasing works is that it will blur the edges by a number of samples. If the number of samples is zero, no anti-aliasing will happen. So for this function, we access the antiAliasing property of QualitySettings and set it to the int value that we pass to the function.
Vsync affects how the frames are rendered. With vsync on, the game will wait until the frame has finished rendering before starting the next frame. With vsync off, the game will start to render the next frame while the current frame is still being rendered. The bonus of vsync being off is that the game will render faster but could cause an effect called screen tear, which shows an obvious line on the screen caused by the frames overlapping each other. Add this function to your script:
public void SetVsync(int Sync)
{
  QualitySettings.vSyncCount = Sync;
}
This function is very similar to the anti-aliasing function. We access the vSyncCount property of QualitySettings and set it to the int value that we pass.
The final video configuration that we'll edit will simply affect the native Unity quality settings. This will be used to quickly change the overall quality settings of the game. Add this function to the script:
public void SetSettings(string Name)
{
  switch(Name)
  {
  case "Low":
    QualitySettings.SetQualityLevel(0);
    break;
  case "Medium":
    QualitySettings.SetQualityLevel(1);
    break;
  case "High":
    QualitySettings.SetQualityLevel(2);
    break;
  }
}
For this function, we run a switch statement on the string that we passed to determine the quality setting. To set the quality setting, we access the SetQualityLevel function of QualitySettings and set it to the associating quality level.
The final function that we will add will allow us to load all of the settings that we saved and set them in our game; this function will be used the most. Add this function to the bottom of the script:
public void LoadAll()
{
  SetSettings(PlayerPrefs.GetString("Custom_Settings"));
  ToggleShadows(PlayerPrefs.GetInt("Custom_Shadows"));
  SetFOV(PlayerPrefs.GetFloat("Custom_FOV"));
  SetResolution(PlayerPrefs.GetInt("Custom_Resolution"), PlayerPrefs.GetInt("Custom_Full"));
  SetAA(PlayerPrefs.GetInt("Custom_AA"));
  SetVsync(PlayerPrefs.GetInt("Custom_Sync"));
}
In this function, we call each of the functions that we created and set them to the saved values. Since we use PlayerPrefs to save our configurations, we get the values from them.