
Our next step is to give our stat tracker all the functionalities that we need. Here, we will create methods to set and reset stats, set and reset PlayerPrefs, and save PlayerPrefs. Finally, we create a way to show our stats on the screen. Playerprefs are functions built in Unity that allow storage of strings, integers, and floats using a system similar to Dictionary or KeyValuePair.
The first function that we will create will allow us to set values to specific stats. Add this function to your script:
void SetStat(string stat, int intValue = 0)
{
  switch(stat)
  {
  case "Kills":
    pKills+= intValue;

    float fKills = pKills;
    float fDeaths = pDeaths;if(fKills != 0)
      pKDR = fDeaths / fKills;
    break;
  case "Deaths":
    pDeaths+= intValue;

    float fKills2 = pKills;
    float fDeaths2 = pDeaths;if(fKills2 != 0)
      pKDR = fDeaths2 / fKills2;
    break;
  case "TotalGold":
    pTotalGold+= intValue;
    break;
  case "CurrentGold":
    pCurrentGold+= intValue;
    break;
  case "GoldSpent":
    pGoldSpent+= intValue;
    break;
  case "Level":
    pLevel+= intValue;
    break;
  case "RoundsWon":
    pRoundsWon+= intValue;

    float fWins = pRoundsWon;
    float fLosses = pRoundsLost;if(fWins != 0)
      pWLR = fLosses / fWins;
    break;
  case "RoundsLost":
    pRoundsLost+= intValue;

    float fWins2 = pRoundsWon;
    float fLosses2 = pRoundsLost;if(fWins2 != 0)
      pWLR = fLosses2 / fWins2;
    break;
  case "TimePlayed":
    pTimePlayed+= fltValue;
    break;
  }
}
What this function does is to first take two parameters, the stat we want to modify and an integer value. The integer is set to 0 by default; this is to help avoid possible errors. Next, we run a switch statement based on the stat string that we passed to decide which of our stats we want to modify.
Kills, deaths, rounds won, and rounds lost have some unique properties. When we set them, we add the new value to the stat, and then we calculate a ratio. When we set kills and deaths, we also do a bit of math to assign the kill-death ratio stat. For rounds won and lost, we also set the rounds won-lost ratio.
To reset our stats, we will add a basic but important function to our script, shown as follows:
void ResetStats()
{
  pKills = 0;
  pDeaths = 0;
  pTotalGold = 0;
  pCurrentGold = 0;
  pGoldSpent = 0;
  pLevel = 1;
  pRoundsWon = 0;
  pRoundsLost = 0;
  pKDR = 0.00f;
  pWLR = 0.00f;
  pTimePlayed = 0.00f;
}
When this function is called, it will reset all of our stats to their base value. This value is 0 for everything but the player's level, which is 1. If we wanted to reset a specific stat to its base value, we can call the previous function that we created, which is SetStat.
To save our stats, we will use Unity's PlayerPrefs. These are a handy way to save small bits of data. They can be used across several platforms and are easy to use. Our first function that we'll create will let us reset our PlayerPrefs value. Add this function to the script:
void ResetAllPrefs()
{
  PlayerPrefs.SetInt("PlayerKills", 0);
  PlayerPrefs.SetInt("PlayerDeaths", 0);
  PlayerPrefs.SetInt("PlayerTotalGold", 0);
  PlayerPrefs.SetInt("PlayerCurrentGold", 0);
  PlayerPrefs.SetInt("PlayerGoldSpent", 0);
  PlayerPrefs.SetInt("PlayerLevel", 0);
  PlayerPrefs.SetInt("PlayerRoundsWon", 0);
  PlayerPrefs.SetInt("PlayerRoundsLost", 0);
  PlayerPrefs.SetFloat("PlayerKDR", 0.00f);
  PlayerPrefs.SetFloat("PlayerWLR", 0.00f);
  PlayerPrefs.SetFloat("PlayerTimePlayed", 0.00f);
  PlayerPrefs.Save();
}
What this function does is set each PlayerPref value to its base value. When they are all reset, we call a native Save function within PlayerPrefs to save our new values.
The next function that we will create will allow us to save all of our PlayerPrefs values. This will be done in a similar way to how we reset all PlayerPrefs. Let's add this new function now:
void SaveAllPrefs()
{
  PlayerPrefs.SetInt("PlayerKills", pKills);
  PlayerPrefs.SetInt("PlayerDeaths", pDeaths);
  PlayerPrefs.SetInt("PlayerTotalGold", pTotalGold);
  PlayerPrefs.SetInt("PlayerCurrentGold", pCurrentGold);
  PlayerPrefs.SetInt("PlayerGoldSpent", pGoldSpent);
  PlayerPrefs.SetInt("PlayerLevel", pLevel);
  PlayerPrefs.SetInt("PlayerRoundsWon", pRoundsWon);
  PlayerPrefs.SetInt("PlayerRoundsLost", pRoundsLost);
  PlayerPrefs.SetFloat("PlayerKDR", pKDR);
  PlayerPrefs.SetFloat("PlayerWLR", pWLR);
  PlayerPrefs.SetFloat("PlayerTimePlayed", pTimePlayed);
  PlayerPrefs.Save();
}
This function is essentially the same as the ResetAllPrefs function, except we change the value at which we assign PlayerPrefs. We assign all of the PlayerPrefs functions their appropriate stats, and then at the end of the function, we save the PlayerPrefs values.
To set a specific pref, we will create a function similar to how we set a specific stat. Add this function to the script:
void SetPref(string Pref, int intValue = 0, float fltValue = 0.00f)
{
  if(intValue != 0)
  {
    if(PlayerPrefs.HasKey(Pref))
      PlayerPrefs.SetInt(Pref, intValue);
  }
  if(fltValue != 0.00f)
  {
    if(PlayerPrefs.HasKey(Pref))
      PlayerPrefs.SetFloat(Pref, fltValue);
  }

  PlayerPrefs.Save();
}
This function will take the PlayerPref function we want to set and also a value that we want to set it to. Inside the function, we will check to see which value is not set to 0. If one of the values are still 0, we ignore that value type. If one of the values is not 0, we check to see whether the PlayerPref function passed to the function exists. If that function exists, we then set the PlayerPref value accordingly and finish off by saving our PlayerPrefs values.
What if you wanted to reset a specific PlayerPref value? For this, we will create a slightly different function that will allow us to do that. Add this new function to our script:
void ResetPref(string Pref)
{
  switch(Pref)
  {
  case "Kills":
    PlayerPrefs.SetInt("PlayerKills", 0);
    break;
  case "Deaths":
    PlayerPrefs.SetInt("PlayerDeaths", 0);
    break;
  case "TotalGold":
    PlayerPrefs.SetInt("PlayerTotalGold", 0);
    break;
  case "CurrentGold":
    PlayerPrefs.SetInt("PlayerCurrentGold", 0);
    break;
  case "GoldSpent":
    PlayerPrefs.SetInt("PlayerGoldSpent", 0);
    break;
  case "Level":
    PlayerPrefs.SetInt("PlayerLevel", 0);
    break;
  case "RoundsWon":
    PlayerPrefs.SetInt("PlayerRoundsWon", 0);
    break;
  case "RoundsLost":
    PlayerPrefs.SetInt("PlayerRoundsLost", 0);
    break;
  case "KDR":
    PlayerPrefs.SetFloat("PlayerKDR", 0.00f);
    break;
  case "WLR":
    PlayerPrefs.SetFloat("PlayerWLR", 0.00f);
    break;
  case "TimePlayed":
    PlayerPrefs.SetFloat("PlayerTimePlayed", 0.00f);
    break;
  }

  PlayerPrefs.Save();
}
For this function, we pass one variable that we want to reset, which is PlayerPref. Then, we run a switch statement for the string that we passed to decide which PlayerPref function to reset. After we reset PlayerPref, we save it.
Our final step in creating our stats is to show them on the screen. To do this, we will need to first add a couple of more variables:
public bool showStats = false;
public Rect statsRect = new Rect(Screen.width / 2, Screen.height / 2, 400, 400);
The new bool variable will decide whether we can show the stats menu, and the Rect variable is the area in which the stats menu will be. Next, we will add the OnGUI function that will draw our GUI on the screen:
void OnGUI()
{
  if(showStats)
  {
    statsRect = GUI.Window(0, statsRect, StatsGUI, "Stats");
  }
}
In the OnGUI function, we check the showStats Boolean variable to see whether or not the stats menu will be seen on the screen. You can see that it calls a function named StatsGUI. This function is what draws everything to the screen; let's add that function now:
void StatsGUI(int ID)
{
  GUILayout.BeginArea(new Rect(15, 25, 400, 400));

  GUILayout.BeginVertical();
  GUILayout.Label("Level - " + pLevel);
  GUILayout.Label("Gold - " + pCurrentGold);
  GUILayout.Label("Kills - " + pKills);
  GUILayout.Label("Deaths - " + pDeaths);
  GUILayout.Label("Kill/Death Ratio - " + pKDR);
  GUILayout.Label("Rounds Won - " + pRoundsWon);
  GUILayout.Label("Rounds Loss - " + pRoundsLost);
  GUILayout.Label("Win/Loss Ratio - " + pWLR);
  GUILayout.Label("Time Played (in minutes) - " + (pTimePlayed / 60.00f));
  GUILayout.EndVertical();

  GUILayout.EndArea();
}
To draw our stats on the screen, we use labels to show some text as well as the associating variables. For the Time Played stat, we divide it by 60 so it will show how many minutes have passed. In Unity, time is tracked by seconds, so we show minutes instead so that there isn't a large and possibly confusing number shown to the player.
To give our script a quick test, create a new scene and place the script onto the camera. Be sure to set the showStats Boolean variable to true in the Inspector window. You should see this on your screen:
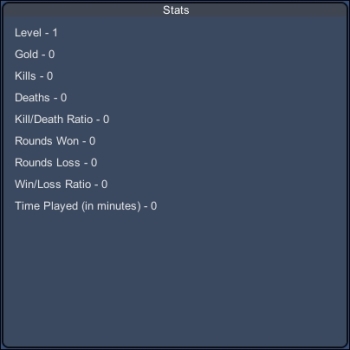
Each of the stats we wanted to track is now shown on the screen in a vertical list. Later in this book, when we put everything together to finish our game, we will tie this into our menu system.