
In this chapter, based on what you learned in the previous chapters, we will create a small game. We won't be using everything, but will use most of what you learned. This chapter will be a great exercise to help you learn how everything we created works.
In this chapter, you will learn how to:
- Create a main menu
- Create a few playable levels
- Implement character interactions
- Use sound effects and music
- Use the save and load features you created
- Implement enemy AI
In the game, there will be three playable levels and a main menu. The main menu will have three buttons on it: one to play the game, one for options, and a final one to exit the game.
Create a new scene and name it Main Menu. Next, drag the Audio_Config, Video_Config, and Config_GUI scripts to the main camera. These will be used for our Options menu. Next, create a new C# script, name it MainMenu, and add this code to it:
void OnGUI()
{
if(GetComponent<Config_GUI>().optionsGUI == false)
{
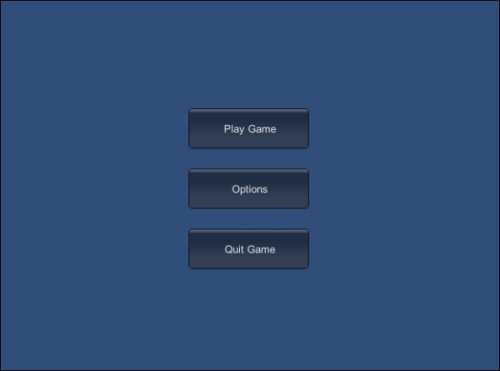
if(GUI.Button(new Rect(700, 400, 150, 50), "Play Game"))
Application.LoadLevel("Chapter 10_a");
if(GUI.Button(new Rect(700, 475, 150, 50), "Options"))
GetComponent<Config_GUI>().optionsGUI = true;
if(GUI.Button(new Rect(700, 550, 150, 50), "Quit Game"))
Application.Quit();
}
GetComponent<Config_GUI>().OnGUI();
}For this script, all that you will need is the OnGUI function. This code will create a few buttons that will be used to either play the game, show the options menu, or exit the game. Save this script and drag it to the main camera as well. When you run the scene, you should be able to see buttons similar to the ones shown in the following screenshot:
We will create the level that we will play in. We will start off with creating just one level; once we start playtesting, we will clone the scene to make them. To make this simple, I'm using the scene from Chapter 5, Enemy and Friendly AIs and naming it Chapter 10_a. Doing this will give us a playable environment, as well as an enemy. Now, delete the main camera that is in the scene and drop in First Person Controller.
If you run the scene, you will see that the skeleton is tiny! This is because of its scale when it is imported to the engine. In the SkeletonData folder, click on the skeleton model. You will see the Inspector window open with the imported model data. In the Scale Factor property, change its value to 0.0225; this should make the skeleton look bigger. This value is the one that I am using, but feel free to use any value that looks good to you and fits the scene.
Now we need to make a few GameObjects and prefabs. First, we will create a gun for our player. Drop a cube primitive and scale it into a skinny rectangle. Move it up to the camera and place it where a gun typically is in an FPS. In the Hierarchy window, drag the Gun object and drop it on the main camera; this will force the gun to rotate with the camera. This is what the gun looks like on my First Person Controller object:

Next, drop a sphere; you can leave it as is, but I have put a material on it with a red diffuse color. Now drop the itemSelf script on it. These are the values that I have given to it:
- First Person Controller on the player slot
- Amount is set to
25 - Value is set to
30 - Armor Amount is set to
0 - Weight is set to
1 - Name is set to
Potion - Stat is set to
Health - Self Action is set to
ChangeHP - Self Type is set to
Potion
Create a new prefab and name it Potion; now drop the sphere that you created on the prefab. You now have a prefab for health potions! Place two of these onto the map. Currently, you can't do anything with these potions, but later we will let the player pick them up.