Now that we have a good understanding of how the pieces of WebRTC are used, we are going to build our first WebRTC-enabled application. By the end of this chapter, you will have a working WebRTC web page where you can see the technology in action. We are going to pull all the information we just covered in to an easy-to-develop example. We will cover:
- Creating a RTCPeerConnection
- Creating the SDP
offerand response - Finding ICE candidates for peers
- Creating a successful WebRTC connection
The application we are going to create will, unfortunately, not be an entirely useful one, unless you happen to like looking at yourself in a mirror. What we aim to do in this chapter is connect a browser window to itself, streaming video data from the user's camera. The end goal is to get two video streams on the page, one coming from the camera directly and the other coming from a WebRTC connection that the browser has made locally.
Although this is not entirely helpful, it helps us by making the code much more readable and straightforward. We will learn how to use a server to make remote connection later on. Since the environment we are connecting to will be the same browser we are coming from, we do not have to worry about network instability or creating servers. After completing the project, your application should look something like this:

As you can see, other than my handsome face, this example is, otherwise, pretty basic. To start out, we will take similar steps to the first example we created in Chapter 2, Getting the User's Media. You will need to create another HTML page and host it using a local web server. It may be a good idea to refer to Setting up a static server subsection under Getting access to media devices section in Chapter 2, Getting the User's Media, and review how to set up your development environment.
The first step we will take is to create a few functions that handle support across multiple browsers. These will be able to tell us whether the current browser supports the functionality we need to use to make our application work. It will also normalize the API, making sure we can always use the same function, no matter what browser we may be running in.
To get started, set up a new web page with a JavaScript source file. Our HTML page will contain two video elements on it, one for the first client and another for the second:
<!DOCTYPE html>
<html lang="en">
  <head>
    <meta charset="utf-8" />
    <title>Learning WebRTC - Chapter 4: Creating a RTCPeerConnection</title>
  </head>
  <body>
    <div id=""container"">
      <video id=""yours"" autoplay></video>
      <video id=""theirs"" autoplay></video>
    </div>
    <script src=""main.js""></script>
  </body>
</html>
The html and head tags of this page should be familiar if you are used to creating HTML5 web pages. This is the standard format for any HTML5-compliant page. There are a lot of different boilerplate templates for creating a page, and this one is the one I feel is the simplest while still getting the job done. There is nothing that will drastically change the way our application works as long as the video elements are there, so if you need to make changes to this file, feel free to do so.
You will notice two video elements labeled—yours and theirs. These will be our two video feeds that will simulate connecting to another peer. Throughout the rest of this chapter—yours will be considered the local user that is initiating the connection. The other user—theirs—will be considered the remote user we are making the WebRTC connection to, even though they are not physically located somewhere else.
Lastly, we include our script function. Always keep in mind to add this at the end of the HTML page. This guarantees that the elements in the body are ready for use and the page is fully loaded for JavaScript to interact with it.
Next, we will create our JavaScript source code. Create a new file named main.js and start filling it out with the following code:
function hasUserMedia() {
  navigator.getUserMedia = navigator.getUserMedia || navigator.webkitGetUserMedia || navigator.mozGetUserMedia || navigator.msGetUserMedia;
  return !!navigator.getUserMedia;
}

function hasRTCPeerConnection() {
  window.RTCPeerConnection = window.RTCPeerConnection || window.webkitRTCPeerConnection || window.mozRTCPeerConnection;
  return !!window.RTCPeerConnection;
}
The first function deals with the getUserMedia API and should look familiar. The second function does a similar thing with the RTCPeerConnection object, ensuring we can use it in the browser. It first tries to assign any implemented WebRTC functions in the browser to a common function we can use in every use case. It then returns the assignment of that variable to see whether it actually exists in this browser.
Now that we can tell which APIs the user supports, let's go ahead and start using them. The next few steps should be pretty familiar as well. We are going to repeat some of the functionality we encountered in Constraining the media stream section in Chapter 2, Getting the User's Media, to get the user's camera stream. Before we do anything with WebRTC, we should get the local camera stream from the user. This ensures that the user is ready to create a peer connection and we do not have to wait for the user to accept camera sharing before we make a peer connection.
Most of the applications we build in WebRTC will go through a series of states. The hardest part about getting WebRTC to work is to do things in the proper order. If one step happens before another, it can break down the application quickly. These states are blocking, which means we cannot go onto the next state without completing the previous one. Here is an overview of how our application is going to work:
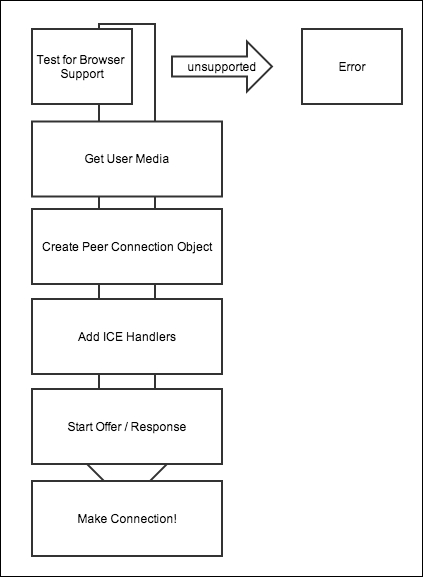
First we need to get the media stream from the user. This ensures that the stream is ready and the user has agreed to share their camera and microphone.
Next, we create the peer connection. This starts off the process in the disconnected state. This is where we can configure the WebRTC connection with the ICE servers that we would like to use. At this moment, the browser is sitting idly and waiting for the connection process to start.
The magic starts when an
offer is created by one of the users. This kicks the browser into action and it starts to get ready to make a peer connection with another user. The offer and response are part of the signaling process, discussed in this chapter.
At the same time, the browser is also going to look for the candidate port and IP combinations that the other peer can connect to. It will continue to do this over a period of time, until a connection can be made or the connection fails to succeed. Once this is completed, the WebRTC connection process is over and the two users can start sharing information.
The next piece of code will capture the user's camera and make it available in our stream variable. You can now add this code after our two function definitions in your JavaScript:
var yourVideo = document.querySelector(''#yours''),
    theirVideo = document.querySelector(''#theirs''),
    yourConnection, theirConnection;

if (hasUserMedia()) {
  navigator.getUserMedia({ video: true, audio: false }, function (stream) {
    yourVideo.src = window.URL.createObjectURL(stream);

    if (hasRTCPeerConnection()) {
      startPeerConnection(stream);
    } else {
      alert(""Sorry, your browser does not support WebRTC."");
    }
  }, function (error) {
    alert(""Sorry, we failed to capture your camera, please try again."");
  });
} else {
  alert("Sorry, your browser does not support WebRTC.");
}
The first part selects our video elements from the document and sets up a few variables we will use down the road. We are assuming that the browser supports the querySelector API at this point. We then check whether the user has access to the getUserMedia API. If they do not, our program stops here and we alert the user that they do not support WebRTC.
If this succeeds, we attempt to get the camera from the user. This is an asynchronous operation since the user has to agree to share their camera. If this succeeds, we set our local video's stream to the user's stream so that they can see this happened successfully. If this fails, we notify the user of the error and stop the process.
Finally, we check whether the user has access to the RTCPeerConnection API. If so, we call the function that will start our connection process (this will be defined in the next section). If not, we stop here and notify the user once more.
The next step is to implement the startPeerConnection function called in the previous section. This function will create our
RTCPeerConnection objects, set up the SDP offer and response, and find the ICE candidates for both peers.
Now we create the RTCPeerConnection object for both the peers. Add the following to your JavaScript file:
function startPeerConnection(stream) {
  var configuration = {
    // Uncomment this code to add custom iceServers
    //"iceServers": [{ "url": "stun:stun.1.google.com:19302" }]" }]
  };
  yourConnection = new webkitRTCPeerConnection(configuration);
  theirConnection = new webkitRTCPeerConnection(configuration);
};
Here, we define our function to create the connection objects. In the configuration object, you can pass parameters for which ICE servers you would like to use in your application. To use custom ICE servers, simply uncomment the code and change the value. The browser will automatically pick up the configuration and use it while making a peer connection. At this point, this is, however, not required, since the browser should have a default set of ICE servers to use. After this, we create two peer connection objects to represent each of the users in our application. Still keep in mind that both of our users will be in the same browser window for this application.
In this section, we will perform the offer and response
answer process for making a peer connection. Our next block of code will set up the offer and response answer flows between the two peers:
function startPeerConnection(stream) {
  var configuration = {
    // Uncomment this code to add custom iceServers
    //""iceServers"": [{ ""url"": ""stun:stun.1.google.com:19302"" }]
  };
  yourConnection = new webkitRTCPeerConnection(configuration);
  theirConnection = new webkitRTCPeerConnection(configuration);

  // Begin the offer
  yourConnection.createOffer(function (offer) {
    yourConnection.setLocalDescription(offer);
    theirConnection.setRemoteDescription(offer);

    theirConnection.createAnswer(function (offer) {
      theirConnection.setLocalDescription(offer);
      yourConnection.setRemoteDescription(offer);
    });
  });
};
One thing you may notice is that, after an entire chapter's worth of explanation, this code seems rather simple. This is due to the fact that both peers are in the same browser window. This way, we can guarantee when the other user gets the offer and do not have to perform many asynchronous operations.
Implementing the offer/answer mechanism this way makes it easier to understand. You can clearly see the steps needed and the order they need to be in to successfully create a peer connection. If you are using a debugging tool attached to your browser, you can go through these steps and inspect the RTCPeerConnection objects at each step to see exactly what is happening.
In the next chapter, we will dig into this topic in a lot more depth. Typically, the other peer you will be connecting to will not be in the same browser—meaning a server is needed to connect peers between browser windows. This makes this process much more complex, given that these steps not only need to happen in the exact order they are shown here, but also across the multiple browser windows. This requires a lot of synchronization in an environment that may, sometimes, be unstable.
The last part of setting up the peer connection will be transferring the ICE candidates between the peers so that they can connect to each other. You can now change your startPeerConnection function to look like the following:
function startPeerConnection(stream) {
  var configuration = {
    // Uncomment this code to add custom iceServers
    //""iceServers"": [{ ""url"": ""stun:127.0.0.1:9876"" }]
  };
  yourConnection = new webkitRTCPeerConnection(configuration);
  theirConnection = new webkitRTCPeerConnection(configuration);

     // Setup ice handling
  yourConnection.onicecandidate = function (event) {
    if (event.candidate) {
      theirConnection.addIceCandidate(new RTCIceCandidate(event.candidate));
    }
   };

  theirConnection.onicecandidate = function (event) {
    if (event.candidate) {
      yourConnection.addIceCandidate(new RTCIceCandidate(event.candidate));
    }
      };

  // Begin the offer
  yourConnection.createOffer(function (offer) {
    yourConnection.setLocalDescription(offer);
    theirConnection.setRemoteDescription(offer);

    theirConnection.createAnswer(function (offer) {
      theirConnection.setLocalDescription(offer);
      yourConnection.setRemoteDescription(offer);
    });
  });
};
You may notice that this part of the code is completely event-driven. This is due to the asynchronous nature of finding the ICE candidates. The browser will continuously look for the candidates, until it has found as many as it thinks is good to create a peer connection or for the peer connection to be established and stable.
In the upcoming chapters, we will build out the functionality that actually sends this data across a signaling channel. The one thing to notice is that, when we get an ICE candidate from theirConnection, we are adding it to yourConnection, and vice versa. When we connect to someone who is not located in the same place that we are, this will have to travel across the Internet.
Adding a stream to a peer connection is easy with WebRTC. The API takes care of all the work of setting a stream up and sending its data across the wire. When the other user adds a stream to their peer connection, this notification gets sent across the connection, notifying the first user of the change. The browser then calls onaddstream to notify the user that a stream has been added:
// Setup stream listening
  yourConnection.addStream(stream);
  theirConnection.onaddstream = function (e) {
    theirVideo.src = window.URL.createObjectURL(e.stream);
  };
We can then add this stream to our local video by creating an object URL for the location of the stream. What this does is create a value that identifies the stream in the browser so that the video elements can interact with it. This acts as the unique ID for our video stream, telling the video element to play the video data coming from a local stream as the source.
Finally, we will add a little bit of styling to our application. The most popular style for a video communication application is one that is commonly seen in apps such as Skype. This has been replicated by many of the demos built with WebRTC today. Typically, the person you are calling is in the front and center of the application while your own camera is shown as a small window inside the larger one. Since we are building a web page, this can be achieved with some simple CSS as follows:
<style>
      body {
        background-color: #3D6DF2;
        margin-top: 15px;
      }

      video {
        background: black;
        border: 1px solid gray;
      }

      #container {
        position: relative;
        display: block;
        margin: 0 auto;
        width: 500px;
        height: 500px;
      }

      #yours {
        width: 150px;
        height: 150px;
        position: absolute;
        top: 15px;
        right: 15px;
      }

      #theirs {
        width: 500px;
        height: 500px;
      }
    </style>
Simply add this to your HTML page, and you should have a good start to a well-styled WebRTC application. At this point, if you still think our applications looks dull, feel free to continue to add styling to the application. We will build on this in the upcoming chapters, and it is always more exciting to have a nice looking demo with some CSS.