At some point when creating a WebRTC application, you will have to break away from developing for a client and build a server. Most WebRTC applications are not solely dependent on just being able to communicate through audio and video and typically need many other features to be interesting. In this chapter, we are going to dive into server programming using JavaScript and Node.js. We are going to create the basis for a basic signaling server that we can utilize through the rest of the book.
In this chapter, we will cover the following topics:
- Setting up our environment to develop in Node.js
- Connecting to the client using WebSockets
- Identifying users
- Initiating and answering a WebRTC call
- Handling ICE candidate transfers
- Hanging up a call
Throughout this chapter, we are going to focus solely on the server part of the application. In the next chapter, we will build the client part of this example. Our example server will be bare bones in nature, giving us just enough to set up a WebRTC peer connection.
The server we are going to build in this chapter will help us connect two users together who are not located on the same computer. The goal of the server is to replace the signaling mechanism with something that travels over a network. The server will be straightforward and simple, supporting only the most basic WebRTC connections.
Our implementation will have to respond to and answer requests from multiple users. It will do this by having a simple bidirectional messaging system between clients. It will allow one user to call another and setup a WebRTC connection between them. Once a user has called another, the server will pass the offer, answer, and ICE candidates between the two users. This will allow them to successfully setup a WebRTC connection.
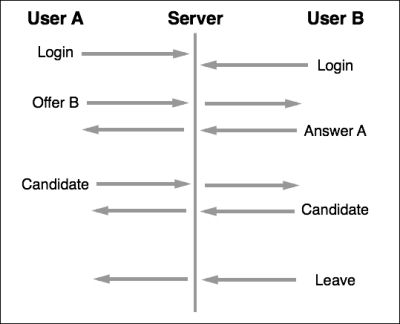
The preceding diagram shows the messaging flow between clients when using the signaling server to setup a connection. Each side will start by registering themselves with the server. Our logging in will simply send a string-based user identifier to the server and make sure it is not taken already. Once both users have registered with the server, they can then call another user. Making an offer with the user identifier they wish to call does this. The other user should answer in turn. Finally, candidates are sent between clients until they can successfully make a connection. At any point, a user can terminate the connection by sending the leave message. The implementation will be simple, acting mostly as a pass-through for the users to send messages to each other.