
Now that we have set everything up properly, we are ready to initiate a call with a remote user. Sending the offer to another user starts all this. Once a user gets the offer, he/she will create a response and start trading ICE candidates, until he/she successfully connects. This process is exactly the same as mentioned in Chapter 3, Creating a Basic WebRTC Application, except for the fact that it is now being done remotely over our signaling server. To accomplish this, we add the following code to our script:
callButton.addEventListener("click", function () {
  var theirUsername = theirUsernameInput.value;

  if (theirUsername.length > 0) {
    startPeerConnection(theirUsername);
  }
});

function startPeerConnection(user) {
  connectedUser = user;

  // Begin the offer
  yourConnection.createOffer(function (offer) {
    send({
      type: "offer",
      offer: offer
    });
    yourConnection.setLocalDescription(offer);
  }, function (error) {
    alert("An error has occurred.");
  });
};

function onOffer(offer, name) {
  connectedUser = name;
  yourConnection.setRemoteDescription(new RTCSessionDescription(offer));

  yourConnection.createAnswer(function (answer) {
    yourConnection.setLocalDescription(answer);
    send({
      type: "answer",
      answer: answer
    });
  }, function (error) {
    alert("An error has occurred");
  });
};

function onAnswer(answer) {
  yourConnection.setRemoteDescription(new RTCSessionDescription(answer));
};

function onCandidate(candidate) {
  yourConnection.addIceCandidate(new RTCIceCandidate(candidate));
};
We start by adding a click handler to the Call button, which initiates the process. Then we implement a number of the functions expected by our message handler that is connected to our server. These will be processed asynchronously until both the parties have made a successful connection. Most of the work has already been done in the server and WebSocket layer, making the implementation of this part easier.
After running this code, you should be able to now log in to the server with two browser tabs with different usernames. You can then call the other tab using the call function which will successfully make a WebRTC connection between the clients.
Congratulations on making a fully-functioning WebRTC application! This is a major step to creating amazing peer-to-peer web-based applications. Something with this much power would typically take the span of several books and frameworks to get working, but we have done it in just a few short chapters with powerful technology.
Debugging a real-time application can be a tough process. With many things happening all at once, it is hard to build an entire picture of what is going on at any given moment. This is where using a modern browser with the WebSocket protocol really shines. Most browsers today will have some way to not only see the WebSocket connection to the server, but also inspect every packet that gets sent across the wire.
In my example, I use Chrome to inspect the traffic. Opening up the debugging tools by navigating to View | Developer | Developer Tools, will give me access to an array of tools for debugging web applications. Opening the Network tab will then show all of the network traffic that has been made by the page. If you do not see any network traffic, refresh the page with Developer Tools open. From there, the connection to localhost is easily seen on the list. When you select it, you have the option to see the frames that have been sent using the WebSocket connection. It shows every packet sent in human-readable format for easy debugging.
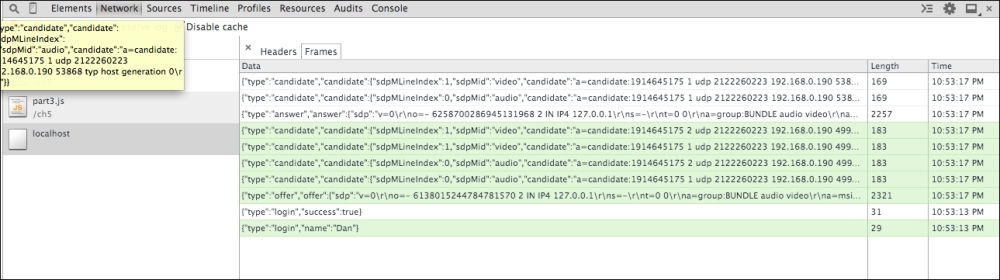
You should be able to see every step of the way in this view. The preceding screenshot shows the login, offer, answer, and every ICE candidate sent across the connection. This way, I can inspect each one for errors, such as malformed data, in the messages. When debugging web applications, it is a good idea to always utilize the built-in tools as much as possible.
There are also many other ways to get this information from the computer. Using the console output on both the server and client are great ways to get small pieces of information. You can also look into using network proxies and packet interceptors to intercept the packets being sent from the browser. This is much harder to set up, but will give much more information about the data being sent between the client and server. I will leave it up to the readers as an exercise to figure out the many ways of debugging web applications.