Graphic icons are an effective way to inform the player that they are carrying an item. In this recipe, if no star is being carried, a grey-filled icon in a blocked-off circle is displayed; then, after the star has been picked up, a yellow-filled icon is displayed, as shown in the following screenshot.

In many cases, icons are clearer (they don't require reading and thinking about) and can also be smaller onscreen than text messages for indicating player status and inventory items.
This recipe assumes that you are starting with the project Simple2Dgame_SpaceGirl setup from the first recipe in this chapter.
To toggle carrying and not-carrying icons for a single object pickup, follow these steps:
- Start with a new copy of the mini-game
Simple2Dgame_SpaceGirl. - In the Hierarchy panel, add a new UI Image object (Create | UI | Image). Rename it
Image-star-icon. - Select
Image-star-iconin the Hierarchy panel. - From the Project panel, drag the sprite icon_nostar_100 (folder
Sprites) into the Source Image field in the Inspector (in the Image (Script) component). - Click on the Set Native Size button for the Image component. This will resize the UI Image to fit the physical pixel width and height of sprite file icon_nostar_100, as shown in the following screenshot:

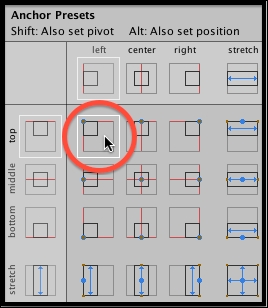
- Now, we will position our icon at the top and left of the Game panel. Edit the UI Image's Rect Transform component, and while holding down SHIFT and ALT (to set pivot and position), choose the top-left box. The UI Image should now be positioned at the top left of the Game panel, as shown in the following screenshot:

- Add the following C# Script
Playerto GameObjectplayer-SpaceGirlin the Hierarchy:using UnityEngine; using System.Collections; using UnityEngine.UI; public class Player : MonoBehaviour { public Image starImage; public Sprite iconStar; public Sprite iconNoStar; private bool carryingStar = false; void OnTriggerEnter2D(Collider2D hit){ if(hit.CompareTag("Star")){ carryingStar = true; UpdateStarImage(); Destroy(hit.gameObject); } } private void UpdateStarImage(){ if(carryingStar) starImage.sprite = iconStar; else starImage.sprite = iconNoStar; } } - From the Hierarchy view, select the GameObject
player-SpaceGirl. Then, from the Inspector, access the Player (Script) component and populate the Star Image public field with UI Image objectImage-star-icon. - Now, populate the Icon Star public field from the Project panel with sprite
icon_star_100and populate the Icon No Star public field from the Project panel with spriteicon_nostar_100, as shown in the following screenshot:
- Now when you play the scene, you should see the no star icon (a grey-filled icon in a blocked-off circle) at the top left until you pick up the star, at which point it will change to show the carrying star icon (yellow-filled star).
The Image variable
starImage is a reference to the UI Image object Image-star-icon. Sprite variables iconStar and iconNoStar are references to the Sprite files in the Project panel—the sprites to tell the player whether or not a star is being carried. The bool variable carryingStar represents internally as program data whether or not the player is carrying the star at any point in time; it is initialized to false.
Much of the logic for this recipe is the same as the previous one. Each time the UpdateStarImage()method is called, it sets the UI Image to the sprite that corresponds to the value of bool variable carryingsStar.
