
Besides the traditional 6 Sided and Cubemap, Unity now features a third type of skybox: the Procedural Skybox. Easy to create and setup, the Procedural Skybox can be used in conjunction with a Directional Light to provide Environment Lighting to your scene. In this recipe, we will learn about different parameters of the Procedural Skybox.
For this recipe, you will need to import Unity's Standard Assets Effects package, which you should have installed when installing Unity.
To set up an Environment Lighting using the Procedural Skybox and Directional Light, follow these steps:
- Create a new scene inside a Unity project. Observe that a new scene already includes two objects: the Main Camera and a Directional Light.
- Add some cubes to your scene, including one at Position X:
0; Y:0; Z:0scaled to X:20; Y:1; Z:20, which is to be used as the ground, as shown:
- Using the Create drop-down menu from the Project view, create a new Material and name it
MySkybox. From the Inspector view, use the appropriate drop-down menu to change the Shader of MySkybox from Standard to Skybox/Procedural. - Open the Lighting window (menu Window | Lighting), access the Scene section. At the Environment Lighting subsection, populate the Skybox slot with the MySkybox material, and the Sun slot with the Directional Light from the Scene.
- From the Project view, select MySkybox. Then, from the Inspector view, set Sun size as
0.05and Atmosphere Thickness as1.4. Experiment by changing the Sky Tint color to RGB:148;128;128, and the Ground color to a value that resembles the scene cube floor's color (such as RGB:202;202;202). If you feel the scene is too bright, try bringing the Exposure level down to0.85, shown as follows: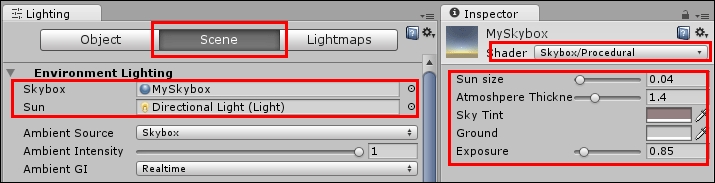
- Select the Directional Light and change its Rotation to X:
5; Y:170; Z:0. Note that the scene should resemble a dawning environment, something like the following scene:
- Let's make things even more interesting. Using the Create drop-down menu in the Project view, create a new C# Script named
RotateLight. Open your script and replace everything with the following code:using UnityEngine; using System.Collections; public class RotateLight : MonoBehaviour { public float speed = -1.0f; void Update () { transform.Rotate(Vector3.right * speed * Time.deltaTime); } } - Save it and add it as a component to the Directional Light.
- Import the Effects Assets package into your project (via the Assets | Import Package | Effects menu).
- Select the Directional Light. Then, from Inspector view, Light component, populate the Flare slot with the
Sunflare. - From the Scene section of the Lighting window, find the Other Settings subsection. Then, set Flare Fade Speed as
3and Flare Strength as0.5, shown as follows: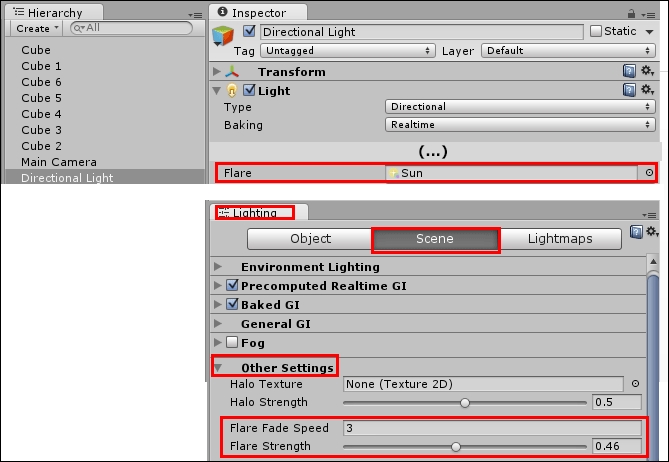
- Play the scene. You will see the sun rising and the Skybox colors changing accordingly.
Ultimately, the appearance of Unity's native Procedural Skyboxes depends on the five parameters that make them up:
- Sun size: The size of the bright yellow sun that is drawn onto the skybox is located according to the Directional Light's Rotation on the X and Y axes.
- Atmosphere Thickness: This simulates how dense the atmosphere is for this skybox. Lower values (less than
1.0) are good for simulating the outer space settings. Moderate values (around1.0) are suitable for the earth-based environments. Values that are slightly above1.0can be useful when simulating air pollution and other dramatic settings. Exaggerated values (like more than2.0) can help to illustrate extreme conditions or even alien settings. - Sky Tint: It is the color that is used to tint the skybox. It is useful for fine-tuning or creating stylized environments.
- Ground: This is the color of the ground. It can really affect the Global Illumination of the scene. So, choose a value that is close to the level's terrain and/or geometry (or a neutral one).
- Exposure: This determines the amount of light that gets in the skybox. The higher levels simulate overexposure, while the lower values simulate underexposure.
It is important to notice that the Skybox appearance will respond to the scene's Directional Light, playing the role of the Sun. In this case, rotating the light around its X axis can create dawn and sunset scenarios, whereas rotating it around its Y axis will change the position of the sun, changing the cardinal points of the scene.
Also, regarding the Environment Lighting, note that although we have used the Skybox as the Ambient Source, we could have chosen a Gradient or a single Color instead—in which case, the scene's illumination wouldn't be attached to the Skybox appearance.
Finally, also regarding the Environment Lighting, please note that we have set the Ambient GI to Realtime. The reason for this was to allow the real-time changes in the GI, promoted by the rotating Directional Light. In case we didn't need these changes at runtime, we could have chosen the Baked alternative.