
Now is the time to start building the underlying logic for each blueprint, to have a gameplay logic that connects all of the game components together.
You may have wondered why we are going to make this player controller. The answer is simple, to enable the ability to detect the swipe event (actually what looks like a swipe, not an actual swipe).
Right-click in your Content Browser, add a new blueprint, and select its base class to be Player Controller. I named it fruitChopperPlayerController. After adding a new blueprint, don't forget to submit it to the correct slot in the Game Mode blueprint that you make in each game.
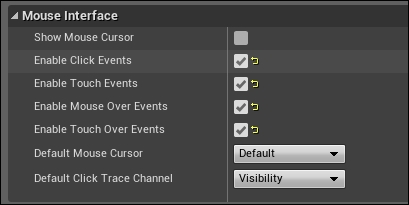
Double-click on the newly created blueprint and from the Defaults tab, adjust the value of Mouse Interface to enable clicks and touches. Now the blueprints will be able to handle those events.
I mentioned before that all of the fruits share the same logic, so in this step, I'll be showing you how to build one of the fruits, and then you can easily reconstruct or duplicate the rest of the fruits blueprints within a few seconds.
As we discussed how to build a multicomponent blueprint in Chapter 3, Creating a Brick Breaking Game, you need to make the fruit actor blueprint out of three components: the Projectile Movement component, the Sphere component as a collider, and the PaperSprite component, which will hold the art asset for the fruit. However, keep in mind that this time the Projectile Movement component should follow gravity, so make sure that Projectile Gravity Scale is set to 1.0.
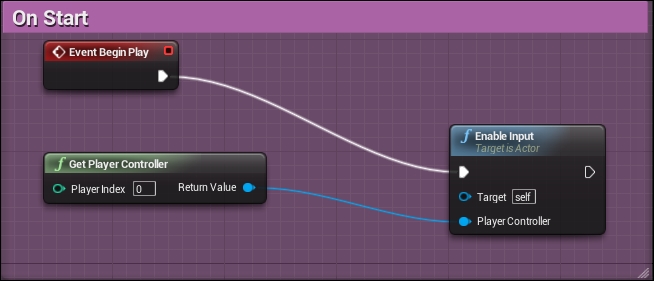
On Event Begin Play, you need to define that this blueprint can get even swipe inputs, so you need to add the Enable Input node and connect it to the Get Player Controller node. And since the game has only one player, you can leave Player Index set to 0 as it means the first player in the player array.
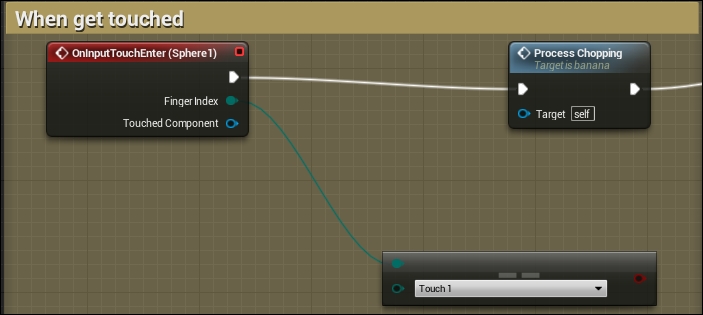
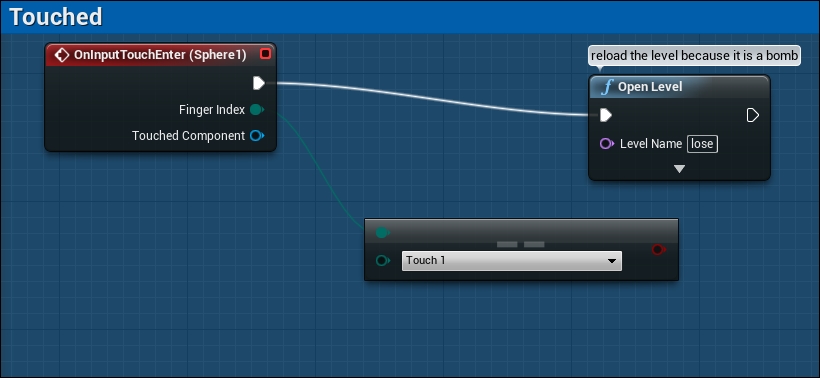
To interface a touch, get over the fruit (swipe); it is a little tricky. As the engine does not have swipe functionality right now, all we need is to just detect the moment when a finger moves over a fruit. So we will calculate it as a touch enter event by using the node OnInputTouchEnter or EventTouchEnter on later editor builds and set FingerIndex to Touch 1 from the enum of touches.
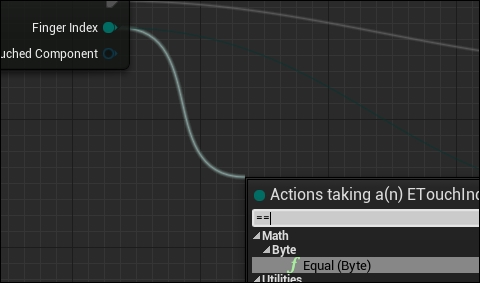
If you were not able to find the enum of touches node, that means you are running a higher editor build. In that case, the easiest way to get a similar result is by looking for a node called Equal(Byte), which is usually inside the Byte section of the Math node. This will give the same result but using numbers directly instead of enums.
With this connection, perform the next step if the player has swiped over the current blueprint (which must have a collider and physics) with one finger. Then, you can add Custom Event and call it Process Chopping, and connect its call to OnInputTouchEnter and that emulates a successful swipe.
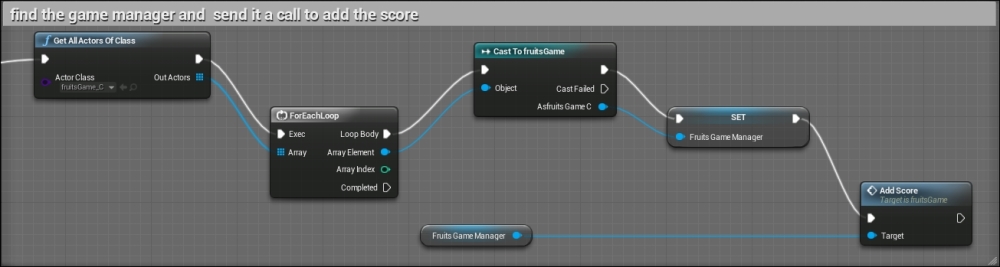
After calling Process Chopping, it is time to add to the score. If you haven't made a fruitsGame blueprint yet, go ahead and build an empty one with an empty Custom Event called Add Score, so that you can manage its call. Alternatively, you can add this part later when you finish adding the fruitsGame blueprint. There are so many ways to communicate between blueprints, and those ways are used according to the blueprint types. And as we are going to communicate between two normal blueprints that are based on the actor's class, the best way to do this is by searching and casting.
- First, let's add a new variable of the type fruitsGame_C, which is the fruitsGame blueprint you have already made and left almost empty. Name it fruitsGameManager.
- Then, you can use the Get All Actors Of Class node to look for all of the available actors of the selected Actor Class in the current level. Then, do a small ForEachLoop between them, and finally, run Cast To fruitsGame and apply the found one into the fruitsGameManager variable you created earlier.
- Finally, call the AddScore function from the fruitsGameManager variable (which is the blueprint we found while using Get All Actors Of Class).
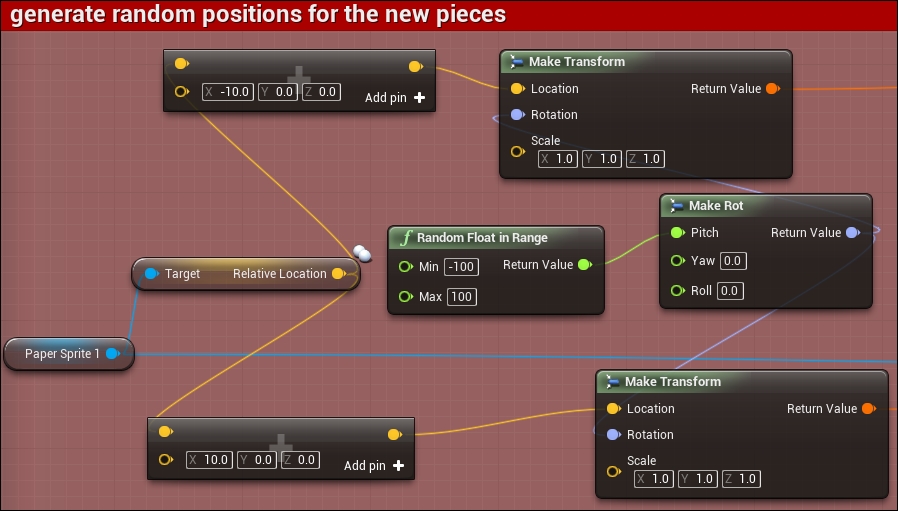
The Process Chopping function/event will be divided into two main parts. The first part is responsible for generating random and rotation positions to add the two new parts of the fruit based on the fruit's current position. The other part is responsible for adding the new sprites and destroying the full fruit sprite. Force the blueprint to stop receiving new inputs, so that we can hit a fruit once.
Using Get Relative Location to PaperSprite of the fruit, you can get its location. Then, using the returned data, you can generate new positions or rotations to the newly chopped sprites that you'll add. Make sure to use the Random Float in Range, Make Rot, Vector+Vector, and Make Transform nodes to construct randomization logic in your own style.
I forced the chopped pieces to be in almost the same positions (10 units to the left and right of the old sprite) and gave them a random rotation between 100 and -100.
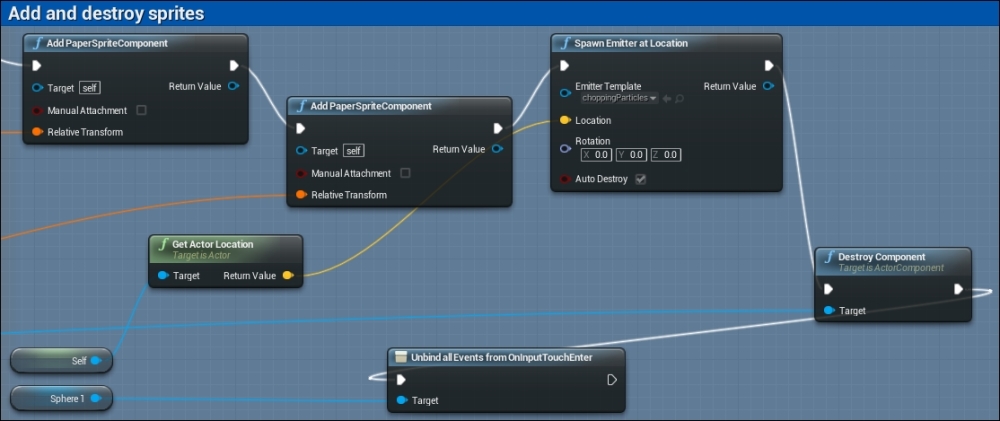
The last part of the fruit blueprint is adding and destroying the newly chopped parts. Using the node Add PaperSpriteComponent, you can add a new sprite. So using it twice will cause you to add two new sprites. Don't forget to set each of them to one of the two chopped pieces. Also, using the Spawn Emitter at Location node will allow you to drop a particle system emitter. Using self and Get Actor Location is a good idea to spawn the current position of the fruit.
Then, using Destroy Component and adding PaperSprite to its target will destroy the full fruit sprite and leave only two chopped pieces. Finally, to stop receiving events on this fruit blueprint (as it is already calculated in the score), you need to use Unbind all Events from OnInputTouchEnter and set the target to the Sphere collider (or whatever collider you are using as a physics component to the blueprint) and you will not receive any events again!
Now you can duplicate the blueprint to make all of the other fruits, but don't forget to change the sprites to the newly made fruit. Also, change the Add PaperSpriteComponent value to the correct value for chopped pieces.
Most of the bomb logic is the same as any other fruit. So you can build and construct your components hierarchy in the same way. Or you can just duplicate one of the fruits and change its sprite to the bomb one.
You can keep only the start function from the old logic of a fruit, which is responsible for enabling the inputs. However, delete anything else related to chopping, as there will not be any chopping to the bomb.
Finally, you need to call the Open Level node when the player swipes over a bomb and sets its value to the lose level as Level Name. So it means that if the player swipes over the bomb, then open the lose level, which will contain a lose word.
The win or lose blueprint will be used in a separate level file. Both of them have the same structure and logic; the only difference is in the text to be shown. So let's show you how to make one of them and you can make the other by duplicating it and changing the text value.
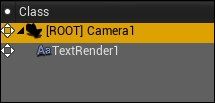
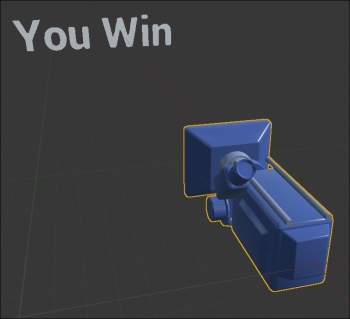
Create a new empty blueprint and name it winScreen and then add two components to it; a camera (orthographic one) and TextRenderer. Try to adjust the text position to fit the middle of the camera and then change its text value to a convenient phrase like You Win.
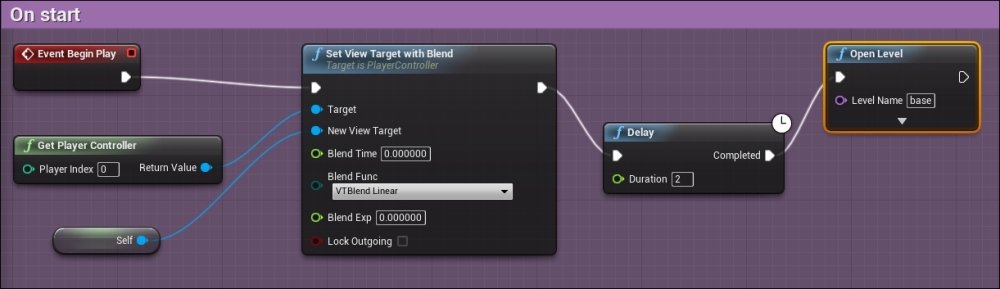
The last thing, in the blueprint logic, is that you need to set the camera component to be the correct one to render using the Set View Target with Blend node and run it in the Event Begin Play function with Get Player Controller as Target and keep Player Index as 0. Then, use a Delay node to wait for a duration of 2 seconds and then call the Open Level node and set LevelName to base, so the player gets into the gameplay again after two seconds. So either win or lose, the player sees the screen and after two seconds, he can go back to playing again.
Now you can duplicate the blueprint, drop it in the lose level and change the text to You Lose and BOOM! You've created the lose screen in a second!
Don't forget to insert a directional light in the game level because the default UI will look black without a light source!
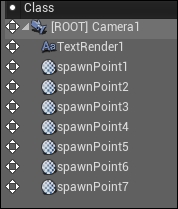
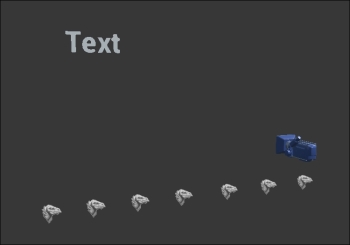
The construction of the component hierarchy is very simple. You must have the Camera component that will render the game. And you need to have a TextRenderer that will work as the UI element to show the player score. And finally, you need several points in the space to be used as spawn points for the fruits; in my case, I made seven points, all of them are of the type Billboard.
The final look of the blueprint when you drop a copy of it into the base level scene should look like this:
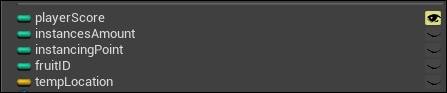
Before you start working on the logic part, you need to add several variables to be used during the process of building the gameplay logic. So add an int variable, call it playerScore. It is to be used as storage for the score value.
Add an integer called instancesAmount to be used as storage for the number of fruits that need to be spawned during the level. Add another integer called instancingPoint, which will work as a random value for the spawn point to be used for the current spawn operation. Another int called fruitID will be randomly changed, and its value will be used to randomly pick a fruit or bomb to be spawned. Finally, a location variable named tempLocation will be used to store the spawn point.
Now the last thing to be added before we start pitching the gameplay logic for this blueprint is something called Macro, which is a collapsed graph of nodes that have an entry point and exit point designated by tunnel nodes. You can find the add Macro button in the same tool bar you use to add a variable. Add a variable and name it delayedLoop. This one will be a normal for loop but will have a delay time before each iteration of the loop.
The easiest way to build it is by adding a normal for loop inside your graph and then double-clicking on it to access its Macro. Then, copy all of the components. Next, open the delayedLoop macro you made and paste everything. The only change you need to make is just add a Delay node to it before the Sequence node and give it a value. I found that a Duration value of 0.7 is working fine with the fruits shooting.

Now let's work on the logic. The first thing, as always, is Event Begin Play.
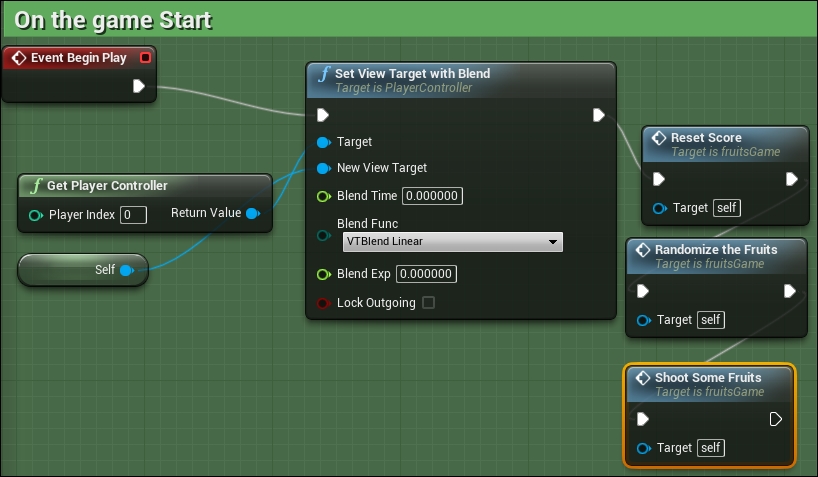
Let's add Set View Target with Blend to it to set the camera view to the current blueprint camera. Also, add Get Player Controller with Player Index of 0 to it to use the first player in the player's array.
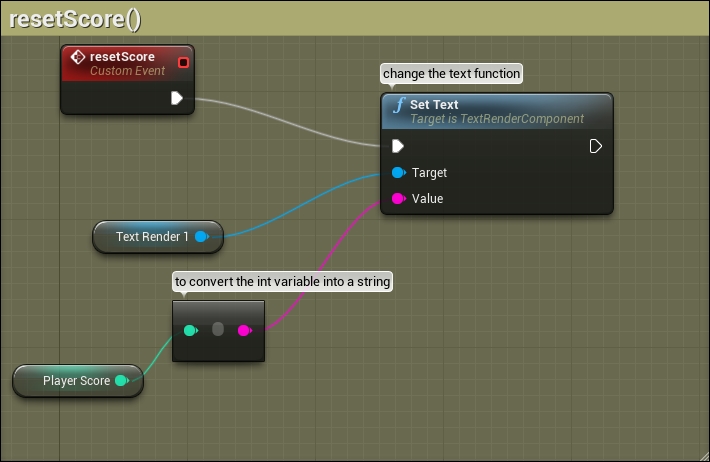
- Reset Score: This is mainly used to set the score in the UI by setting the playerScore variable to zero (which is zero by default anyway), and converting it into string and applying it to the TextRenderer component using the Set Tex node and setting Value to the playerScore converted string.
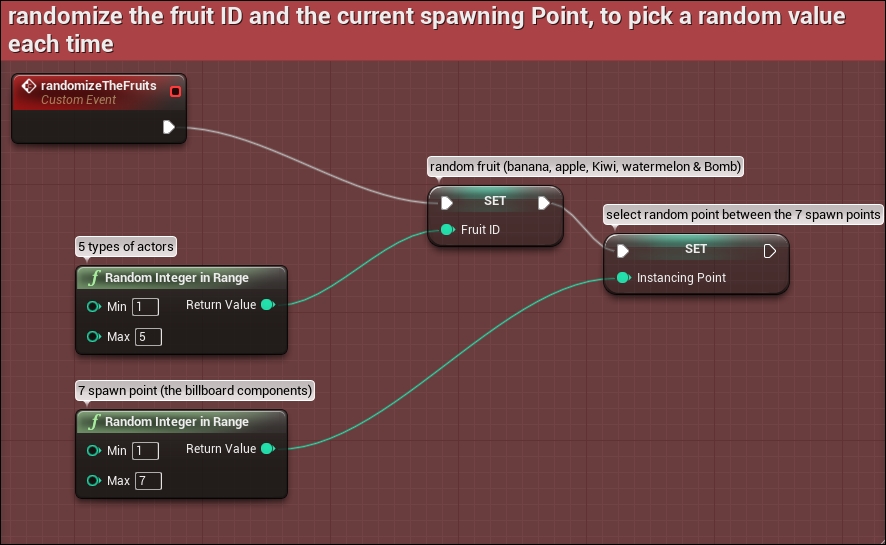
- Randomize the Fruits: This simple function will be called whenever we want to set a random value to the fruitID or instancingPoint variables. As both of them are int type variables, we will use the node Random Integer in Range and set the range for fruitID between 1 and 5 as all of the fruits and bombs are five blueprints only. Then set the range for instancingPoint to between 1 and 7 as I have only seven instances of the billboard components.
- Shoot Some Fruits: The first thing to do is defining how many fruit/bombs we are going to shoot during this level using the Set node for the instancesAmount variable. I set it to 70 as it gives 4 minutes of gameplay approximately, which is not a long or short level. Using a
forloop (the custom one we made which has the delay inside its logic) and adding the instancesAmount variable as its Last Index will guarantee us the game will fire the shot even for fruits with the same amount we defined. For loops are the best! Then call a custom event called pickTheRandomSpawnPoint, which I'll break down in a moment, but for now, this function is responsible for picking a spawn point out of the seven we have and using it for the current spawning operation.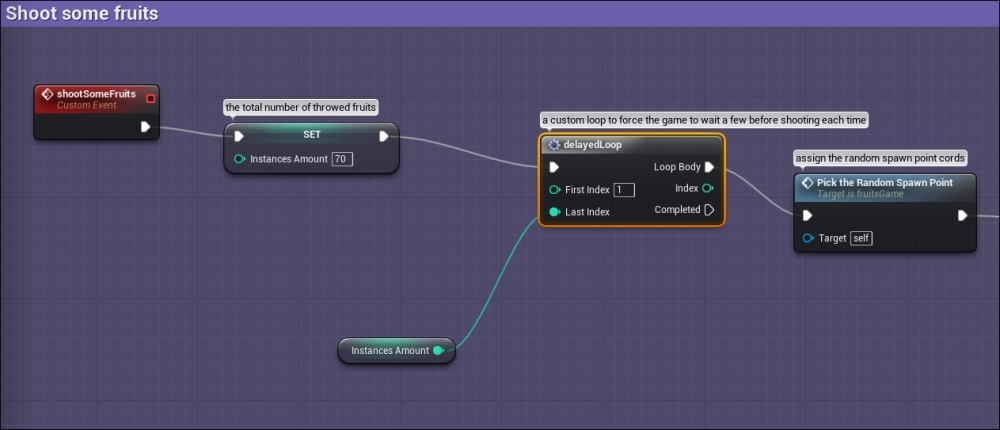
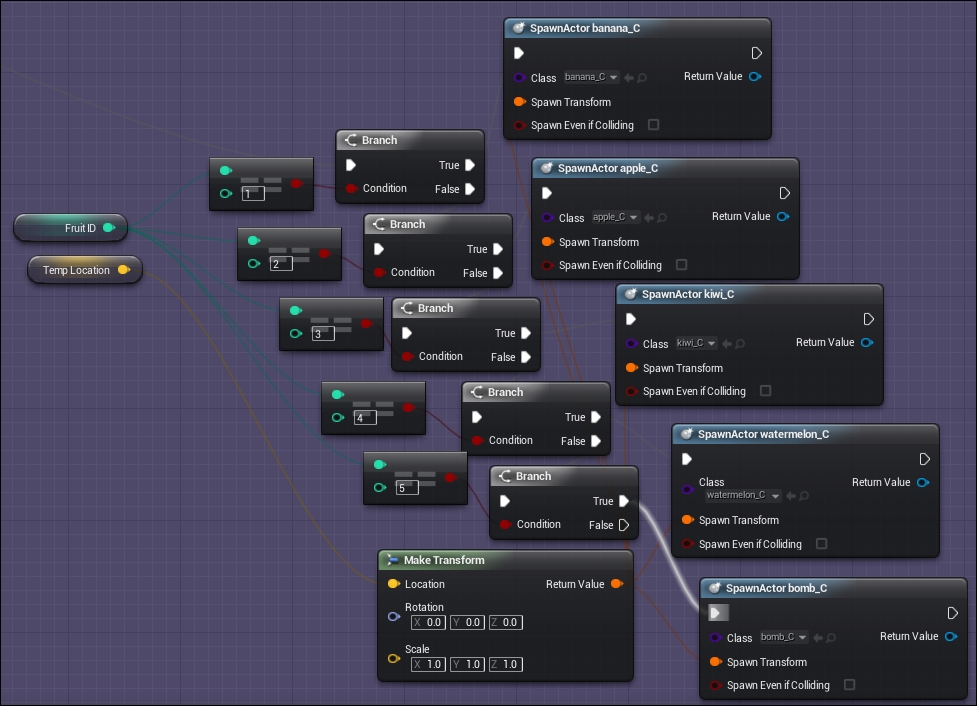
Finally, start executing several compare loops to check the random fruitID value. And according to the value, the blueprint will be spawning a different fruit blueprint using the SpawnActor node using tempLocation (we set its value in the pickTheRandomSpawnPoint function) as its spawn location.
Don't forget to assign a different fruit class to the Class value of the SpawnActor node. And note that I picked the number 5 of fruitID to represent the bomb actor blueprint.
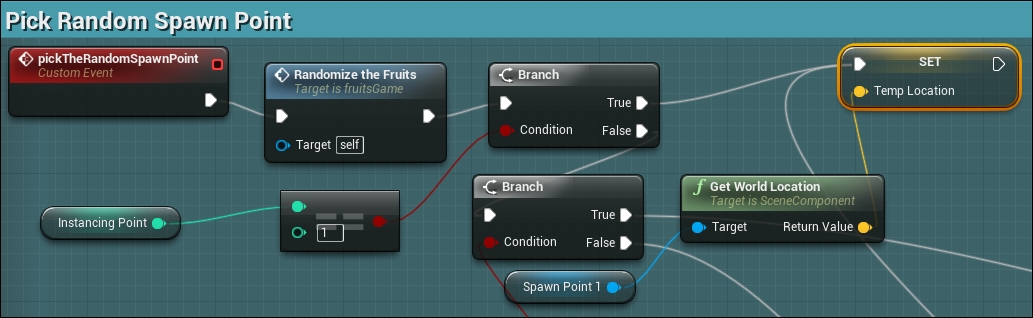
The pickTheRandomSpawnPoint event starts with a call to the randomizeTheFruits function, which was made to give a random fruitID and instancingPoint. Then, start to compare the variable instancingPoint to different values, and according to the compared value, we choose one of the billboard components positions to be the spawn point.
Then, by getting the location for the billboard point by the Get World Location node, we can get the value and store it to the tempLocation variable to be used in the rest of the spawning operation with the node Spawn Actor.
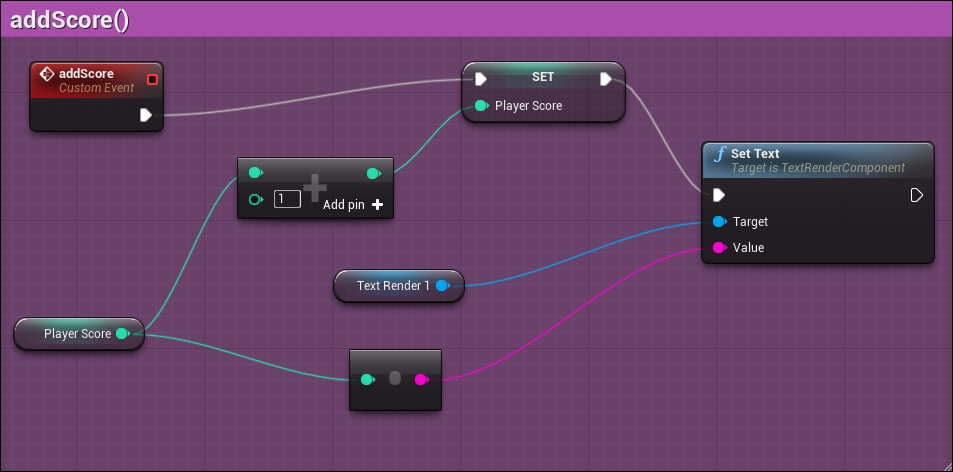
Now let's add the function that will be used to add the score to the layer. Remember you may have already added this function but it is empty. As advised in the process of creating a fruit blueprint, you may already have the addScore node type of custom event now.
Add a custom event and call it addScore if you haven't yet. Using the Integer+Integer node and applying the playerScore variable as one of its inputs and the value of 1 to the other input, you always get the value of 1 added to the latest score. By connecting the output of this calculation to a Set node of the playerScore variable and applying the result as a string to the TextRenderer node SetText, the score will be added and shown at the same time in the game UI.
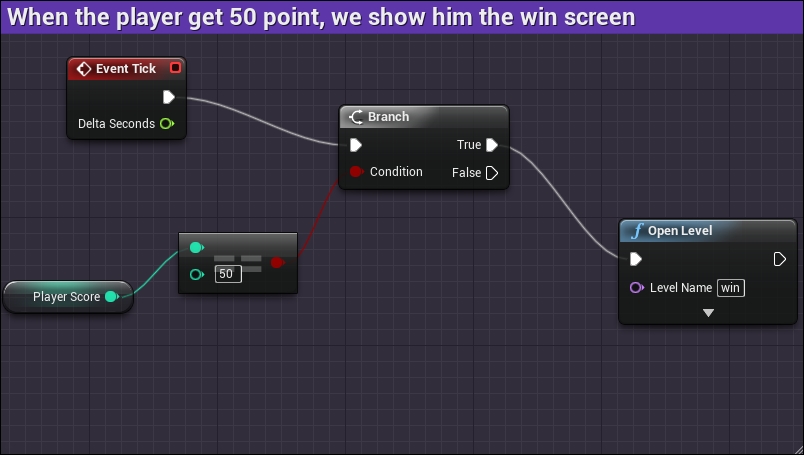
With the logic of showing a lose screen added to the bomb logic, we only have one case to break the game loop, which is the losing case. Now, it is time to add the logic for a win case.
By comparing the playerScore variable to 50 (the maximum for this level is 50 points) inside Event Tick, we can do whatever we want when the player hits 50. So using the Open Level node and setting its Level Name to the win level, we will be loading the win level once the player scores 50.
And now we have a full and complete game loop. The game starts and keeps running. If the player hits a bomb, it loads a lose screen and then waits for 2 seconds and takes them back into the game. If the player is skilled enough to avoid the bomb, once his score becomes 50, a win screen is loaded, which waits for 2 seconds, and then loads the game level again. And so on!
One last small note is that if you are still using the same version as I am, which is UE 4.3, you will not be able to see particles in the game. Don't panic! It is a known issue with the orthographic camera; if you switched the game camera to perspective, you'll be able to see the particles. This issue has been reported and it might be fixed with Version 4.5 or 4.6 as 4.4 is already out now, and it is not addressed it.