
At this stage, you're probably wondering just how is it technically possible, using code, to substitute or inject (to use the correct term) different compiled code during a test execution. To illustrate the various options for Dependency Injection let's start with a simple code example. We will explore how unit testing can be applied to Apex Enterprise patterns later in this chapter.
The following diagram shows the Unified Modeling Language (UML) for a Car class model, which has been designed with SOC in mind. Responsibilities such as engine, dashboard, and the digital readout display have been separated. This is a pure Apex code example to illustrate how dependencies between classes can be managed with Dependency Injection (DI):
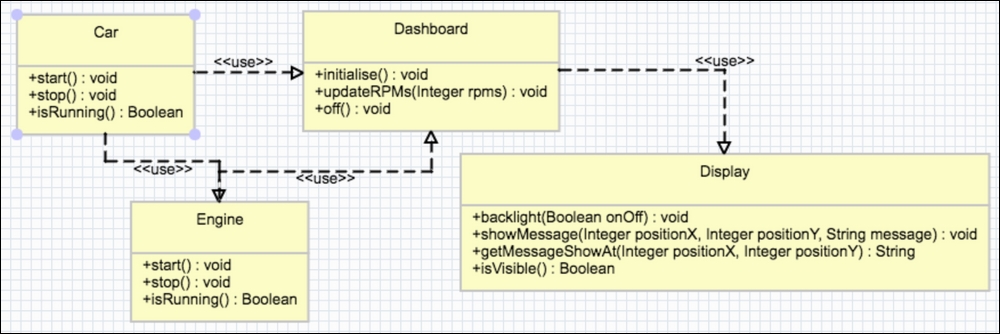
The following code is for the Car class. It has a dependency on methods from the Dashboard and Engine classes. The caller must set up and provide instances of these classes for the methods to function correctly:
public class Car {

    private Engine engine;
    private Dashboard dashboard;
    private Boolean isRunning;

    public Car(Engine engine, Dashboard dashboard) {
        this.dashboard = dashboard;
        this.engine = engine;
    }

    public void start() {
        dashboard.initialise();
        engine.start();
    }

    public void stop() {
        engine.stop();
        dashboard.off();
    }

    public Boolean isRunning() {
        return engine.isRunning();
    }
}
The start and stop methods contain functionality that ensures that dashboard and engine are initialized accordingly. The following code for the Dashboard class requires an instance of the Display class, which handles the display of information:
public class Dashboard {

    private Display display;

    public Dashboard(Display display) {
        this.display = display;
    }

    public void initialise() {
        display.backlight(true);
        display.showMessage(10, 20, 'Hello Driver!'),
    }

    public void updateRPMs(Integer rpms) {
        display.showMessage(10,10, 'RPM:' + rpms);
    }

    public void off() {
        display.backlight(false);
    }
}
The methods on the Dashboard class integrate with the Display class to show messages on the digital display of the car at various locations. The Display class has no dependencies, so for simplicity is not shown here. (If you want to view its code you can refer to the sample code for this chapter). Finally, the Engine class is shown as following:
public class Engine {

    private Dashboard dashboard;
    private Boolean isRunning;

    public Engine(Dashboard dashboard) {
        this.dashboard = dashboard;
    }

    public void start() {
        dashboard.updateRPMs(1000);
        isRunning = true;
    }

    public void stop() {
        dashboard.updateRPMs(0);
        isRunning = false;
    }

    public Boolean isRunning() {
        return isRunning;
    }
}
The methods in the Engine class call methods on the Dashboard class to update the driver on the Revolutions per Minute (RPM) of the engine.
First let's take a look at what an integration test looks like for the Car:
@IsTest
private class CarTest {

    @IsTest
    private static void integrationTestStartCar() {

        // Given
        Display display = new Display();
        Dashboard dashboard = new Dashboard(display);
        Engine engine = new Engine(dashboard);

        // When
        Car car = new Car(engine, dashboard);
        car.start();

        // Then
        System.assertEquals(true, car.isRunning());
        System.assertEquals(true, engine.isRunning());
        System.assertEquals(true, display.isVisible());
        System.assertEquals('Hello Driver!',display.getMessageShowAt(10,20));
        System.assertEquals('RPM:1000',display.getMessageShowAt(10,10));
    }
}
Note
The setup for this test looks simple, but imagine if each of the classes constructed required other configuration and data to be created, the setup logic can grow quickly. This integration test is perfectly valid and useful in its own right. However, as I mentioned earlier, you cannot assume just because you have fully unit tested methods that everything still works when you put it all together!
The preceding test code is split into three main sections, Given, When, and Then. This type of approach and thinking originates from another practice known as Behavior Driven Development (BDD). You can read more about this from Martin Fowlers web site. https://martinfowler.com/bliki/GivenWhenThen.html
In this section let's review what type of unit tests we would want to write and what these tests should assert for some of the methods in the preceding example.
Let's consider what we would assert in writing a unit test that just tested the following logic in the Car.start method. (Remember we are not interested in testing the dashboard.initialise or engine.start methods yet):
    public void start() {
        dashboard.initialise();
        engine.start();
    }
For this method, we would assert that the dashboard.initialize and engine.start methods actually got called. So in a unit test for this method, we are testing the behavior of the start method only. In separate unit tests, we would also test the Dashboard.initialise and Engine.start methods themselves.
Note
Solely testing the behavior or implementation of a method (for example, which methods it called), might seem odd, compared to asserting values. But sometimes asserting that certain methods were called (and how many times they were called) and any parameters that may exist were passed to them is a key validation that the code is working as expected. Asserting values returned from methods, as a means of testing correct behavior, is also valid in a unit test.
In the case of the Engine.start method, shown again in the following code, we want to assert that the dashboard.updateRPMs method was called with the correct idle RPM's value and that the state of the engine was correctly setup as running:
    public void start() {
        dashboard.updateRPMs(1000); // Idle speed
        isRunning = true;
    }
We are not interested in testing whether the method updated the display; that's the concern of another unit test which tests the Dashboard.updateRPMs method directly.
Here is the Dashboard.updateRPMs method code again. When writing a unit test for this method, we should validate that any value passed to the rpms parameter was correctly passed to the Display.showMessage method:
    public void updateRPMs(Integer rpms) {
        display.showMessage(10,10, 'RPM:' + rpms);
    }
In order to write unit tests for these methods and these methods alone, we need the dashboard, display and engine variables to reference something the compiler will recognize as having the required methods. But it also needs to allow us to make a substitution of the real implementation of these methods with special test-only versions so we can record when the methods are called in order to assert behavior. What we need is mock implementations of the Dashboard, Engine and Display classes.
The preceding code makes explicit hard coded dependencies between classes. To work around this, CDI can be applied. This has been used in other languages such as Java. In the following examples Apex Interfaces are utilized to express the dependencies between various units of code that you want to test in isolation.
By leveraging the ability to have multiple implementations of a given interface we can vary which implementation gets executed. We can execute the real implementation of a method (this is provided by the preceding classes) or the test only the mock behavior of it, typically defined in the test itself. Thus depending on the type of test being written, integration or unit test, you then pass the appropriate implementations constructor of the Car class.
To support this type of injection, the following three things must be changed:
Firstly, interfaces are created to reflect the methods on the Engine, Dashboard, and Display classes. The following code shows how these interfaces are defined:
public interface IEngine {
    void start();
    void stop();
    Boolean isRunning();
}
public interface IDashboard {
    void initialise();
    void updateRPMs(Integer rpms);
    void off();
}
public interface IDisplay {
    void backlight(Boolean onOff);
    void showMessage(Integer positionX, Integer positionY, String message);
    String getMessageShowAt(Integer positionX, Integer positionY);
    Boolean isVisible();
}
Second, the real implementation of the classes must implement the interfaces, since the interfaces are based on their methods. This typically just requires stating the class implements the interface:
public class Engine implements IEngine {

public class Dashboard implements IDashboard {

public class Display implements IDisplay {
Finally, references to the interface types and not the concrete classes must be made throughout the codebase. For example, the Car constructor now takes the interface types, as does the member types engine and dashboard used to call the methods:
public class Car {

    private IEngine engine;
    private IDashboard dashboard;
    private Boolean isRunning;

    public Car(IEngine engine, IDashboard dashboard) {
        this.dashboard = dashboard;
        this.engine = engine;
}The mock implementations of the interfaces can now also be implemented. These mock classes can be as simple or as complex as you desire, depending on what behavior you need to emulate and what it is you're asserting. Note that, you do not have to fully implement all methods; stubs are fine. Implement what is needed for your test scenarios:
private class MockDashboard implements IDashboard {
    public Boolean initialiseCalled = false;
    public Boolean updateRPMsCalled = false;
    public Integer updateRPMsCalledWith = null;
    public void initialise() { initialiseCalled = true; }
    public void updateRPMs(Integer rpms) {
        updateRPMsCalled = true;
        updateRPMsCalledWith = rpms;
    }
    public void off() { }
}

private class MockEngine implements IEngine {
    public Boolean startCalled = false;
    public void start() { startCalled = true; }
    public void stop() { }
    public Boolean isRunning() { return true; }
}

private class MockDisplay implements IDisplay {
    public Boolean showMessageCalled = false;
    public String showMessageCalledWithMessage = null;
    public void backlight(Boolean onOff) { }
    public void showMessage(Integer positionX, Integer positionY, String message) {
        showMessageCalled = true;
        showMessageCalledWithMessage = message;
    }
    public String getMessageShowAt(Integer positionX, Integer positionY) { return null; }
    public Boolean isVisible() { return false; }
}After making the preceding changes and introduction of the mocking classes, the implementation of the Car class object model now supports unit testing through CDI.
Each of the following unit tests resides in the corresponding test class within the sample code for this chapter, for example, CarTest, EngingeTest and DashboardTest.
The following is a unit test for the Car.start method:
@IsTest
private static void
  whenCarStartCalledDashboardAndEngineInitialised () {

   // Given
   MockDashboard mockDashboard = new MockDashboard();
   MockEngine mockEngine = new MockEngine();

   // When
   Car car = new Car(mockEngine, mockDashboard);
   car.start();

   // Then
   System.assert(car.isRunning());
   System.assert(mockDashboard.initialiseCalled);
   System.assert(mockEngine.startCalled);
}
Tip
Notice the method naming approach used by the test method. This is deliberate, as unit testing often results in the creation of many small unit test methods. Having a naming convention such as the examples shown in this section helps make it clearer at a glance what the test is covering. Once again this convention is borrowed from the BDD principles referenced earlier in this chapter.
Notice that the test did not need any setup to fulfill the setup requirements of the engine and dashboard dependencies, such as constructing an instance of the Display class.
Mock classes can also record the values passed as parameters for later assertion. The following is a unit test for the Engine.start method:
    @IsTest
 private static void whenStartCalledDashboardUpdated() {

    // Given
    MockDashboard mockDashboard = new MockDashboard();

    // When
    Engine engine = new Engine(mockDashboard);
    engine.start();

    // Then
    System.assert(engine.isRunning());
    System.assert(mockDashboard.updateRPMsCalled);
    System.assertEquals(1000, mockDashboard.updateRPMsCalledWith);
 }
It uses the mock implementation of the dashboard to confirm the Dashboard.updateRPMs method was correctly passed the corresponding value.
Finally, the following unit test is for the Dashboard.updateRPMs method:
@IsTest
private static void whenUpdateRPMsCalledMessageIsDisplayed() {

    // Given
    MockDisplay mockDisplay = new MockDisplay();

    // When
    Dashboard dashboard = new Dashboard(mockDisplay);
    dashboard.updateRPMs(5000);

    // Then
    System.assert(mockDisplay.showMessageCalled);
    System.assertEquals('RPM:5000',mockDisplay.showMessageCalledWithMessage);
 }
It uses the mock implementation of the display to validate the correct behavior and the display value is calculated and passed to the display when the method is called:
Note
Using interfaces to achieve Dependency Injection has an overhead in the development and use of interfaces in the production code. This is something Salesforce has improved on with the introduction of the Apex Stub API described later in this chapter. As the Stub API is still quite new, you may still see the DI accomplished with interfaces. The Apex Enterprise Patterns library utilized it prior to the arrival of the Stub API.
Also keep in mind, as we have seen in previous sections in this book, Apex Interfaces also have many other uses in providing flexibility in your architecture's evolutions and reduce coupling between clearly defining boundaries such as those in this book and your logic can also define.
A variation on the constructor pattern is to use setter methods to inject references into the instance of a class being unit tested. These should use the @TestVisible annotation so that these methods do not get used to override the instance setup to point to the real instances of dependent classes, which might be setup in the constructor.
The factory pattern discussed earlier in this book can also be used to inject alternative implementations of the mock implementations. The factory approach does not require constructors to be declared with a list of dependencies for each class. Instead, instances of the interfaces are obtained by calling factory methods.
Note
The use of factory dependency injection over CDI can be a matter of preference regarding whether the dependencies need to be declared up front or not. The Apex Enterprise pattern library chose to use a factory pattern for injection over CDI since layers such as service, domain, and selector are well defined and consistently applied throughout an applications code base.
The Application class factories used in the preceding chapters of this book allow you to implement runtime injection of services, domain, or selector implementations by calling the respective methods on each of the corresponding factories.
The following Application class factory methods allow you to obtain an instance of an object implementing the specified service, unit of work, domain, or selector class. These are the same methods that have been used in earlier chapters to implement various dynamic configuration behaviors at runtime:
You must cast the result to the applicable Apex class or interface.
Application.Service.newInstance
Application.Domain.newInstance
Application.Selector.newInstance
Application.UnitOfWOrk.newInstance
The following methods can be used to register an alternative implementation during test setup of a given service, domain or selector class.
Application.Service.setMock
Application.Domain.setMock
Application.Selector.setMock
Application.UnitOfWork.setMock
The preceding newInstance methods will then return these in preference to instances of the real classes you configured in the Application class.
In an earlier chapter the RaceService created and implemented the IRaceService. The following unit test for the RaceController class leverages this interface and the Application.Service.setMock method. To register with the factory a mock implementation of the IRaceService interface. In order to implement a unit test that validates the controllers, record Id is correctly passed to the called service method:
@IsTest
private static void whenAwardPointsCalledIdPassedToService() {

    // Given
    MockRaceService mockService = new MockRaceService();
    Application.Service.setMock(IRaceService.class, mockService);

    // When
    Id raceId = fflib_IDGenerator.generate(Race__c.SObjectType);
    RaceController raceController =
        new RaceController(
            new ApexPages.StandardController(
                new Race__c(Id = raceId)));
    raceController.awardPoints();

    // Then
    System.assert(mockService.awardChampionshipPointsCalled);
    System.assertEquals(new Set<Id> { raceId },
        mockService.awardChampionshipPointsCalledWithRaceIds);
}
Note
The MockRaceService is not shown here for brevity, but it follows the same pattern as the other mock classes shown so far in this chapter. Refer to it within the RaceControllerTestMockingDemo class included in the sample code of this chapter. Also recall that the RaceService.service method utilizes the Application service factory to create an instance of the service to execute.
So far we have discussed ways in which you can achieve dependency injection by using factories or constructors and implementing Apex Interfaces to inject alternative mock implementations of classes you wish to mock. DI frameworks offer ways for developers to access certain underlying language runtime features that can provide more direct ways to implement these aspects.
Thus DI frameworks tend to help developers gain easier access to the benefits of DI with much less boilerplate coding such as utilizing interfaces, especially in older code bases. However the developer may still have to write the mock implementations such as those we have seen above and manage dependencies between classes carefully via SOC.
Java for example leverages its reflection API to allow the injection at runtime without the need for interfaces. The Java Spring framework extends this feature by allowing configuration via XML files to allow for different runtime configurations. Some frameworks will also intercept the use of the native new operator. This avoids the need to implement factory- or constructor based injection approaches outlined in the preceding code.
A relatively recent addition to the Apex runtime is the Apex Stub API. This is one such DI framework provided by Salesforce as part of their platform. It does not override the new operator. The developer still needs to implement an injection approach such as those described earlier. However, it does make it easier to adopt mocking in legacy code bases (where interfaces have not been applied). The rest of this chapter will continue to explore this API in more detail and frameworks will be built on top of it.