So far we have been depending on the developer to ensure that the changes they push up to the GitHub remote repository do not cause regressions elsewhere in the application, by running Apex tests before making their commits. This is always a good practice!
However, this is not always a fully reliable means of determining the quality of the code, as the main code base will likely have moved on due to other developers also pushing their changes. When integrated together, they might cause tests or even code to fail to compile. Continuous Integration monitors changes to the Source Control repository and automatically starts its own build over the fully integrated source code base. Failures are reported back to the developers who last pushed code to the repository.
In this part of the chapter, we are going to explore this process using the popular Jenkins Continuous Integration server that uses the Ant script to perform the build step. Before we get into setting this up, let's take a moment to review the CI process that we are going to use.
The following diagram shows the CI process that we will be setting up over the course of the next few sections. Once you have a basic CI setup like this, you can start to add other features such as code documentation generation, static code analysis, security code scanner, and automated regression testing (something we will discuss briefly later on).
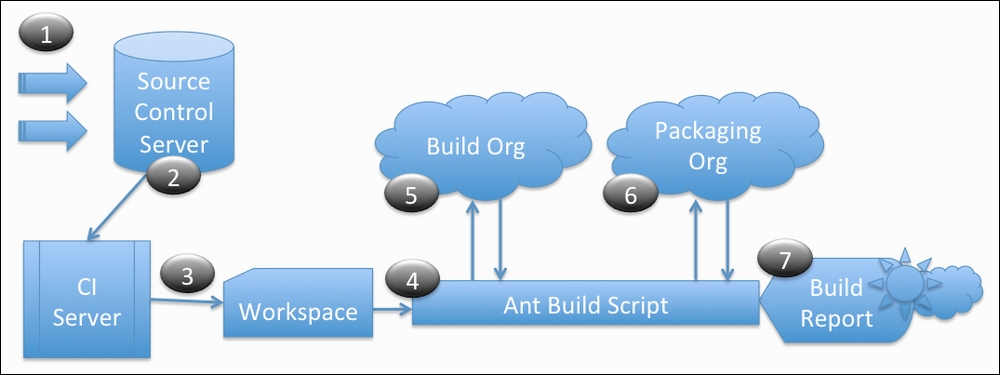
The following is the CI process:
- Developers make multiple contributions to Source Control, just as we did earlier in this chapter via the GitHub UI desktop client.
- The CI server is able to poll (configurable) the Source Control server (in our case, the GitHub remote repository) for changes.
- Once changes are detected, it downloads the latest source code into a local workspace folder.
- A part of the configuration of the CI server is to inform it of the location of the Ant
build.xmlscript to execute after the workspace is set up. - A build org is simply a designated developer org set aside solely for the use of the CI process. We will create one of these shortly for this purpose, though, with Salesforce DX a scratch org can be created and deleted dynamically. As with the deploy process, the same Ant script is used to deploy the code to the build org (thus confirming code compilation) and run Apex tests.
- As described earlier, developer orgs are used to develop the changes that are unmanaged environments as opposed to managed. Some of the constraints, such as the ability to change a previously released
globalApex class, that would normally apply are not enforced. In this step, a verification check-only deployment is performed against the packaging org to confirm that the code would, when needed, still deploy to the packaging org for release. This step can also help validate that code and tests continue to execute in a managed namespace context. This deployment is only a check, no changes are made to the packaging org regardless of the outcome. - Finally, the CI server will record the log and results of the build for analysis and the number of success versus failed builds and provide reports and notifications on the overall health of the source code in Source Control. If there are failures, there are options to e-mail certain team members as well as specific targets (those who made the most recent changes). Making sure a team stops what they are doing and attends to a broken build is very important. The longer the broken builds exist, the harder they are to solve, especially when further changes occur.
Before we can set up our CI server, we need to ensure that our Ant script has an appropriate entry point for it. This is similar to that used by the developer in the steps described earlier. The following is a new target designed as an entry point for a CI server. More complex scripts might involve some reuse between developer usage and CI usage.
The following target will clean the build org (by virtue of the dependency on the undeploy target) and then deploy to it. It will then perform a second deploy to perform a check-only deployment to the packaging org. If you are following along, commit the changes to the build.xml file so that the Jenkins server can see the new target when it downloads the latest source code from GitHub.
<target name="deploy.jenkins" depends="undeploy">
  <sf:deploy
      username="${sf.username}"
      password="${sf.password}"
      serverurl="${sf.server}"
      runAllTests="true"
      deployRoot="${basedir}/src"/>
  <sf:deploy
      username="${sf.package.username}"
      password="${sf.package.password}"
      serverurl="${sf.server}"
      checkOnly="true"
      runAllTests="true"
      deployRoot="${basedir}/src"/>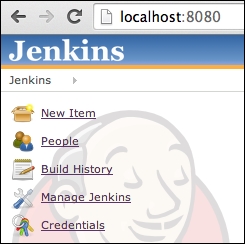
</target>Setting up a Jenkins server is a broad topic beyond the scope of this chapter. A good way, however, to get started is to go to http://jenkins-ci.org/ and download one of the prebuilt installations for your operating system. In this case I used the Mac pkg file download. After installation, I was able to navigate to http://localhost:8080 to find Jenkins waiting for me!
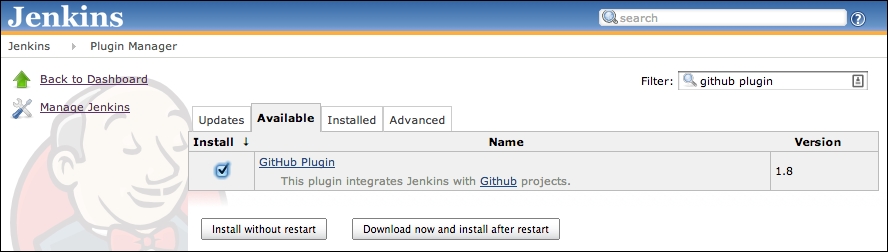
Jenkins has a plugin system that permits many custom extensions to its base functionality, by clicking on Manage Jenkins and then Manage Plugins to locate a GitHub Plugin:
Once this plugin is installed, you can create a Jenkins job that points to your GitHub repository and Ant script to execute the deploy.jenkins target defined earlier. On the Jenkins main page, click on New Item and select the Build a free-style software project option. Complete the following steps to create a build project:
- Complete the Project Name field with an appropriate name, such as
FormulaForce Build. - In the GitHub project field, enter the full URL to your GitHub repository, for example
https://github.com/afawcett/formulaforce-chapter13. - Under the Source Control Management section, select Git.
- In the Repository URL field, enter your GitHub repository URL, which is different from the preceding URL and takes the format of
https://github.com:githubuser/repositoryname.git, for example,https://github.com:afawcett/formulaforce-chapter13.git. - If your repository is private and not public, you will need to ensure that you have exchanged deployment keys between Jenkins and your GitHub account. This involves generating a key and copying and pasting it to the Deploy keys section in your GitHub repository settings. For the purposes of this book, it is recommended that you use a public GitHub repository.
- Although not recommended for a production Jenkins server, let's set it to poll every minute for changes to the repository. In the Build Triggers section, select Poll SCM and enter
*/1 * * * *in the Schedule field. - Scroll further down the project setup page to the Build section, and from the Add build step drop-down select Invoke Ant.
- In the Targets field, enter
deploy.jenkins(as per the name of the Ant target created in thebuild.xmlfile). - Click on the Advanced button, then click on the black down arrow icon to the right of the Properties field to expand it so that you are able to enter multiple properties. The
deploy.jenkinsAnt target that we created earlier requires theusernameandpasswordparameters to deploy to the build org and perform the check deploy to the packaging org. Enter the property name-value pairs on separate lines as follows:sf.username=buildorgusername sf.password=buildorgpasswordbuildorgtoken sf.package.username=packagingorgusername sf.package.password=packagingorgpasswordpackagingorgtoken
- Click on the Save button at the bottom of the page.
After a minute, Jenkins realizes that there has not been a build yet and starts one. However, you can also click on the project and click on the Build Now button if you cannot wait!
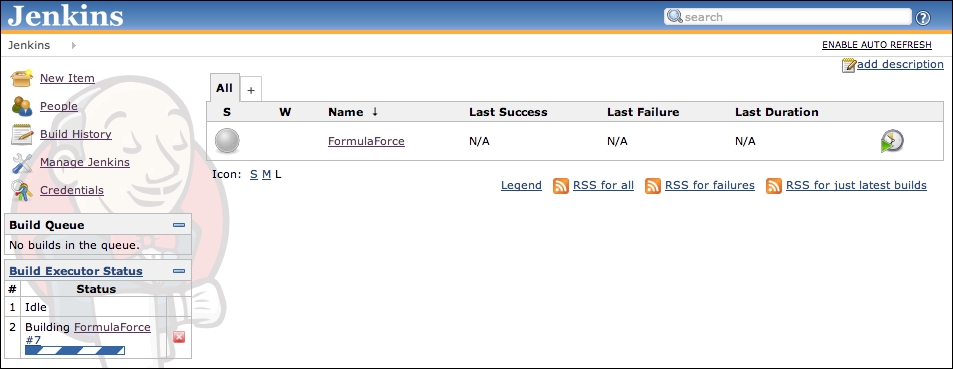
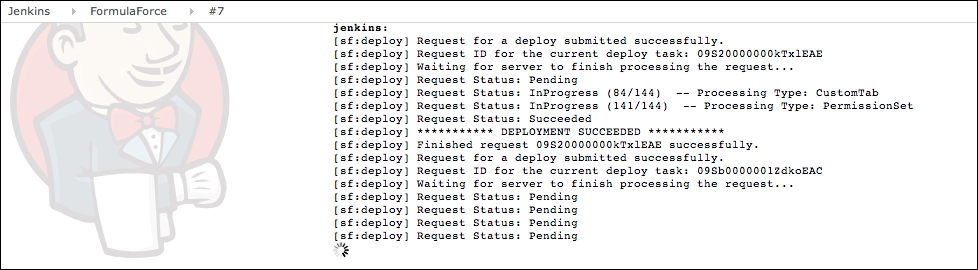
If you click on the hyperlink to the build itself (shown in the sidebar), you can monitor in real time the Ant script log just as if you had run it manually:
After this build completes, Jenkins will resume monitoring the GitHub repository for changes and automatically start a new build when it detects one.
This section has barely scratched the surface of what is possible with Jenkins and Ant scripts. You can either extend your Ant scripts to perform additional checks as described earlier and/or even custom logic to write back statistics to your own Salesforce production environment. Continue to explore this process a bit further by making some minor and some major changes to the repository to see the effects.
For example, try changing the method name of one of the global Apex methods (for example, ComplianceService.report to ComplianceService.reportX) as well as the methods in ComplianceResource and ComplianceResource_1_0 calling it. While this compiles in the developer and build orgs, it eventually results in the following error from the Jenkins build, as the check deployment to the packaging org failed because published global methods cannot be removed or renamed. In this case, the following build failure will be reported by Jenkins:
classes/ComplianceService.cls -- Error: Global/WebService identifiers cannot be removed from managed application: Method: LIST<fforce.ComplianceService.VerifyResult> report(SET<Id>) (line 1, column 8)
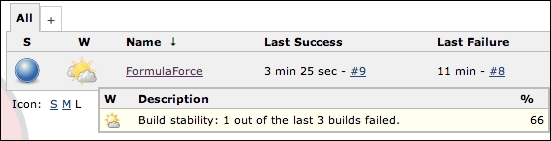
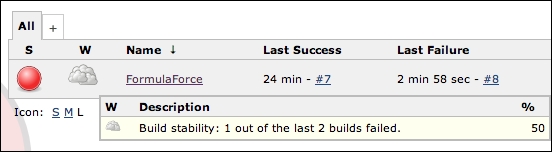
The dashboard on Jenkins shows the project with a dark cloud as one out of the last two builds have now failed. It is time to fix the build:
Once a new build completes successfully, Jenkins rewards you with some sunshine: