
The URL action allows the dashboard to invoke a webpage, either using the user's default web browser or using a web page placeholder that exists in the dashboard. Adding a URL action can add a lot of value to a dashboard because it can allow additional information to be searched or fetched in addition to information the dashboard already offers. This can definitely engage the end users.
In this recipe, we will create a dashboard that uses a URL action to look up information about an NBA team from Wikipedia.

To follow this recipe, open B05527_04 – STARTER.twbx. We will use the following worksheets:
- Teams
- Points History

The following are the steps to create the dashboard in this recipe:
- At the bottom of your Tableau design area are three tabs with plus signs, which allow you to create a new sheet, dashboard, and story point respectively. Click on the middle icon with the grid to create a new dashboard.

- When in the dashboard design area, the sidebar becomes a Dashboard bar, showing the available worksheets and other dashboard components.
- Change the dashboard name to
Team and Players – Embed URL. - Check the Show dashboard title checkbox. This will show the dashboard title text box in the dashboard.

- Change dashboard title to show the following:

- Right-click on the dashboard title, and select Format Title. Choose a light gray background to the title.
- If needed, adjust the height of dashboard title so the whole text is visible.
- Under the Objects section, ensure that Tiled is selected and not Floating.
- Click on the Dashboard menu, and choose Format.
- Under Dashboard Shading, change the color beside Default to a light color. This will set the dashboard background color.

- Drag the worksheets from the Dashboard tab, under the Sheets section, onto the dashboard.
- Drag the Teams worksheet. By default, when Tiled is selected, this worksheet will occupy the whole dashboard space.
- Drag Web Page from the Objects section to the right of Teams.
- Drag Points History below Teams, but to the left of the web page component.
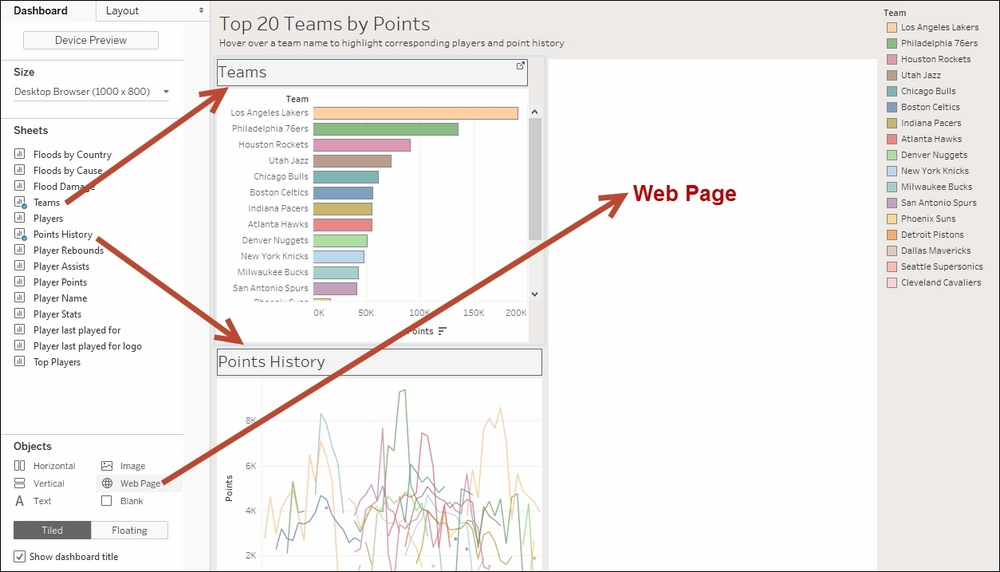
- Click the color legend to activate it, and select the X in the top-right corner to remove it from the dashboard.
- Click on the Dashboard menu and select Actions.

- In the Actions window, click on Add Action, and choose URL.
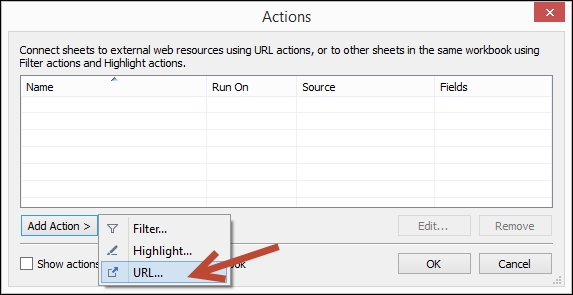
- In the Add URL Action window:
- Change the Name to
Check out the <Team> NBA.com home page - Change the Run action on: to Menu
- Add the URL
http://www.nba.com/<Team>/ - Click OK to close the window

- Change the Name to
- Add another URL action with the following settings:
- Change the Name to
Look for <Team> information on Wikipedia - Change the Run action on: to Menu
- Add the URL
http://www.nba.com/<Team>/

- Add a filter action with the following settings:
- Change the Name to
Filter dashboard for <Team> - Change the Run action on: to Select
- Under Source Sheets, ensure the Team and Players – URL dashboard is selected (icon should be the grid), and the Teams worksheet is checked
- Under Target Sheets, ensure the Team and Players – URL dashboard is selected (icon should be the grid), and the Points History worksheet is checked

- Change the Name to
- Test the dashboard. Use the presentation mode (or press F7) to see what the end users will see. Confirm that when you hover over any of the teams in the bar chart, you see the corresponding points history for that team highlighted in the time series graph, as well as the players on that team highlighted in the scatter plot.
The URL action allows us to specify a URL that our dashboard can navigate to. If there is a web page object in the dashboard, the URL action displays the web page in that object. If there is no web page object, the URL is opened in the default web browser.
As with the other actions, the URL action can be used with Select, Hover, or Menu. Menu is quite popular as this creates a hyperlink for each URL action, almost simulating a drop-down menu from a web page. The hyperlink can be customized, and can include values we have in the dashboard.

To feed values from our dashboard to the target URL, the target URL must be able to accept parameters at the URL string. These are called GET parameters.
The URL action opens up a world of possibilities. However, be wary that when websites are embedded, the behavior may change as the providers change their agreement, code, and so on. For example, a while back, it was pretty easy to embed YouTube videos into Tableau dashboards and play them on Tableau Desktop. However, this behavior has changed and the dashboard is now required to be published to Tableau Server/Online/Public before the video plays.
Another aspect to consider when embedding web pages in Tableau dashboards is using the mobile version of the page, when available. Otherwise, many web pages tend to show all the extraneous headers and footers, which may make the page look odd or out of place.
One current limitation is if you have multiple URLs and want to direct them to different web page objects in your dashboard, you cannot. You also cannot choose to open the web page in a new window if you have a web page object in your dashboard.