The hardest part of learning about flying robots is the constant crashing. From learning flight control for the first time, to testing new hardware or flight algorithms, the resulting failures can have a huge cost in terms of broken hardware components. To avoid such costs, a simulated air vehicle designed and developed for ROS is ideal.
A simulated quadrotor UAV for the ROS Gazebo environment has been developed by Team Hector of Technische Universität Darmstadt. This quadrotor, called Hector Quadrotor, is enclosed in the hector_quadrotor metapackage. This metapackage contains the URDF description for the quadrotor UAV, its flight controllers, and launch files for running the quadrotor simulation in Gazebo.
Advanced use of the Hector Quadrotor simulation allows the user to record sensor data such as Lidar, depth camera, and so on. The quadrotor simulation can also be used to test flight algorithms and control approaches in simulation.
The hector_quadrotor metapackage contains the following key packages:
hector_quadrotor_description: This package provides a URDF model of the Hector Quadrotor UAV and the quadrotor configured with various sensors. Several URDF quadrotor models exist in this package, each configured with specific sensors and controllers.hector_quadrotor_gazebo: This package contains launch files for executing Gazebo and spawning one or more Hector Quadrotors.hector_quadrotor_gazebo_plugins: This package contains four UAV specific plugins:- The simple controller
gazebo_quadrotor_simple_controllersubscribes to acmd_veltopic and calculates the required forces and torques - A sensor plugin
gazebo_ros_barosimulates a barometric altimeter - The plugins
gazebo_quadrotor_propulsionandgazebo_quadrotor_aerodynamicssimulate the propulsion, aerodynamics, and drag from messages containing motor voltages and wind vector input
- The simple controller
hector_quadrotor_controllers: This package provides a library and a node for controlling a quadrotor usingros_control.hector_quadrotor_controller_gazebo: This package implements theros_controlRobotHWSiminterface for the quadrotor controller.hector_quadrotor_model: This package provides libraries used to model several aspects of quadrotor dynamics.hector_quadrotor_teleop: This package provides a node and launch files for controlling a quadrotor using a joystick or gamepad.hector_quadrotor_demo: This package provides sample launch files that run the Gazebo quadrotor simulation andhector_slamfor indoor and outdoor scenarios.
The entire list of packages for the hector_quadrotor metapackage is given in the next section.
The repository for the hector_quadrotor software can be found at: https://github.com/tu-darmstadt-ros-pkg/hector_quadrotor.
At the time this chapter is being revised, the hector_quadrotor software is in a development release for ROS Kinetic. The instructions for installing this release are provided here, but you should check the GitHub repository identified in the preceding paragraph to determine whether a Debian package has been created. If it has, you can use the apt-get command to install it on your system. Otherwise, install the Kinetic development release of hector_quadrotor in your catkin workspace using the following commands:
$ cd ~/catkin_ws/src
$ wstool init hector https://raw.github.com/tu-darmstadt-ros-pkg/hector_quadrotor/kinetic-devel/tutorials.rosinstall
$ wstool update
Prior to performing a catkin_make on your workspace, you will need to install the geographic_msgs package:
$ sudo apt-get install ros-kinetic-geographic-msgs
Then proceed with:
$ cd ~/catkin_ws
$ catkin_make
A large number of ROS packages are downloaded with the hector_quadrotor metapackage, including the metapackages for hector_slam, hector_localization, hector_gazebo, and hector_models. Within these metapackages, this installation downloads the following packages:
hector_components_descriptionhector_compressed_map_transporthector_gazebo_pluginshector_gazebo_thermal_camerahector_gazebo_worldshector_geotiffhector_geotiff_pluginshector_imu_attitude_to_tfhector_imu_toolshector_map_serverhector_map_toolshector_mappinghector_marker_drawinghector_nav_msgshector_pose_estimationhector_pose_estimation_corehector_quadrotor_actionshector_quadrotor_controller_gazebohector_quadrotor_controllershector_quadrotor_demohector_quadrotor_descriptionhector_quadrotor_gazebohector_quadrotor_gazebo_pluginshector_quadrotor_interfacehector_quadrotor_modelhector_quadrotor_pose_estimationhector_quadrotor_teleophector_sensors_descriptionhector_sensors_gazebohector_slam_launchhector_trajectory_serverhector_uav_msgshector_xacro_toolsmessage_to_tf
A number of these packages will be discussed as the Hector Quadrotor simulations are described in the next section.
Two demonstration tutorials are available to provide simulated applications of the Hector Quadrotor for both outdoor and indoor environments. These simulations are described in the next sections.
Before you begin the Hector Quadrotor simulations, check your ROS Master using the following command in your terminal window:
$ echo $ROS_MASTER_URI
If this variable is set to localhost or the IP address of your computer, no action is needed. If not, type the following command:
$ export ROS_MASTER_URI=http://localhost:11311
The preceding command should be typed into every new terminal window that is opened, or it can also be added to your .bashrc file. In the .bashrc file, delete or comment out (with a #) any other commands setting the ROS_MASTER_URI variable.
The quadrotor outdoor flight demo software is included as part of the hector_quadrotor metapackage. Start the simulation by typing the following command:
$ roslaunch hector_quadrotor_demo outdoor_flight_gazebo.launch
This launch file loads a rolling landscape environment into the Gazebo simulation and spawns a model of the Hector Quadrotor configured with a Hokuyo UTM-30LX sensor. An rviz node is also started and configured specifically for the quadrotor outdoor flight. A large number of flight positions and control parameters are initialized and loaded into the Parameter Server.
Note that the quadrotor propulsion model parameters for the quadrotor_propulsion plugin and quadrotor drag model parameters for the quadrotor_aerodynamics plugin are displayed. Then, look for the four Enabled messages:
Enabled wrench output
Enabled attitude output
Enabled yaw rate output
Enabled thrust output
The following screenshots show both the Gazebo and rviz display windows when the Hector outdoor flight simulation is launched:

Hector Quadrotor outdoor Gazebo view

Hector Quadrotor outdoor rviz view
The view from the onboard camera can be seen in the lower-left corner of the rviz window. If you do not see the camera image on your rviz screen, be sure that Camera has been added to your Displays panel on the left and the checkbox has been checked. If you would like to pilot the quadrotor using the camera, it is best to uncheck the checkboxes for tf and robot_model because the visualizations sometimes block the view. The quadrotor appears on the ground in the simulation and it is ready for takeoff. Its forward direction is marked by a red mark on its leading motor mount. To fly the quadrotor, you should launch the joystick controller software for the Xbox 360 controller. In a second terminal window, launch the joystick controller software with a launch file from the hector_quadrotor_teleop package:
$ roslaunch hector_quadrotor_teleop xbox_controller.launch
This launch file launches the joy node to process all joystick input from the left stick and right stick on the Xbox 360 controller, as shown in the following figure. The message published by joy node contains the current state of the joystick axes and buttons. The teleop node subscribes to these messages and publishes messages on the topic /command/twist. These messages provide the velocity and direction for the quadrotor flight.
Several other joystick controllers are currently supported by the ROS joy package, including PS3 and Logitech devices. For this launch, the joystick device is accessed as /dev/input/js0 and is initialized with a deadzone value of 0.050000. Parameters to set the joystick buttons and axes are as follows:
* /teleop/go_button: 6
* /teleop/slow_button: 4
* /teleop/stop_button: 2
* /teleop/thrust_axis: -3
* /teleop/x_axis: 5
* /teleop/y_axis: 4
* /teleop/yaw_axis: 1
* /teleop/z_axis: 2
These parameters map to the left stick and the right stick controls and buttons on the Xbox 360 controller shown in the following diagram. The directions of the sticks' controls are as follows:
- Left stick:
- Forward (Up) is ascend
- Backward (Down) is descend
- Right is rotate clockwise
- Left is rotate counterclockwise
- Right stick:
- Forward (Up) is fly forward
- Backward (Down) is fly backward
- Right is fly right
- Left is fly left

Xbox 360 joystick controls for Hector
To begin your flight, press and release the Go Button indicated in the previous figure. Now, use the joystick to fly around the simulated outdoor environment. Pressing and holding the Slow Button will cause the quadrotor's speed to decrease to 20 percent.
The pilot's view can be seen in the Camera image view at the bottom-left of the rviz screen.
Within ROS, a clearer understanding of the interactions between the active nodes and topics can be obtained using the rqt_graph tool. The following diagram depicts all currently active nodes (except debug nodes) enclosed in oval shapes. These nodes publish to the topics enclosed in rectangles that are pointed to by arrows:

ROS nodes and topics for Hector Quadrotor outdoor flight demo
The command rostopic list will provide a long list of the topics currently being published. Other command-line tools such as rosnode, rosmsg, rosparam, and rosservice will help gather specific information about Hector Quadrotor's operation.
To understand the orientation of the quadrotor on the screen, use the Gazebo GUI to show the vehicle's tf reference frame. Select quadrotor in the World panel on the left, and then select the Translation mode on the top Environment toolbar (looks like crossed double-headed arrows). This selection will bring up the red-green-blue axis for the x-y-z of the tf frame. In the following figure, the x axis is pointing to the left, the y axis is pointing to the right (toward the reader), and the z axis is pointing up:

Hector Quadrotor tf reference frame
A YouTube video of a hector_quadrotor outdoor scenario demo shows the hector_quadrotor in Gazebo operated with a gamepad controller. You can find the video at: https://www.youtube.com/watch?v=9CGIcc0jeuI.
The quadrotor indoor SLAM demo software is included as part of the hector_quadrotor metapackage. To launch the simulation, type the following command:
$ roslaunch hector_quadrotor_demo indoor_slam_gazebo.launch
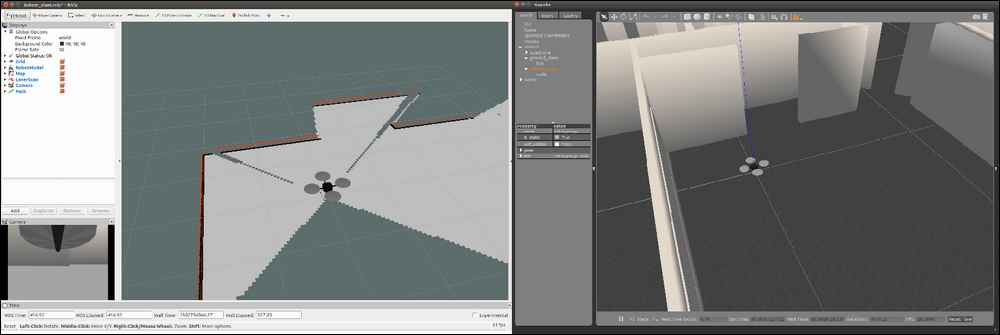
The following screenshots show both the rviz and Gazebo display windows when the Hector indoor simulation is launched:

Hector Quadrotor indoor rviz and Gazebo views
If you do not see this image for Gazebo, roll your mouse wheel to zoom out of the image. Then, you will need to rotate the scene to a top-down view in order to find the quadrotor. Click on the icon on the top Environment toolbar to Change the View Angle, then select the top icon View from the top.
The environment was the offices at Willow Garage and Hector starts out on the floor of one of the interior rooms. Just as in the outdoor demo, the xbox_controller.launch file from the hector_quadrotor_teleop package should be executed:
$ roslaunch hector_quadrotor_teleop xbox_controller.launch
If the quadrotor becomes embedded in the wall, waiting a few seconds should release it and it should (hopefully) end up in an upright position ready to fly again. If you lose sight of it, zoom out from the Gazebo screen and look from a top-down view. Remember that the Gazebo physics engine is applying minor environment conditions as well. This can create some drifting out of its position.
The rqt graph of the active nodes and topics during the Hector indoor SLAM demo is shown in the following figure. As Hector is flown around the office environment, the hector_mapping node will be performing SLAM and creating a map of the environment:

ROS nodes and topics for Hector Quadrotor indoor SLAM demo
The following screenshot shows Hector Quadrotor mapping an interior room of Willow Garage:
Hector mapping indoors using SLAM
The 3D robot trajectory is tracked by the hector_trajectory_server node and can be shown in rviz. The map, along with the trajectory information, can be saved to a GeoTIFF, file with the following command:
$ rostopic pub syscommand std_msgs/String "savegeotiff"
To find the map, use the roscd command:
$ roscd hector_geotiff/maps
In this directory, there will be two parts of the map, labeled hector_slam_map. One file will be a .tfw format and the other a .tif format. The .tfw file is a text file that stores the X and Y pixel size, rotational information and world coordinates for the map that is stored in the .tif file. The .tif file contains the TIFF image of the map.
A YouTube video of hector_quadrotor stack indoor SLAM (https://www.youtube.com/watch?v=IJbJbcZVY28) demo shows the hector_quadrotor in Gazebo operated with a gamepad controller.
Now, we will take a look at real quadrotors. For this chapter, we evaluated the entire spectrum of quadrotors that interface with ROS and were available at the time. At the bottom of the price range, the Crazyflie was an easy pick, due to its small size and the advantage of flying it indoors. The small motors cause the propellers to spin at a high RPM, but the propellers are soft and compliant. Because the vehicle is lightweight, damage to property, people, or the vehicle itself is usually minimal. In addition, replacement parts are inexpensive.