
The rqt tools (ROS Qt GUI toolkit) that are part of ROS allow graphical representations of ROS nodes, topics, messages, and other information. The ROS wiki lists many of the possible tools that are added to the rqt screen as plugins: http://wiki.ros.org/rqt/Plugins.
The ROS tutorial on the topics also describes some of the features of the rqt tool is at: http://wiki.ros.org/ROS/Tutorials/UnderstandingTopics.
One of the common uses of rqt is to view the nodes and topics that are active. Bring the TurtleBot up with the minimal launch as previously described. Then, on the remote computer, issue the following command:
$ rqt_graph
Select the top-left box, Nodes/Topics (all). The following screenshot of rqt_graph shows the nodes that are active and the connections between the publishers and subscribers that deal with moving the base of the TurtleBot. Pass the cursor over the various items to see the nodes and topics and see how they communicate:

rqt_graph after minimal launch of TurtleBot
On the menu bar at the top of the screen, keep the dead sinks, leaf topics, and debug topics hidden to simplify the graph. Take a look at the preceding graph; the names, such as mobile_base, are called namespaces to identify the items. Ellipses (ovals) represent nodes while arrows represent connections through topics. The names in the rectangles represent topics.
For example, the /mobile_base_nodelet_manager node publishes on the /joint_states and /diagnostics topics.
After the minimal launch, the keyboard_teleop.launch command is issued in a separate terminal window, as described earlier. Issue the following command:
$ roslaunch turtlebot_teleop keyboard_teleop.launch
One of the screen outputs shows the name of the node that the turtlebot_teleop package is using, as follows:
NODES
  /turtlebot_teleop_keyboard (turtlebot_teleop/turtlebot_teleop_key)
The following screenshot portion shows selected nodes and topic after the launch of keyboard_teleop.launch. As shown in the following screenshot, a new turtlebot_teleop_keyboard node has appeared, publishing on the /cmd_vel_mux/input/teleop topic:
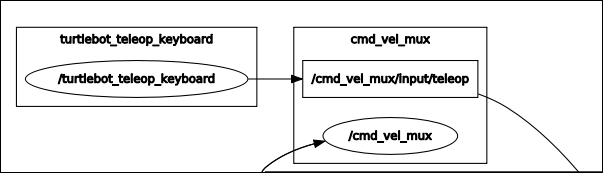
rqt_graph after TurtleBot teleoperation
To list all the active nodes, the rosnode list command, on the remote computer, can be issued. For details on a particular node, such as /turtlebot_teleop_keyboard, type the following command:
$ rosnode info /turtlebot_teleop_keyboard
The output is as follows:
--------------------------------------------------------------------------------
Node [/turtlebot_teleop_keyboard]
Publications:
 * /rosout [rosgraph_msgs/Log]
 * /cmd_vel_mux/input/teleop [geometry_msgs/Twist]
Subscriptions: None
Services:
 * /turtlebot_teleop_keyboard/get_loggers
 * /turtlebot_teleop_keyboard/set_logger_level

contacting node http://192.168.11.139:34375/ ...
Pid: 8593
Connections:
 * topic: /cmd_vel_mux/input/teleop
    * to: /mobile_base_nodelet_manager
    * direction: outbound
    * transport: TCPROS
 * topic: /rosout
    * to: /rosout
    * direction: outbound
    * transport: TCPROS
From the keyboard, the messages of the geometry_msgs/Twist type are sent when you press a key that moves TurtleBot as indicated by the node's publications.
There are a number of variations of the rqt command with options. The simplest command is as follows:
$ rqt
This brings up a display screen, as shown in the following screenshot. In the menu bar, there are drop-down menu items that allow you to make choices to perform the following steps:
- Select the Plugins tab that will be displayed; in our screenshot, the Message Publisher and Topic Monitor options were chosen from the Plugins tab.
- Select the topics or other information for your plugins.
- Rearrange the screen to suit your preferences if you choose more than one plugin.
The rqt command and the drop-down menu selections are shown in the following screenshot:
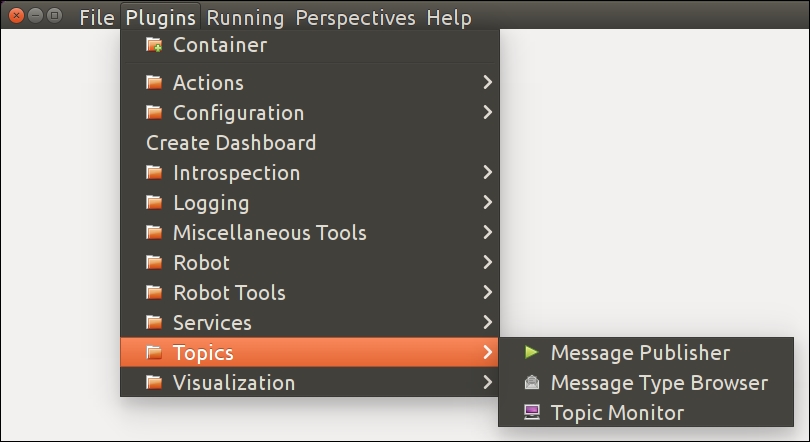
rqt command initial screen with plugin selections
For the following screenshot of rqt, the selections are made in the following order:
- Issue the
rqtcommand. - From the Plugins tab, select Message Publisher under the Topics tab.
- From the Plugins tab, select Topic Monitor under the Topics tab.
- Choose to publish the
Twistmessage to/cmd_vel_muxand see the message monitored. - Rearrange the plugins on the screen for convenient viewing:

Two rqt plugins to publish and monitor messages
Specifically, in the Topic entry box, type /cmd_vel_mux/input/teleop and click on the + button to add the topic. Left-click to check the topic's checkbox and right-click to expand the parameters of the message to see the angular and linear parameters of the Twist message. Note that the rate variable has been set to 10.00 from its original value of 1.00 so that the TurtleBot can move smoothly. When you click on the linear x or angular z variable, you can change the parameter under the column titled expression. Changing the values from 0.0 will cause the TurtleBot to move because the message will be published.
The result shows the Message Publisher and the Topic Monitor with the /cmd_vel_mux/input/teleop topic selected. From the geometry_msgs package, the Twist message will be sent to the TurtleBot to move the robot.
From the screenshot showing the drop-down menu, it is clear that there are many options associated with the rqt tools. View the tutorials and try various options to experience the power of the rqt tools to allow you to control and monitor your robot's activities. One use is for debugging your scripts if the TurtleBot does not respond as expected, because you can monitor the messages sent to the TurtleBot.