
Chapter 10: Exploring User Interfaces and User/Robot Interactions
The automation of user interfaces (UIs) is one of the most important automation topics and is most frequently used in today's automation world. UI elements are the building blocks of the UI (for example, windows, text fields, buttons, drop-down menus, checkboxes, and text boxes). Your robot should be capable of communicating with the UI elements easily to perform actions such as clicking, typing inputs, and reading output values to achieve a perfect automation solution.
As part of this chapter, you will understand various techniques to interact with UI elements faster and more easily. You will learn about recorders and see how to efficiently use them for faster automation. You will also learn about some advanced UI automation, such as image and text automation. Finally, you will learn more about input and output actions, and explore various useful methods for effective automation.
This chapter consists of the following sections:
- Introducing UI interactions
- Recording the graphical user interface
- Advanced UI automation
- Input actions and methods
- Output actions and methods
Technical requirements
This chapter requires you to have UiPath Studio and Robot installed, along with a basic understanding of Studio UIs, variables, data types, control flows, and data manipulation. You can refer to Chapters 5 to 9 to gain all the required knowledge.
Introducing UI interactions
The graphical user interface (GUI) is made up of various graphical objects, such as windows, text fields, buttons, dropdowns, checkboxes, text boxes, tables, and URLs. UiPath can seamlessly interact with most types of desktop and web applications as it has deep integration with major GUI frameworks, such as HTML, Java, .NET, and SAP. GUI automation interacts with these GUI objects by clicking, typing, selecting, checking values, copying data, and pasting data using various UiPath activities. The interaction of the UiPath robots exactly replicates the human interaction in a logical, faster, and error-free way as instructed by the RPA developer who designs or develops the process workflows or automation projects.
Foreground versus background automation
Foreground processes are run by attended robots and are usually performed under human supervision. The Robot uses foreground activities to interact with the GUI elements. Background processes are performed by unattended robots in a dedicated machine that uses background activities. You need to use the appropriate activities to achieve efficient UI automation and, for that, let's explore the key UiPath UI Automation elements in UiPath Studio as follows:
- Activities: This instructs the Robot to perform actions on the GUI bases on the type of activities selected, configured inputs, properties of activities, and output generated by the GUI. As a prerequisite, you need to ensure the UiPath.UIAutomation.Activities dependency package is available by default in the Dependencies node. In case the package is not available or has been removed by mistake, you need to install the same package from Manage Packages. We will explore more about the key activities in the upcoming sections, as shown in Figure 10.1:
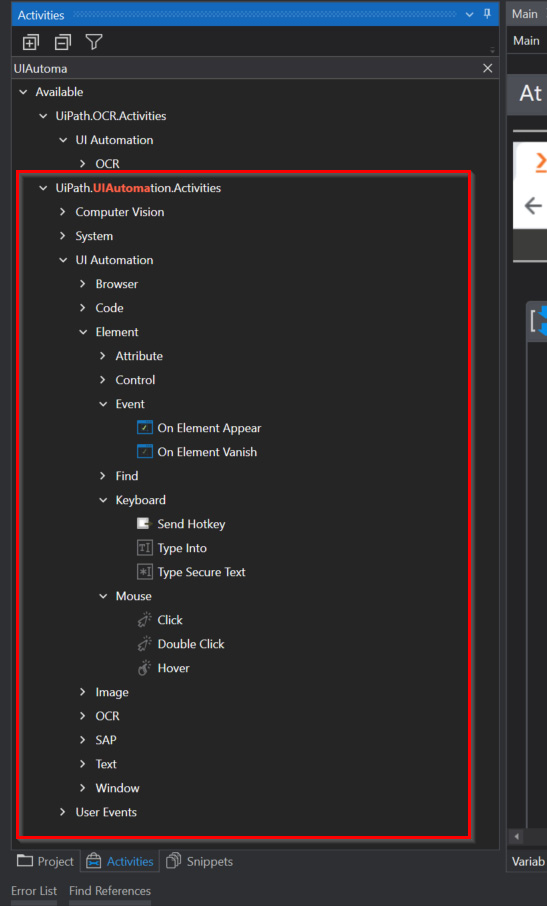
Figure 10.1 – Key UI Automation activities
- Recording: This enables the RPA developer to capture the step-by-step process and all the key interaction with the GUI elements, and convert them into a sequencing workflow in UiPath Studio for developing UI automation much faster, as shown in the following figure:
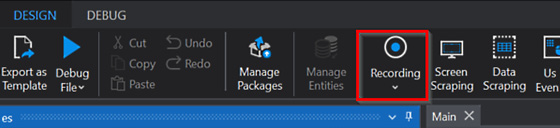
Figure 10.2 – Recording
- Target: This instructs the robot on which UI elements need to be actioned based on the Target properties configured, as shown in Figure 10.3. The most important element is Selector, which we have already discussed in Chapter 8, Exploring UiPath Selectors.
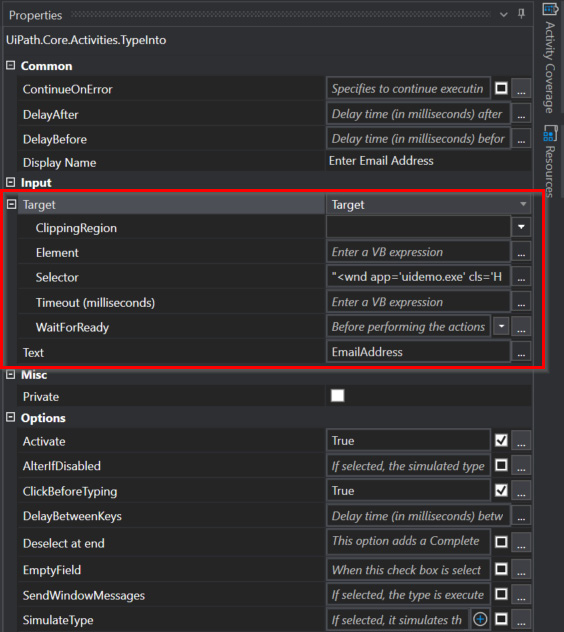
Figure 10.3 – Targeting methods
- Input and Output: These are important features in UiPath to decide the type of UI automation you are developing, such as foreground or background automation. You will be enabling SendWindowsMessages or SimulateType, as shown in Figure 10.4. These options are selected if your automation needs to run in the background without any human intervention:
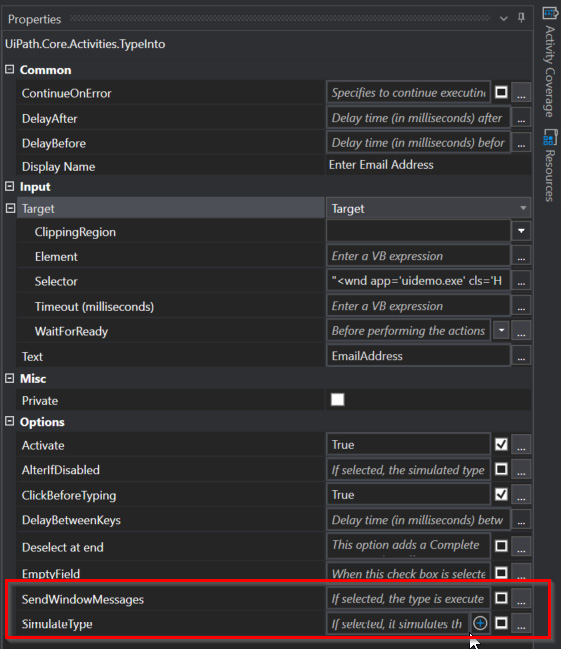
Figure 10.4 – Input and output methods
Activities
UI Automation activities are used to develop tasks or workflows for the robot to communicate with the GUI of several applications. Activities are essentially classified into four different types. These are shown in Figure 10.5:
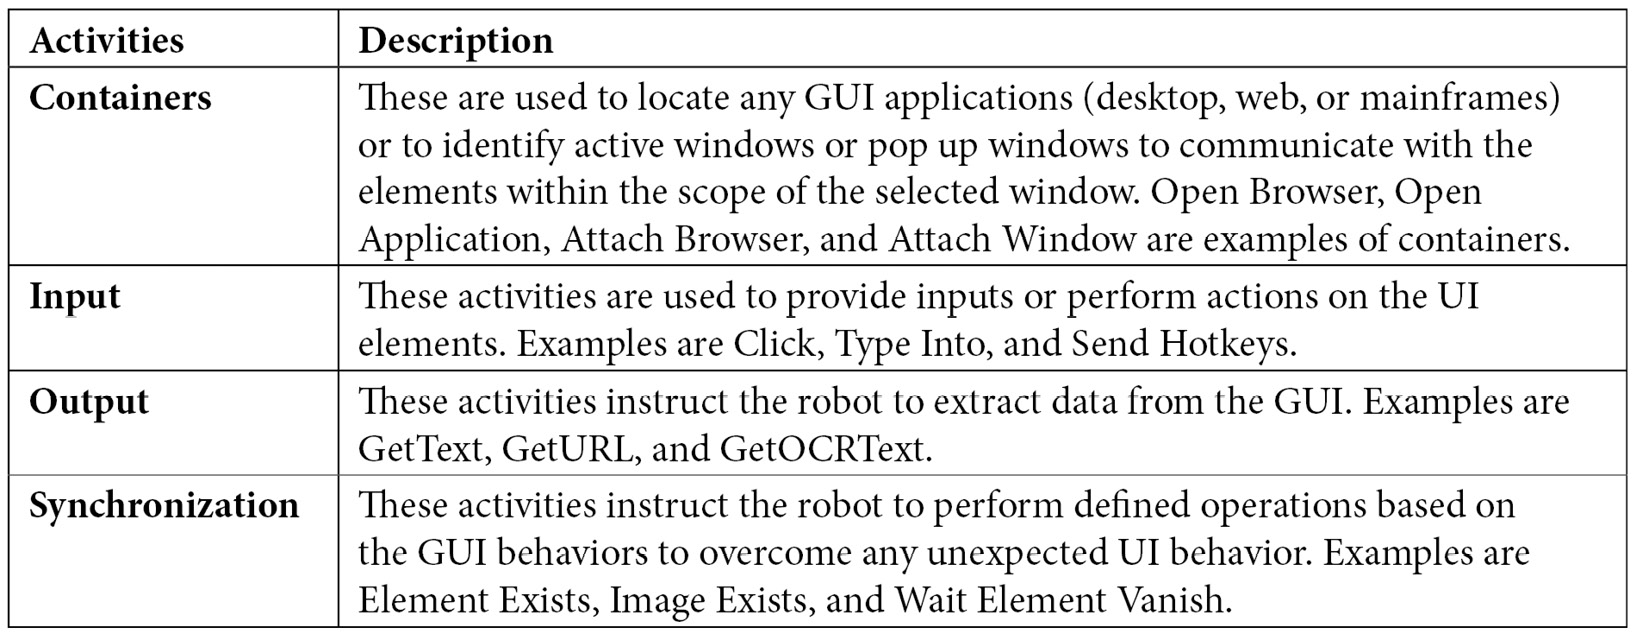
Figure 10.5 – Types of UI Automation activities
Properties
The properties of the activity decide how the robot will interact with the GUI based on the activity used. The different properties options can be found in the Properties panel section, usually displayed by default on the right-hand side of UiPath Studio. Let's explore some key properties used in GUI automation as follows:
- DelayAfter and DelayBefore: Instructs the robot to wait for a specified time in milliseconds before or after performing the activity. The default amount of delay time for DelayAfter is 300 milliseconds, and the wait time for DelayBefore is 200 milliseconds. You may increase or decrease the delay time depending on the responses of the UI element.
- ContinueOnError: Instructs the robot to wait for a specified time in milliseconds before or after performing the activity. By default, ContinueOnError is False, which means the remaining activities will not be executed in case of any errors or exceptions. You may select this as True if you want to continue with the execution despite an application exception.
- ClippingRegion: Used to target a specific region using coordinates such as Left, Right, Top, and Bottom. The values in the clipping regions are blank by default. You may input the values of the coordinates if available.
- SendWindowMessages: Sends specific messages to the target application and can run in the background, but it is not the fastest option and is not compatible with all desktop applications. By default, the SendWindowMessages checkbox is not selected.
- SimulateType and SimulateClick: Sends specific messages to the target application and can run in the background; this is the fastest option and compatible with all desktop applications. By default, the SimulateType or SimulateClick checkbox is not selected.
- Target: Helps the robot in different ways to identify target elements by providing inputs in the form of selectors, fuzzy selectors, images, or anchors. Selector is a commonly used method to identify elements; it's a key property for the robot to identify the target element using an XML fragment that has several attributes to locate the unique target element.
- Output: Used to store the output of the activity using variables or arguments to be used within the project. By default, the Output field will be empty. You may create a variable within the field to store the output generated in the selected activity.
Let's explore an example using https://www.packtpub.com/ to apply a few of the UI Automation activities and properties learned so far to ensure that we can communicate with the web application. I can see a Free 7 Day Trial page at this URL while writing this lesson. If you do not find the same, you can use any other similar pages. In this example, you will be accessing a web application and interacting with the web elements to provide input, and access the data from the web page:
- Launch https://www.packtpub.com/.
- Click on the Start 7-day FREE trial button, as shown in Figure 10.6:

Figure 10.6 – Packtpub free trial access
- The next page shows the Account details section, which we are going to automate, as shown in Figure 10.7:
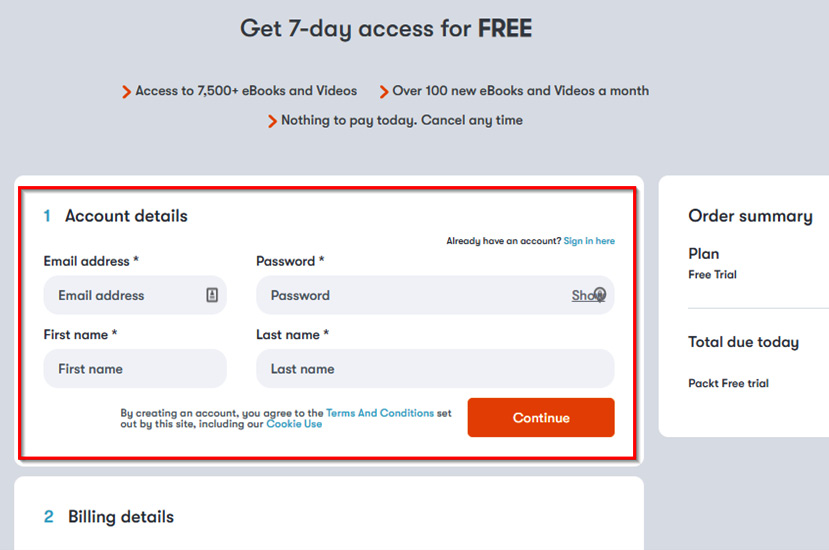
Figure 10.7 – Packtpub free trial registration
- Apply the following steps to launch UiPath, and create a Sequence workflow for handling data in the Account details section, as shown in Figure 10.8:
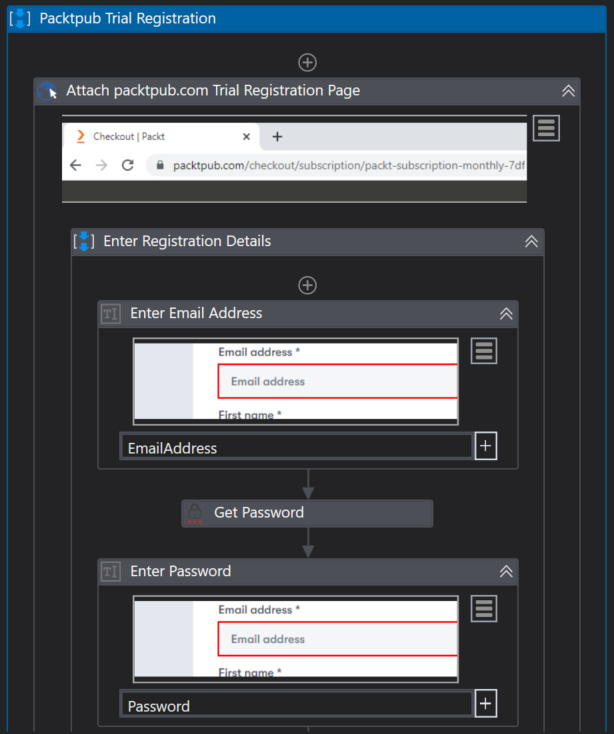
Figure 10.8 – Enter the email address and password
- Launch UiPath Studio.
- Create a new Sequence and name it Packtpub Trial Registration.
- Create the EmailAddress, Password, FirstName, LastName, and TermsAndConditions variables of the String type, and add default values for EmailAddress, FirstName, and LastName, as shown in the Figure 10.9:
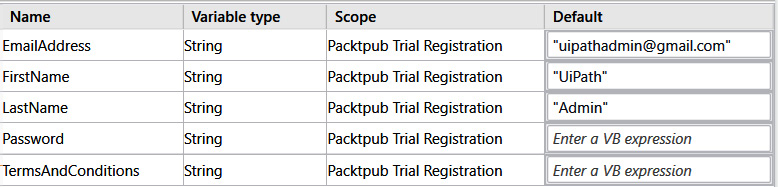
Figure 10.9 – Variable definitions
- Drag and drop the Attach Browser activity and connect to the Packtpub Trial Registration page by using the Indicate option.
- Drag and drop the Sequence activity into the Attach Browser activity and name it Enter Registration Details.
- Drag and drop the Type into activity into Enter Registration Details and name it as Enter Email Address. In the text field of the properties, use the EmailAddress variable.
- Drag and drop the Get Password activity into Enter Registration Details and type your password in the Password field of Properties. Use the Password variable in the Result field of Properties to save the secured password, as shown in Figure 10.10:
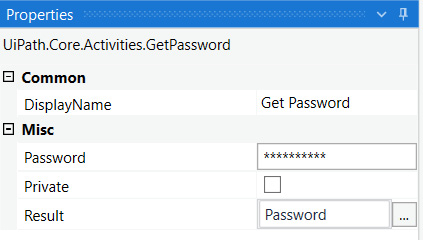
Figure 10.10 – Password properties
- Drag and drop the Type into activity into Enter Registration Details, and name it Enter Password. In the text field of the properties, use the Password variable.
- Enter First name and Last name using the Type into activity and extract the TermsAndConditions text using the Get Text activity, as shown in Figure 10.11:
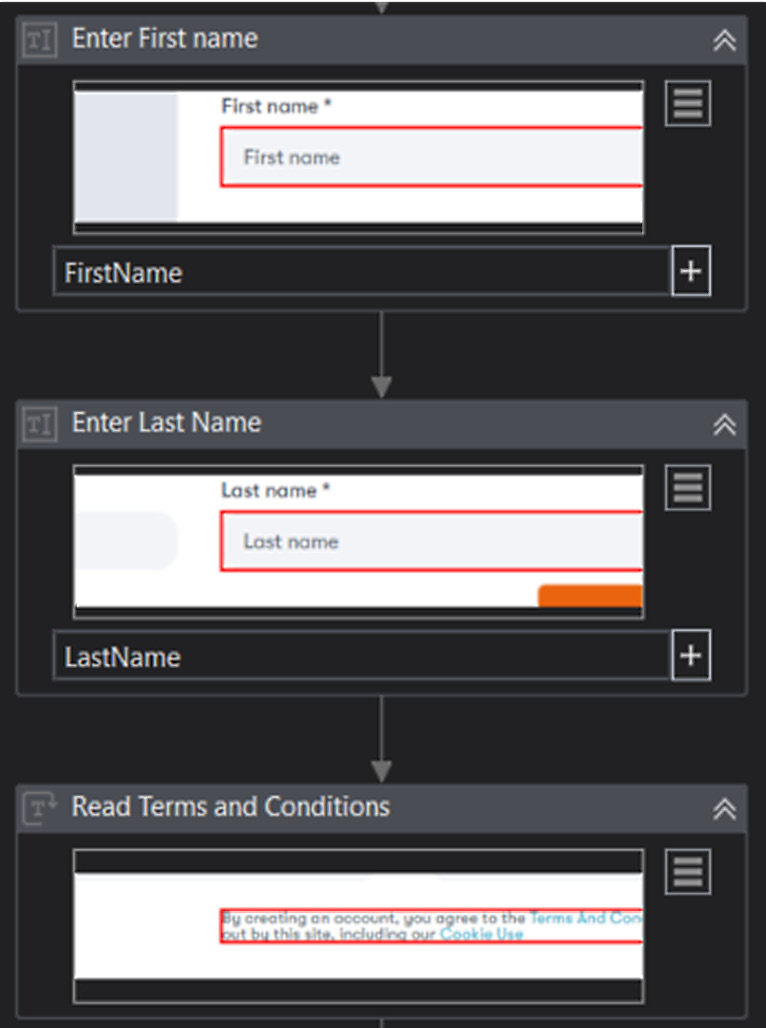
Figure 10.11 – Enter First Name, Enter Last Name, and Read Terms and Conditions text
- Drag and drop the Element Exists activity into Enter Registration Details, and name it Check the Continue Button Exists. In the Output field of the properties, create a ContinueAvailable variable. Next, drag and drop the Write Line activity to output the value of the ContinueAvailable variable, as shown in Figure 10.12.
- Check for the availability of the Continue Button and write the output using the Element Exists and Write Line activities, as shown in Figure 10.12:
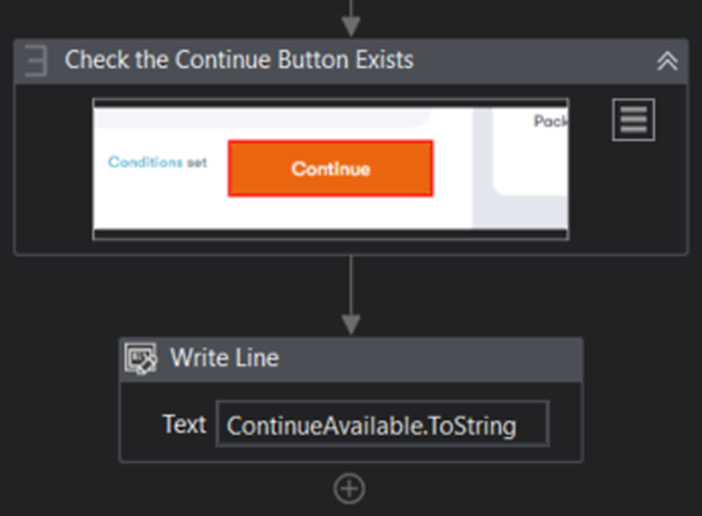
Figure 10.12 – Checking for the availability of the Continue button
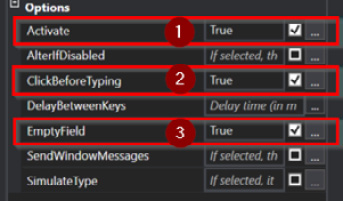
Figure 10.13 – Enabling Type Into options
- Run the process to find the robot, navigate to the Account details page, and enter the account details as per your input data, as shown in Figure 10.14:
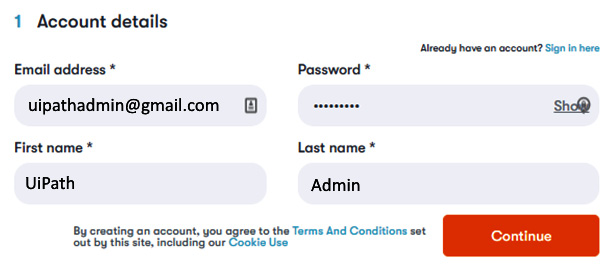
Figure 10.14 – Checking the output on the Packtpub page
- Verify the output in the Output panel to ensure the TermsAndConditions text has been extracted from the web page and the Continue button is available as shown in Figure 10.15:
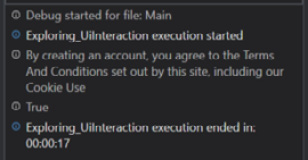
Figure 10.15 – Checking the output in UiPath Studio
In this section, we have seen how the robot interacts with a web page to read and write data. We have also seen how the robot interacts with the GUI using automation activities and properties to automate a web application. You have been introduced to the different types of activities and properties you need to be aware of while doing GUI automation. We have also used the activities and properties in an example to understand their functionality better. You will understand more about the different recording options available, and input and output methods in the upcoming sections, which will help you to perform the development faster and perform background automation.
Methods of recording the GUI
Recording is one of the important features in UiPath Studio, and allows users to capture the actions performed on the screen and convert them into sequences; this saves a lot of time and effort in automating business processes. To start recording, you need to access the DESIGN (1) panel and click on Recording (2), which will display all the available recording options (3), as shown in Figure 10.16:
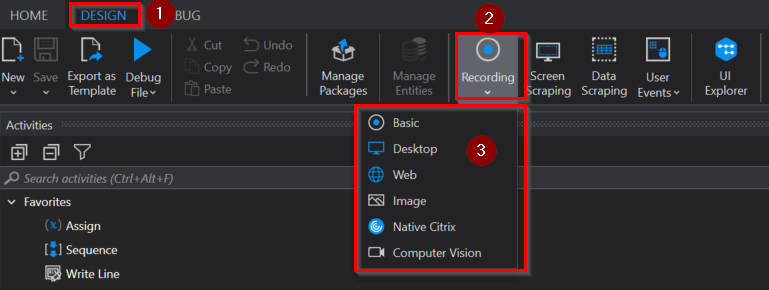
Figure 10.16 – Different recording options
There are six types of recordings: Basic, Desktop, Web, Image, Native Citrix, and Computer Vision. However, we will be exploring only the first three types (Basic, Desktop, and Web), as those are the most commonly used options and are more relevant for the RPA Associate certification.
Basic
Basic generates a full selector for each activity but does not create a container for the activities. This is better suited for creating linear sequences within a container and can be used for recording both web applications and desktop applications but is the slowest of all recorders.
Let's use the same example of the Packtpub web page to read and write data used in the previous section, but this time using the Basic recording:
- Create a new sequence and name it Recordings.
- Click on Recording (1) and then on Basic (2), as shown in Figure 10.17:
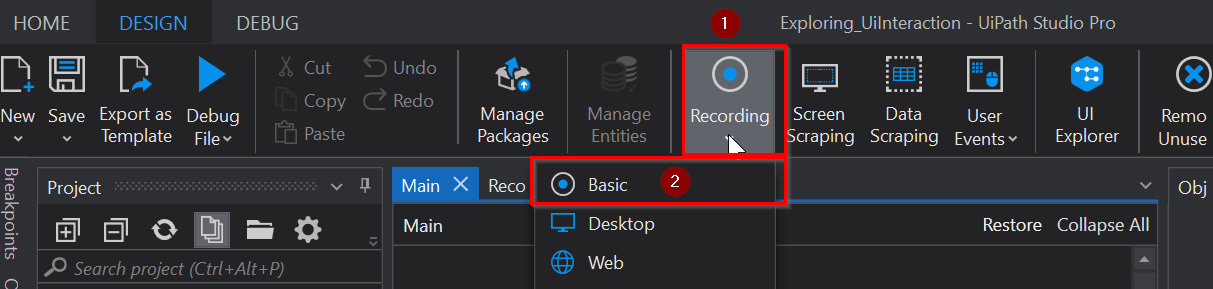
Figure 10.17 – Launching Basic recording
- The Basic Recording panel is displayed with different options and you are able to perform the following actions, as shown in Figure 10.18.
- Record a series of actions or events (such as launch an application, click on a menu, and type into a field), using the Record option (1). For this, you need to click on the Record button and perform all the required actions, and stop the recording by pressing the Esc key once your actions are completed. Perform step-by-step recording (such as launching the application using Start App, clicking on a menu using Click, and typing into the text field using Type) using the different recording tools (2) or you can perform combinations of both options 1 and 2. Press the Esc key to stop recording once you have completed all your actions.
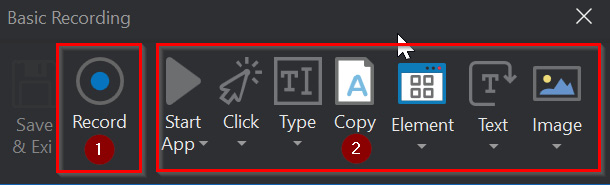
Figure 10.18 – Starting a basic recording
- Click on the Record button from the previous screen to record the elements from the Account details section of the Subscription page at https://www.packtpub.com/, in the order of elements numbered as shown in Figure 10.19:
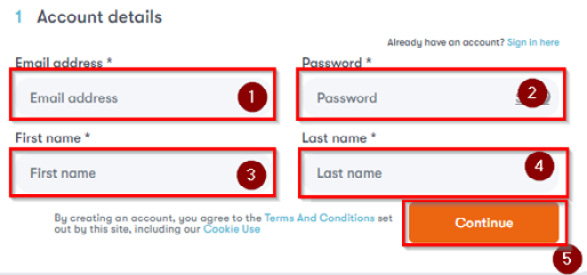
Figure 10.19 – Packtpub Account details section
- Press the Esc button on the keyboard or right-click on the mouse to stop recording, and once the recording has been completed, you will find the following, where you can see the option to save your recording or to start a new recording using the various recording options:
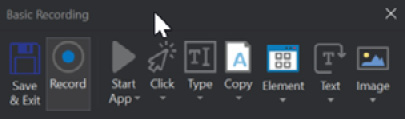
Figure 10.20 – Basic Recording tool
- Click on the Save & Exit button for the recorded activities to be saved to the workflow and to exit from Basic Recording:
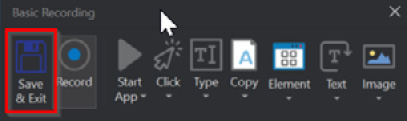
Figure 10.21 – Basic Recording Save & Exit
- Verify whether the username and password were generated from the recording, as shown in Figure 10.22:
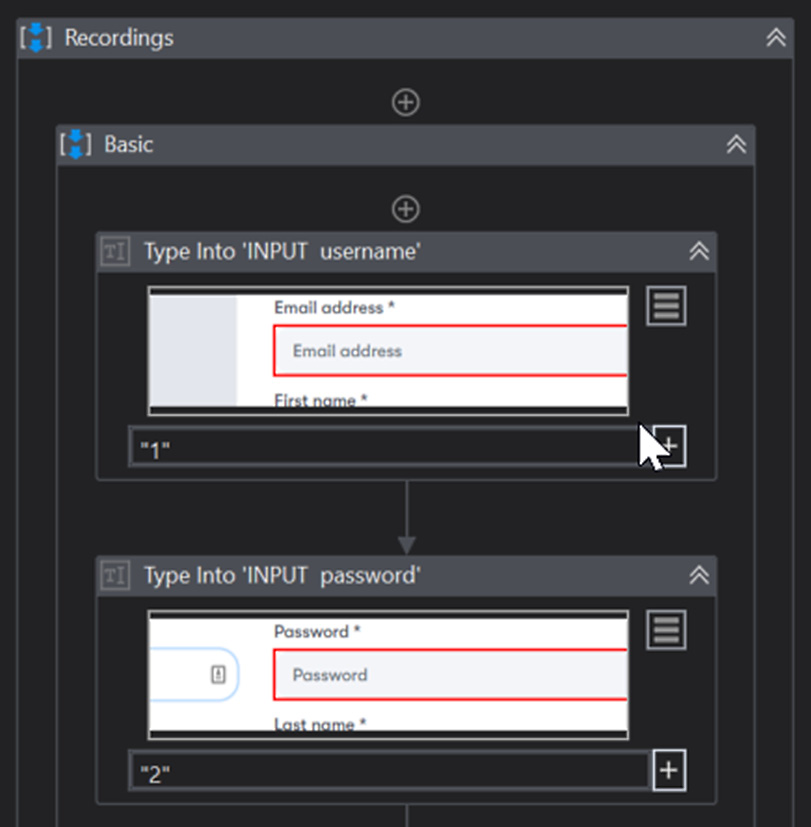
Figure 10.22 – Workflow verification of username and password
- Verify whether First name, Last name, and the Continue button were recorded, as shown in Figure 10.23:
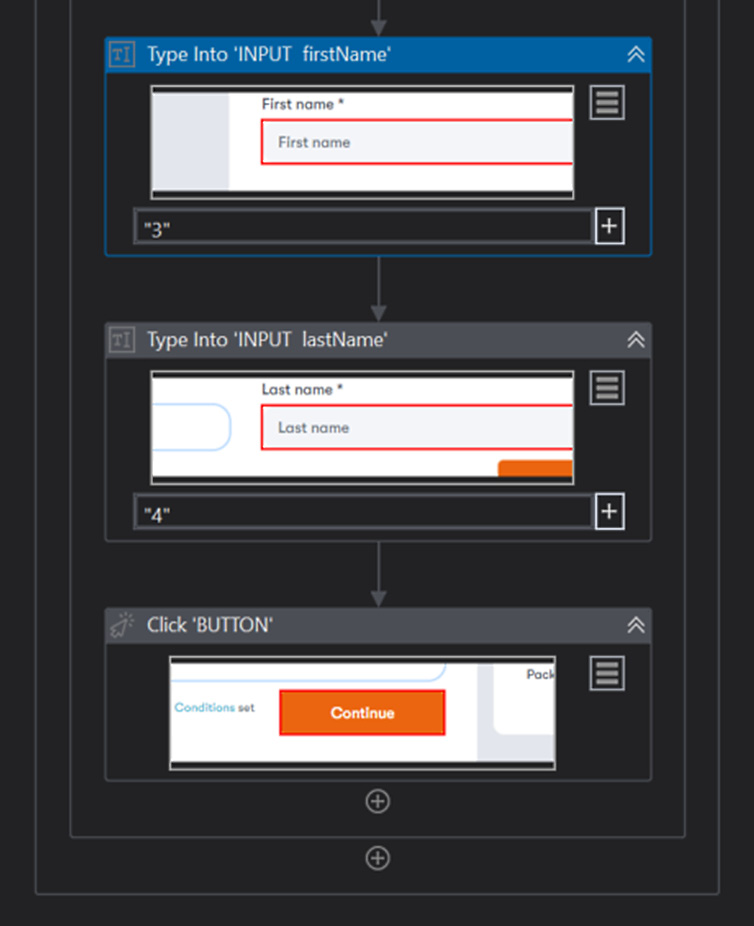
Figure 10.23 – Workflow verification, other recorded fields
- Click on the Options menu (1) and then click on Edit Selector (2) from one of the activities, as shown in Figure 10.24:
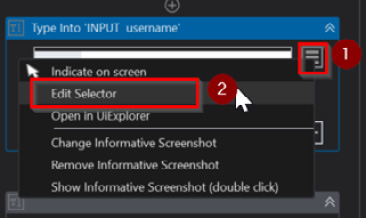
Figure 10.24 – Edit Selector menu option
- Verify the Edit Selector section to ensure that the full HTML fragment of the selector is displayed and editable. Also, verify the browser details displayed; this is the reason we call the Basic recording a full selector as shown in Figure 10.25. Note that the HTML fragment section is non-editable in partial selectors.
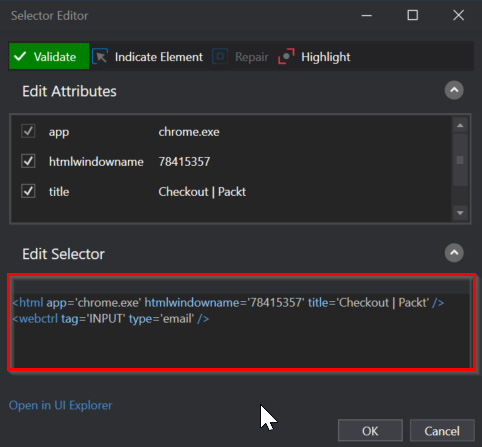
Figure 10.25 – Edit Selector – Full selector
- Note that even though it is recorded from a web application, there are no containers, such as Open Browser or Attach Browser, recorded within the Basic sequence, as shown in Figure 10.22.
Now, let's explore another example of basic recording, where the robot enters the text UiPath into Notepad. To perform that, follow these steps to generate the Basic sequence, as shown in Figure 10.26:
- Launch Notepad.
- Click on the Basic Recording option from UiPath Studio.
- Click on the Type option from the Basic Recording tool (2) as shown in Figure 10.18 during the recording and navigate the cursor to the Notepad.
- Type UiPath in Notepad.
- Press the Esc button to stop recording.
- Click on the Save & Exit button.
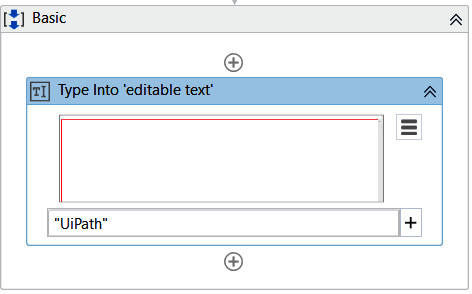
Figure 10.26 – Type into Notepad application (Basic recording)
- Click on the Options menu (1) and then click on Edit Selector (2) from one of the activities, as shown in Figure 10.27:
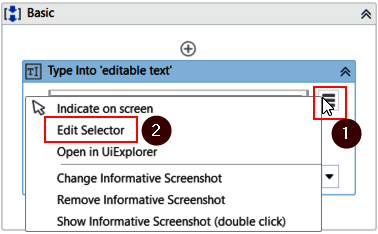
Figure 10.27 – Edit Selector
- Verify the Edit Selector box of the Type Into activity to ensure the HTML code generated follows the structure of a full selector, which means each and every attribute within the HTML tags is editable as shown in Figure 10.28:
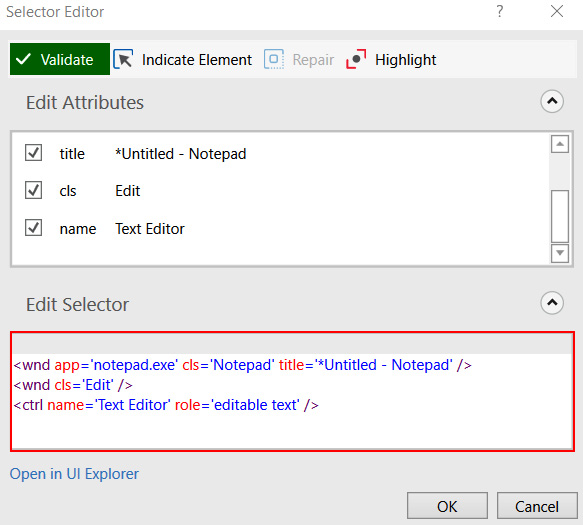
Figure 10.28 – Selector Editor view of a full selector (Type Into Notepad)
No matter whether it is a desktop applications or web-applications, the Basic recording generates full selectors, which means there are no separate containers generated, such as Attach Browser or Attach Window. Therefore, this recording is the slowest and most suitable for single activities within containers or for linear workflows.
Desktop
Desktop generates a partial selector for each activity and creates a container for the activities. This is better suited for automating desktop applications. This is faster than a Basic recording. Let's look at an example of automatically entering texts in to a notepad application:
- Create a new sequence and name it Desktop Recording.
- Click on the Recording button (1) and then Desktop (2), as shown in Figure 10.29:
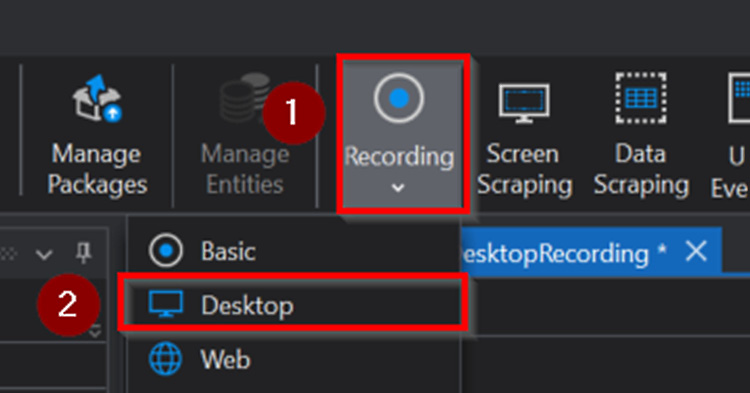
Figure 10.29 – Launching Desktop recording
- The Desktop Recording panel is displayed with the multiple recording options as shown in Figure 10.30. Refer Step 3 of Basic recording to understand more about the recording features:
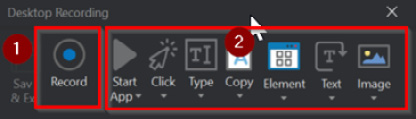
Figure 10.30 – Desktop Recording tool
- Launch a new Notepad application and click on the Record button. Then, type UiPath (1), click on the Format tab (2), change the font size to 55 (3), and finally, click OK (4), as shown in Figure 10.31:
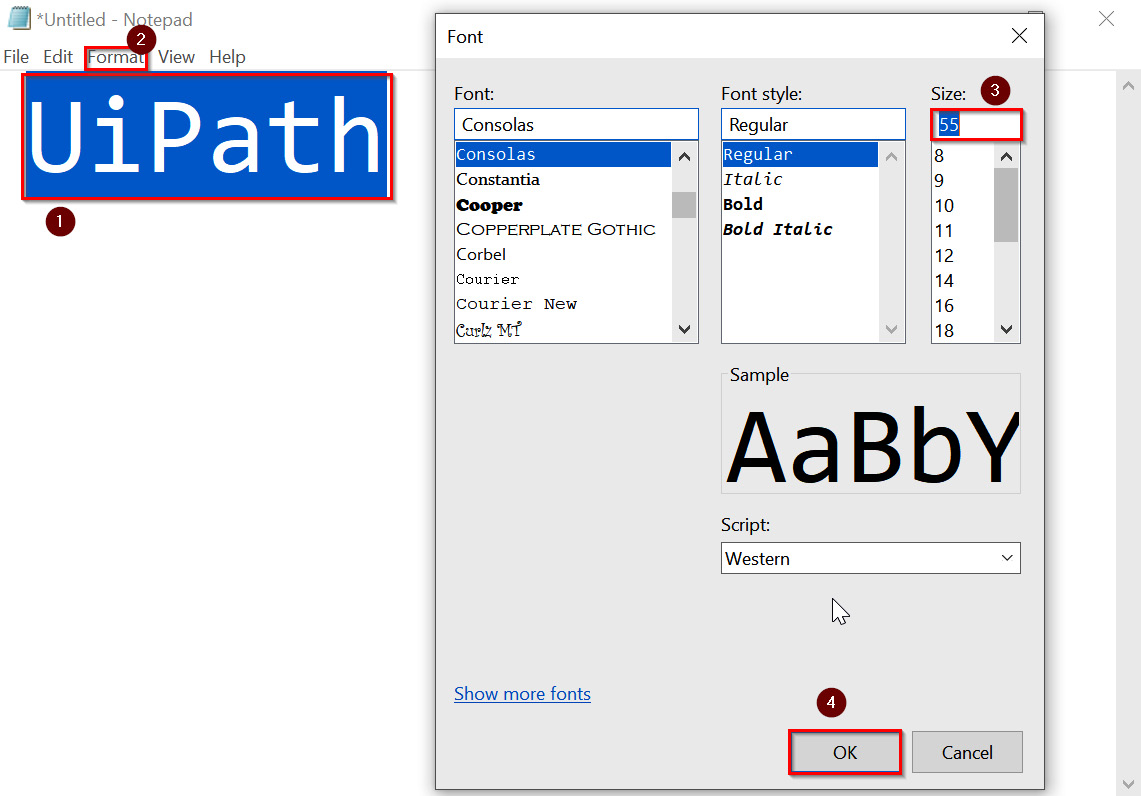
Figure 10.31 – Notepad during recording
- Press the Esc button on the keyboard once the recording has been completed to find the options to either save the recordings or to start new recordings, as shown in Figure 10.32:
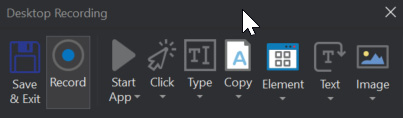
Figure 10.32 – Desktop Recording tool
- Click on the Save & Exit button for the recorded activities to be saved to the workflow, as shown in Figure 10.33:

Figure 10.33 – Save activities
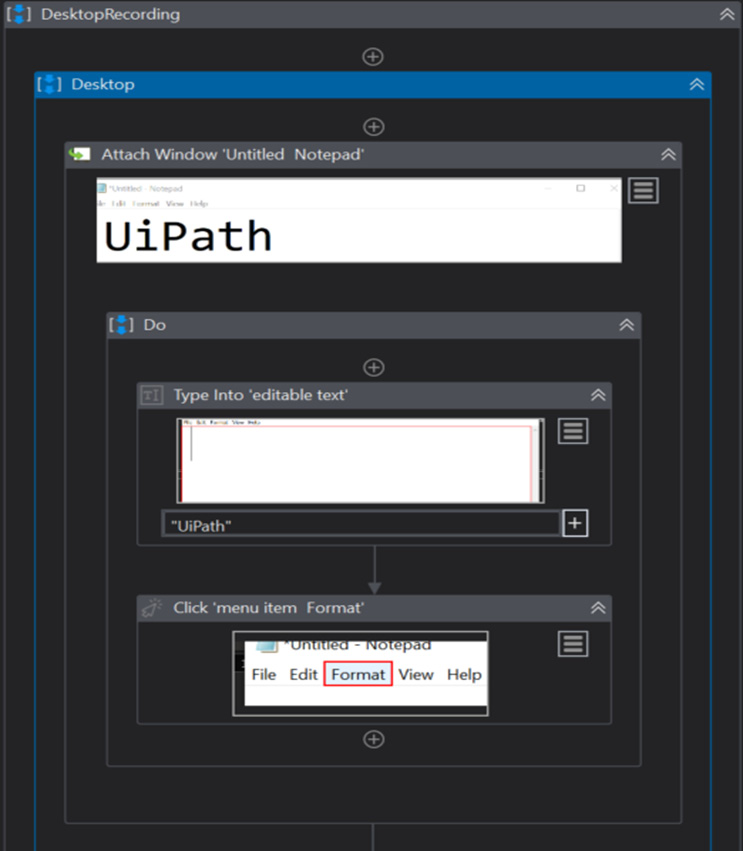
Figure 10.34 – Recorded activities verification
- Verify whether the Font… changes are recorded, as shown in Figure 10.35:

Figure 10.35 – Recorded activities verification continued
- Click on the Options menu (1), and then click on Edit Selector (2) from one of the activities, as shown in Figure 10.36:
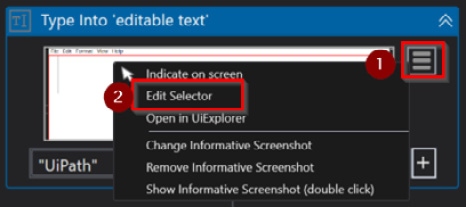
Figure 10.36 – Edit Selector
- Verify the Edit Selector section to ensure that the HTML fragment of the selector is displayed, and part of the HTML is non-editable, which is grayed out in the first line of the Edit Selector section. This is the reason we call the Desktop recording a partial selector, as shown in Figure 10.37:
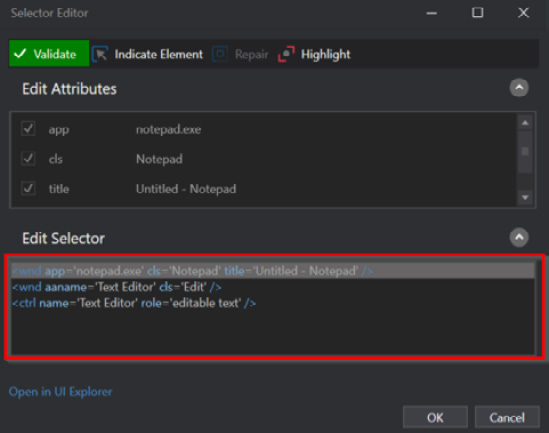
Figure 10.37 – Edit Selector
- Verify the recorded activities have containers, such as Attach Window or Use Application, to ensure the desktop recording supports containers, as shown in Figure 10.38:
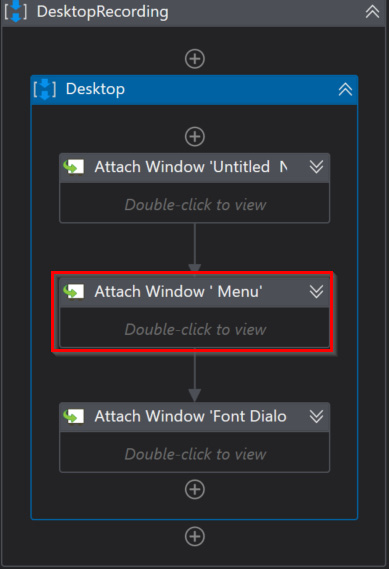
Figure 10.38 – Container verification
We have seen how to record desktop applications using Desktop recording and experienced how fast and easy it is to record every event.
Web
Web generates a partial selector for each activity and creates a container for the activities. This is better suited for automating web applications, and is faster than Basic recordings.
Let's see an example of automatically entering texts in to a notepad application with Web:
- Create a new sequence and name it Web_Recording.
- Click on the Recording button (1), and then click on Web (2), as shown in Figure 10.39:
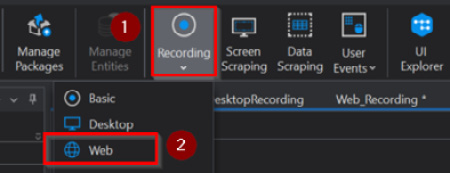
Figure 10.39 – Launching Web recording
- The Web Recording panel is displayed with multiple options, as shown in Figure 10.40. This is similar to the Basic recording from the earlier section except that Web Recording has the Open Browser option instead of the Open Application in the Basic recording.
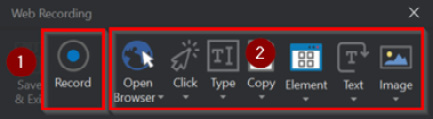
Figure 10.40 – Web Recording tool
- Click on Record as shown in the previous srceenshot to record the Account details sections from the Subscription page of https://www.packtpub.com/, and capture the elements in the order numbered in Figure 10.41:
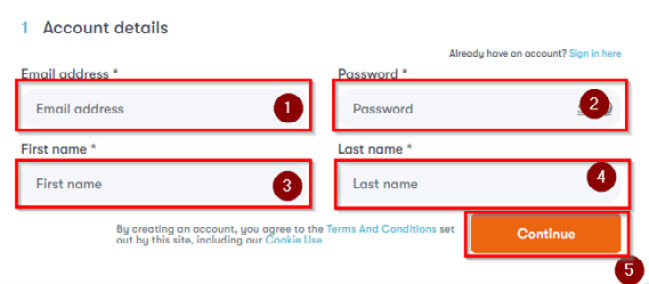
Figure 10.41 – Packtpub account details during recording
- While typing the password during the recording, a pop-up box is displayed, as shown in Figure 10.42, in which you need to perform the following:
- Type your secure password in Type the desired value (1).
- Check the Type password (2) option to enable secure text.
- Press the Enter key.
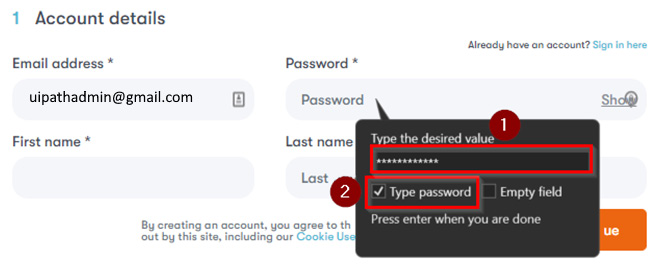
Figure 10.42 – Packtpub password during recording
- Press the Esc button on your keyboard once the recording has been completed to find the options to either save the recordings or to start new recordings, as shown in Figure 10.43:
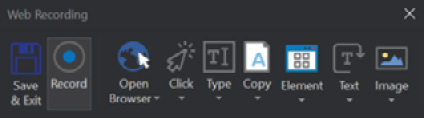
Figure 10.43 – Web Recording options
- Click on the Save & Exit button for the recorded activities to be saved to the workflow and to exit from Web Recording, as shown in Figure 10.44:
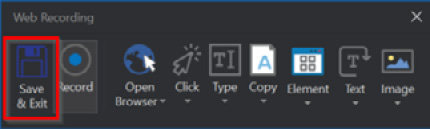
Figure 10.44 – Web Recording Save & Exit
- Verify whether the username and password are generated from the generated workflow, as shown in Figure 10.45:

Figure 10.45 – Web Recording activities verification
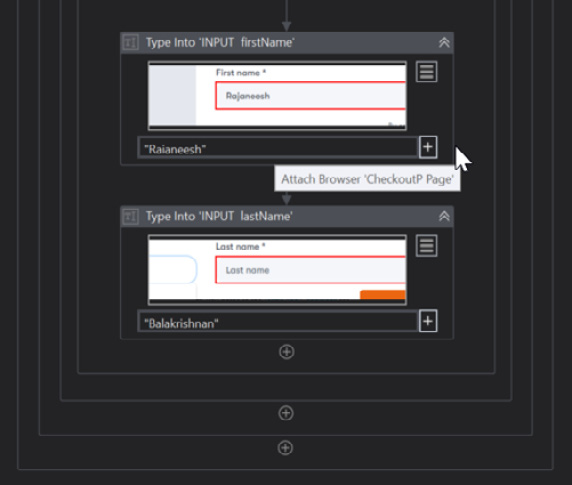
Figure 10.46 – Web Recording activities verification continued
- Click on the options menu (1) and then click on Edit Selector (2) from the activities, as shown in Figure 10.47:
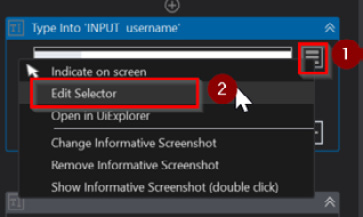
Figure 10.47 – Edit Selector
- Verify the Edit Selector section to ensure that the full HTML fragment of the selector is displayed, and part of the fragment is non-editable. This is the reason we call the Web recording a partial selector, as shown in Figure 10.48:
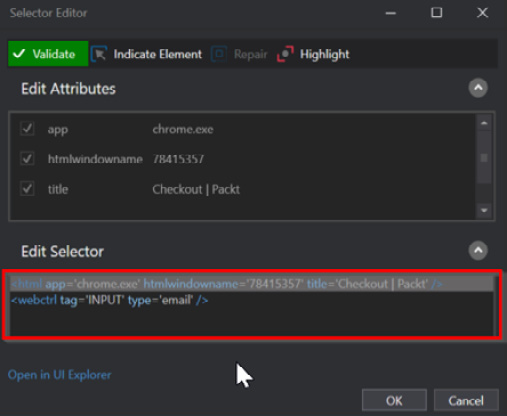
Figure 10.48 – Edit Selector
- Note this recording is the fastest and most suitable for web application recording. You will find activities such as Open Browser or Attach Browser are recorded within the Web Recording sequence, as shown in Figure 10.49:

Figure 10.49 – Container verification
We have seen how to record web applications using Web recording and experienced how fast and easy it is to record each event within a browser. We have also seen that Web recordings use a partial selector and is the fastest of all the recording options.
So far, we have seen the different recording options we have in UiPath and have explored some key recording concepts with examples. Now, you have a better idea of how to choose the correct recorder based on the given application being automated. We have come across different activities and properties and have applied them in our examples. In the next section, let's explore some more advanced recording options.
When to use which types of recording?
Let's discuss the different types of available recordings, their usage, advantages, and disadvantages, as shown in Figure 10.50:
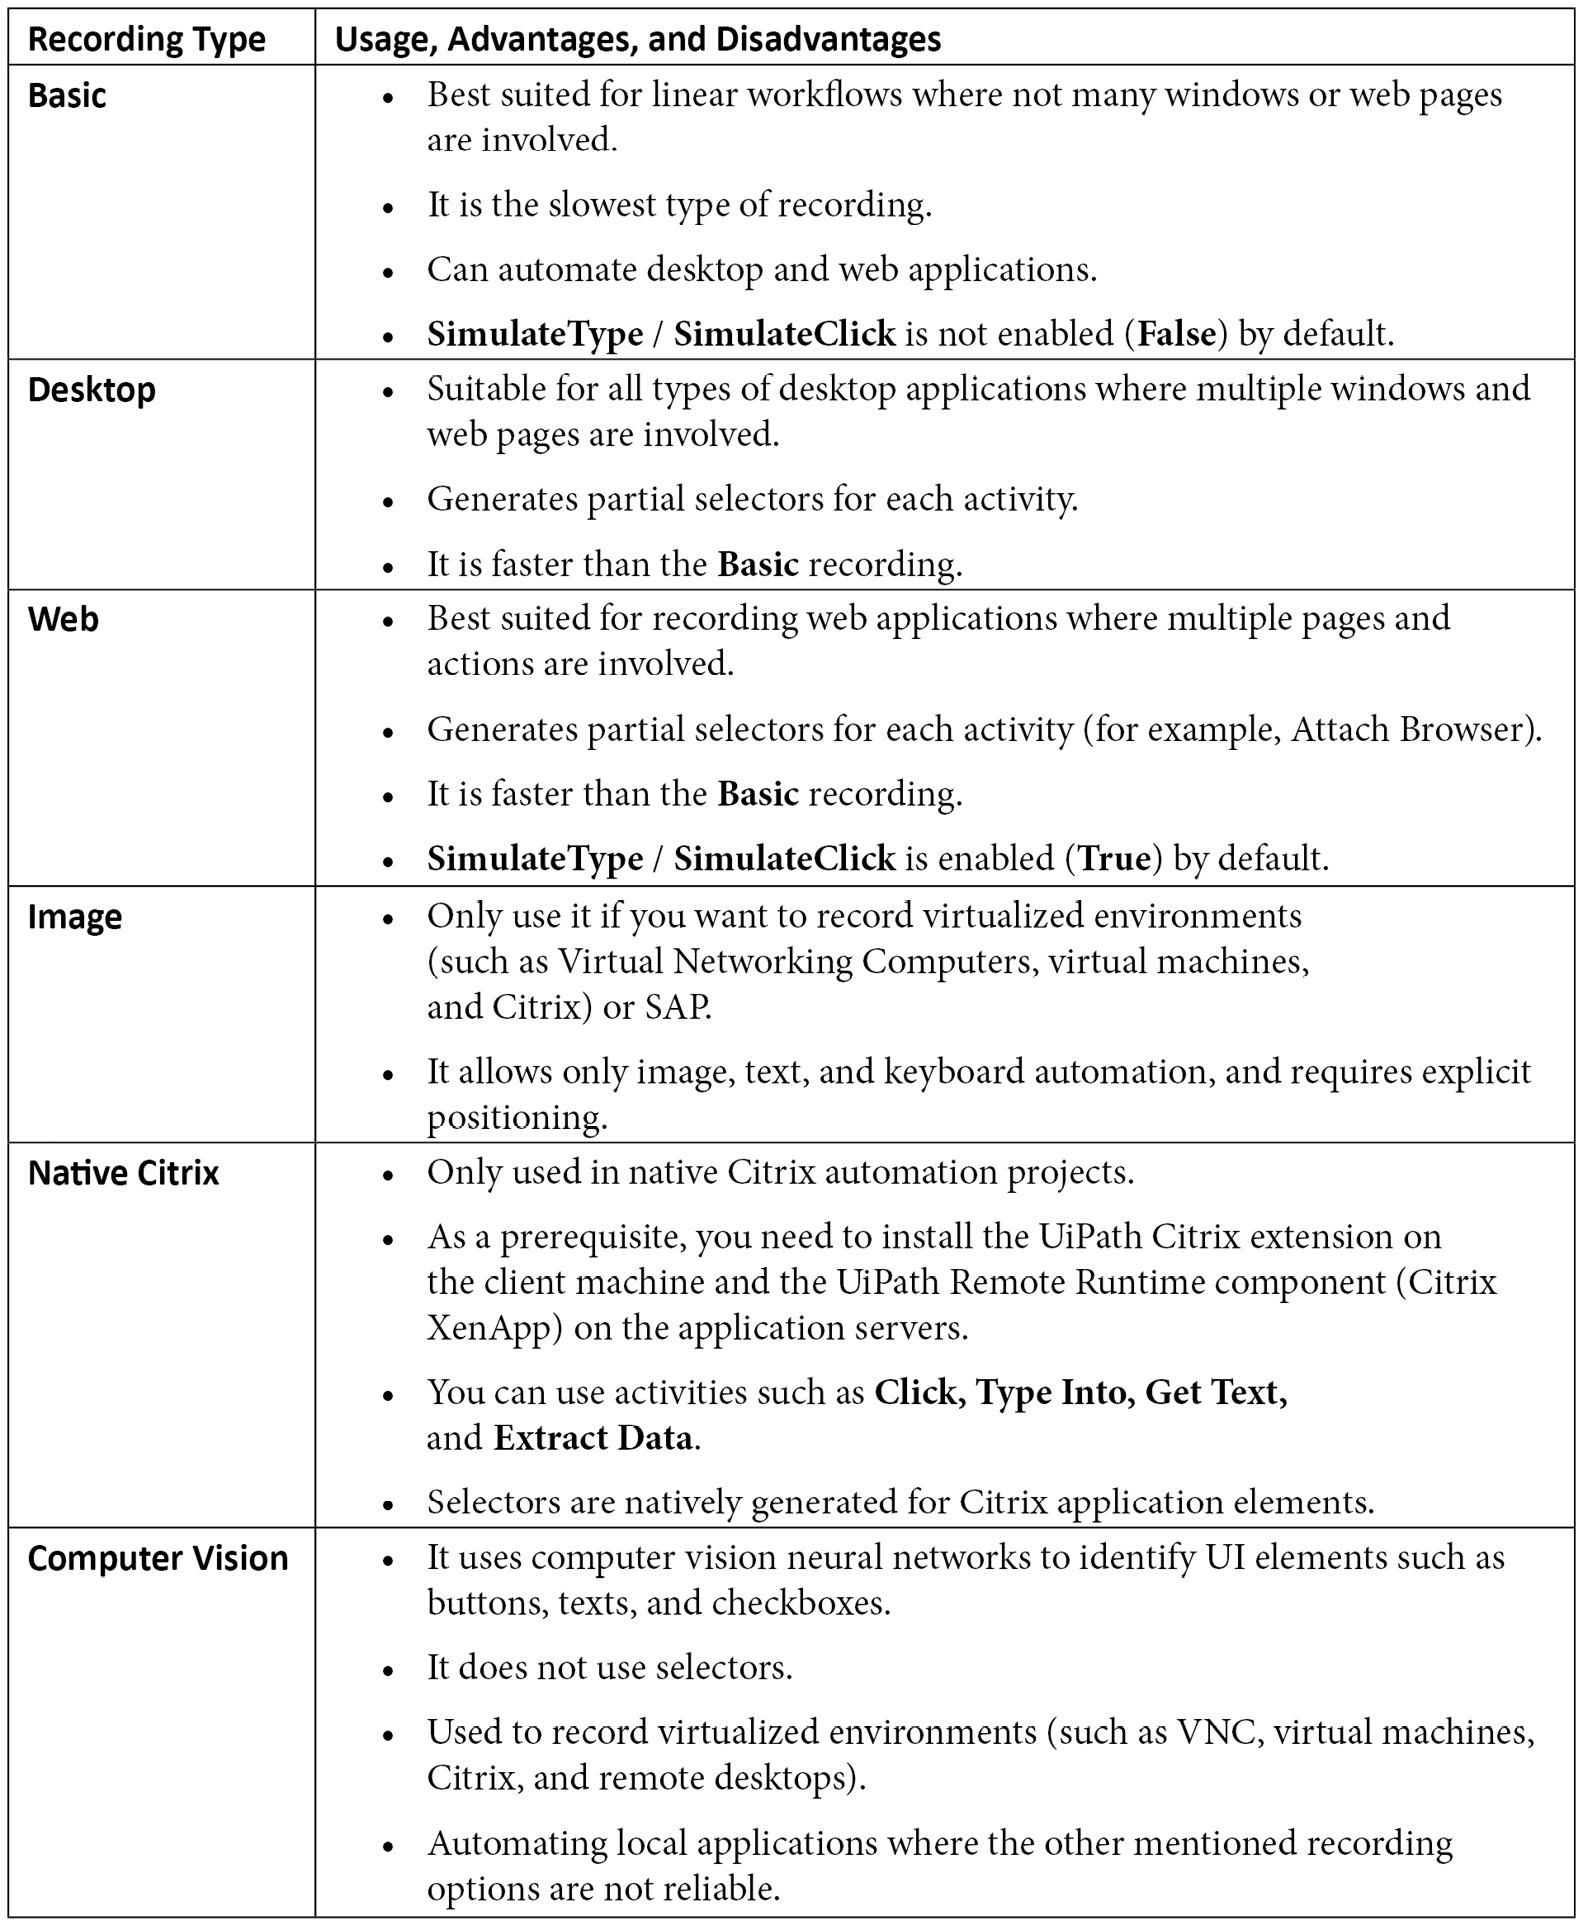
Figure 10.50 – Different types of recordings and their uses
This has provided us with better clarity about recordings and guided us to select the right recording tool for different situations.
Advanced UI Automation tools
Let's discuss a few advanced recording options available to automate complex GUIs, such as Citrix, SAP, and mainframes:
- Image: This recording is used to record images, text, and keyboard inputs, and is suitable for virtual environment automations such as VMs, Citrix, SAP, and mainframes. It captures the exact user interface position of the element and the value of the coordinates of elements to automate the GUI.
- Native Citrix: This recording is used to record images, text, and keyboard inputs, and is suitable for applications within the Citrix environment. It is like the desktop recorder, which can be used for recording different types of applications inside the Citrix environment.
- Computer Vision: This recording is mainly used to record images, text, and keyboard inputs, and is suitable for applications within the Citrix environment and Windows environment where any other previously discussed recording options failed to identify UI elements. It is a smart recorder that uses a built-in neural network to capture the UI element more accurately to overcome any selector inconsistency.
- Object repository: An advanced feature used to capture UI elements from applications and store them as reusable objects in the repository so that they can be used as and when required, or can be shared with other projects. These objects can be dragged and dropped from the object repository to the workflows for faster automation development, which is easily manageable, reusable, and reliable.
We have discussed a few advanced concepts and have seen how the GUIs such as Citrix, mainframes, and SAP can be automated using different tools and techniques. In the next section, we will explore a bit more about the input and output methods to develop a more efficient automation solution.
Input actions and methods
Automation requires certain properties to be configured to work seamlessly during the execution of the process. To perform either foreground or background automation, the input needs to be actioned in a GUI either directly by the user or by the robot. There are three types of input methods, which we will discuss now.
Default or hardware events
The default application mimics a mouse event or keyboard event using the hardware driver to communicate with the GUI. This is selected when SendWindowMessages and SimulateType are disabled by default, as shown in Figure 10.51. In the case of this event, the robot exactly mimics human actions, such as moving the cursor and clicking on a UI element. The UI elements need to be visible for this event to be successful.
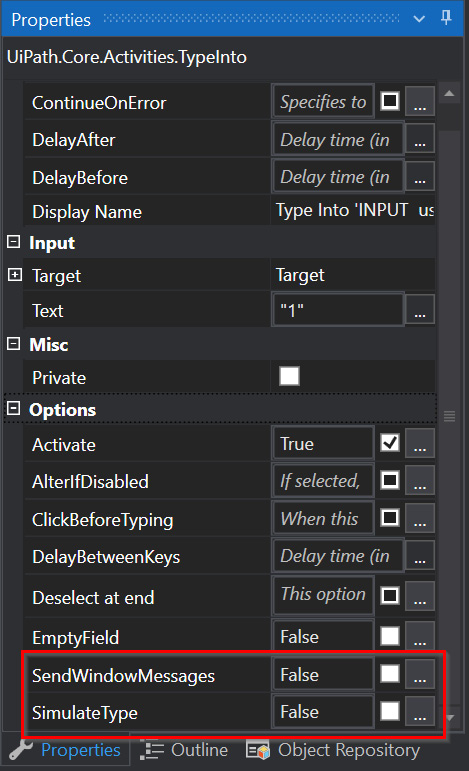
Figure 10.51 – Default method
The key characteristics of the default method are as follows:
- It is 100% compatible with all applications.
- It runs only in the foreground and no background execution is possible.
- The execution speed is generally slow and is only 50% of Simulate Type.
- This supports hotkeys by default.
- It does not auto-empty the input fields by default, which means it does not clear any existing values available in the input field that may include any spaces or previous executed input values.
SendWindowMessages
SendWindowMessages mimics a mouse event or keyboard event by sending a specific message directly to the GUI element. This can be activated when SendWindowMessages is selected in the Options section, as shown in Figure 10.52. The UI element does not need to be visible for this event to be successful as its work in the background.

Figure 10.52 – SendWindowMessages
The key characteristics of the SendWidowsMessages method are as follows:
- It is 80% compatible with all applications.
- It runs only in background execution.
- The execution speed is slightly better than the default and is around 50% of Simulate Type.
- This supports hotkeys by default.
- It does not auto-empty the input fields by default.
SimulateType
The SimulateType method mimics a mouse event or keyboard event by communicating using the API, which provides a set of functions that allows applications to access specific features or data from the target application and is the fastest of all three input methods. This is selected when the SimulateType method is selected in the Options section, as shown in Figure 10.53. It is compatible with both desktop and web applications, and the UI element does not need to be visible for this event to be successful as its works in the background.
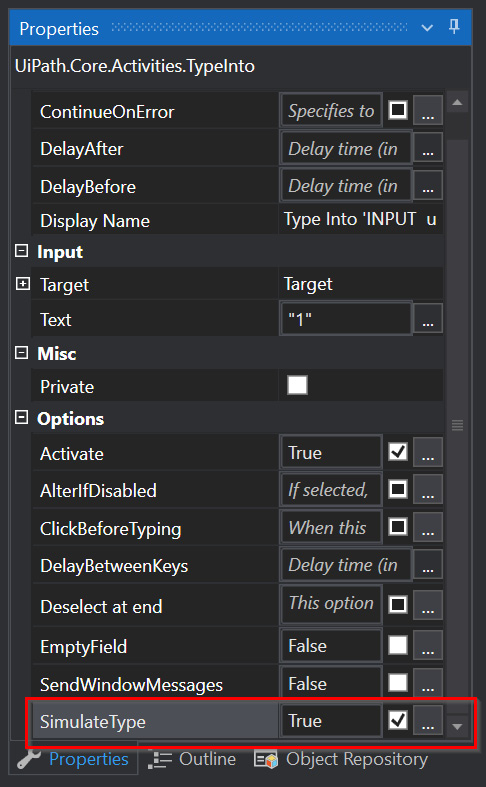
Figure 10.53 – SimulateType
The key characteristics of the SimulateType method are as follows:
- It is 99% compatible with web applications and 60% compatible with desktop applications.
- It runs in both foreground and background execution.
- The execution speed is the fastest of all three types of input actions.
- It does not support hotkeys by default.
- It auto-empties the input fields by default.
In this section, we have explored the different input methods and have seen how to use them in practical situations. In the next section, we will learn about output data extraction using output methods.
Output actions and methods
Automation requires certain screen scraping methods and scrape options to be configured to extract values from GUI elements, PDFs, or documents. There are three types of output methods, which we will discuss here.
FullText
FullText is the default output method and is the most frequently used. You need to follow the next steps to work with the FullText method:
- Click on Screen Scraping from the Design panel, as shown in Figure 10.54, which gives you a cursor to select the Target element:
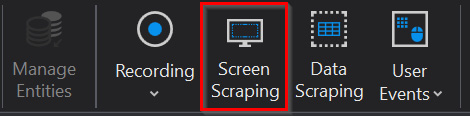
Figure 10.54 – Screen Scraping
- Click on the element to be extracted, which will open Screen Scraper Wizard, and then complete the following:
- Select FullText (1) for Scraping Method.
- Check Ignore Hidden (2) under Scrape Options to ignore any hidden texts.
- Click on the Refresh (3) button if there's any change in Scrape Options.
- Verify the output in Scrape Result Preview (4).
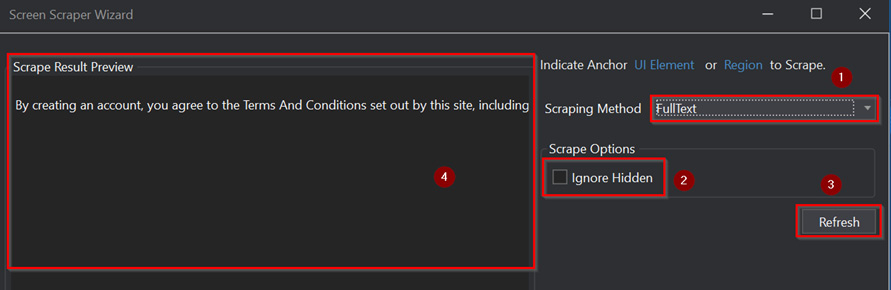
Figure 10.55 – Screen Scraping Wizard
The characteristics of the FullText scraping method are as follows:
- The fastest execution of all scraping methods.
- The accuracy of the method is 100%.
- It supports background execution.
- It does not extract text position.
- It can extract hidden text.
- It does not extract output from Citrix.
Native
The Native method is capable of extracting data from applications that are compatible with the graphics device interface (GDI) and Microsoft API, which are used for identifying graphical objects.
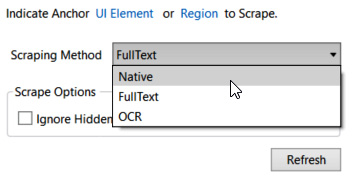
Figure 10.56 – Screen Scraping Wizard – Native
The characteristics of the Native scraping method are as follows:
- It has the fastest execution and the rate of speed is 80% of FullText.
- The accuracy of the method is 100%.
- It does not support background execution.
- It can extract text position.
- It cannot extract hidden text.
- It does not extract output from Citrix.
OCR
If the other two methods do not provide the desired results, then it is advisable to go for OCR. That extracts data from scanned documents or images and converts the inputs into machine-readable text. It is not 100% accurate and works with different types of applications. By default, OCR uses the Google Tesseract and Microsoft Modi OCR engines.
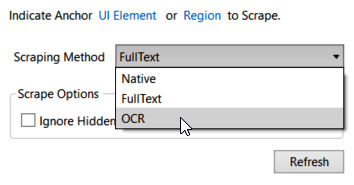
Figure 10.57 – Screen Scraping Wizard – OCR
The characteristics of the Native scraping method are as follows:
- It is the slowest of all three output methods and a rate of speed of 30% of FullText.
- The accuracy of the method is 98%.
- It does not support background execution.
- It can extract text position.
- It cannot extract hidden text.
- It can extract test outputs from Citrix.
In this section, we have explored the different output methods and have seen the applications of each method to use in extracting outputs from various applications.
Summary
We have explored everything about UI Automation interaction in this chapter: analyzed how to deal with different UI Automation activities, the different types of recording, and different types of input and output methods. We have explored more about activities and have performed a few projects to scrape data from web applications and desktop applications. We have also introduced some advanced UI Automation concepts, such as image and computer vision recording.
In the next chapter, you will be working with PDF automation, where you can implement the concept of UI interaction to retrieve data from PDFs using Get Full Text as well as OCR. You will be also implementing most of the activities, input, and output methods to deal with PDF data.