
Chapter 14: Invoice Processing – Dispatcher
Henry's Food Mart is a chain of convenience stores in the US with headquarters in New York, and there are currently 400+ stores located in the US. The invoice processing process has been selected for RPA automation as part of the larger project initiative conducted within Henry's Food Mart's finance and accounting department.
The objective of this process automation is linked to the project business case and is primarily intended to do the following:
- Deliver faster processing of the invoices.
- Reduce redundant activities in the invoice processing.
- Improve overall performance and reliability by eliminating errors.
The invoice processing process reads through emails and downloads the invoices received in the form of an email attachment as a PDF. Then, it extracts customer information and invoice particulars from the invoices and enters them into the order entry CRM.
You will be building this process in two parts. You will follow the dispatcher-performer model and create two different processes. In this chapter, you will build the dispatcher model, and in the next chapter, you will build the performer model.
Here is what you will learn as part of this Invoice Processing – Dispatcher project:
- Creating and consuming orchestrator assets
- Using mail automation
- Manipulating data in UiPath Studio
- Automating PDF files to read data
- Modifying selectors
- Using regular expressions
- Working with the UiPath Studio data scraping wizard
- Creating and uploading data to Orchestrator queues
- Exception handling in UiPath Studio
- Logging in UiPath Studio
Technical requirements
Let's understand the requirements for this project:
- UiPath Studio Community/Enterprise/Academic Alliance Edition version 20.10 and above, connected to UiPath Orchestrator
- Access to the UiPath Orchestrator services
- A Gmail account
- Adobe Acrobat PDF Reader
- Access to the internet
- Read-write permission in the machine where UiPath Studio is installed
You can get the entire code for the invoice processing dispatcher at GitHub: https://github.com/PacktPublishing/UiPath-Associate-Certification-Guide.git.
The project overview
In this chapter, you will be designing the dispatcher model of invoice processing. Let's understand the process in detail. Here are the steps that you will need to perform:
- Program a robot that will read the last unread emails from your Gmail account.
- Program a robot that will download all the invoice attachments from the read mails. The conditions for downloading the attachment are as follows:
- The subject line of the mail must be Invoice-Henry-FM-Invoice Number-Customer Name.
- The naming convention of the attachment must be Invoice-Henry FM-Invoice Number-Customer Name.pdf.
- Program a robot to save all invoice attachments in a folder named Invoice, created in the project directory.
- Program a robot to extract the following relevant fields from the invoice:
- Customer Details:
- Customer Name
- Customer Address
- Customer Phone Number
- Customer Email ID
- Invoice Particulars:
- Invoice Date
- Invoice Number
- Order Information:
- Item Quantity
- Item Description
- Item Unit Price
- Line Total Amount
- Subtotal Amount
- Shipping Amount
- Total Amount
- Customer Details:
- Program a robot to upload the following details to the Orchestrator queue:
- Customer Details
- Invoice Particulars
- Repeat steps 4–5 for the remaining invoices.
- Program the robot to successfully end the process if all the attachments downloaded from the mail in step 2 are processed.
Let's understand the entire process with the help of a diagram:
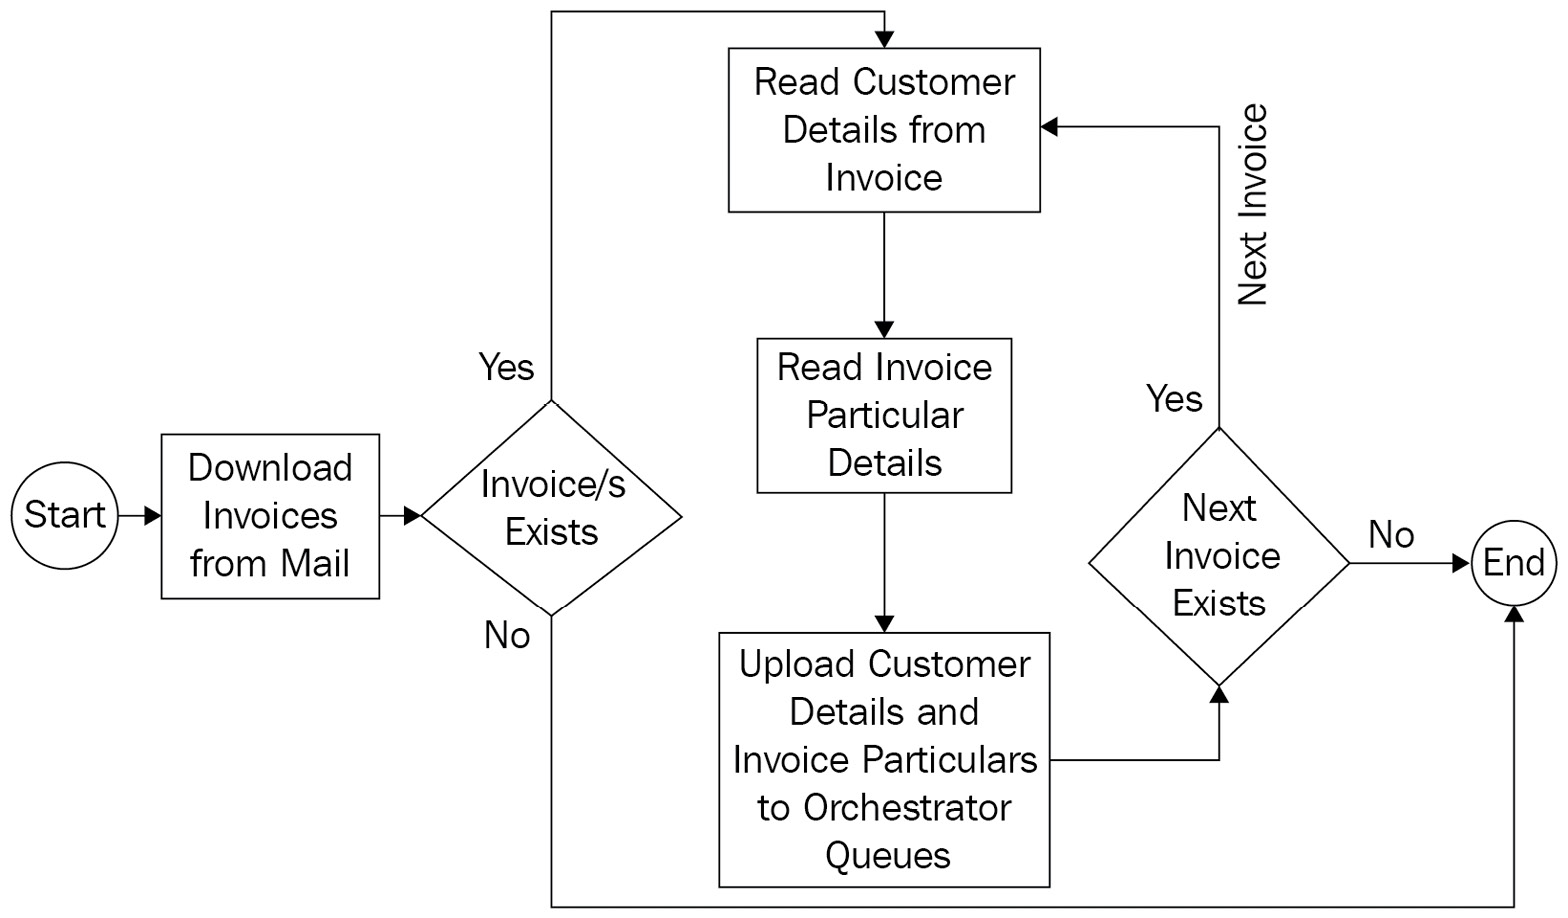
Figure 14.1 – A high-level process diagram
Before you begin designing the process automation, download all the provided invoices from the Input File – Invoice folder from this GitHub repository: https://github.com/PacktPublishing/UiPath-Associate-Certification-Guide/tree/main/Chapter14/Input%20File%20%E2%80%93%20Invoice.
Send a separate email for every individual invoice to your own Gmail account from where the bot will read the email. The subject line must be Invoice-Henry-FM-Invoice Number-Customer Name (the invoice number and customer name are present in the invoice file name) – for example, if the customer's name is Adam Smith and the invoice number is 8745, then the subject line of the mail should be Invoice-Henry-FM-8745-Adam Smith. Here are some examples:
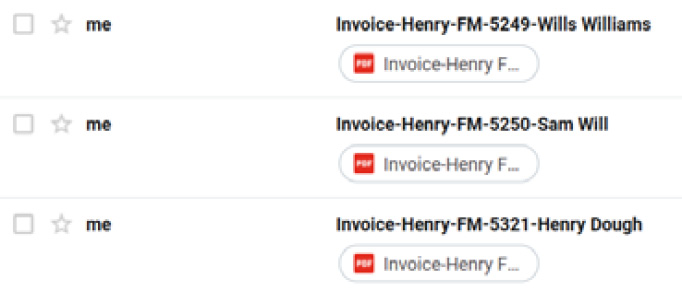
Figure 14.2 – A snippet of the Gmail inbox with the subject line and attachment
Now that you have sent the invoices to your mail ID, let's start building the automation.
Setting up the project
Before we start building the process, let's first set up all the UiPath Studio configurations correctly:
- Open up UiPath Studio and create a new process with the name Invoice_Processing_Dispatcher:
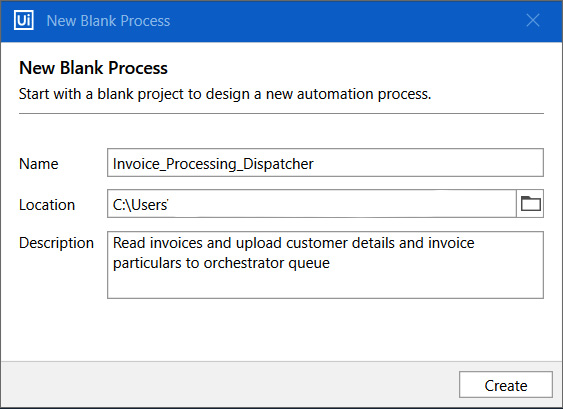
Figure 14.3 – Creating a new process
- Click on Manage Packages from the Designer ribbon bar and update the project dependencies to the following versions:
- UiPath.Excel.Activities – v2.10.4
- UiPath.Mail.Activities – v1.10.5
- UiPath.System.Activities – v21.4.1
- UiPath.UIAutomation.Activities – v21.4.4
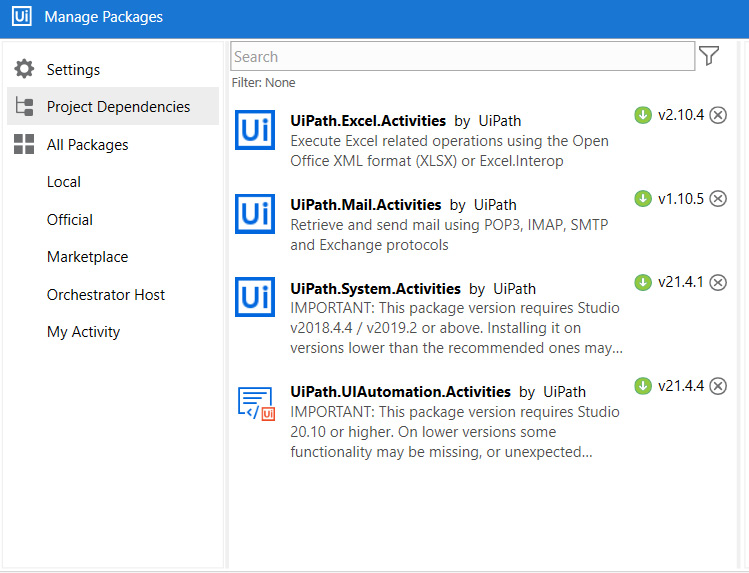
Figure 14.4 – Updating the dependencies
- Now that you have updated the dependencies to the correct versions, let's also install one more dependency, UiPath.PDF.Activities – v3.4.0:
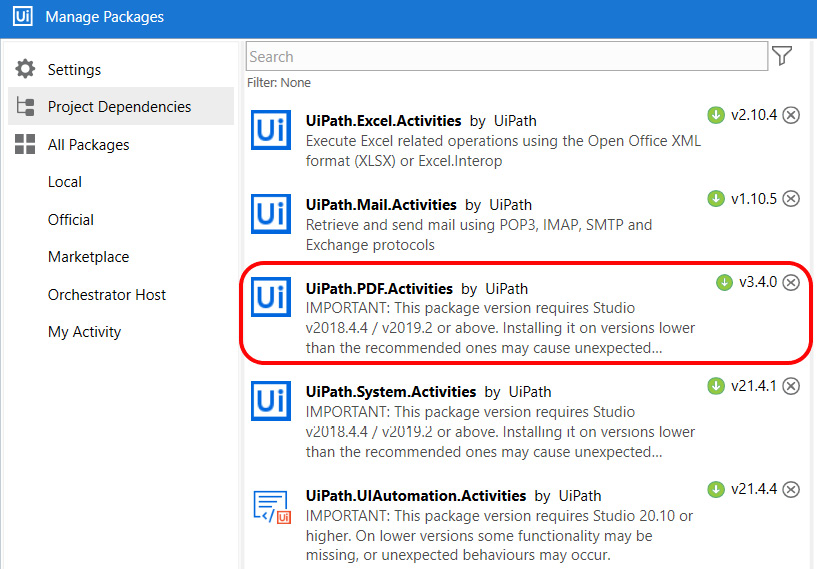
Figure 14.5 – The PDF dependencies added
- In the Orchestrator web page under your tenant, navigate to the Folders section and create a new folder named Packt.
Now that you have configured everything that is needed, let's start building the process.
Downloading the invoice
In this section, you will design the bot to download all the invoices from the Gmail account. The following diagram explains the high-level process of downloading the invoices:
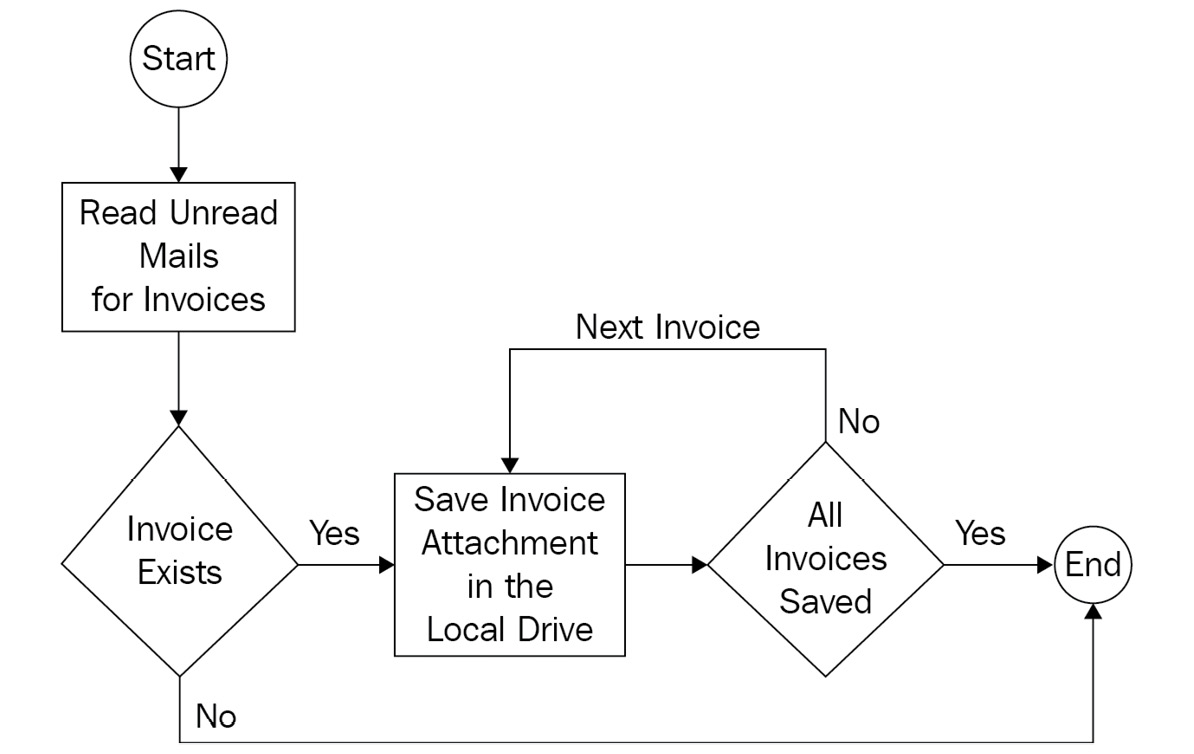
Figure 14.6 – Downloading the invoice
Downloading the invoices is the first step of the entire process. Let's build it:
- Click on the New button from the DESIGN ribbon bar and select Sequence.
- Name the sequence Download_Invoice and click on the Create button:
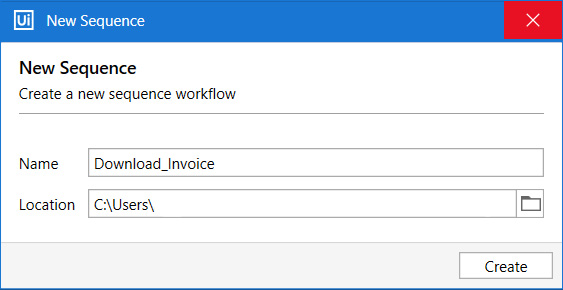
Figure 14.7 – Creating the Download_Invoice sequence
- Log in to your cloud.uipath.com account and start the Orchestrator services. Under the Assets section, create an asset with the name Mail Credential and choose Credential for Type. Next, type in your Gmail ID Username and Password details and click on the Create button:
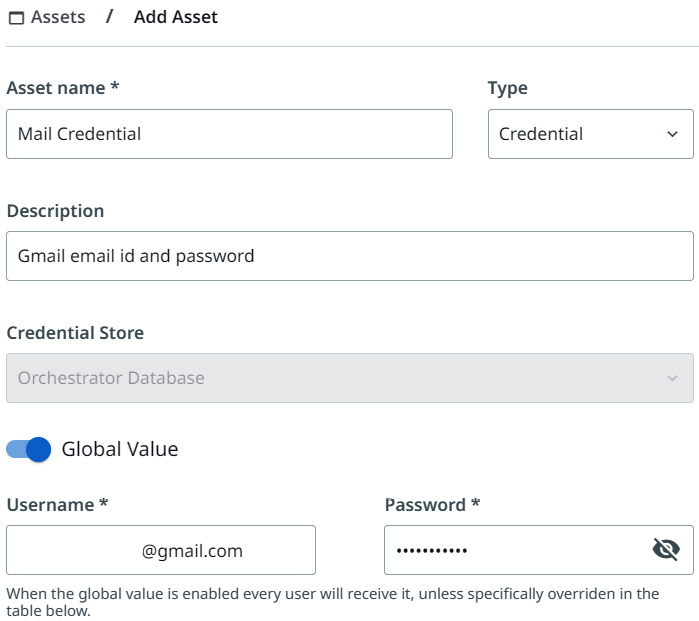
Figure 14.8 – Creating a credential asset to store the Gmail credentials
The Mail Credential asset in this scenario is created in the personal workspace folder. You can create the asset in the Packt folder if you wish to.
- In Studio, inside the Download_Invoice sequence, drag and drop the Try Catch activity and then drop the Get Credential activity inside the Try block. Next, click on the Properties panel of the Get Credential activity. For the Input property, provide "Mail Credential" under AssetName. Then, under Output, create a new variable for the Password and Username properties using Ctrl + K. Type in pwd for Password and press Enter, and then type in email for Username and press Enter again:
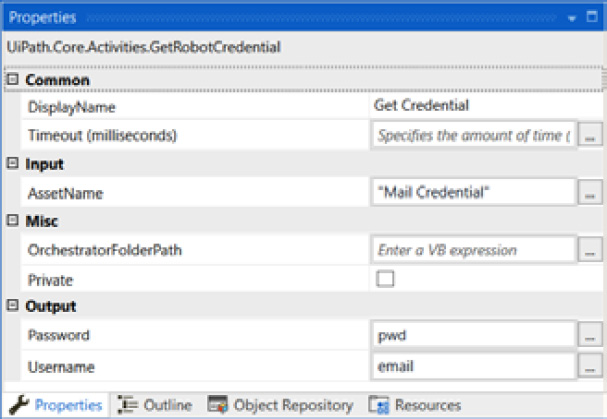
Figure 14.9 – The Properties panel of the Get Credential activity
- Drag and drop the Get IMAP Mail Messages activity after the Get Credential activity. By clicking on the Properties panel of the Get IMAP Mail Messages, configure the properties as follows:
- MailFolder – "Inbox".
- Port – 993.
- Server – "imap.gmail.com".
- Email – pass the email variable.
- SecurePassword – pass the pwd variable.
- FilterExpression - "SUBJECT Invoice-Henry-FM".
- Check the MarkAsRead option.
- Top – 10.
- Add a new variable called mails for the Messages property under Output:

Figure 14.10 – The Properties panel of the Get IMAP Mail Messages activity
- Next, use the For Each activity to iterate over all mails. Then, pass the mails variable in the Value section, change the argument name to mail from item, and change TypeArgument to System.Net.Mail.MailMessage.
- Inside the body of the For Each activity, use an If activity where you will check whether the mail has the invoice as the attachment. Under the If activity condition, type mail.Attachments.Count > 0 And mail.Attachments.Count < 2 And mail.Attachments.Item(0).Name.ToString.StartsWith("Invoice-Henry FM-") And mail.Attachments.Item(0).Name.ToString.EndsWith(".pdf".
- The Boolean condition checks for a single attachment and the naming convention of the invoice. If the Boolean condition is TRUE, you will save the attachment; otherwise, log a message, with the log level as Info and a message saying "No invoice attachment in the mail".
- Then, drag and drop the Save Attachments activity into the Then block of the If activity to download the invoice. Finally, pass the mail argument in the Message property. Now, type in "Invoice" (the folder name to save the invoice) in the FolderPath property of the Save Attachments activity.
- In the Arguments panel, create an argument with the name out_isMail. Set the direction of it to Out and choose the argument type as boolean.
- Then, use an Assign activity below Save Attachments, passing out_isMail in the To section and True in the Value section. You will be using the out_isMail argument in Main.xaml later to read invoices:
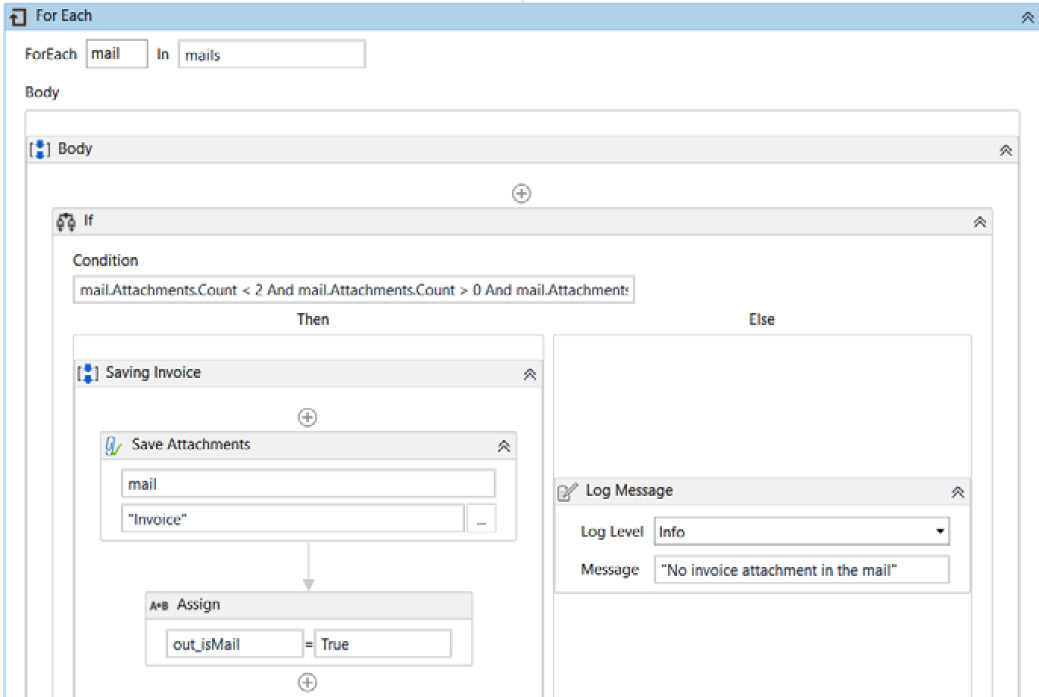
Figure 14.11 – Saving an invoice attachment from mail
- Finally, inside the Catches block, catch SystemException and log a message. The Log Level value should be Error and Message should be "Unable to fetch the mail, please check Logon or host properties setting"+vbLf+exception.Message+vbLf+exception.Source:
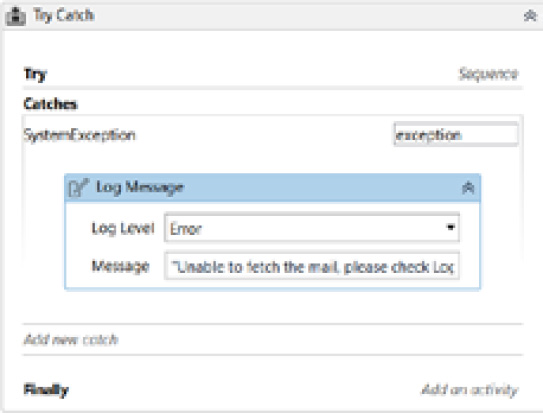
Figure 14.12 – The Catches block with the Log Message activity
Before finishing up with this Download_Invoice sequence, let's do a final check on it. The Variables panel of the Download_Invoice sequence should have three variables, as shown in the following screenshot:

Figure 14.13 – The Variables panel
The Arguments panel of the Download_Invoice sequence should have one Out argument, as shown in the following screenshot:

Figure 14.14 – The Arguments panel
Now that we have completed the downloading of the invoices from the mail, let's look at the next section on how to read the downloaded invoices to extract the required information from them.
Reading the invoice
In this section, you will read the invoices that have been downloaded from the mail. The following diagram explains the high-level process of reading the invoices:
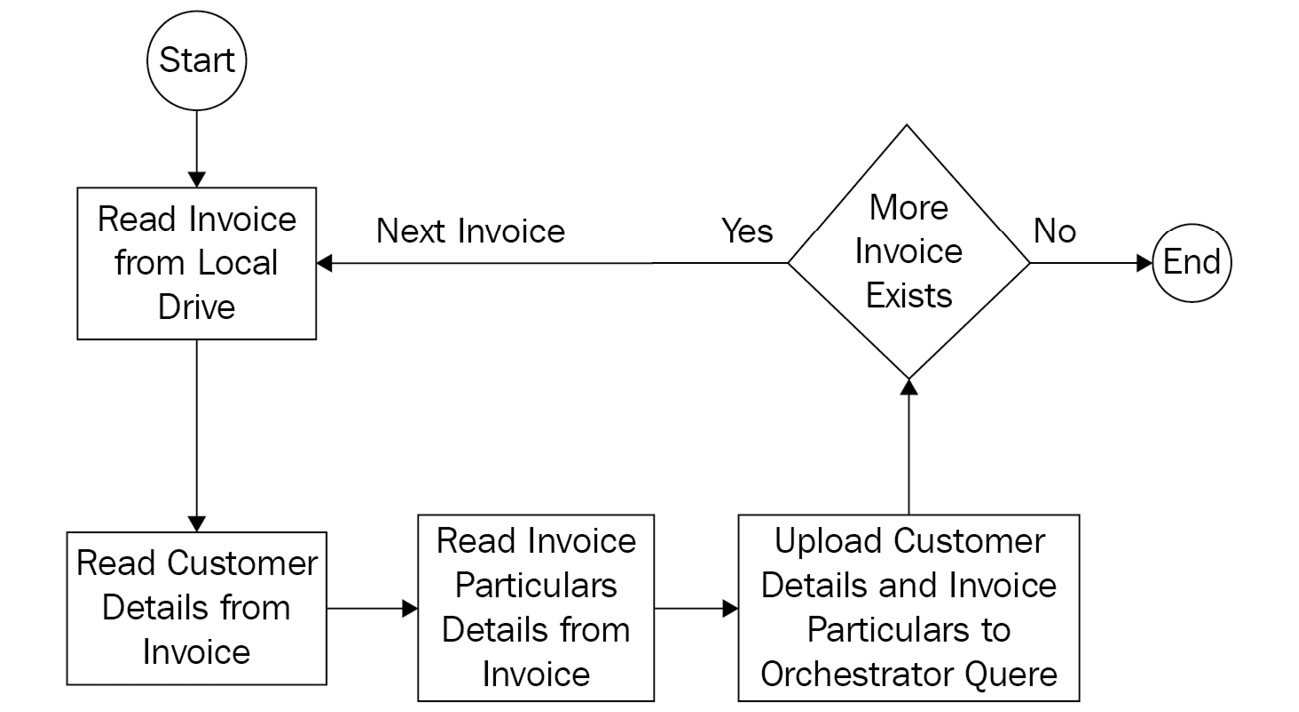
Figure 14.15 – Reading the invoice details
Here, you will be extracting the customer details and invoice particulars from the read invoices. Let's begin designing this process:
- Let's start by creating a new sequence with the name Read_Invoice.
- Then, in the Variables panel, create a variable with the name currentDirectoryPath, choose the type as String, and type Directory.GetCurrentDirectory() in the Default section.
- Also, create two more variables, the first named invoices of the String[] type (an array of String) and the second named invoicePath of the String type.
- In the Read_Invoice sequence, drag and drop the first Assign activity. Pass the invoices variable in the To section and Directory.GetFiles(currentDirectoryPath+"Invoice") in the Value section. This will fetch all the names of the invoices from the Invoice folder and store them in the variable named invoices.
- Next, drag and drop the For Each activity so that you can iterate over each invoice and extract information from them. Then, pass invoices in the Values section and change item to invoice in the For Each activity.
- Add an Assign activity inside the body of the For Each activity and pass the InvoicePath variable in the To section and invoice.ToString in the Value section:
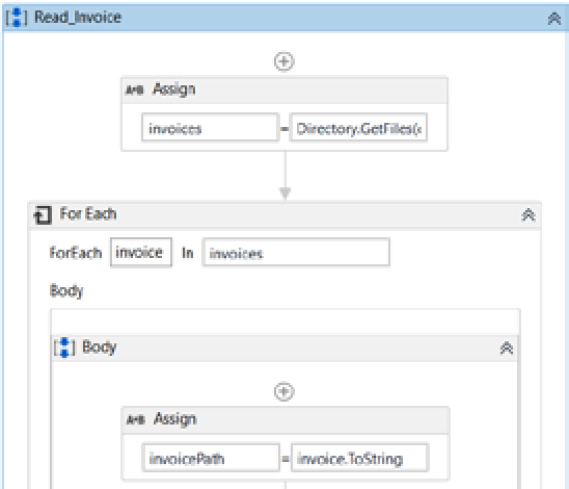
Figure 14.16 – The Read_Invoice sequence
Now that we can iterate over each invoice, let's first extract customer details from the invoice. After that, we'll extract invoice particulars too.
Extracting customer details
In this section, you will extract the customer details from the read invoice. The following diagram explains the high-level process of extracting customer details from the invoice:
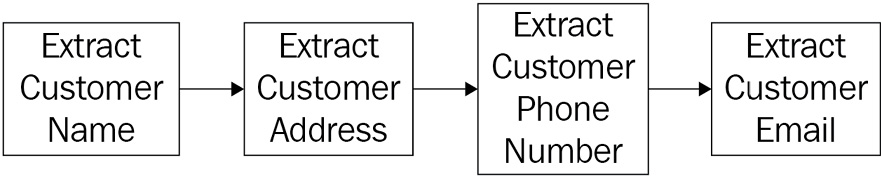
Figure 14.17 – Extracting customer details
In this sequence, you will extract the customer's name, address, phone number, and email from the invoice:
- Let's start by creating a new sequence and naming it Extract_Customer_Details.
- Create four Out arguments and one In argument, as shown in the following screenshot:
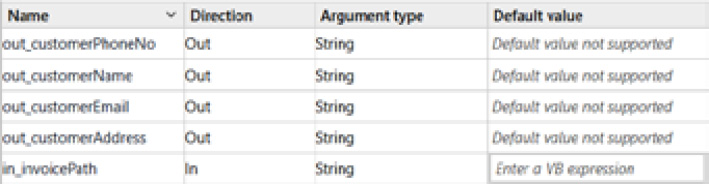
Figure 14.18 – The Arguments panel
- To extract the customer name, drag and drop a Sequence activity and rename it Customer Name.
- If you look at the invoice name, it has the customer name already present in it. Therefore, you can use String manipulation methods and extract only the customer name from the complete string.
- Inside the Customer Name sequence, add an Assign activity and pass out_customerName in the To section. Then, type in in_invoicePath.Split({"-"},StringSplitOptions.None)(3).Split({"."},StringSplitOptions.None)(0) in the Value section:
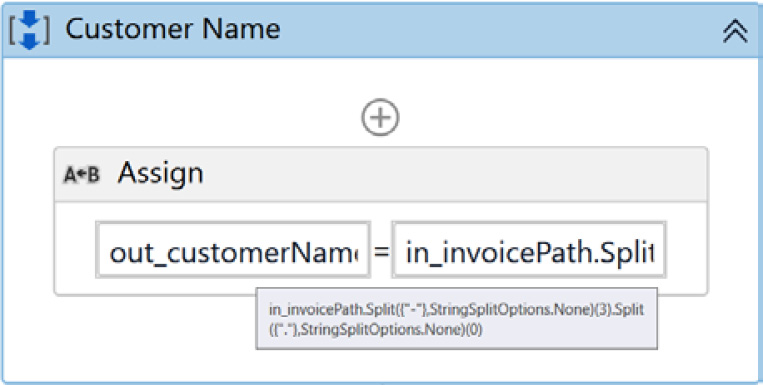
Figure 14.19 – Extracting the customer name
- Let's now extract the customer address. We will use the Read PDF Text activity to read the invoice. Pass the in_invoicePath argument under the FileName property. Next, create a new variable for the Text property under Output using Ctrl + K; then, type in invoiceData and press Enter. All the invoice data read using the Read PDF Text activity will be saved in the invoiceData variable:

Figure 14.20 – The Read PDF Text activity
- If you look at the invoice, the customer's address is between the customer's name and phone number. So, to find customer addresses, you will once again use the string manipulation methods.
- Drag and drop a Sequence activity and rename it Customer Address.
- Create a new variable with the name custNameIndex (to get the index position of the customer name from the invoice) of the Int32 type.
- Inside the Customer Address sequence, add an Assign activity, pass custNameIndex in the To section, and type in invoiceData.IndexOf(out_customerName) in the Value section.
- Drag and drop another Assign activity and pass the out_customerAddress argument in the To section and type in invoiceData.Substring(custNameIndex + out_customerName.Length, invoiceData.IndexOf("Ph No:", custNameIndex + out_customerName.Length) - custNameIndex - out_customerName.Length) in the Value section:
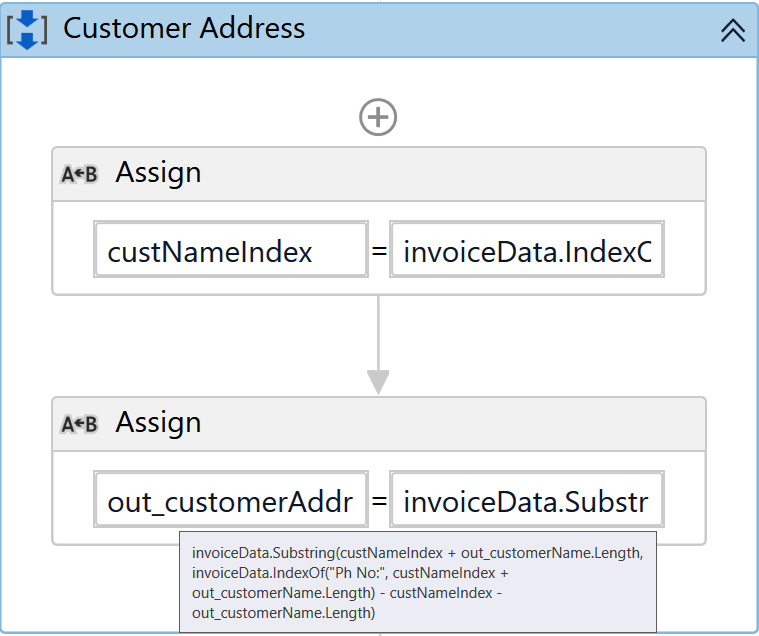
Figure 14.21 – Extracting the customer address
Let's now extract the customer's phone number. You will follow the same logic as the customer address. The customer phone number is between the Ph No: and Email: text. Again, you will use string manipulation methods here.
- Drag and drop a Sequence activity and rename it Customer Phone Number.
- Create a new variable with the name custPhoneNoIndex (to get the index position of Ph No: from the invoice) of the Int32 type.
- Inside the Customer Phone Number sequence, add an Assign activity, pass custPhoneNoIndex in the To section, and type in invoiceData.IndexOf("Ph No: ") in the Value section.
- Drag and drop another Assign activity and pass the out_customerPhoneNo argument in the To section and type in invoiceData.Substring(custPhoneNoIndex + 6, invoiceData.IndexOf("Email:", custPhoneNoIndex + 6) - custPhoneNoIndex - 6) in the Value section:
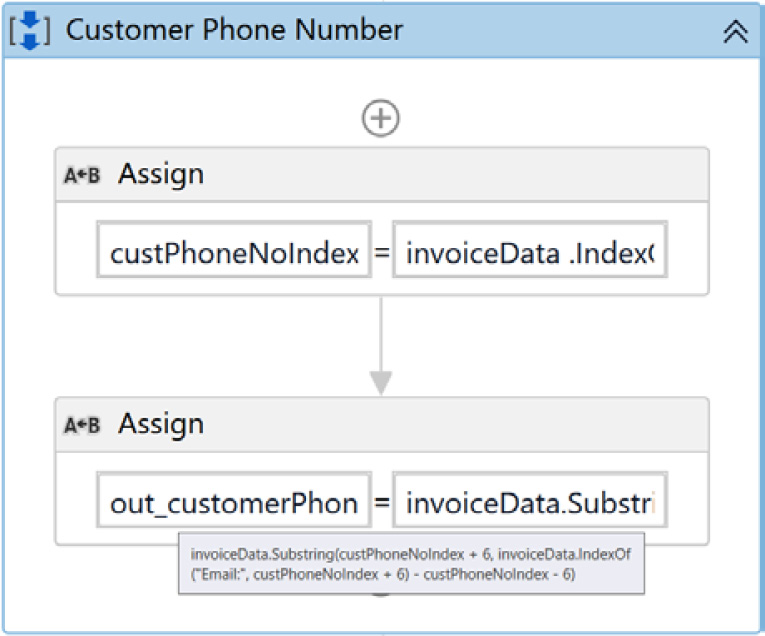
Figure 14.22 – Extracting the customer phone number
- Let's now extract the customer's email address. To do so, you will use the Regular Expression (RegEx) technique, covered in Chapter 7, Manipulating Data using UiPath. Drag and drop a Sequence activity and rename it Customer Email.
- Next, inside the Customer Email sequence, drag and drop the Matches activity.
- Click on the Configure Regular Expression button to pass the email regex.
- In the RegEx Builder window, from the RegEx drop-down menu, choose Email and click on the Save button:
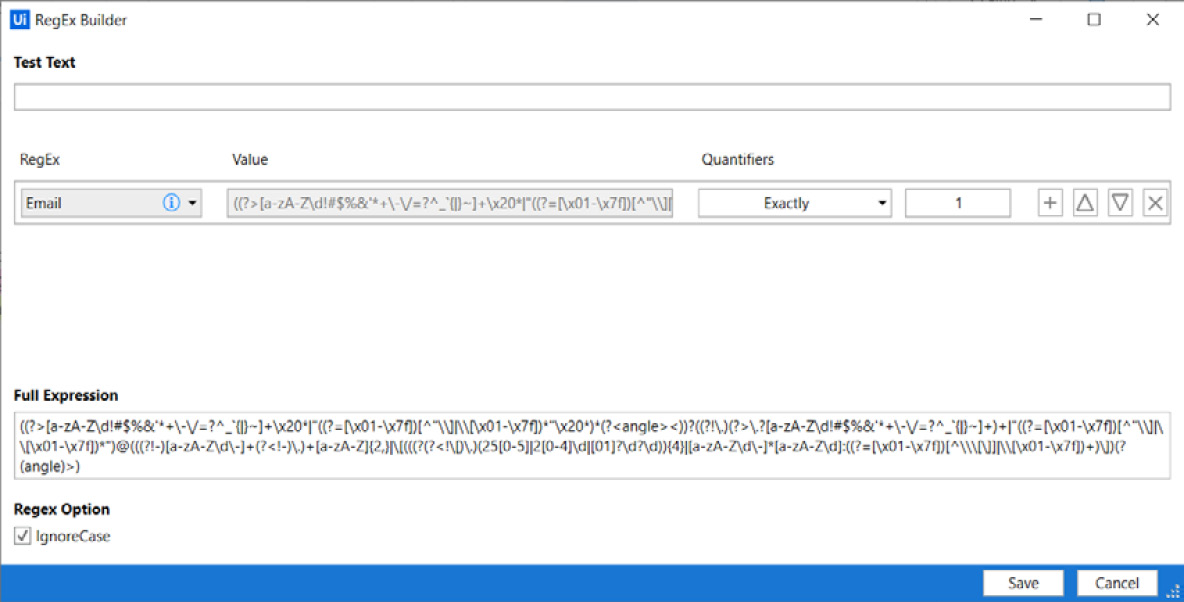
Figure 14.23 – Selecting Email from RegEx Builder
- In the properties section of the Matches activity, pass invoiceData under Input. Then, in the Result section, create a new variable (using Ctrl + K) named emails.
- After the Matches activity, drag and drop an Assign activity to assign the email extracted from the regex.Pass out_customerEmail argument in the To section. Then, type in emails.ElementAt(0).ToString in the Value section of the Assign activity.
Since the invoice has only one email address, you will access it by the 0th index only:

Figure 14.24 – Extracting the customer email
- Return to the Read_Invoice sequence. From the Project panel, drag and drop the Extract_Customer_Details.xaml workflow below the Assign activity in the body of the For Each activity:
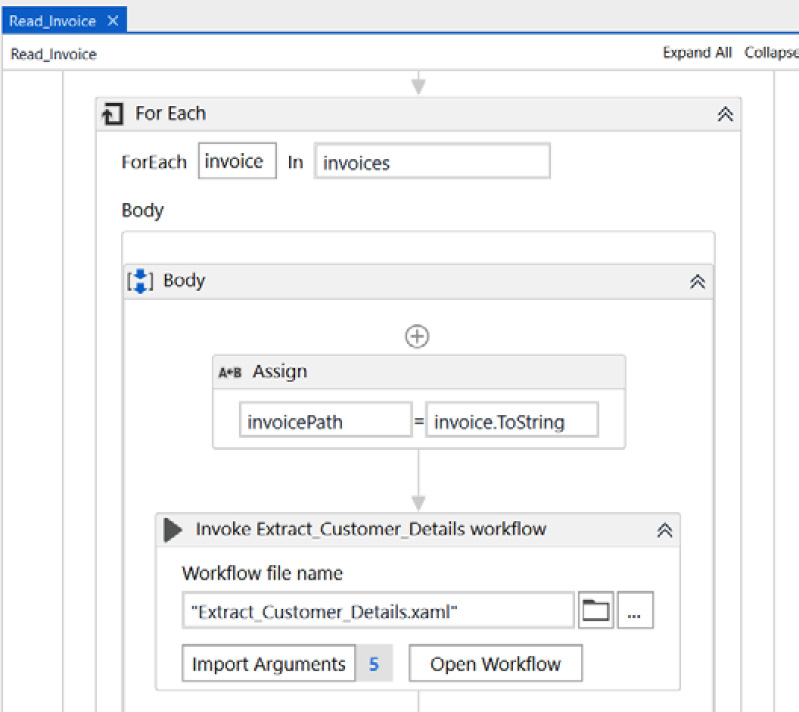
Figure 14.25 – Invoking Extract_Customer_Details.xaml
- Click on the Import Arguments button and pass the invoicePath variable as the value to the in_InvoicePath argument.
- Create four new variables using Ctrl + K named customerName, customerAddress, customerEmail, and customerPhoneNo. Then, pass them as Value to all the Out arguments, as shown in the following screenshot:
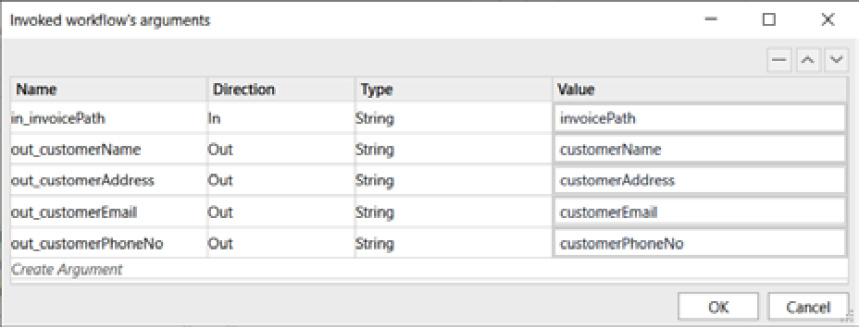
Figure 14.26 – The import arguments
Now that we have successfully extracted the customer's name, phone number, address, and email, let's now look at how we can extract invoice particulars.
Extracting invoice particulars
In this section, you will extract the invoice particulars from the read invoice. The following diagram explains the high-level process of extracting customer details from the invoice:
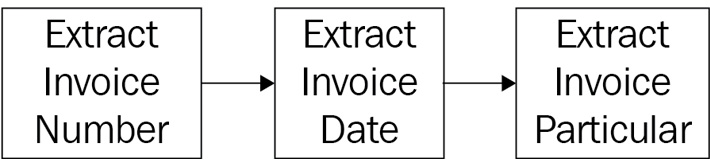
Figure 14.27 – Extracting invoice particulars
In this sequence, we will extract the invoice date, invoice number, and order information:
- Let's start by creating a new sequence and naming it Extract_Invoice_Particular.
- Now, create three Out arguments and one In argument, as shown in the following screenshot:
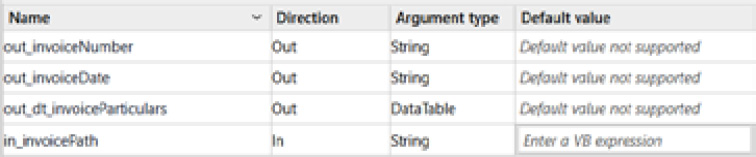
Figure 14.28 – The Arguments panel
- Drag and drop the Start Process activity and pass the in_invoicePath argument in the FileName properties section. When the bot is running, the Start Process activity in this scenario will open up the invoice PDF file in Adobe Acrobat Reader:
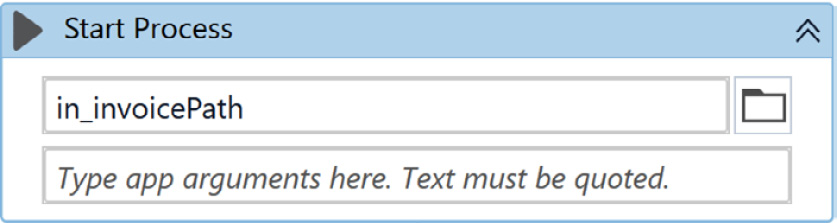
Figure 14.29 – The Start Process activity
- Now, in the background, open any one of the invoices in Adobe Acrobat Reader (note that the Adobe Acrobat Reader used in this process is a 32-bit version). Then, in UiPath Studio, after the Start Process activity, drag and drop the Attach Window activity.
- Next, click on Indicate window on screen, hover the mouse on Adobe reader (Invoice), and then right-click on it. This will capture the invoice PDF.
- Let's look at the selector of the Attach Window activity. The selector code looks as follows:
<wnd app='acrord32.exe' cls='AcrobatSDIWindow' title='Invoice-Henry FM-Henry Dough.pdf - Adobe Acrobat Reader DC (32-b*'/>
- If you look at the title attribute, the value is 'Invoice-Henry FM-Henry Dough.pdf - Adobe Acrobat Reader DC (32-b*'. Here, the customer name is also included, which means this will run only for the customer named Henry Dough, but we have multiple invoices and need to iterate over them, so this selector will not be valid for other invoices. Hence, we need to make the selector dynamic so that it will work for all the invoices.
- To do so, add * wildcards to the selector (as discussed in Chapter 8, Exploring UiPath Selectors). Edit the selector and replace the customer name part with * and click on the Validate button. This turns green, which confirms that the new selector is correct.
- After adding the * wildcard, your new selector code should look like this – <wnd app='acrord32.exe' cls='AcrobatSDIWindow' title='Invoice-Henry FM-*.pdf - Adobe Acrobat Reader DC (32-b*' />:

Figure 14.30 – The Selector Editor window of the Attach Window activity
- Drag and drop the Get Text activity inside the Attach Window activity. You will use this Get Text activity to capture the invoice date from the PDF. Click on the Indicate element inside window action of the Get Text activity. Then, hover the mouse cursor on the Date field of the invoice and record it by doing a right-click, as shown in the following screenshot:
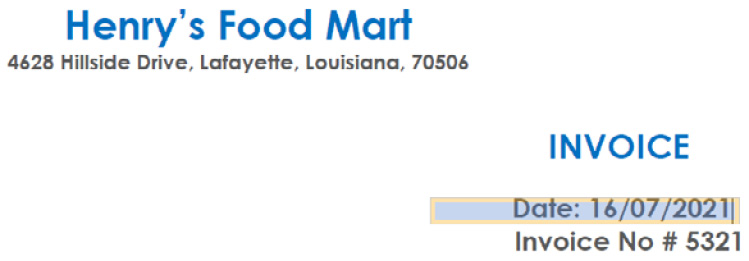
Figure 14.31 – Capturing the date from the invoice
- Let's look at the selector of this Get Text activity. In this case, the date mentioned in the invoice is captured by the selector. Here is the part of the selector:
<ctrl name=' Date: 16/07/2021 ' role='text' />
As we want it to be dynamic to work with any other date provided, we will use the dynamic selector concepts again. Replace the 16/07/2021 part with * and click on the Validate button. The Validate button turns green, which confirms that the new selector is correct. Your new selector code should look as follows:
<ctrl name=' Date: * ' role='text' />
* will make sure that it works for any date provided in the invoice:
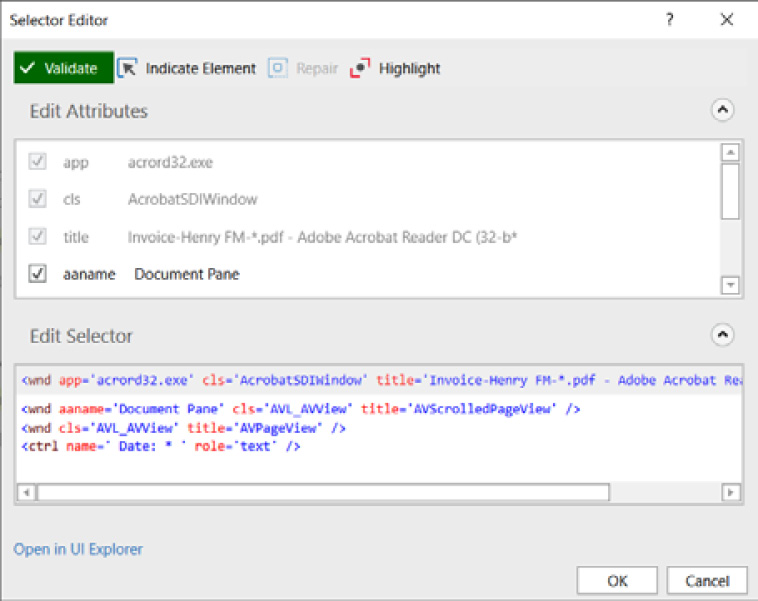
Figure 14.32 – The Selector Editor window of the Get Text activity for the invoice date
- Now that we have captured the invoice date, let's save it into our already created argument. Under the Properties panel, pass out_invoiceDate in the Value section of the Output property.
We have successfully extracted the invoice date. Now, let's extract the invoice number.
- Drag and drop the Get Text activity below the Get Text activity of the invoice date. You will use this Get Text activity to capture the invoice number from the PDF.
- Click on Indicate element inside window, hover the mouse cursor on the Invoice number field of the invoice, and then record it by doing a right-click.
- Let's look at the selector of this Get Text activity. In this case, the invoice number mentioned in the invoice is captured by the selector. Here is the part of the selector:
<ctrl name=' Invoice No # 5321 ' role='text' />
As we want the selector to be dynamic to work with any other invoice number provided, we will use the dynamic selector concepts again. Replace the 5321 part with * and click on the Validate button. The Validate button turns green, which confirms that the new selector is correct. Your new selector code should look as follows:
<ctrl name=' Invoice No # * ' role='text' />
* will make sure that it works for any invoice number provided in the invoice:
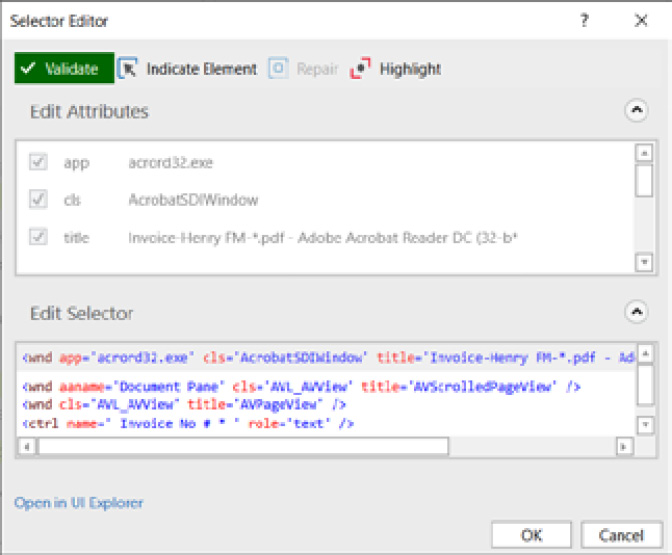
Figure 14.33 – The Selector Editor window of the Get Text activity for the invoice number
- Now that we have captured the invoice number, let's save it into our already created argument. Under the Properties panel, pass out_invoiceNumber in the Value section of the Output property.
Note
The selector for the invoice date and invoice number is partially generated because both Get Text activities are used inside the Attach Window activity.
Let's extract the invoice particulars now. Since the data is structured data, presented in the form of a table, we will use the data scraping wizard tool of UiPath Studio to extract it:
- Click on the Data Scraping button from the DESIGN ribbon bar. A new Extract Wizard window opens up; then, click on the Next button to start the data scraping process:
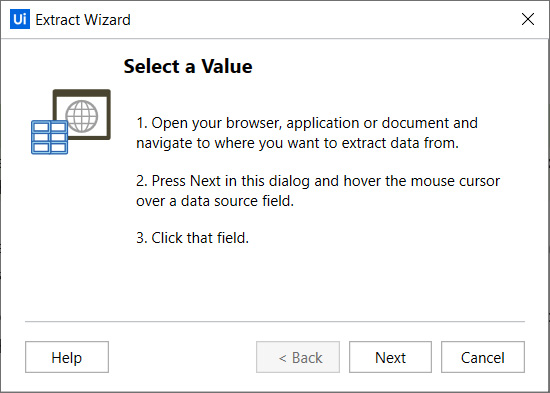
Figure 14.34 – The data scraping wizard
- Hover the cursor over any of the table cells and right-click on it:
Figure 14.35 – Selecting a table cell
- A new window appears, which shows all the extracted table cell values. Enter 0 (zero) in the Maximum number of results field and click on the Finish button:
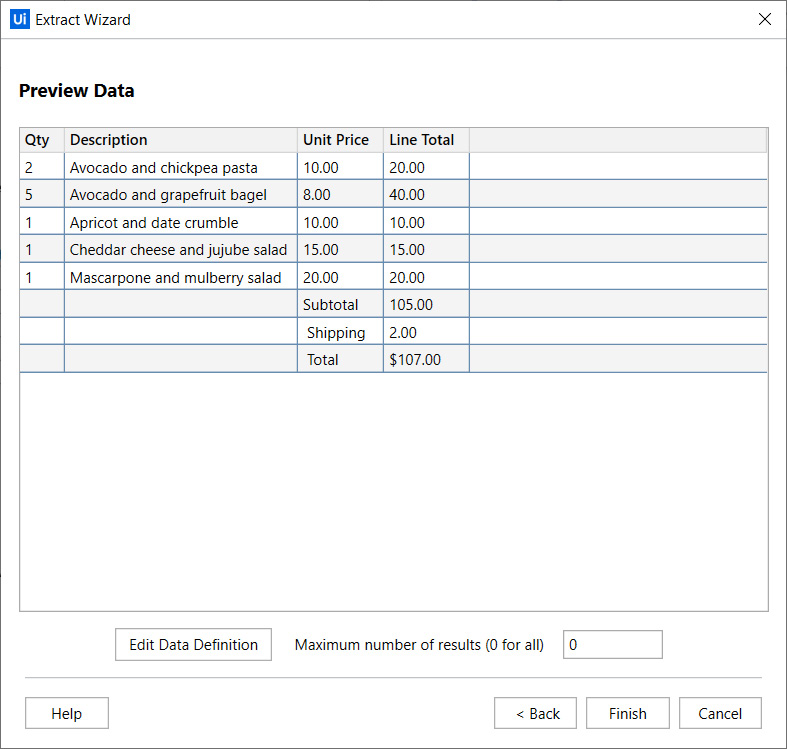
Figure 14.36 – The extracted table cells
- Clicking on the Finish button places the Extract Structured Data activity in Studio inside an Attach Window activity:
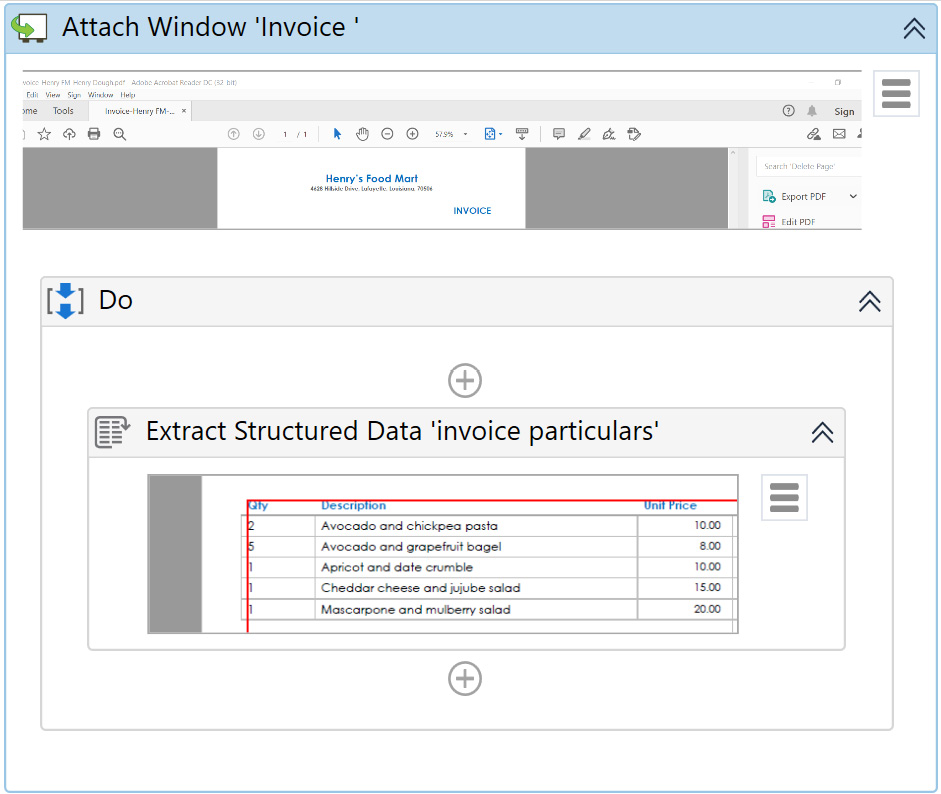
Figure 14.37 – The Extract Structured Data activity
- Edit the selector for the Attach Window activity, since it contains the customer's name. The edited selector should look as follows:
<wnd app='acrord32.exe' cls='AcrobatSDIWindow' title='Invoice-Henry FM-*.pdf - Adobe Acrobat Reader DC (32-b*' />
- The data scraping wizard will extract the data in a DataTable format. Save it into your already created DataTable argument. Under the Properties panel, pass out_dt_invoiceParticulars in the DataTable section of the Output property.
- Finally, drag and drop the Close Application activity, click on Indicate element inside window, hover the mouse on Adobe Acrobat Reader, and right-click on it. This will close the PDF reader after extracting all the required fields from it.
- Return to the Read_Invoice sequence. From the Project panel, drag and drop the Extract_Invoice_Particular.xaml workflow below the InvokeExtract_Customer_Details workflow activity in the body of the For Each activity:
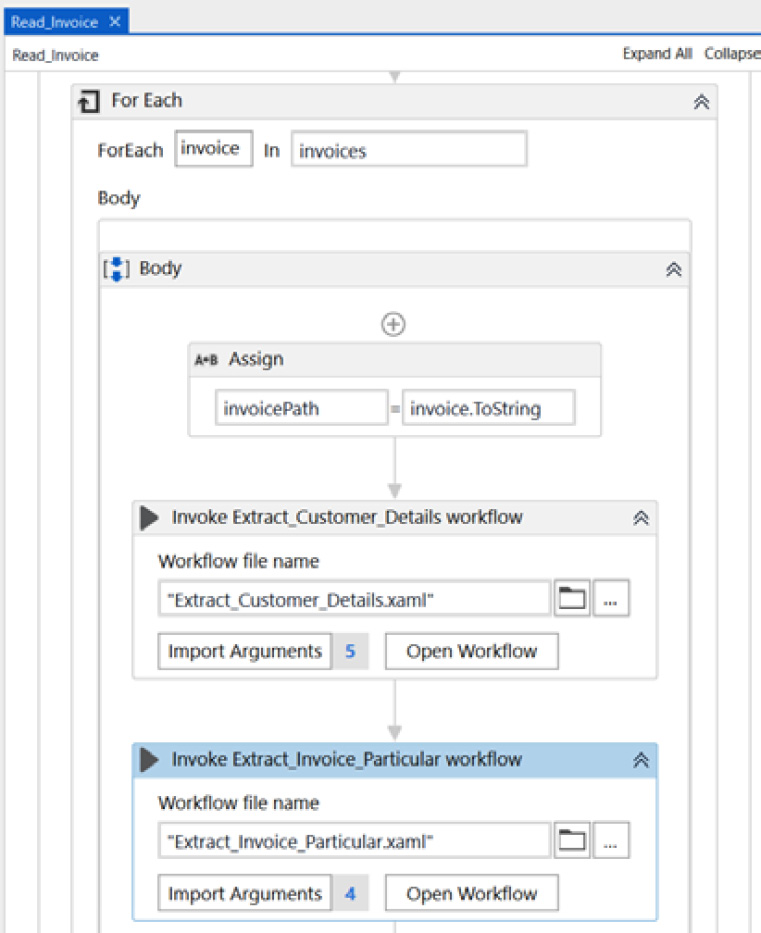
Figure 14.38 – Invoking Extract_Invoice_Particular.xaml
- Click on the Import Arguments button and pass the invoicePath variable as the value to the in_InvoicePath argument.
- Create three new variables using Ctrl + K, named invoiceDate, invoiceNumber, and dt_invoiceParticulars, and pass them as Value to all the Out arguments, as shown in the following screenshot:
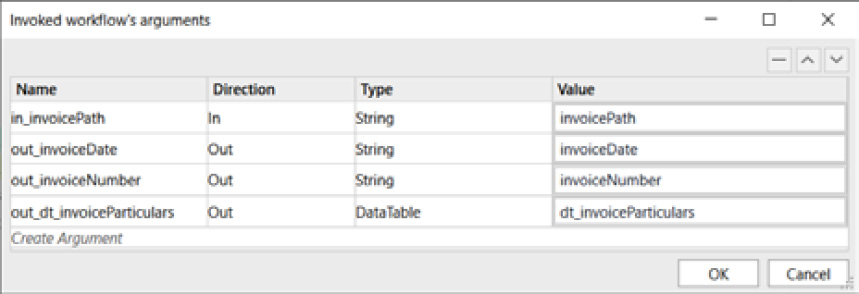
Figure 14.39 – The import arguments
Congratulations! You have extracted all the necessary fields from the invoice. Let's upload all these values to the Orchestrator queues.
Uploading the invoice data to the Orchestrator queues
In this section, you will upload the customer details and invoice particulars to the Orchestrator queues. The following diagram explains the high-level process of uploading data to the queues:

Figure 14.40 – Uploading to the Orchestrator queue
Uploading the customer details and invoice particulars to the queue will help you build the performer model of this process where you can consume the data from the queue and then process it.
Let's get started:
- First, let's create a queue in Orchestrator. Click on the queue section and create a new queue. Type in HenryFoodMartInvoice as the queue name and click on the Add button to create the queue:
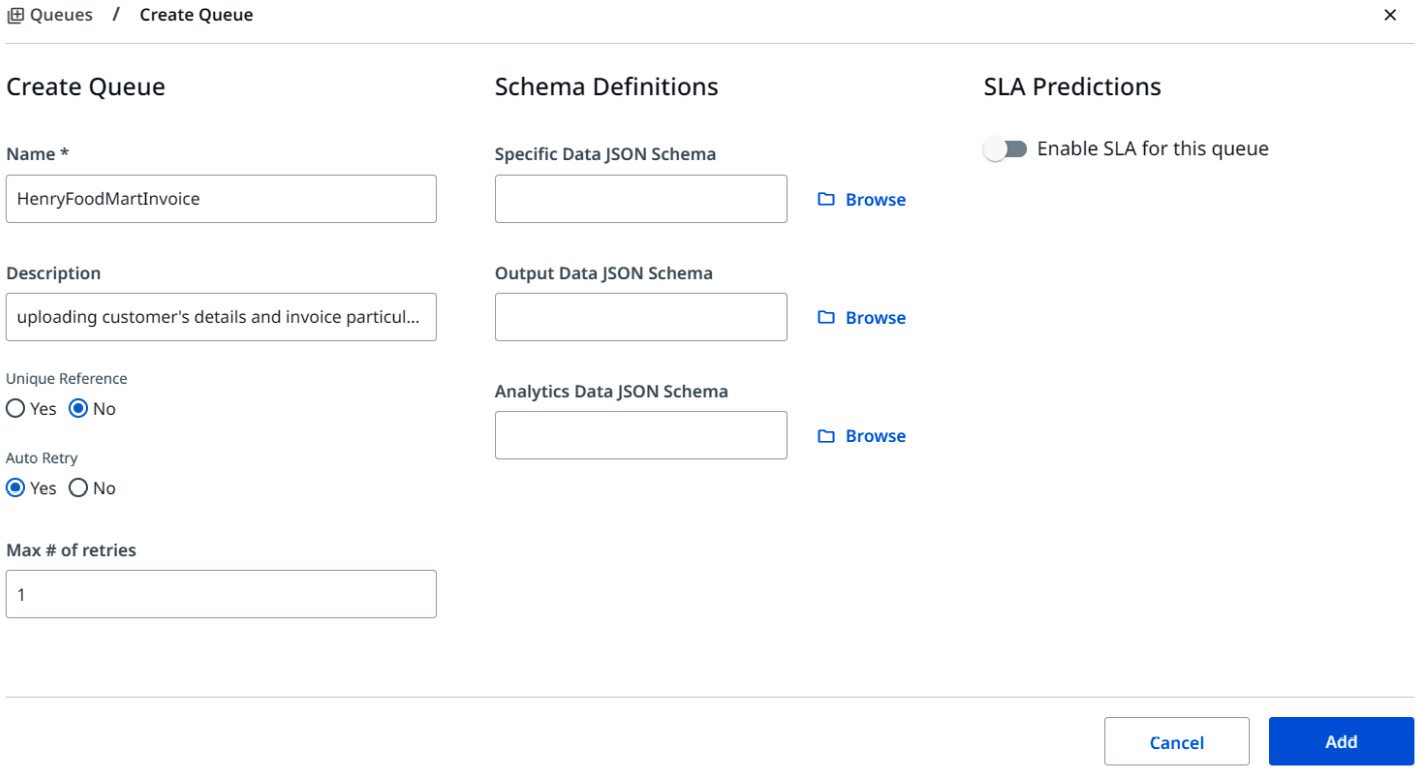
Figure 14.41 – Creating a queue
- In Studio, create a new sequence and name it Upload_To_Queue.
- Then, click on the Imports panel and search for the Newtonsoft.Json namespace and add it. You will use this for serializing the in_dt_invoiceParticulars arguments so that the entire DataTable can be added in a single transaction in the queue:
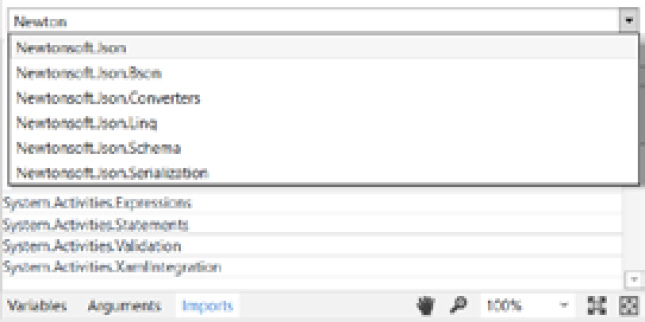
Figure 14.42 – Adding the Newtonsoft.Json namespace
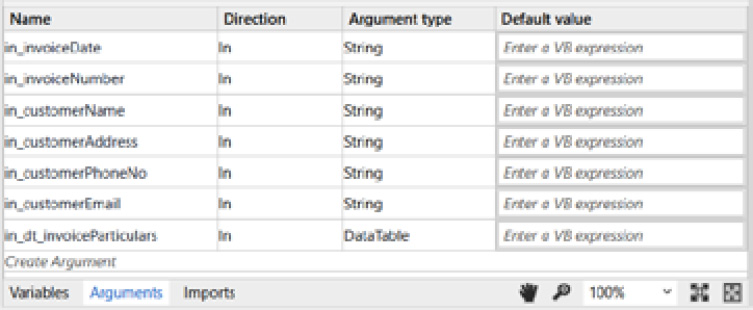
Figure 14.43 – The Arguments panel
- Drag and drop a Try Catch activity as the first activity.
- Then, drag and drop the Add Queue Item activity inside the Try block. Then, under the Properties panel of the Add Queue Item activity, type in "HenryFoodMartInvoice" as the queue name in the QueueName section.
- In this scenario, the queue was created under the folder named Packt in Orchestrator, so you must pass the folder name in the Add Queue Item activity properties. In the Folder Path section, type in "Packt":
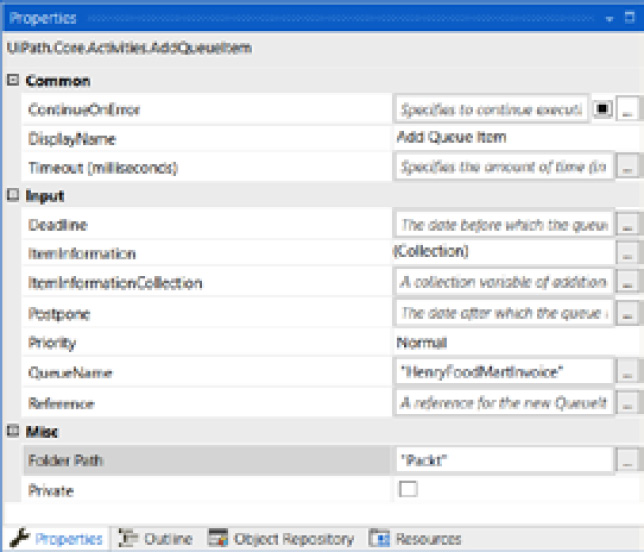
Figure 14.44 – The Properties panel of the Add Queue Item activity
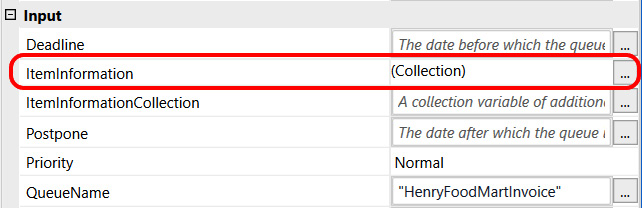
Figure 14.45 – The ItemInformation collection property
- In the ItemInformation window, create seven arguments called invoiceDate, invoiceNumber, customerName, customerAddress, customerPhoneNo, customerEmail, and invoiceParticulars of the String type.
- Let's assign values to all the arguments:
- invoiceDate = in_invoiceDate.Split({":"},StringSplitOptions.None)(1).ToString.Trim
- invoiceNumber = in_invoiceNumber.Split({"#"},StringSplitOptions.None)(1).ToString.Trim
- customerName = in_customerName
- customerAddress = in_customerAddress
- customerPhoneNo = in_customerPhoneNo
- customerEmail = in_customerEmail
- invoiceParticulars = JsonConvert.SerializeObject(in_dt_invoiceParticulars)
After assigning all the values in the Value section, your ItemInformation window should look as follows:
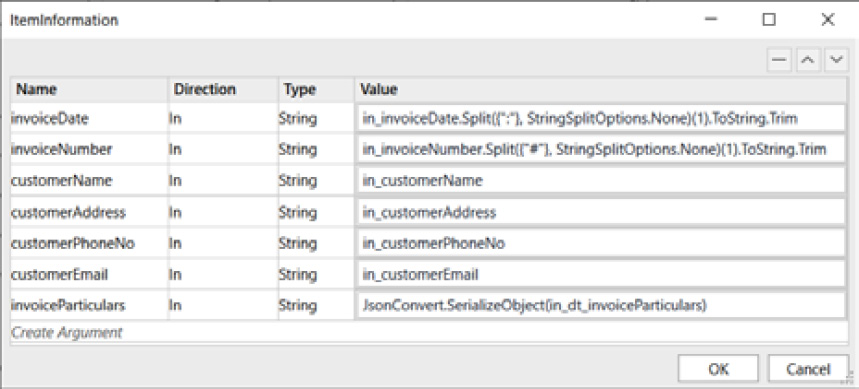
Figure 14.46 – The ItemInformation window with all the values assigned
- The invoice date and invoice number have extra characters in them. To get rid of them, use the Split() function with the appropriate delimiter. As mentioned earlier, the DataTable arguments have to be serialized before uploading to the queue. The SerializeObject() function of the JsonConvert class will help serialize it into a JSON object.
- Finally, inside the Catches block, catch a SystemException.
- Also, log a message, with Log Level as Error and Message as "Unable to Upload to Queue" + vbLf+exception.Message + vbLf + exception.Source.
- Return to the Read_Invoice sequence, and from the Project panel, drag and drop the Upload_To_Queue.xaml workflow below the Invoke Extract_ Invoice_Particular workflow activity in the body of the For Each activity:
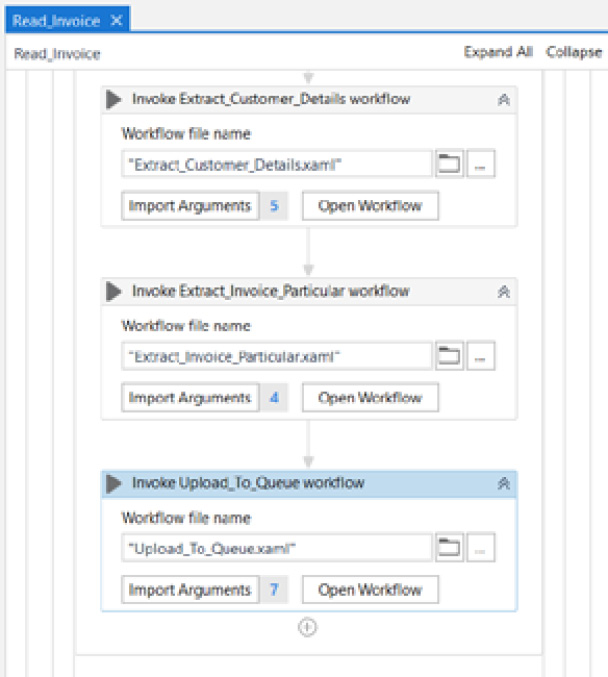
Figure 14.47 – Invoking Upload_to_Queue.xaml
- Click on the Import Arguments button and pass the variables for all the seven In arguments, as shown in the following screenshot:
Ing t
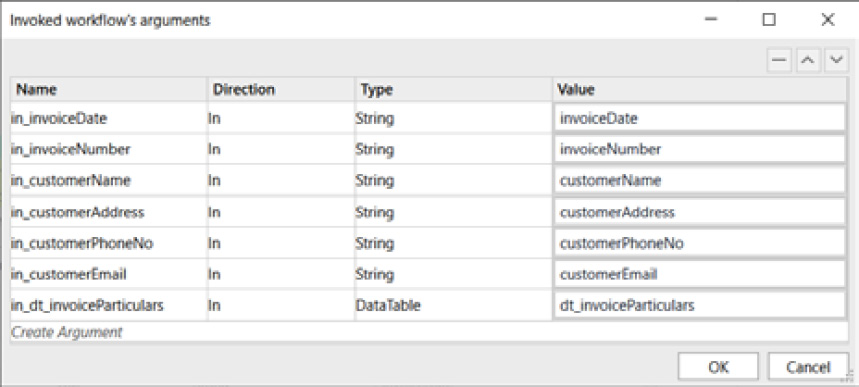
Figure 14.48 – Importing the arguments
Now that you have completed the uploading to the queue section, it is time to assemble the Main.xaml file to run the process.
Assembling Main.xaml
It's time to run the process, but let's invoke the Download_Invoice.xaml and Read_Invoice.xaml workflows in the Main.xaml file before running the process:
- In the Main.xaml workflow, create a variable named isMail of the boolean type. Then, drag and drop the Download_Invoice.xaml workflow in the Main.xaml workflow from the Project panel.
- Click on the Import Arguments button and pass the isMail variable as the value to the out_isMail argument:
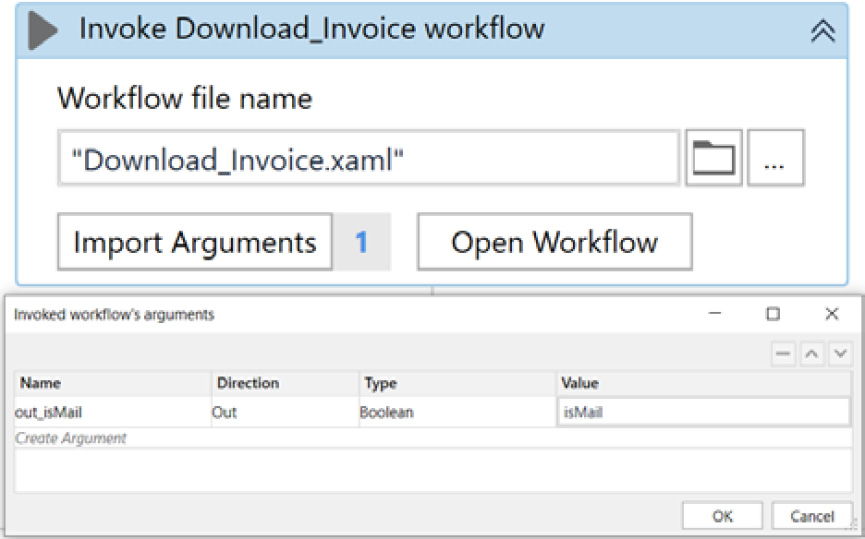
Figure 14.49 – The Invoke Download_Invoice workflow
- Next, drag and drop the If activity and pass the isMail variable in Condition. If the isMail variable value is True, then you can start reading the invoices; otherwise, you will stop the process.
- Drag and drop the Read_Invoice.xaml workflow inside the Then block of the If activity from the Project panel.
- Below that, add a Log Message activity at the Info level and set the message to "All invoices details uploaded to queue".
- In the Else block, add a Log Message activity at the Info level and set the message to "No invoice to process":
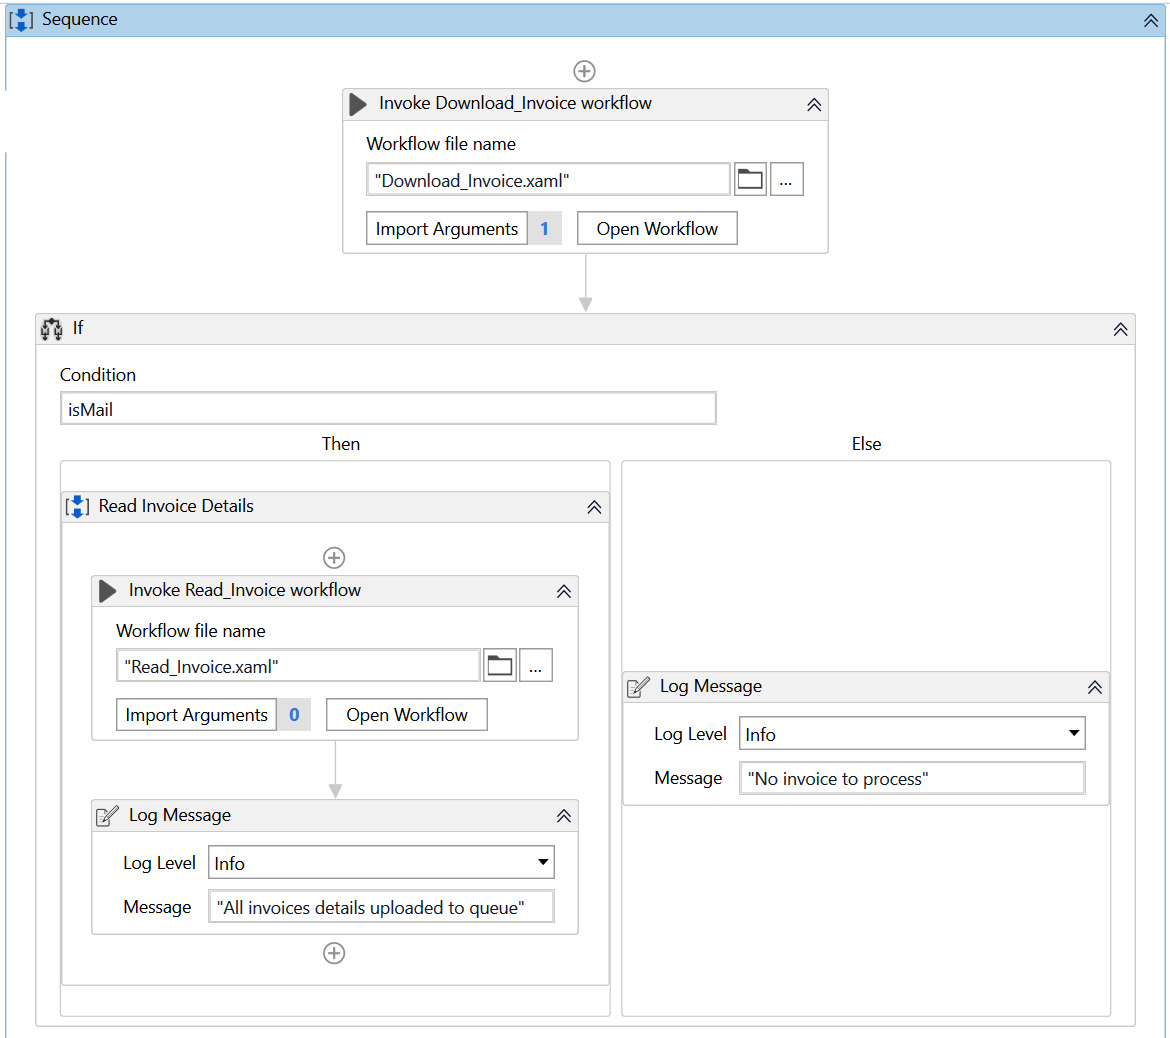
Figure 14.50 – The Main.xaml workflow
- Now, let's run the entire process by clicking on the Run button from the DESIGN ribbon bar. The process completes without any errors, and all the invoice details are uploaded to the Orchestrator queue:
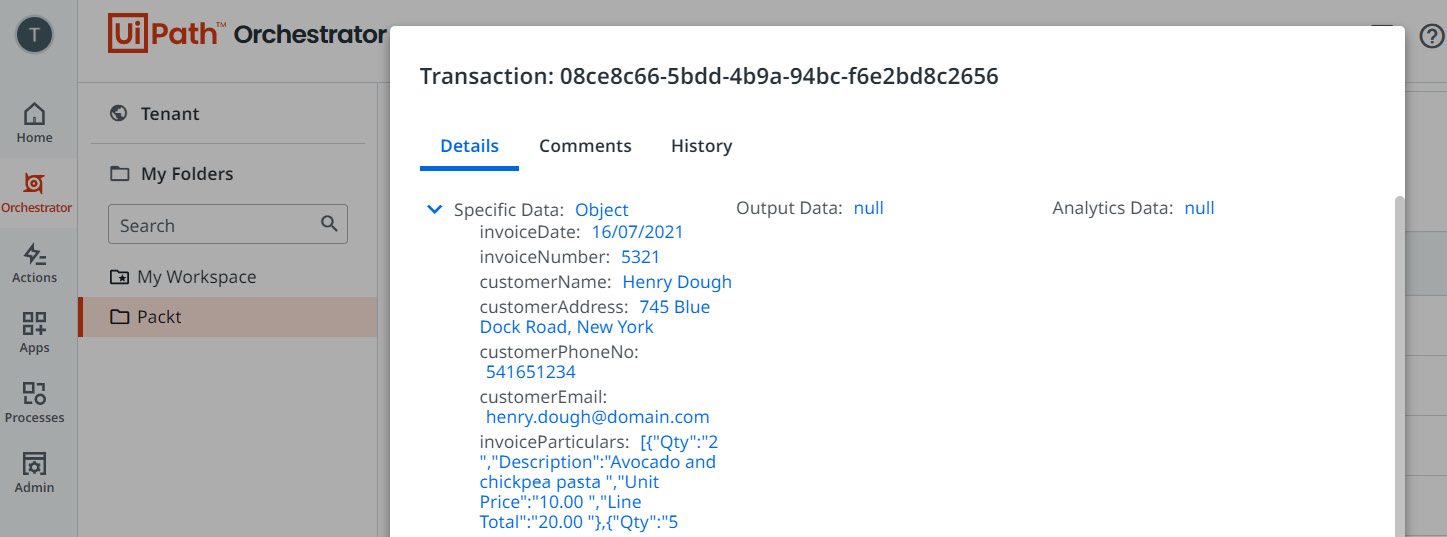
Figure 14.51 – The transaction item from the queue
Congratulations! You have successfully built the automation for the dispatcher model of invoice processing. Now, you can publish the code to Orchestrator to run the bot from the Orchestrator page or the UiPath Assistant.
Summary
In this chapter, you developed an automation process that scrapes relevant data from invoices for further processing. First, the robot read through emails and downloaded the invoices, received in the form of an email attachment as a PDF. Then, it extracted specific data from the invoices and uploaded them to the Orchestrator queue.
In the next chapter, you will learn how to build the performer model to consume values from the Orchestrator queues and punch them into the order entry CRM.