
Chapter 9: Using Helm, Kustomize, and KubeVela
This chapter concentrates mainly on configuration management for bespoke applications. The Kubernetes configuration for bespoke applications includes deployment, service, ingress, secret, configmaps, tags needed for governance, cross-cutting concerns, application security context, and other dependencies. Managing these configurations requires carefully choosing patterns and tools that fit the use case. Also, we must keep reuse, team collaboration, and scalability in mind. In the previous chapter, we lightly touched on a few tools such as Helm, Kustomize, and KubeVela for application configuration management. This chapter will be an opportunity to explore these tools in more detail.
The following topics are covered in the chapter:
- Application configuration management capabilities
- Using Helm for application deployment
- Hands-on chart development
- Customizing configurations with Kustomize
- Deploying application workloads with KubeVela
Application configuration management capabilities
Operating an application successfully in the Kubernetes environment requires a few capabilities from the perspective of configuration management. Here is a list of critical configuration management capabilities:
- Packaging: As discussed several times, deploying an application into Kubernetes involves configuring multiple resources. It requires a capability where we can package all these resources into a single bundle.
- Life cycle management: An application and all its dependencies must be executed into the cluster as a single deployment supporting the required release management constructs such as rollout, rollback, version management, and blue-green deployment.
- Application discovery: This is a capability that is required for day-to-day operations. It will enable any discovery tools to dashboard a list of applications deployed, their version, and dependencies.
- Application description customization: Not all environments will hold the same configuration. For example, the replication count in a staging environment could be one, while in production, we may set up horizontal Pod scaling. The capability is also required when we want to inject dependencies enabling segregation of concerns.
Let’s explore the tools available for application configuration management, keeping the capabilities in mind. The following section will deep dive into Helm, our first tool to explore.
Using Helm for application deployment
Helm is one of the popular configuration management tools in the Kubernetes ecosystem. It came into existence as early as 2015. It has come a long way in evolving itself and solving all the bottlenecks. Being a Cloud Native Computing Foundation (CNCF)-graduated project shows its maturity, production readiness, and value. Here are three key concepts of Helm:
- Charts: Charts are the basic units of applications in Helm. A chart is nothing but the bundled package of an application with all its dependencies.
- Repository: A bundled chart requires a consistent way of storage to distribute reliably, and repositories support this requirement. While open source applications can use a public repository, private repositories can be used for proprietary applications. Starting from Helm v3.8.0, any Open Container Initiative (OCI)-compliant repository will support Helm. This means that most container registries support Helm packages as well.
- Release: This is an instance of the chart running in the cluster. When we install a chart for the first time, it creates a new release version. Any update will be an increment in the release version. The construct enables release management capabilities such as rollout, rollback, and blue-green deployment.
Using Helm requires a client-side command-line interface (CLI) setup. In a macOS operating system, use brew to install the CLI, while the choco installer can be used for Windows. The following code snippet shows how to install the CLI on either of these operating systems:
# Helm install macOS
brew install Helm
# Helm install Windows
choco install kubernetes-helm
For more installation options, visit https://helm.sh/docs/intro/install/. We will explore Helm in two parts—the first part will cover working with an existing chart, and new chart development will be covered in the second part.
Working with an existing chart
Working with an existing chart can be categorized into repository management, release management, and cluster discovery. Here are a few repository management commands:
# Add a repo (Add bitnami repo to your local repo list)
helm repo add bitnami https://charts.bitnami.com/bitnami
# For private repository, use additional authentication flags
# To view the list of possible authentication flags
helm repo add --help
# Update the charts in all the added repo's
helm repo update
# Update the charts in a specific repo.
helm repo update bitnami
# Search for charts with the given name within the added repo
helm search repo wordpress
# Search charts in ArtifactHub, a famous open-source repo
helm search hub wordpress
#List all the repositories added
helm repo list
The preceding repository management commands are good enough for our day-to-day repository operations. Next, we will look at a few release management Helm commands, as follows:
# Install a chart
# Format
helm install <release-name> <chart-name>
# Example
helm install redis bitnami/redis
# Each chart will support a list of variables to be set
# Variables can be hierarchical. For example, the 'enabled' flag is under the 'auth' hierarchy in the bitnami/redis chart.
helm install redis bitnami/redis --set auth.enabled=false
# Install with a value set in the values file
helm install redis bitnami/redis -f values.yaml
# If the same variable is present in both the command line set and value file, the command line set takes precedence.
helm install redis bitnami/redis -f values.yaml --set auth.enabled=false
# Update a release
# Format
helm upgrade <release-name> <chart-name>
# Example
helm upgrade redis bitnami/redis -f values.yaml --set auth.enabled=true
# Roll back a release
# Format
helm rollback <release-name> <release>
# Example, roll back redis to the first release version
helm rollback redis 1
# Uninstall format
helm uninstall <release-name>
# Uninstall redis release
helm uninstall redis
The preceding commands are some frequently used release management commands. The following snippet will cover a couple of cluster discovery commands:
# List all the Helm releases in the target cluster
helm list
# Find the status of a release named redis
helm status redis
It’s time to explore new chart development through a step-by-step, hands-on example.
Hands-on chart development
Helm charts are nothing but a set of configuration templates with variable placeholders in the templates. These placeholders can be replaced with values when templates are rendered for installation. Helm has a powerful domain-specific language (DSL) providing a wide range of constructs for variable replacement. We will look at some frequently used constructs to learn chart development in the upcoming sections.
Chart generation
A Helm chart bundle has a set of organized files and folders. Either we need to understand the structure to develop it from scratch or we can use the generator. In the hands-on example, we will use the generator to create a chart named hello-world (helm create <chart-name>), as illustrated in the following screenshot:
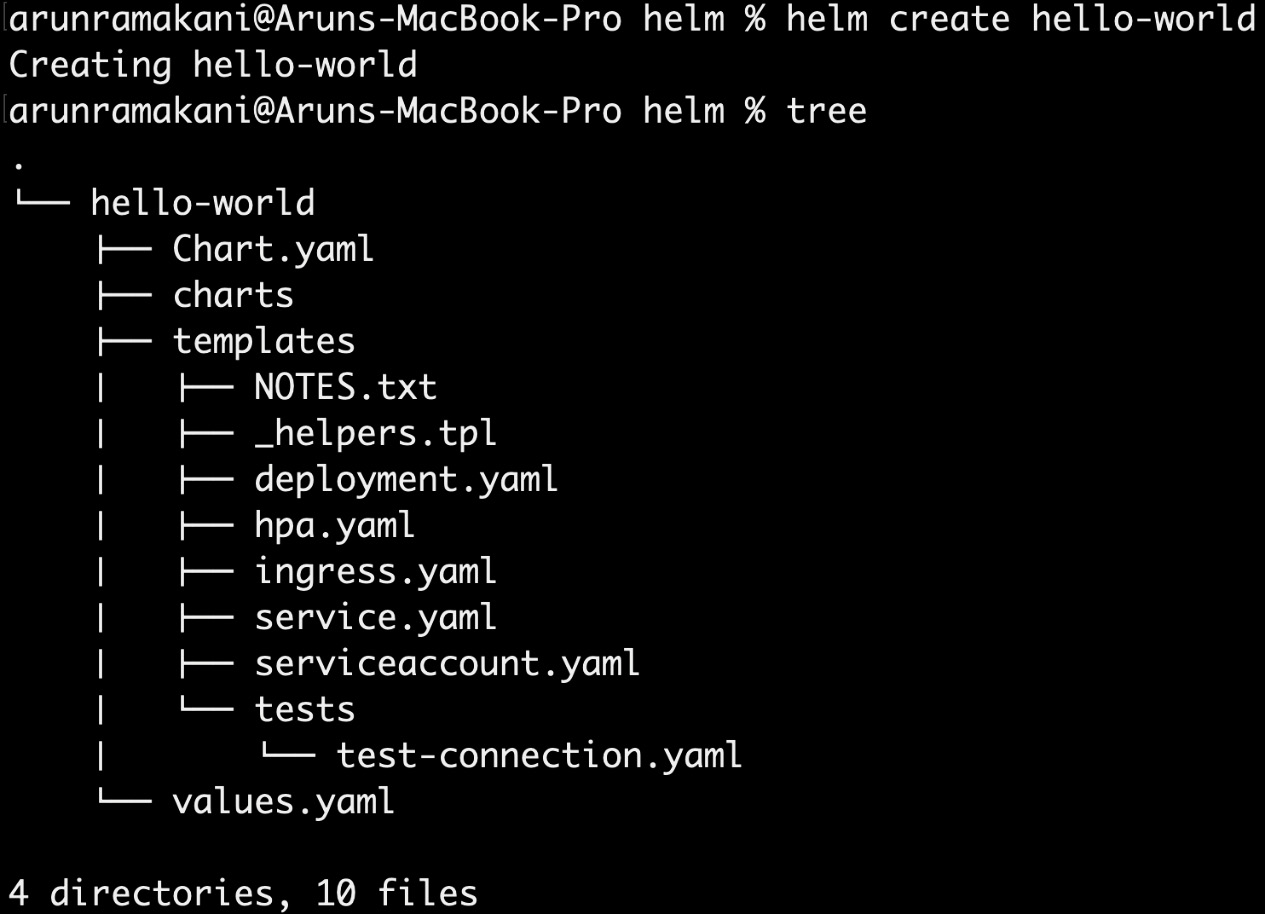
Figure 9.1 – Creating a chart
Let’s look at the use of each file, as follows:
- Chart.yaml: This is a file that holds a description for the chart. It contains information such as supported Helm version, chart version, application version, application name, description, other dependent charts, maintainers, and so on. It also has an attribute called type that holds the value of either application or library. application refers to the fact that we are packing a Kubernetes application, and library means that the chart contains utility functions for reuse.
- charts folder: This is a folder that can hold a list of dependent sub-charts. We can use sub-charts for many reasons. Dividing an extensive application into small modules with a sub-chart for each module is one way to use it. Another way could be to use it as a packaging mechanism for application dependencies such as a database. We could also use it as a holder of reusable functions that can be used as a shared library. An important thing to note here is that sub-charts can be independently deployed, meaning they cannot explicitly refer to the parent, but a parent can override values of sub-chart templates when required.
- values.yaml: This YAML Ain’t Markup Language (YAML) file holds values that need to be replaced when templates are rendered. We can override this file with a new file through the CLI—for example, helm upgrade redis-install-1 bitnami/redis -f values.yaml. Also, we can use the set flag in the CLI to override a specific value.
- template folder: NOTES.txt, _helpers.tpl, and Kubernetes resource YAML templates are files that are part of the template folder. The NOTES.txt file is a template file that will be rendered and printed in the console when we run helm install or helm upgrade. The _helpers.tpl file will hold reusable functions that can be used across a chart. The rest of the files will be standard Kubernetes resource templates relevant to the application. Using the Helm create command to generate a basic chart adds a list of Kubernetes resources required for application deployment into the template folder. We can delete resources that are not necessary.
- tests folder: This can hold unit tests to test the logic we write in the resource template.
Helm uses the template package from the Go language and provides many powerful templating constructs to render complex scenarios. The following sections will explain each concept using the hello-world example.
Variable access
When templates are rendered, we can replace placeholder variables by simply specifying the variable hierarchy with the following syntax:
# Variable reference syntax - {{ variable-hierarchy }}# Examples
# Refer deployment.yaml line no 9
{{ .Values.replicaCount }}# Refer _helpers.tpl line no 50
{{ .Release.Name }}In the preceding example, note that . acts as a separator representing the variable hierarchy. We start with . representing the root, then refer to one of the root objects. Note that we could have a variable with a multiple-depth hierarchy—for example, {{ .Values.image.repository }}. Here are some important built-in root objects available for us to use:
- Release: This object holds release-related information such as the release’s name, release namespace, revision number, and so on.
- Values: An object formed with the values file/command-line set flags.
- Chart: Values defined in the chart.yaml file will be available under this object.
There are more objects available, such as Files, Capabilities, Template, and so on. Refer to https://helm.sh/docs/chart_template_guide/builtin_objects/ for a complete list.
Tip
To remove an object or a specific attribute from the template, use the --set command-line with a null value—for example, --set livenessProbe.httpGet=null.
Functions and pipelines
We may have requirements to replace variables after doing some transformation, and built-in functions and pipelines can help with these. For example, refer to the following code snippet:
# Refer _helpers.tpl line no 40
app.kubernetes.io/version: {{ .Chart.AppVersion | quote }}We refer to the application version and then enclose a string inside a quote in the preceding example. There are two essential things to note here. The quote is an built-in function available for us to use, and | will help pipe the output from one instruction to another. Here is a list of some frequently used functions:
- indent: Useful to format the configuration YAML. It takes a numerical input and indents the row with the specified index.
- nindent: The function works like the intent function, with an addition of a newline at the beginning.
- trunc: Truncates a string with the specified number of indexes.
- trimSuffix: This method takes a string suffix as input and truncates the suffix if it is present in the operating string.
- replace: The replace method can replace one substring with another in an operating string.
- semverCompare: This function can be used to compare two semantic versions.
These are some of the functions used in deployment.yaml and _helpers.tpl. Refer to https://helm.sh/docs/chart_template_guide/function_list/ to look at an extensive list of built-in functions.
Information
Note that there is - in many template placeholders—for example, the sixth line of deployment.yaml has {{-. This instructs the template engine to remove whitespace on the left. Similarly, -}} can remove whitespace on the right.
Flow control
Flow controls make any programming language powerful and enable us to encode complex logic. Helm’s template language provides three flow controls. The first flow control available is the standard if/else statement. It is helpful to include a block based on a specific condition. The following code snippet from the ingress.yaml file checks the Kubernetes version to decide on the ingress application programming interface (API) version:
# Refer ingress.yaml line no 9
{{- if semverCompare ">=1.19-0" .Capabilities.KubeVersion.GitVersion -}}apiVersion: networking.k8s.io/v1
{{- else if semverCompare ">=1.14-0" .Capabilities.KubeVersion.GitVersion -}}apiVersion: networking.k8s.io/v1beta1
{{- else -}}apiVersion: extensions/v1beta1
{{- end }}Note that Capabilities is an built-in object providing the capabilities of the target Kubernetes cluster. The second flow control, with, allows us to create a block with a specific variable scope. Refer to the following code snippet from serviceaccount.yaml:
# Refer serviceaccount.yaml line no 8
# We create a scope block with variable Values.serviceAccount.annotations
{{- with .Values.serviceAccount.annotations }}annotations:
{{- toYaml . | nindent 4 }}{{- end }}Remember our earlier discussion about variable references? We mentioned that the initial . refers to all objects’ roots. Inside a with block, the definition changes. The initial . within the block will refer to the scope variable defined. The third flow control is the range used for looping. Refer to the following code snippet from NOTES.txt:
# Refer NOTES.txt line no 2
# Loops over the hosts with an inner loop on path
{{- range $host := .Values.ingress.hosts }} {{- range .paths }} http{{ if $.Values.ingress.tls }}s{{ end }}://{{ $host.host }}{{ .path }} {{- end }}{{- end }}We declare a new variable, host, in the preceding example, and refer to it within the loop. Similarly, we could use variable declaration in other places as well.
Tip
We can use dry-run and a disable-openapi-validation flag with helm install or helm upgrade to debug or validate the YAML outputs.
Named templates
Named templates are frequently used, and they act as static custom-defined functions. We define a template with a name and then import them into the required place. Generally, these named templates are described in the helper file and reused across the chart. Refer to the two pieces of code in the following snippet:
# Template named hello-world.selectorLabels is defined in the _helpers.tps line no 45
# hello-world is a release name prefix added to avoid name conflicts when we have sub-charts and dependent charts.
{{- define "hello-world.selectorLabels" -}}app.kubernetes.io/name: {{ include "hello-world.name" . }}app.kubernetes.io/instance: {{ .Release.Name }}{{- end }}# deployment.yaml line number 12
# Template included with the name
matchLabels:
{{- include "hello-world.selectorLabels" . | nindent 6 }}Note that the template output can be piped with other built-in functions. We have covered most of the skills required to create new Helm charts for our bespoke applications. After changing the image name to hello-world in the value.yaml file, we can deploy the chart. Refer to the following screenshot for the chart installation:
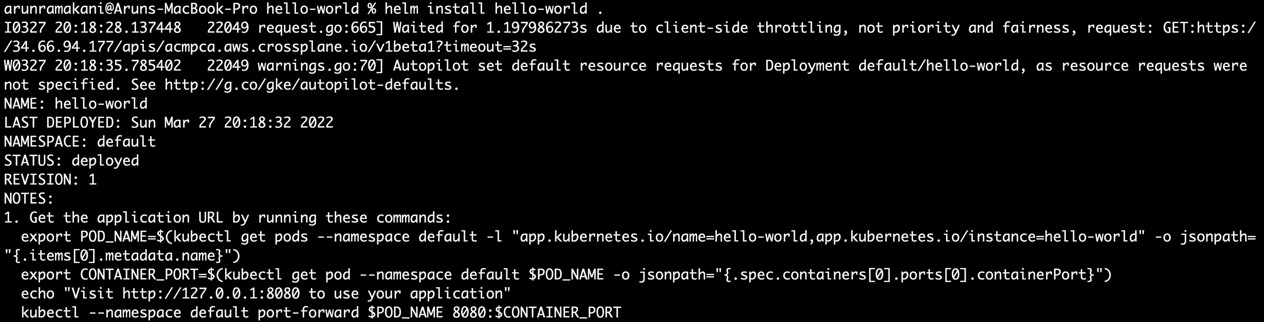
Figure 9.2 – Installing the chart
In the next section, we can use Kustomize to customize the configuration.
Customizing configurations with Kustomize
Be it a configuration managed by Helm or other configuration management tools, Kustomize is one of the best tools for configuration customization. Let’s look at some of the use cases for Kustomize, as follows:
- Keeping environment-specific customization separate from the base configuration is one use case. For example, replication counts can be done in staging, while the production environment could be enabled with auto-scaling.
- Managing cross-cutting configurations outside the base configuration is another use case. For example, the application operator working with governance-specific labels in all deployments can keep the configuration separate from the base configuration. It can enable separation of concerns (SoC) for multi-persona collaboration without friction. Injecting a service mesh configuration as a cross-cutting concern is another example.
- The third use case is fixing vulnerabilities as a step in the configuration pipeline. Consider that there is a security vulnerability with an nginx image. The security team can add a customization step in the pipeline to ensure that the vulnerable version of nginx is updated for all deployments.
- The classic use case is to avoid abstraction leaking, as we discussed many times in the previous chapters. When we want to reuse the base configuration template across a few similar workloads, we can consider Kustomize as the new parameter.
The following screenshot represents how Kustomize patching can be used in a multi-persona collaboration environment:
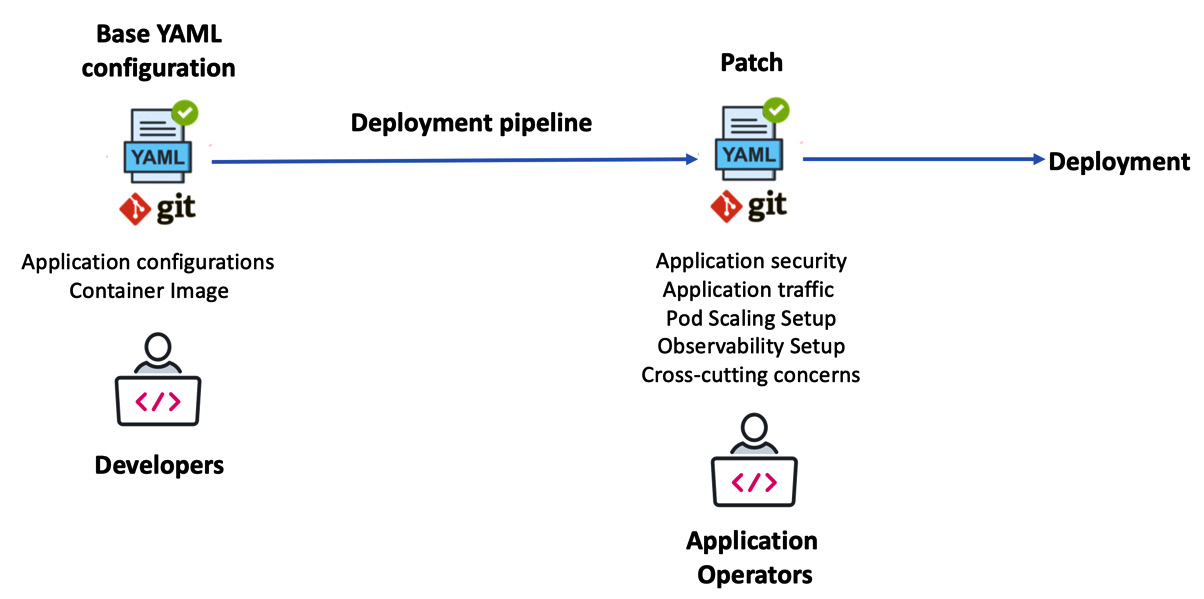
Figure 9.3 – Configuration customization
Let’s look at a simple example to use Kustomize. We should have the base configuration on one side and kustomization.yaml on the other. kustomization.yaml defines how to customize the base configuration. Here is a sample kustomization.yaml file:
resources:
- deployment.yaml
commonLabels:
team-name: alpha
namespace: test
The preceding configuration refers to the base configuration and defines how to customize it. The deployment.yaml file is the base configuration reference under the resources section. The commonLabels configuration adds the team’s name as a label to the deployment, and the namespace configuration will override the deployment resource namespace. We can run the kubectl kustomize . command to perform the customization. Refer to the following screenshot:
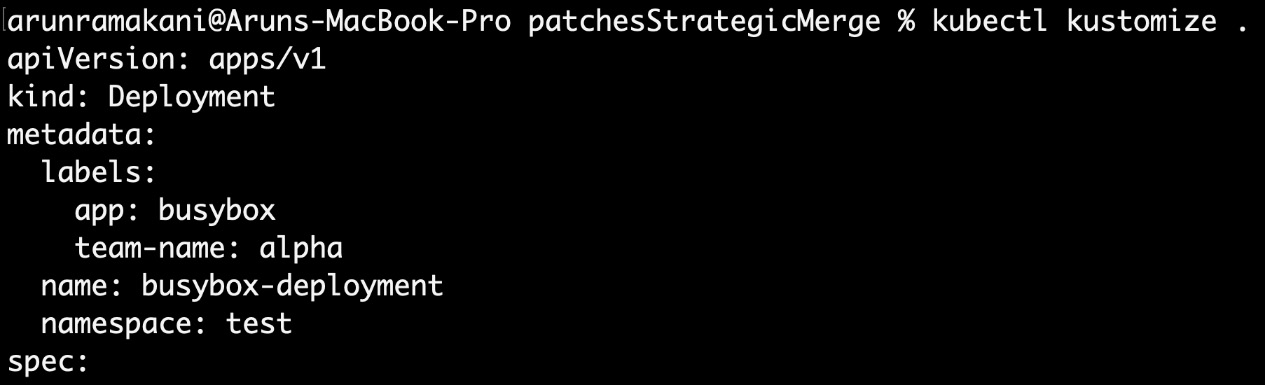
Figure 9.4 – Configuration customization (continued)
Kustomize can work with Crossplane configurations as well. An example to add a label to the composition is available in the hands-on example repository for this chapter.
Tip
helm install can use Kustomize as a post-render step by specifying the path to kustomization.yaml. The syntax is helm install <release-name> <chart-name> --post-renderer ./path/to/executable.
An example of using Helm and Kustomize is available at https://github.com/thomastaylor312/advanced-helm-demos/tree/master/post-render.
More than labels and namespaces, a lot more is possible with Kustomize. Refer to https://kubectl.docs.kubernetes.io/references/kustomize/kustomization/ for a deep dive into all possible customizations. This takes us to the end of the discussion on Kustomize, and in the following section, we will discuss KubeVela for application workload deployment.
Deploying application workloads with KubeVela
As discussed earlier, KubeVela is a project like Crossplane but focuses primarily on bespoke application workload. It can also cover off-the-shelf components via add-ons. Before getting into the details, let’s look at ways to install KubeVela. We will do the KubeVela installation in two steps. The first part is installing the KubeVela CLI. We can use Homebrew or a script if you have a macOS operating system. In the case of Windows, we can use PowerShell. Here are the CLI installation instructions:
# Installing in macOS with Homebrew
brew update
brew install kubevela
# Installing in macOS with script
curl -fsSl https://kubevela.io/script/install.sh | bash -s 1.3.0
# Installing in windows with a script
powershell -Command "iwr -useb https://kubevela.io/script/install.ps1 | iex"
As the next step, we should install KubeVela into the Kubernetes cluster, which is nothing but a set of Custom Resource Definitions (CRDs). Here are the KubeVela CRDs’ installation instructions. We can use either the CLI or a Helm chart:
# Using the CLI
vela install
# Using a Helm chart
helm repo add kubevela https://charts.kubevela.net/core
helm repo update
helm install --create-namespace -n vela-system kubevela kubevela/vela-core --version 1.3.0 --wait
Additionally, we can enable add-ons. Add-ons enhance the capability of KubeVela. For example, we can use the velaux add-on as an application management dashboard. terraform-gcp is another add-on useful to compose Google Cloud Platform (GCP) resources’ dependencies:
# View list of Add-ons available
vela add-on list
# Install the application management dashboard add-on
vela add-on enable velaux
We are all good to start using KubeVela. The core of the KubeVela configuration is the application API, and the anatomy of the application API is described in the following section.
Anatomy of a KubeVela application definition
The application specification carries the following four key sections:
- Components: Components are the root specification representing what we want to deploy as a Kubernetes workload. It can also be an external off-the-shelf dependency. In the case of Kubernetes workloads, it can be a Helm chart or a Kustomize package, or other Kubernetes objects such as Deployment and Job. The external off-the-shelf dependency components can be a Terraform module, CloudFormation template, or even a Crossplane Composite Resource (XR)/Claim.
- Traits: Traits are nothing but declarative operational behavior. Application rollout behavior, auto-scaling rules, and route rules are some examples of a trait. Traits are attached to the components, and we could have more than one trait attached.
- Policies: Policies are a set of rules to be enforced. Pod security policy and health-check configurations are a couple of examples.
- Workflow: A workflow is a final section that allows us to control the component delivery process. Approval steps and environment-specific traits are examples.
Have a look at the complete list of components, traits, policies, and workflows supported by our cluster using the following commands:
# List of Components
kubectl get ComponentDefinition -n vela-system
# List of Traits
kubectl get TraitDefinition -n vela-system
# List of Policies
kubectl get PolicyDefinition -n vela-system
# List of Workflows
kubectl get WorkflowStepDefinition -n vela-system
The following screenshot describes the anatomy of a KubeVela application with a hands-on example:
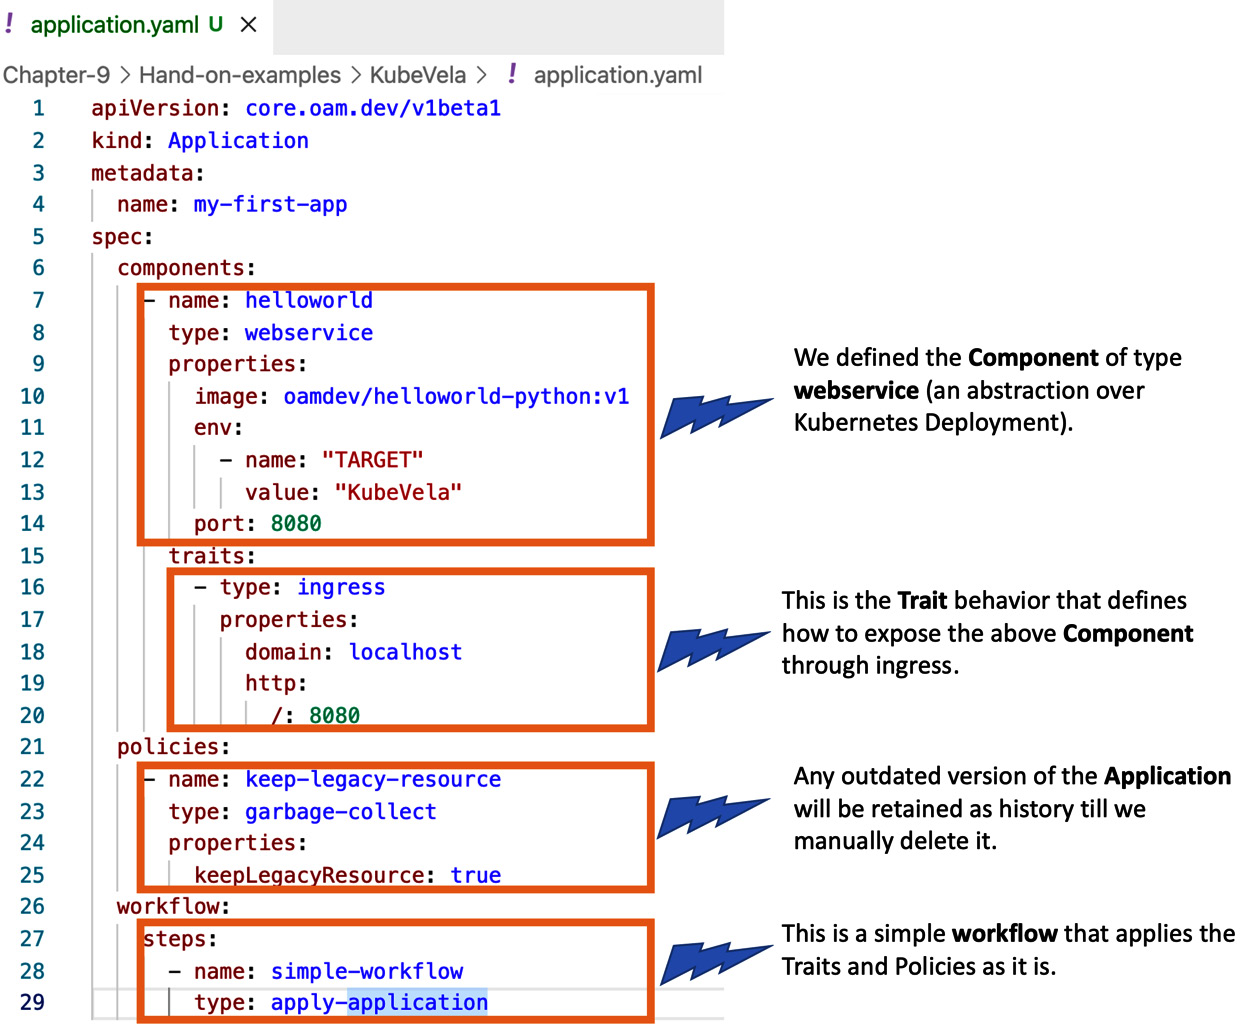
Figure 9.5 – Application API
Apply the application YAML, and you will find that our hello-world application is running successfully, as we can see here:

Figure 9.6 – Deployed application
The KubeVela community has developed many components, traits, policies, and workflows based on the Open Application Model (OAM) specifications and documented them in the usage examples. The list will cover most of the requirements. Refer to https://kubevela.io/docs/end-user/components/references for a deep dive. If we have a custom requirement, KubeVela has all the ingredients to compose a custom component, trait, policy, and workflow. It is again creating and registering new CRDs. As with Crossplane, KubeVela also provides a framework to develop these CRDs. That takes us to the end of the chapter and the discussion on KubeVela.
Summary
The chapter discussed some popular configuration management tools from the perspective of bespoke applications. While we did not cover every aspect of the tool, we did cover basic concepts, usage patterns, and a hands-on example. Each tool discussed here requires a book by itself to learn about in depth, which is beyond the scope of this book. The concepts, patterns, and tools we discussed will guide us to approach end-to-end (E2E) automation of the whole application using Crossplane.
The next chapter will go through a hands-on journey to onboard a complete application and its dependency using Crossplane, Helm, and a few other tools.