Chapter 3: Automating Infrastructure with Crossplane
It is time to stop being abstract about ideas and deep-dive into details. Starting with this chapter, we will go on a hands-on journey to implement what we have learned and explore different Crossplane concepts at the same time. Trying out the examples given in this book will ensure that we have the ideas and experience to practice modern infrastructure engineering in our day-to-day jobs. This chapter will specifically cover the detailed architecture of Crossplane and its out-of-the-box features.
The following are the topics covered in this chapter:
- Understanding Custom Resource Definitions and custom controllers
- Understanding the Crossplane architecture
- Installing Crossplane
- Installing and configuring providers
- Multiple provider configuration
- An example of POSTGRES provisioning
Understanding Custom Resource Definitions and custom controllers
Understanding the concept of Custom Resource Definitions (CRDs) and custom controllers in Kubernetes is vital to know how Crossplane works. Before getting into the Crossplane architecture, we will take a quick look at CRDs and custom controllers.
Terminology
The term resources in Kubernetes represents a collection of objects of a similar kind. Pods, Services, Deployments, namespaces, and many more are the in-built object kinds. Each resource has the respective API endpoints at kube-apiserver.
CRDs are the way to extend the in-built resources list. It adds a new resource kind, including a set of API endpoints at kube-apiserver, to operate over the new resource. The term CRD precisely indicates what it does. The new resource added to Kubernetes using a CRD is called a Custom Resource (CR). Storing and retrieving a structured object defined with a CRD is not helpful unless backed by a custom controller. Custom controllers are our addition to the in-built controllers. They generally operate over a CR to perform specific actions in a control loop for each API event of a given resource. Chapter 1, Introducing the New Operating Model, has already covered the concept of a control loop. Refer to the Control theory section if you want to brush up on the idea. Note that the custom controllers do not necessarily always work with a CR. They can work with any existing resources to extend its functionality, which is not in the scope of our discussion. The Prometheus operator is one of the most famous and widely used examples of adding a few new CRs and controllers into the Kubernetes cluster to perform monitoring of workloads.
Terminology
The term operator when applied to Prometheus is a term coined by CoreOS. Operators are nothing but a combination of CRD + a custom controller + application focus.
Adding a new CRD
While there are a few ways to add CRDs to Kubernetes, let's add CRDs by creating a yaml file and applying the same on the cluster. The yaml file provides a structure to the CR. The following are the key attributes of a CRD YAML:
- ApiVersion for a CRD YAML falls under apiextensions.k8s.io/v1beta1.
- Kind is the elements that specify that we are representing a resource as YAML. The name designated for the CRD resource is CustomResourceDefinition.
- The metadata name is the next critical element that requires a standard format. The format is the plural name (the plural name of the CR we define) + . + group (the API group under which we what to classify the CR). In the following YAML sample, we describe it as clouddbs.book.imarunrk.com, where clouddbs is the plural name and book.imarunrk.com is a newly defined API group. The term plural name is nothing but a representation of the resource name in the plural format. For example, the plural format of the existing resource pod is pods. We can always use that with kubectl commands (kubectl get pods).
- Spec is the section under which we define the details of the CR. The attributes of this section include the API group, version, scope, and name. This section also describes the validation requirements of the API itself, such as the parameter list, their data types, and whether they are a required parameter.
The following is a sample CRD YAML that represents a cloud database resource. It takes a couple of mandatory parameters, the database type, and the cloud provider name:
apiVersion: "apiextensions.k8s.io/v1beta1"
kind: "CustomResourceDefinition"
metadata:
name: "clouddbs.book.imarunrk.com"
spec:
group: "book.imarunrk.com"
version: "v1"
scope: "Namespaced"
names:
plural: "clouddbs"
singular: "clouddb"
kind: "CloudDB"
validation:
openAPIV3Schema:
required: ["spec"]
properties:
spec:
required: ["type","cloud"]
properties:
type:
type: "string"
minimum: 1
cloud:
type: "string"
minimum: 1
Executing the following YAML code will enable new rest endpoints at kube-apiserver to create, modify, and delete the CloudDB resource:
# Apply the CRD yaml to the Kubernetes cluster
kubectl create -f crd.yaml
The next step is to write the custom controller to manage the CR API events. We can write a controller in many different languages using different open source frameworks. Writing a controller is an advanced topic that is covered later in Chapter 7, Extending and Scaling Crossplane. Crossplane providers are nothing but controllers to manage external infrastructure resources – generally, cloud providers' managed services. For now, we must remember that controllers implement functions to execute three actions – observe, analyze, and react in a control loop. In the preceding example, the control loop will create, update, and delete the cloud database based on the resource's creation, update, and delete API events.
Working with the CRD
Once we have the CRD and controller in place, we can start creating and managing the cloud database with kubectl. It will work very similarly to other in-built resources such as the Pod. The following YAML is an example of creating Amazon RDS:
apiVersion: "book.imarunrk.com/v1"
kind: "CloudDB"
metadata:
name: "aws_RDS"
spec:
type: "sql"
cloud : "aws"
Applying the following command will create a new CloudDB resource:
# Apply the CloudDB yaml to the Kubernetes cluster
kubectl create -f aws_rds.yaml
Note that the preceding YAML will not create an RDS, as we have not developed and deployed a controller. The example is to explain how CRDs and custom controllers work. Now that we have learned about CRDs and custom controllers, it's time to look at the Crossplane architecture in detail.
Understanding the Crossplane architecture
From what we know so far, Crossplane is nothing but a set of Kubernetes custom controllers and CRDs representing external infrastructure resources. If you take a closer look, Crossplane is much more than a combination of CRDs and custom controllers. Crossplane has four key components. The components are as follows:
- Managed resources
- Providers
- Composite resources
- The Crossplane core
Managed resources
A Managed Resource (MR) connects a CRD and respective custom controller to represent a single external infrastructure resource. MRs are in a one-to-one mapping with infrastructure resources. For example, CloudSQLInstance is an MR representing Google Cloud SQL. The following diagram depicts the MR mapping for Amazon RDS and Google Cloud Storage:

Figure 3.1 – MR mapping
The Crossplane Resource Model (XRM) is the open standard used when developing an MR. The XRM is an opinionated extension of the Kubernetes Resource Model (KRM). The XRM sets the standards for external resource naming, dependency management, package management, and so on. MRs are the basic building blocks on which everything else in Crossplane is made. We can use MRs directly to provision an external infrastructure, but this is very rarely done. The best practice is to compose a higher-level API above an MR to consume. We will look at how and why in a later section of this chapter, as well as a dedicated chapter to address this aspect in detail. The following YAML represents the provisioning of CloudSQLInstance directly using an MR:
apiVersion: database.gcp.crossplane.io/v1beta1
kind: CloudSQLInstance
metadata:
name: my-GCP-DB
spec:
forProvider:
databaseVersion: POSTGRES_9_6
region: asia-south2
settings:
tier: db-n1-standard-1
dataDiskSizeGb: 10
writeConnectionSecretToRef:
namespace: DB
name: my-GCP-DB-credentials
The YAML will provision a GCP Cloud SQL instance with the resource constraints mentioned in the configurations. Since MR is the low-level Crossplane construct mapping to the infrastructure provider API, it will directly support all the attributes available in the infrastructure API. The reconciliation control loop of Crossplane controllers will fill default values assigned by the infrastructure API for the features not provided in the configuration YAML. This concept of MR is called late initialization. Whatever we provide under the forProvider: section will represent the attributes of the infrastructure API. If someone or a parallel process performs an unauthorized change to the infrastructure resource, Crossplane will roll back the changes to the source of truth mentioned in the YAML. The remaining parts of the configuration will help to determine other Crossplane behavior. For example, the preceding YAML has writeConnectionSecretToRef: to decide how to save the database credentials. There can be many more such behavior controls, which we will learn as we go further. The following commands can help look at the details of the created GCP resource and clean up the resources after testing:
# View the resources created with
kubectl get cloudsqlinstance my-GCP-DB
kubectl describe cloudsqlinstance my-GCP-DB
# Delete the resources created with
kubectl delete cloudsqlinstance my-GCP-DB
We can also import the existing provisioned infrastructure into the Crossplane ecosystem. The MR checks whether the resources named in the configuration YAML already exist before fresh provisioning. When we build that YAML for the existing infrastructure, we can provide the authorized attributes that need to be maintained by the reconciliation loop under forProvider. In the next chapter, we will look at an example of importing existing infrastructure into Crossplane.
Tip
One of the possible Crossplane behavior controls is the deletion policy, specified with an attribute called deletionPolicy. It can have two possible values – Delete, which is the default, and Orphan. While Delete will remove the resource from the infrastructure provider, Orphan will just remove the Crossplane reference.
Providers
Providers are a group of related MRs packaged together as a bundle. Each cloud vendor, other infrastructure services such as Rook (the cloud-native storage for Kubernetes – https://rook.io/), and software tools such as Helm have a provider package. The format of these packages is nothing but a container image. Installing a provider can be done either with a configuration YAML or using a Helm package. It requires a ProviderConfig configuration before we can start using these packages. The ProviderConfig resource helps us to set up the infrastructure vendor credentials. We will look at provider installation and ProviderConfig setup in the next section of the chapter.
The following figure represents the AWS and GCP providers extending Crossplane for the respective cloud resource provisioning:

Figure 3.2 – A provider view
Composite resources
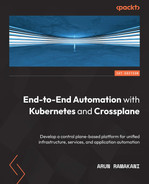
Every organization is different in its structure, size, operating model, technology maturity, compliance, and security requirements. All these aspects will directly create a set of rules as policies for infrastructure provisioning and usage. Also, there is a complexity in assembling multiple pieces of the infrastructure stack. Composing is a way to build our custom infrastructure APIs above one or more MR APIs. These custom APIs can encode all the policy guidelines and assemble multiple pieces of infrastructure into simple, easy-to-use infrastructure recipes. These APIs are called Composite Resources (XRs). The critical aspect is that Crossplane allows us to define such resources in a no-code way, just with configurations. In the absence of a Crossplane composite, we will end up building complex Kubernetes custom controllers. Composition and Composite Resource Definition (XRD) are the configurations that we use to compose a higher-level XR API. XRD defines the schema of the new custom API that we are building. It's the definition of a new CRD. Composition is the configuration that provides a mapping between the new CRD schema and the existing MRs. Once the new XR resource is available, we can start provisioning the infrastructure recipes using a resource claim object. The Claim API is something that gets created when we add a new XR API, provided we have asked for it in the XRD configuration. The Claim and XR APIs are almost the same with minor differences, which we will explore in an upcoming section. The following diagram represents how we can use CloudSQLInstance, a firewall, and network MRs from the GCP provider to construct an XPOSTGRES database composite:
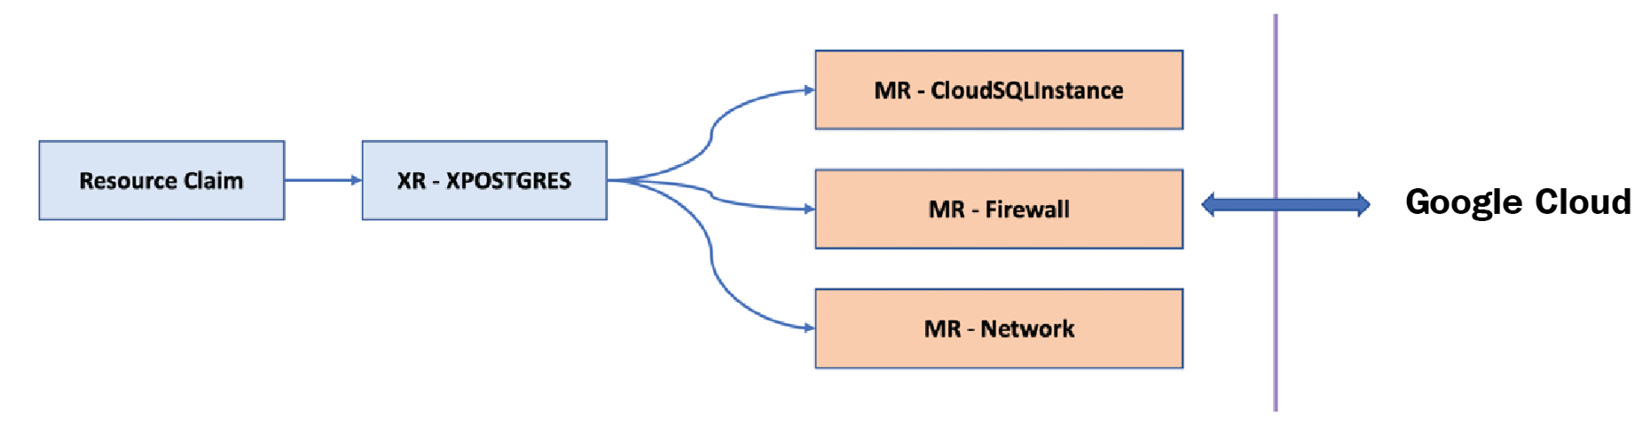
Figure 3.3 – A composite resource
We have thousands of cloud-managed services with many attributes requiring a detailed configuration. It adds a significant cognitive load to shortlist the options and implement the resource provisioning, with good guardrail settings that suit our organization's needs. Every product team in an organization cannot take up this level of cognitive load. Usually, organizations use a platform team to abstract the cognitive load. The composing layer is for platform teams to build such abstractions. Crossplane enables us to expose these abstractions as Kubernetes APIs, allowing self-service for the product teams. The following diagram represents the platform and product team interaction model:

Figure 3.4 – Product and platform team interaction
Crossplane core
Before setting up the providers we are interested in and building XRs above that, we need to have a Crossplane core component installed in the cluster. This component provides the primitives required to manage multiple providers, build new XRs, and build new packages. Again, the core component is a bundle of CRDs and custom controllers. It is the glue that holds everything else about Crossplane together. The following figure represents how all the pieces fit within the Kubernetes ecosystem:

Figure 3.5 – All the pieces of Crossplane
Let's revisit some of the acronyms that we have used so far, which we will use going forward:
- CRD stands for Custom Resource Definition, a way to extend the Kubernetes API to support new resource types.
- CRs are the resources defined with the CRD. CR stands for Custom Resource.
- XRM stands for Crossplane Resource Model, an extension of the Kubernetes Resource Model. It is a set of rules set by Crossplane on how to build an XR or MR.
- MRs are nothing but Managed Resources, a combination of a CRD and custom controllers in a one-to-one mapping with external infrastructure resources.
- XRD stands for Composite Resource Definition, a definition for building a custom infrastructure API above Crossplane.
- XR stands for Composite Resource, which represents a custom infrastructure API built with Crossplane.
Installing Crossplane
I have set up a local Kubernetes cluster on my Macintosh computer. We will make this cluster the Crossplane control plane for provisioning resources from Google Cloud Platform in our tutorials. To follow the tutorials, we assume that you already have access to a Kubernetes cluster. If you need help setting up a local Kubernetes cluster, refer to https://kind.sigs.k8s.io/. kind is one of the simplest ways to set up a local Kubernetes cluster, but you can work on the tutorials with any Kubernetes cluster setup. The following screenshot gives a quick glimpse at cluster information, versions, and node details:
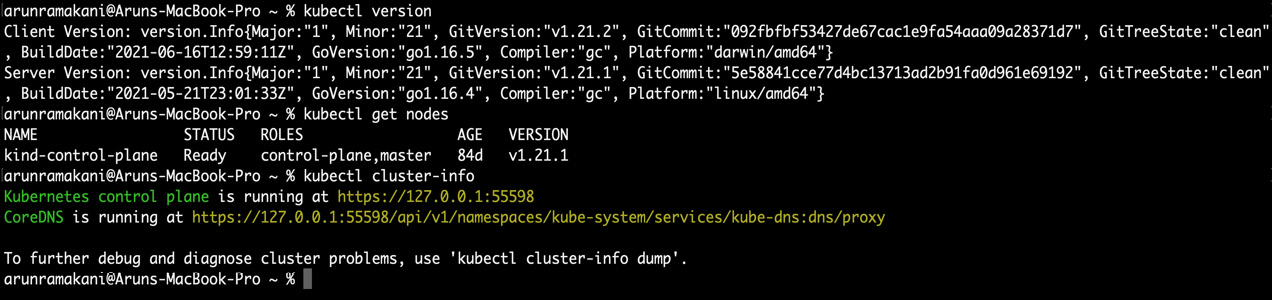
Figure 3.6 – Cluster information, versions, and node details
While there are a few ways to install Crossplane in Kubernetes, we will install it with a Helm chart. Make sure you have Helm installed. Installing Helm is pretty simple on both Macintosh and Windows with the brew or choco package managers. The following commands can install helm in your environment:
# Install helm in mac
brew install helm
# Install helm in windows
choco install kubernetes-helm
For more installation options, visit https://helm.sh/docs/intro/install/. For Crossplane installation, we need a minimum Kubernetes version of v1.16.0 and a minimum Helm version of v3.0.0. Master and stable are the two flavors of Crossplane available. Master has the latest commits, but this version may have stability issues. Stable is a version that is ready for community use and recommended for production usage. We will be using the stable version of the Crossplane in this tutorial. The installation of Crossplane is done in three steps, as follows:
- Create a new target namespace called crossplane-system for installation.
- Add and update the Crossplane repository to the helm repo list.
- Install Crossplane with helm in the target namespace.
The code is as follows:
# Step 1: Create target namespace
kubectl create namespace crossplane-system
# Step 2: Add crossplane stable repo to helm and update
helm repo add crossplane-stable https://charts.crossplane.io/stable
helm repo update
# Step 3: Install Crossplane
helm install crossplane --namespace crossplane-system crossplane-stable/crossplane
The Crossplane Helm chart supports quite a few template values for custom configuration options. Replica count is one example, which specifies how many Crossplane Pods are to run for a high-availability setup. Have a look at all possible configuration options available for the Crossplane Helm template at Artifact Hub. The installation screenshot is as follows:

Figure 3.7 – Crossplane installation
We can remove the Crossplane installation with the standard helm delete command:
# To remove Crossplane
helm delete crossplane --namespace crossplane-system
A screenshot of the result is as follows:
Figure 3.8 – Crossplane installation health
Now that we have installed Crossplane, we will learn how to install and configure the providers in the following section.
Installing and configuring providers
Once we have the Crossplane core component installed in the Kubernetes cluster, the next step is installing and configuring the Crossplane provider. We will install and configure the GCP provider, which is the scope of our tutorial. We can do this in a three-step process:
- Setting up a cloud account
- Installing a provider
- Configuring the provider
We will look at each of these aspects in detail with a step-by-step guide in the following sections.
Setting up a cloud account
We need to have a Google Cloud account with the project and billing setup enabled. Google Cloud offers $300 credit for new users to learn and experiment for a maximum of 3 months, provided you have a credit card. It will be more than enough for us to learn Crossplane and other infrastructure automation concepts. All we need to do is log on to the Google Cloud account to fill out a form and start the free trial. The next step is to create a separate project space for us to experiment with Crossplane. You can create a new project by clicking the project dropdown on the top bar of the GCP console and clicking on NEW PROJECT, as shown in the following screenshot:

Figure 3.9 – Creating a new GCP project
Once we have a GCP account, free credits, and the project started, the next step is to enable all the needed cloud API access. We are going to do that with the gcloud CLI. Download the CLI from https://cloud.google.com/sdk/docs/install and follow these steps:
- Install the gcloud CLI after the download:
./google-cloud-sdk/install.sh
- Initialize the SDK with the cloud credentials and project:
gcloud init
gcloud init will redirect us to a web browser to authenticate with the Google account. Once we can successfully provide necessary access, we must select the project when asked for it by the CLI. Now, we should be able to enable the required cloud services with the following commands:
# Enable Kubernetes APIs , CloudSQL APIs, Network APIs and Compute APIs
gcloud services enable container.googleapis.com
gcloud services enable sqladmin.googleapis.com
gcloud services enable compute.googleapis.com
gcloud services enable servicenetworking.googleapis.com
A screenshot of the result is as follows:

Figure 3.10 – Enabling the cloud APIs
Once we are done enabling the API access for the project, the next step is to create a service account and extract the credentials required to set up the GCP Crossplane provider. It involves a few steps:
- Find the project ID to use in the necessary upcoming commands:
gcloud projects list --format='value(project_id)'
- Create the service account, get the name, and enable the required roles on the service account. Note that crossplane-330620 in all the following commands is my Google project ID. You will replace that with your Google project ID. Use the preceding command to explore the list of your project IDs. Similarly, crossplane-service-account@crossplane-330620.iam.gserviceaccount.com is the name of the created service account in my GCP environment. Replace this with your service account name. You can get your service account name by executing the second command in the following code block to list the service accounts:
# Create service account
gcloud iam service-accounts create crossplane-service-account --display-name "crossplane service account" --project=crossplane-330620
# Get the name of the service account
gcloud iam service-accounts list --filter="email ~ ^crossplane-service-account" --format='value(email)'
# Add required IAM role to the service account
gcloud projects add-iam-policy-binding crossplane-330620 --member "serviceAccount:crossplane-service-account@crossplane-330620.iam.gserviceaccount.com" --role="roles/iam.serviceAccountUser"
gcloud projects add-iam-policy-binding crossplane-330620 --member "serviceAccount:crossplane-service-account@crossplane-330620.iam.gserviceaccount.com" --role="roles/cloudsql.admin"
gcloud projects add-iam-policy-binding crossplane-330620 --member "serviceAccount:crossplane-service-account@crossplane-330620.iam.gserviceaccount.com" --role="roles/container.admin"
gcloud projects add-iam-policy-binding crossplane-330620 --member "serviceAccount:crossplane-service-account@crossplane-330620.iam.gserviceaccount.com" --role="roles/redis.admin"
gcloud projects add-iam-policy-binding crossplane-330620 --member "serviceAccount:crossplane-service-account@crossplane-330620.iam.gserviceaccount.com" --role="roles/compute.networkAdmin"
gcloud projects add-iam-policy-binding crossplane-330620 --member "serviceAccount:crossplane-service-account@crossplane-330620.iam.gserviceaccount.com" --role="roles/storage.admin"
- To extract the service account file, use the first command, as follows:
gcloud iam service-accounts keys create crossplane-service-account.json --iam-account crossplane-service-account@crossplane-330620.iam.gserviceaccount.com
- Finally, create a Kubernetes Secret with the service account file. The Secret will be referred to when we make a provider configuration, which you will see in the next section:
kubectl create secret generic gcp-account -n crossplane-system --from-file=creds=./crossplane-service-account.json
Installing a provider
Let's now install the GCP Crossplane provider. We have to run the following provider resource YAML with the latest GCP provider container image version. The current available stable version is v0.18.0. Update the version accordingly when you are executing:
apiVersion: pkg.crossplane.io/v1
kind: Provider
metadata:
name: provider-gcp
spec:
package: crossplane/provider-gcp:v0.18.0
Apply the YAML and validate whether the provider container is running:
kubectl apply -f Provider.yaml
kubectl get all -n crossplane-system
A screenshot of the result is as follows:

Figure 3.11 – Running the GCP provider
Configuring the provider
The final step is to set up provider configuration for authentication using the ProviderConfig Crossplane API. Preparing the credentials can be slightly different for each provider, depending on the construct for authentication by the infrastructure vendor. In the case of GCP, it will be a service account, it's a service principle for Azure, an IAM for AWS, and so on. The following YAML will configure credentials for the GCP provider:
apiVersion: gcp.crossplane.io/v1beta1
kind: ProviderConfig
metadata:
name: gcp-credentials-project-1
spec:
projectID: crossplane-330620
credentials:
source: Secret
secretRef:
namespace: crossplane-system
name: gcp-account
key: service-account
A couple of crucial aspects of GCP provider configuration are the project ID reference and the service account credentials. We need to provide our GCP project ID under projectID:. We will not have this configuration element for other infrastructure provider configurations such as AWS. Note that the provider configuration mentioned previously references the Kubernetes Secrets. Apply the YAML and validate the provider configuration with the following commands:
kubectl apply -f providerconfig.yaml
kubectl get providerconfig
A screenshot of the result is as follows:
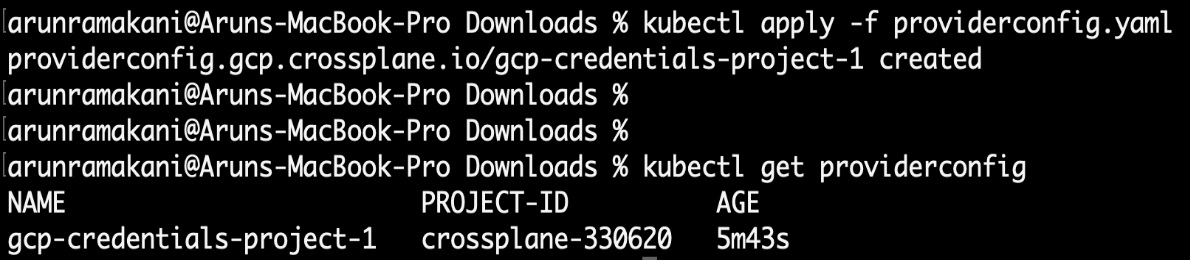
Figure 3.12 – The GCP provider config
With this, we are concluding Crossplane installation, GCP provider setup, and configuration. Other provider setups also mostly look like GCP. Now, the environment is ready for provisioning GCP resources with an MR, or we can start composing our XR API above the MR.
Multiple provider configuration
We can have multiple ProviderConfig configured against a provider. It's like having many credentials or cloud accounts to access the cloud platform and choosing the appropriate credentials based on the given context. When provisioning the infrastructure resources with an MR or XR, we specify providerConfigRef: to determine which ProviderConfig to use in the given context. If providerConfigRef: is not available in an MR or XR, Crossplane refers to the ProviderConfig named default. This way of organizing infrastructure resources under different credentials can help us manage infrastructure billing and maintain resources concerning the organizational structure in groups. The following YAML will provision POSTGRES from GCP using the provider config named gcp-credentials-project-1, which we created in the preceding section:
apiVersion: database.gcp.crossplane.io/v1beta1
kind: CloudSQLInstance
metadata:
name: my-GCP-DB
spec:
# Reference to use a specific provider config
providerConfigRef:
name: gcp-credentials-project-1
forProvider:
databaseVersion: POSTGRES_9_6
region: asia-south2
settings:
tier: db-n1-standard-1
dataDiskSizeGb: 10
The following figure represents multiple teams using different provider configs:

Figure 3.13 – Multiple provider configuration
An example of POSTGRES provisioning
It's time that we go through an actual provisioning experience. We will create a POSTGRES instance in GCP using CloudSQLInstance, an MR available in the GCP Crossplane provider. Direct provisioning of infrastructure resources with an MR or XR is not a good strategy. Instead, we should be using the claim object created with XR for provisioning. The next chapter is devoted to covering these topics. Currently, we are using an MR for resource provisioning to understand the basic building blocks of Crossplane. We are going to use the following attributes while provisioning the resource:
- The name of the resource provisioned should be db-gcp.
- The region of provisioning will be us-central.
- We will request POSTGRES version 9.6 – POSTGRES_9_6.
- The size of the data disk should be 20 GB.
- The GCP tier of the database should be db-g1-small.
- Create the resource under the gcp-credentials-project-1 provider configuration.
- Database credentials should go to a crossplane-system namespace with a Secret named db-conn.
These are just a few possible parameters. The complete API documentation for CloudSQLInstance is available at https://doc.crds.dev/github.com/crossplane/provider-gcp/database.gcp.crossplane.io/CloudSQLInstance/[email protected]. Note that there is a required tag against a few API parameters, which are mandatory in YAML. The following YAML code will provision GCP POSTGRES with the mentioned attributes:
apiVersion: database.gcp.crossplane.io/v1beta1
kind: CloudSQLInstance
metadata:
name: db-gcp
spec:
providerConfigRef:
name: gcp-credentials-project-1
writeConnectionSecretToRef:
namespace: crossplane-system
name: db-conn
forProvider:
databaseVersion: POSTGRES_9_6
region: us-central
settings:
tier: db-g1-small
dataDiskSizeGb: 20
Once you apply the YAML code, you can see the resources provisioned in the GCP console. Use the following command to look at the states. Note that, initially, we will see the status as pending creation (PENDING_CREATE), and it will soon become runnable (RUNNABLE). Also, we can see that the database credentials are available in the Secrets:
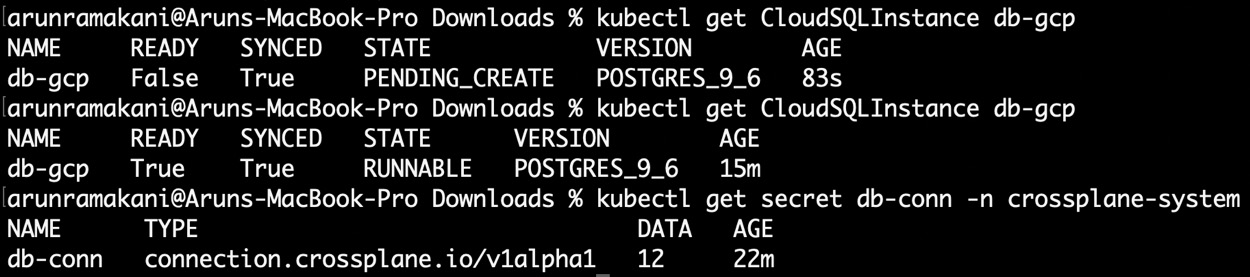
Figure 3.14 – Database provisioning
Suppose we look at the database details in the GCP console and change the database machine type. Crossplane will restore it to the original tier mentioned in the YAML code. It was fun to try that and see the status change. Initially, it will go into maintenance mode when we change the console, and then Crossplane will realize that something was changed to put the resource out of sync. Then, Crossplane will bring it back to its original state. Please refer to the following screenshot and go through values in each column (STATE, SYNCED, and READY):
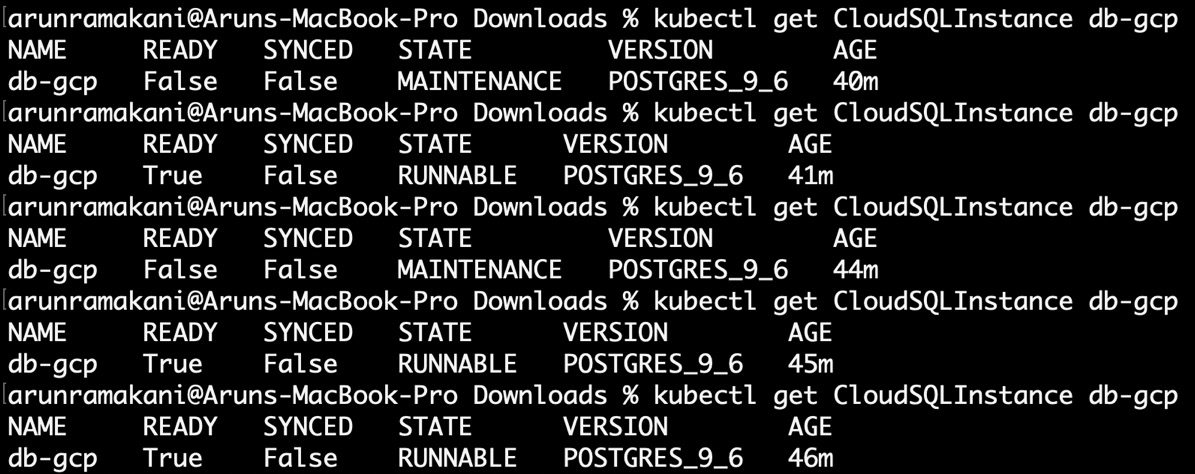
Figure 3.15 – The reconciliation loop
And finally, the resources will sync. We can clean up the provisioned resources based on the deletion policy:

Figure 3.16 – The final state
Tip
If you want to create the resource in the vendor infrastructure with a name different from that of the Crossplane resource claim, use the crossplane.io/external-name:my-special-name annotation in the metadata section.
All the examples discussed throughout this book can be referred to at https://github.com/PacktPublishing/End-to-End-Automation-with-Kubernetes-and-Crossplane.
Summary
We started with understanding CRDs and custom controllers, and then the Kubernetes resource extension point concept, which are the building blocks of Crossplane. Then, we went through various Crossplane components, their architecture, and how those components fit together. Finally, we undertook some hands-on work by installing Crossplane and its GCP provider, and experimenting with Postgres database provisioning. Now we know how Crossplane works end to end, which brings us to the end of the chapter. In the next chapter, we will learn advanced Crossplane concepts.