Chapter 10: Onboarding Applications with Crossplane
This will be a fully hands-on chapter where we will look at the end-to-end automation of an application and all its dependencies. The dependencies will involve the setup of the project repository, creating the Continuous Integration and Continuous Deployment (CI/CD) pipelines, dependent infrastructure resources, and so on. You will see the real power of how Crossplane can automate every possible step, starting from the initial repository setup. We will go through the hands-on journey from the perspective of three different personas. The three personas are the platform developer creating the required XR/claim APIs, the application operator configuring the application deployment using the XR/claim, and the developer contributing to the application development. The platform developer persona is the key to the whole journey, so most of the content in this chapter will be from their perspective. Whenever required, we will explicitly mention the other personas. The hands-on journey will cover application, services, and infrastructure, all three aspects of automation with Crossplane.
The following are the topics covered in this chapter:
- The automation requirements
- The solution
- Preparing the control plane
- Automating the application deployment environment
- The repository and CI setup
- The deployment dependencies
- API boundary analysis
We will start with the requirement from the product team to explore the ways to automate.
The automation requirements
We will start our high-level requirement story from the perspective of an imaginary organization, X. They are planning to develop a new e-commerce website named product-a. It has many modules, each functional at a different time in the customer journey, for example, cart, payment, and customer support. Each model requires independent release and scaling capabilities while sharing a standard website theme and a unified experience. The product architecture group has recommended micro-frontend architecture with separate deployment for each module in Kubernetes. They also suggested that an individual team will develop the website framework, shared UI components, and cross-cutting concerns in the form of a library. The independent module team can use these dependent libraries to build their features. The product team has recently heard about Crossplane and its ability to automate the applications from end to end. They wanted to use the opportunity of developing a greenfield product and experiment with Crossplane to set up a high-velocity, reliable product development practice. They have reached the platform team, requesting help to develop a proof of concept (POC). The POC project will be the scope of our hands-on journey in this chapter. The following diagram represents what the product development team wanted to achieve:

Figure 10.1 – Product team requirements
Information
Please note that both the requirements and solutions discussed in the chapter are not exhaustive. Our attempt here is to look for ways to approach automation from end to end, covering the entire application life cycle and its dependencies.
The following section explores one possible solution option from the perspective of a platform engineer using Crossplane.
The solution
We will approach the solution in three steps:
- First, we will completely automate the product-a deployment environment provisioning (Kubernetes) and cross-cutting concern setups to support all the micro-frontend deployment.
- Next will be the application onboarding, which covers steps such as new repository creation and setting up the CI pipeline for a specific micro-frontend.
- The final step will be to set up the CD pipeline and dependent infrastructures (database) provisioning for the micro-frontend for which the repository is created. We will do this using a set of providers, such as Helm, GitLab, GCP, and Kubernetes.
Information
We will create a template GitLab project with the dependent library and kick-start the micro-frontend development using a repository cloned from the base template repository.
The following diagram represents the complete solution:

Figure 10.2 – High-level solution view
The following stages cover the high-level solution in the preceding diagram in a bit more detail:
- Stage 1: The first stage will be to get the Crossplane control plane ready with the required providers (GCP, Helm, Kubernetes, and GitLab) and configurations.
- Stage 2: The next stage will create a Kubernetes cluster to deploy the micro-frontend using the GCP provider. We will also immediately create the Helm and Kubernetes provider configuration in the control plane cluster, referring to the product-a cluster. The Helm provider configuration helps to set up Argo CD in the product-a cluster. The Kubernetes provider configuration will help deploy micro-frontend applications into the product-a cluster.
- Stage 3: The third stage is relevant to every micro-frontend application in the product. This step will create a new repository for the micro-frontend from the template repository. While creating the new repository, we will also clone the CI pipeline.
- Stage 4: The final stage will be to set the CD for the created repository using the Kubernetes provider. The Kubernetes provider configuration created in stage 2 will be used here. The stage will also create the cloud database instance required by the submodule/micro-frontend.
The rest of the chapter will investigate details of how we configure Crossplane and implement the solution discussed. The following section will deep dive into the control plan setup required to implement the use case.
Information
The complete example is available at https://github.com/PacktPublishing/End-to-End-Automation-with-Kubernetes-and-Crossplane/tree/main/Chapter10/Hands-on-example.
Preparing the control plane
This is the stage to install the required components into the Crossplane cluster. We will establish the necessary providers and respective configurations. The first step will be to install the GCP provider.
The GCP provider
This is the same step we took in Chapter 3, Automating Infrastructure with Crossplane, but slightly deviating from it. We will differ in how we create and use the GCP provider configuration. It is good to have an individual provider configuration for each product team to enhance security, auditing, policy compliance, governance, and so on in using the XR/claim APIs. Each product team and platform team should create a different provider configuration referring to a separate GCP service account secret. The provider configurations will be named against the product (product-a), and a new namespace will be created with the same name. The compositions will be developed in such a way to refer to the provider configuration based on the claim namespace dynamically. It is one of the multi-tenancy patterns we discussed in Chapter 7, Extending and Scaling Crossplane. To finish the GCP setup, do the following:
- Execute GCP-Provider.yaml to install the provider. Wait until the provider pods are up and running.
- Meanwhile, ensure that the Kubernetes Secret with the product-a GCP service account is available in the cluster. This Secret will be referred to in the provider configuration. To remind yourself of the steps to make the Secret, refer to the Configure the provider section in Chapter 3.
- Once you have the Secret available, execute Provider-Config.yaml to create the product-specific provider configuration. Note that the name of the provider configuration is product-a.
- Finally, apply namespace.yaml to create the product-a namespace. It is an additional step to hold Claim objects.
The preceding steps will ensure that the GCP provider is fully set. In the following section, we will look at the GitLab provider.
The GitLab provider
We will use the GitLab provider to manage the micro-frontend repository and CI pipeline. The free account provided by GitLab is good enough to continue with our experiment. The provider setup is done in three steps:
- GitLab credentials: We need to create the GitLab access token as a Kubernetes Secret. It will be referred to in the GitLab provider configuration. Generate a GitLab access token in the GitLab UI user setting. Use the following command to create the Secret:
# Create Kubernetes secret with the access token
kubectl create secret generic gitlab-credentials -n crossplane-system --from-literal=gitlab-credentials=<YOUR_ACCESS_TOKEN>
- Installing the provider: Execute provider-gitlab.yaml to install the GitLab provider and wait until the pods are up and running.
- Configuring the provider configuration: Execute provider-config.yaml to create the provider configuration. Again, it will be specific to the product with the name product-a.
We are done with the GitLab provider setup. The following section will look at the Helm and Kubernetes provider setup.
Helm and Kubernetes provider setup
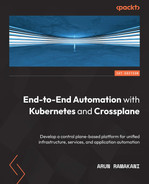
Both the Helm and Kubernetes providers are helpful to configure a remote or the same Kubernetes cluster. It is the remote Kubernetes cluster created for product-a in our case. Both providers require credentials to access the remote cluster. The product-specific provider configuration will be created automatically for the remote cluster when we provision the cluster with our XR API. We will look at more details on this in the next section. We will only install the provider for now. Execute Helm-Provider.yaml and k8s-Provider.yaml to install the providers. Refer to the following screenshot showing the installation of all providers and respective configuration setup:
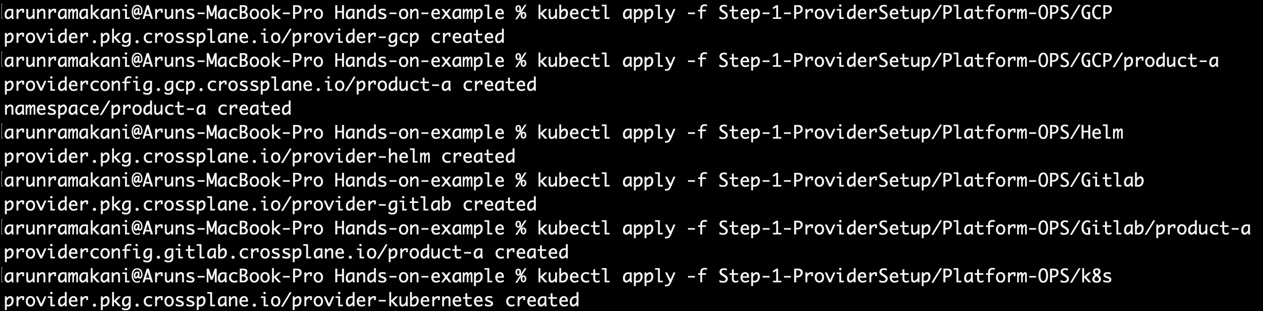
Figure 10.3 – Provider setup
To run the setup yourself, use the following commands:
# GCP Provider
kubectl apply -f Step-1-ProviderSetup/Platform-OPS/GCP
kubectl apply -f Step-1-ProviderSetup/Platform-OPS/GCP/product-a
# Helm Provider
kubectl apply -f Step-1-ProviderSetup/Platform-OPS/Helm
# GitLab Provider
kubectl apply -f Step-1-ProviderSetup/Platform-OPS/Gitlab
kubectl apply -f Step-1-ProviderSetup/Platform-OPS/Gitlab/product-a
# Kubernetes Provider
kubectl apply -f Step-1-ProviderSetup/Platform-OPS/k8s
This takes us to the end of configuring the Crossplane control plane. All these activities are meant to be done by the platform team. In the following section, we will deep dive into setting up a remote Kubernetes cluster as a deployment environment for product-a.
Automating the application deployment environment
The complete Kubernetes cluster creation and configuring of the cross-cutting concerns will be automated using this step. We will develop an XR/claim API, which does the following:
- Provisions a remote GKE cluster
- Sets up Helm and the Kubernetes provider configuration for the GKE cluster
- Installs Argo CD using the Helm provider into the product-a GKE cluster
Let’s look at the XRD and composition to understand the API in detail (refer to the XRD and composition in the book’s GitHub repository). We will capture two mandatory parameters (node count and machine size). The size parameter takes either BIG or SMALL as an enum value. Inside the composition, we have composed five resources. The following is the list of resources and their purpose:
- Cluster and NodePool: Cluster and NodePool are two relevant resources responsible for GKE cluster provisioning. It is very similar to the way we provisioned GKE in Chapter 5, Extending Providers. The node count and the machine type will be patched into the node pool. The node pool is again referred to inside the cluster. Both resources will refer to the GCP provider configuration dynamically using the claim namespace. Also, the Secret required to connect to the GKE cluster is stored in the claim namespace. Refer to the following code snippet on the patching operation in the cluster resource:
patches:
- fromFieldPath: spec.claimRef.namespace
toFieldPath: spec.providerConfigRef.name
- fromFieldPath: spec.claimRef.name
toFieldPath: metadata.name
- fromFieldPath: spec.claimRef.namespace
toFieldPath: spec.writeConnectionSecretToRef.namespace
- fromFieldPath: spec.claimRef.name
toFieldPath: spec.writeConnectionSecretToRef.name
transforms:
- type: string
string:
fmt: "%s-secret"
- Helm and Kubernetes ProviderConfig: As the cluster is ready, it’s time to create the Helm and Kubernetes provider configuration. The provider configuration will refer to the newly created cluster Secret. Another critical point is defining the readiness check as none, as ProviderConfig is not an external resource. Failing to do so will not allow the XR/claim to become ready. Refer to the following code snippet:
# Patches and reediness check from the Helm Provider config
patches:
- fromFieldPath: spec.claimRef.namespace
toFieldPath: spec.credentials.secretRef.namespace
- fromFieldPath: spec.claimRef.name
toFieldPath: spec.credentials.secretRef.name
transforms:
- type: string
string:
fmt: "%s-secret"
- fromFieldPath: spec.claimRef.name
toFieldPath: metadata.name
transforms:
- type: string
string:
fmt: "%s-helm-provider-config"
readinessChecks:
- type: None
- Install Argo CD: We will install Argo CD into the cluster using the Helm provider. Again, the provider configuration will be referred to dynamically with a predictable naming strategy. Argo CD is designed to enable CD for the micro-frontend repositories.
Information
Note that the cluster creation XR/claim API example discussed here is not production ready. You should be installing other cross-cutting concerns using the Helm or Kubernetes provider. Also, we missed many fine-grained cluster configurations. Refer to https://github.com/upbound/platform-ref-gcp for a more detailed cluster configuration.
To establish and validate our cluster API into the control plane, execute the following commands:
# Install GCP Cluster XR/Claim API
kubectl apply -f Step-2-CreateProductTeamsKubernetesCluster/Platform-OPS
# Validate the health of installed API
kubectl get xrd
kubectl get composition
The platform team that manages the control plane will do the preceding operations. Refer to the following screenshot where the APIs are established:

Figure 10.4 – Cluster API
As a next step, the application operator close to the product team can create the cluster using a claim configuration. The application operator will create a GKE cluster with the name product-a using the following commands:
# Create the GCP Cluster using a Claim object
kubectl apply -f Step-2-CreateProductTeamsKubernetesCluster/Application-OPS
# Validate the health of the GKE cluster and the Argo CD
kubectl get GCPCluster -n product-a
kubectl get release
Refer to the following screenshot where the GKE cluster and Helm releases are established:

Figure 10.5 – Cluster claim
We are all good with the cluster creation. We will discuss the next stage to onboard the micro-frontend repository in the following section.
The repository and CI setup
At this stage, an XR/claim is developed to clone the template repository to create the new micro-frontend repository and CI pipeline. We can do this in two steps. First, we will configure GitLab, and then we’ll develop an XR/claim API.
GitLab configuration
We need to make the following one-time configurations in GitLab before we start the XR/claim API development:
- Create the template project: We need to have a template repository from which we will make a new micro-frontend repository. You can access the template repository I have created at https://gitlab.com/unified.devops/react-template. The repository has a GitLab pipeline set up to build and push the Docker image into the Docker Hub registry. You can also set up a private registry here. We will automatically get the template project structure and CI set up while we clone the template repository for a micro-frontend. The Docker image name will be chosen based on the micro-frontend repository name.
- Group for product-a: We will keep all micro-frontend repositories in a single GitLab group to keep it organized, manage user permissions, and maintain environment variables for a CI pipeline. You can access the group I have created at https://gitlab.com/unified-devops-project-x.
- Setup environment variables: To enable the GitLab pipeline to access Docker Hub, we need to set up a couple of environment variables. We will add these variables at the group level so that all micro-frontend repository pipelines can access them. Go to the group-level settings CI/CD section. In the Variables section, add REG_USER and REG_PASSWORD with your Docker Hub credentials, as shown in the following screenshot:
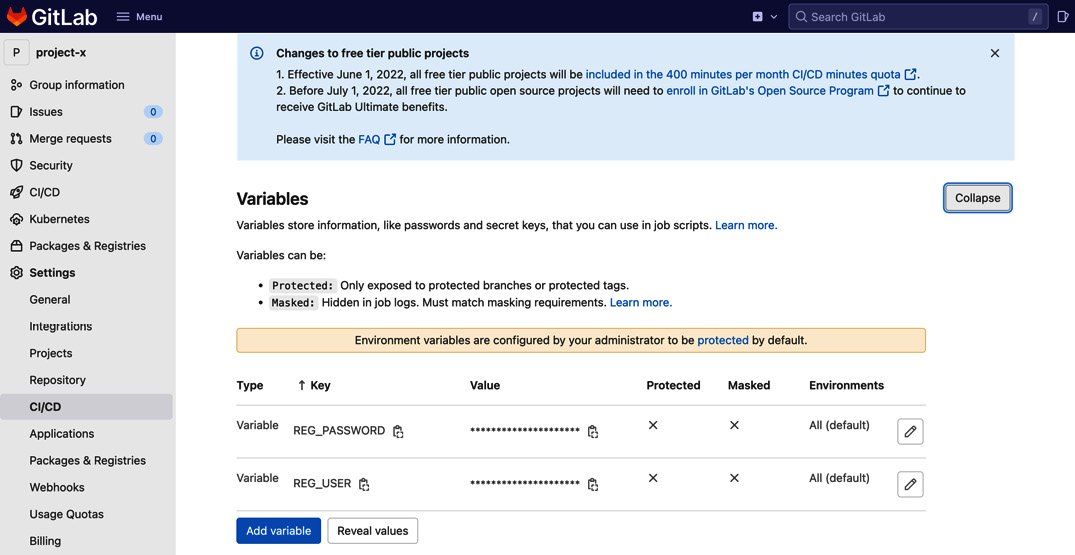
Figure 10.6 – CI Docker Hub variables
Tip
Note that the group creation and user onboarding into the group can be automated. Considering doing that with Crossplane. An example of this is available at https://github.com/crossplane-contrib/provider-gitlab/tree/master/examples/groups.
We have all the components to develop our project onboarding XR/claim API. The following section will look at the details of the onboarding API.
The onboarding XR/claim API
If we look at the XRD (gitproject-xrd.yaml), we take in two parameters as inputs. The template’s name refers to the template repository from which we should be cloning, and the group ID will determine the GitLab group under which the repository will be created. You can get the group ID from the GitLab group details page or group settings page. These two parameters make the API generic, so it can be used across the organization. The newly created micro-frontend repo URL and an access token to work with the repository will be stored as connection Secrets. We can use these with Argo CD to read the repo. Our example doesn’t require the access token as the repository is public. It will be a simple composition to map the template name with a template URL, clone the repository into the specified group, and copy back the repository details into the Secret. The repository’s name will be referred to from the name of the claim object. To establish and validate the onboarding API into the control plane, execute the following commands:
# Install the onboarding API
kubectl apply -f Step-3-GitProjectOnboarding/Platform-OPS
# Validate the health of installed API
kubectl get xrd
kubectl get composition
Refer to the following screenshot, where the APIs are established:
Figure 10.7 – Onboarding API
As a final step in the onboarding stage, the application operator can onboard the repository and CI pipeline using a Claim configuration. The application operator will create a repository with the name micro-frontend-one using the following commands:
# Create claim and validate
kubectl apply -f Step-3-GitProjectOnboarding/Application-OPS
kubectl get gitproject -n product-akubectl get xrd
Refer to the following screenshot where the claims are created in GitLab:
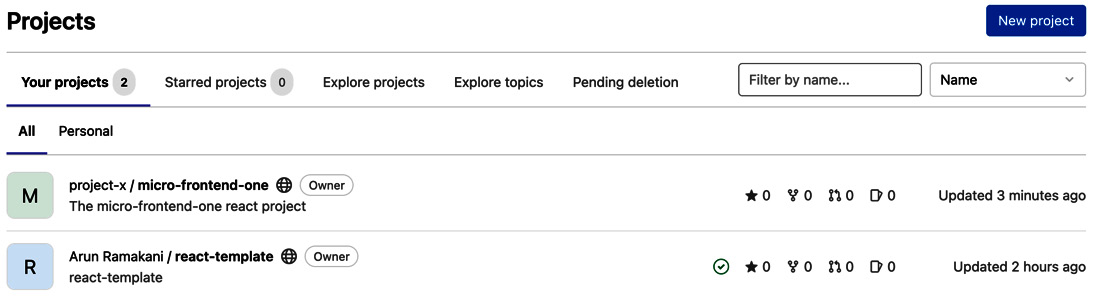
Figure 10.8 – Onboarding the repository
You can go to the CI/CD section of the new repository to run the CI pipeline to see that the Docker images are created and pushed into Docker Hub. Developers can now make changes to the repository, and any new commit will automatically trigger the GitLab CI pipeline. In the following section, we can investigate the final stage to set up CD and provision other infrastructure dependencies.
The deployment dependencies
The final stage is to automate the deployment dependencies for the micro-frontend. Automating the deployment dependencies means taking care of two aspects:
- Infrastructure dependencies: The step involves provisioning the needed infrastructure dependencies for the micro-frontend. In our case, we will create a GCP MySQL database. There could be more dependencies for an application. We will settle with just a database to keep the example simple.
- Continuous deployment: If you look at the template-helm folder inside our template repository (https://gitlab.com/unified.devops/react-template/-/tree/main/template-helm), it holds a Helm chart for deploying the application into Kubernetes. To deploy this Helm chart in a GitOps fashion, we must add an Argo CD configuration to the product-a Kubernetes cluster to sync the chart. We will construct an Object-type Kubernetes provider configuration, which can help apply any Kubernetes configuration to a target cluster. Our composition will compose an Argo CD configuration to deploy a Helm chart from a repository. Read more on how to use Argo CD for Helm deployment at https://cloud.redhat.com/blog/continuous-delivery-with-helm-and-argo-cd.
We will build a nested XR to satisfy the preceding requirement. The XWebApplication will be the parent API, and XGCPdb will be the nested inner XR. The parent API captures the product Git group and database size as input. The micro-frontend name will be another input derived from the name of the claim. The parent composition will compose the Argo CD config and an XGCPdb resource (inner XR). Refer to our example repo’s application and database folder to go through the XRD and composition of both XRs. The following are a few code snippets that are key to understanding. In the Argo CD object, the following is the patch for the repository URL. We construct the GitLab URL from the group name and claim name (repository name). Look at the claim to see the actual input (Claim-Application.yaml). The following is the repository URL patch code:
- type: CombineFromComposite
toFieldPath: spec.forProvider.manifest.spec.source.repoURL
combine:
variables:
- fromFieldPath: spec.parameters.productGitGroup
- fromFieldPath: spec.claimRef.name
strategy: string
string:
fmt: "https://gitlab.com/%s/%s.git"
We dynamically patch the Kubernetes provider config name using a predictable naming strategy. The following is the code snippet for this:
- fromFieldPath: spec.claimRef.namespace
toFieldPath: spec.providerConfigRef.name
transforms:
- type: string
string:
fmt: "%s-cluster-k8s-provider-config"
Another important patch is to bind the Docker image name dynamically. In our CI pipeline, we use the repository name as the Docker image name. As the claim name and the repository name are the same, we can use the claim name to dynamically construct the Docker image name. The following is the patch code snippet for this:
- fromFieldPath: spec.claimRef.name
toFieldPath: spec.forProvider.manifest.spec.source.helm.parameters[0].value
transforms:
- type: string
string:
fmt: "arunramakani/%s
source and destination are two key sections under the Argo CD config. This configuration provides information about the source of the Helm chart and how to deploy this in the destination Kubernetes cluster. The following is the code snippet for this:
source:
# we just saw how this patched
repoURL: # To be patched
# The branch in which Argo CD looks for change
# When the code is ready for release, move to this branch
targetRevision: HEAD
# Folder in the repository in which ArgoCD will look for automatic sync
path: template-helm
helm:
# We will patch our clime name here
releaseName: # To be patched
parameters:
- name: "image.repository"
# we just saw how this patched
value: # To be patched
- name: "image.tag"
value: latest
- name: "service.port"
value: "3000"
destination:
# Indicates that the target Kubernetes cluster is the same local Kubernetes cluster in which ArgoCD is running.
server: https://kubernetes.default.svc
# Namespace in which the application is deployed
namespace: # to be patched
To establish and validate our APIs in the control plane, execute the following commands:
kubectl apply -f Step-4-WebApplication/Platform-OPS/Application
kubectl apply -f Step-4-WebApplication/Platform-OPS/DB
kubectl get xrd
kubectl get composition
Refer to the following screenshot, where the APIs are established and validated:

Figure 10.9 – Onboarding the application API
Tip
Note that we did not configure any access token for Argo CD to access GitLab as it is a public repository. We will have private repositories in real life, and a token is required. Refer to https://argo-cd.readthedocs.io/en/release-1.8/operator-manual/declarative-setup/#repositories to see how to set up an access token. Again, this can be automated as a part of repository onboarding.
As a final step in the application deployment automation stage, the application operator can provision the database as an infrastructure dependency and configure the CD setup using the following claim configuration:
apiVersion: learn.unified.devops/v1alpha1
kind: WebApplication
metadata:
# Use the same name as the repository
name: micro-frontend-one
namespace: product-a
spec:
compositionRef:
name: web-application-dev
parameters:
# Group name in gitlab for the product-a
productGitGroup: unified-devops-project-x
databaseSize: SMALL
The application operator will use the following commands:
# Apply the claim
kubectl apply -f Step-4-WebApplication/Application-OPS
# Verify the application status, including the database and ArgoCD config
kubectl get webapplications -n product-a
kubectl get XGCPdb
kubectl get object
Refer to the following screenshot, where the application infrastructure dependencies and CD configurations are provisioned:

Figure 10.10 – Onboarding the API
Tip
We have used Argo CD and Helm chart deployment to handle application automation. We can replace Helm with KubeVela, combine Helm/KubeVela with Kustomize, or even use a plain Kubernetes object as required for your team. Even Argo CD can be replaced with other GitOps tools, such as Flex.
This takes us to the end of the hands-on journey to automate the application from end to end. Our micro-frontend example and its dependent database are up and running now. In the following section of this chapter, we will discuss the reasoning behind our XR/claim API boundaries.
API boundary analysis
We divided the end-to-end automation into four stages. We can ignore stage one as it is about preparing the Crossplane control plane itself. It’s essential to understand why we split the remaining stages into three with four XR/claim APIs. The following are the ideas behind our API boundaries:
- The cluster XR/claim: Setting up the cluster is not just relevant to product-a. All modern workloads are generally deployed in Kubernetes, and the organization will have many such cluster setup activities in the future. Building a separate API to enable reusability and centralized policy management makes sense. Another critical reason to keep the API separate is that the cluster setup is a one-time activity and acts as cross-cutting for further application workload deployments.
- The onboarding API: The XR/claim for the GitLab project onboarding is developed as a separate API. We don’t need to onboard the repository and CI pipeline for every environment (production, staging, and development). That’s why we decided to keep XGitProjectAPI/GitProject API separate.
- The application API: This is the step where we onboard the application infrastructure dependencies and CI setup, which is done once per environment. That’s why we developed XWebApplication/WebApplication as a separate API. Note that there is an inner nested API for the database provisioning. The idea is to keep it separate as there are organization-wide policies in database provisioning. Note that the database API does not have a claim as it is designed to be used as only a nested API. The policy requirement is an assumption that may not be true for your case.
Tip
The repository URL and access token created with the onboarding API is required in the application API to set up CI. The onboarding API is a one-time activity, and the application API is used in every environment. If we have a different Crossplane for every environment (production, staging, and development), sharing the credentials across in an automated way could be challenging. Consider using an external key vault to sync the repository details from the onboarding API. Other Crossplane environments can synchronize these Secrets using tools such as External Secrets (https://external-secrets.io/v0.5.3/).
Summary
This chapter discussed one of the approaches to handling the end-to-end automation of applications, infrastructure, and services. There are multiple patterns to approach end-to-end control plane-based automation using the ways we learned throughout the book. I can’t wait to see what unique ways you come up with. This chapter takes us to the end of learning Crossplane concepts and patterns and our hands-on journey.
In the final chapter, we will look at some inspirations to run a platform as a product. You will learn essential engineering practices that make our Crossplane platform team successful.