Chapter 6: More Crossplane Patterns
Following the previous chapter, we will continue to discover more Crossplane patterns that are key to building a state-of-the-art infrastructure automation platform. We will cover different topics, such as managing dependencies between resources, propagating secrets, using the Crossplane Helm provider, trade-off points in defining the XR API boundary, and monitoring the Crossplane control plane using Prometheus. Throughout the chapter, we will use examples with a hands-on journey to understand these concepts. We have been using GCP in all the previous chapters. In this chapter, we will use both GCP and AWS to learn Crossplane. Finally, we will learn more debugging skills, which are vital for day-to-day platform development and operations.
The following are the topics covered in the chapter:
- AWS provider setup
- Managing dependencies
- Secret propagation hands-on
- Helm provider hands-on
- Defining API boundaries
- Alerts and monitoring
- More troubleshooting patterns
AWS provider setup
Some of the examples in this chapter will use AWS as the cloud provider. Apart from GCP, we are covering AWS to establish what it takes to work with a new cloud provider. It will help us realize how working with one cloud provider will enable us to be competent enough to handle any cloud provider in Crossplane. We can look at the AWS provider setup in the following three steps:
- Creating an AWS account and IAM user
- Creating the Kubernetes secret
- Provider and ProviderConfig setup
Creating an AWS account and IAM user
You can register with AWS and use some of its services free, provided you have a credit card. You can read more about the AWS free tier at https://aws.amazon.com/free/free-tier-faqs/. Once you have the free account created, the next step is to create a new IAM user. The following screenshots will cover the different stages in the IAM user creation. Go to the IAM section in the AWS web console and click Add a user. Select the credentials type as an access key shown in the following screenshot:

Figure 6.1 – Creating a user
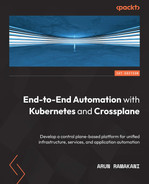
The next step is to add the user to an access group. If you don’t have a user group already, you can use the Create group button and create a new group with appropriate access control. Alternatively, we can attach an existing access policy to the user or copy permissions from a current user. Ensure that you have added the required permissions for the resources provisioned through Crossplane. I have provided an AdministratorAccess role to provide full access to all AWS resources.
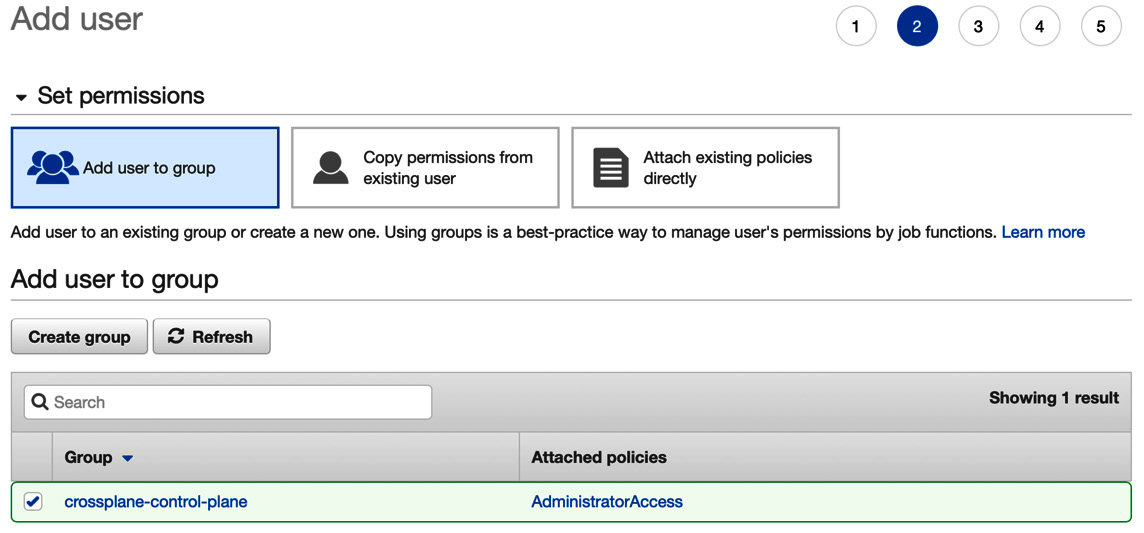
Figure 6.2 – Add user to group
Now you will have the access ID and secret of the new IAM user in the AWS console, which will be helpful for Crossplane AWS Provider configuration:

Figure 6.3 – New IAM user
The next step is to use the access key ID and the secret key of the IAM user to configure the Kubernetes secret.
Creating the Kubernetes secret
Creating the Kubernetes secret starts with setting up the AWS CLI in your local environment. It will be a simple step to download the installable and perform the installation. Follow the installation instructions at https://docs.aws.amazon.com/cli/latest/userguide/getting-started-install.html. Next, we can create the AWS login profile using the aws configure --profile default command. It will ask for the access key ID, secret access key, default region, and output format. The access key ID and the secret key are what we got while creating the IAM user. You can ignore the default region and output format.

Figure 6.4 – Login profile
The next step is to create the Kubernetes secret using the preceding profile. Execute the following commands:
# Set a variable with the profile name
AWS_PROFILE=default
# Create a configuration file with profile data
echo -e "[$AWS_PROFILE]
aws_access_key_id = $(aws configure get aws_access_key_id --profile $AWS_PROFILE)
aws_secret_access_key = $(aws configure get aws_secret_access_key --profile $AWS_PROFILE)" > aws-credentials.conf
# Create kubernetes secret from the configuration file
kubectl create secret generic aws-credentials -n crossplane-system --from-file=creds=./aws-credentials.conf
Refer to the following screenshot where the Kubernetes secret is created:

Figure 6.5 – Kubernetes secret creation
We are now done with the creation of Kubernetes secrets. The following section will look at the AWS provider installation and setup in the Crossplane environment.
AWS provider and ProviderConfig setup
Install Crossplane AWS provider by applying the following YAML to the cluster. The configuration has two parts to it. The provider configuration will install the AWS provider, and ControllerConfig enables debugging mode to the provider pod logs. It is not mandatory to have the ControllerConfig configuration. The example here will be helpful when you want to debug an issue. Note that the ControllerConfig name refers to the provider configuration:
apiVersion: pkg.crossplane.io/v1alpha1
kind: ControllerConfig
metadata:
name: debug-config
spec:
args:
- --debug
---
apiVersion: pkg.crossplane.io/v1
kind: Provider
metadata:
name: provider-aws
spec:
package: "crossplane/provider-aws:v0.23.0"
controllerConfigRef:
name: debug-config
Finally, apply the following provider configuration YAML referring to the secret:
apiVersion: aws.crossplane.io/v1beta1
kind: ProviderConfig
metadata:
name: aws-credentials
spec:
credentials:
source: Secret
secretRef:
namespace: crossplane-system
name: aws-credentials
key: creds
We are ready to create the resources from the AWS free tier and experiment. All the setup instructions are available at https://github.com/PacktPublishing/End-to-End-Automation-with-Kubernetes-and-Crossplane/tree/main/Chapter06/Hand-on-examples/aws-setup. Execute the rds.yaml file to validate whether the AWS provider setup is down proper. The following screenshot refers to the successful provisioning of an RDS resource from AWS:

Figure 6.6 – RDS provisioning
This completes the AWS setup activities. The following section will look at resource referencing to manage dependencies between the resources.
Managing dependencies
One external resource referencing another resource is a recurring pattern in infrastructure. For example, we may want to provision our Kubernetes cluster in a specific Virtual Private Network (VPN). The S3 bucket policy definition referring to the S3 bucket is another example. We could go on with many such examples. From the perspective of building an XR API, there will be a requirement to establish dependencies between external resources within a given XR or in a nested XRs scenario, or between resources in independent XRs. Crossplane offers three different ways to refer one resource from another. Each of these options has its use case:
- Direct reference: This configuration option refers to the resources directly with a unique identifier such as a resource name or an Amazon Resource Name (ARN) or other identifier based on the specific cloud provider and resource type. For example, consider the AWS resource UserPolicyAttachment. It can attach an IAM user to a Policy object. Here, the reference to the Policy object can be done using the attribute called PolicyARN (ARN reference). Similarly, a User object reference can be executed using the UserName attribute (name reference).
- Selector reference within the XR: This option refers to the resources within the XR using a selector attribute. selector is an attribute that instructs Crossplane to look for the referring resources based on the conditions specified in its sub-attributes. MatchControllerRef and MatchLabels are the sub-attributes of the selector attribute. The MatchControllerRef value will be true, guiding Crossplane to look for the referring resources within the XR. The second attribute, MatchLabels, drives Crossplane to look for referring resources with the specified labels. If the selector identifies more than one recourse, one of the resources is selected randomly. If the direct reference attribute discussed in the previous option is present in the configuration, the selector attributes will be ignored.
- Selector reference outside the XR: Its behavior is the same as option two, excluding the false MatchControllerRef value. It guides the Crossplane to look for matching resources outside the XR.
Tip
We can use two strategies to identify the value for direct reference configuration. We can create the resources with a predictable name to reconstruct them again at the reference point. It is similar to what we discussed about external resource names in the last chapter. If the unique identifier is a cloud-generated ID such as ARN, copy the identifier to a custom-defined status attribute (XR API response) for usage at a later point in time.
Don’t worry if it’s confusing. Let’s look at the resource reference with a couple of hands-on examples. The first example will cover the direct and selector configurations within and nested XR.
Resource reference within and nested XR
The example will be a real-world scenario. We will create an S3 bucket with a specific IAM policy and create an IAM user who can access the bucket. The following are the managed resources involved in the example:
- Bucket: This is an MR to create an S3 bucket. We will use this to provision the bucket in a specific region.
- Policy: This is the MR part of the AWS IAM resources list. It is helpful in defining usage guidelines for a given resource. In the example here, we will create a policy with full access to read and edit all objects in the bucket.
- User: The MR represents the AWS IAM user. We will create a new user to access the created bucket.
- UserPolicyAttachment: This is again part of the list of resources under AWS IAM. This MR will attach a policy to a user. We will link the bucket policy we created to the user.
You can see that there is a requirement for referring one resource from another. For example, a Policy resource would have to refer to the bucket name to build the policy configuration. Another example is UserPolicyAttachment, referring to the Policy and User resources to attach them. The following diagram will represent the relation between the resources, their reference option, and the XR boundary:
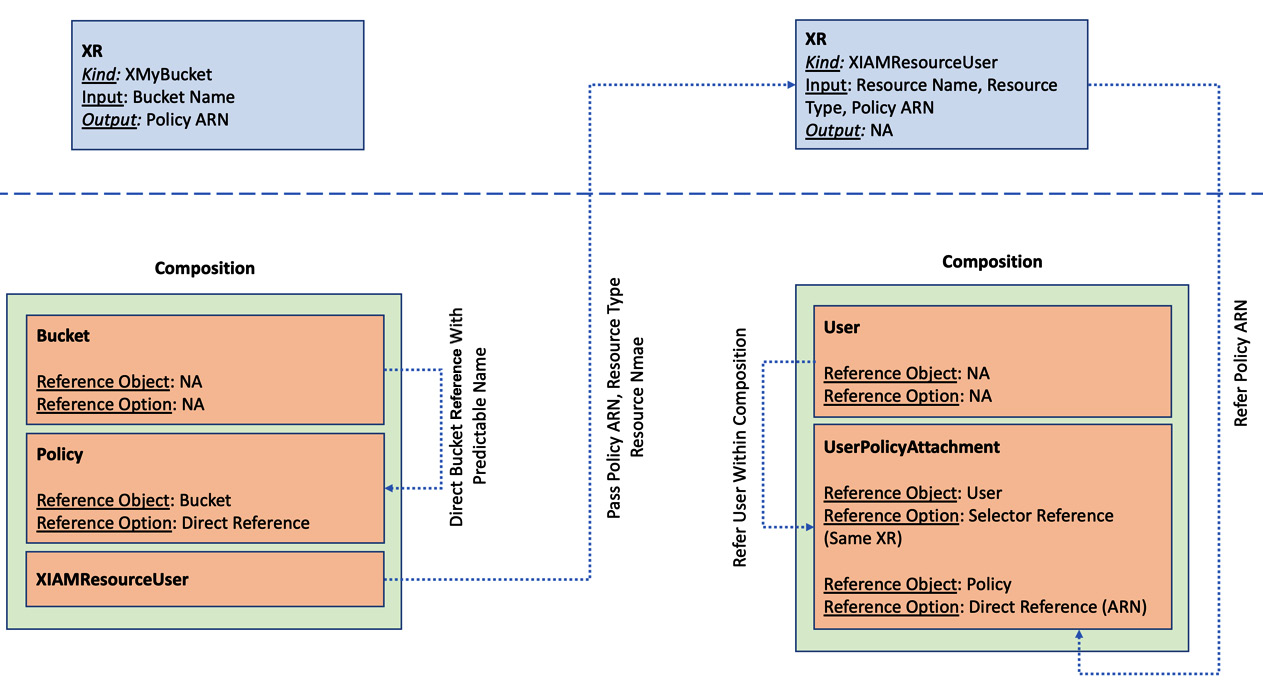
Figure 6.7 – Resource reference within and nested XR
The complete example with XRD, composition, and Claim is available at https://github.com/PacktPublishing/End-to-End-Automation-with-Kubernetes-and-Crossplane/tree/main/Chapter06/Hand-on-examples/same-nested-xr-reference. Let’s look at some of the essential code snippets to get comfortable with the example and the concept. Bucket name reference within the policy document is the first snippet we will see. Both Policy and Bucket MRs are in the same composition. The requirement is to refer to the bucket ARN name within the policy document JSON. Thankfully ARN identifiers have a predictable format, and we can construct the ARN from the bucket’s name. The bucket’s name is already available as both MRs are in the same composition, and the bucket name is an XR API input. Following is the code snippet showing the resource reference discussed. It patches the policy document attribute using the CombineFromComposite patch type. Here, the bucket name is embedded directly using an fmt string operation:
- type: CombineFromComposite
toFieldPath: spec.forProvider.document
combine:
variables:
- fromFieldPath: spec.parameters.bucketName
- fromFieldPath: spec.parameters.bucketName
strategy: string
string:
fmt: |
{"Version": "2012-10-17",
"Statement": [
{"Effect": "Allow",
"Action": [ "s3:*" ],
"Resource": [
"arn:aws:s3:::%s",
"arn:aws:s3:::%s/*"
]
}
]
}
Next, we will look at how the Policy resource ARN is extracted to pass it on to the inner nested XR - XIAMResourceUser. It works in two steps:
- Patch the ARN identifier of the Policy object back into the API response attribute.
- Patch the extracted ARN identifier as an API input to the nested XR (XIAMResourceUser).
Note that initially, XIAMResourceUser will fail till the Policy object is wholly created and ARN is available. It is the typical control-plane behavior to make the resources eventually consistent. Following is the code snippet of the ARN patching from two resources, Policy and XIAMResourceUser:
# Policy - Patch API response with ARN
- type: ToCompositeFieldPath
fromFieldPath: status.atProvider.arn
toFieldPath: status.policyARN
# XIAMResourceUser - patch the policy arn as API input
- fromFieldPath: status.policyARN
toFieldPath: spec.parameters.policyARN
Finally, we will look at the code snippet of the UserPolicyAttachment resource, where we have two external resources (User and Policy) using the different referencing methods. The policy reference will be made directly with the ARN identifier, and the user reference will be made using the selector. Refer to the following code:
- base:
apiVersion: iam.aws.crossplane.io/v1beta1
kind: UserPolicyAttachment
spec:
providerConfigRef:
name: aws-credentials
forProvider:
# Selectors refer to the User from the same composition
userNameSelector:
matchControllerRef: true
patches:
# Patch the resource name
# <Type>-<Parent Type>-<Parent Resource Name>
- type: CombineFromComposite
toFieldPath: metadata.name
combine:
variables:
- fromFieldPath: spec.parameters.resourceType
- fromFieldPath: spec.parameters.resourceName
strategy: string
string:
fmt: "policy-attachement-%s-%s"
# Patch the policy ARN reference
- toFieldPath: spec.forProvider.policyArn
fromFieldPath: spec.parameters.policyARN
To execute the example yourself and validate the references, follow the next steps:
- Apply XRDs and compositions to the target Crossplane.
- Next, apply the Claim configuration. It will create all the required resources and establish the required dependencies.
The following screenshot shows successful bucket creation in AWS:

Figure 6.8 – S3 bucket provisioned
The following screenshot shows all the execution steps of the example:
Figure 6.9 – Example execution
Also, note that the User object is created with the Policy resource attached in the AWS console:
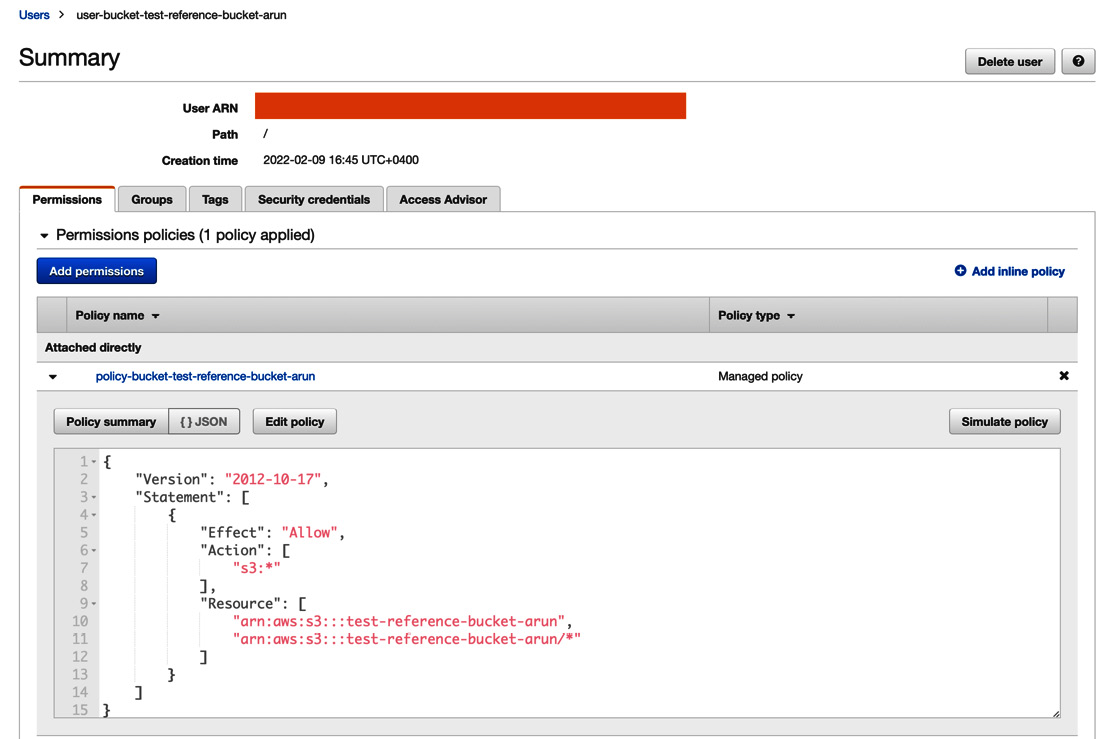
Figure 6.10 – Created user execution
Finally, refer to the screenshot showing the events where XIAMResourceUser fails owing to the unavailability of the policy ARN. It will work automatically once the policy ARN is available:

Figure 6.11 – XIAMResourceUser failure event
Information
Please note that we have not used MatchLabels in our selector reference. Only MatchControllerRef was used with true as the value. In this case, there was only one User object in the same composition, which can be referred to without any issue. We will use MatchLabels if we have more than one User object within the composition or if we want to refer to a recourse external to the current composition.
We are done with the exploration of referring resources within and nested XR. We will refer to a resource outside the composition in the following section.
Referring to an outside resource
To refer to a resource outside the composition, we will use MatchLabels and MatchControllerRef. MatchControllerRef should be specified as false. This would refer to an outside resource, MR, or another resource inside a Claim/XR. We will modify the last example into two independent XRs and ensure that the UserPolicyAttachment object can refer to the Policy object from an independent XR using label selectors. The following diagram will represent the relation between the resources, their reference option, and the XR boundary:
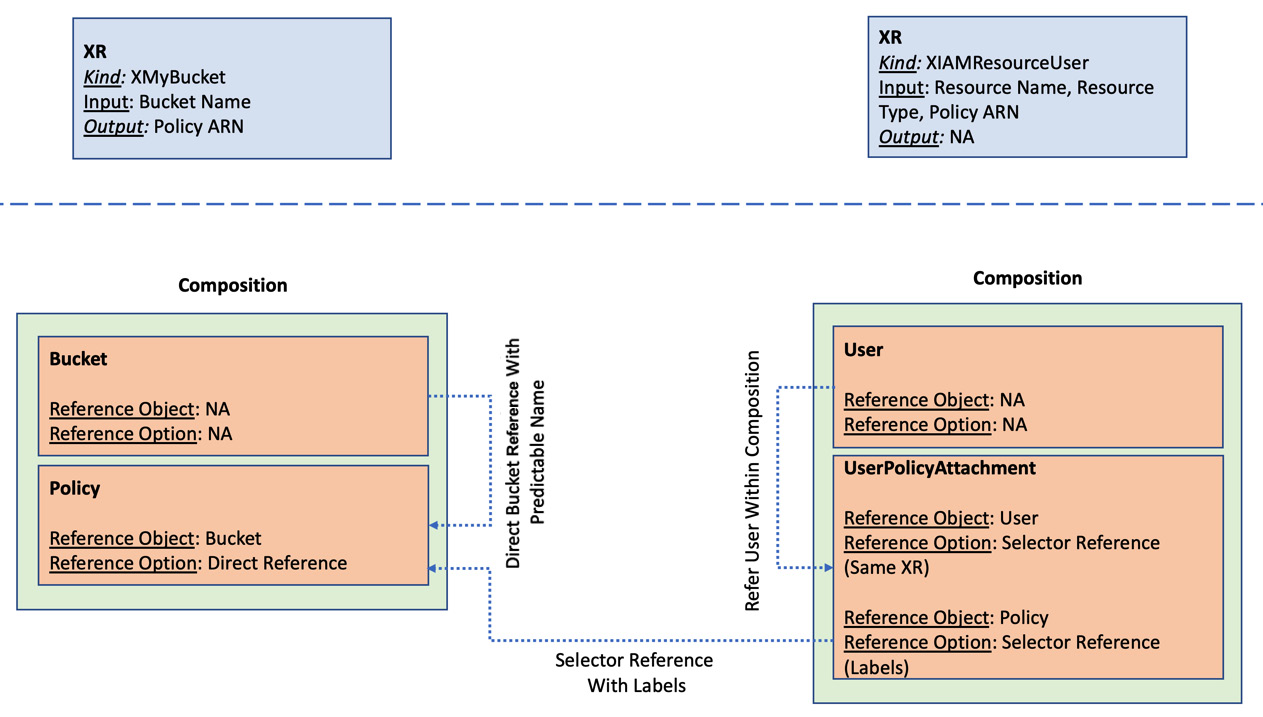
Figure 6.12 – Referring to an outside resource
Note that the XRs are not nested here. The XMyBucket XR will not have XIAMResourceUser as one of the resources. Providing a scenario where both XRs are independent, the Policy object must refer to the XR using a label selector. Let’s look at a couple of essential code snippets that reference resources using selector labels. Following is the code that adds a couple of labels to the Policy resource. The first label, resourceType, is added directly to the metadata. The second label, resourceName, is patched using the bucket name, which is the input parameter for the XR:
- base:
apiVersion: iam.aws.crossplane.io/v1beta1
kind: Policy
metadata:
# Add labels one as the resource type
labels:
resourceType: bucket
spec:
providerConfigRef:
name: aws-credentials
forProvider:
path: "/"
patches:
# patch labels two from the resource name
- fromFieldPath: spec.parameters.bucketName
toFieldPath: metadata.labels[resourceName]
The next part of the code will patch both resourceName and resourceType labels to the UserPolicyAttachment resource. It will be patched under policyArnSelector’s MatchLabels attribute. Both label values are part of the XR API input. You can decide on your predictable labeling strategy to make this discovery process standard. Note that the MatchControllerRef value is true for the User object reference within the XR and false for the Policy object reference across the XR:
- base:
apiVersion: iam.aws.crossplane.io/v1beta1
kind: UserPolicyAttachment
spec:
providerConfigRef:
name: aws-credentials
forProvider:
# refer to the IAM user from the same composition
userNameSelector:
matchControllerRef: true
policyArnSelector:
matchControllerRef: false
patches:
# Patch the policy ARN lable 1
- toFieldPath: spec.forProvider.policyArnSelector.matchLabels.resourceName
fromFieldPath: spec.parameters.resourceName
# Patch the policy ARN lable 2
- toFieldPath: spec.forProvider.policyArnSelector.matchLabels.resourceType
fromFieldPath: spec.parameters.resourceType
The example discussed is available at https://github.com/PacktPublishing/End-to-End-Automation-with-Kubernetes-and-Crossplane/tree/main/Chapter06/Hand-on-examples/different-xr-reference. To fully experience resource provisioning, apply composition-IAM.yaml, composition-bucket.yaml, xrd-IAM.yaml, and xrd-bucket.yaml to the target Crossplane cluster. It will create both XRs and their respective compositions. Then, apply claim-bucket.yaml and claim-iam.yaml to create the resources. The following screenshot covers full execution of the example:

Figure 6.13 – Referring to an outside resource – Example
Like Figure 6.10, the User object will be created with the Policy resource attached in the AWS console. We have now completed our exploration of resource references. The following section will look at secret propagation with a hands-on example.
Secret propagation hands-on
Secret propagation is a critical Crossplane pattern, as all resources provisioned generally require credentials to access the resource. We covered the same topic in Chapter 4, as theory. Now, we will go through a hands-on journey using a real-world example. Before jumping into the example, let’s brush up on the concept quickly in a few points:
- Define the list of secret keys in XRD using the ConnectionSecretKeys attribute.
- Define the namespace and secret name under the respective resource using the WriteConnectionSecretToRef configuration.
- Finally, populate the secret keys defined in the XRD using the ConnectionDetails configuration.
We will expand the hands-on example used for resource reference with nested XR to learn configurations for storing the secret. We created an S3 bucket, its policy, and an IAM user to access the bucket in that specific example. The example will not be fully finished until we extract the bucket details and IAM credentials into secrets. That is what we will exactly try to do in this example. The bucket details are already available in the Bucket resource, but we need to create a new resource named AccessKey attached to the created user for IAM credentials. The following diagram will represent the two XRs, their resources, and the secret key storage structure:
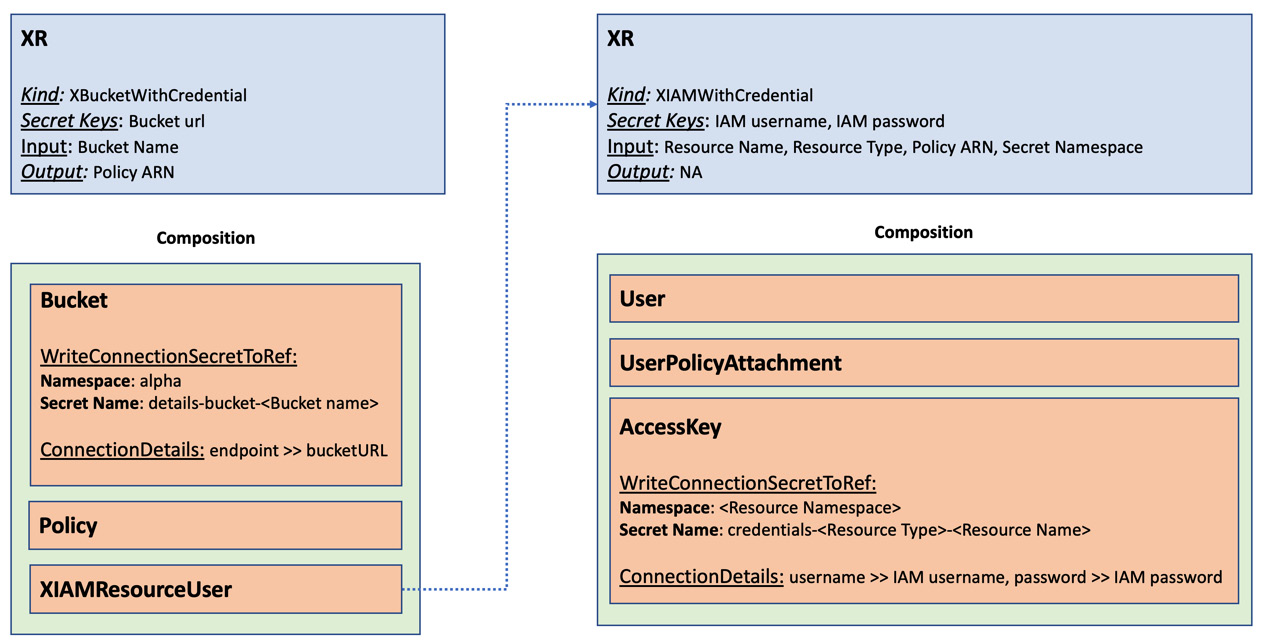
Figure 6.14 – Secret propagation
Let’s look at some of the critical code snippets from the example. Following is the code from XIAMWithCredential and XBucketWithCredential to list the secret keys:
# List of secrets defined in XRD - XBucketWithCredential
connectionSecretKeys:
- bucket_url
# List of secrets defined in XRD - XIAMWithCredential
connectionSecretKeys:
- iam_username
- iam_password
It was a simple list of secret keys under the ConnectionSecretKeys attribute in the XRD YAML. The secret name and storage namespace must be pushed to the resource to copy the secret key. Note that the namespace for the secret is automatically extracted out of the Claim. Following is the code from AccessKey and the Bucket resource to define the secret name and storage namespace:
# Secret name and namespace patching for Bucket resource
# Namespace to save the secret same as the resource namespace
- fromFieldPath: spec.claimRef.namespace
toFieldPath: spec.writeConnectionSecretToRef.namespace
# Generate and patch the kubernete secret name
- fromFieldPath: spec.parameters.bucketName
toFieldPath: spec.writeConnectionSecretToRef.name
transforms:
- type: string
string:
fmt: "details-bucket-%s"
# Secret name and namespace patching for AccessKey resource
# Namespace to save the secret is the same as the resource
- fromFieldPath: spec.parameters.secretNamespace
toFieldPath: spec.writeConnectionSecretToRef.namespace
# Generate and patch the kubernete secret name
- type: CombineFromComposite
toFieldPath: spec.writeConnectionSecretToRef.name
combine:
variables:
- fromFieldPath: spec.parameters.resourceType
- fromFieldPath: spec.parameters.resourceName
strategy: string
string:
fmt: "credentials-%s-%s"
The final configuration we will look at is the actual copy of secrets into the keys defined at XRD. The following is the code from AccessKey and the Bucket resource to perform the same:
# Populate the connection secret keys from AccessKey secrets
connectionDetails:
- name: iam_username
fromConnectionSecretKey: username
- name: iam_password
fromConnectionSecretKey: password
# Copy the endpoint secret key to bucketURL for
connectionDetails:
- name: bucketURL
fromConnectionSecretKey: endpoint
The example discussed is available at https://github.com/PacktPublishing/End-to-End-Automation-with-Kubernetes-and-Crossplane/tree/main/Chapter06/Hand-on-examples/secret-propagation. To fully experience the secret creation in the Kubernetes cluster, create the XR, composition, and Claim from the preceding link. The following screenshot covers the complete example execution:
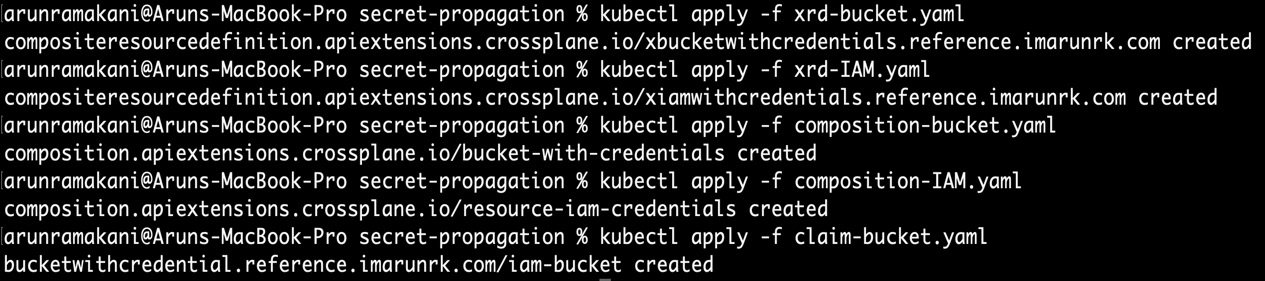
Figure 6.15 – Secret propagation
Once the resources are created in their entirety, you will see that the secrets are available inside the alpha namespace:
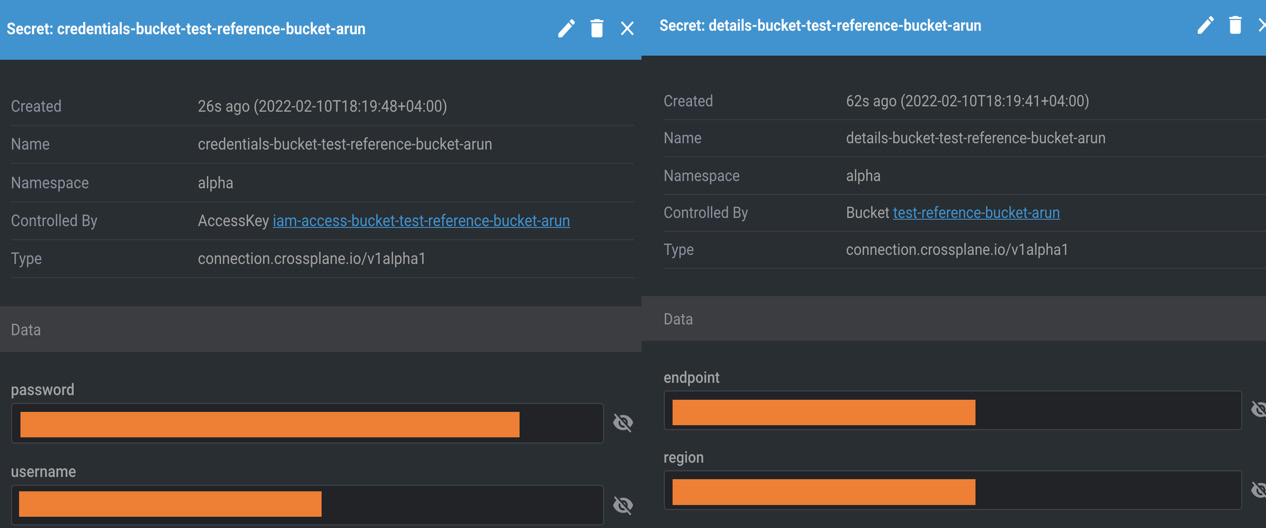
Figure 6.16 – Created secret
Information
May organizations prefer to store secrets in a key vault rather than Kubernetes secrets. There is an example on the Crossplane website to execute this integration at https://crossplane.io/docs/v1.6/guides/vault-injection.html. The Crossplane team is working on a more straightforward way to do this using an MR. The MR will represent the specific external vault resource and push the secrets accordingly. Keep watching the Crossplane release.
This concludes our exploration of secrets. The next section of this chapter will use the Crossplane Helm provider to deploy an application in a remote Kubernetes cluster. It will continue what we looked at in Chapter 5, in the Managing external software resources section.
Helm provider hands-on
It is exciting to introduce this aspect of Crossplane. It is precisely the crossroads where it unifies infrastructure automation and application automation. After creating an infrastructure resource, we would be interested in doing additional operations. For example, after deploying a Kubernetes cluster, we would be interested in setting up Prometheus or deploying an application in the remote Kubernetes cluster. Helm Crossplane provider can perform this operation.
Similarly, after provisioning a database, we will be interested in creating tables. SQL provider can perform these activities from Crossplane. The examples open a way to define all application dependencies in Crossplane and package them along with infrastructure. This section will go through a hands-on journey to experiment with Crossplane Helm provider. We will use GCP to create a Kubernetes cluster. It will fit well within the free tier limits. The following diagram represents how the Helm provider works inside the Crossplane ecosystem to manage application deployment in a remote Kubernetes cluster:
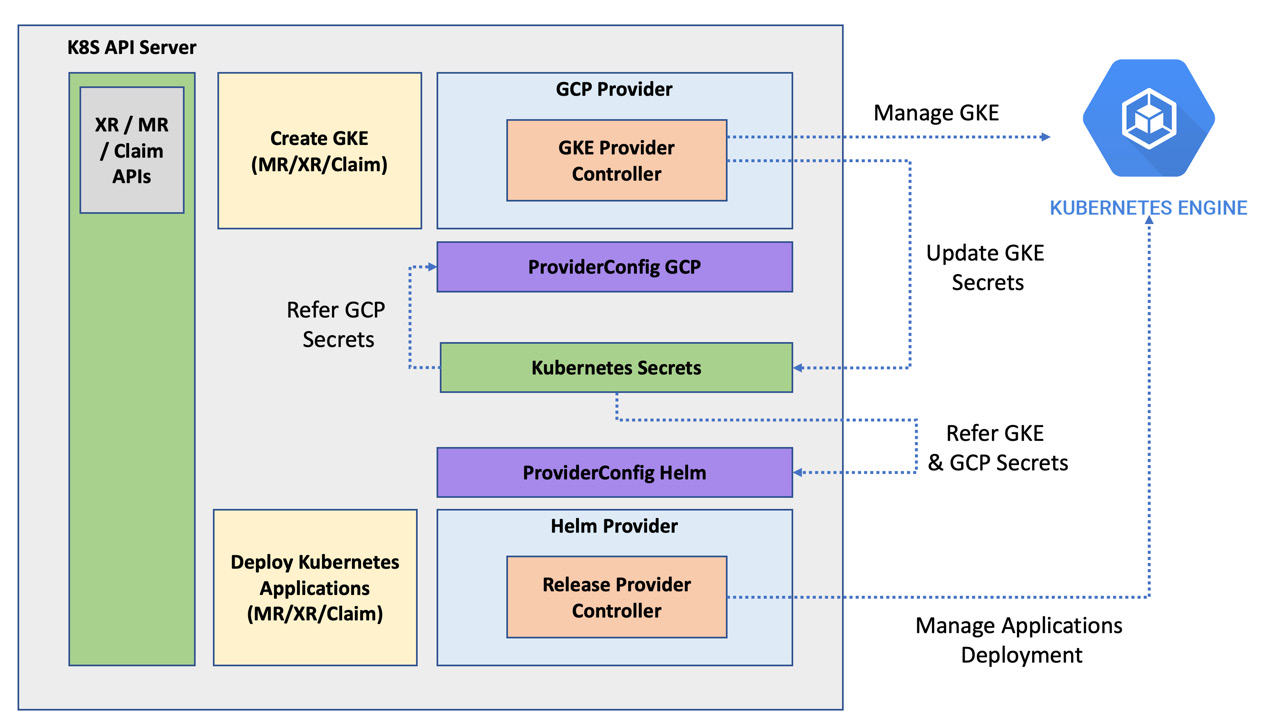
Figure 6.17 – Helm provider and GKE
Let’s look at the details of how different components work together to manage applications using Helm in a few steps:
- With your existing GCP provider and provider configuration, we can create a Google Kubernetes Engine (GKE) using the Cluster.container.gcp.crossplane.io MR.
- Define the namespace and secret name in the MR to store the remote cluster credentials.
- Install the Helm provider in the Crossplane control plane using the respective configuration YAML.
- Next, set up the provider configuration for Helm provider using the Kubernetes credentials and GCP credentials stored in the Kubernetes secrets.
- Now we can create the Helm releases in the remote GKE cluster using the Release.helm.crossplane.io MR.
Refer to the following code for the Helm provider configuration YAML:
apiVersion: pkg.crossplane.io/v1
kind: Provider
metadata:
name: provider-helm
spec:
package: crossplane/provider-helm:master
The following is the configuration for the Helm provider GKE. It requires credentials from both the Kubernetes cluster and the cloud provider. The secret reference under the credentials section refers to a specific Kubernetes cluster. The secret reference under the identity section refers to the GCP cloud credentials. The identity section of credentials may not be available for other cloud providers. Ensure that the Kubernetes APIs are enabled for the GCP cloud credentials:
apiVersion: helm.crossplane.io/v1beta1
kind: ProviderConfig
metadata:
name: helm-provider
spec:
# GKE credentials
credentials:
source: Secret
secretRef:
name: secret-gke-for-helm-deployment
namespace: crossplane-system
key: kubeconfig
# GCP credentials
identity:
type: GoogleApplicationCredentials
source: Secret
secretRef:
name: gcp-account
namespace: crossplane-system
key: service-account
Before applying the provider configuration, we must ensure that the GKE cluster is created and that its credentials are stored secretly. All examples of the Helm provider experiment are available at https://github.com/PacktPublishing/End-to-End-Automation-with-Kubernetes-and-Crossplane/tree/main/Chapter06/Hand-on-examples/helm-provider. Apply GKE.yaml to create the cluster. Refer to the following screenshot of GKE cluster creation, Helm provider installation, and provider configuration setup:
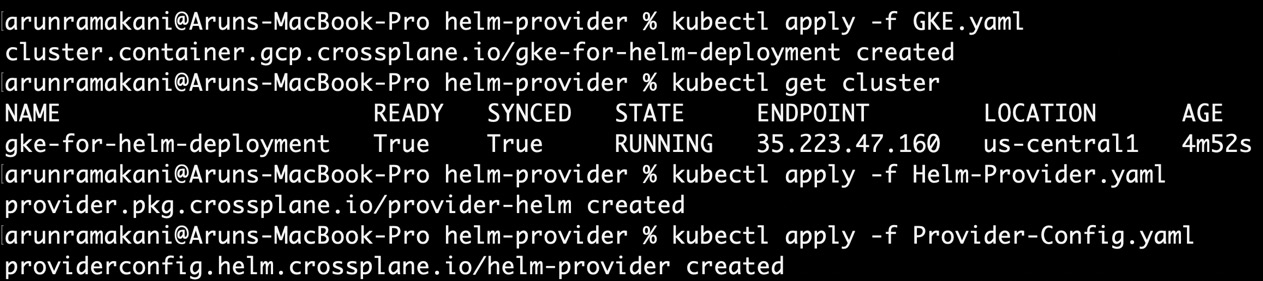
Figure 6.18 – GKE and Helm provider setup
Now we can start managing application deployment in the GKE cluster using Helm. The release is the MR construct available in Helm provider used to manage applications. Release MR has the following vital configurations:
- The spec.forProvider.chart configuration will hold basic information about the chart, such as the repository name, chart name, and version.
- spec.forProvider.valuesFrom, spec.forProvider.values, and spec.forProvider.set are the three different ways to provide the values for the Helm templated variables. If we set the values for the same variable in multiple ways, then the order of preference will be the same as the order mentioned previously.
- spec.forProvider.patchesFrom will be helpful in specifying post-rendering patches to override values at the last mile before deployment.
Refer to a simple Release configuration:
apiVersion: helm.crossplane.io/v1beta1
kind: Release
metadata:
name: redis-crossplane-example
spec:
providerConfigRef:
name: helm-provider
forProvider:
chart:
name: hello
repository: https://www.kleinloog.ch/hello-helm/
version: 0.3.0
namespace: default
Applying the preceding configuration will create the hello world example in the GKE cluster. Refer to the following screenshot with application deployment:

Figure 6.19 – Crossplane Helm deployment
The same Release MR from the Crossplane Helm provider also handles upgrades to our initial release of the Helm chart. We can change the required chart information, values, or patches and re-apply the YAML to upgrade our release. Apply Helm-test-deploy-upgrade.yaml, which changes the container version to move our release version. Before creating an upgraded release, the Release controller MR checks any actual change to the configuration. It will make sure that there are no unnecessary releases. Refer to the following screenshot showing an upgraded release:

Figure 6.20 – Crossplane Helm release upgrade
This concludes our Helm experimentation for now. The following section will rescue us from code and help us learn some guiding principles to define the XR API boundaries.
Tip
In all our examples, we referred to composition directly with its name in the Claim/XRs. We can also refer to the composition using label selectors after adding the respective labels in the composition metadata.
Defining API boundaries
We expect platform engineers to compose all the infrastructure and application automation concerns in XR APIs. How to define an API boundary is a bit tricky. It’s because many conflicting trade-off points are influencing the API boundaries. Let’s start with the fact that we wanted to compose every resource required for an application and its infrastructure in a single composition. Here are some considerations that will not allow us to do that:
- There would be many security and architecture policies that need to centralize. We cannot add them again and again in multiple compositions.
- Some resources may have compliance requirements and must be composed separately for audit purposes.
- Overly big compositions are difficult to read, understand, debug, and refactor.
- Testing a bulk composition is difficult.
- Every application will require some customization to the infrastructure recipe, provided we have a bulk composition. We will fork the main code for customization. It will be challenging to maintain as we grow.
- Specific infrastructure such as the network layer is owned by a particular team. It must be composed separately and referred to in the required XR.
There could be more reasons depending upon your organization’s realities. In summary, we must build small XR APIs and organize them together with resource references and nested XRs. As soon as we talk about small XR APIs, API boundary questions arise. Which are the resources that make sense to be composed together? It is something like what we do in the world of microservices. A merge versus a split trade-off is something that we always do in microservices.
Tip
It’s challenging to get the boundary correct on the first go. We should do our initial trade-off analysis, which provides an initial boundary and then evolves in iterations based on real-world experience.
Earlier in our S3 bucket example, we composed the bucket and its policy in a single XR. The second nested XR was holding the IAM user and policy attachment resource. This design can ensure that the IAM XR can be used with other resources.
Information
Later in Chapter 10, Onboarding Applications with Crossplane, we will do a trade-off analysis of a hands-on journey example to analyze the impact of different API boundaries.
The following diagram covers different factors influencing the trade-off analysis:
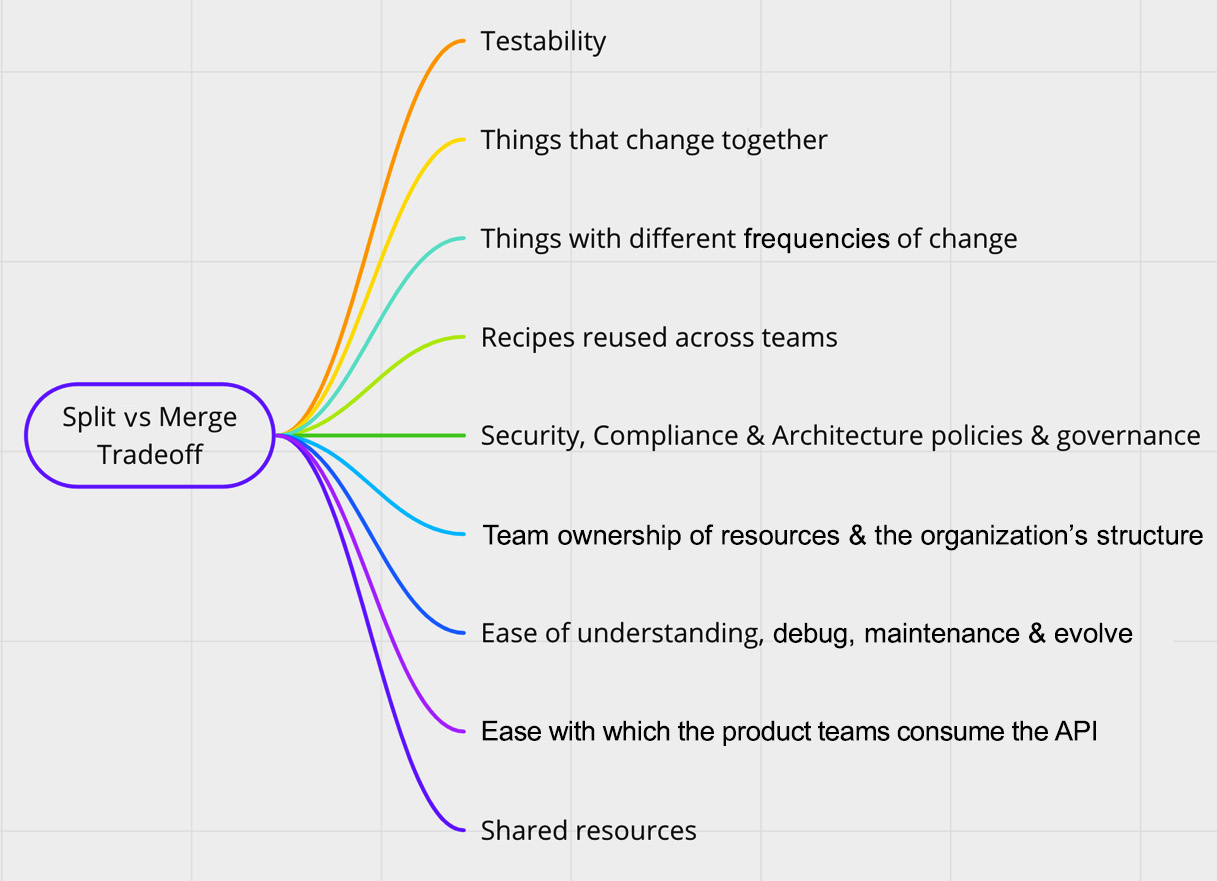
Figure 6.21 – Crossplane Helm release upgrade
This concludes the API boundary discussion. In the following section of the chapter, we will explore monitoring the Crossplane control plane.
Alerts and monitoring
Prometheus and Grafana, the popular tools in the Kubernetes world, can be used for Crossplane monitoring as well. Before starting, we should ensure that the Crossplane pod can emit metrics. It is as simple as setting the metrics parameter to true (--set metrics.enabled=true) during the Helm deployment of Crossplane. We can do it either at the first Crossplane release or upgrade the Helm release using the following command:
# Fresh install with metrics enables
helm install crossplane --namespace crossplane-system crossplane-stable/crossplane --set args='{--debug}' --set metrics.enabled=true# Helm upgrade with metrics enables
helm upgrade crossplane --namespace crossplane-system crossplane-stable/crossplane --set args='{--debug}' --set metrics.enabled=trueWe can split the monitoring and alert setup into three parts:
- Enable Prometheus to scrape metrics.
- Set up monitoring alerts.
- Enable the Grafana dashboard.
We can start first with metric scraping.
Enabling Prometheus to scrape metrics
First, we must set up Prometheus in the Kubernetes control plane. We will do this installation using the Prometheus operator. You can look at the quick start guide at https://prometheus-operator.dev/docs/prologue/quick-start/. The following are the simple steps to get the Prometheus operator installed:
# Step 1: Clone the Prometheus operator repository and switch to the folder
git clone https://github.com/prometheus-operator/kube-prometheus.git
cd kube-prometheus
# Step 2: Execute the initial setup instructions
kubectl create -f manifests/setup
# Step 3: Install the operator
kubectl create -f manifests/
# Step 4: Once the pods are up and running, view the dashboard after the port forward
kubectl --namespace monitoring port-forward svc/Prometheus-k8s 9090
http://localhost:9090/
All configurations required for the monitoring example are available at https://github.com/PacktPublishing/End-to-End-Automation-with-Kubernetes-and-Crossplane/tree/main/Chapter06/Hand-on-examples/monitoring. Once you have Prometheus installed, the next step is to ask Prometheus to scrape the metrics from the Crossplane and GCP provider pods. We need to add ControllerConfig to the GCP provider to define the metrics port. Configuration of the same is available in GCP-Provider.yaml. Then, we can configure PodMonitor, which instructs Prometheus to scrape metrics from a specific POD at a given port. Configuration of the same is available in monitor.yaml. Once these steps are done, we can start looking at the controller reconciliation metrics in the Prometheus console. Create a GCP CloudSQLInstance instance with an incorrect configuration, which will not reconcile, and look at the reconciliation failure metrics. The following is the Prometheus query for the reconciliation failure metrics from CloudSQLInstance:
sum_over_time(controller_runtime_reconcile_errors_total{namespace="crossplane-system", controller="managed/cloudsqlinstance.database.gcp.crossplane.io"}[5m])Refer to the following screenshot where we are looking at the reconciliation failure metrics for CloudSQLInstance:

Figure 6.22 – Metrics
The next step is to set up monitoring alerts for the reconciliation failure scenarios.
Setting up monitoring alerts
We can also set up alerts for this reconciliation error using the following configuration. It may be too much to trigger alerts for every reconciliation failure. Additionally, some of the reconciliation errors are expected scenarios. For example, if one resource is referring to another, the referring resource will fail to reconcile until the referred resource is provisioned. The following alert configuration is configured to throw an alert only if the reconciliation error exceeds 20 times within a 5-minute window:
apiVersion: monitoring.coreos.com/v1
kind: PrometheusRule
metadata:
name: sql-alerts
namespace: crossplane-system
labels:
app.kubernetes.io/part-of: crossplane
spec:
groups:
- name: Crossplane
rules:
- alert: ReconciliationFailure
expr: sum_over_time(controller_runtime_reconcile_errors_total{namespace="crossplane-system", controller="managed/cloudsqlinstance.database.gcp.crossplane.io"}[5m]) > 20for: 5m
labels:
severity: page
annotations:
summary: '{{ $labels.controller }} reconciliation has been failing for more than 20 time in the last 5 minutes.'Refer to the following screenshot where we are looking at the reconciliation failure alert:

Figure 6.23 – Alerts
Information
The list of metrics emitted by Crossplane is an area to be improved. We should get detailed metrics around compositions and Claims. We can expect more enhancements happening soon from the Crossplane community.
The final step involves setting up the Grafana dashboard to visualize the metrics and errors better.
Enabling the Grafana dashboard
Finally, we can set up a Grafana dashboard to visualize the metrics, logs, and alerts. The Grafana dashboard will already be installed in the cluster as part of the Prometheus Operator. What we must do additionally is to set up a dashboard for the Crossplane control plane. At grafana.json in the Git repository, I have added a sample dashboard configuration from the Crossplane community. Import the JSON into Grafana and look through the metrics. Refer to the following Grafana screenshot, which indicates that CloudSQLInstance is the active controller running the reconciliation loop:
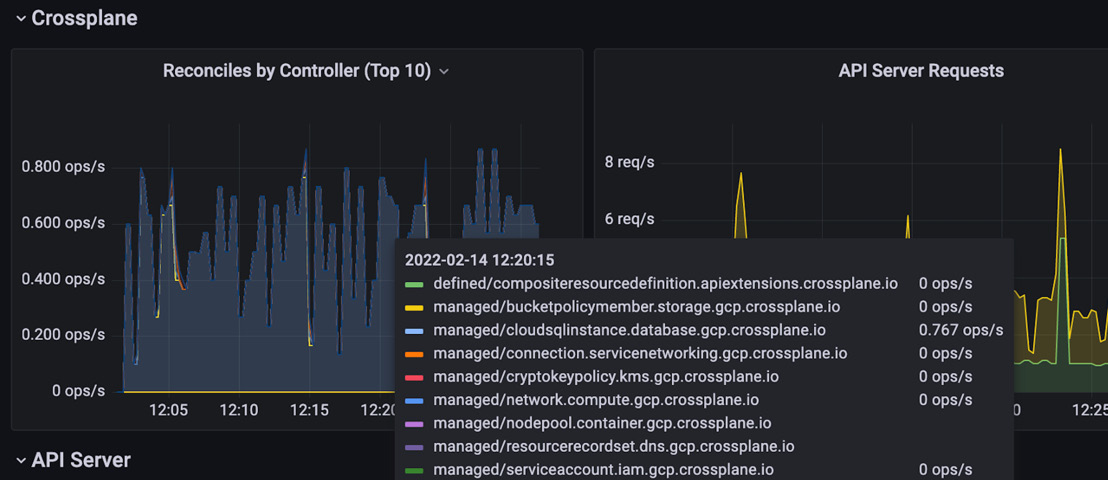
Figure 6.24 – Grafana metrics view
We will conclude the monitoring concepts here and move on to the final section of the chapter, which covers a few troubleshooting patterns.
More troubleshooting patterns
We explored different troubleshooting patterns in the last couple of chapters and earlier in this chapter. It covered ways to look at resource references in the resource description to move from composition to the MR, using the event logs in the resource description, and enabling Crossplane/provider pod logs to debug. This section will add a couple more debugging skills to enhance our platform development skills. The following are the new patterns we will look at:
- Pause the Crossplane: Sometimes, there may be a requirement to stop the controller reconciliation loop in order to debug resource issues. We can simply edit the Crossplane deployment to make the replication count to zero. This is the simplest way to pause Crossplane during our debug window. Once our debugging is done, we can restore the replication count. Similarly, we can also pause the Providers. We reduce the provider replication count to zero using ControllerConfig (the configuration we used earlier to enable debugging and expose the metrics port).
- Hung resources: Sometimes, we may notice that the resources are hung, and we cannot delete them. It should be because of the finalizers. We should patch the resource with an empty finalizer and delete it again. This will guarantee resource deletion only in the Crossplane control plane. It is not guaranteed that the resource is deleted from the external provider. We must visit the external provider console to validate whether the resources are deleted. The following code will render the finalizers empty:
kubectl patch <resource-type> <resource-name> -p '{"metadata":{"finalizers": []}}' --type=merge
Summary
This chapter covered many new Crossplane patterns required to build the state-of-the-art resource composing control plane. I am explicitly mentioning the resource composing control plane instead of the infrastructure composing control plane because we no longer compose only external cloud provider resources. We experimented with resource referencing, secret propagation, and Helm deployment with the help of hands-on examples. We also looked at setting up monitoring with another hands-on example. In addition to these hands-on journeys, we also learned some debugging skills and ways to define our API boundaries.
The next chapter will cover different ways to extend and scale Crossplane.