
8
Securing Software Delivery to GKE with Cloud Build
Software supply chain security has become a critical focus of the industry in recent years, with numerous compromises resulting in damaging outcomes for companies and users alike. This focus has yielded more rigorous practices in securing software delivery, underscoring the importance of practices such as verifying trust in the artifacts you deploy and applying the principle of least privilege (POLP). With Cloud Build being a recommended mechanism for automating software delivery in Google Cloud, it is important to understand its capabilities and best practices around security.
In this chapter, we will walk through an example of leveraging Cloud Build to deploy a set of applications to a private Google Kubernetes Engine (GKE) cluster while implementing multiple security best practices using Cloud Build features.
Specifically, we will cover these topics in this chapter:
- Creating your build infrastructure and deployment target
- Securing build and deployment infrastructure
- Applying POLP to builds
- Configuring release management for builds
- Enabling verifiable trust in artifacts from builds
Creating your build infrastructure and deployment target
The deployment target in this example is a GKE cluster. Cloud Build will implement our software delivery pipeline as a build, performing both the building of container images and the release of Kubernetes manifests to run the container images in the GKE cluster.
Before we dive into how you can secure this software delivery to GKE from Cloud Build, we should review the aspects of Kubernetes and GKE that are relevant to our software delivery processes.
Kubernetes (https://kubernetes.io) is a popular open source software (OSS) project owned by the Cloud Native Computing Foundation (CNCF) (https://www.cncf.io) that is responsible for running containerized applications across numerous machines.
At a high level, it achieves this via software that acts as a control plane coordinating the lifecycle of containerized applications across a set of servers registered with the control plane called nodes. These nodes can be shared by multiple containerized applications or can be isolated for specific applications. In addition, Kubernetes also allows for the logical separation of applications via a Kubernetes resource called a namespace.
Together, these components make up a Kubernetes cluster, as depicted in the following diagram:
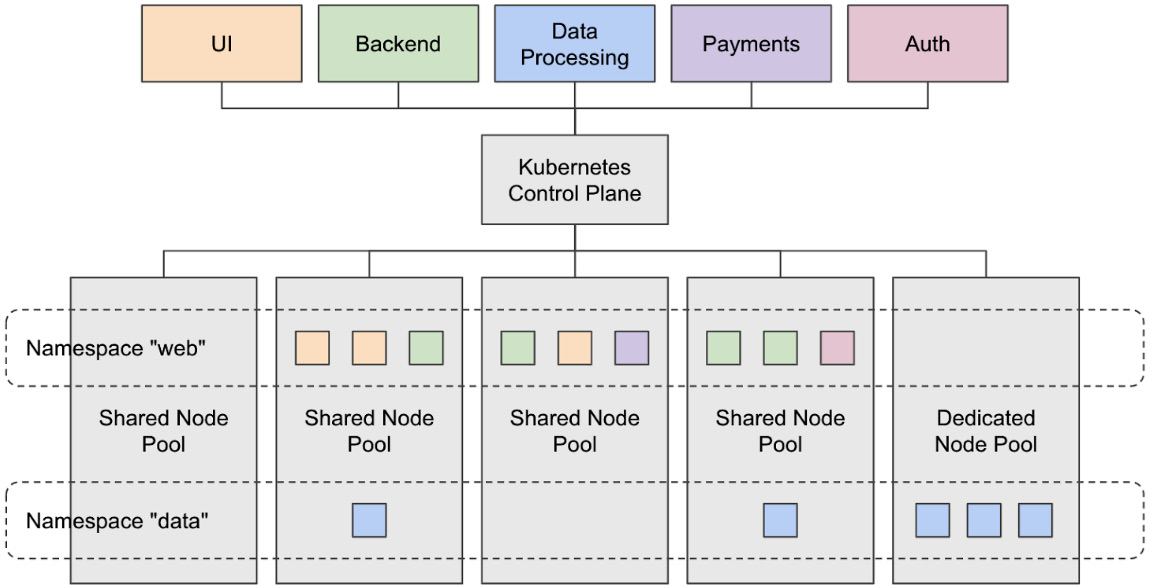
Figure 8.1 – High-level architecture of a Kubernetes cluster
The control plane is critical for this chapter’s examples as it is the foundational point of interaction with the cluster for users and automation alike. It provides a network endpoint exposing the Kubernetes application programming interface (API) and runs software that performs functions such as the admission of containerized applications into the cluster.
This means that the interactions with the control plane must be secure and that we must utilize Cloud Build security functionality with its capabilities for admission control.
If you are new to Kubernetes and would like to dive deeper, it is recommended to visit the official documentation (https://kubernetes.io/docs) to learn more about how it operates.
GKE is a platform in which Google provides managed Kubernetes clusters as a service to users. The level of management that GKE provides depends on the cluster mode you utilize. You can choose from the following cluster modes:
- GKE Standard, in which the control plane is fully managed by Google but you can still control aspects of node provisioning and upgrade lifecycle
- GKE Autopilot, in which both the control plane and node lifecycles are fully managed by Google
In this example, you will be using GKE to create a GKE Standard cluster, which means that the control plane will run in a Google-owned environment and be fully managed by Google:
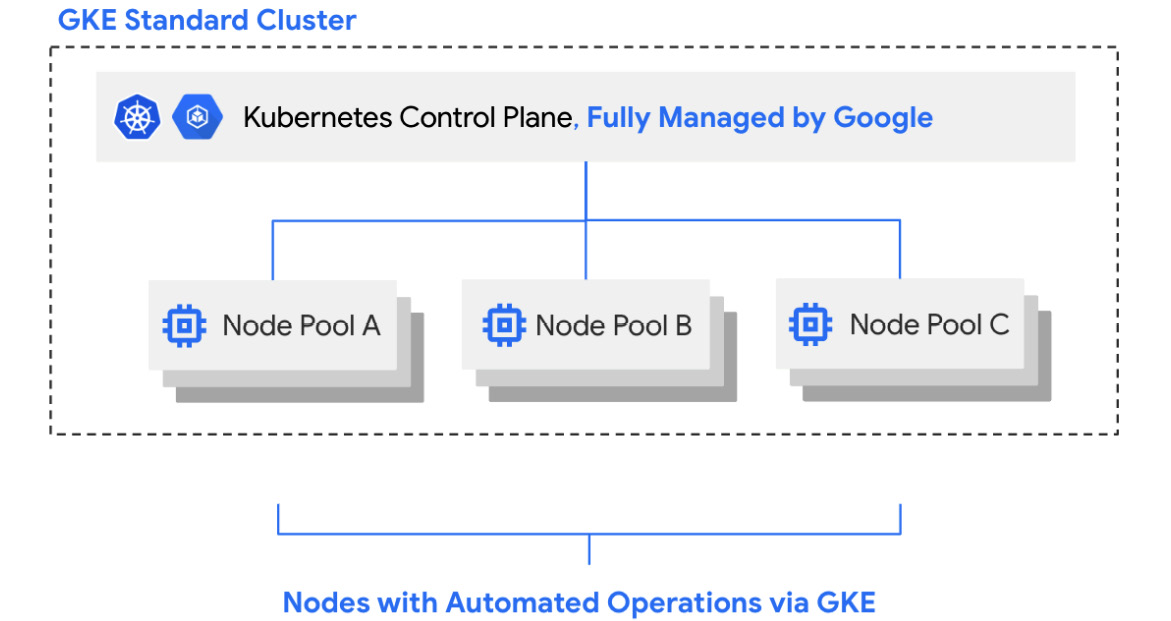
Figure 8.2 – High-level architecture of a GKE Standard cluster
Specifically, you will create a private GKE Standard cluster. This is a configuration for a GKE cluster in which the control plane is only accessible by a private endpoint on a network managed by Google and peered with your own Google virtual private cloud (VPC).
This means that we can align Cloud Build and GKE security best practices by using private pools in Cloud Build to build and deploy to private GKE clusters. This ensures that Cloud Build’s calls to the Kubernetes control plane do not travel across the public internet, but rather over a private network connection.
Enabling foundational Google Cloud services
To get started with this example and create a secure build infrastructure, you must first ensure that you enable all relevant services in your Google Cloud project.
It is highly recommended that you run this chapter’s examples in a sandbox or test Google Cloud project, as you will have full control not only to run the example but also to easily clean up resources created.
You will begin by initiating a session in Cloud Shell (shell.cloud.google.com), the ephemeral Linux workstation provided by Google Cloud.
Clone the example repository from GitHub using the following command:
$ cd ~ && git clone https://github.com/agmsb/cloudbuild-gke.git && cd cloudbuild-gke/08
Run the gcloud command to configure gcloud to use the appropriate Google Cloud project as follows, replacing <add-project-id> with the Google Cloud project you want to use:
$ gcloud config set project <add-project-id>
Given that it is recommended that this example be run in a sandbox Google Cloud project, it is best completed with the role of a project owner assigned to your user in Identity and Access Management (IAM).
With the project owner role, you can enable the services required for this project, using the following command:
$ gcloud services enable container.googleapis.com cloudbuild.googleapis.com artifactregistry.googleapis.com binaryauthorization.googleapis.com servicenetworking.googleapis.com containeranalysis.googleapis.com
This command will enable the following services in your project:
- GKE
- Cloud Build
- Artifact Registry
- Binary Authorization
- Service Networking API
- Container Analysis API
With these services enabled, you can now begin setting up the resources for this chapter’s example.
Setting up the VPC networking for your environment
We will run numerous commands that will require names for various resources; for your convenience, default names are provided in a file accessible via the GitHub repository.
It is recommended you walk through this example using these variable names; once you have completed it, you can go back and reuse the example and change the variable names to something with more meaning specific to your use case.
Source the bin/variables.sh file to read the environment variables into your current session, like so:
$ source bin/variables.sh
With the proper variables set, we can move forward with creating our first set of resources, as follows:
- A VPC for your GKE cluster
- A VPC with which your fully managed private pool workers can peer
- Cloud virtual private network (VPN) tunnels connecting the aforementioned VPCs over a private, encrypted connection
Change directories into the vpc directory, in which you will find a main.tf file. This contains Terraform configuration code to create the preceding resources. Here’s the code you need to execute:
$ cd infra/vpc
To use the Terraform configuration code, you will need to initialize Terraform in that directory by running the following command using the terraform command-line interface (CLI). This was last tested on version 1.2.7 of terraform:
$ terraform init
Review all of the resources to be created by the terraform CLI using the following command:
$ terraform plan
To actualize those changes, run terraform apply, as follows. You will need to also type in “yes” when prompted in the terminal; this allows you to proceed with the provisioning of the resources in main.tf:
$ terraform apply
This will take a number of minutes to complete. Once the VPC networking resources for our example have been created, we can move forward with creating a GKE cluster.
Setting up your private GKE cluster
Because GKE is a managed Kubernetes offering, it provides numerous turnkey features enabled by parameters passed to GKE upon cluster creation.
As a reminder, if you have lost context since working on the previous section, run the following commands to navigate to the right directory and source the proper environment variables.
Replace <add-project-id>, shown here, with the project you are working with:
$ gcloud config set project <add-project-id>
Navigate to the directory you are working in, like so:
$ cd ~/cloudbuild-gke/08
Source the required environment variables by running the following command:
$ source bin/variables.sh
Now, we can create a GKE cluster. Run the following command to kick off cluster creation. Do note that this consumes quota from Google Compute Engine (GCE) and Persistent Disk, creating a cluster with six nodes in total, each with 20 gigabytes (GB) of Persistent Disk:
$ gcloud container clusters create $CLUSTER_NAME
--project=$PROJECT_ID
--cluster-version=$CLUSTER_VERSION
--enable-ip-alias
--network=$CLUSTER_VPC_NAME
--subnetwork=$CLUSTER_SUBNET_NAME
--cluster-secondary-range-name=pod
--services-secondary-range-name=svc
--region=$REGION
--num-nodes=2
--disk-size=20
--enable-private-nodes
--enable-private-endpoint
--master-ipv4-cidr=$CLUSTER_CONTROL_PLANE_CIDR
--workload-pool=$PROJECT_ID.svc.id.goog
--enable-binauthz
There are a few things worth noting in this cluster configuration. The first is that we are able to lock down the cluster to only private networking via the –enable-private-nodes, –enable-private-endpoint, and –master-ipv4-cidr parameters.
The –enable-private-nodes parameter ensures that no nodes running in the GKE cluster have a public Internet Protocol (IP) address. This by default blocks the nodes from pulling any publicly hosted container images at locations such as Docker Hub. By configuring your cluster in such a manner, you are implicitly denying these images from running in your cluster—a good start for ensuring your cluster runs known and trusted software.
Later in this chapter, in the Enabling verifiable trust in artifacts from builds section, we will review how to explicitly ensure you run known and trusted software using the last parameter we specified: –enable-binauthz.
Given this configuration, this also means we cannot pull from Container Registry or Artifact Registry via public IP addresses. To still ensure that our cluster can run containers hosted in Google Cloud registries, we will need Private Services Access. This is a feature in Google Cloud that enables both Google and third parties to offer services accessible via a private IP address rather than public endpoints.
By default, this is enabled for GKE private clusters; however, if you are looking to replicate this example with a shared VPC, you will need to manually enable Private Services Access. You can find more information on how to do this here: https://cloud.google.com/vpc/docs/private-google-access.
The –enable-private-endpoint parameter ensures that we only make our GKE control plane available via a private IP address. This means that API calls from humans and automation alike do not traverse the public internet. These API calls may have sensitive information that leaks details about your software, such as container image names, environment variables, or secrets. Thus, it is important to ensure that these calls are made privately.
Finally, --master-ipv4-cidr=$CLUSTER_CONTROL_PLANE_CIDR defines the range that Google will use to allocate private IP addresses for you to interact with the control plane. This is because the control plane is actually owned and run by Google; the way it interacts with your nodes is via a peering that is created with your VPC, which is where your GKE nodes and other resources you create reside.
While this peering is created for you automatically upon cluster creation, we actually need to update this peering to do the following:
- Export custom routes to connect to the private pool.
- Decline the exchanging of routes for public IP destinations.
Run the following commands to extract the name of the automatically created peering, and update it according to the preceding points:
$ export GKE_PEERING_NAME=$(gcloud container clusters describe $CLUSTER_NAME
--region=$REGION
--format='value(privateClusterConfig.peeringName)')
$ gcloud compute networks peerings update $GKE_PEERING_NAME
--network=$CLUSTER_VPC_NAME
--export-custom-routes
--no-export-subnet-routes-with-public-ip
Let’s review the current architecture of the GKE cluster, now that we have created the VPC for the GKE private cluster and the cluster itself. You can view this here:
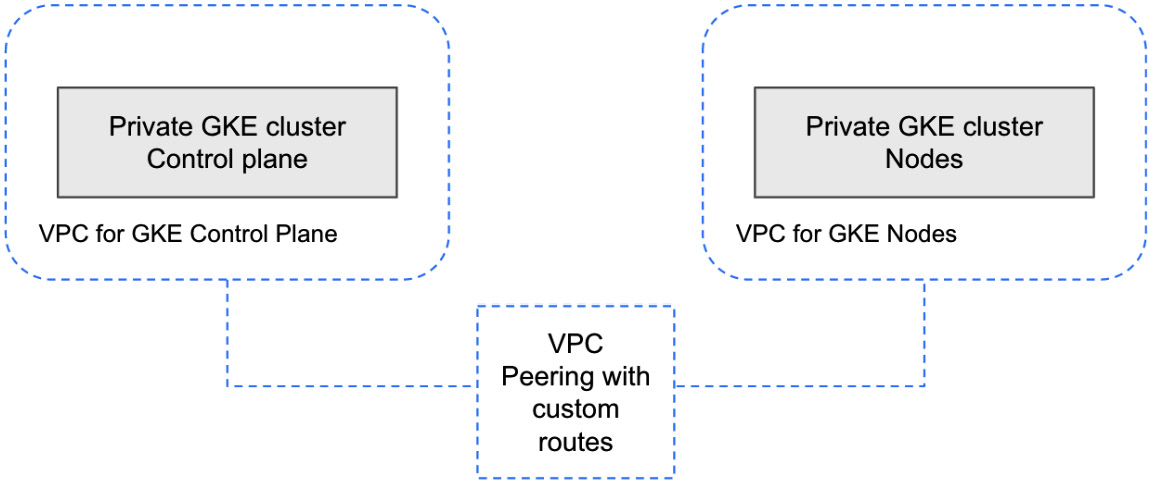
Figure 8.3 – High-level architecture of the private GKE cluster created
To summarize, the critical aspects of what you have created include the following:
- Ensuring access to the GKE control plane is only available via a private connection.
- Nodes cannot pull container images from public registries.
- Nodes pull container images via private, internal IP addresses.
With this completed, let’s now move forward with creating a secure build and deployment infrastructure using Cloud Build private pools.
Securing build and deployment infrastructure
When securing your software delivery processes in Cloud Build, it is important to begin with the underlying infrastructure that runs the builds themselves. If compromised, attackers can access sensitive information such as your source code, your secrets that the build may access, and the deployment targets with which your builds interact.
Underlying infrastructure in this chapter’s example specifically means the following:
- Private pool workers that execute Cloud Build builds
- VPC networking, connecting workers to systems such as Artifact Registry and GKE
- Minimal or managed container images executing build steps
We will begin by creating a private pool for our example.
Creating private pools with security best practices
Previously introduced in Chapter 2, Configuring Cloud Build Workers, private pools are a specific mode for Cloud Build workers that have distinct features from the default pool, including VPC connectivity and greater machine-type availability, all while remaining fully managed in a Google-owned environment.
We will be using a private pool in this example to run four builds, as follows:
- Team A, Build 1—Build a container image for a Python app.
- Team A, Build 2—Deploy the container image to GKE.
- Team B, Build 1—Build a container image for a Python app.
- Team B, Build 2—Deploy the container image to GKE.
This simulates a scenario in which two different teams both deploy their workloads to the same Kubernetes cluster configured for simple multi-tenancy by isolating the applications in the cluster using Kubernetes namespaces, as illustrated in the following diagram:
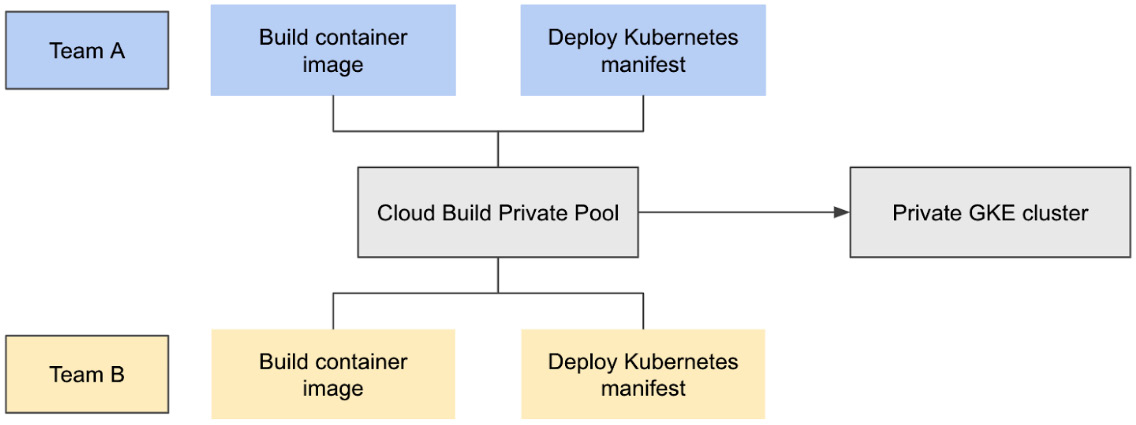
Figure 8.4 – High-level architecture of the software delivery workflow in this chapter
Before we can run the builds, we must create our private pool and set it up to communicate with our GKE cluster, all with the following goals in mind:
- Create secure workers to run builds in the private pool.
- Securely access the GKE control plane.
- Limit access to the GKE control plane via allowlists.
- Secure the network perimeter in which Cloud Build and GKE communicate.
As a reminder, if you have lost context since working on the previous section, run the following commands to navigate to the right directory and source the proper environment variables.
Replace <add-project-id>, shown here, with the project you are working with:
$ gcloud config set project <add-project-id>
Navigate to the directory you are working in, as follows:
$ cd ~/cloudbuild-gke/08
Source the required environment variables, like so:
$ source bin/variables.sh
Beginning with the first goal in mind, you will create a Cloud Build private pool and ensure that the security configurations available to us are utilized. But before we can create a private pool, there are a couple of extra networking resources we have to create, as follows:
- Private IP range for private pool workers
- VPC peering to peer the VPC we previously created with the Service Networking API (https://cloud.google.com/service-infrastructure/docs/enabling-private-services-access), enabling connectivity to private pool workers
To create an IP range for the private pool, run the following command:
$ gcloud compute addresses create $PRIVATE_POOL_IP_RANGE_NAME
--global
--addresses=$PRIVATE_POOL_IP_RANGE
--purpose=VPC_PEERING
--prefix-length=$PRIVATE_POOL_IP_RANGE_SIZE
--network=$PRIVATE_POOL_VPC_NAME
To create a peering with the VPC we created earlier, run the following commands:
$ gcloud services vpc-peerings connect
--service=servicenetworking.googleapis.com
--ranges=$PRIVATE_POOL_IP_RANGE_NAME
--network=$PRIVATE_POOL_VPC_NAME
--project=$PROJECT_ID
$ gcloud compute networks peerings update servicenetworking-googleapis-com
--network=$PRIVATE_POOL_VPC_NAME
--export-custom-routes
--no-export-subnet-routes-with-public-ip
We created the peering with two configurations of note: --export-custom-routes and --export-custom-routes. These configurations respectively allow for us to export routes between our private pool and our private GKE control plane, while also preventing any routes with public IP addresses to be exported.
With our peering properly set up, we will finish our networking configuration by advertising our private pool and GKE control-plane IP addresses, as follows:
$ gcloud compute routers update-bgp-peer ${PRIVATE_POOL_ROUTER}
--peer-name=$PRIVATE_POOL_ROUTER_PEER_0
--region=${REGION}
--advertisement-mode=CUSTOM
--set-advertisement-ranges=${PRIVATE_POOL_IP_RANGE}/${PRIVATE_POOL_IP_RANGE_SIZE}
$ gcloud compute routers update-bgp-peer ${PRIVATE_POOL_ROUTER}
--peer-name=$PRIVATE_POOL_ROUTER_PEER_1
--region=${REGION}
--advertisement-mode=CUSTOM
--set-advertisement-ranges=${PRIVATE_POOL_IP_RANGE}/${PRIVATE_POOL_IP_RANGE_SIZE}
$ gcloud compute routers update-bgp-peer ${CLUSTER_ROUTER}
--peer-name=${CLUSTER_ROUTER_PEER_0}
--region=${REGION}
--advertisement-mode=CUSTOM
--set-advertisement-ranges=$CLUSTER_CONTROL_PLANE_CIDR
$ gcloud compute routers update-bgp-peer ${CLUSTER_ROUTER}
--peer-name=${CLUSTER_ROUTER_PEER_1}
--region=${REGION}
--advertisement-mode=CUSTOM
--set-advertisement-ranges=$CLUSTER_CONTROL_PLANE_CIDR
Now, we can proceed with creating a private pool. To create your private pool, begin by sourcing the required environment variables and creating a private pool configuration file called private-pool.yaml under the infra/ directory, as follows:
$ cat > infra/private-pool.yaml <<EOF
privatePoolV1Config:
networkConfig:
# egressOption: NO_PUBLIC_EGRESS
peeredNetwork: projects/$PROJECT_ID/global/networks/$PRIVATE_POOL_VPC_NAME
workerConfig:
machineType: e2-standard-2
diskSizeGb: 100
EOF
The most important parts with regard to security in this configuration file are under the networkConfig stanza. Private pools, given that they are fully managed by Google, operate similarly to GKE control planes in that they are given access to resources in your VPC via VPC peering. You can see an illustration of this in the following diagram:
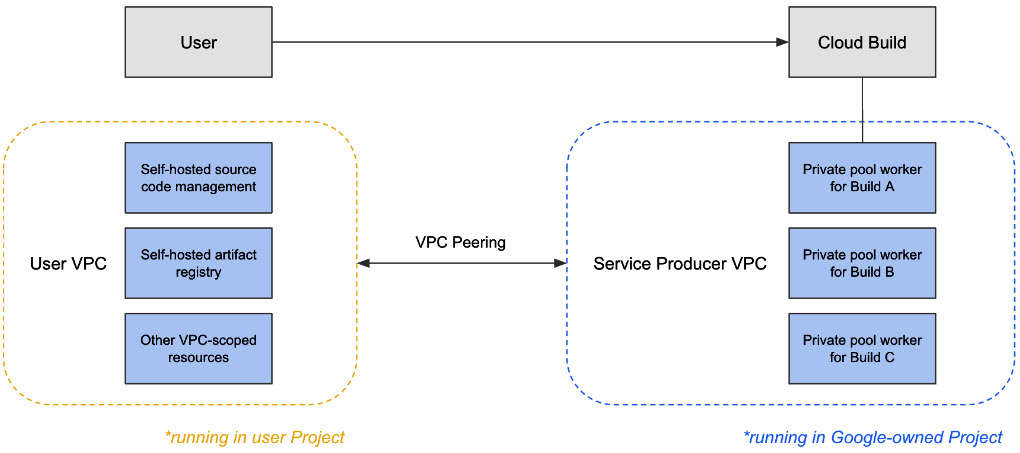
Figure 8.5 – Network architecture between your VPC and the VPC where private pools run
Let’s review the egressOption and peeredNetwork fields and what they mean for our private pool, as follows:
- Setting egressOption to NO_PUBLIC_EGRESS removes public IP addresses from our workers in the private pool.
- Setting peeredNetwork to a distinct VPC separate from our GKE cluster VPC is required. This is due to a lack of transitive peering functionality.
If we were to remove public IP addresses from our private pool, this means that we could also deny our worker infrastructure access to the public internet and artifacts that could be either malicious or vulnerable. This helps reduce the surface area where your software delivery pipeline could be compromised.
Note
For this example, we will leave the NO_PUBLIC_EGRESS option out of our private pool config because the source repository to which we will be connecting will be GitHub.com. This is for simplicity and to avoid any need for licensing.
In a secure software delivery setup, you would ideally utilize this parameter in conjunction with a private source code management (SCM) system such as GitHub Enterprise, which the private pool would be able to access over a private connection.
Now, create a private pool using the configuration file created in the previous command, like so:
$ gcloud builds worker-pools create $PRIVATE_POOL_NAME --config-from-file infra/private-pool.yaml --region $REGION
However, for many, it is not enough to merely make communications between the build system and the GKE control plane private. Should an attacker have access to creating resources within a VPC that has access to that VPN, they may still be able to interact with your private GKE control plane.
Let’s review how we can secure the control plane from other resources within our network perimeter.
Securing access to your private GKE control plane
As a reminder, if you have lost context since working on the previous section, run the following commands to navigate to the right directory and source the proper environment variables.
Replace <add-project-id>, shown here, with the project you are working with:
$ gcloud config set project <add-project-id>
Navigate to the directory you are working in, as follows:
$ cd ~/cloudbuild-gke/08
Source the required environment variables, like so:
$ source bin/variables.sh
It is recommended to configure an allowlist using the authorized networks for the GKE control-plane access feature in GKE (https://cloud.google.com/kubernetes-engine/docs/how-to/authorized-networks), as illustrated in the following screenshot:
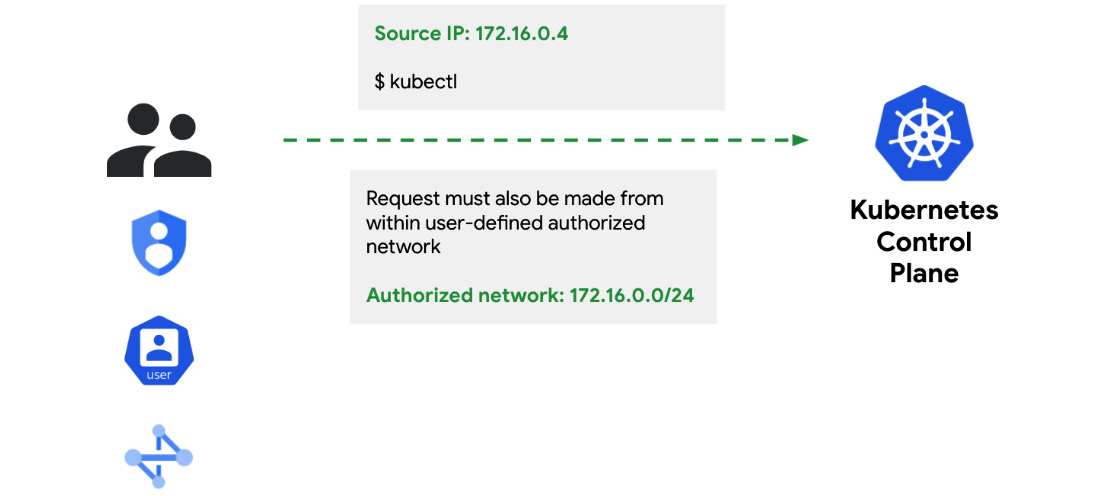
Figure 8.6 – Ensuring that users come from a known and trusted network identity
This will enable you to restrict access to the control plane by denying any traffic incoming from network identities that is not on a specific allowlist. This also means you must provide GKE with the network range that should be authorized to call the control plane. You can do this by running the following commands:
$ gcloud container clusters update $CLUSTER_NAME
--enable-master-authorized-networks
--region=$REGION
--master-authorized-networks=$PRIVATE_POOL_IP_RANGE/$PRIVATE_POOL_IP_RANGE_SIZE
This now means that you will only be able to utilize Cloud Build workers from this private pool to interact with your GKE control plane. If you wanted to create a private workstation or a bastion host using a Compute Engine virtual machine (VM), you would also need to add its private IP address to the allowlist in order to interact with the GKE control plane using kubectl.
With the worker, cluster, and networking configuration set up, it is time to begin evaluating the permissions with which our builds run in this environment.
Applying POLP to builds
When builds run and interact with other Google Cloud resources, by default they utilize the Cloud Build service account as their identity, to which their permissions are assigned.
This, however, does not enable builds or users to apply POLP; if you have one GCP service account that is used by multiple builds that perform different tasks or interact with different resources, then all builds that use that service account will be overly privileged.
Cloud Build has support for per-build or per-trigger service accounts; this enables you to create each service account with intention and according to POLP.
This principle ensures that each build has no more permissions than the minimal amount it requires to execute successfully; this is achieved with purpose-specific GCP service accounts.
Creating build-specific IAM service accounts
Let’s begin by creating two GCP service accounts, with one for each team we simulate in this example.
As a reminder, if you have lost context since working on the previous section, run the following commands to navigate to the right directory and source the proper environment variables.
Replace <add-project-id>, shown here, with the project you are working with:
$ gcloud config set project <add-project-id>
Navigate to the directory you are working in, as follows:
$ cd ~/cloudbuild-gke/08
Source the required environment variables, like so:
$ source bin/variables.sh
Now, create the first service account. This will be associated with Team A and will be associated with the build responsible for building a container image and pushing it to Team A’s repository in Artifact Registry. Here’s the code you need to execute:
$ gcloud iam service-accounts create $GCP_SA_NAME_01
--display-name=$GCP_SA_NAME_01
The permission that this service account would require is the ability to write a container image to a specific repository in Artifact Registry. This adheres to POLP, as we do not want to grant access to all repositories in Artifact Registry, especially if we have other teams building and storing images that have nothing to do with Team A. You can see a representation of this in the following screenshot:
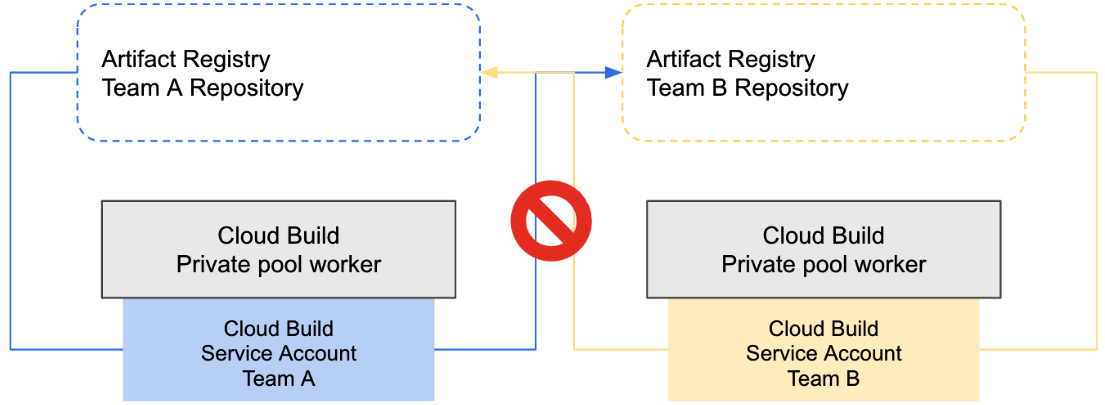
Figure 8.7 – Per-build service accounts with permissions to a specific Artifact Registry repository only
Let’s create a repository in Artifact Registry along with a role binding that will give the service account permission to a single, named repository for Team A in Artifact Registry, as follows:
$ gcloud artifacts repositories create $REPOSITORY_A
--repository-format=docker
--location=$REGION
$ gcloud artifacts repositories add-iam-policy-binding team-a-repository
--location us-west1 --member=$GCP_SA_NAME_01 --role= roles/artifactregistry.writer
Let’s now repeat the same process, except for Team B’s specific service account for building and pushing container images to their own repository in Artifact Registry, like so:
$ gcloud iam service-accounts create $GCP_SA_NAME_02
--display-name=$GCP_SA_NAME_02
$ gcloud artifacts repositories create $REPOSITORY_B
--repository-format=docker
--location=$REGION
$ gcloud artifacts repositories add-iam-policy-binding team-b-repository
--location us-west1 --member=$GCP_SA_NAME_02 --role= roles/artifactregistry.writer
We must also grant the service accounts logging access to write build logs to Cloud Logging, using the two following commands:
$ gcloud projects add-iam-policy-binding ${PROJECT_ID}
--member="serviceAccount:${GCP_SA_NAME_01}@${PROJECT_ID}.iam.gserviceaccount.com"
--role=roles/logging.logWriter
$ gcloud projects add-iam-policy-binding ${PROJECT_ID}
--member="serviceAccount:${GCP_SA_NAME_02}@${PROJECT_ID}.iam.gserviceaccount.com"
--role=roles/logging.logWriter
With this completed, we will now move on to configuring minimal permissions for the service accounts on the GKE cluster side. Similar to what we did with Artifact Registry, we will apply POLP to cluster access.
Custom IAM roles for build service accounts
Because Team A and Team B will have their own namespaces in your GKE cluster, we only want their service accounts to have permissions to those namespaces, rather than the entire GKE cluster, as depicted in the following diagram:
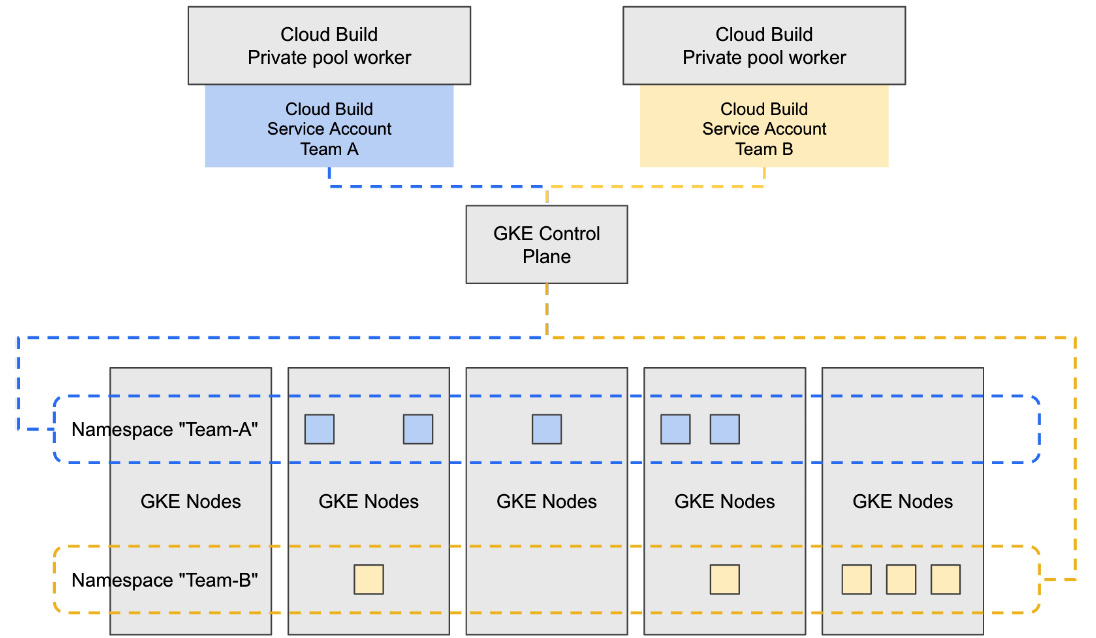
Figure 8.8 – GCP service accounts with namespace-level permissions via Workload Identity
To achieve this, we must create namespaces in your GKE cluster, custom IAM roles for the build service accounts for Team A and Team B, and utilize Kubernetes role-based access control (RBAC) to have minimal permissions within the GKE cluster.
For the purposes of disambiguation between very similarly named resources, see the following diagram:
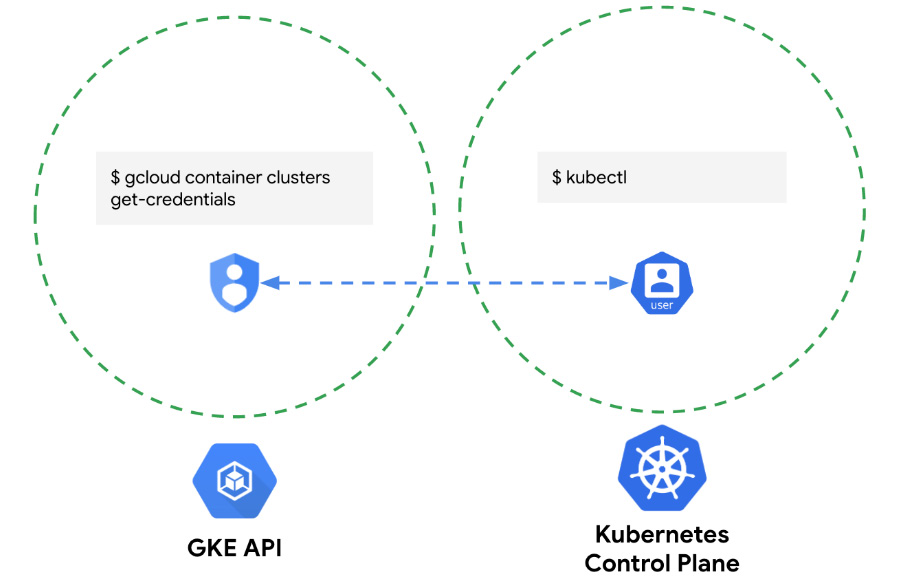
Figure 8.9 – GCP service account to fetch credentials; Kubernetes service account for everything else
Begin by creating a custom role that each service account will use to fetch credentials for the GKE cluster, as follows:
$ cat << EOF > infra/minimal-gke-role.yaml
title: minimal-gke
description: Gets credentials only, RBAC for authz.
stage: GA
includedPermissions:
- container.apiServices.get
- container.apiServices.list
- container.clusters.get
- container.clusters.getCredentials
$ gcloud iam roles create minimal-gke-role --project=$PROJECT_ID
--file=infra/minimal-gke-role.yaml
Now, bind that custom role to each of the service accounts that will be used for each of the builds that deploy Team A and Team B’s respective containerized applications to the GKE cluster, like so:
$ gcloud projects add-iam-policy-binding ${PROJECT_ID}
--member="serviceAccount:${GCP_SA_NAME_01}@${PROJECT_ID}.iam.gserviceaccount.com"
--role=projects/$PROJECT_ID/roles/minimal_gke_role
$ gcloud projects add-iam-policy-binding ${PROJECT_ID}
--member="serviceAccount:${GCP_SA_NAME_02}@${PROJECT_ID}.iam.gserviceaccount.com"
--role=projects/$PROJECT_ID/roles/minimal_gke_role
With your GCP service accounts set up with the custom role to get credentials from GKE clusters, we now must set up the Kubernetes resources. Run the following commands to create namespaces and Kubernetes service accounts in your cluster:
$ gcloud projects add-iam-policy-binding ${PROJECT_ID}
--member="serviceAccount:${GCP_SA_GCB_DEFAULT}"
--role=roles/container.admin
$ cat << EOF > infra/bootstrap-cluster.yaml
steps:
- name: gcr.io/cloud-builders/gcloud
id: Bootstrap GKE cluster
entrypoint: bash
args:
- '-c'
- |
gcloud container clusters get-credentials cluster --region $REGION --project $PROJECT_ID
kubectl create ns $NAMESPACE_01
kubectl create ns $NAMESPACE_02
kubectl create role team-a-admin --verb=get,list,watch,create,update,patch,delete --resource=deployments.apps,services --namespace=$NAMESPACE_01
kubectl create role team-b-admin --verb=get,list,watch,create,update,patch,delete --resource=deployments.apps,services --namespace=$NAMESPACE_02
kubectl create rolebinding team-a-gcp-sa-binding --role=team-a-admin --user=${GCP_SA_NAME_01}@${PROJECT_ID}.iam.gserviceaccount.com --namespace=$NAMESPACE_01
kubectl create rolebinding team-b-gcp-sa-binding --role=team-b-admin --user=${GCP_SA_NAME_02}@${PROJECT_ID}.iam.gserviceaccount.com --namespace=$NAMESPACE_02
options:
workerPool: 'projects/$PROJECT_NUM/locations/$REGION/workerPools/$PRIVATE_POOL_NAME'
EOF
$ gcloud builds submit . --config=infra/bootstrap-cluster.yaml
Let’s now validate that both the GKE and Kubernetes resources have been set up accordingly. We will create a test build in which we will attempt to get Kubernetes deployments from each of the team namespaces we created.
Run the following commands to create and run the test build for Team A. The build should fail, but logs should reveal that this service account was able to get resources for the team-a namespace while failing to obtain resources for the team-b namespace:
$ cat << EOF > bin/test-build-a.yaml
steps:
- name: gcr.io/cloud-builders/gcloud
id: Test GCP SA for Team A
entrypoint: bash
args:
- '-c'
- |
gcloud container clusters get-credentials $CLUSTER_NAME --region $REGION --project $PROJECT_ID
kubectl get deployments -n $NAMESPACE_01
kubectl get deployments -n $NAMESPACE_02
serviceAccount: 'projects/$PROJECT_ID/serviceAccounts/${GCP_SA_NAME_01}@${PROJECT_ID}.iam.gserviceaccount.com'
options:
workerPool: 'projects/$PROJECT_NUM/locations/$REGION/workerPools/private-pool'
logging: CLOUD_LOGGING_ONLY
EOF
$ gcloud builds submit . --config=bin/test-build-a.yaml
The output in your Cloud Build logs should look similar to this:
>2022-07-01T15:02:23.226364190Z No resources found in team-a namespace.
>2022-07-01T15:02:23.625289198Z Error from server (Forbidden): deployments.apps is forbidden: User "[email protected]" cannot list resource "deployments" in API group "apps" in the namespace "team-b": requires one of ["container.deployments.list"] permission(s).
You can also test this out with the Team B service account if you so choose.
Having now secured the build infrastructure and ensured that the permissions with which builds run will be minimal, it is time to begin setting up the build execution.
Configuring release management for builds
In Chapter 5, Triggering Builds, we introduced build triggers; in this example, we will utilize triggers with GitHub.com, though in theory this workflow can be applied to other integrations such as GitHub Enterprise.
The workflow in this example will follow this ordering of steps:
- The developer works on a feature branch.
- The developer pushes code changes to the GitHub repository on that feature branch.
- The developer opens a pull request (PR) to the main branch, triggering the first build.
- Cloud Build runs tests and builds a container image for an app.
- The GitHub repository owner merges PRs, triggering the second build.
- Cloud Build runs and deploys the container image to the private GKE cluster.
The workflow will remain the same for both Team A and Team B. In order to get started with walking through this workflow, begin by setting up GitHub.com to integrate with Cloud Build.
Integrating SCM with Cloud Build
To run this example requires a GitHub.com account. You can begin by logging in to your GitHub account in the browser (https://www.github.com). If you do not have one, you can sign up for free here (https://docs.github.com/en/get-started/signing-up-for-github/signing-up-for-a-new-github-account).
You will also need to authenticate using the gh command-line utility built into Cloud Shell, which we will use to automate the creation of repositories for Team A and Team B.
As a reminder, if you have lost context since working on the previous section, run the following commands to navigate to the right directory and source the proper environment variables.
Replace <add-project-id>, as shown, with the project you are working with:
$ gcloud config set project <add-project-id>
Navigate to the directory you are working in, as follows:
$ cd ~/cloudbuild-gke/08
Source the required environment variables, like so:
$ source bin/variables.sh
Now, run the following command to step through the GitHub authentication flow and follow the prompts you receive:
$ gh auth login
Begin by creating and pushing two repositories to GitHub.com, one for Team A and one for Team B. We will use pre-built repository templates that contain the respective files for Team A and Team B.
Create and clone the Team A repository using the following commands:
$ cd bin
$ gh repo create $GH_A –public
$ gh repo clone $GH_A && cd $GH_A
Seed the empty repository with the repository template for Team A by running the following command:
$ cp -r ../../repo_templates/team_a/. .
Now, commit the changes and push them to the upstream repository, as follows:
$ git add .
$ git commit -m "Copy over example repo."
$ git push --set-upstream origin HEAD
We’ll repeat the steps for Team B, creating and cloning the Team B repository using the following command:
$ cd ..
$ gh repo create $GH_B --public
$ gh repo clone $GH_B && cd $GH_B
Seed the empty repository with the repository template for Team B by running the following command:
$ cp -r ../../repo_templates/team_b/. .
Now, commit the changes and push them to the upstream repository, as follows:
$ git add .
$ git commit -m "Copy over example repo."
$ git push --set-upstream origin HEAD
Before we set up the triggers to kick off the builds from events from these repositories, we will need to install the GitHub App for Cloud Build to integrate with GitHub.com (https://cloud.google.com/build/docs/automating-builds/build-repos-from-github#installing_gcb_app).
Note
For this example, we are utilizing GitHub.com-based integrations with Cloud Build for simplicity and to avoid any requirement for licensing.
In a more realistic example, you would want to set up integrations with a private SCM system such as GitHub Enterprise, with which Cloud Build would have private connectivity.
To view how you can set up integrations such as this, view the documentation here: https://cloud.google.com/build/docs/automating-builds/build-repos-from-github-enterprise.
Now, create two triggers for Team A, like so:
$ gcloud beta builds triggers create github
--name=team-a-build
--region=$REGION
--repo-name=$GH_A
--repo-owner=$GH_USERNAME
--pull-request-pattern=master --build-config=build-a.yaml
--service-account=projects/$PROJECT_ID/serviceAccounts/${GCP_SA_NAME_01}@${PROJECT_ID}.iam.gserviceaccount.com
$ gcloud beta builds triggers create github
--name=team-a-deploy
--region=$REGION
--repo-name=$GH_A
--repo-owner=$GH_USERNAME
--branch-pattern=master --build-config=deploy-a.yaml
--service-account=projects/$PROJECT_ID/serviceAccounts/${GCP_SA_NAME_01}@${PROJECT_ID}.iam.gserviceaccount.com
--require-approval
Let’s review some of the differences between the two triggers.
In the first trigger created, we are utilizing Cloud Build’s support for triggering on PRs by using the --pull-request-pattern parameter. By specifying main, this means that builds will run upon PR being opened against the master branch.
In the second trigger created, we specify –branch-pattern instead to trigger on any changes to the master branch.
Now, create triggers for Team B, which will follow the same pattern as the triggers for Team A, as follows:
$ gcloud beta builds triggers create github
--name=team-b-build
--region=$REGION
--repo-name=$GH_B
--repo-owner=$GH_USERNAME
--pull-request-pattern=master --build-config=build-b.yaml
--service-account=projects/$PROJECT_ID/serviceAccounts/${GCP_SA_NAME_02}@${PROJECT_ID}.iam.gserviceaccount.com
$ gcloud beta builds triggers create github
--name=team-b-deploy
--region=$REGION
--repo-name=$GH_B
--repo-owner=$GH_USERNAME
--branch-pattern=master --build-config=deploy-b.yaml
--service-account=projects/$PROJECT_ID/serviceAccounts/${GCP_SA_NAME_02}@${PROJECT_ID}.iam.gserviceaccount.com
--require-approval
With the triggers now created, we can now review how we can gate these builds, ensuring that there can be additional human review before the builds actually run.
Gating builds with manual approvals
This brings us to the last difference you may have noticed between each of the two triggers for each team—the addition of the –require-approval flag, which introduces this method of explicit and manual approval for builds.
This provides a basis in which an administrator with the distinct IAM permissions of Cloud Build Approver can approve builds that require approval. Without this approval, the builds sit and wait and do not execute.
For this example workflow, we place manual approvals in front of the second trigger for both Team A and Team B, allowing for a gate prior to simulating a rollout to production.
If you visit the Cloud Build console, you will see the following options for a build awaiting approval:
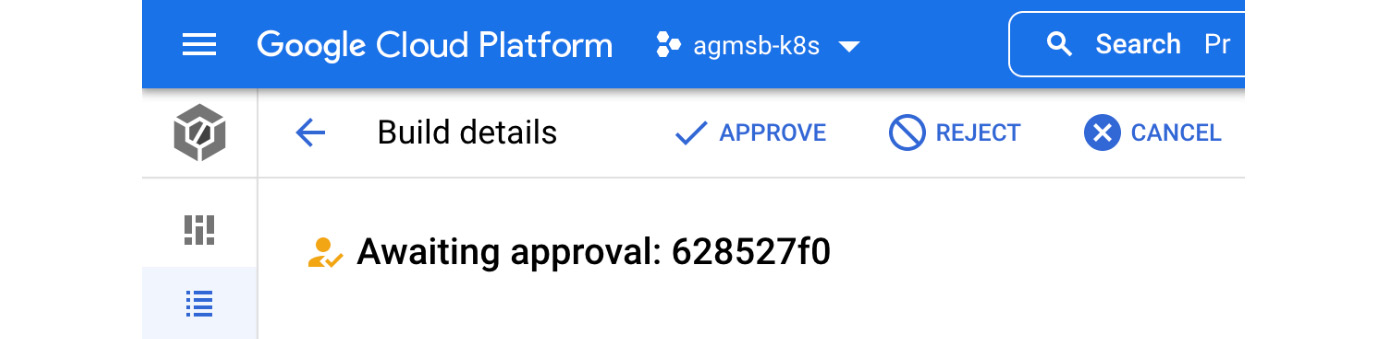
Figure 8.10 – Viewing individual build approval requests
When actually approving the build, not only does this action get captured in Cloud Audit Logging to understand who performed which rollout and when, but it also enables the Cloud Build Approver to provide reasons and metadata that defend the decision to approve the build, as illustrated in the following screenshot:
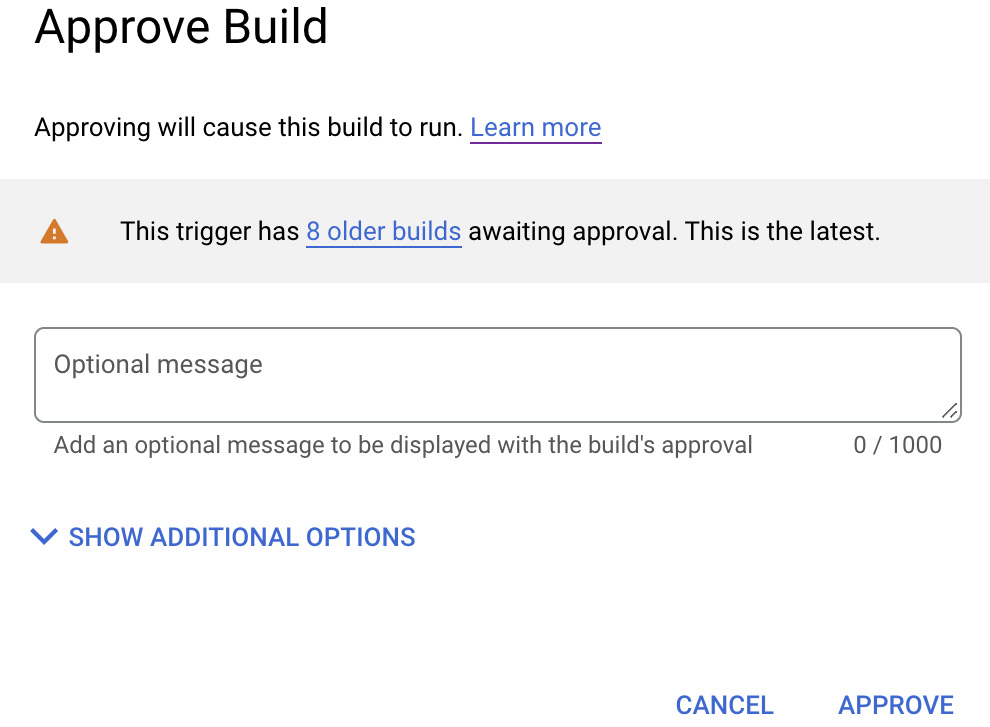
Figure 8.11 – Viewing build approval dialog from the Cloud Build console
This allows for multiple gates, both implicit and explicit, that allow for human review to decide whether or not code and artifacts get promoted into different environments, including production.
Now, let’s run through this example from end to end by triggering all four of the builds we described for Team A and Team B respectively.
Executing builds via build triggers
Begin by creating Cloud Build configuration files for each of these triggers.
As a reminder, if you have lost context since working on the previous section, run the following commands to navigate to the right directory and source the proper environment variables.
Replace <add-project-id>, shown here, with the project you are working with:
$ gcloud config set project <add-project-id>
Navigate to the directory you are working in, as follows:
$ cd ~/cloudbuild-gke/08
Source the required environment variables, like so:
$ source bin/variables.sh
Start by creating build files for building container images for Team A and Team B. These builds will be responsible for building a container image and pushing it to the Team A and Team B repositories in Artifact Registry respectively. Here’s the code you need to execute:
$ cat << EOF > bin/$GH_A/build-a.yaml
steps:
- name: gcr.io/cloud-builders/docker
id: Build container image
args: ['build', '-t', '${REGION}-docker.pkg.dev/$PROJECT_ID/$REPOSITORY_A/team-a-app:v1', '.']
images: [${REGION}-docker.pkg.dev/$PROJECT_ID/$REPOSITORY_A/team-a-app:v1]
serviceAccount: 'projects/${PROJECT_ID}/serviceAccounts/${GCP_SA_NAME_01}@${PROJECT_ID}.iam.gserviceaccount.com'
options:
requestedVerifyOption: VERIFIED
workerPool: 'projects/$PROJECT_NUM/locations/$REGION/workerPools/$PRIVATE_POOL_NAME'
logging: CLOUD_LOGGING_ONLY
images: [${REGION}-docker.pkg.dev/$PROJECT_ID/$REPOSITORY_A/ team-a-app:v1]
EOF
$ cat << EOF > bin/build-b.yaml
steps:
- name: gcr.io/cloud-builders/docker
id: Build container image
args: ['build', '-t', '${REGION}-docker.pkg.dev/$PROJECT_ID/$REPOSITORY_B/team-b-app:v1', '.']
images: [${REGION}-docker.pkg.dev/$PROJECT_ID/$REPOSITORY_B/team-b-app:v1]
serviceAccount: 'projects/${PROJECT_ID}/serviceAccounts/${GCP_SA_NAME_02}@${PROJECT_ID}.iam.gserviceaccount.com'
options:
requestedVerifyOption: VERIFIED
workerPool: 'projects/$PROJECT_NUM/locations/$REGION/workerPools/$PRIVATE_POOL_NAME'
logging: CLOUD_LOGGING_ONLY
images: [${REGION}-docker.pkg.dev/$PROJECT_ID/$REPOSITORY_B/ team-b-app:v1]
EOF
Next, create build files to deploy Team A and Team B’s applications to their respective namespaces in the GKE cluster, as follows:
$ cat << EOF > bin/$GH_A/deploy-a.yaml
steps:
- name: gcr.io/cloud-builders/gke-deploy
id: Prep k8s manifests
args:
- 'prepare'
- '--filename=k8s.yaml'
- '--image=${REGION}-docker.pkg.dev/$PROJECT_ID/$REPOSITORY_A/team-a-app:v1'
- '--version=v1'
- name: gcr.io/google.com/cloudsdktool/cloud-sdk
id: Get kubeconfig and apply manifests
entrypoint: sh
args:
- '-c'
- |
gcloud container clusters get-credentials $CLUSTER_NAME --region $REGION --project $PROJECT_ID
kubectl apply -f output/expanded/aggregated-resources.yaml -n $NAMESPACE_01
serviceAccount: 'projects/${PROJECT_ID}/serviceAccounts/${GCP_SA_NAME_01}@${PROJECT_ID}.iam.gserviceaccount.com'
options:
workerPool: 'projects/$PROJECT_NUM/locations/$REGION/workerPools/$PRIVATE_POOL_NAME'
logging: CLOUD_LOGGING_ONLY
EOF
$ cat << EOF > bin/$GH_B/deploy-b.yaml
steps:
- name: gcr.io/cloud-builders/gke-deploy
id: Prep k8s manifests
args:
- 'prepare'
- '--filename=k8s.yaml'
- '--image=${REGION}-docker.pkg.dev/$PROJECT_ID/$REPOSITORY_A/team-b-app:v1'
- '--version=v1'
- name: gcr.io/google.com/cloudsdktool/cloud-sdk
id: Get kubeconfig and apply manifests
entrypoint: sh
args:
- '-c'
- |
gcloud container clusters get-credentials $CLUSTER_NAME --region $REGION --project $PROJECT_ID
kubectl apply -f output/expanded/aggregated-resources.yaml -n $NAMESPACE_02
serviceAccount: 'projects/${PROJECT_ID}/serviceAccounts/${GCP_SA_NAME_02}@${PROJECT_ID}.iam.gserviceaccount.com'
options:
workerPool: 'projects/$PROJECT_NUM/locations/$REGION/workerPools/$PRIVATE_POOL_NAME'
logging: CLOUD_LOGGING_ONLY
EOF
With the build files in place for each team’s repository, let’s now get those changes upstream. We’ll create a test branch and push those to our remote repository on GitHub.com, like so:
$ cd bin/$GH_A
$ git branch test
$ git checkout test
$ git add .
$ git commit -m "Add Cloud Build YAML files."
$ git push --set-upstream origin HEAD
$ cd ../$GH_B
$ git branch test
$ git checkout test
$ git add .
$ git commit -m "Add Cloud Build YAML files."
$ git push --set-upstream origin HEAD
$ cd ../..
We can now visit the web user interface (UI) for GitHub.com in which we will be prompted to create a PR in each repository respectively to merge the changes added to the test branch.
Upon opening the PRs for each repository, we will see our first pair of triggers kick off. These should each build the container images for Team A and Team B respectively. By specifying the images field, we also ensure that they will be pushed by Cloud Build with build provenance automatically generated, as previously discussed in Chapter 6, Managing Environment Security.
Now, we can merge each of the PRs for each repository, which will kick off our second pair of triggers. Each of these builds run two steps: first, preparing the Kubernetes manifests by inserting digests for each of the container images, and second, applying those manifests to the GKE cluster.
Because approvals are required, you must approve each of these builds before they can kick off. Once you approve the builds and they complete successfully, navigate to Workloads in the GKE menu in the sidebar. We can now see that team-a-app and team-b-app have successfully been deployed. You can also navigate to Services and Ingress in the GKE menu in the sidebar to access the load balancer endpoint that fronts requests to your respective apps.
Enabling verifiable trust in artifacts from builds
Finally, in securing the delivery of software from source to GKE via Cloud Build, you will want to ensure that you can verify that the software artifacts running in your cluster were indeed built in a trusted environment—in this case, your Cloud Build workers.
Cloud Build provides automatic build provenance (https://cloud.google.com/build/docs/securing-builds/view-build-provenance), which enables Cloud Build to generate signed metadata for each container image it builds, proving that the artifact originated from a build in Cloud Build and not out-of-band (OOB) via a bad actor.
Building images with build provenance
Finally, in securing the delivery of software from source to GKE via Cloud Build, you will want to ensure that you can verify that the software artifacts running in your cluster were indeed built in a trusted environment—in this case, your Cloud Build workers. You can see an illustration of this here:

Figure 8.12 – Build provenance provides crypto-signed metadata attesting artifact origin
We can view this metadata by running the following command:
$ gcloud artifacts docker images describe
$REGION-docker.pkg.dev/$PROJECT_ID/$REPOSITORY_A/team-a-app:v1
--show-provenance
Now, we will take a look at how we can use this metadata in our deployment processes.
Utilizing Binary Authorization for admission control
With this metadata generated from the Cloud Build perspective, we can now secure our target environments by enabling Binary Authorization and creating policies that will deny container images from being run that do not have the build provenance generated by Cloud Build.
This enables you to have the means by which to generate verifiable trust in Cloud Build, and verify that generated trust at runtime in GKE or Cloud Run. The process is illustrated in the following diagram:
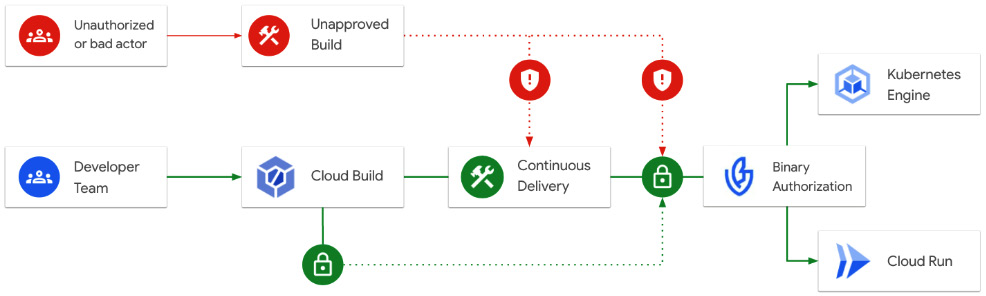
Figure 8.13 – Utilizing attestations to automatically admit or deny artifacts into the production GKE cluster
In this example, we will enable Binary Authorization by importing a policy that requires an attestation from the built-by-cloud-build attestor, which is automatically generated for you when running a build that generates build provenance.
Run the following command to create the required policy:
$ cat << EOF > infra/policy.yaml
globalPolicyEvaluationMode: ENABLE
defaultAdmissionRule:
evaluationMode: REQUIRE_ATTESTATION
enforcementMode: ENFORCED_BLOCK_AND_AUDIT_LOG
requireAttestationsBy:
- projects/${PROJECT_ID}/attestors/${ATTESTOR_ID}
EOF
Run the following command to import the required policy:
$ gcloud container binauthz policy import infra/policy.yaml
With this policy enabled, we now ensure that only images built by Cloud Build with build provenance will be admitted into our cluster at deployment time.
Let’s test this out by trying to deploy a container image OOB, built locally in Cloud Shell and not via our workers in Cloud Build.
We’ll do this by pulling an existing sample container not built by Cloud Build into our project. Configure Docker in Cloud Shell to pull images from Artifact Registry, and pull the hello-app image from google-samples, like so:
$ gcloud auth configure-docker $REGION-docker.pkg.dev
$ docker pull us-docker.pkg.dev/google-samples/containers/gke/hello-app:1.0
Then, tag the container image as out-of-band-app and push it to Team A’s repository in Artifact Registry, like so:
$ docker tag us-docker.pkg.dev/google-samples/containers/gke/hello-app:1.0 $REGION-docker.pkg.dev/$PROJECT_ID/$REPOSITORY_A/out-of-band-app:tag1
$ docker push $REGION-docker.pkg.dev/$PROJECT_ID/$REPOSITORY_A/out-of-band-app:tag1
Now, let’s create a Kubernetes manifest and apply it to our cluster using a build in Cloud Build, as follows:
$ cd bin
$ mkdir out-of-band && cd out-of-band
$ DIGEST=$(gcloud artifacts docker images describe $REGION-docker.pkg.dev/$PROJECT_ID/$REPOSITORY_A/out-of-band-app:tag1 --format="json" | jq '.image_summary."digest"' | cut -d """ -f 2)
$ cat << EOF > k8s.yaml
apiVersion: apps/v1
kind: Deployment
metadata:
name: out-of-band-app
spec:
selector:
matchLabels:
app: out-of-band
replicas: 1
template:
metadata:
labels:
app: out-of-band
spec:
containers:
- name: app
image: $REGION-docker.pkg.dev/$PROJECT_ID/$REPOSITORY_A/out-of-band@$DIGEST
imagePullPolicy: Always
EOF
$ cat << EOF > cloudbuild.yaml
steps:
- name: gcr.io/google.com/cloudsdktool/cloud-sdk
id: Get kubeconfig and apply manifest of out of band app
entrypoint: sh
args:
- '-c'
- |
gcloud container clusters get-credentials $CLUSTER_NAME --region $REGION --project $PROJECT_ID
kubectl apply -f k8s.yaml -n $NAMESPACE_01
serviceAccount: 'projects/${PROJECT_ID}/serviceAccounts/${GCP_SA_NAME_01}@${PROJECT_ID}.iam.gserviceaccount.com'
options:
workerPool: 'projects/$PROJECT_NUM/locations/$REGION/workerPools/$PRIVATE_POOL_NAME'
logging: CLOUD_LOGGING_ONLY
EOF
$ gcloud builds submit . --config=cloudbuild.yaml
When navigating to out-of-band-app in your GKE cluster, you should see an error similar to the one here:

Figure 8.14 – Error showing that out-of-band-app does not have the attestation required
Binary Authorization is flexible and extensible; you can also create policies based on custom attestations and metadata or take advantage of integrations with security scanning and create policies based on vulnerability levels associated with the contents of your artifacts.
Using Binary Authorization to create policies that adhere to your requirements and organizational policies is best practice—you can find additional examples of policies and use cases here: https://cloud.google.com/container-analysis/docs/ods-cloudbuild#build_your_container.
Summary
In this chapter, we reviewed how to set up a secure software delivery pipeline in Cloud Build for multiple teams sharing a GKE cluster. We set up secure infrastructure using private connectivity and per-build GCP service accounts with minimal permissions. We introduced human-in-the-loop review with Cloud Build approvals while ensuring that we only admitted trusted and verified container images into our GKE cluster.
These features and practices enable you to begin to implement a more secure software delivery pipeline to GKE, one of the most popular runtimes in Google Cloud.
Next, we will shift focus to using Cloud Build to automate workflows with a more developer-centric, serverless platform—Cloud Run.