
10
Running Operations for Cloud Build in Production
So far in this book, we’ve described the value of managed services, how to use Cloud Build, described Cloud Build capabilities, and provided end-to-end examples of Cloud Build in action. In this chapter, we are going to highlight specific Cloud Build capabilities and introduce new concepts to help you leverage Cloud Build in a production environment. The topics in this chapter will help you optimize your use of Cloud Build and the observability of your builds.
In this chapter, we will cover the following topics:
- Executing in production
- Configurations to consider in production
- Speeding up your builds
Executing in production
As a managed service, Cloud Build is leveraged by specifying build steps that result in a pipeline, whether it’s building code or manipulating infrastructure components. It does not distinguish between environments; a pipeline that is running in your development environment is treated the same as a pipeline running in your production environment. They both will have the same Cloud Build Service-Level Agreement (SLA) of 99.95% (https://cloud.google.com/build/sla). The differences between environments can be, but are not limited to, the following:
- The uniqueness of the build steps in your configuration
- Different compute resources (default or private pools) defined in your project
- Security boundaries defined (identity, role bindings, permissions, and network resources)
For these criteria referenced, it is important to decide on the project(s) that will be hosting your build pipelines. This could be a factor of what your build pipelines are responsible for, and the roles of members within the organization that are responsible for interacting with the pipelines.
Organizations decide on the pattern that works best for them; however, the most common pattern is to host production separately from resources that are considered non-production. Pipelines, however, tend to blur the lines between non-production and production resources. For instance, there may be a neutral set of projects just for pipelines. When an integration pipeline is responsible for generating a container image to be used by downstream environments, it must have access to a shared container registry (for example, an Artifact Registry) that it can push built images to. Once the images are built the first time, it is a best practice that the same image is used in the remainder of the downstream environments from development to test to production. If it needs to communicate with other tools that deploy into other environments, it will need permission to communicate with the tool as well. The image may also be signed with specific attestations that it has passed through each of the pipelines for each respective environment.
Once the type of project has determined where the Cloud Build service pipelines will be executed, it is important to ensure that sufficient resources can be allocated. This requires you to understand the quotas and limits of the Cloud Build service (https://cloud.google.com/build/quotas). At the time of writing, the following are quotas for the Cloud Build service. Please refer to the aforementioned link for the most up-to-date information:
|
Resource |
Description |
Default Limit |
Can Be Increased |
Scope |
|
Private pool |
Number of private pools |
2 to 10 |
Yes. |
Per region |
|
Build triggers |
Number of build triggers |
300 |
Yes. |
Per region |
|
CPU |
Number of concurrent CPUs run in a regional private pool |
0 * to 2,400 |
Yes. When this quota is filled, requests for additional CPUs are queued and processed serially. |
Per region |
|
CPU |
Number of concurrent CPUs run in a regional default pool |
5 to 100 |
No. If you require more than 100 concurrent CPUs, use private pools. |
Per region |
|
Request |
Number of concurrent builds run in a global default pool |
10 to 30 |
No. If you want to run more than 30 concurrent builds, consider using private pools. |
Table 10.1 – Quotas for the Cloud Build service
An important factor to bear in mind from the preceding table is how many concurrent builds you will need to run in each respective project. For instance, the project where development and integration pipelines run may be more active than pipelines required for production environments or vice versa, depending on your environment. This emphasizes the importance and flexibility of leveraging private pools for your pipelines. Private pools allow the following:
- You can specify more machine types for your builds
- You can have more concurrent builds – that is, 30+
- You can gain access to VPC-connected resources
- You can have network flexibility
Determining how to organize Cloud Build pipelines, capabilities to leverage, and identifying dependent resources are important considerations in the planning process.
Leveraging Cloud Build services from different projects
If the goal is to leverage Cloud Build services across multiple teams or environments, sharing the same Google Cloud project will require additional considerations. In Chapter 6, Managing Environment Security, we discussed the principle of least privilege, where we defined specific Cloud Build user-specified service accounts for each configured trigger. When teams share the project, you may have service accounts that are hosted in a different project. If that is the case, additional permissions might be needed for the service account to be used in the Cloud Build project where the pipeline will be executing.
The following are for example and illustrative purposes, as you may have a different repository configured in your environment.
Set up the appropriate variables to be utilized in the remainder of the commands for this example as your values will differ based on your environment. The GCS bucket should be unique:
$ SA_NAME=build-dev
$ DEV_PROJECT=dev-project
$ BUILD_PROJECT=build-project
$ ARTIFACT_REGISTRY_IMAGE_REPO=image-repo
$ GCS_BUCKET=packt-cloudbuild-dev-bucket
$ GIT_REPO=packt-cloudbuild
$ GIT_OWNER=user
Note
In the following example, dev-project must have the iam.disableCrossProjectServiceAccountUsage organizational policy disabled. Organizational policies are configured at the organizational level but can be applied to folders and individual projects, depending on the type of constraint. Constraints can vary but determine what can be done, beyond what IAM permissions define, which determine who can do what.
The following diagram shows what this example will create, as well as the relationship between a build and a user-specified service account:
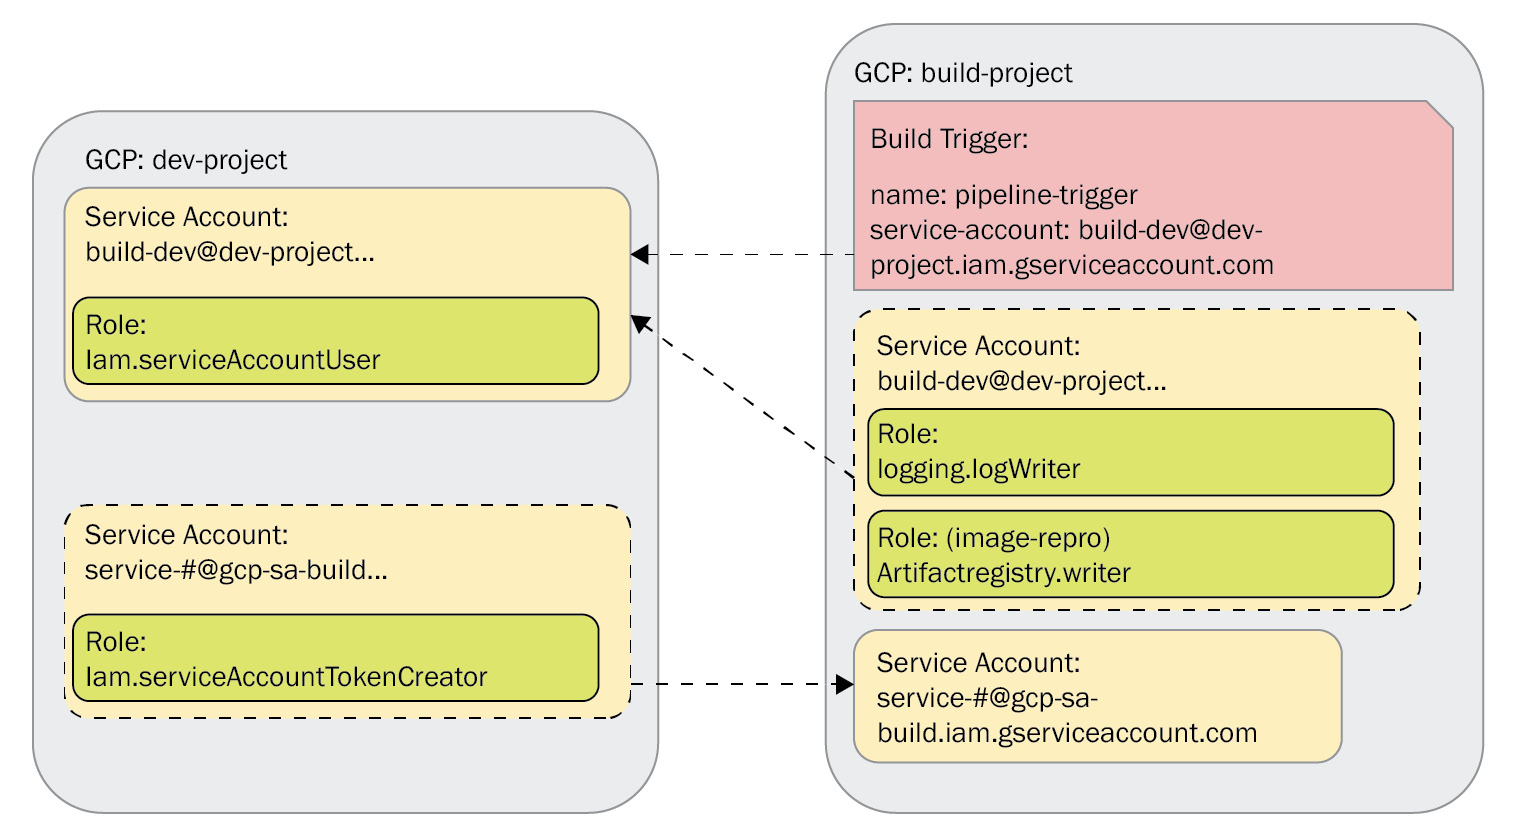
Figure 10.1 – User-specified service account in a separate project
The preceding diagram shows the relationship between the two projects and the permissions associated with each project to leverage a user-specified service account in another project.
Create the service account to be used as your user-specified service account for the Cloud Build pipeline:
$ gcloud iam service-accounts create ${SA_NAME}
--description="Build Dev Service Account"
--project ${DEV_PROJECT}
The service account needs Service Account User permissions so that it can be used by the Cloud Build service agent in the project that will use the Cloud Build service:
$ gcloud projects add-iam-policy-binding ${DEV_PROJECT}
--member=serviceAccount:${SA_NAME}@${DEV_PROJECT}.iam.gserviceaccount.com
--role=roles/iam.serviceAccountUser
The project number for the Google Cloud Project that will leverage the Cloud Build service is required so that service account impersonation can be performed. We set the permission for the Cloud Build service agent to be able to create service account tokens to execute commands on behalf of the service account hosted on our development project:
$ export BUILD_PROJECT_NUMBER=$(gcloud projects list
--filter="${BUILD_PROJECT}"
--format="value(PROJECT_NUMBER)"
)
$ gcloud projects add-iam-policy-binding ${DEV_PROJECT}
--member="serviceAccount:service-${BUILD_PROJECT_NUMBER}@gcp-sa-cloudbuild.iam.gserviceaccount.com"
--role="roles/iam.serviceAccountTokenCreator"
Although the service account is located on the development project, we give the service account permissions to write logs into the build project where the Cloud Build service will be utilized:
$ gcloud projects add-iam-policy-binding ${BUILD_PROJECT}
--member=serviceAccount:${SA_NAME}@${DEV_PROJECT}.iam.gserviceaccount.com
--role=roles/logging.logWriter
Since we are using a user-specified service account, we will need to configure with our cloudbuild.yaml configuration to only log. The following code shows part of the cloudbuild.yaml file. Later in this chapter, we will walk through a scenario where we store the logs in a Google Cloud Storage (GCS) bucket:
...
options:
logging: CLOUD_LOGGING_ONLY
...
The trigger is created on the build project, but the user-specified service account is the one we created in our development project:
$ gcloud beta builds triggers create github
--repo-name=${GIT_REPO}
--repo-owner=${GIT_OWNER}
--branch-pattern=^main$
--name=pipeline-trigger
--build-config=cloudbuild.yaml
--project=${BUILD_PROJECT}
--service-account=projects/${DEV_PROJECT}/serviceAccounts/${SA_NAME}@${DEV_PROJECT}.iam.gserviceaccount.com
In this example, we are pushing a container image to Artifact Registry’s image repository, which is also hosted on the same Cloud Build project. Permissions will be required to write to the image repository:
$ gcloud artifacts repositories add-iam-policy-binding ${ARTIFACT_REGISTRY_IMAGE_REPO}
--location=us-central1
--member=serviceAccount:${SA_NAME}@${DEV_PROJECT}.iam.gserviceaccount.com
--role=roles/artifactregistry.writer
--project ${BUILD_PROJECT}
This is the sample output for the build details of the triggered build from the preceding example. The Project ID that the build was executed from is in build-project and the service account is from dev-project. We can get this information by describing the build:
$ gcloud builds describe 2ddd7e2e-1b75-49e2-b3a9-4781ad509f18 --project build-project
The following is the output of running the preceding command, which identifies the user-specified service account being utilized:
id: 2ddd7e2e-1b75-49e2-b3a9-4781ad509f18
...
projectId: build-project
...
serviceAccount: projects/dev-project/serviceAccounts/build-dev@dev-project.iam.gserviceaccount.com
Since the build is running in the build project and it automatically triggers when there is a commit to the repository, it may very well be the scenario that developers or specific team members only have access to specific projects – in this case, dev-project. In the previous example, we wrote logs into build-project, but we could set up a sink and forward logs (https://cloud.google.com/logging/docs/export/configure_export_v2#supported-destinations) from the build-project to dev-project.
Another approach consists of writing to a GCS bucket that is managed and hosted in dev-project. The build log data is created by build-project and is stored in dev-project for further analysis:
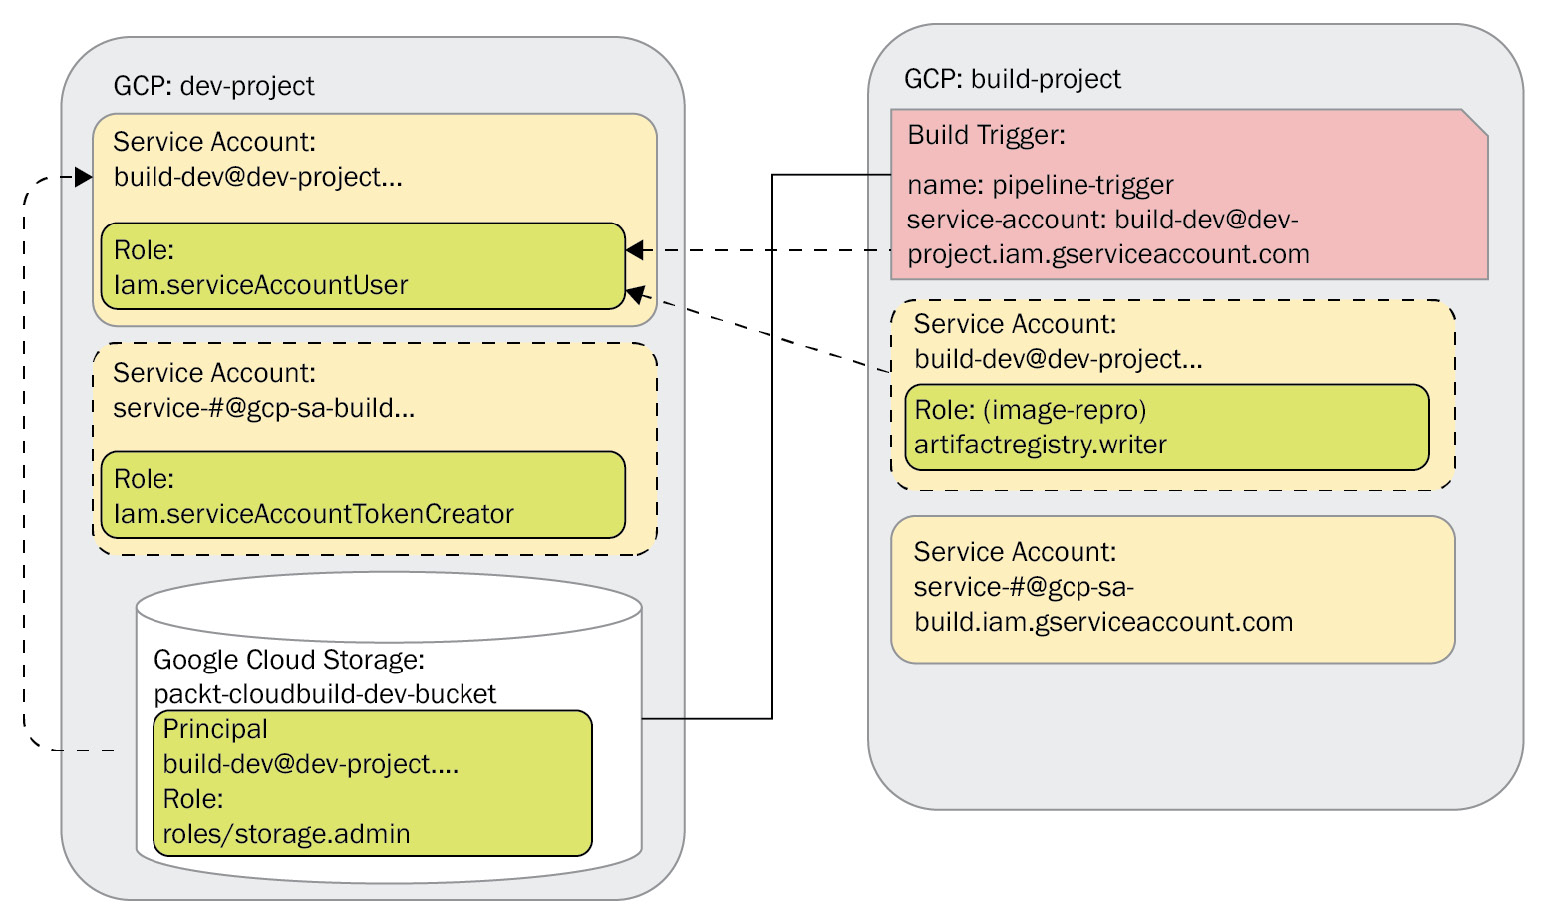
Figure 10.2 – Logging to a GCS bucket in another project
The preceding diagram shows how the build writes to the GCS bucket, with the specific permissions required by the user-specified service account at the bucket level.
First, let’s create the bucket in dev-project:
$ gsutil mb -p ${DEV_PROJECT}
gs://${GCS_BUCKET}
To allow the Cloud Build service to use our user-specified service account to write to the GCS bucket, we need to give the necessary permissions to our service account:
$ gsutil iam ch
serviceAccount:${SA_NAME}@ ${DEV_PROJECT}.iam.gserviceaccount.com:roles/storage.admin
gs://{GCS_BUCKET}
We will also need to tell Cloud Build that we want to store logs in a GCS bucket through our cloudbuild.yaml file:
...
logsBucket: "gs://${REPLACE_WITH_YOUR_GCS_BUCKET_NAME}"
options:
logging: GCS_ONLY
...
After a successful build run, we can see that the log is now available in our storage bucket. We can see this in the example output:
$ gsutil ls gs://{GCS_BUCKET}
gs://packt-cloudbuild-dev-bucket/log-44045da7-3a03-4f9d-8aa0-f9599e3efd47.txt
Note
If permissions were not set properly for Cloud Build to log to the GCS bucket, the build will not be able to properly execute. In that case, you may receive the following error from the Cloud Build service:
generic::invalid_argument: invalid bucket “packt-cloudbuild-dev-bucket”; builder service account does not have access to the bucket
When leveraging different projects, storing log data in different projects may be necessary. The example in this section shows how this can be done.
Securing build triggers even further
In Chapter 6, Managing Environment Security, we discussed Virtual Private Cloud Service Controls (VPC-SC) as a mechanism to help prevent data exfiltration for GCP services, including Cloud Build. Another mechanism available in Cloud Build to prevent triggers from external sources to secure your build environment is through organizational policies. With this constraint set, we can specify which domains can perform a function or deny specific domains.
So far, our examples have been triggered through github.com. Now, we will deny a trigger coming from github.com. To define this, we must set a constraint and specify permissions:
name: projects/**REDACTED_project_number**/policies/cloudbuild.allowedIntegrations
spec:
  inheritFromParent: false
  rules:
    - values:
        deniedValues:
          github.com
We are going to deny triggers that are sourced from github.com. Notice the constraint that we will be enforcing – that is, cloudbuild.allowedIntegrations. Once enforced, the trigger from the previous section will no longer be able to execute and create a build. The following Cloud Logging output snippet shows the reason why the build is unable to trigger and execute:
status: {
code: 9
message: "Constraint "constraints/cloudbuild.allowedIntegrations" violated for "**REDACTED_project_id**" attempting to process an event from "github.com""
}
This provides another capability to help secure your builds.
Notifications
When you initially set up builds or manually trigger builds, you may be interacting with and watching the builds as you incrementally test out the build configuration. You would be aware of when builds are failing or succeeding. However, this is not a typical usage pattern when builds are automatically triggered based on external events such as a commit to a Source Control Management (SCM) repository. Organizations have different types of mechanisms to notify developers and operations teams of the status of builds. These can vary from systems that post messages regarding the build status in a chat infrastructure, email notifications, or custom infrastructure to allow teams to digest build event status.
Depending on the verbosity required, organizations may end up tracking the following:
- Git commits into a repository branch
- Merges between branches
- Triggered build pipeline status (for example, successful, failed, pending, and so on)
- The build success rate
This helps give organizations insight into the health and frequency of their builds so that they can be used to optimize or identify bottlenecks within an organization.
Cloud Build uses Cloud Pub/Sub (https://cloud.google.com/pubsub) by publishing messages on a specific topic. While these messages can be consumed by subscribing to the topic using Cloud Pub/Sub clients, Cloud Build includes a Cloud Build notifier (https://cloud.google.com/build/docs/configuring-notifications/notifiers) client that can also subscribe to the topic, consume messages, and push messages to supported platforms. The Cloud Build notifier clients are container-based images that run on Cloud Run (https://cloud.google.com/run), which is a managed serverless platform that scales up and down based on usage. The following table shows the available notifier-supported platforms:
|
Notifier |
Description |
|
bigquery |
Writes build data to a BigQuery table |
|
googlechat |
Uses a Google Chat webhook to post messages to a Google Chat space |
|
http |
Sends a JSON payload to another HTTP endpoint |
|
slack |
Uses a Slack webhook to post messages to a Slack channel |
|
smtp |
Sends emails via an SMTP server |
Table 10.2 – Cloud Build notifier platforms
The preceding table shows the available notifiers at the time of writing. If you are using a platform that is not listed here, you can develop a notifier using the example provided (https://cloud.google.com/build/docs/configuring-notifications/create-notifier).
Deriving more value from logs
Logs provide important details for debugging and validating the progress of builds. The output of logs typically requires an individual to view the logs to make sense of the output. When aggregating builds that have numerous pipeline runs, viewing logs may not be viable. In the previous section, we discussed notifications as a way to aggregate build pipeline event statuses that are outputted to understand the health of pipelines. What if we wanted to know how many times during a build step certain log entries are being outputted? We can use this to identify certain patterns and help with automation or approvals. We can also alert if the same log output accumulates to a specified threshold.
Logs-based metrics can be achieved through a Cloud Logging capability. Suppose, for instance, while building a Node.js application, we want to track how many times we get deprecation warnings. In this example, the Node.js bookshelf application (https://github.com/GoogleCloudPlatform/nodejs-getting-started/tree/main/bookshelf) is being built and outputs the following Cloud Build log output:
...
Step 4/6 : RUN npm install
Running in 30f414a77c43
npm WARN deprecated ...
...
We want to be able to track how many times this is outputted during our builds. Given this is a Node.js warning, the builds will still succeed, but we want to see how many times this is occurring; if it exceeds a certain threshold, we may want to take action. Builds may be succeeding now, but for how long before they start failing?
Let’s create a log-based counter metric for this output:
$ gcloud logging metrics create npm_dep_warning
--description "NPM Deprecation Warnings"
--log-filter "resource.type=build AND npm WARN deprecated"
The counter metric increments by 1 each time the evaluation of the log filter returns a new entry. The count can be viewed through the Cloud Monitoring Metrics Explorer pane. More details can be found in the documentation (https://cloud.google.com/monitoring/charts/metrics-selector).
The following screenshot shows that within 10 minutes, the log-based metric has counted that our npm WARN deprecated log entry has occurred twice:

Figure 10.3 – Cloud Monitoring Metrics Explorer NMP_DEP_WARNING
We can alert based on any threshold that makes the most sense. In the following example, we have an alerting policy that triggers if it happens five times within a rolling 10-minute window. More details on how to create the alert can be found in the documentation, which can be created through the user interface (UI) or the API (https://cloud.google.com/monitoring/alerts/using-alerting-ui).
The following example alert policy will create an incident when the warning threshold goes beyond the count of 5:
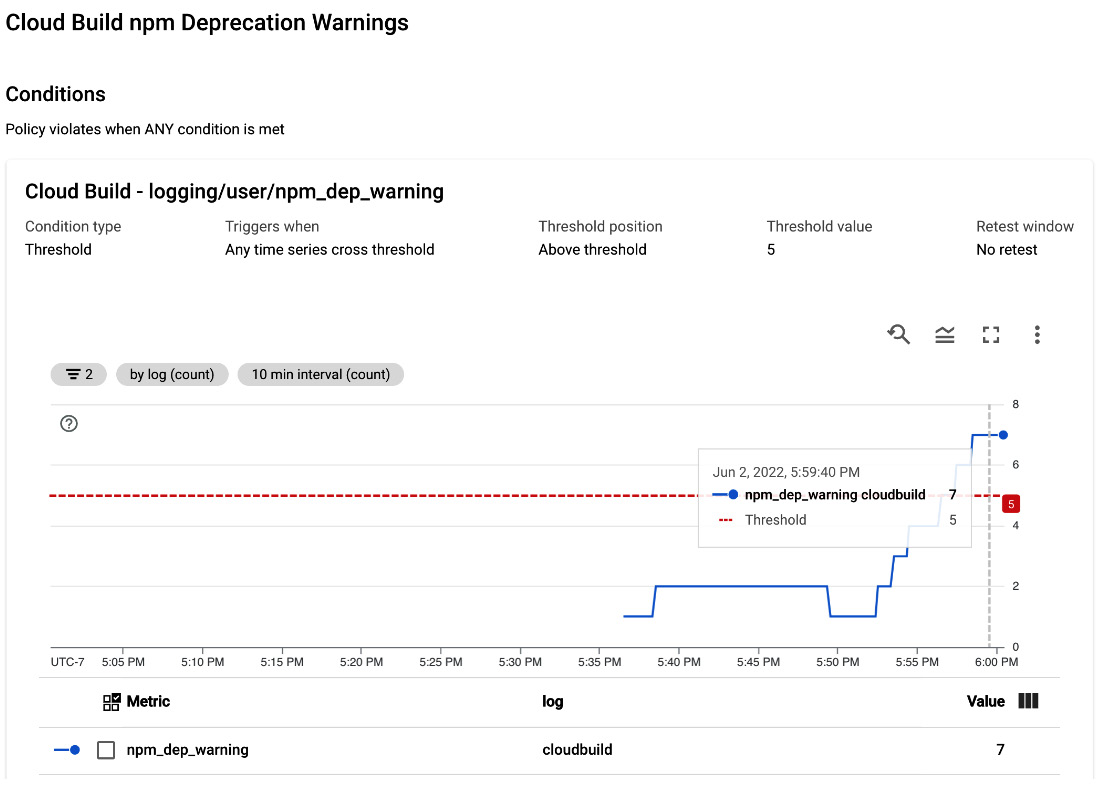
Figure 10.4 – Cloud Monitoring alert policy Cloud Build npm deprecation warnings
From the Alerting pane, we can see that an incident has been raised and what action may need to be taken. Cloud Monitoring notification channels include a variety of pre-built integrations for tools such as Cloud Mobile App, Cloud Pub/Sub, Email, SMS, SMS, PagerDuty, Slack, and webhooks:

Figure 10.5 – Cloud Monitoring alert incident
While this example consisted of tracking how many times an entry showed up in a log, we can also track the inverse – that is, how many times something did not show up during a specified period.
Log-based metrics also support another metric known as the distribution metric, which can measure the latency or duration between entries to identify bottlenecks within builds. The combination of counter and distribution metrics provided by Cloud Logging and Cloud Monitoring can help extrapolate more details beyond default build statistics.
Executing in production requires additional considerations beyond just running a pipeline. It is important to test and identify the best machine type for each build that results in acceptable build times and associated costs. Private pools provide a larger selection of machine types, while also offering additional network and security capabilities. Depending on your organization’s Google Cloud project architecture, team roles, and personas, access to different projects may need to be considered. Getting the most out of your logs and deriving patterns from logs and notifications are essential to Cloud Build running in the background and running smoothly.
Configurations to consider in production
In Chapter 4, Build Configuration and Schema, we covered a few configuration options that can be used to customize how Cloud Build will execute your build. In production, there are a few configurations that stand out and should be configured to optimize your builds in production.
We discussed Cloud Build request limits, which depend on the type of pool that is selected, in the previous section. Regardless of the type of pool, we can prioritize or determine that certain build pipelines should fail if they are queued for too long.
To configure this setting, we will use the queueTtl syntax in our build configuration. Once a build is in the queue, the timer starts. If it is unable to be executed before the duration is specified in the queueTtl configuration, it will be canceled, removed from the queue, and given an EXPIRED status. This can help provide a level of prioritization to the builds. If there are too many in the queue, the builds will back up, and critical tasks may be delayed, which can impact productivity. One way around this could be to increase the amount of compute resources in a private pool or switch from the default to a private pool. Organizations may have defined budgets or have certain builds that can be requeued at a later time when builds may be less busy.
Making builds more dynamic
Variables can be used in Cloud Build’s configuration to make pipelines more dynamic and reusable. In Chapter 5, Triggering Builds, we covered using variables to perform a Git checkout with the commit SHA and storing a Git SSH key from a secret. The commit SHA value is not known during configuration time and could change for each triggered build. The SSH key should preferably be managed outside so that it is stored on a platform that has more secure secrets.
Cloud Build includes a few default metadata-related variables that can be used in the build, such as ${PROJECT_ID} and ${BRANCH_NAME} to trigger the Git repository. Default variables provide metadata, but user-defined variables can allow for additional metadata, as well as drive behaviors within a build pipeline. You may want to leverage a variable to define the environment for the build, such as ${_ENV}. This can be used within your build configuration to set particular metadata as part of the build or runtime configuration.
To make your build steps or pipelines more flexible, you can use variables within variables. Cloud Build enables this capability through the use of a configuration option known as dynamic_substitutions. Dynamic substitutions are automatically enabled on build triggers, but builds that are manually invoked require this setting to be set to true in the build configuration.
Let’s walk through an example of a Docker build. Here, we want to use user-defined variables to customize the container image repository, name, and tags. We also want to use dynamic substitutions to build out the full image URL.
We will continue to use the Node.js bookshelf application (https://github.com/GoogleCloudPlatform/nodejs-getting-started/tree/main/bookshelf) for this example. The following code is from the cloudbuild.yaml configuration file, which builds a container image:
steps:
- name: gcr.io/cloud-builders/docker
  args:
  - "build"
  - "-t"
  - "${_IMAGE_URL}:${_BUILD_ID}"
  - "-t"
  - "${_IMAGE_URL}:${_TAG_VERSION}"
  - "."
substitutions:
  _IMAGE_URL: "${_IMAGE_BASE}/${_IMAGE_NAME}"
  _IMAGE_BASE: "us-central1-docker.pkg.dev/${PROJECT_ID}/image-repo"
  _IMAGE_NAME: "nodejs-bookshelf"
  _TAG_VERSION: "dev"
options:
  dynamic_substitutions: true
images:
- ${_IMAGE_URL}:${_BUILD_ID}
- ${_IMAGE_URL}:${_TAG_VERSION}
The dynamic substitution setting has been configured because the example build is manually invoked. The ${_IMAGE_BASE} variable contains repository information and is dynamically injecting ${PROJECT_ID}. ${_IMAGE_URL}, which is used by the build step, is the combination of ${_IMAGE_BASE} and ${_IMAGE_NAME}. This will allow us to substitute repository information, as well as the image name if needed; otherwise, the defined defaults in the configuration will be used.
In the build step, notice that the container image tags are appended, one of which is ${BUILD_ID}. This is coming from the Cloud Build metadata. There’s also ${TAG_VERSION}, which is a variable.
If this were manually invoked, a straightforward gcloud builds submit is all that is needed. If this were triggered, the dynamic_substitutions option is not required, and variables can be customized in the trigger if required. After the build is completed, Artifact Registry contains the image and our configured tags:
$ gcloud artifacts docker images list us-central1-docker.pkg.dev/**REDACTED_project_id**/image-repo/nodejs-bookshelf --include-tags
The following is the output from running the preceding command:
IMAGE: us-central1-docker.pkg.dev/**REDACTED_project_id**/image-repo/nodejs-bookshelf
DIGEST: sha256:aa4ba108423771db58502095fbc8a70a7f54fbb56fdd09b38bbcf78a 7a39bcc5
TAGS: 36e3094e-be72-41ee-8f02-874dc429764e, dev
Leveraging variables and dynamic variables can help us create more flexible pipelines and allow teams to adjust values as needed without modifying the build configuration.
Changes in Cloud Build related to secret management
In Chapter 6, Managing Environment Security, we covered using secrets while leveraging two different GCP services: Secret Manager and Cloud Key Management Service (KMS). While Secret Manager is the recommended way, Cloud KMS can also be used to declare secrets. The recommended way is to use the availableSecrets syntax in your Cloud Build configuration. The availableSecrets syntax can be used to declare both Secret Manager and Cloud KMS resources.
The following is the previous declaration method:
...
secret:
- kmsKeyName: projects/**PROJECT_ID_redacted**/locations/global/keyRings/secret_key_ring/cryptoKeys/secret_key_name
envMap:
MY_SECRET: '**ENCRYPTED_SECRET_encoded**'
...
The following is the recommended declaration method, as noted in Chapter 6, Managing Environment Security:
...
availableSecrets:
  inline:
  - kmsKeyName: projects/**PROJECT_ID_redacted**/locations/global/keyRings/secret_key_ring/cryptoKeys/secret_key_name
    envMap:
      MY_SECRET: '**ENCRYPTED_SECRET_encoded**'
...
The availableSecrets syntax provides an ongoing way to define secrets and can be used with multiple Google Cloud services.
Configuration parameters within Cloud Build can help organizations prepare for production. While private pools allow for more concurrent builds, it’s still important to manage build life cycles. For example, setting expirations when a build has queued for too long is a good habit to have. Variable substitutions provide for more flexible and dynamic build pipelines to help determine the behavior and outputs of builds. The Secret Manager integration with Cloud Build introduced a new syntax that can be used with both Secret Manager and Cloud KMS.
Speeding up your builds
Whether you are just getting started or have been leveraging Cloud Build for a while, it’s always good to seek ways to reduce the amount of time it takes for a build to take place. The following is an example list:
- Specifying a machineType with more resources, such as standard, highmem, and highcpu (covered in Chapter 2, Configuring Cloud Build Workers)
- Parallelizing steps using waitFor (covered in Chapter 4, Build Configuration and Schema)
- Leaner builder container images for each build step
- Caching intermediate image layers to be used in subsequent builds
The techniques for optimizing Docker images (https://docs.docker.com/develop/dev-best-practices/) also apply to Cloud Build builder images. The smaller the images are, the less time it takes for the Cloud Build worker to pull the image and begin executing the step. Having images that separate the dependencies for building application code and the libraries required to execute an application at runtime may be different, so they should be isolated as different images. Removing unnecessary files, package caches, and temp files is also critical to reducing container image sizes.
Caching is another mechanism that can help reduce the time of pipelines that involve Docker container images being built. Cloud Build supports the use of Kaniko (https://github.com/GoogleContainerTools/kaniko) as a tool to build container images instead of the traditional Docker binary. Kaniko allows you to assign a unique key to intermediate steps in a Dockerfile. These keys are used to identify if a container image build step needs to be re-performed because of changes or leverage the cache, which can help improve the performance of a container image build.
In this example, we will use the Node.js bookshelf application (https://github.com/GoogleCloudPlatform/nodejs-getting-started) in a container image.
The following is the sample Dockerfile (https://cloud.google.com/build/docs/kaniko-cache#example_using_kaniko_cache_in_a_nodejs_build) that we will use in this example:
FROM node:8
WORKDIR /usr/src/app
COPY package*.json ./
RUN npm install
COPY . .
CMD [ "npm", "start" ]
Instead of using a typical docker build –t image, we will use a Kaniko executor to specify cache details in this sample cloudbuild.yaml file:
steps:
- name: 'gcr.io/kaniko-project/executor:latest'
  args:
  - --destination=us-central1-docker.pkg.dev/${PROJECT_ID}/image-repo/nodejs-bookshelf
  - --cache=true
  - --cache-ttl=1h
The Kaniko executor is run to build a Node.js application. The cached layers are unavailable, and snapshots are taken:
...
INFO[0002] No cached layer found for cmd RUN npm install
INFO[0002] Unpacking rootfs as cmd COPY package*.json ./ requires it.
...
INFO[0019] Taking snapshot of files...
...
INFO[0019] RUN npm install
INFO[0019] Taking snapshot of full filesystem...
…
DURATION: 1M
In a subsequent run with no changes, the build time is reduced to almost half – from 1 minute to 31 seconds. The cache layer is found and used in the image build:
...
INFO[0001] Checking for cached layer us-central1-docker.pkg.dev/**REDACTED_project_id**/image-repo/nodejs-bookshelf/cache:5bf2e0a45d0dc8dd3109fa3ff73a1ebc195c64b476951c28bf25065 c25250cd4...
INFO[0001] Using caching version of cmd: RUN npm install
INFO[0001] Unpacking rootfs as cmd COPY package*.json ./ requires it.
...
INFO[0015] RUN npm install
INFO[0015] Found cached layer, extracting to filesystem
…
DURATION: 31S
In this example, Artifact Registry is used to store container images and Laniko creates a nodejs-bookshelf/cache to be used in subsequent builds. We can use the gcloud command to list our images:
$ gcloud artifacts docker images list us-central1-docker.pkg.dev/**REDACTED_project_id**/image-repo --include-tags
The following output shows the images in Artifact Registry that contain the built container image, as well as the cache layers created by Kaniko:
...
IMAGE: us-central1-docker.pkg.dev/**REDACTED_project_id**/image-repo/nodejs-bookshelf
DIGEST: sha256:6c31e49a502904fa73a466547876d38d3b6ed39c81a95c9050a2747d 167d1b2f
TAGS: latest
..
IMAGE: us-central1-docker.pkg.dev/**REDACTED_project_id**/image-repo/nodejs-bookshelf/cache
DIGEST: sha256:687201b973469a84dee8eb5519f9bebf630cd2e8a5599d2579760250 520672b9
TAGS: 5bf2e0a45d0dc8dd3109fa3ff73a1ebc195c64b476951c28bf25065c25250 cd4
The image tags for the cached images listed in the preceding output help Kaniko identify if particular container image layers need to be rebuilt.
Many paths can be taken and should be considered to reduce build times overall, which can help improve productivity. Tools should be incorporated to help facilitate overall pipeline time reduction. In this section, we reference Laniko, but code builds can also be improved with Bazel (https://bazel.build/). Bazel is an open source build and test tool with a cloud builder image (https://github.com/GoogleCloudPlatform/cloud-builders/tree/master/bazel).
Summary
Cloud Build doesn’t differentiate between environments (for example development, non-production, and production), but configurations and recommended practices should be considered to maximize all of its capabilities. In this chapter, we covered topics ranging from optimization, observability, security, and patterns to help with the adoption of Cloud Build within your organization. Each of these topics can be incorporated into your build configurations to satisfy your requirements.
In the next chapter, we will provide a forward-looking view of Cloud Build and look at what is to come.