
Chapter 10: Setting up the Frontend for Our Spring Boot RESTful Web Service
This chapter explains the steps that are required to start the development of the frontend part. We will first define the functionalities that we are developing. Then, we will do a mock-up of the UI. As a backend, we will use our Spring Boot application from Chapter 5, Securing and Testing Your Backend. We will begin development using the unsecured version of the backend. Finally, we will create the React app that we will use in our frontend development.
In this chapter, we will cover the following topics:
- Why a mock-up is necessary and how to go about it
- Preparing our Spring Boot backend for frontend development
- Creating the React app for the frontend
Technical requirements
The Spring Boot application that we created in Chapter 5, Securing and Testing Your Backend, is required.
Node.js also has to be installed, and the code samples available at the following GitHub link will be required to follow along with the examples in this chapter: https://github.com/PacktPublishing/Full-Stack-Development-with-Spring-Boot-and-React/tree/main/Chapter10.
Check out the following video to see the Code in Action: https://bit.ly/3NzdSxs
Mocking up the UI
In the first few chapters of this book, we created a car database backend that provides the RESTful API. Now, it is time to start building the frontend for our application. We will create a frontend that lists cars from the database and provides paging, sorting, and filtering. There is a button that opens the modal form to add new cars to the database. In each row of the car table, there is a button to delete or edit the car from the database. The frontend contains a link or button to export data from the table to a CSV file.
Let's create a mock-up from our UI. There are lots of different applications for creating mock-ups, or you can even use a pencil and paper. You can also create interactive mock- ups to demonstrate a number of functionalities. If you have done a mock-up, it is much easier to discuss requirements with the client before you start to write any actual code. With the mock-up, it is also easier for the client to understand the idea of the frontend and suggest corrections for it. Changes to the mock-up are really easy and fast to implement, compared to modifications involving actual frontend source code.
The following screenshot shows the mock-up of our car list frontend:
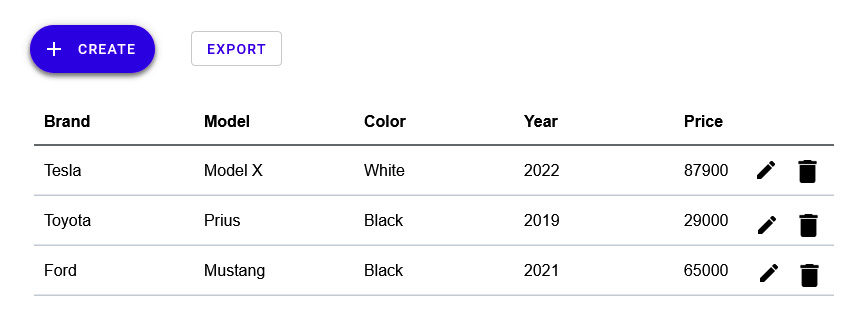
Figure 10.1 – The frontend mock-up
The modal form that is opened when the user presses the New Car button looks like the following:

Figure 10.2 – The frontend mock-up
Now that we have our mock-up from our UI ready, let's look at how we can prepare our Spring Boot backend.
Preparing the Spring Boot backend
We are beginning frontend development with the unsecured version of our backend. In the first phase, we will implement all CRUD functionalities and test that these are working correctly. In the second phase, we will enable security in our backend, make the modifications that are required, and finally, implement authentication.
Open the Spring Boot application with Eclipse, which we created in Chapter 5, Securing and Testing Your Backend. Open the SecurityConfig.java file that defines the Spring Security configuration. Temporarily comment out the current configuration and give everyone access to all endpoints. Refer to the following modifications:
@Override
protected void configure(HttpSecurity http) throws Exception {
// Add this row
http.csrf().disable().cors().and()
.authorizeRequests().anyRequest().permitAll();
/* Comment this out
http.csrf().disable().cors().and()
.sessionManagement()
.sessionCreationPolicy
(SessionCreationPolicy.STATELESS).and()
.authorizeRequests()
.antMatchers(HttpMethod.POST, "/login").permitAll()
.anyRequest().authenticated().and().exceptionHandling()
.authenticationEntryPoint(exceptionHandler).and()
.addFilterBefore(authenticationFilter,
UsernamePasswordAuthenticationFilter.class);
*/
}
Now, if you start the MariaDB database, run the backend, and send the GET request to the http:/localhost:8080/api/cars endpoint with Postman, you should get all cars in the response, as shown in the following screenshot:
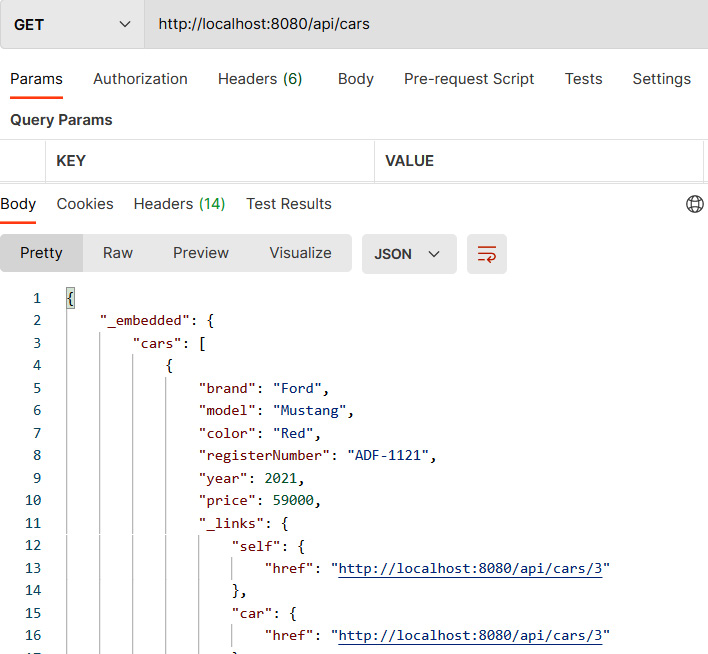
Figure 10.3 – The GET request
Now, we are ready to create our React project for the frontend.
Creating the React project for the frontend
Before we start coding the frontend, we have to create a new React app:
- Open PowerShell, or any other suitable terminal. Create a new React app by typing the following command:
npx create-react-app carfront
- Move to the project folder and install the Material-UI component library by typing the following commands:
cd carfront
npm install @mui/material @emotion/react @emotion/styled
- Run the app by typing the following command in the project's root folder:
npm start
Alternatively, if you are using yarn, type in the following:
yarn start
- Open the src folder with Visual Studio Code, remove any superfluous code, and use the MUI AppBar component in the App.js file to get the toolbar for your app. Following the modifications, your App.js file source code should appear as follows:
import './App.css';
import AppBar from '@mui/material/AppBar';
import Toolbar from '@mui/material/Toolbar';
import Typography from '@mui/material/Typography';
function App() {
return (
<div className="App">
<AppBar position="static">
<Toolbar>
<Typography variant="h6">
Carshop
</Typography>
</Toolbar>
</AppBar>
</div>
);
}
export default App;
Your frontend starting point will look like the following:
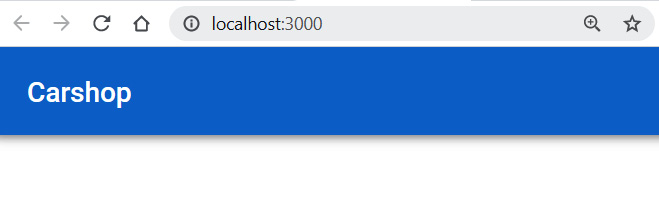
Figure 10.4 – Carshop
We have now created the React project for our frontend and can continue with further development.
Summary
In this chapter, we started the development of our frontend using the backend that we created in Chapter 5, Securing and Testing Your Backend. We defined the functionalities of the frontend and created a mock-up of the UI. We started frontend development with an unsecured version of the backend and, therefore, made some modifications to our Spring Security configuration class. We also created the React app that we are going to use during development.
In the next chapter, we will start to add CRUD functionalities to our frontend.
Questions
- Why should you do a mock-up of the UI?
- How do you disable Spring Security from the backend?
Further reading
Packt has other great resources available for learning about React. These are as follows:
- React – The Complete Guide by Academind GmbH: https://www.packtpub.com/product/react-the-complete-guide-includes-hooks-react-router-and-redux-2021-updated-second-edition-video/9781801812603
- React 17 Design Patterns and Best Practices – Third Edition by Carlos Santana Roldán: https://www.packtpub.com/product/react-17-design-patterns-and-best-practices-third-edition/9781800560444