Chapter 14: Securing Your Application
This chapter will explain how to implement authentication to our frontend when we are using JSON Web Token (JWT) authentication in the backend. In the beginning, we will switch on security in our backend to enable JWT authentication. Then, we will create a component for the login functionality. Finally, we will modify our CRUD functionalities to send the token in the request's authorization header to the backend. We will learn how to secure our application in this chapter.
In this chapter, we will cover the following topics:
- Securing the backend
- Securing the frontend
Technical requirements
The Spring Boot application that we created in Chapter 5, Securing and Testing Your Backend, is required (located on GitHub at https://github.com/PacktPublishing/Full-Stack-Development-with-Spring-Boot-2-and-React/tree/main/Chapter05), as is the React app that we used in Chapter 12, Styling the Frontend with React MUI (located on GitHub at https://github.com/PacktPublishing/Full-Stack-Development-with-Spring-Boot-2-and-React/tree/main/Chapter12).
The following GitHub link will also be required: https://github.com/PacktPublishing/Full-Stack-Development-with-Spring-Boot-and-React/tree/main/Chapter14.
Check out the following video to see the Code in Action: https://bit.ly/38RFO0X
Securing the backend
We have implemented CRUD functionalities in our frontend using an unsecured backend. Now, it is time to switch on security for our backend and go back to the version that we created in Chapter 5, Securing and Testing Your Backend:
- Open your backend project with the Eclipse IDE and open the SecurityConfig.java file in the editor view. We have commented the security out and have allowed everyone access to all endpoints. Now, we can remove that line and also remove the comments from the original version. Now, the configure method of your SecurityConfig.java file should look like the following:
@Override
protected void configure(HttpSecurity http) throws Exception {
http.csrf().disable().cors().and()
.sessionManagement()
.sessionCreationPolicy(SessionCreationPolicy.
STATELESS).and()
.authorizeRequests()
.antMatchers(HttpMethod.POST, "/login").permitAll()
.anyRequest().authenticated().and()
.exceptionHandling()
.authenticationEntryPoint(exceptionHandler).and()
.addFilterBefore(authenticationFilter,
UsernamePasswordAuthenticationFilter.class);
}
Let's test what happens when the backend is secured again.
- Run the backend by pressing the Run button in Eclipse, and check from the Console view that the application started correctly. Run the frontend by typing the npm start command into your terminal, and the browser should be opened to the address localhost:3000.
- You should now see that the list page and the car list are empty. If you open the developer tools and the Network tab, you will notice that the response status is 401 Unauthorized. This is actually what we wanted because we haven't yet executed authentication in relation to our frontend:
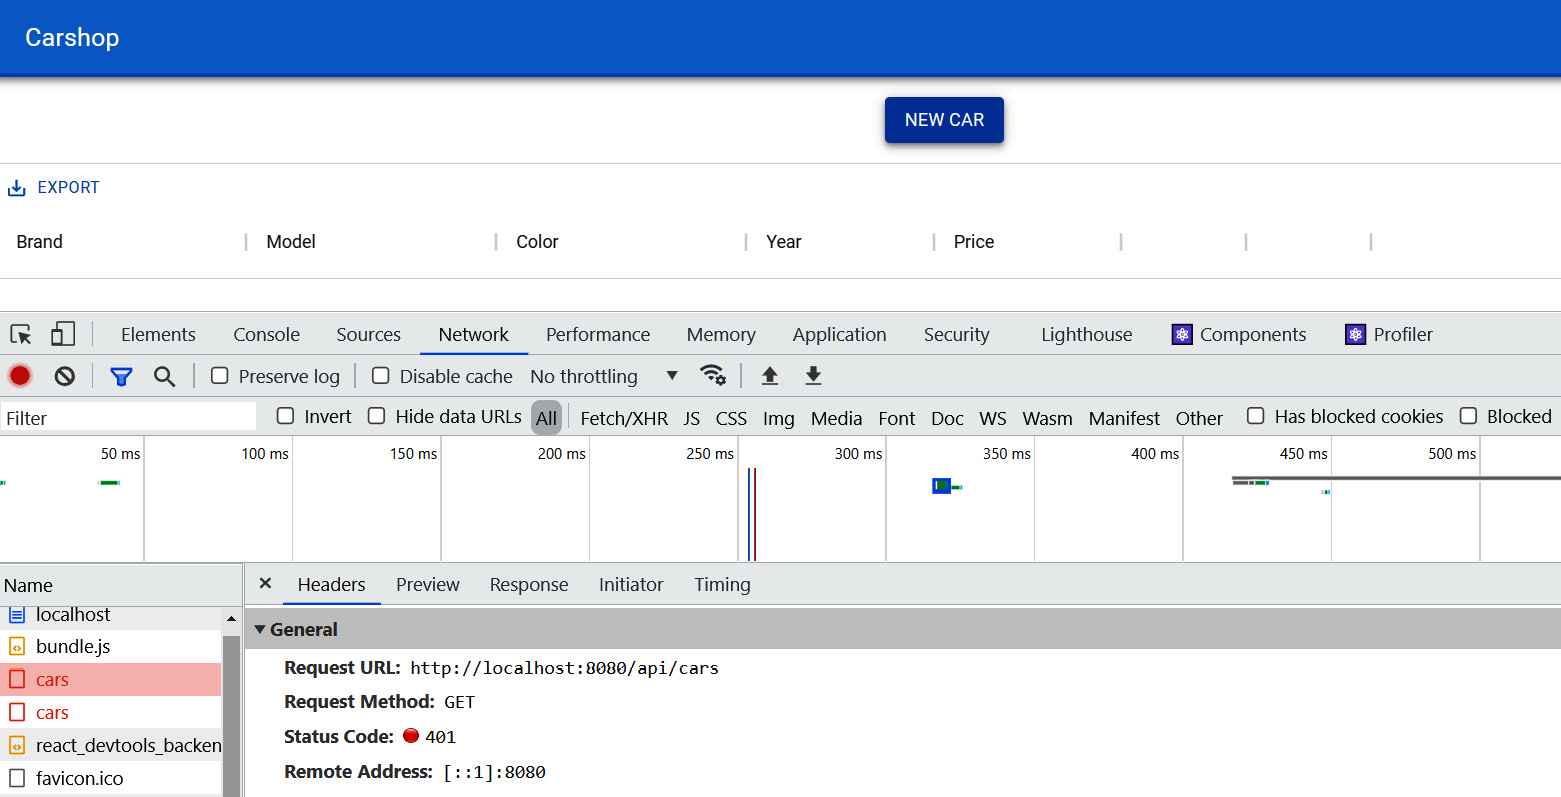
Figure 14.1 – 401 Unauthorized
Now, we are ready to work with the frontend.
Securing the frontend
The authentication was implemented in the backend using JWT. In Chapter 5, Securing and Testing Your Backend, we created JWT authentication, and everyone is allowed access to the /login endpoint without authentication. On the frontend's login page, we have to first call the /login endpoint using the user credentials to get the token. After that, the token will be included in all requests that we send to the backend, as demonstrated in Chapter 5, Securing and Testing Your Backend.
Let's first create a login component that asks for credentials from the user to get a token from the backend:
- Create a new file, called Login.js, in the components folder. Now, the file structure of the frontend should be the following:
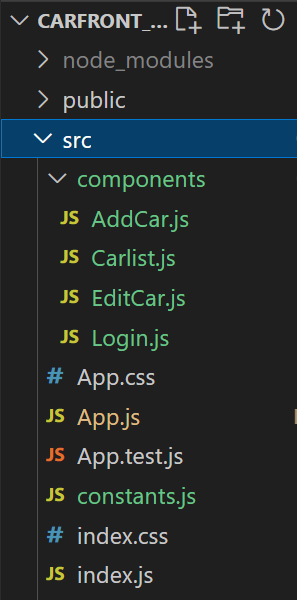
Figure 14.2 – Project structure
- Open the file in the VS Code editor view and add the following base code to the Login component. We are also importing SERVER_URL, because it is required in a login request:
import React, { useState } from 'react';
import { SERVER_URL } from '../constants.js';
function Login() {
return(
<div></div>
);
}
export default Login;
- We need three state values for the authentication: two for the credentials (username and password), and one Boolean value to indicate the status of the authentication. The initial value of the authentication status state is false:
const [user, setUser] = useState({
username: '',
password: ''
});
const [isAuthenticated, setAuth] = useState(false);
- In the user interface, we are going to use the Material UI (MUI) component library, as we did with the rest of the user interface. We need some TextField components for the credentials, the Button component to call a login function, and the Stack component for layout. Add imports for the components to the login.js file:
import Button from '@mui/material/Button';
import TextField from '@mui/material/TextField';
import Stack from '@mui/material/Stack';
- Add imported components to a user interface by adding these to the return statement. We need two TextField components: one for the username and one for the password. One Button component is needed to call the login function that we are going to implement later in this section:
return(
<div>
<Stack spacing={2} alignItems='center' mt={2}>
<TextField
name="username"
label="Username"
onChange={handleChange} />
<TextField
type="password"
name="password"
label="Password"
onChange={handleChange}/>
<Button
variant="outlined"
color="primary"
onClick={login}>
Login
</Button>
</Stack>
</div>
);
- Implement the change handler function for the TextField components, in order to save typed values to the states:
const handleChange = (event) => {
setUser({...user,
[event.target.name] : event.target.value});
}
- As shown in Chapter 5, Securing and Testing Your Backend, the login is done by calling the /login endpoint using the POST method and sending the user object inside the body. If authentication succeeds, we get a token in a response Authorization header. We will then save the token to session storage and set the isAuthenticated state value to true. The session storage is similar to local storage, but it is cleared when a page session ends. When the isAuthenticated state value is changed, the user interface is re-rendered:
const login = () => {
fetch(SERVER_URL + 'login', {
method: 'POST',
headers: { 'Content-Type':'application/json' },
body: JSON.stringify(user)
})
.then(res => {
const jwtToken = res.headers.get
('Authorization');
if (jwtToken !== null) {
sessionStorage.setItem("jwt", jwtToken);
setAuth(true);
}
})
.catch(err => console.error(err))
}
- We can implement conditional rendering that renders the Login component if the isAuthenticated state is false, or the Carlist component if the isAuthenticated state is true. We first have to import the Carlist component to the Login.js file:
import Carlist from './Carlist';
- Then, we have to implement the following changes to the return statement:
if (isAuthenticated) {
return <Carlist />;
}
else {
return(
<div>
<Stack spacing={2} alignItems='center' mt={2} >
<TextField
name="username"
label="Username"
onChange={handleChange} />
<TextField
type="password"
name="password"
label="Password"
onChange={handleChange}/>
<Button
variant="outlined"
color="primary"
onClick={login}>
Login
</Button>
</Stack>
</div>
);
}
- To show the login form, we have to render the Login component instead of the Carlist component in the App.js file:
import './App.css';
import AppBar from '@mui/material/AppBar';
import Toolbar from '@mui/material/Toolbar';
import Typography from '@mui/material/Typography';
import Login from './components/Login';
function App() {
return (
<div className="App">
<AppBar position="static">
<Toolbar>
<Typography variant="h6">
Carshop
</Typography>
</Toolbar>
</AppBar>
<Login />
</div>
);
}
export default App;
Now, when your frontend and backend are running, your frontend should look like the following screenshot:
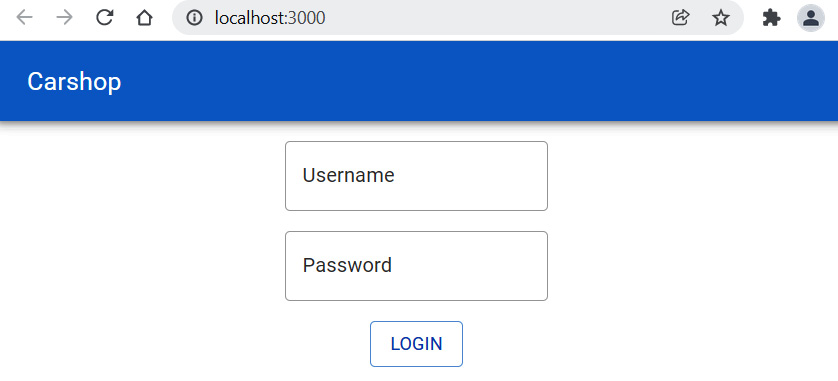
Figure 14.3 – Login page
If you log in using the user/user or admin/admin credentials, you should see the car list page. If you open the developer tools' Application tab, you can see that the token is now saved to the session storage:
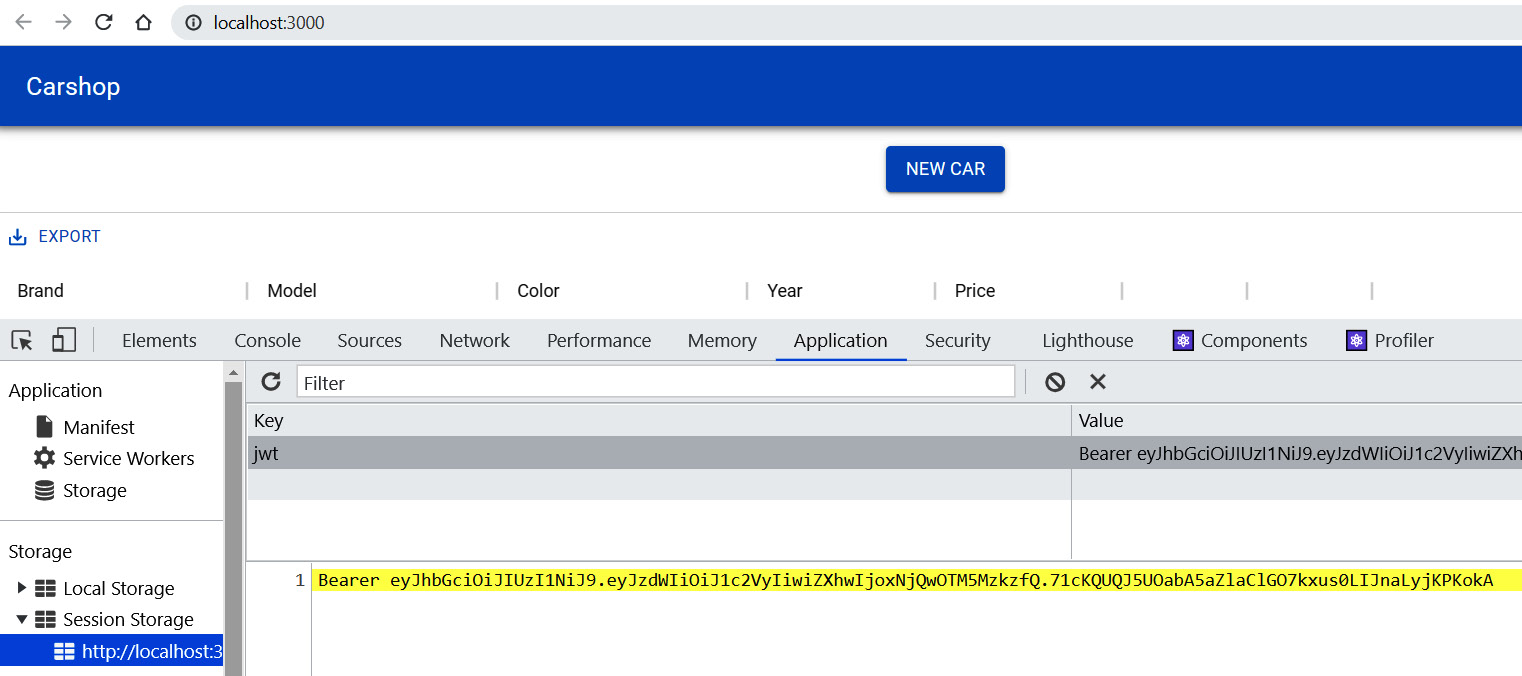
Figure 14.4 – Session storage
The car list is still empty, but that is correct because we haven't included the token in the GET request yet. That is required for the JWT authentication, which we will implement in the next phase:
- Open the Carlist.js file in the VS Code editor view. To fetch the cars, we first have to read the token from the session storage and then add the Authorization header with the token value to the GET request. You can see the source code of the fetchCars function here:
const fetchCars = () => {
// Read the token from the session storage
// and include it to Authorization header
const token = sessionStorage.getItem("jwt");
fetch(SERVER_URL + 'api/cars', {
headers: { 'Authorization' : token }
})
.then(response => response.json())
.then(data => setCars(data._embedded.cars))
.catch(err => console.error(err));
}
- If you log in to your frontend, you should see the car list populated with cars from the database:
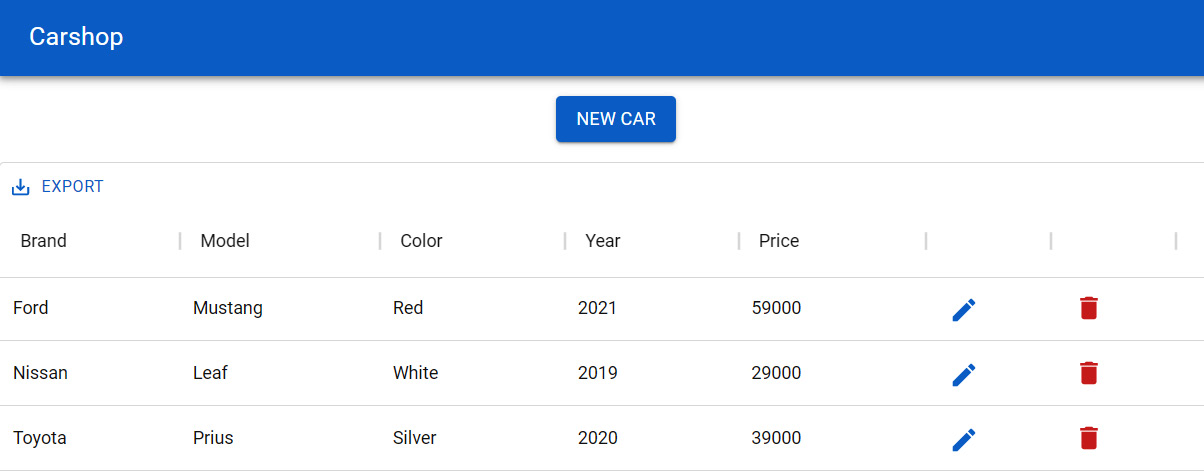
Figure 14.5 – Car list
- Check the request content from the developer tools; you can see that it contains the Authorization header with the token value:

Figure 14.6 – Request headers
All other CRUD functionalities require the same modification to work correctly. The source code of the onDelClick function appears as follows, after the modifications:
// Carlist.js
const onDelClick = (url) => {
if (window.confirm("Are you sure to delete?")) {
const token = sessionStorage.getItem("jwt");
fetch(url, {
method: 'DELETE',
headers: { 'Authorization' : token }
})
.then(response => {
if (response.ok) {
fetchCars();
setOpen(true);
}
else {
alert('Something went wrong!');
}
})
.catch(err => console.error(err))
}
}
The source code of the addCar function appears as follows, after the modifications:
// Carlist.js
// Add a new car
const addCar = (car) => {
const token = sessionStorage.getItem("jwt");
fetch(SERVER_URL + 'api/cars',
{
method: 'POST',
headers: {
'Content-Type':'application/json',
'Authorization' : token
},
body: JSON.stringify(car)
})
.then(response => {
if (response.ok) {
fetchCars()
}
else {
alert('Something went wrong!');
}
})
.catch(err => console.error(err))
}
Finally, the source code of the updateCar function looks like this:
// Carlist.js
// Update car
const updateCar = (car, link) => {
const token = sessionStorage.getItem("jwt");
fetch(link,
{
method: 'PUT',
headers: {
'Content-Type':'application/json',
'Authorization' : token
},
body: JSON.stringify(car)
})
.then(response => {
if (response.ok) {
fetchCars();
}
else {
alert('Something went wrong!');
}
})
.catch(err => console.error(err))
}
Now, all the CRUD functionalities will be working after you have logged in to the application.
In the final phase, we are going to implement an error message that is shown to a user if authentication fails. We are using the Snackbar MUI component to show the message:
- Add the following import to the Login.js file:
import Snackbar from '@mui/material/Snackbar';
- Add a new state called open to control the Snackbar visibility:
const [open, setOpen] = useState(false);
- Add the Snackbar component to the return statement:
<Snackbar
open={open}
autoHideDuration={3000}
onClose={() => setOpen(false)}
message="Login failed: Check your username and
password"
/>
- Open the Snackbar component if authentication fails, by setting the open state value to true:
const login = () => {
fetch(SERVER_URL + 'login', {
method: 'POST',
headers: { 'Content-Type':'application/json' },
body: JSON.stringify(user)
})
.then(res => {
const jwtToken = res.headers.get('Authorization');
if (jwtToken !== null) {
sessionStorage.setItem("jwt", jwtToken);
setAuth(true);
}
else {
setOpen(true);
}
})
.catch(err => console.error(err))
}
If you now log in with the wrong credentials, you will see the following message:
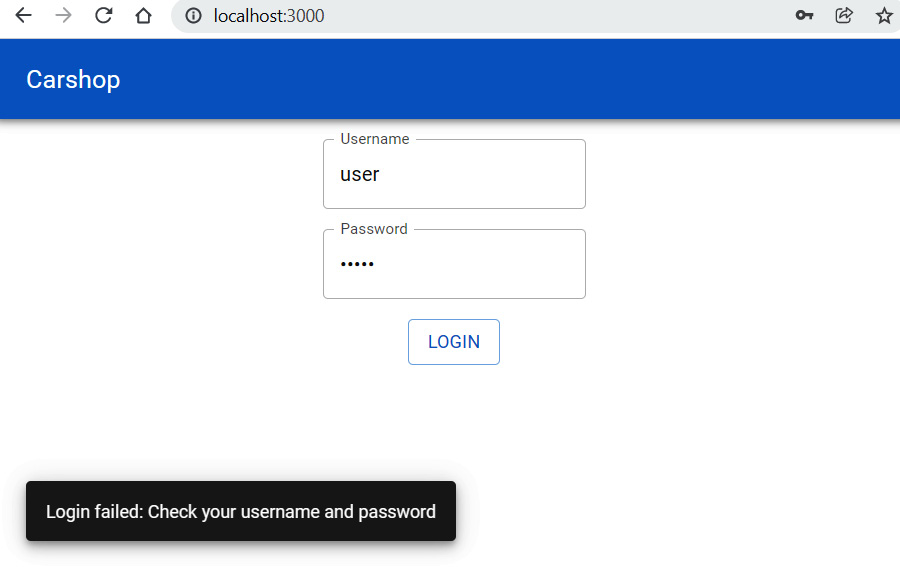
Figure 14.7 – Login failed
The logout functionality is much more straightforward to implement. You basically just have to remove the token from the session storage and change the isAuthenticated state value to false, as shown in the following source code:
const logout = () => {
sessionStorage.removeItem("jwt");
setAuth(false);
}
Now, we are ready with our car application.
Summary
In this chapter, we learned how to implement a login functionality for our frontend when we are using JWT authentication. Following successful authentication, we used session storage to save the token that we received from the backend. The token was then used in all requests that we sent to the backend; therefore, we had to modify our CRUD functionalities to work with authentication properly.
In the next chapter, we will deploy our application to Heroku, as we demonstrate how to create Docker containers.
Questions
- How should you create a login form?
- How should you log in to the backend using JWT?
- How should you store tokens in session storage?
- How should you send a token to the backend in CRUD functions?
Further reading
Packt has other great resources available for learning about React. These are as follows:
- React - The Complete Guide, by Academind GmbH: https://www.packtpub.com/product/react-the-complete-guide-includes-hooks-react-router-and-redux-2021-updated-second-edition-video/9781801812603
- React 17 Design Patterns and Best Practices - Third Edition, by Carlos Santana Roldán: https://www.packtpub.com/product/react-17-design-patterns-and-best-practices-third-edition/978800560444
