
Chapter 7: Securing Storage
This chapter focuses on one of the most common concepts when it comes to Azure and that is securing storage on the Azure platform. The focus here will be on implementing and managing storage from a security point of view, such as generating Shared Access Signature (SAS) tokens, managing access keys, configuring Azure Active Directory (AD) integration, and configuring access to Azure files. We will also explore the storage replication options available to us in Azure and understand the management of a blob's life cycle.
In this chapter, we are going to cover the following main topics:
- Configuring network access to storage accounts
- Storage access keys
- Working with SAS tokens
- Configuring access and authentication
- Copying data by using AzCopy
- Configuring storage replication and life cycle
Technical requirements
To follow along with the hands-on material, you will need the following:
- Access to an Azure subscription with owner or contributor privileges. If you do not have access to one, students can enroll for a free account: https://azure.microsoft.com/en-us/free/.
- PowerShell 5.1 or later installed on a PC where labs can be practiced from. Note that many examples can only be followed on a PC.
- Installation of the Az module. This can be performed by running the following in an administrative PowerShell session:
Set-ExecutionPolicy -ExecutionPolicy RemoteSigned -Scope CurrentUser
Also run the following:
Install-Module -Name Az -Scope CurrentUser -Repository PSGallery -Force
- Storage Explorer.
Configuring network access to storage accounts
You can secure your storage account to a specific set of supported networks which are granted access by configuring network rules so that only applications that request data over the specific set of networks can access the storage account. When these network rules are effective, the application needs to use proper authorization on the request. This authorization can be provided by Azure AD credentials for blobs and queues, with a SAS token or a valid account access key.
Public endpoint and Azure Virtual Network (VNet) integration
By default, storage accounts are provisioned with a public endpoint, and thanks to the enhanced control Azure offers, network traffic can be limited to those trusted IP addresses and networks to which you have granted access on Azure. For good security practice, all public access to storage accounts should be set to deny for the public endpoint by default. The network rules defined for the storage account will apply across all protocols, including SMB and REST; therefore, to allow access, an explicit rule will need to be defined. There are additional exceptions that can be configured that give you the ability to allow access to Azure services on the trusted services list to the storage account, as well as configuring logging and metric access for any networks (such as for Log Analytics).
Top Tip
When integrating a resource with an Azure VNet, your VNet needs to exist within the same region as your resource.
In the following demonstration, we are going to configure network access to the storage account that we created in the previous chapter to restrict network access to a specific network in Azure, as well as allowing our public IP to communicate:
- Navigate to the Azure portal by opening https://portal.azure.com.
- Go to the storage account we created in the previous chapter.
- On the Storage account blade, select Networking from the left menu under Security + networking.
- Click Selected networks under Allow access from and then click Add new virtual network. Notice that we can create a new network or choose an existing one.

Figure 7.1 – Storage accounts – Adding a VNet
- Enter a name and address space, select a subscription, resource group, and location, and then leave all other settings on their default values and click Create. You will note that the VNet can be created in a different resource group; it can even be in a different subscription.
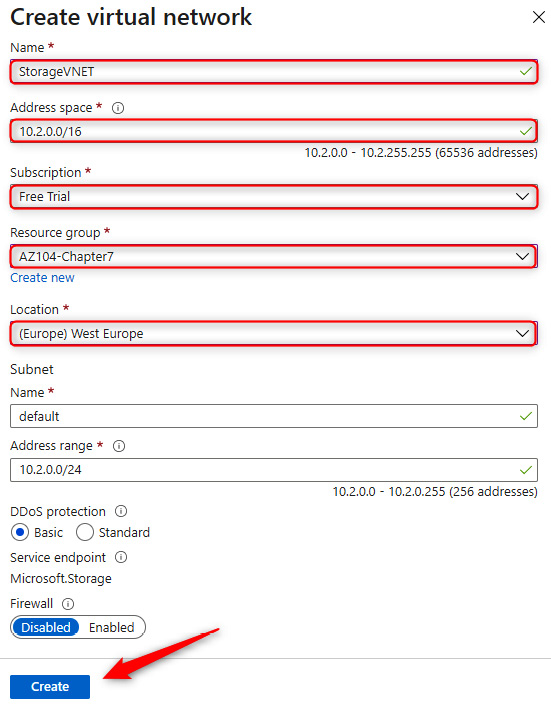
Figure 7.2 – Storage accounts – Creating a VNet
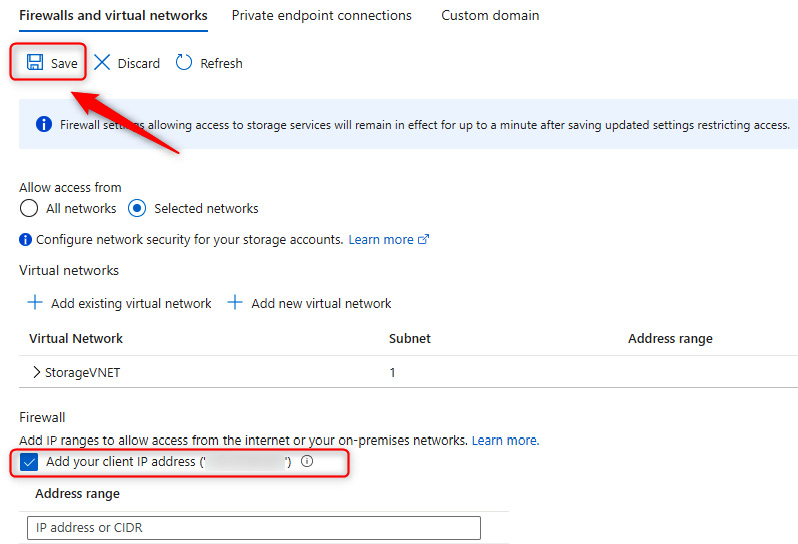
Figure 7.3 – Storage accounts – Configuring the firewall and VNets
- You have now locked down access to the specified network and your public IP address. Open Storage Explorer (preview) on the left menu.
- Open FILE SHARES, click on any of your folders, and note that it is accessible. You can confirm its functionality by uploading a file to the service.
- To demonstrate the effect of IP restriction from the firewall configuration, navigate back to the Networking blade by clicking Networking on the left menu. In the Firewall context section, click the trash can icon to delete your IP and click Save.
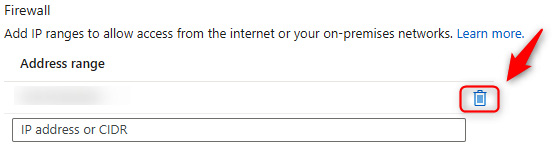
Figure 7.4 – Storage accounts – Deleting a public IP
- Now, navigate back to Storage Explorer (preview), click FILE SHARES once more, and open the share you used previously. Note that you are denied access now. Click OK.

Figure 7.5 – Storage accounts – Authorization failure
You have now completed this section on network restrictions on public endpoints. Should you wish to test connectivity with this, you can deploy a VM in the same VNet as the storage account and connect to the storage account from inside the VM. In the next section, we will discuss private endpoints.
Private endpoints
Private endpoints provide a mechanism for Azure Storage accounts to have a private interface for a storage account and can be used to eliminate public access. They provide enhanced security over a public endpoint because they prevent unauthorized access by not being exposed publicly. When implementing a private endpoint, a Network Interface Card (NIC) is associated with the storage account and will be placed in a VNet. The traffic for the storage account will traverse the VNet to which it is associated. Private endpoints are provided through a service called Private Link.
Top Tip
For scenarios requiring advanced security, you should disable all public access to the storage account and enable a private endpoint. All traffic should be directed through a firewall for integration and a Network Security Group (NSG) should be implemented on the subnet layer to restrict unauthorized access further.
In the following demonstration, we will attach a private endpoint to a storage account:
- Navigate to the Azure portal by opening https://portal.azure.com.
- Go to the storage account we created in the previous chapter.
- On the Storage account blade, select Networking from the left menu under the Security + networking context.
- On the tab menu bar, select the Private endpoint connections tab and click + Private endpoint.
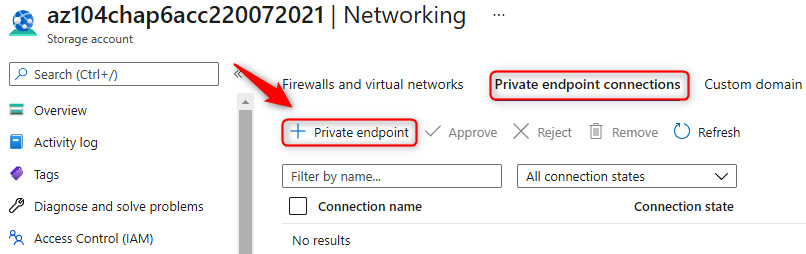
Figure 7.6 – Storage accounts – Private endpoint connections
- In the Basics tab, select the subscription, resource group, and region, then enter a name for the instance. For this demo, we will use az104privateendpoint. Click Next : Resource >.
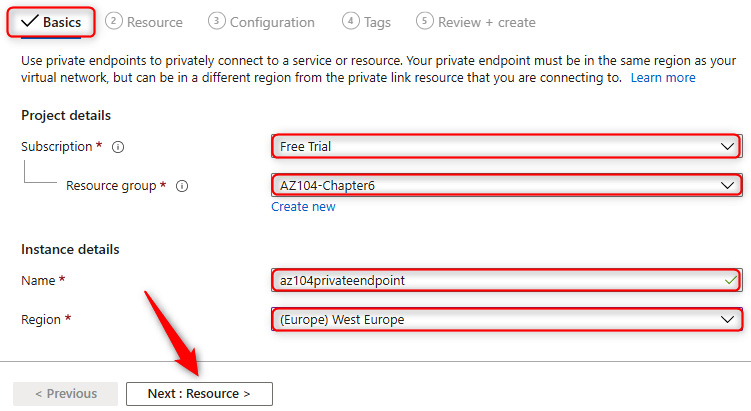
Figure 7.7 – Private endpoint connections – Basics tab
- On the Resource tab, select the target sub-resource. This will be the type of storage being consumed from the storage account. Select file. Click Next : Configuration >.
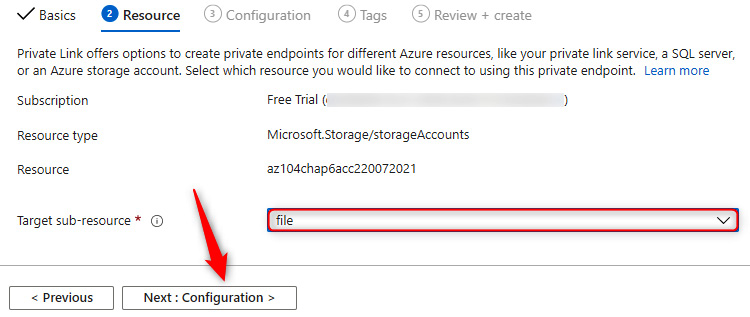
Figure 7.8 – Private endpoint connections – Resource tab
- On the Configuration tab, enter all the networking configurations for the private endpoint. Select your VNet and subnet. For the Integrate with private DNS zone option, select No. Private DNS allows you to create a DNS entry for the private endpoint you are using on the service. This will be hosted within the private DNS zone you provision in Azure. Private DNS in Azure provides a mechanism for managing your own DNS entries hosted by Azure. We will discuss this in Chapter 14, Implementing and Managing Virtual Networking. Click Review + create.
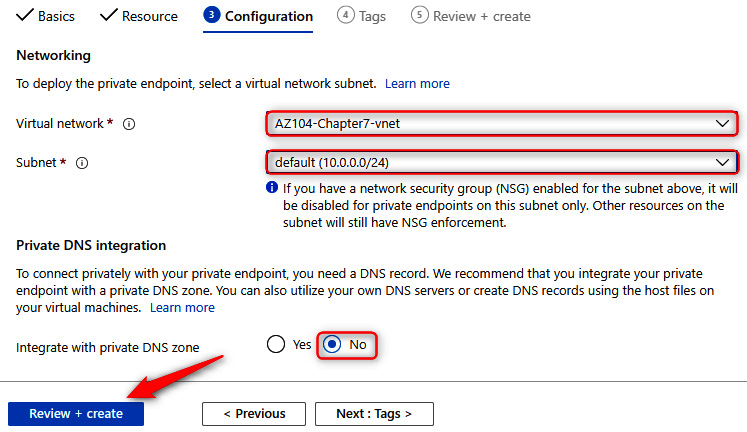
Figure 7.9 – Private endpoint connections – Configuration tab
- Once validation has passed, click Create.
You have now successfully deployed a private endpoint. That brings us to the end of this section. We encourage you to play with this more in the next chapter, where you can follow along with a lab deployment. We will now discuss network routing on a storage account.
Top Tip
Take note that a private endpoint can also be provisioned on the creation of a storage account.
Network routing from storage accounts
The default network routing preference option chosen for storage accounts and most Azure services will be for the Microsoft network. This is a high-performance, low-latency global connection to all services within Azure and serves as the fastest delivery service to any consuming service or user. This is due to Microsoft configuring several points of presence within their global network. The closest endpoint to a client is always chosen. This option costs slightly more than traversing the internet. If you select Internet routing, then traffic will be routed in and out of the storage account outside the Microsoft network.
The following screenshot shows the setting under the Firewall and virtual networks tab on the Networking blade for your storage account:
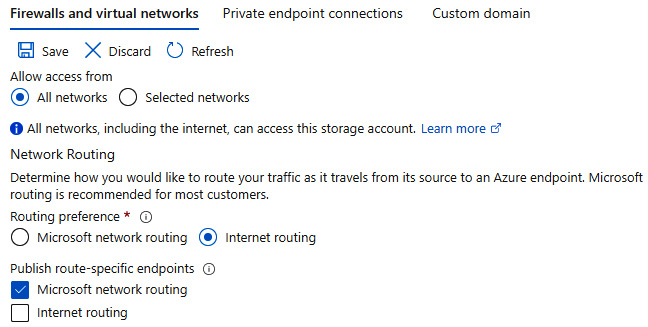
Figure 7.10 – Storage account routing configuration
You will note there is also an option to publish route-specific endpoints for the storage account. This can be used in scenarios where you might want the default network routing option to be configured for the Microsoft network, while providing internet endpoints or vice versa. These endpoints can be found in the Endpoints section of your storage account, as shown in the following screenshot:
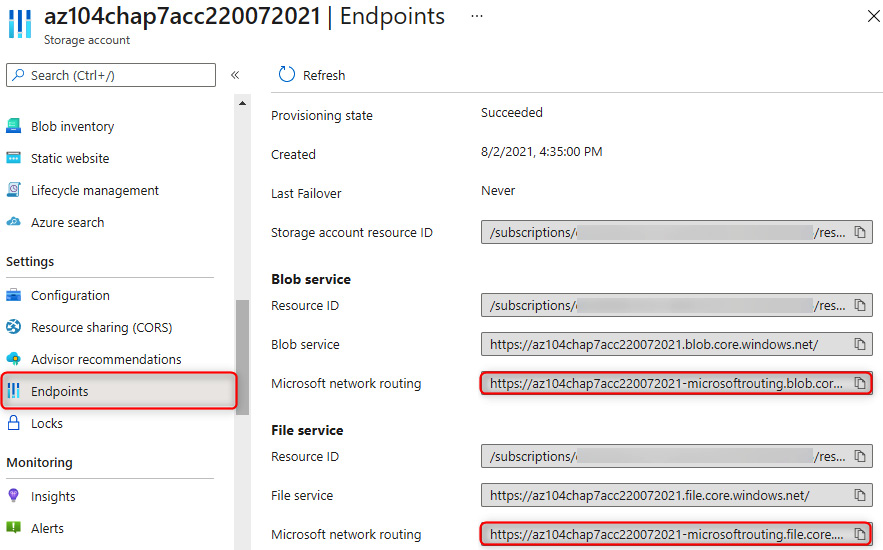
Figure 7.11 – Storage account – Endpoints
From this list, you may copy the endpoints that are required. Now that we have briefly observed the configuration options available for network routing on storage accounts, in the next section, we will explore a PowerShell script for configuring a private endpoint on a storage account.
PowerShell scripts
The following script creates a new private endpoint that is associated with an existing storage account. It is linked to the defined VNet and links to the first subnet within that VNet:
$storageAccount = Get-AzStorageAccount -ResourceGroupName "AZ104-Chapter7" -Name "az104xxxxxxxx"
$privateEndpointConnection = New-AzPrivateLinkServiceConnection -Name 'myConnection' -PrivateLinkServiceId ($storageAccount.Id) -GroupId 'file';
$vnet = Get-AzVirtualNetwork -ResourceGroupName "AZ104-Chapter7" -Name "StorageVNET"
## Disable private endpoint network policy ##
$vnet.Subnets[0].PrivateEndpointNetworkPolicies="Disabled"
$vnet | Set-AzVirtualNetwork
## Create private endpoint
New-AzPrivateEndpoint -ResourceGroupName "AZ104-Chapter7" -Name "myPrivateEndpoint" -Location "westeurope" -Subnet ($vnet.Subnets[0]) -PrivateLinkServiceConnection $privateEndpointConnection
Once this code has been run, you will have successfully created a private endpoint for your storage account. It will be linked to the VNet and subnet you defined. You can navigate to the private endpoint to discover its private IP address, which will be used for internal communication to the service going forward.
Further reading
That brings an end to this section. We have learned about VNet integration for the storage accounts and the different options available. In the next section, we will explore managing access keys.
We encourage you to read up on this topic further by using the following links:
- Configuring firewalls and VNets: https://docs.microsoft.com/en-us/azure/storage/common/storage-network-security?tabs=azure-portal#change-the-default-network-access-rule
- Private endpoints for your storage accounts: https://docs.microsoft.com/en-us/azure/storage/common/storage-private-endpoints
- Private Link resources: https://docs.microsoft.com/en-us/azure/private-link/private-endpoint-overview#private-link-resource
Storage access keys
Storage access keys are like passwords for your storage account and Azure generates two of these when you provision your account, being a primary and secondary key. Just like passwords, they need to be changed from time to time to ensure you are not compromised. This practice is referred to as key rotation. In the following section, we will run through an example of how to access your keys and how to renew them.
Managing access keys
In this demonstration, we will explore how to view access keys as well as how to renew them:
- Navigate to the Azure portal by opening https://portal.azure.com.
- Go to a storage account.
- On the left menu for the storage account, click Access keys under the Security + networking context. You will notice key1 and key2, as well as the last rotated date for each specified.
- To copy the access keys, a two-step process will be performed. First, click on Show keys.
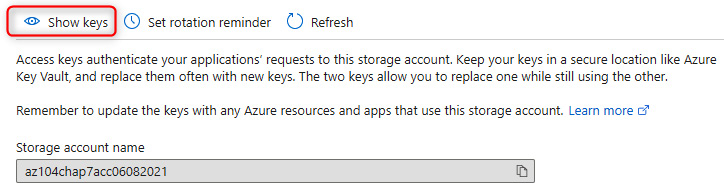
Figure 7.12 – Show keys
- Then, copy the corresponding key for the storage account by clicking the clipboard icon.
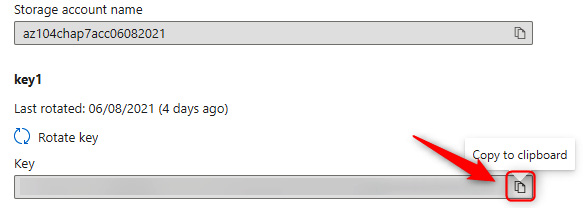
Figure 7.13 – Copying an access key
Now that you know how to access the storage access keys, we will look at how to rotate keys in the following exercise:
- Navigate to the Azure portal by opening https://portal.azure.com.
- Go to a storage account.
- On the left menu for the storage account, click Access keys under the Security + networking context. Click Rotate key in the key2 section.
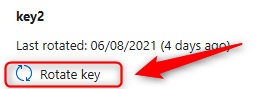
Figure 7.14 – Rotate key option
- A notification will come up to confirm that you want to regenerate the key. Click Yes.

Figure 7.15 – Regenerate access key
- Repeat the process for key1.
You have now completed a key rotation for a storage account. This ensures unauthorized access is prevented on the storage keys and it is best practice to rotate these keys every 90 days. As a recommendation, key2 should be rotated first and updated for any relevant applications and services, then followed by key1. This process ensures that the primary key (key1) is not directly impacting all business-critical services and causing unnecessary downtime. The rotation process should still be properly planned and maintained through an appropriate change control process within your organization.
Top Tip
As a best practice, keys should be rotated every 90 days to prevent unauthorized exposure to the account. This will also limit the potential attack window for compromised SAS tokens.
In the next section, we will explore SAS tokens.
Working with SAS tokens
SAS tokens are secure access tokens that provide delegated access to resources on your storage account. The storage service confirms the SAS token is valid in order to grant access. The construct of a SAS token includes the permissions granted on the token, the date validity, and the signing key for the storage account. When creating a SAS token, several items need to be considered that govern the granular level of access granted, which are as follows:
- Resource types that the client might use
- Permissions on the resource types that are required
- The period the SAS key should function for
Types of SAS
There are three types of SAS supported by Azure Storage:
- User-delegated SAS: This is a SAS token that is secured by AD credentials.
- Account SAS: An account SAS is created and secured using a storage key. The permissions granted can span several services (blob, file, queue, and table), as well as accessing permissions for the chosen services.
- Service SAS: A service SAS is identical to an account SAS except that it is limited to a single service. There are limitations to some read, write, and delete operations for a service SAS that the account SAS has higher privileges to allow.
Forms of SAS
SAS tokens can take two forms, as detailed here:
- Ad hoc SAS: This SAS token is created as needed where permissions are chosen along with accessible services in alignment with the type of SAS used. The configuration is specified in the SAS URI. This is generally used for scenarios where quick access is required for a temporary period. SAS tokens cannot be managed after being issued. User-delegated SAS and account SAS can only be provisioned as an ad hoc SAS.
- Service SAS with stored access policy: This form of SAS token is more secure and enhances the functionality that an ad hoc SAS token delivers. SAS tokens can be managed after being issued and are manufactured to comply with policies configured in the stored access policy. SAS tokens can be modified and deleted using a stored access policy.
Top Tip
Microsoft advises a best security practice is to use Azure AD credentials whenever possible.
Now that you have an understanding of the core components of a SAS, we will explore some exercises for creating and managing these.
Generating SAS tokens
In this demonstration, you will learn how to create a SAS token for sharing access to a storage account:
- Navigate to the Azure portal by opening https://portal.azure.com.
- Go to a storage account.
- On the left menu for the storage account, click Shared access signature under the Security + networking context. Create a new SAS key by selecting the Container and Service options on the Allowed resource types options list. Change the Allowed services option list as desired.
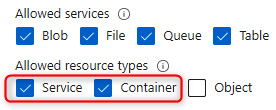
Figure 7.16 – SAS permissions
- Set the time for start to 5 minutes from your current time and click Generate SAS and connection string. Copy the connection string – you are only ever presented with this once.
- Open Azure Storage Explorer, then click the Open Connect Dialog button.

Figure 7.17 – Open Connect Dialog
- Click Storage account or service, and select Connection string as your connection method, then click Next.
- Paste the connection string copied earlier into the Connection string dialog. Change the desired Display name text if desired. Click Next.
- You will be presented with a summary page noting all endpoints and other details. Click Connect.
- You will get a success message as follows:
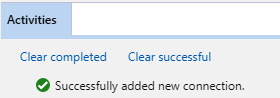
Figure 7.18 – Storage Explorer – Success message
- Navigate through the hamburger menu to the Storage Accounts section, click the arrow to open all accounts, and notice your storage account connection.
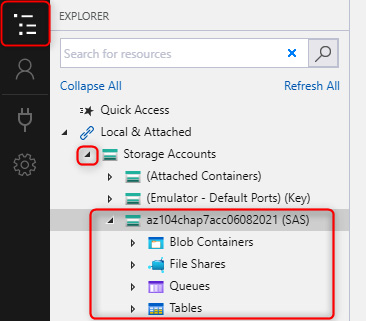
Figure 7.19 – Storage Accounts
You now know how to generate a SAS token and connect to a storage account using the token. In the next section, we will explore storage access policies and how these enhance the concept of SAS tokens.
Top Tip
Allowed protocols should be limited to HTTPS on the SAS creation for enhanced security. The SAS start and end time should be limited as far as possible to the necessary time required for access.
Storage access policies
A storage access policy provides an additional layer of control over SAS by introducing policies for managing the SAS token. SAS tokens can now be configured for a start and expiry time with the ability to revoke access after they have been issued. The following steps demonstrate the process for creating a storage access policy on a container:
- Navigate to the Azure portal by opening https://portal.azure.com.
- Navigate to your storage account, click Containers on the left-hand menu, and click on a container.
- Click Access policy, then on the right-hand pane, click + Add policy under Stored access policies.
- Enter an identifier and select permissions. For this exercise, you may select read and list permissions. Enter the desired start/stop date. Click OK.
You have now learned how to create a storage access policy. You will learn how to edit an existing policy in place through the following steps:
- Navigate to the Azure portal by opening https://portal.azure.com.
- Navigate to your storage account, click Containers on the left-hand menu, and click on a container.
- Click Access policy, then click the ellipsis (…) icon of the identifier that matches the name given in the previous step. Click Edit.
- You may modify the Identifier, Start time, Permissions, and Expiry time. Click OK.
You have now learned how to modify an existing policy. Let's follow the given steps to remove an existing access policy:
- Navigate to the Azure portal by opening https://portal.azure.com.
- Navigate to your storage account, click Containers on the left-hand menu, and click on a container.
- Click Access policy, then click the ellipsis (…) icon of the identifier that matches the name given in the previous step. Click Delete.
You have just learned how to delete an access policy. That concludes this section, where we have learned what SAS tokens are and how they work. We have also explored storage access policies as well as how these enhance the management of SAS tokens. In the next section, we have provided additional reading material for you to learn more if desired.
Further reading
We encourage you to read up on the topic further by using the following links:
- Managing storage account access keys: https://docs.microsoft.com/en-us/azure/storage/common/storage-account-keys-manage?tabs=azure-portal
- Automation of storage access key rotation: https://docs.microsoft.com/en-us/azure/key-vault/secrets/tutorial-rotation-dual?tabs=azure-cli
Configuring access and authentication
Storage accounts can provide identity-based authentication through either Active Directory (on-premises) or Azure Active Directory Domain Services (AADDS). Both offer the ability to utilize Kerberos authentication offered by Active Directory. The join is limited to a single forest, whereas multiple forest connections will require the configuration of domain trusts.
For the file share to provide authentication capabilities, it will join the respective directory service as a computer account object. There are three primary permissions (authorization) on the SMB share that you should be cognizant of:
- Storage File Data SMB Share Reader: This permission grants read access to the SMB share files and directories.
- Storage File Data SMB Share Contributor: This grants read, write, list, and delete access to the SMB share files and directories.
- Storage File Data SMB Elevated Contributor: This grants contributor access as well as the ability to assign permissions (modify Access Control Lists (ACLs)) to other SMB share files and directories.
In the following sections, we will investigate the steps involved in configuring Active Directory domain-joined Azure file shares and the allocation of permissions to these shares.
Configuring Azure AD authentication for a storage account
To authenticate through either directory service, several requirements are needed. The following diagram illustrates the requirements for an Active Directory integration:
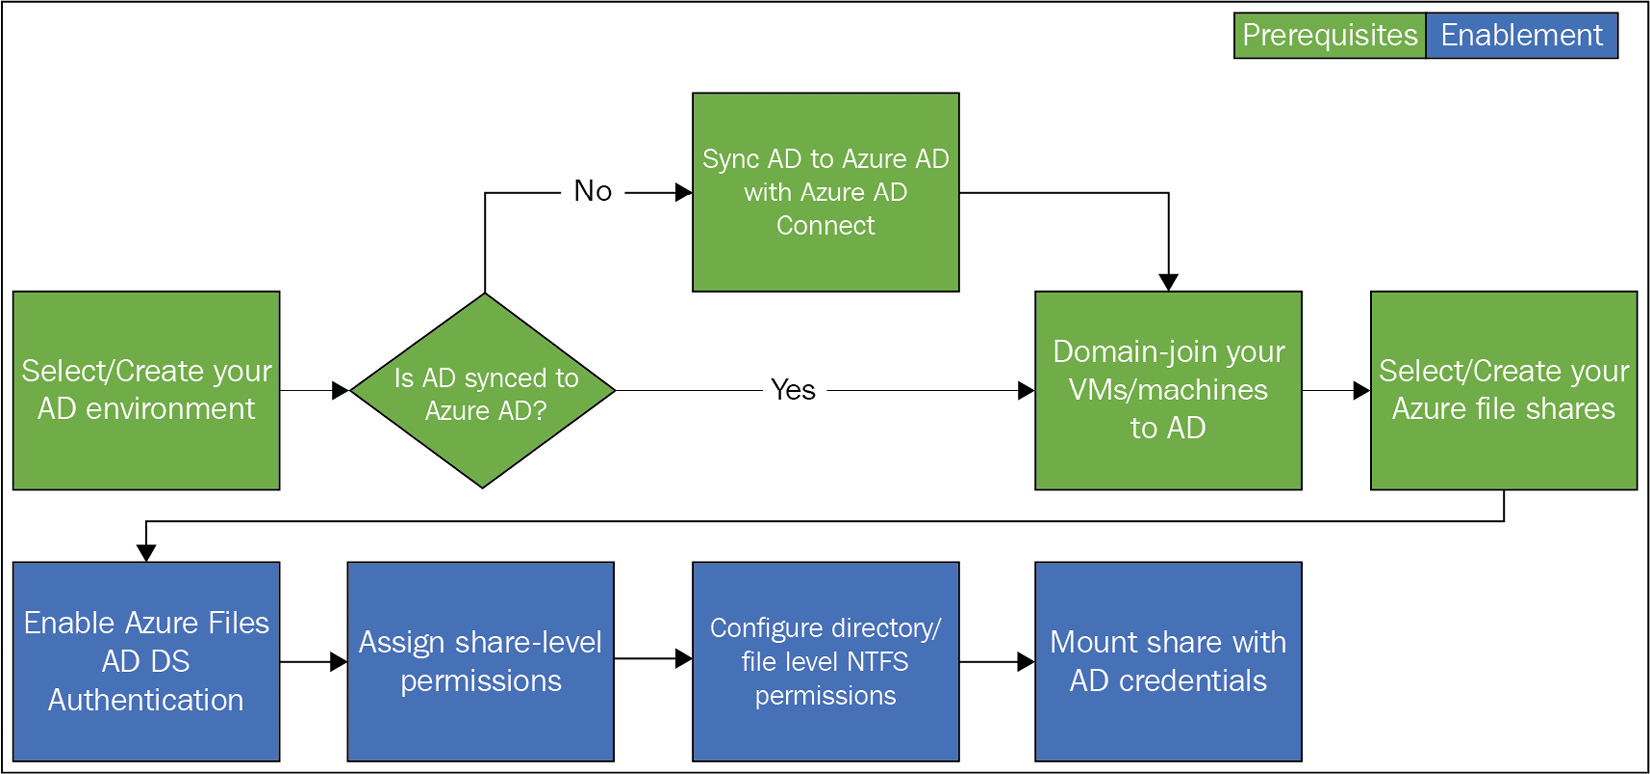
Figure 7.20 – Azure AD authentication enablement process
We will now follow the process for configuring AD authentication on an Azure file share. In the section that follows this, we will explore configuring access to the file share and then mounting the file share. Finally, we will explore how to configure permissions on the share:
- Create an AD environment. You can run the following quick-start template, which will deploy an Active Directory server in Azure: https://azure.microsoft.com/en-gb/resources/templates/create-ad-forest-with-subdomain/.
- Set up Azure AD Connect and Sync AD with Azure AD.
- Deploy a test VM.
- Domain-join your VM to AD.
- Set up an Azure Storage account (limit the account name to 15 characters) and set up an Azure file share.
- Download the following module for configuring AADDS authentication: https://github.com/Azure-Samples/azure-files-samples/releases/tag/v0.2.3.
- Enable AADDS authentication on the file share by running the following PowerShell script and change the domain name to what you configured on Active Directory. This must be run on an AD-joined machine. You can use the test VM:
Import-Module -name AZFilesHybrid;
Join-AzStorageAccountForAuth -ResourceGroupName "AZ104-Chapter7" -StorageAccountName "storagename01" -Domain "domainname.com" -OrganizationalUnitName "OU=AzureShares,OU=Az104_Resources,DC=domainname,DC=com"
Your Azure file share should now be joined to your on-premises AD domain.
Top Tip
Should you receive an error for updating any module, such as the PowerShellGet module, you can run the following command to force an update. The module name can be changed accordingly:
get-module | Where-Object{$_.name -like "*PowerShellGet*"} | Update-module
In the next section, we will explore assigning share-level and file-level permissions, as well as mounting an SMB share on a Windows machine.
Configuring access to Azure files
In the following section, we will explore assigning share and file permissions on the AD-joined storage from the previous exercise, as well as mounting the share and exploring how to validate the security.
Assigning share-level permissions
In this section, we will look at the steps involved to assign share-level permissions:
- Navigate to the Azure portal by opening https://portal.azure.com.
- Go to the storage account from the previous exercise.
- Click on File shares on the left menu under the Data storage context.
- Create a file share and name it shared.
- Click the new share you just created, and then on the left menu, click Access Control (IAM). Click + Add and then Add role assignment.
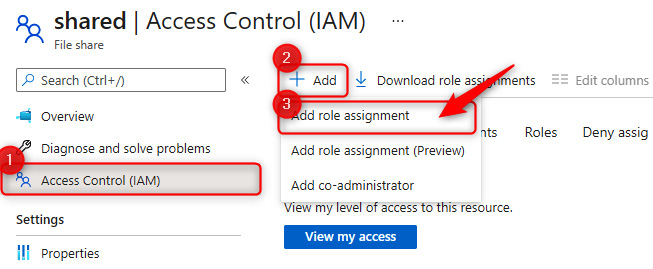
Figure 7.21 – Adding SMB permissions
- Select Storage File Data SMB Share Contributor for Role and search for the appropriate user account you created on AD, then click Save.
You have just added contributor permissions for a user to your SMB share on Azure. This same process can be applied to the other SMB roles if desired. We will look at assigning file-level permission in the next section.
Mounting the file share
In this section, we will look at the steps involved to mount an Azure file share on the test VM with AD credentials. It should be noted that port 445 will need to be open on the Windows server and SMB 3.x enabled (these should be open by default):
- Navigate to the Azure portal by opening https://portal.azure.com.
- Go to the storage account from the previous exercise.
- Click on File shares on the left menu under the Data storage context.
- Click the share you used in the previous exercise, and on the left menu, click Overview, then click Connect on the top menu of the overview blade.
- Select a drive letter and set Authentication method to Active Directory. Copy the generated script at the bottom of the page.
- Navigate to your test VM and log in with the user account you added to the SMB share (this must be an on-premises account). Open PowerShell, then paste your script into the PowerShell window and hit Enter. This will map the share as a PSDrive.
- To have this mapped in Windows File Explorer, you could also map the network path you have from the share as \storagename.file.core.windows.netshared.
- Log on to your Active Directory server and attempt the same connection under your administrator account. Note that you get an Access is denied message. This is because you haven't assigned SMB permissions to this user.
You have now successfully mounted the SMB share for your Azure files storage and also seen the effect placed on the share using permissions. In the next section, we will explore the effects of file-level permissions.
Configuring file-level permissions
In this section, we will look at the steps involved to assign share-level permissions:
- Create a new user on AD and assign this user Storage File Data SMB Share Contributor permissions for the share from the previous exercise. The synchronization can take some time to replicate to Azure.
- Navigate to your test VM and paste some files in there. Notice that you have permission to do so. Right-click one of the files and click Properties. On the window that pops up, click Security.
- Click edit. Notice that your user has full permission. Click Add…, type in the new username, click the Check Names button, and then click OK. Click Apply. You get an error stating that you don't have permission. This is because you need to assign the Storage File Data SMB Share Elevated Contributor role to this user account to modify ACL permissions. Repeat the operation after assigning this to the new user account and you will now complete the operation.
- Navigate to the AD server and mount the SMB share using the new user credentials. Note that you may need to wait for synchronization to complete before this works as expected.
- You can play around with changing settings and completely removing read permissions on the files and confirming the other users indeed cannot read this.
You have now learned how to configure file-level ACLs for Azure Storage shares. This concludes the section for Azure AD authentication and integration for access to Azure file shares. In the next section, we provide additional reading material should you wish to learn more.
Further reading
We encourage you to read up on this topic further by using the following links:
- Enabling AADDS authentication: https://docs.microsoft.com/en-us/azure/storage/files/storage-files-identity-auth-active-directory-enable
- Automation of storage access key rotation: https://docs.microsoft.com/en-us/azure/key-vault/secrets/tutorial-rotation-dual?tabs=azure-cli
- How to mount an SMB file share on Windows: https://docs.microsoft.com/en-us/azure/storage/files/storage-how-to-use-files-windows
- Configuring file-level permissions: https://docs.microsoft.com/en-us/azure/storage/files/storage-files-identity-ad-ds-configure-permissions
Copying data by using AzCopy
AzCopy is a utility that can be used for copying files to and from Azure Storage accounts. Authentication can be conducted using either an Active Directory account or a SAS token from storage. AzCopy provides many different functions, but the primary function is for file copying and is structured as azcopy copy [source] [destination] [flags].
Downloading and installing
You can download AzCopy from here: https://docs.microsoft.com/en-us/azure/storage/common/storage-use-azcopy-v10.
In this exercise, you will copy data to your Azure blob using a SAS token:
- Download and install the relevant AzCopy installer from the preceding link.
- Extract the files from the archive you downloaded and place them in a location that suits you, such as C:AzCopy.
- Launch PowerShell, navigate to the folder using the cd command, and press Enter.
Figure 7.22 – Changing directory in PowerShell
You now have a copy of AzCopy on your machine ready to work with.
Copying data by using AzCopy
In this demonstration, we will copy data using the AzCopy utility and SAS tokens. This exercise can also be conducted using Azure AD credentials. Follow these steps to complete the exercise:
- Identify a file you would like to copy to the Azure Storage account and note the path. For simplification, we will place it in the same path as AzCopy.
- Navigate to the Azure portal by opening https://portal.azure.com.
- Select a storage account and create two containers on the storage account, one named azcopysource and the other azcopydestination. These can be any name you choose in later implementations.
- On the left menu for the storage account, click Shared access signature the Security + networking. Create a new SAS key by selecting the Container option on the Allowed resource types options list.
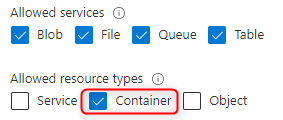
Figure 7.23 – SAS permissions
- Set the time for Start to 5 minutes from your current time and click Generate SAS and connection string. Copy the SAS token – you are only ever presented with this once.
- We will copy the filename for the file identified in step 1 and insert this name in the following script. The following script will copy the file you enter in SourceFilePath to the blob container you specified with StorageAccountName and ContainerName:
# Change all Variables Below
$SourceFilePath = "C:AzCopyfile1.txt"
$StorageAccountName = "az104chap7acc06082021"
$ContainerName = "azcopydestination"
$SASToken = "?sv=xxxxxxxxxxxxxxxxxxxxxxxxxxxxxxxxxxxxxxxxxxxxxxxx%3D"
# Run AzCopy Command
./azcopy.exe copy "$SourceFilePath" "https://$StorageAccountName.blob.core.windows.net/$($ContainerName)?$SASToken"
- The script can either be saved as a PowerShell script file (*.ps1) and called in PowerShell or you can copy and paste your edited script code into PowerShell and press Enter for it to run.
Now that you have seen AzCopy in action, you will complete the same task copying files from a source container on a storage account to a destination container on the same storage account.
Copying data between containers using AzCopy
We will now demonstrate a similar copy task to the previous section except this time, you will be copying data from a source container on a storage account to a destination container on the same storage account. Note that this technique can also be used across storage accounts as the principle is the same. Follow these steps:
- Navigate to the Azure portal by opening https://portal.azure.com.
- Select a storage account and create two containers on the storage account, one named azcopysource and the other azcopydestination. These can be any name you choose should you want to implement this again later for other environments, just remember to update these names in your copy script.
- On the left menu for the storage account, click Containers under the Data storage context, then click on the azcopysource container. Click Shared access tokens under the Settings context on the left menu. Create a new SAS key by setting Permissions to Read and List, setting time for Start to 5 minutes from your current time, and then clicking Generate SAS token and URL. Copy the SAS token – you are only ever presented with this once. Perform the same operation for the destination container. This time, set the Shared access tokens permissions to Read, Add, Create, Write, Delete, and List.
- The following script will copy the files from the source container, azcopysource to the destination container, azcopydestination. Note the extra switches (flags) used by the following script. –overwrite=ifsourcenewer performs the operation of overwriting files on the destination if the source files are newer. The --recursive flag recursively copies data from the source container and subsequent folders on any filesystem you copy from, essentially copying all the files and folders it finds:
Change all Variables Below
$StorageAccountName = "az104chap7acc06082021"
$SrcContainerName = "azcopysource"
$DestContainerName = "azcopydestination"
$SourceSASToken = "sp=rxxxxxxxxxxxxxxxxxxxxxxxxxxxxxx%3D"
$DestSASToken = "sp=rxxxxxxxxxxxxxxxxxxxxxxxxxxxxxx%3D"
# Run AzCopy Command
./azcopy.exe copy "https://$StorageAccountName.blob.core.windows.net/$($SrcContainerName)?$SourceSASToken" "https://$StorageAccountName.blob.core.windows.net/$($DestContainerName)?$DestSASToken" --overwrite=ifsourcenewer --recursive
- After running the preceding script, you will notice text such as this appear indicating that a file copy operation has been completed:
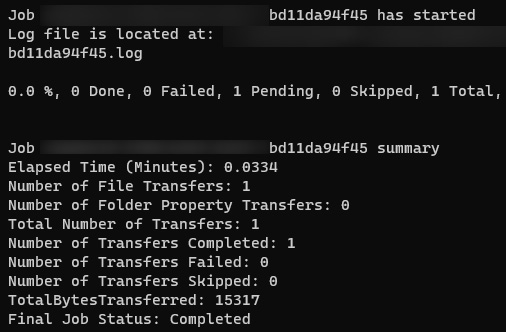
Figure 7.24 – AzCopy script run
You have just learned how to copy data between containers using AzCopy, which brings us to the end of this section, where we have learned what AzCopy is, how to download it, how it works, and also how to copy data between different containers. In the next section, we have provided additional reading material for you to learn more if desired.
Further reading
That brings an end to this section, where we have learned how to use AzCopy to copy files to Azure Storage. In the next section, we will discuss storage replication and life cycle management.
We encourage you to read up on the topic further by using the following links:
- AzCopy documentation: https://docs.microsoft.com/en-us/azure/storage/common/storage-use-azcopy-v10
- Authorizing to AzCopy using Azure AD: https://docs.microsoft.com/en-us/azure/storage/common/storage-use-azcopy-authorize-azure-active-directory
Configuring storage replication and life cycle
In the following section, we will explore the various storage replication and life cycle management features available to us in Azure. First, we will describe some key services and configurations you should be aware of.
Storage replication and management services
The following section will explore the various storage replication services available for Azure Storage.
Azure File Sync service
Azure File Sync is a service that can synchronize the data from on-premises file shares with Azure Files. This way, you can keep the flexibility, compatibility, and performance of an on-premises file server, but also store a copy of all the data on the file share in Azure. You can use any protocol that's available on Windows Server to access your data locally, including Server Message Block (SMB), Network File System (NFS), and File Transfer Protocol over TLS (FTPS).
Blob object replication
Blob object replication provides the capability within Azure to replicate blob objects based on replication rules. The copy will run asynchronously between source and destination containers across two different storage accounts. Several rules can be configured for your desired outcome. Note that for replication to be enabled, blob versioning needs to be enabled.
Blob life cycle management
This is a capability available for GPv2 storage accounts, blob storage accounts, and Azure Data Lake Storage. It allows the management of the blob life cycle through rule-based policies. Data can be automatically transitioned between tiers using this functionality, as well as expired. The following actions can be applied to blobs based on the requirements, automated data tiering, blob snapshots, blob versioning, and blob deletion. Multiple rules can be created and can also be applied to a subset of blobs and containers through filters such as name prefixes. Pricing for blob life cycle management is based upon tier operational charges, as discussed in the previous chapter, but the service itself is free, and the delete operations are also free. It should be noted that this is a great feature to assist in the optimization of your overall storage account costs by automatically transitioning between tiers.
Blob data protection
Blob data protection is a mechanism that assists with the recovery of data in the event of data deletion or being overwritten. The implementation of data protection is a proactive stance to securing data before an incident occurs. Azure Storage provides the capability of protecting data from being deleted or modified, as well as the restoration of data that has been deleted or modified. Soft delete for containers or blobs enables the preceding capability to restore data based on the period chosen to retain deleted data, where the default configuration is 7 days. When you restore a container, the blobs, as well as the versions and snapshots, are restored.
Blob versioning
Blob versioning enables a blob to maintain several versions of the object, which can be used for restoring blob data as the version captures the current state of the blob upon being created or modified. This operation is run automatically when blob versioning is enabled.
Immutable storage
Immutable storage, often referred to as Write Once, Read Many (WORM), can be configured on blob storage. This is often used to protect data from accidental deletion or overwrites. Many times, there are legal requirements to manage data in this manner. It is always advised to understand your organization's governance requirements regarding data to ensure you comply with the governance standards required and in place.
Immutable storage can be configured with two types of policies:
- Time-based retention policies: Data objects are managed against a time policy, for the duration that the active policy data follows WORM, but after the expiration of this, data may be deleted but not overwritten.
- Legal hold policies: Data is held in WORM state until the legal hold policy is explicitly cleared. This is often for litigation requirements.
Top Tip
Container soft delete can only restore the entire container with all the contents, not individual blobs. To achieve blob-level recovery capability, soft delete for blobs should be enabled.
Storage account deletion
There are circumstances where you may delete a storage account and identify that you need to recover the data. There are instances where the storage account can be recovered provided the account was deleted in less than 14 days. The following requirements would also need to be adhered to:
- The storage account was created using the ARM model.
- A storage account with the same name was not provisioned since the deletion of the storage account in question.
- The user performing the recovery has the appropriate permissions.
You can read more about this here: https://docs.microsoft.com/en-us/azure/storage/common/storage-account-recover.
Next, we will look at the creation and configuration of the Azure File Sync service.
Creating and configuring the Azure File Sync service
In the next demonstration, we are going to configure Azure File Sync. You will need the following to be in place to follow this demonstration:
- Windows Server: You may use Windows Server 2012 R2, 2016, or 2019. Make sure that you enable Remote Desktop (RDP) on the server.
- A storage account: This storage account needs to be created in one of the supported regions for Azure File Sync. You can refer to the following website for the available regions: https://azure.microsoft.com/en-gb/global-infrastructure/services/?products=storage.
- An Azure file share: This must be provisioned in the preceding storage account.
Top Tip
Opening the RDP port for a VM during creation is covered later in the book. This can be configured on VM creation in Azure.
Once the preceding resources are created, we can start with the creation of the Azure File Sync service in Azure and the installation of Azure File Sync on the Windows Server.
First, we will create the Azure File Sync service in Azure. Therefore, take the following steps:
- Navigate to the Azure portal by opening https://portal.azure.com.
- In the left menu, click + Create a resource, and in the search box, type Azure File Sync. Click Azure File Sync in the search results. On the following screen, click Create.
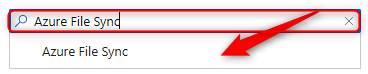
Figure 7.25 – Searching Azure File Sync
- Choose a Storage Sync Service name and the resource group that has the storage account you have deployed for this, and then select the same region as the storage account. After entering the values, click Review + Create. Click Create.
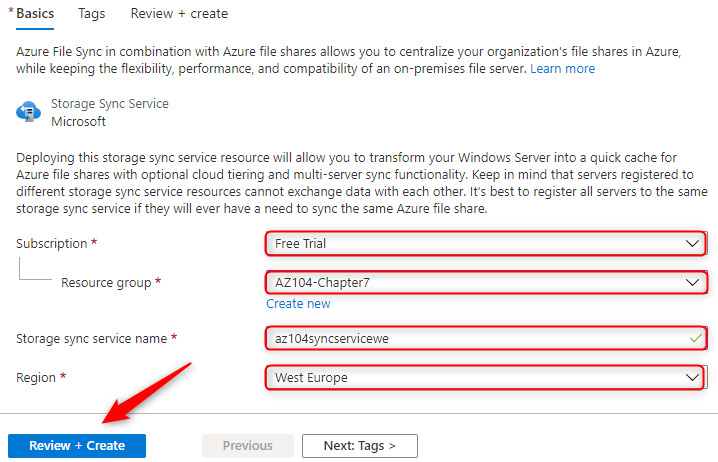
Figure 7.26 – Deploying Azure File Sync
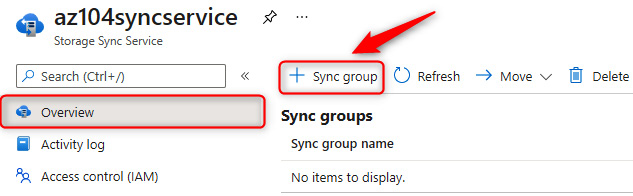
Figure 7.27 – Creating an Azure File Sync group
- Enter a sync group name, choose a subscription, select your storage account, and choose the Azure file share you created at the beginning of this section. Click Create.
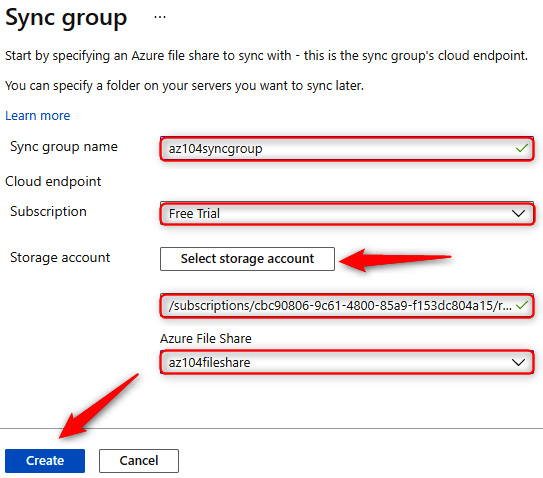
Figure 7.28 – Deploying an Azure file sync group
- RDP to Windows Server and log in. You should first disable Internet Explorer Enhanced Security Configuration. Open Server Manager, select Local Server, disable it for administrators, then click OK.
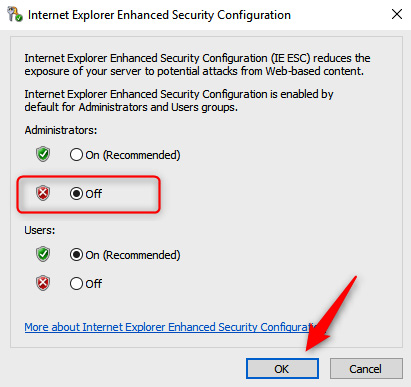
Figure 7.29 – Disabling Enhanced Security Configuration
- Download the Azure File Sync agent from the following website and select the appropriate downloader: https://www.microsoft.com/en-us/download/details.aspx?id=57159.
- Install the agent on the server. Keep the default path to install the agent. On the next screen, enable Use the existing proxy settings configured on the server.
- Click Next.
- Select Use Microsoft Update and click Next. On the following screen, click Install.
- The ServerRegistration tool will start to run. This is where we can register the server. You need to sign in by clicking the Sign in button (leave the Azure environment as AzureCloud).
- Choose the Azure subscription, resource group, and Storage Sync Service, then click Register.
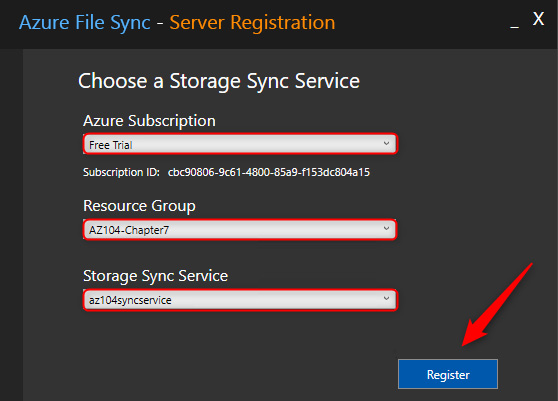
Figure 7.30 – Azure File Sync – Registering
- After the registration is successful, there is a trust relationship established between the on-premises server and the Storage Sync Service in Azure. Click OK.
- Now, you need to go back to the Azure portal. Go to the Storage Sync Service again and select the sync group that you created earlier. In the sync group settings blade, select Add server endpoint in the top menu.

Figure 7.31 – Azure File Sync – Adding a server endpoint
- Select the registered server and provide the path: D:Data. Keep Cloud Tiering as Disabled and leave Initial Sync configured as the merge option, with the Initial download configuration set to Download the namespace first. Click Create.
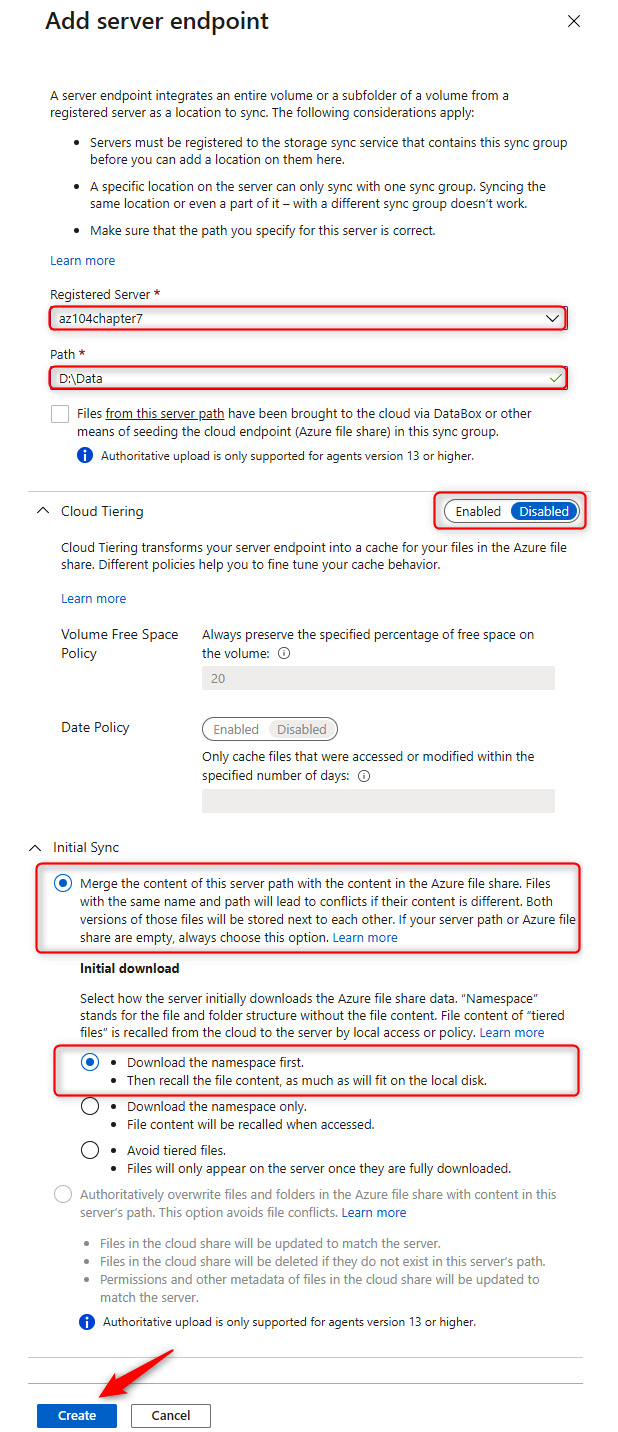
Figure 7.32 – Azure File Sync – Adding a server endpoint
- If you now go back to the VM where we installed the sync agent and open the D: drive, you will see that there is a folder added called Data. You can copy files to it, as shown in the following screenshot:
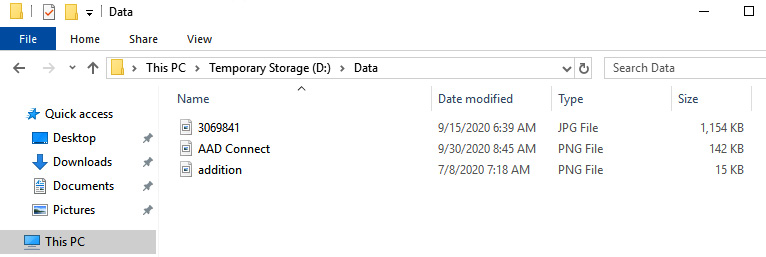
Figure 7.33 – Azure File Sync – Images stored in the Data folder
- When you switch back to the file share in Azure, you will see that all the files are synced to the storage account in Azure, as shown in the following screenshot:
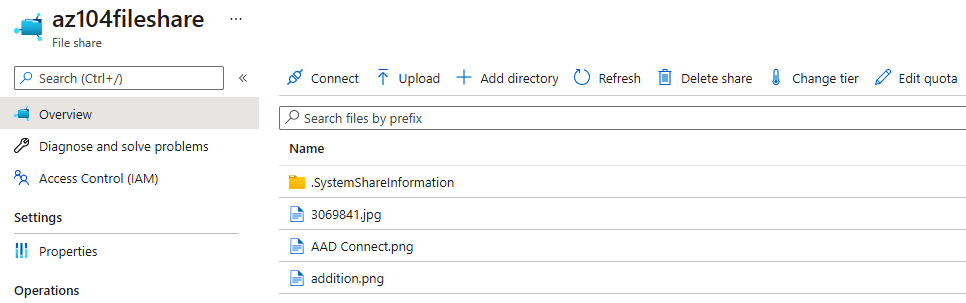
Figure 7.34 – Azure File Sync – Synced files in Azure file storage
This concludes the section about Azure file storage and the Azure File Sync service. In the next section, we are going to look at Azure Storage replication.
Implement Azure Storage replication
In the previous chapter, we uncovered the different replication options available to us in Azure, including Locally-redundant storage (LRS), Zone-redundant storage (ZRS), Geo-redundant storage (GRS), and Geo-zone-redundant storage (GZRS). In this section, we will explore changing the replication chosen for a deployed storage account. Follow the given steps to implement Azure storage replication:
- Navigate to the Azure portal by opening https://portal.azure.com.
- Select a storage account to configure.
- On the Storage account blade, navigate to the left menu, then under Settings, click on Configuration. Note the various options available.
- Click on the Replication drop-down menu, then select the appropriate option and click Save.
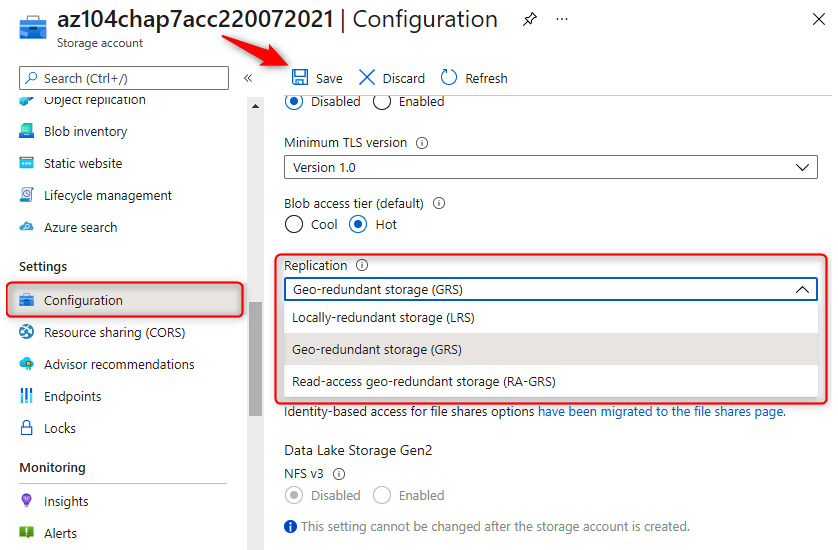
Figure 7.35 – Storage account replication configuration
You have now completed the configuration of the replication type for a storage account.
Top Tip
For enhanced security, it is advised that the Secure transfer required and Allow Blob public access options in the Configuration blade for a storage account are configured to Enabled.
Configuring blob object replication
In the following demonstration, you will learn how to configure blob object replication. To follow along, you will require two storage accounts:
- Navigate to the Azure portal by opening https://portal.azure.com.
- Go to a storage account, then on the left menu, under Data management, click Object replication. Click + Set up replication rules on the top menu.
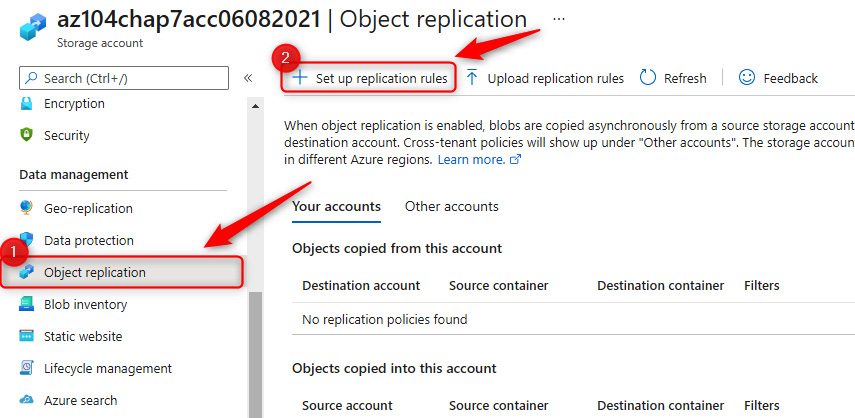
Figure 7.36 – Storage account – Object replication
- Select the destination storage account, then choose a source and destination container in the lower section.
- Click add under Filters, then on the following screen that pops up, enter Azure for Prefix match and click Save. This will be used to filter all items, such as folders and blobs, that match the entered prefix entered.

Figure 7.37 – Object replication – Filters
- Under the Copy over context, click change. On the subsequent screen, select Everything. Click Save.

Figure 7.38 – Object replication – Copy over rules
- Click Save and apply.
- Navigate to your source container. Upload some items that you name starting with Azure. You can even make some files up, such as a text file.
- Wait 5 minutes then navigate to your destination container and notice that the files copied across are now in your destination container too, matching the implemented rule(s).
You have now completed the configuration of blob object replication and have seen it in action. In the next section, we will explore blob life cycle management.
Top Tip
While it may be tempting to see object replication as a backup mechanism, this is not something to rely on the same as a backup service, there is a difference in SLAs for instance and errors will be replicated too. Also remember that data is copied asynchronously, meaning there is a delay in the destination copy.
Configuring blob life cycle management
The following exercise will demonstrate the configuration of blob life cycle management:
- Navigate to the Azure portal by opening https://portal.azure.com.
- Go to a storage account and create a container named demo.
- On the left menu, under Data management, click Lifecycle Management. Click + Add a rule on the top menu.
- Enter CoolToHotTiering as the rule name, and change Rule scope to Limit blobs with filters. You can leave Blob type as Block blobs and Blob subtype as Base blobs. Click Next.
- You will note that the Base blobs tab will present a conditional statement (if..then) for the blobs. Based on a time interval, an automated action can be performed. For the More than (days ago) field, enter 1. For the Then field, change the drop-down option to Move to cool storage. Note that to apply multiple actions for a rule, you can click + Add conditions. Please click this now. The condition you have just configured basically applies as follows: for blobs that are more than 1 day old, automatically move them to cool storage.
- For the next conditional block, enter 1 in the More than (days ago) field, and select Delete the blob for the Then dropdown. Click Next. Click Next again. The condition you have just configured basically applies as follows: for blobs that are more than 1 day old, you then automatically delete the blob. The way it will work is that blobs more than 1 day old in the preceding step move to cold storage, and blobs that are a further 1 day old in cold storage are deleted.
- The Filter set tab allows you to define a blob prefix for filtering a subset of blobs. In the Blob prefix field, enter demo/pic. Click Add.
You have now created your first life cycle management rule. Next, we will explore how to implement a life cycle management policy using JSON code.
Life cycle management policy deployed as code
At times, it may be desired to implement your policy as code, especially where the reuse of policies is applicable. This approach drives better consistency and reduces the likelihood of errors:
- Navigate to the Azure portal by opening https://portal.azure.com.
- Go to a storage account and create a container named demo.
- On the left menu, under Data management, click Lifecycle Management. Click Code View.
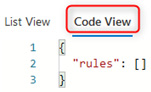
Figure 7.39 – Code View
- Modify the following JSON code to suit your deployment. The current file code reads as move any blob to cool tier if the period since the last modification is greater than 1 day. It will match this to the files container:
{"rules": [
{"enabled": true,
"name": "move-to-cool",
"type": "Lifecycle",
"definition": {"actions": {"baseBlob": {"tierToCool": {"daysAfterModificationGreaterThan": 1
}
}
},
"filters": {"blobTypes": [
"blockBlob"
],
"prefixMatch": [
"files/log"
]
}
}
}
]
}
- Copy the modified code in the preceding code block into the Code View section on the Azure portal and click Save.
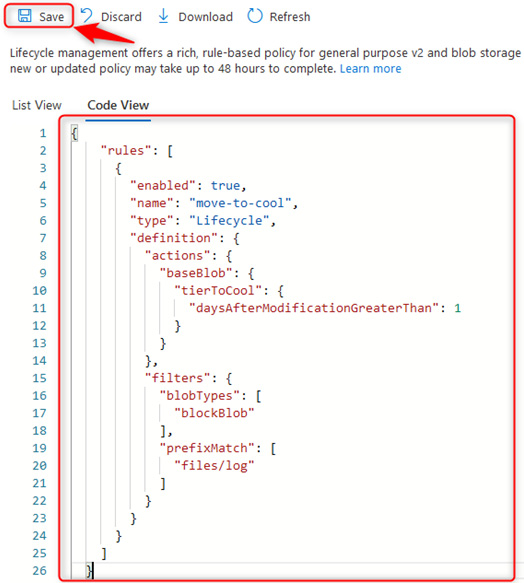
Figure 7.40 – Blob life cycle management – Code View
You know how to configure the life cycle management policy using JSON code. In the next section, we will explore the ability to disable and delete the rule.
Deleting a life cycle management rule
You may want to delete a life cycle management rule. The following steps will guide you through the process of doing so:
- Open a storage account with a life cycle management rule configured and click the Lifecycle management button on the storage menu.
- Hover over the rule you would like to modify and note a checkbox appears to the left of it. Click this.

Figure 7.41 – Selecting a rule
- Note the top menu bar now provides the option to disable or delete the rule. Disabling will stop the rule from applying until enabled again and deleting will remove the rule permanently. Click Delete.
Figure 7.42 – Deleting a rule
That brings us to the end of the blob life cycle management section. In the next section, we will explore blob data protection.
Top Tip
Automated data tiering moves blobs to cooler tiers or deletes them. Associated actions within a single rule must follow a transitive implementation from hotter tiers to cooler tiers.
Configuring blob data protection
In the following exercise, you will explore configuring soft delete options as part of the data protection options available to you:
- Navigate to the Azure portal by opening https://portal.azure.com.
- Go to a storage account. On the left menu, under the Data management context, click Data protection. Select the options under the Recovery context for Enable soft delete for blobs and Enable soft delete for containers. Set both periods to 7 days and click Save.
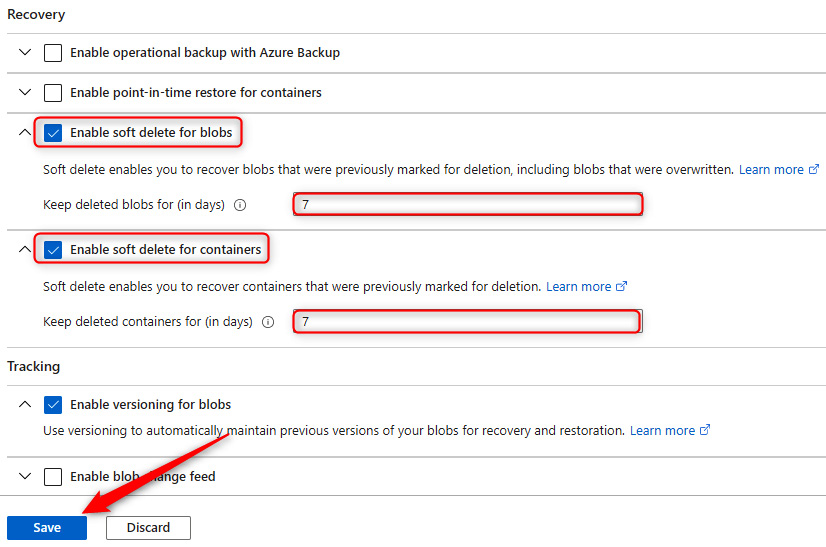
Figure 7.43 – Blob data protection
- You will receive a success notification indicating that the setting has taken effect.
Figure 7.44 – Success notification
You now know how to configure blob data protection settings on your storage accounts. In the next section, we have provided additional reading material for the configuration of storage replication and life cycle management.
Further reading
That brings an end to this section. We have learned about storage replication and life cycle management.
We encourage you to read up on the topic further by using the following links:
- Azure File Sync services: https://docs.microsoft.com/en-us/azure/storage/file-sync/file-sync-introduction
- Configuring object replication: https://docs.microsoft.com/en-gb/azure/storage/blobs/object-replication-configure?tabs=portal
- Blob versioning: https://docs.microsoft.com/en-gb/azure/storage/blobs/versioning-overview
- Blob life cycle management: https://docs.microsoft.com/en-us/azure/storage/blobs/storage-lifecycle-management-concepts?tabs=azure-portal
- Blob data protection overview: https://docs.microsoft.com/en-us/azure/storage/blobs/data-protection-overview
Summary
In this chapter, we covered how to manage the security of storage within Azure by integrating storage with VNets, using private endpoints, working with SAS tokens, and configuring access and authentication. You also learned how to configure storage replication and blob life cycle management. You now have the skills to secure and manage Azure Storage.
In the next chapter, we will work through some labs to enhance your new skills for storage management and work through practical applications of storage.