
Chapter 14: Implementing and Managing Virtual Networking
This chapter is the start of the exam objective called configure and manage virtual networking, which has an exam weighting of 20–30% of the overall exam.
In this chapter, we are going to look at implementing and managing virtual networking. This includes how to create and configure virtual networks, peer networks with each other, configure private and public IP addresses, create user-defined network routes, implement subnets, create endpoints on subnets, configure private endpoints, and finally, configure Azure DNS, including custom DNS settings and private or public DNS zones. This chapter is very important, as networking is often referred to as the cornerstone of Infrastructure as a Service (IaaS).
In brief, the following topics will be covered in this chapter:
- Creating and configuring virtual networks, including peering
- Configure private and public IP addresses
- Configure user-defined network routes
- Implement subnets
- Configure endpoints on subnets
- Configure private endpoints
- Configure Azure DNS, including custom DNS settings and private or public DNS zones
Technical requirements
To follow along with the hands-on lessons, you will need access to an Azure Active Directory as a global administrator. If you do not have access to one, students can enroll for a free account at https://azure.microsoft.com/en-in/free/.
An Azure subscription is also required; you can either register with your own credit card or enroll for the free $200 once-off credit if you use the following link: https://azure.microsoft.com/en-us/free/.
PowerShell will be used for some of the lab sections. For more details on how to configure PowerShell, visit https://docs.microsoft.com/en-us/powershell/azure/install-az-ps?view=azps-1.8.0.
Creating and configuring virtual networks, including peering
In this section, we are going to look at how to create and configure Virtual Networks (VNets) and peering. Let's start with an overview of VNets and IP addressing and how it works within Azure.
A VNet overview
Before we dive into how to configure VNets, let's take a moment to understand what VNets are and what their purpose is. A VNet in Azure is a representation of your network in the cloud that is used to connect resources such as virtual machines and other services to each other.
Unlike traditional networks, which make use of physical cables, switches, and routers to connect resources, VNets are completely software-based. VNets have isolated IP ranges, and resources placed inside a VNet do not talk to the resources in other VNets by default. To allow resources in two different VNets to talk to each other, you would need to connect the VNets using VNet peering.
Important Note
All resources deployed to a VNet must reside in the same region.
An IP addressing overview
Azure supports both private and public IP addresses. Private IP addresses are assigned within the VNet in order to communicate with other resources within it and cannot be accessed via the internet by design. Public IP addresses are internet-facing by design and can be assigned to a virtual machine (VM) or other resources, such as VPN gateways.
Both private and public IP addresses can be configured to be dynamic or static. Dynamic IP addresses change when the host or resource is restarted, whereas static IP addresses do not change even if the resources are restarted.
Dynamic IP addresses are automatically assigned by Azure based on the subnet range. When a VM is deallocated (stopped), the dynamic IP address goes back into the pool of IP addresses that can be assigned to other resources again. By default, private IP addresses are dynamic but can be changed to static via the Azure portal when needed.
Static public IP addresses are random public IP addresses that do not change after being assigned to a resource. Unlike a dynamic IP address that changes when a resource is restarted, the static IP address is persisted. Public IPs are usually assigned to internet-facing resources such as VPN gateways and, in some instances, VMs.
Now that we have covered the basic networking components, let's go ahead and configure a VNet via PowerShell:
- First, we need to connect to our Azure tenant by using the following PowerShell command:
Connect-AzAccount
The output appears as shown in the following screenshot:

Figure 14.1 – Connecting to the Azure tenant via PowerShell
- If you have multiple Azure subscriptions, you can use the following PowerShell command to select a specific subscription:
Select-AzSubscription -SubscriptionId "your-subscription-id"
- Now that we have selected our Azure tenant and subscription, let's go ahead and create a new Resource Group (RG):
New-AzResourceGroup -Name VNet_Demo_ResourceGroup -Location WestEurope
The following screenshot shows the output of the command:

Figure 14.2 – A new RG is created
- Next, let's create the VNet:
$vnet = @{Name = 'DemoVNet'
ResourceGroupName = 'VNet_Demo_ResourceGroup'
Location = 'WestEurope'
AddressPrefix = '10.0.0.0/16'
}
$virtualNetwork = New-AzVirtualNetwork @vnet
The following screenshot shows the output of the command:

Figure 14.3 – A new VNet is created
- Next, we need to configure a subnet range within the VNet:
$subnet = @{Name = 'Demo_Subnet'
VirtualNetwork = $virtualNetwork
AddressPrefix = '10.0.0.0/24'
}
$subnetConfig = Add-AzVirtualNetworkSubnetConfig @subnet
- Lastly, we need to associate the newly created subnet to the VNet with the help of the following command:
$virtualNetwork | Set-AzVirtualNetwork
- Verify in the Azure portal that the new VNet and subnet have been created:
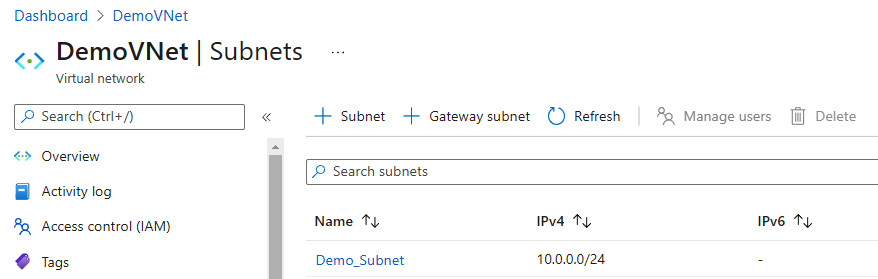
Figure 14.4 – The VNet and subnet showing in the Azure portal
Hint
If you are getting an error stating that scripts are disabled on your system, you can use the following PowerShell command to resolve it: set-executionpolicy unrestricted –Scope CurrentUser.
One of the exam objectives for this chapter is to gain the ability to configure VNet peering. VNet peering is when two or more VNets are linked with each other so that traffic can be sent from one network to another. There are two types of VNet peering:
- VNet peering: Connects VNets with the same region. There is also a cost associated with inbound and outbound data transfers for VNet peering.
- Global VNet peering: Connects VNets across different regions. This is more costly than VNet peering within the same region.
When using the Azure portal to configure VNet peering, there are a few settings that you should be aware of:
- Traffic to a remote VNet: Allows communication between two VNets, as this allows the remote VNet address space to be included as a part of the virtual-network tags.
- Traffic forwarded from a remote VNet: Allows traffic forwarded by a VNet appliance in a VNet that did not originate from the original VNet to flow via VNet peering to the other VNet.
- Virtual network gateway or Route Server: This is relevant when a VNet gateway is deployed to the VNet and needs traffic from the peered VNet to flow through the gateway.
- Virtual network deployment model: Select which deployment model you want with the peered VNet. This will either be classic or the standard resource manager method.
Let's go ahead and configure VNet peering. To do this, we need to create another VNet first using these steps:
- In PowerShell, use the following command:
Connect-AzAccount
- Next, the following command will create another VNet, which will include a subnet that links to the VNet in the same RG that we created earlier in this chapter:
$vnet = @{Name = 'DemoVNet_2'
ResourceGroupName = 'VNet_Demo_ResourceGroup'
Location = 'WestEurope'
AddressPrefix = '192.168.0.0/24'
}
$virtualNetwork = New-AzVirtualNetwork @vnet
$subnet = @{Name = 'Main_Subnet'
VirtualNetwork = $virtualNetwork
AddressPrefix = '192.168.0.0/24'
}
$subnetConfig = Add-AzVirtualNetworkSubnetConfig @subnet
$virtualNetwork | Set-AzVirtualNetwork
- Sign in to the Azure portal by visiting https://portal.azure.com and navigating to the RG:

Figure 14.5 – Both VNets showing in the Azure portal

Figure 14.6 – Configuring VNet peering
- Next, configure the peering link name, as shown in Figure 14.7, and set the following fields as Allow (default):
- Traffic to remove virtual network
- Traffic forwarded from remote virtual network
- Virtual network gateway or Route Server:

Figure 14.7 – Configuring VNet peering for DemoVNet
- Next, give the remote peering link a name of VNet_Peering, select the VNet, and configure the following fields as Allow (default):
- Traffic to remove virtual network
- Traffic forwarded from remote virtual network
- Virtual network gateway or Route Server
Next, click on Add:

Figure 14.8 – Configuring VNet peering for DemoVNet_2
- Give the peering status a few minutes to enforce the peering. The final peering status will be Connected:

Figure 14.9 – Successfully configured peering between VNets
In this section, we had a look at how virtual networking works in Azure as well as how to create a VNet and subnet via PowerShell. We also had a look at how to configure VNet peering between two VNets.
We encourage you to read up on Azure virtual networking and VNet peering further by using the following links:
- https://docs.microsoft.com/en-us/azure/virtual-network/quick-create-powershell
- https://docs.microsoft.com/en-us/azure/virtual-network/manage-virtual-network
- https://docs.microsoft.com/en-us/azure/virtual-network/virtual-network-peering-overview
Create private and public IP addresses
In the previous section, we had a brief look at IP addressing, such as public and private IP addressing and also static and dynamic IP addresses. This section focuses on how to configure private and public IP addresses.
Let's first look at how to configure a private IP address for a VM from dynamic to static via the Azure portal. In order to do this, we are going to reference a VM we created earlier in this book:
- Navigate to the Azure portal by opening a web browser and navigating to https://portal.azure.com.
- In the left menu, select Resource groups and choose an RG with a VM. In this case, we're going to select the Az-104 RG:
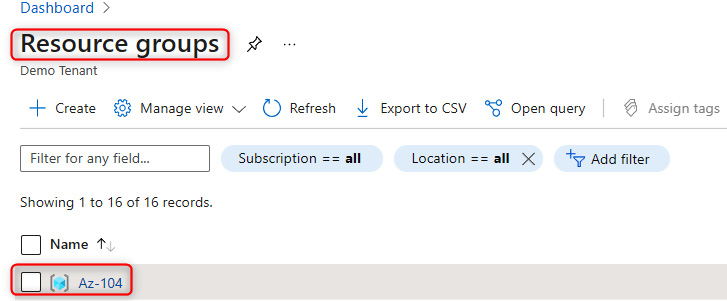
Figure 14.10 – Selecting a previously deployed RG that has a VM

Figure 14.11 – Selecting a previously deployed VM
- Under the Settings tab, select Networking and click on the Network Interface Card (NIC) associated with the VM:

Figure 14.12 – Select the NIC for the VM

Figure 14.13 – Select the private IP address associated with the VM
- Finally, under Assignment, select Static instead of Dynamic, and click Save:

Figure 14.14 – Select Static and save the configuration
That is how we configure private IP addresses to be static instead of dynamic.
Next, we are going to look at how to create a public IP address via PowerShell:
- In PowerShell, use the following command to connect to our Azure tenant:
Connect-AzAccount
The following screenshot shows the output of the command:

Figure 14.15 – Authenticating to the Azure tenant via PowerShell
- Next, the following code will create a new static public IP address in the West Europe region as a standard SKU:
$ip = @{Name = 'myStandardPublicIP'
ResourceGroupName = 'VNet_Demo_ResourceGroup'
Location = 'WestEurope'
Sku = 'Standard'
AllocationMethod = 'Static'
IpAddressVersion = 'IPv4'
Zone = 1,2,3
}
New-AzPublicIpAddress @ip
The following screenshot shows the output of the command:
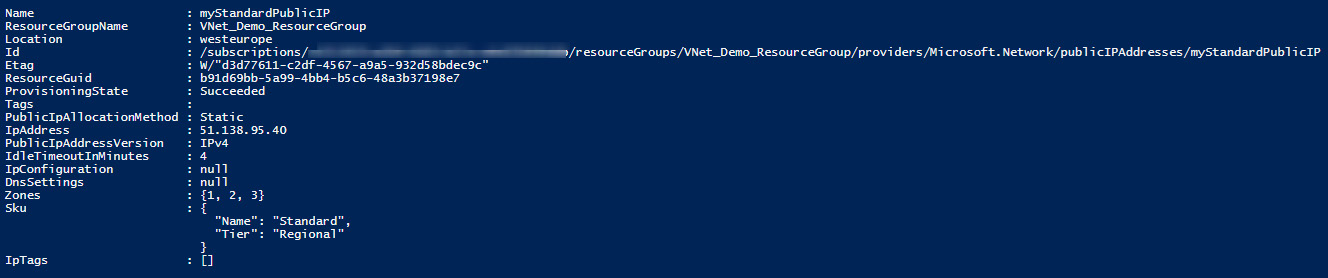
Figure 14.16 – Creating a new public IP address via PowerShell code
- Finally, verify that the public IP address has been created in the Azure portal:

Figure 14.17 – Verifying the new public IP address in the Azure portal
It is that simple to create a public IP address via PowerShell. Once the IP address has been created, it is now ready to be assigned to a resource such as a VM or other types of resources that support pre-created public IP addresses.
Next, we are going to look at user-defined routing.
User-defined routing
By default, Azure automatically creates system routes and assigns them to the different subnets within a VNet. These routes can't be removed but can be overridden by custom routes known as User-Defined Routes (UDRs). These routes have a next hop setting that points to the next interface from a routing perspective so that traffic can be sent to the correct destination.
There are three main next hop types for system routes:
- VNet: This routes traffic between address ranges within the address space of a VNet.
- Internet: This routes traffic specified by the address prefix to the internet; the default route is 0.0.0.0/0, which means anything by default is routed to the internet.
- None: Traffic routed to a next hop type as none is dropped.
UDRs create a route table if you want to create custom routes. When working with UDRs, it is important to note that they support the preceding routing types as well as the following:
- VNet gateway: This is used to route traffic to a VNet gateway.
- Virtual appliance: A virtual appliance is a VM that usually acts as a firewall.
Let's go ahead and create a UDR via the Azure portal to forward all traffic to a VNet gateway:
- Navigate to the Azure portal by opening a web browser and navigating to https://portal.azure.com.
- Select Create a resource. Search for Route table and click on Create:
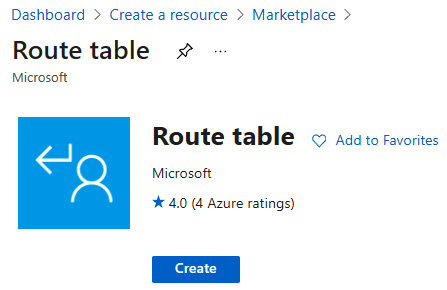
Figure 14.18 – Creating a new route table via the Azure portal
- Next, select the subscription and RG that the route table needs to be deployed to. Enter the region and name and set Propagate gateway routes to Yes:

Figure 14.19 – The route table creation configuration settings
- Now that the route table has been created, you can select it, and under Settings, select Routes, and then click on Add:

Figure 14.20 – Adding a new route on the newly created route table
- Next, enter the route name as VPN-Traffic and the address prefix as 0.0.0.0/0 (which indicates all traffic), set Next hop type to Virtual network gateway, and click OK:

Figure 14.21 – The new route configuration settings
- Finally, we'll have to verify whether the route is showing up under Routes:

Figure 14.22 – The newly configured route successfully created
We encourage students to read up further on Azure user-defined routing (UDRs) by visiting the following link: https://docs.microsoft.com/en-us/azure/virtual-network/virtual-networks-udr-overview.
In this section, we created a route table with a custom route to route all traffic via the VPN gateway. Next, we are going to look at implementing subnets.
Implementing subnets
Inside a VNet, subnets allow you to segment your IP address ranges in which to place your resources. Resources in a single subnet get an IP address from the subnet IP address range. Resources in subnets within the same VNet can talk to each other. A VNet can have one or more subnets. Traffic can be filtered between subnets either via Network Security Groups (NSGs) or UDRs. It is also important to know that Azure reserves five IP addresses within each subnet that cannot be used. The reason for this is that these IPs are reserved for the network address, the Azure default gateway, Azure DNS, and the network broadcast address. An example of this would be the following:
Let's say there is a 10.1.1.0/24 subnet; the following addresses are reserved:
- 10.1.1.0: This is reserved for the network address.
- 10.1.1.1: This is reserved for the default gateway.
- 10.1.1.2 and 10.1.1.3: These are reserved by Azure to map DNS IPs to the VNet space.
- 10.1.1.255: This is reserved for broadcast traffic.
Important Note
Subnets can be added, removed, or modified.
Subnets within a VNet can be managed via the following methods:
- The Azure portal: This is done by signing into the Azure portal.
- PowerShell: This is done by authenticating to your Azure tenant and making changes via the Command-Line Interface (CLI).
- The Azure CLI: This is done by authenticating to your Azure tenant and making changes via the CLI.
- A REST API: This is done by authenticating to your Azure tenant and using the PUT command.
Important Note
Subnets' address spaces cannot overlap one another.
Let's go ahead and add a subnet to an existing VNet via the Azure portal using the following steps:
- Navigate to the Azure portal by opening a web browser and navigating to https://portal.azure.com.
- Browse to an RG that has a VNet. In our instance, this is the VNet_Demo_ResourceGroup. Select DemoVNet and then Subnets under the Settings blade:

Figure 14.23 – The subnet selection section for a VNet
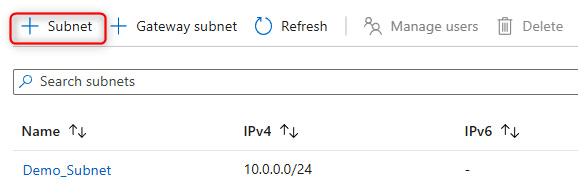
Figure 14.24 – Adding a subnet
- Provide a name in the Name field and choose a subnet address range that is available based on the VNet range. Set the following fields to None:
- NAT gateway
- Network security group
- Route table
- SUBNET DELEGATION
Important Note
In the real world, the preceding changes may be configured instead of being set to None, depending on the requirements.
Set the Services fields to 0 selected, and click on Save:

Figure 14.25 – Configuring the new subnet
- The new subnet will show up under the Subnets section once created:

Figure 14.26 – A new subnet created successfully
In this short section, we had a look at subnetting in Azure and learned how to create additional subnets via the Azure portal. In the next section, we are going to look at configuring endpoints on subnets.
Configuring endpoints on subnets
Endpoints, also referred to as service endpoints, allow secure and direct connectivity to Azure services over the Azure backbone network. Endpoints allow you to secure the traffic between your VNets, including subnets, and critical Azure resources such as Key Vault and SQL databases. Service endpoints allow private IP addresses in a VNet to be routed over the Azure backbone without requiring a dedicated public IP address.
Service endpoints are only supported on a limited number of Azure services.
Here are some of the key benefits of using service endpoints:
- Improved security for Azure service resources: Routing of traffic to Azure services to and from the VNet. Subnets are routed through the Azure network without the need to make use of dedicated public IP addresses.
- Optimal routing for Azure service traffic from your VNet: Optimized routing and keeps traffic on the Azure backbone network, allowing you to still audit and monitor outbound internet-facing traffic.
- Ease of configuration and management: Less work is required as there are no more public IP addresses required to manage via the firewall and also no Network Address Translation (NAT) or gateway devices to configure and manage.
Let's go ahead and configure a SQL service endpoint on a subnet via the Azure portal using the following steps:
- Navigate to the Azure portal by opening a web browser and entering the following URL: https://portal.azure.com.
- Browse to an RG that has a VNet and Azure SQL deployed. In our case, this will be AZ-104SQL. Select the VNet, which in our case will be VNet_Demo_SQL, and then select Subnets in the Settings blade. Next, choose a subnet:

Figure 14.27 – Selecting a subnet to configure service endpoints
- Next, under SERVICE ENDPOINTS, click on the drop-down menu for Services, and select Microsoft.Sql. Next, click on Save:

Figure 14.28 – Selecting the SQL service under SERVICE ENDPOINTS
- Next, navigate to the SQL server instance, and under Security, select Firewalls and virtual networks:

Figure 14.29 – Selecting the SQL firewall and VNet option
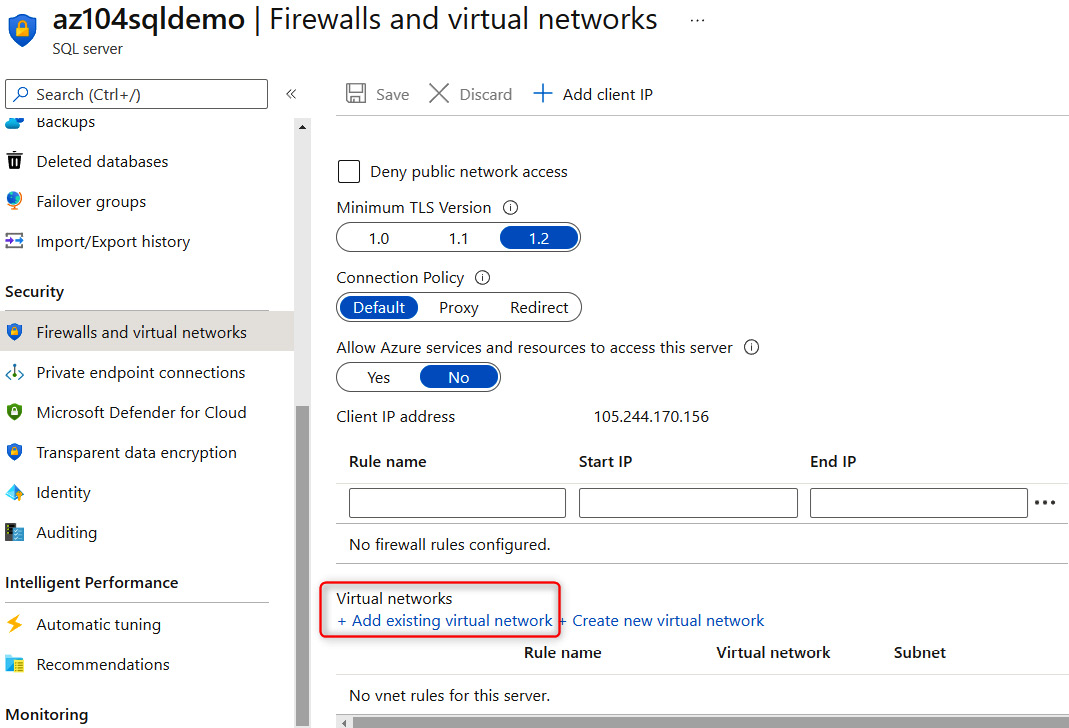
Figure 14.30 – Adding an existing VNet to the SQL instance
Following are the settings to create the network rule:
- Name: SQLTrafficRule
- Subscription: Demo (choose your own subscription here)
- Virtual network: VNet_Demo_SQL
- Subnet name / Address prefix: SQL / 10.50.0.0/24

Figure 14.31 – Configuring the traffic rule for the service endpoint
In this section, we had a look at what service endpoints are and learned how to configure them for an SQL service with a specific subnet.
We encourage you to read up on Azure service endpoints further by visiting the following link: https://docs.microsoft.com/en-us/azure/virtual-network/virtual-network-service-endpoints-overview.
Configuring private endpoints
Azure Private Link enables you to access Platform as a Service (PaaS) services such as Azure Storage and SQL databases, and Azure-hosted services over a private endpoint in your own VNet.
Much like service endpoints, private endpoints allow traffic between a VNet and a service to travel through the Microsoft backbone network. This way, exposing your service over the internet is no longer required.
A key difference between service endpoints and private endpoints is that service endpoints connect to Azure/Microsoft services over their backbone while the PaaS resources are still outside of the VNet and, thus, need to be routed as such, whereas private endpoints bring the resources directly into your VNet. It is important to understand that private endpoints keep all the traffic within your VNet:
- Let's go ahead and configure a Key Vault private endpoint via the Azure portal using the following steps:
- Navigate to the Azure portal by opening a web browser and visiting the following URL: https://portal.azure.com.
- Under Create a resource, search for private link and click on Create.
- Next, click on Create private endpoint:

Figure 14.32 – Creating a private endpoint

Figure 14.33 – Page one of creating a private endpoint
- Next, we choose a subscription from the drop-down list, select Resource type as Microsoft.KeyVault/vaults, and choose the name for the existing resource, and the target sub-resource:

Figure 14.34 – Page two of creating a private endpoint
- Next, select the VNet that you want the Key Vault service to be added to, as well as the Subnet name. Set Private DNS integration to No:
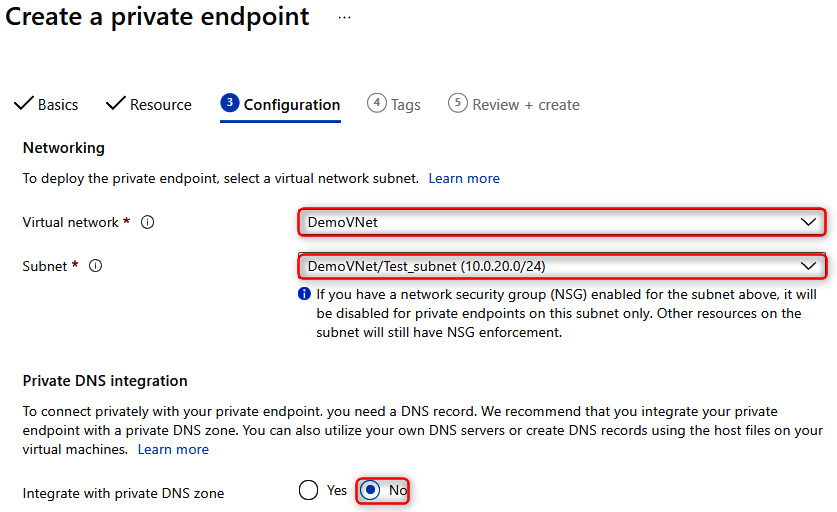
Figure 14.35 – Page three of creating a private endpoint
- Next, it is optional to provide a name and value as a resource tag. In our case, we're going to skip this for now.
- On the Review and create tab, click Create.
- Finally, once the private endpoint has been created successfully, you can verify it by navigating to the resource and confirming that Connection status is Approved:

Figure 14.36 – Verifying that the private endpoint has been created successfully
In this section, we had a look at what private endpoints are and how they differ from service endpoints, and learned how to configure private endpoints for an existing key vault and VNet.
We encourage you to read up further on Azure private endpoints by visiting the following links:
- https://docs.microsoft.com/en-us/azure/private-link/private-link-overview
- https://docs.microsoft.com/en-us/azure/private-link/create-private-endpoint-portal
- https://docs.microsoft.com/en-us/azure/private-link/private-endpoint-dns
Configuring Azure DNS
Azure DNS is a hosting service for DNS domains where the name resolution is done via the Microsoft Azure infrastructure. It is important to note that you cannot buy domains via Azure DNS. However, you can delegate permissions to Azure DNS for record management.
There is also a feature called Azure Private DNS that provides a reliable and secure DNS service for VNets. When using private DNS zones, you can use a custom domain name instead of using the default domain names provided by Azure. One of the main reasons for using Azure Private DNS is that the domain names in the VNet will be resolved without having to configure custom DNS on the VNet.
The following is a high-level overview of how Azure Private DNS works:

Figure 14.37 – Azure Private DNS
Important Note
Azure DNS does not support Domain Name Security Extensions (DNSSEC).
The following are some of the benefits of using Azure Private DNS:
- Removes the need for custom DNS solutions: DNS zones can be managed via native Azure infrastructure, which simplifies DNS configuration, since complex custom DNS solutions are no longer required.
- Supports common DNS record types: Azure DNS supports the following records – A, AAAA, CNAME, NX, PTR, SOA, SRV, and TXT.
- Automatic hostname record management: Azure automatically maintains hostname records for VMs within VNet.
- Hostname resolution between VNets
- Familiar tools and user experience: You can use the following to update DNS records – the Azure portal, PowerShell, the Azure CLI, ARM templates, and a REST API.
- Split-horizon DNS support: The creation of DNS zones with the same name that resolve to different IPs within a VNet and the internet.
- Availability: DNS private zones are available across all Azure regions and the Azure public cloud.
Let's go ahead and configure Azure Private DNS via PowerShell using the following steps:
- In PowerShell, use the following command to connect to our Azure tenant:
Connect-AzAccount
- Next, we will need to install the Azure Private DNS module using the following command:
Install-Module -Name Az.PrivateDns -force
- Now, we need to create a new DNS zone using the following command. You will need to give it a name and point it to an existing RG:
$zone = New-AzPrivateDnsZone -Name demo.packt.com -ResourceGroupName VNet_Demo_ResourceGroup
- Lastly, we need to link the newly created DNS zone with a VNet using the following command. You will need to add your own RG name and VNet ID to link it to the correct VNet:
$link = New-AzPrivateDnsVirtualNetworkLink -ZoneName demo.packt.com `
-ResourceGroupName VNet_Demo_ResourceGroup -Name "mylink" `
-VirtualNetworkId /subscriptions/xxx/resourceGroups/VNet_Demo_ResourceGroup/providers/Microsoft.Network/virtualNetworks/DemoVNet -EnableRegistration
- Lastly, let's confirm that our DNS zone has been created successfully. To do this, use the following PowerShell command:
Get-AzPrivateDnsZone -ResourceGroupName VNet_Demo_ResourceGroup
The output of the command is shown in the following screenshot:

Figure 14.38 – Verifying that the private DNS zone has been created successfully
In this section, we had a look at what Azure DNS is and the difference between Azure DNS and Azure Private DNS. We also looked at how to configure a private DNS zone, link it to an existing VNet, and verify that it has been created successfully.
We encourage you to read up on Azure DNS further by using the following links:
- https://docs.microsoft.com/en-us/azure/dns/dns-overview
- https://docs.microsoft.com/en-us/azure/dns/private-dns-overview
Summary
In this chapter, we discussed how to create VNets including VNet peering, and how to configure private and public IP addresses and UDRs. We also had a look at subnetting in Azure and learned how to configure endpoints and private endpoints for VNets. Lastly, we looked at how Azure DNS works and configured a custom private DNS zone, linking it to an existing VNet via PowerShell.
Skills that students have gained after reading this chapter and following along with the hands-on demos include virtual networking, custom routing in Azure, securing resources via endpoints and private endpoints, and Azure DNS.
In the next chapter, we'll cover how to secure access to VNets.