
Chapter 15: Securing Access to Virtual Networks
This chapter focuses on securing access to virtual networks. You will learn how to create security rules and associate a Network Security Group (NSG) with a subnet or network interface. You will also learn how to effectively evaluate security rules and try a hands-on deployment on Azure Firewall and Azure Bastion. These are key skills to have as an Azure administrator and ensure you have good experience securing a network and deploying network security components.
In this chapter, we will cover the following main topics:
- Associating an NSG with a subnet
- Creating NSG rules
- Evaluating effective security rules
- Implementing Azure Firewall and Azure Bastion
Technical requirements
To follow along with the hands-on lessons, you will need access to the following:
- An Azure Active Directory as a global administrator. If you do not have access to one, students can enroll for a free account at https://azure.microsoft.com/en-in/free/.
- An Azure subscription is also required; you can either register with your own credit card or enroll for the free $200 one-off credit by using the following link: https://azure.microsoft.com/en-us/free/.
- PowerShell will be used for some of the lab sections. For more details on how to configure PowerShell, visit https://docs.microsoft.com/en-us/powershell/azure/install-az-ps?view=azps-1.8.0.
Associating an NSG with a subnet
When it comes to deploying resources on virtual networks within Azure, it is recommended to only allow the required traffic from a security point of view. One of the free solutions on the Azure platform to use for traffic filtering is called NSGs. NSG rules are evaluated by priority using the following five-tuple information:
- Source: This is where the traffic will be coming from, which can be set to the any option, an IP address or IP address range, a service tag, or an application security group.
- Destination: This will be the end destination receiving the traffic, which can be set to the any option, an IP address or IP address range, a service tag, or an application security group.
- Source port: This is the ports from where the traffic is originating, which can be a single port such as port 80 or multiple ports such as 80 and 443.
- Destination port: These are the ports that the traffic is destined for, which can be a single port such as port 80 or multiple ports such as 80 and 443.
- Protocol: The protocol can be set to TCP, UDP, ICMP, or any protocol.
Based on the preceding configuration, the NSG rule can be configured to either block or allow traffic.
Important Note
NSGs can be assigned on a subnet or at a network interface card level.
Let's look at how to create an NSG via the Azure portal and associate it with an existing subnet, using the following steps:
- Navigate to the Azure portal by opening a web browser and visiting https://portal.azure.com.
- In the left menu, select Create a resource, and in the search bar, type network security group, and then click Create:
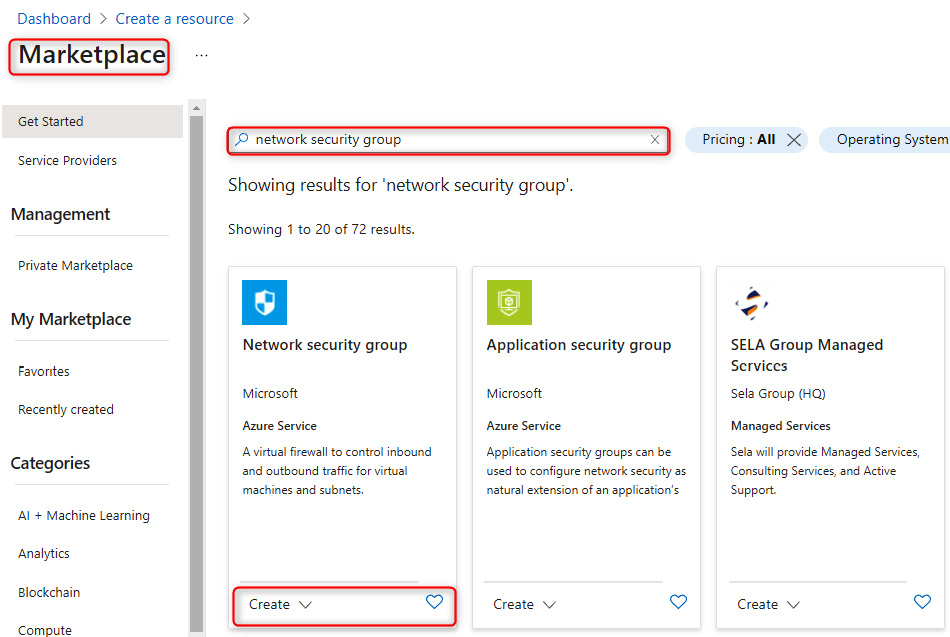
Figure 15.1 – Azure Marketplace filtered for the NSG
- Next, select an existing subscription and resource group and give the NSG a name, such as Prod-NSG, and assign it to a region – in my case, I'm going to choose East US. Then, click on Review + create:
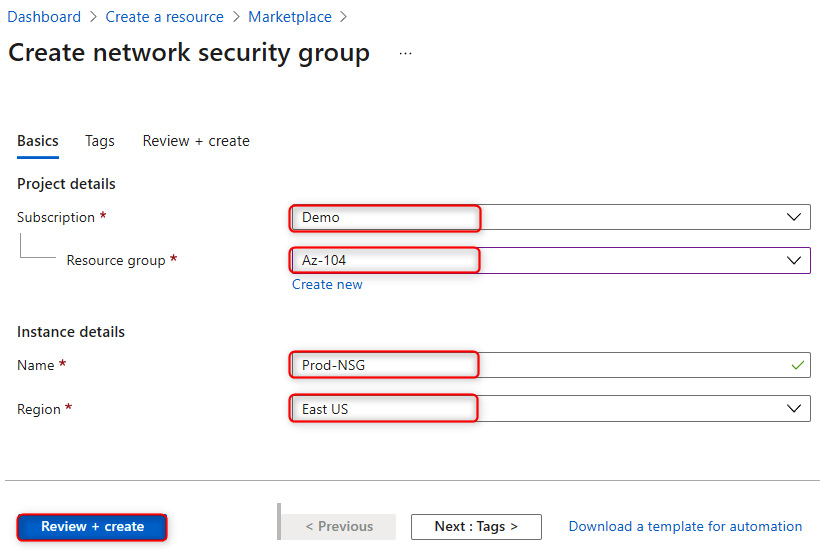
Figure 15.2 – Creating an NSG
Now that we have successfully created our NSG, we are going to assign it to all resources on the subnet level for a specific virtual network (VNet). To do this, let's navigate to the newly created NSG overview page in Azure. This can be found under the All resources section.
- Under Settings on the NSG page, select the Subnets blade and click on + Associate:

Figure 15.3 – The Subnets blade
- Next, select an existing VNet – in my case, this will be Vnet-prod-US. Select an existing subnet – in my case, this will be prod-subnet. Then, click on Ok.
In this demonstration, we covered what the purpose of NSGs is and how to create a new NSG via the Azure portal and assign it to an existing subnet.
In the next section, are going to have a look at how to configure NSG rules.
Creating NSG rules
Now that we have associated the NSG with its default rules with a subnet, we need to create a new NSG rule that will deny Remote Desktop Protocol (RDP) traffic from the internet to the entire VNet. In order to do this, we need to do the following:
- Navigate to the Azure portal by opening a web browser and visiting https://portal.azure.com/#home.
- In the left menu, select All resources, and in the search bar, type network security group. Select the NSG we created earlier – in my case, it will be Prod-NSG:
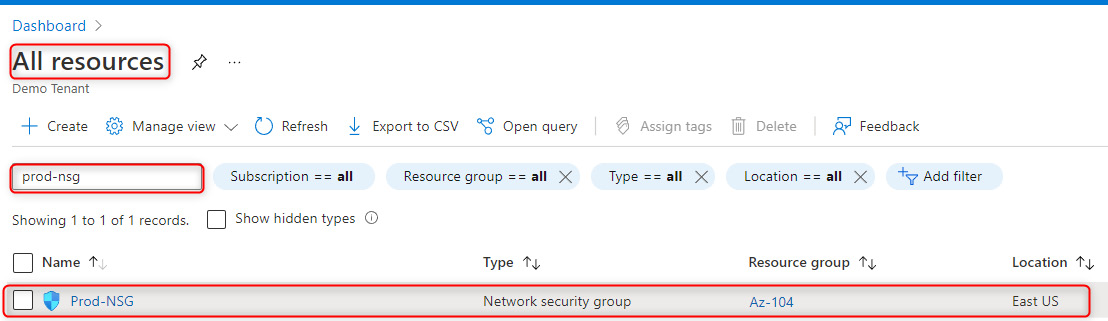
Figure 15.4 – Selecting the newly created NSG
- Under the Settings pane, select Inbound security rules and click on Add:

Figure 15.5 – Adding an inbound rule to the NSG
- Next, under Source, select Service Tag, and under Source service tag, select Internet from the dropdown list. Next, leave Source port ranges with an asterisk sign. Destination will be the VirtualNetwork option from the dropdown list. Service will be RDP from the dropdown list. Enter the destination port range as 3389. Select TCP as the protocol. Leave Priority at 100. Choose the Deny action. Lastly, give the rule a name of Deny-RDP and click on Add:

Figure 15.6 – Configuring the inbound security rule
- The final step is to verify that the RDP session is not allowed to any virtual machine (VM) within the subnet via the internet:

Figure 15.7 – Proof that our inbound security rule is denying RDP traffic
This concludes the demonstration of how to configure NSG rules. We also confirmed that our newly created rules are working as expected. We encourage students to further read up on NSGs by using the following links:
- https://docs.microsoft.com/en-us/azure/virtual-network/network-security-groups-overview
- https://docs.microsoft.com/en-us/azure/virtual-network/tutorial-filter-network-traffic
Next, we are going to look at how to evaluate effective NSG rules.
Evaluating effective security rules
When you create an NSG, there are some default inbound and outbound security rules created for you automatically. The default rules are low-priority rules. You can also add custom rules to them. You can create inbound and outbound security rules. NSG rules follow priority, with the lowest rule number taking preference over the next rule.
The following is a screenshot of NSG inbound rules that show two RDP rules – one to allow RDP and one to deny RDP. The RDP rule with the lowest priority takes preference, meaning that the allow RDP rule will take effect before the deny RDP rule:

Figure 15.8 – The NSG inbound rules for RDP are allowed
If there are too many NSG rules to manually review or multiple NSGs associated with a resource and you are unsure of which rules are taking preference, it is a good idea to use a built-in tool in Azure called Network Watcher to check the flow of traffic by using the IP flow verify blade of the tool. More information can be found here: https://docs.microsoft.com/en-us/azure/network-watcher/network-watcher-monitoring-overview.
In this section, we had a look at NSG rules to understand how rules take preference and which advanced troubleshooting tools we can use in Azure to verify the flow of traffic.
Implementing Azure Firewall and Azure Bastion
Let's have a look at Azure Firewall and the different SKUs available and what functionality they have.
Azure Firewall
When it comes to networking in Azure, NSGs are considered a basic-level firewall. However, sometimes a solution is required that has more granular control over traffic, or a smarter firewall is required; this is where Azure Firewall shines.
Azure Firewall has three main policies that can be configured:
- A Network Address Translation (NAT) rule: This is used to translate the firewall's public IP address and port to a private IP address and port.
- A network rule: This has the same rules as NSGs but has additional features, such as being able to create rules based on fully qualified domain names (FQDNs) instead of just using IP addresses.
- An application rule: This is used to allow or deny traffic based on specific applications that are based on FQDNs.
The following diagram shows how rules in Azure Firewall are processed based on rule type:

Figure 15.9 – Azure Firewall rule processing
It is important to understand rule processing within Azure Firewall, especially in troubleshooting scenarios.
Tip
Network rules are processed before application rules.
There are two SKUs for Azure Firewall:
- Azure Firewall Standard: This provides OSI layer three to OSI layer seven filtering, based on threat intelligence feeds directly from Microsoft. This enables Microsoft to feed Azure Firewall intelligence on known malicious IP addresses and domains to block these threats from accessing resources behind the firewall:

Figure 15.10 – Azure Firewall standard SKU capabilities
- Azure Firewall Premium: This provides advanced threat protection for organizations that are highly regulated, such as financial and healthcare institutions. This SKU supports Transport Layer Security (TLS) inspection of traffic to prevent malware and viruses from spreading across a network. It also supports URL filtering to include an entire URL and allow or deny a user access to websites by category, such as gambling sites and social media:

Figure 15.11 – Azure Firewall Premium SKU capabilities
The Azure Firewall Premium SKU offers the same features as the standard SKU and Premium features, such as TLS inspection and IDPS protection, to prevent the spread of malware and viruses across a network.
Note
Azure Firewall Manager can be used to centrally manage Azure firewalls across multiple subscriptions.
Azure Bastion
Traditionally, there were two main ways to connect to VMs in the cloud. The first was to assign a static public IP address and connect to them via the Remote Desktop Protocol (RDP) or secure shell (SSH), but this was later replaced by removing the public IP address and using a virtual private network (VPN) to securely connect to the server via the RDP or SSH. The Azure Bastion service enables you to connect to a VM by using your browser and the Azure portal instead of using technologies such as VPN. Bastion is a platform-as-a-service (PaaS) that you provision inside the VNet in Azure, which provides secure connectivity on management ports such as the RDP and SSH. Here are some key benefits of using Azure Bastion:
- The RDP and/or SSH directly in the Azure portal: An RDP or SSH session via the browser.
- Remote session via TLS: Bastion uses an HTML5-based web client that is streamed to the device, connecting to it via TLS on port 443 for security purposes.
- No public IP address required on a VM: Bastion will open an RDP/SSH connection to the VM by using the private IP address, meaning no public IP address is required.
- No additional firewall rules required: There are no additional complex NSG rules required for this solution to work; only allow Bastion to access the required VMs.
- Reduced attack surface: VMs are better protected, as there are no public IP addresses assigned to them, which means external malicious users cannot port-scan the VM to detect weaknesses in the VM.
The following is a diagram that shows how Azure Bastion works:

Figure 15.12 – How Azure Bastion works
Now that we have a better understanding of Azure Firewall and Azure Bastion, let's learn how to do the following via PowerShell:
- Create a new VNet with a VM.
- Deploy an Azure Firewall.
- Create a default route within the firewall.
- Configure an application rule to allow access to www.google.com.
- Configure a network rule to allow access to external Domain Name System (DNS) servers.
- Test the firewall rules.
To achieve the preceding objectives, follow these steps:
- First, we need to connect to our Azure tenant by using the following PowerShell command:
Connect-AzAccount
The screenshot shows the output of the command:

Figure 15.13 – Connecting to the Azure tenant via PowerShell
- If you have multiple subscriptions, you can use the following PowerShell command to select a specific subscription:
Select-AzSubscription -SubscriptionId "your-subscription-id"
- Now that we have selected our Azure tenant and subscription, let's go ahead and create a new Resource Group (RG):
New-AzResourceGroup -Name Test-FW-RG -Location "East US"
The screenshot shows the successful creation of the new RG:

Figure 15.14 – Creating the new RG
- Next, we are going to create the VNet, which has three subnets — a bastion subnet, a firewall subnet, and the VM subnet:
- $Bastionsub = New-AzVirtualNetworkSubnetConfig -Name AzureBastionSubnet -AddressPrefix 10.0.0.0/27
- $FWsub = New-AzVirtualNetworkSubnetConfig -Name AzureFirewallSubnet -AddressPrefix 10.0.1.0/26
- $VMSubnet = New-AzVirtualNetworkSubnetConfig -Name VMSubnet -AddressPrefix 10.0.2.0/24
- $testVnet = New-AzVirtualNetwork -Name Test-FW-VN -ResourceGroupName Test-FW-RG -Location "East US" -AddressPrefix 10.0.0.0/16 -Subnet $Bastionsub, $FWsub, $VMSubnet

Figure 15.15 – A newly created VNet with the three subnets
- Next, we are going to create a public IP address for the Bastion service:
$publicip = New-AzPublicIpAddress -ResourceGroupName Test-FW-RG -Location "East US" -Name Bastion-pip -AllocationMethod static -Sku standard
The public IP address for Bastion is shown in the following screenshot:

Figure 15.16 – A newly created public IP address for the Bastion service
- Next, we are going to create the Bastion host:
New-AzBastion -ResourceGroupName Test-FW-RG -Name Bastion-01 -PublicIpAddress $publicip -VirtualNetwork $testVnet
The following screenshot shows the newly created Bastion service:

Figure 15.17 – Creating the Bastion service
- Next, we are going to create the VM. You will be prompted to enter a username and password while running the script; please ensure that you remember this information:
#Create the NIC
$wsn = Get-AzVirtualNetworkSubnetConfig -Name VMSubnet -VirtualNetwork $testvnet
$NIC01 = New-AzNetworkInterface -Name VM01 -ResourceGroupName Test-FW-RG -Location "East us" -Subnet $wsn
#Define the virtual machine
$VirtualMachine = New-AzVMConfig -VMName VM01 -VMSize "Standard_DS2"
$VirtualMachine = Set-AzVMOperatingSystem -VM $VirtualMachine -Windows -ComputerName VM01 -ProvisionVMAgent -EnableAutoUpdate
$VirtualMachine = Add-AzVMNetworkInterface -VM $VirtualMachine -Id $NIC01.Id
$VirtualMachine = Set-AzVMSourceImage -VM $VirtualMachine -PublisherName 'MicrosoftWindowsServer' -Offer 'WindowsServer' -Skus '2019-Datacenter' -Version latest
#Create the virtual machine
New-AzVM -ResourceGroupName Test-FW-RG -Location "East US" -VM $VirtualMachine -Verbose
In this section of code, we have created the VM along with a password, as shown in the following screenshot. This information needs to be stored for use later:

Figure 15.18 – The created VM01 with its components
- Next, we are going to deploy the firewall along with a public IP address:
# Get a Public IP for the firewall
$FWpip = New-AzPublicIpAddress -Name "fw-pip" -ResourceGroupName Test-FW-RG `
-Location "East US" -AllocationMethod Static -Sku Standard
# Create the firewall
$Azfw = New-AzFirewall -Name Test-FW01 -ResourceGroupName Test-FW-RG -Location "East US" -VirtualNetwork $testVnet -PublicIpAddress $FWpip
#Save the firewall private IP address for future use
$AzfwPrivateIP = $Azfw.IpConfigurations.privateipaddress
$AzfwPrivateIP
The following screenshot displays the newly deployed firewall:

Figure 15.19 – The Azure Firewall deployed
- Next, we are going to configure a default route on the firewall along with a route table and associate the latter with our VMSubnet:
$routeTableDG = New-AzRouteTable `
-Name Firewall-rt-table `
-ResourceGroupName Test-FW-RG `
-location "East US" `
-DisableBgpRoutePropagation
#Create a route
Add-AzRouteConfig `
-Name "DG-Route" `
-RouteTable $routeTableDG `
-AddressPrefix 0.0.0.0/0 `
-NextHopType "VirtualAppliance" `
-NextHopIpAddress $AzfwPrivateIP `
| Set-AzRouteTable
#Associate the route table to the subnet
Set-AzVirtualNetworkSubnetConfig `
-VirtualNetwork $testVnet `
-Name VMSubnet `
-AddressPrefix 10.0.2.0/24 `
-RouteTable $routeTableDG | Set-AzVirtualNetwork
In this section of code, we have created a new route table with a route named DG-Route and associated it with the subnet.
The following screenshot displays the newly created route table:
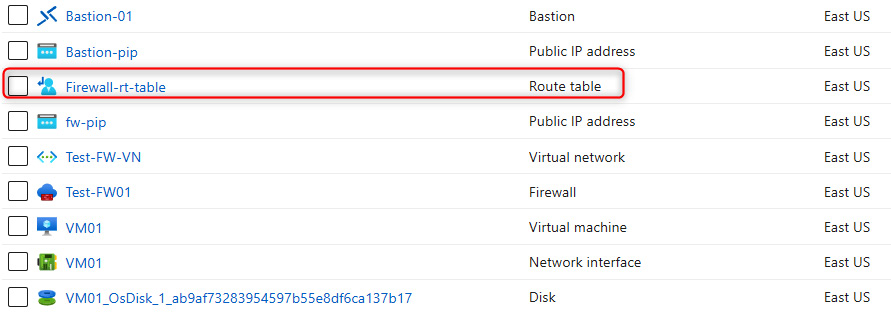
Figure 15.20 – The newly created route table
- Next, we are going to create an application rule on the firewall to allow outbound access to www.google.com:
$AppRule1 = New-AzFirewallApplicationRule -Name Allow-Google -SourceAddress 10.0.2.0/24 `
-Protocol http, https -TargetFqdn www.google.com
$AppRuleCollection = New-AzFirewallApplicationRuleCollection -Name App-Coll01 `
-Priority 200 -ActionType Allow -Rule $AppRule1
$Azfw.ApplicationRuleCollections.Add($AppRuleCollection)
Set-AzFirewall -AzureFirewall $Azfw
In this section of code we have created a new Azure Firewall application rule to allow outbound access to Google.
The following screenshot displays the newly created Azure Firewall application rule:

Figure 15.21 – The application rule added to Azure Firewall
- Next, we are going to configure a network rule on the firewall to allow outbound access to 8.8.8.8 on the port 53 UDP, which is for DNS resolution:
$NetRule1 = New-AzFirewallNetworkRule -Name "Allow-DNS" -Protocol UDP -SourceAddress 10.0.2.0/24 `
-DestinationAddress 8.8.8.8 -DestinationPort 53
$NetRuleCollection = New-AzFirewallNetworkRuleCollection -Name RCNet01 -Priority 200 `
-Rule $NetRule1 -ActionType "Allow"
$Azfw.NetworkRuleCollections.Add($NetRuleCollection)
Set-AzFirewall -AzureFirewall $Azfw
In this section of code, we have created an Azure Firewall application rule to allow outbound access to Google's DNS server, which is 8.8.8.8 for DNS resolution, as shown in the following screenshot:

Figure 15.22 – Adding a firewall rule to allow outbound DNS traffic to 8.8.8.8
- Finally, we are going to change the DNS server address for VM01 to 8.8.8.8 to align with the firewall rule for DNS:
$NIC01.DnsSettings.DnsServers.Add("8.8.8.8")$NIC01 | Set-AzNetworkInterface
Now that we have completed all the required configurations, let's test and confirm the VM and firewall rules:
- Navigate to the Azure portal by opening a web browser and visiting https://portal.azure.com.
- Navigate to the new VM we created called VM01. On the Overview page, select Connect and choose Bastion:

Figure 15.23 – Connect to the VM using Bastion
- Next, the Bastion window is will appear, and you will need to enter the VM credentials you specified in step 7 and then click on Connect:
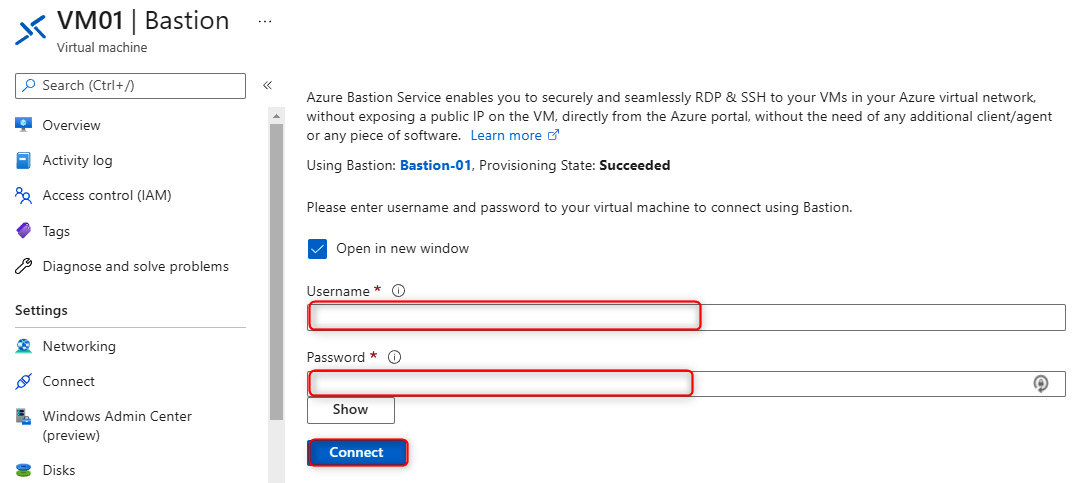
Figure 15.24 – Enter the credentials for the VM on the Bastion blade
- On the VM, open up PowerShell and enter the following commands:
nslookup www.google.com
nslookup www.microsoft.com
Both commands should return answers, as the DNS queries are allowed through the firewall:
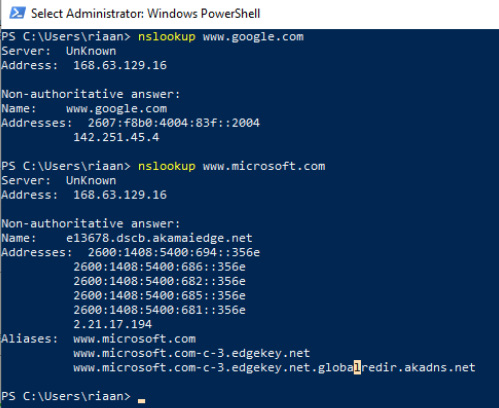
Figure 15.25 – Proof that the firewall DNS settings are working as expected
- Next, we want to confirm that we are able to browse only to www.google.com and not any other sites. To do this, run the following command in PowerShell:
Invoke-WebRequest -Uri https://www.google.com
The preceding command will request the www.google.com website via the PowerShell command-line interface (CLI):

Figure 15.26 – The firewall allowing traffic to www.google.com
- Finally, let's confirm that we are not able to visit any other FQDN, such as www.microsoft.com. In order to test this, run the following command in PowerShell:
Invoke-WebRequest -Uri https://www.microsoft.com
The screenshot confirms that we cannot resolve www.microsoft.com based on the Azure Firewall configuration rules, which is the expected behavior:

Figure 15.27 – Traffic is not allowed to www.microsoft.com as per our firewall configuration
To summarize this demo section, we have learned how to configure Azure Bastion along with an Azure firewall to allow DNS requests to 8.8.8.8 and only allow www.google.com from a browsing perspective and block all other sites.
We encourage you to further read up on Azure Bastion and Azure Firewall by using the following links:
- https://docs.microsoft.com/en-us/azure/firewall/overview#:~:text=Azure%20Firewall%20is%20a%20cloud,availability%20and%20unrestricted%20cloud%20scalability.
- https://docs.microsoft.com/en-us/azure/firewall/threat-intel
- https://docs.microsoft.com/en-us/azure/firewall/policy-rule-sets
- https://docs.microsoft.com/en-us/azure/bastion/bastion-overview#:~:text=Azure%20Bastion%20is%20a%20service,browser%20and%20the%20Azure%20portal.&text=Using%20Azure%20Bastion%20protects%20your,secure%20access%20using%20RDP%2FSSH.
If you want to remove the resources created in this section to avoid further costs, you can run the following command in PowerShell:
Connect-AzAccount
Remove-AzResourceGroup -Name Test-FW-RG
The preceding PowerShell commands will remove the RG we created earlier along with all resources within it to ensure there will be no unforeseen costs incurred by the resources for this chapter.
This will help you save additional costs.
Summary
In this chapter, we discussed what NSGs are and how to use them to create new rules, as well as how to associate them with a subnet. We also discussed how to evaluate NSG rules based on priority. Lastly, we covered Azure Firewall and Azure Bastion, what they do, and how to configure them via a hands-on demo.
After reading this chapter, you should now know how to secure VNets via an NSG and secure resources by using Azure Bastion and Azure Firewall. In the next chapter, we'll cover how to configure load balancing by using Azure Application Gateway and internal and external load balancers, and how to troubleshoot load balancing.