
Chapter 11: Creating and Configuring Containers
This chapter focuses on the creation and configuration of containers. Some topics to look forward to include the following: configuring the sizing and scaling of containers, working with Azure Container Instances (ACI), working with Azure Kubernetes Service (AKS) storage, scaling AKS, and the networking side of AKS. You will explore what containers are and the difference between containers and virtual machines (VMs), you'll understand use cases for containers, and you'll also learn how to manage and orchestrate container deployments within Azure. By the end of this chapter, you should feel confident in working with containers and being able to administer them on Azure.
In this chapter, we are going to cover the following main topics:
- Introduction to containers
- Containers versus VMs
- Azure Container Instances (ACI)
- Container groups
- Docker platform
- AKS
- Creating an Azure container registry
- Deploying your first Azure container instance
- Configuring container groups for Azure container instances
- Configuring sizing and scaling for Azure container instances
- Deploying AKS
- Configuring storage for AKS
- Configuring scaling for AKS
- Configuring network connections for AKS
- Upgrading an AKS cluster
Technical requirements
This chapter uses the following tools for our examples:
- Access to an Azure subscription with owner or contributor privileges. If you do not have access to one, students can enroll for a free account at https://azure.microsoft.com/en-in/free/.
- PowerShell 5.1 or later installed on a PC from which labs can be practiced. Note that many examples can only be followed from a PC or https://shell.azure.com (PowerShell 7.0.6 Long-Term Support (LTS) or above is recommended).
For this exercise, we are going to configure Docker so that you can see your first container in action. Follow the given steps to configure Docker:
- Sign up on Docker Hub at the following URL: https://hub.docker.com/signup?redirectTo=/subscription%3Fplan%3Dfree.
- Next, proceed to download the Docker application, as follows:
- For Windows, use the following link: https://desktop.docker.com/win/stable/amd64/Docker%20Desktop%20Installer.exe.
- For Linux, use the following link: https://hub.docker.com/search?q=&type=edition&offering=community&operating_system=linux.
- For macOS, use the following link: https://hub.docker.com/editions/community/docker-ce-desktop-mac.
Introduction to containers
Businesses are constantly looking for newer and quicker ways to deploy applications and keep businesses running. These requirements lead to software development and support teams to find solutions for saving money and time. Adopting an approach of using containers for rapid deployments leaves more time for software deployment and reduces time spent on creating and configuring environments.
Containers are specialized packages of software that bundle application software with associated configuration files, libraries, and dependencies that are required to enable an application to run. Containers also contain the kernel for an operating system (OS) and don't require the whole OS in itself, which allows for larger-scale deployments than what VMs could achieve using the same resources. The reason for this is that the OS consumes resources, such as storage, memory, and processing power. In the previous chapter, you learned about VMs and how they work by logically creating a machine using resources; we say that VMs abstract the hardware layer. Containers, by association, abstract the OS layer. When deploying a VM, you will still need to specify the type of OS you require—this is typically Windows or Linux. The exact kernel version won't be required to make it work as the kernel will be packaged in your container, and you just need to concern yourself with the application code, libraries, and dependencies to get your application to work. Using this approach allows for easy scaling, and only a single OS is consumed on the host of all the containers for the OS type, such as Windows or Linux. Being more lightweight, containers become easier to manage and much faster to deploy and scale. They introduce a standardized and repeatable mechanism for packaging, managing, and deploying applications.
Prior to containers, the challenge was writing applications for various systems with different versions of dependencies that the developers couldn't control. This leads to several issues that make solutions very difficult to manage. With containers, you can standardize the deployment with dependencies and enable a consistent experience for all users.
Azure container instances allow you to run containers in Azure without the requirement to deploy your own container host or VM.
Top Tip
Windows container hosts can run both Windows and Linux containers; conversely, Linux can only run Linux containers to date. Running Linux containers on Windows will require Hyper-V services and using a system called LinuxKit (essentially a Linux VM). When deploying to ACI, however, it is important to select the correct OS for your requirement, as Linux containers run on the Linux OS and Windows containers run on the Windows OS.
Containers versus VMs
Hardware virtualization has enabled the possibility of running multiple isolated OS instances at the same time on physical hardware. As containers abstract the OS by virtualizing it, this enables several applications to be run using the same OS while still being isolated from each other. VMs, on the other hand, contain the full OS and files and essentially only abstract the hardware layer, whereas containers abstract the OS layer and contain your application files as well as configuration files and dependencies. Containers are much smaller in size and utilize fewer resources.
A hypervisor is the software, firmware, and hardware that enables VMs to be created and run. It is the layer that resides between the physical hardware and the software-implemented VM. New machines have virtualization instruction sets built into the processes and specialized hardware to enable VMs to run just as well as physical hardware and leverage physical hardware resources as native services.
The following diagram depicts the relationship between VMs and containers:

Figure 11.1 – VMs versus containers
It should be noted that hypervisors are formed at different levels of integration from systems. As you will note from the preceding diagram, there is a hypervisor layer present just above the hardware/infrastructure layer—this is referred to as a type 1 hypervisor (also known as a bare-metal hypervisor) as it has direct access to hardware. There is another type of hypervisor referred to as type 2 (also known as a host OS hypervisor); this runs much like an application within the OS, and this is the technology that Docker uses.
It can become confusing to distinguish between containers and VMs, so to help you better understand their differences, we have identified some key concepts to be aware of, as outlined next.
Isolation
VMs provide the most complete and secure isolation solution to isolate all other VMs and even the host OS from each other. This is the best mechanism for security when you have shared infrastructure and are looking to isolate applications or services from competing companies that are on the same server or cluster.
Containers, in comparison to VMs, provide a much lighter-weight isolation mechanism. They don't provide as strong a security boundary from the host and other containers as a VM does.
Takeaway
When choosing a solution that requires the most secure method of isolation, it is best to go with VMs.
OS
VMs run the entire OS, including the kernel. This will obviously be a more resource-intensive approach as the OS requires system resources such as memory, central processing unit (CPU), and storage.
Containers, by comparison, require far fewer system resources to run applications. They do this by only running the customized user-mode portion of OSs that contain only services that are essential for running your application.
Takeaway
When choosing a solution that requires better utilization of system resources, you can't go wrong with containers. In fact, your resources will go much further than with a VM.
Deployment
VMs are deployed using some form of a hypervisor. With Windows systems, they can be deployed and managed by Windows Admin Center, Hyper-V Manager, and System Center Virtual Machine Manager (SCVMM). PowerShell can also be used with the relevant Hyper-V modules enabled.
Containers, in comparison to VMs, are deployed using Docker through the command line for single instances, and for multiple containers, it is advised that an orchestrator service such as AKS is used.
Takeaway
Understand the tools for each deployment type, knowing that on Azure, we predominantly use Docker containers and AKS for container orchestration.
Storage persistence
VM storage is very easy to scale and maintain in Azure. We simply add or scale up disks as required, as you experienced in the previous chapter. This storage is persistent as it doesn't disappear if disconnected or if the VM shuts down. Another mechanism of providing persistent storage is through Server Message Block (SMB) shares.
Containers, in comparison, have the option of leveraging Azure disks for local storage on a single-node deployment and configuring SMB shares for multiple nodes or servers.
Takeaway
Identify whether storage requires persistence and find the mechanism that best suits your requirements. For shared storage, SMB shares make a lot of sense, but there are several other mechanisms that can be used to achieve the same result. These are beyond the scope of this book, however, but you are still encouraged to explore and find what works for you.
Fault tolerance
VMs can fail over to another server in a cluster when configured for fault tolerance. The resultant effect, however, is that the VM's OS will be restarted on the new hosting server, which can add potentially significant time to restore services.
Containers, in comparison, have the ability to quickly recover instances. The orchestrator recreates the container on another cluster node when it detects a failed cluster node.
Takeaway
Catering to fault tolerance is always advised, especially when dealing with production workloads. You need to understand the caveats of each system and be able to plan accordingly. Containers, being more lightweight, are more resistant to failures and more readily restored.
Having understood the preceding key comparative areas, it is important to highlight the several advantages containers hold over VMs and physical machines, as follows:
- Due to better resource utilization, containers can achieve better workload density.
- They standardize deployments and simplify the application testing process.
- Application deployment is quicker and more streamlined. It is also more standardized, making it more consistent and reliable.
- Improved speed and flexibility in developing application code, as well as sharing.
You should now understand the key differences between containers and VMs, as well as be able to identify scenarios that best suit either deployment. In the next section, we will explore ACI and how this allows easy deployment of containers to the Azure platform.
ACI
ACI is a container hosting service that provides a fast and easy method for running containers in Azure. Using this solution will enable you to deploy containers without needing to manage any VMs or utilize any higher-level services. Azure container instances provide a great solution for applications that can run in isolated containers. There are several benefits to working with container instances on Azure, as outlined here:
- Fast startup times: Azure containers are designed to be able to start in seconds.
- Public connectivity: Azure containers have been designed to enable direct exposure to the internet by associating with a public Internet Protocol (IP) address that also allows the association of a fully qualified domain name (FQDN) (public Domain Name System (DNS) name associated with the public IP).
- Security: Azure container applications apply hypervisor-level security that enables container applications to be isolated as they would be in a VM.
- Custom sizes: Azure container nodes are designed to be dynamically scaled to meet the resource demands required for an application.
- Storage persistence: Azure containers enable storage persistence through Azure File Shares by allowing them to be directly mounted. Without this, storage is only ephemeral.
- Various OSs: Azure container instances can schedule containers for both Windows and Linux systems. Simply select the OS type you need when you create your container groups.
- Co-scheduled groups: Azure container instances are designed to support the sharing of host machine resources through multi-container groups on the same host.
- Virtual network (VNet) deployment: Azure container instances have been designed to allow integration into Azure VNets.
Now that you understand what Azure container instances are and the several benefits they can offer, we will start to understand how container groups fit into the structure. You will learn what container groups are and what to consider when designing and deploying these.
Container groups
Container groups contain a set of containers that share their life cycle, resources, network configuration, and storage resources, essentially grouping them together. Containers within a container group are scheduled together on the same host (the server on which these run) and in ACI, which is the top-level resource. Container groups can consist of one or more containers. The following diagram is an example container group that contains two containers scheduled on the same host. The container group exposes port 80 on a single public IP (an IP accessible from the internet) and has a public DNS label associated with it. The container group also contains two different storage accounts, each of which is associated with one of the containers. Of the two containers, one container exposes port 80 while the other exposes port 1433. On private ports, as illustrated in the following diagram, private refers to ports, IP, or DNS being restricted to access within the local network only:

Figure 11.2 – Example container group
You now have a basic understanding of what a container group is, so next, we will explore some common scenarios for using multi-container groups.
Common scenarios
There are several scenarios where multi-container groups prove beneficial, such as when you define a frontend and backend for your container groups. Tasks may be divided into an application container and a logging or monitoring container; they perform two separate functions but are both complementary to the end service delivery of the application. Images can be deployed and managed by different teams within your organization.
Some other scenarios include the following:
- An application container and a database container. The application container(s) may deliver the end application, while the database container commits data to a service location.
- A web application service deployed to a container within the group and another container for managing source control.
Resources
Container groups are allocated resources by ACI by adding resource requests for all instances in a container group, such as CPUs, memory, and even graphics processing units (GPUs). For example, if you have two container instances in a container group and each instance requires two CPUs and 4 gigabytes (GB) of memory, the container group will then be allocated four CPUs and 8 GB of memory, as depicted in the following diagram:

Figure 11.3 – Container group resource allocation
You now understand how resources are allocated for container groups. Next, we will explore the networking components of the Azure Container Instance service.
Networking
Containers within a container group can share a public-facing IP address with an associated DNS label. This label is referred to as an FQDN, which is a user-friendly name for finding an IP associated with your web application. The container group exposes ports on the public IP address to enable external clients to reach a container. The exposed public ports must also be enabled on the container level, which doesn't always need to be publicly accessible but can be limited internally too. When the container group is deleted, then the associated public IP and FQDN will be released too. A note on containers within the group is that all containers within the group share a port namespace, and because of this, port mapping isn't supported.
An example to help you understand the concept better is provided here: imagine you have a container group deployment that contains one frontend server and one backend server. The frontend server requires access over port 443 (HyperText Transfer Protocol Secure, or HTTPS) on a public IP, while the backend server communicates over port 8080 and will be limited to local communication. You can see a depiction of this in the following diagram:

Figure 11.4 – Example container group frontend and backend
You now understand more about how some networking components work for container groups, so next, we will explore how we run deployments.
Deployment
There are two primary methods of deployment for a multi-container group: an Azure Resource Manager (ARM) template or a YAML Ain't Markup Language (YAML) file. In Chapter 9, Automating VM Deployments Using ARM Templates, we explored the deployment of VM resources using ARM templates; this serves as an extension of that prior knowledge. The beauty of ARM deployment is that it allows for additional resources to be deployed alongside container instances, such as Azure File Shares. YAML files, on the other hand, are designed for supporting container instance deployments within a container group only. These are designed as an alternative to ARM templates for container deployments due to them being more concise in their nature and structure.
Now that you understand more about container groups, in the next section, we will explore Docker, which is one of the platforms that enable containerization. Docker is one of the most popular platforms and is well integrated into Azure.
Docker platform
Docker is one of the most popular platforms that enable developers to host their applications within containers. It can be run on either the Windows, Linux, or macOS and ensures a standardized software deployment. The beauty of the system is that it allows local development on a container platform (such as Docker) and can be easily redeployed into the Azure cloud for sharing and distribution. The package will run as expected since all the package components are bundled into the Docker image you deploy. Docker acts as the container host as well as a tool for building containers. When containers are deployed through ACI, the service allows them to be scaled easily.
Docker terminology
When working with Docker and container instances, you should understand the following terminology. This will help you become comfortable working with containers and performing actions such as creating, building, and testing containers:
- Container: This refers to an instance of one of your Docker images. As we discussed, containers are specialized packages of software that bundle application software with associated configuration files, libraries, and dependencies that are required to enable an application to run. In Docker, this consists of the Docker image, the execution environment, and your standard set of instructions. The platform enables you to create multiple instances of a container using the same image, which is important to remember when you want to scale your application.
- Container image: This refers to all the dependencies and information packaged together that are required to create a container. These include frameworks, as well configurations for deployment and executions that a container runtime uses. An image is typically created from multiple base images stacked on top of each other to form the container's filesystem. An image is immutable once it has been created.
- Docker Registry: This is the repository provided by the Docker platform for storing various image files. Azure has another solution, however— Azure Container Registry, which is the solution we will use.
- Build: This is the action of building your container. The build will be based on the container image and will be constructed based on the information provided by the Dockerfile. The build also includes any other necessary files.
- Pull: This refers to the action of downloading a container image from one of your container registries.
- Push: This refers to the action of uploading a container image to one of your container registries.
- Dockerfile: This defines instructions for building your image. It is stored as a text file. The first line in a Dockerfile structure is used to identify the base image needed, while the rest of the file contains the associated build actions for your image.
The Docker platform is structured as per the following diagram. You will notice the container registry comprises Azure Container Registry, Docker Hub, or another container registry, the Docker Engine components, and the containers. The following diagram will help you understand the relationship between these components:

Figure 11.5 – Docker components
You now understand more about the Docker platform, and you are now aware of the various components that work together to enable your solution. Next, we will explore how to set up Docker.
Setting up Docker
For this exercise, we are going to configure Docker so that you can see your first container in action. Proceed as follows:
- Sign up on Docker Hub at the following URL: https://hub.docker.com/signup?redirectTo=/subscription%3Fplan%3Dfree.
- Next, proceed to download the Docker application and install it. For the remainder of the exercise, it will be assumed you are running from a Windows machine. After installing the Docker application, you may be required to restart your machine.
For Windows, use the following link: https://desktop.docker.com/win/stable/amd64/Docker%20Desktop%20Installer.exe.
For Linux, use the following link: https://hub.docker.com/search?q=&type=edition&offering=community&operating_system=linux.
For Mac, use the following link: https://hub.docker.com/editions/community/docker-ce-desktop-mac.
- After installation on Windows, you will want to update the Windows Subsystem for Linux 2 (WSL 2) package. Run the following link and restart your machine: https://wslstorestorage.blob.core.windows.net/wslblob/wsl_update_x64.msi.
- Once Docker is set up, run the following command for your first Docker image. Launch an administrative PowerShell session for this and add the following command, then press Enter:
docker run -d -p 80:80 docker/getting-started
The following screenshot shows the output of the preceding command:

Figure 11.6 – First Docker container
Note that this command runs a pull command for a docker/getting-started image.
Top Tip
If you are one of the users that face an issue when running the previous command, try running the following command to fix Docker: cd "C:Program FilesDockerDocker. Then, press Enter and add the following code: ./DockerCli.exe -SwitchDaemon. Following this, press Enter.
After running this command, you may open the Docker Desktop application, and if you click Containers / Apps on the left menu, you will notice an image on the right, as illustrated in the following screenshot. A name is randomly generated each time you create a container unless you specify otherwise:

Figure 11.7 – First Docker container: Docker Desktop
You will note that this is running on port 80, which means the application is accessible as a web application locally. To access this, launch a browser and navigate to the following URL: http://127.0.0.1. You will see a success message, along with guidance on other exercises you can follow, as illustrated in the following screenshot. We encourage you to carry this out and learn more:

Figure 11.8 – Using your Docker container
Now that you have successfully installed Docker and run your first container from a precompiled image, we will explore the creation of your first image and publish it to Docker Hub.
Creating our first Docker image
For this exercise, you will need to first sign in to Docker Hub. Then, follow the next steps:
- Once signed in, click on the Repositories button on the top menu bar, as illustrated in the following screenshot:

Figure 11.9 – Repositories button
- Enter a name and description for this repository, then click Create. Note that you may select whether your repository is Public or Private too. For this repository, I'll leave it as Public, as illustrated in the following screenshot:

Figure 11.10 – Creating your repository
- Return to your PowerShell window and paste the following command into it:
docker pull mcr.microsoft.com/azuredocs/aci-helloworld
For our demonstration, we will be using the following image to demonstrate how we upload an image to Docker as well as to use this later in ACI:

Figure 11.11 – Pull of the aci-helloworld image
- Now that your image is downloaded, run docker images, as illustrated in the following screenshot, and press Enter:

Figure 11.12 – Listing all local Docker images
This command lists all images on your local system. Now, you will list all running containers on your system using the following command: docker ps. Then, press Enter.
- You will notice the container you ran from earlier in the PowerShell window. Note the name and proceed by running the following command: docker stop [container name]. Then, press Enter. To confirm the container has been stopped run docker ps, then press Enter. The process is illustrated in the following screenshot:

Figure 11.13 – Using PowerShell to manage Docker containers
- Let's start our downloaded image; we will run it on the local port 80, and expose port 80 for connecting back to the container. Note your image name from earlier; you can run docker images to confirm, as illustrated in the following screenshot:

Figure 11.14 – Listing Docker images
- The command will be constructed as follows, after which you can run docker ps again:
docker run -d -p 80:80 mcr.microsoft.com/azuredocs/aci-helloworld
The following screenshot shows the output of the preceding command:

Figure 11.15 – Our second container
- To access this container, launch a browser and navigate to the following URL: http://127.0.0.1. You will see a welcome message, as illustrated in the following screenshot, and will then know that the application is working:
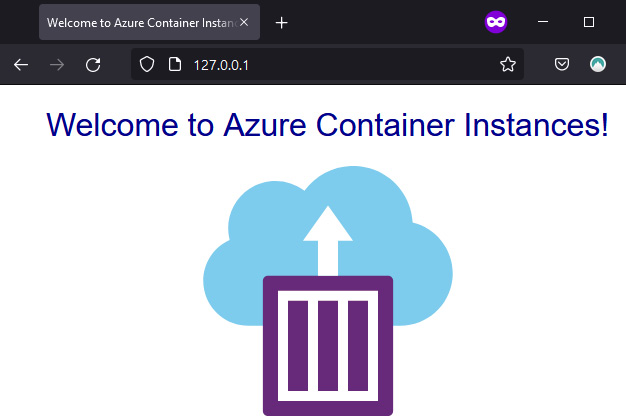
Figure 11.16 – Our second container running
- You will now push the image to your repository based on the repository name you gave earlier. You will first need to tag your image for Docker to understand which image file to push. Run the following command in PowerShell and press Enter:
docker tag mcr.microsoft.com/azuredocs/aci-helloworld [docker hub username]/myfirstrepo
The following screenshot shows the output of the preceding command:
Figure 11.17 – Pushing the Docker image

Figure 11.18 – Tagging the Docker image
- Now, log in to Docker using the docker login command. We will now proceed to push an image to your Docker repository. The easiest way to push is to follow this command on the page where we created our repository earlier:

Figure 11.19 – The docker push command
Here is the output of the preceding command:

Figure 11.20 – Pushing your first image
You have now successfully pulled and pushed an image from and to Docker Hub. In the next section, we will explore deploying an Azure container instance and using Azure as the host instead of Docker for your images.
AKS
Kubernetes is designed as a management and orchestration service to assist with managing containers and creating a mechanism for scale. AKS is a serverless implementation of the Kubernetes service, which minimizes the management of the Kubernetes cluster for us. The service is designed so that you just take care of the agent nodes. Azure builds upon Kubernetes by enhancing some of its default implementations to enable functions, such as the following:
- Identity and Access Management (IAM): Identity is integrated into Azure Active Directory (Azure AD) and managed or the system identity can be used on the service.
- Azure VNet integration: Enable private networking natively to Azure networks, network security groups (NSGs), and even network policies.
- Persistent storage: Azure overcomes the ephemeral-based storage native to containers by enabling easy integration of persistent storage mechanisms such as Azure File Shares.
- Autoscaling: This function enables the autoscaling of Pods and clusters.
AKS also enables health monitoring for the service and the coordination of upgrades. As part of the service, master nodes are not billed for and are included for free, but all agent nodes are billed for. The service constitutes master nodes, node pools, Pods, networks, and storage. It's important to understand how all these components function together. The control plane component of the service contains all the functions that allow you to administer your containers within AKS as well as the master node, which is the orchestrator service within AKS. Node pools are essentially your VM infrastructure and are used to provide resources for your Pods and, by association, containers for the service. Then, Pods are your collections of containers within AKS where containers are grouped into their respective functions or applications. The following diagram illustrates the relationship between these various components:
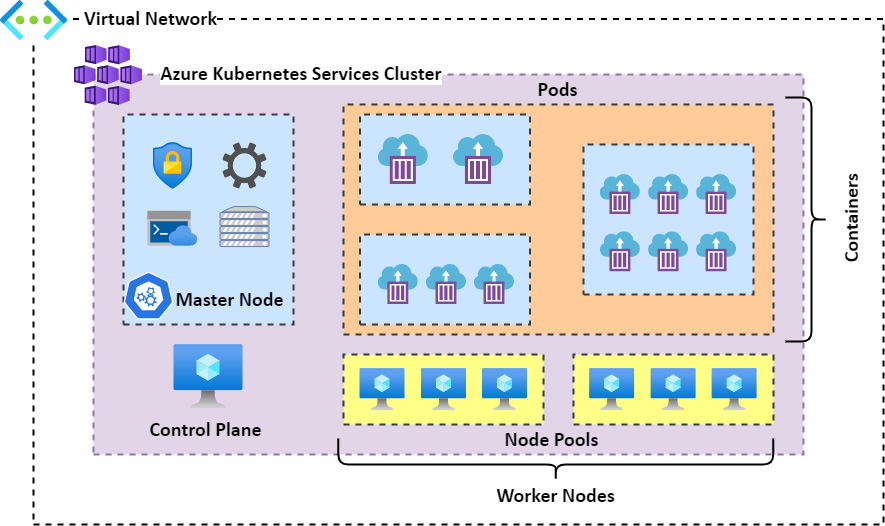
Figure 11.21 – AKS structure
Now that you are more familiar with containers and the orchestration tools that we can use such as AKS, let's dive into some exercises to give you some hands-on experience of working with these services.
Creating an Azure container registry
For this exercise, we are going to create a registry in Azure Container Registry. As mentioned previously, this is very similar to Docker Hub but is native to Azure. Proceed as follows:
- Sign in to the Azure portal at https://portal.azure.com.
- Open the resource group you will be using for this exercise, click Overview on the left menu, then click Create.
- On the top search bar, type container registry, and click the Container Registry option that appears. Then, click Create, as illustrated in the following screenshot:

Figure 11.22 – Creating a container registry
- Ensure that you have selected the right resource group, give it a unique Registry name entry, and select the appropriate Location entry. Then, we will leave the SKU value as Standard for this exercise. Click Review + create. The process is illustrated in the following screenshot:

Figure 11.23 – Creating an Azure container registry
- Click Create.
- After the deployment has succeeded, navigate to the resource. Click on Access keys on the left-hand menu. Then, on the right screen, click the toggle button next to Admin user, and note your username and passwords. This will enable you to connect to the registry using Docker. The process is illustrated in the following screenshot:

Figure 11.24 – Container registry access keys
- In PowerShell, type the following command and press Enter:
docker login [yourregistryname].azurecr.io
For your username and password, enter the username and password you just copied from the portal, as illustrated in the following screenshot:

Figure 11.25 – The docker login command
- You will now tag the image we used previously for Azure Container Registry using the following command:
docker tag mcr.microsoft.com/azuredocs/aci-helloworld [your registry name].azurecr.io/myimages/containerdemo:latest
- You will then run the following push command to push your container to the registry:
docker push[your registry name].azurecr.io/myimages/containerdemo:latest
The output of the preceding command is shown in the following screenshot:

Figure 11.26 – Pushing your image to Docker
- On the Azure portal, if you navigate to Repositories on the left menu, you will now notice that your image has been uploaded to the registry, as illustrated in the following screenshot:
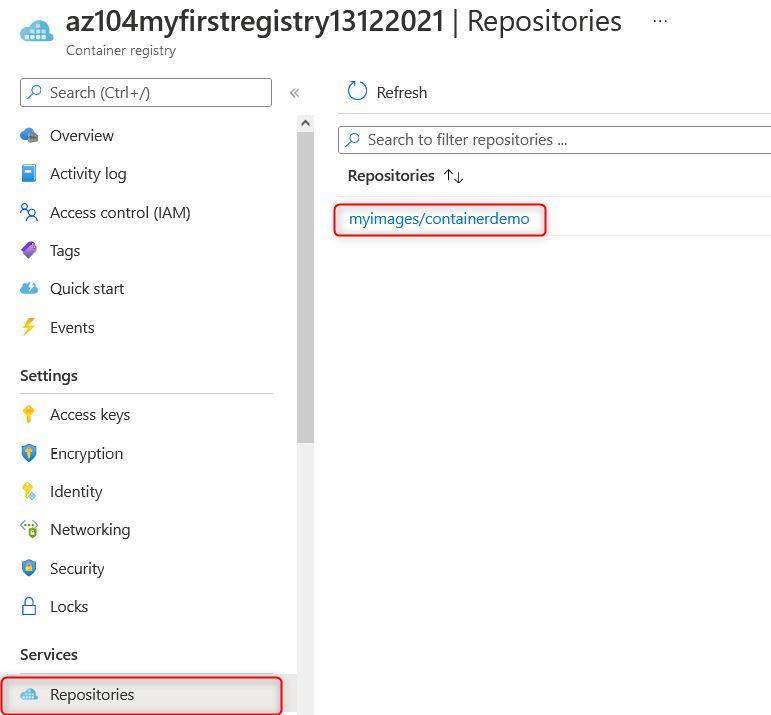
Figure 11.27 – Listing Azure container images
You have successfully uploaded your first Docker image to Azure Container Registry. Now that you have the basics under your belt, we will explore deploying your first container instance in the next section.
Deploying your first Azure container instance
For this exercise, you will create a container group and then deploy a container instance to the group with the following steps:
- Sign in to the Azure portal at https://portal.azure.com.
- Open the resource group you will be using for this exercise, click Overview on the left menu, then click Create.
On the left menu bar, click Containers, then click Container Instances, as illustrated in the following screenshot:

Figure 11.28 – ACI
- Enter your Resource group type, then give your container a name (in this case, I have used myfirstcontainer), and then select your Region value. Now, for Image source, we will use our previously uploaded image, but you will note that you have a choice to connect to Docker Hub and other registries too. You will also have the choice to start with some Quickstart images, which are sample images created to enable you to set up your container faster. Select Azure Container Registry and select the Registry type we created in the previous exercise; the Image type will also be the one we created previously, and the Image tag value will be the latest one. Leave the Size field as the default setting. A note on sizing is that you can change this to select between one and four CPUs and 0.5 to 14 GB memory for your instance. Click Next: Networking >. The process is illustrated in the following screenshot:

Figure 11.29 – Creating a container instance
- For this exercise, select Public as your Networking type value, and create a unique DNS name label value for your container, then leave the Ports configuration as it is. Just note that we are exposing port 80 (HTTP) traffic to the internet for access to this container. Click Next: Advanced >. The process is illustrated in the following screenshot:

Figure 11.30 – Creating your container instance: Networking tab
- On the Advanced tab, we can configure the Restart policy field for your container. The default option is On failure, and we will leave ours as it is. You also can configure Environment variables values. Click Review + create, then click Create. The process is illustrated in the following screenshot:

Figure 11.31 – Creating your container instance: Advanced tab
- Once your resource has been deployed, you can now connect to it on the DNS name label you configured previously.
You now know how to deploy a container instance within Azure and are ready to start your journey on containers. In the next exercise, you will explore creating your first container group.
Configuring container groups for Azure container instances
For this exercise, we are going to configure an Azure container group using an ARM template and Azure Cloud Shell using the following steps:
- Sign in to the Azure portal at https://portal.azure.com.
- On the top menu bar, click the Cloud Shell icon, as illustrated in the following screenshot:
Figure 11.32 – Azure icons
- Type code azuredeploy.json and press Enter. You may resize the screen on the highlighted points shown in the following screenshot:

Figure 11.33 – Azure Cloud Shell
Alternatively, you could also select Open a new session, which will open a shell in a new browser tab. You can see the icon for this in the following screenshot:
Figure 11.34 – Azure Cloud Shell: Open a new session icon
- In the top section of the window, paste the following code and then click the ellipsis (…) on the top right and click Save:

Figure 11.35 – Azure Cloud Shell: Visual Studio Code (VS Code)
The following code snippet contains the ARM template code for deploying your container instances:
{
    "$schema": "https://schema.management.azure.com/schemas/2019-04-01/deploymentTemplate.json#",
    "contentVersion": "1.0.0.0",
    "parameters": {
      "containerGroupName": {
        "type": "string",
        "defaultValue": "myfirstcontainergroup",
        "metadata": {
          "description": "My First Container Group"
        }
      }
    },
    "variables": {
      "container1name": "aci-tutorial-app",
      "container1image": "mcr.microsoft.com/azuredocs/aci-helloworld:latest",
      "container2name": "aci-tutorial-sidecar",
      "container2image": "mcr.microsoft.com/azuredocs/aci-tutorial-sidecar"
    },
    "resources": [
      {
        "name": "[parameters('containerGroupName')]",
        "type": "Microsoft.ContainerInstance/containerGroups",
        "apiVersion": "2019-12-01",
        "location": "[resourceGroup().location]",
        "properties": {
          "containers": [
            {
              "name": "[variables('container1name')]",
              "properties": {
                "image": "[variables('container1image')]",
                "resources": {
                  "requests": {
                    "cpu": 1,
                    "memoryInGb": 1.5
                  }
                },
                "ports": [
                  {
                    "port": 80
                  },
                  {
                    "port": 8080
                  }
                ]
              }
            },
            {
              "name": "[variables('container2name')]",
              "properties": {
                "image": "[variables('container2image')]",
                "resources": {
                  "requests": {
                    "cpu": 1,
                    "memoryInGb": 1.5
                  }
                }
              }
            }
          ],
          "osType": "Linux",
          "ipAddress": {
            "type": "Public",
            "ports": [
              {
                "protocol": "tcp",
                "port": 80
              },
              {
                  "protocol": "tcp",
                  "port": 8080
              }
            ]
          }
        }
      }
    ],
    "outputs": {
      "containerIPv4Address": {
        "type": "string",
        "value": "[reference(resourceId('Microsoft.ContainerInstance/containerGroups/', parameters('containerGroupName'))).ipAddress.ip]"
      }
    }
}- Now, type in the following code to deploy the ARM template:
az deployment group create --resource-group AZ104-Chapter11 --template-file azuredeploy.json
Press Enter. This will take a few minutes to run and will show the following output:
Figure 11.36 – ARM template deployment
- Once your deployment has completed, you can close the Cloud Shell window by clicking the cross on the top-right bar, as illustrated in the following screenshot:
Figure 11.37 – Closing VS Code
Navigate to the resource group where you deployed your container group. Open the container group resource by clicking on it. On the Overview pane, note the public IP address and that you have two containers. Copy the IP address to your browser, and note that you can connect to the site where your container group is functional, as illustrated in the following screenshot:

Figure 11.38 – Container group public IP
- Click on the Containers menu option on the left pane and note your two containers are deployed to the container group, as illustrated in the following screenshot:

Figure 11.39 – Container group: Containers
You have just successfully deployed your first container group in Azure. In the next section, we will explore how to manage the sizing and scaling of your deployed container instances.
Configuring sizing and scaling for Azure container instances
Azure container instances cannot be resized after deployment; you will notice there are no options to do so in the Azure portal. The only way to resize a container instance is to redeploy the solution with the required size. If you are looking to scale horizontally (multiple instances), you can achieve this through the container group or by deploying several instances. To configure sizing for your container instance, you will recall that on the instance setup, there is a Change size sizing option, as illustrated in the following screenshot:

Figure 11.40 – ACI: Size
The following screen will pop up for you to configure the desired size for your container instance:

Figure 11.41 – ACI: Size options
For Number of CPU cores, you can select a value between 1 and 4. You can select from between 1 and 16 for Memory (GiB). Where you have GPU-based applications or requirements, you will note that you can change your GPU type. Note that GPUs are only available to some regions, and at the time of writing, this is still a preview feature. The options available are K80, P100, or V100. The GPU selected enables further options for selecting the number of GPUs you would like, 1, 2, or 4, as shown in the following screenshot:

Figure 11.42 – ACI: GPU options
Top Tip
1 gibibyte (GiB) = 1,024 mebibyte (MiB) where GB = 1,000 megabytes (MB). Most people refer to MB or GB, and due to easy conversions and the internet industry, the conversion is often defined as 1,000 MB in 1 GB, where computers work on a binary-based number system, meaning that all numbers are calculated from a base of 2. Therefore, GiB is defined as 2^10 MiB, which is 1,024.
You now know about the sizing available to container instances, so in the next section, we will explore how Kubernetes can assist in the management of our containers.
Deploying AKS
This exercise is to help you gain familiarity with AKS. We will deploy our first AKS instance, and then with the corresponding exercises, we will explore the different management components for this. Proceed as follows:
- Sign in to the Azure portal at https://portal.azure.com.
- Open the resource group you will be using for this exercise, click Overview on the left menu, then click Create.
- On the left Category menu, select Containers, then click Create under Kubernetes Service, as illustrated in the following screenshot:

Figure 11.43 – Creating an Azure Kubernetes service
- Select your Resource group type, enter your Kubernetes cluster name value, select your Region type, and then leave all the other settings on their default configuration and click Next: Node pools >. The process is illustrated in the following screenshot:
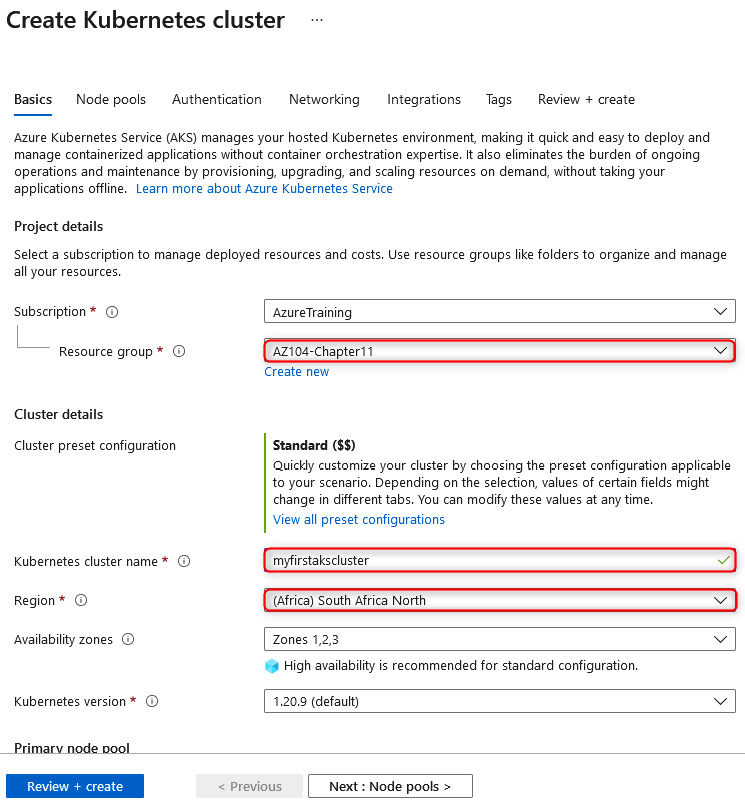
Figure 11.44 – Creating a Kubernetes cluster
- Scroll down the page, and note that we can change the Node size value. Changing this option allows you to choose a size very similar to what you saw in the previous chapter with VMs. Next, you can select how you would like to manage scaling; this can be either Manual or Autoscale. Manual means that you would like to modify the scale count yourself whenever you would like to change the count of nodes for your pool, whereas Autoscale will allow you to scale automatically based on a scaling rule. For this option, you select a range being the minimum number of nodes you want and the maximum you would like to scale it up to. As you can see, there is a lot of room for scaling with this service. Click Next: Node pools >. The process is illustrated in the following screenshot:

Figure 11.45 – Primary node pool sizing
- On the Node pools tab, you will note the ability to add additional pools that can also be configured to scale in the same fashion as the Primary node pool type we configured in the previous step. You also have the Enable virtual nodes option, which enables you to scale your containers beyond your VM specified in the previous steps, and scale to use ACI as additional nodes when AKS needs to scale out. The final option available is Enable virtual machine scale sets. You will note that it is already checked for our deployment, the reason being that it's required to support the Availability zones configuration we have from Step 4. Scale sets enable us to have a scaling VM supporting the container service; this allows better scaling of resources when it's required since a single VM will be limited in the number of containers it can host. This also enables dynamic scaling (no downtime) due to horizontal scaling ability. Having to change the size vertically (such as more or fewer resources—essentially, the stock-keeping unit (SKU)) would result in losing access to the resource temporarily while it's resized and restarted. This is a more static type of scaling. Next, click Next: Authentication >. The process is illustrated in the following screenshot:

Figure 11.46 – Creating a Kubernetes cluster: Node pools tab
- Next, we have the Authentication tab; here, you will note we can modify the setting for the Authentication method type to either Service principal or System-assigned managed identity. This will be used by AKS for managing the infrastructure related to the service. For this exercise, we will leave this at its default setting. Then, you have the Role-based access control (RBAC) option. By default, this is set to Enabled; this is the best option to manage the service as it allows fine-grained access control over the resource; leave this as Enabled. You will also have the choice to enable AKS-managed Azure Active Directory. Checking this will enable you to manage permissions for users on the service based on their group membership within Azure AD. Note that once this function has been enabled, it can't be disabled again, so leave this unchecked for this exercise. Finally, you have the option of the Encryption type value you want. For this exercise, leave it as the default setting. Click Next: Networking >. The process is illustrated in the following screenshot:

Figure 11.47 – Creating a Kubernetes cluster: Authentication tab
- For the Networking section, we will leave most of the settings as their default configuration. Note that for Network configurations we have two options here, one for Kubenet and another for Azure CNI. kubenet is a new VNet for the cluster whereby Pods are allocated an IP address and containers have network address translation (NAT) connections over the shared Pod IP. Azure Container Networking Interface (Azure CNI) enables Pods to be directly connected to a VNet. In association, this allows containers to have an IP mapped to them directly, removing the need for NAT connection. Next, we have the DNS name prefix field, which will form the first part of your FQDN for the service. You will then notice Traffic routing options available to us for the service—we will discuss this more in one of the next exercises, as well as the Security options available to us. Select Calico under Network policy. Click Next: Integrations >. The process is illustrated in the following screenshot:

Figure 11.48 – Creating a Kubernetes cluster: Networking tab
- On the Integrations tab, you will note the option to select a container registry. We will select the registry that we previously deployed. You will also note you have the option to deploy a new registry directly from this creation dialog. Next, we have the option to deploy container monitoring into the solution on creation. We will leave the default setting here, but monitoring will not be covered under the scope of this chapter. Finally, you have the option of applying Azure Policy directly to the solution; this is recommended where you want to enhance and standardize your deployments. This solution enables you to deliver consistently and control your deployments on AKS more effectively. Click Review + create, then click Create. The process is illustrated in the following screenshot:

Figure 11.49 – Creating a Kubernetes cluster: deployment
You have just successfully deployed your first Kubernetes cluster; you now know how to deploy and manage containers at scale and in a standardized way. Next, we will look at how we configure storage for Kubernetes and make persistent storage available to our solution.
Configuring storage for AKS
AKS enables different storage options available for containers; you can leverage either local (non-persistent) storage or shared storage (persistent storage) for your containers through AKS. For persistent storage options, you can leverage Azure Managed Disks, which is primarily focused on premium storage solutions, such as for fast input/output (I/O) operations, as we discussed in Chapter 6, Understanding and Managing Storage. Azure File Shares is another option available and the default storage mechanism for enabling persistent storage on containers. This is typically cheaper to deploy and provides decent levels of performance for most workloads. For better performance, premium file shares can be used. Azure File Shares is also great for sharing data between containers and other services, whereas a managed disk will be restricted to a single Pod but is easier to deploy.
The following diagram illustrates the different storage options available:

Figure 11.50 – Kubernetes: Storage layers
In this exercise, we will configure shared storage using Azure File Shares in your AKS cluster. Proceed as follows:
- Sign in to the Azure portal at https://portal.azure.com.
- Create a storage account and a file share named fileshare01. Once created, note the primary storage account key.
- Launch Azure Cloud Shell and run the following commands. Replace the resource group name with your name and the AKS cluster name for the Name field:
Az login
Install-AzAksKubectl
Import-AzAksCredential -ResourceGroupName AZ104-Chapter11 -Name myfirstakscluster
- Modify the following script with your storage account name and storage account key, then paste it into Cloud Shell and press Enter:
kubectl create secret generic azure-secret --from-literal=azurestorageaccountname=storageaccountname --from-literal=azurestorageaccountkey=storageaccountkey
- Navigate to the AKS cluster you created in the previous section. Click on Storage on the left menu, then ensure you are on the Persistent volume claims tab, and click Add, as illustrated in the following screenshot:

Figure 11.51 – Adding a persistent volume claim
- Click Add with YAML, as illustrated in the following screenshot:
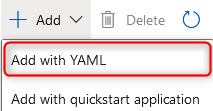
Figure 11.52 – Add with YAML
- Paste or type the following YAML document into the window:
apiVersion: v1
kind: PersistentVolume
metadata:
name: azurefile
spec:
capacity:
storage: 5Gi
accessModes:
- ReadWriteMany
azureFile:
secretName: azure-secret
shareName: fileshare01
readOnly: false
mountOptions:
- dir_mode=0777
- file_mode=0777
- uid=1000
- gid=1000
- mfsymlinks
- nobrl
Then, click Add, as illustrated in the following screenshot. This will create your persistent volume:

Figure 11.53 – Adding a persistent volume using YAML
- Now, to create a persistent volume claim, click Add again, and paste the following YAML. Click Add:
apiVersion: v1
kind: PersistentVolumeClaim
metadata:
name: azurefile
spec:
accessModes:
- ReadWriteMany
storageClassName: ""
resources:
requests:
storage: 5Gi
- You now have a persistent volume claim. Click on the Persistent volume claims tab, as illustrated in the following screenshot:

Figure 11.54 – Persistent volume claims tab
- Note your persistent volumes by clicking on the Persistent volumes tab, as illustrated in the following screenshot:

Figure 11.55 – Persistent volumes tab
You have successfully added persistent storage to your AKS cluster. You now know the tasks involved to achieve this goal. In the next section, we will explore AKS scaling.
Configuring scaling for AKS
You will note that from our previous exercises, there was no option to automatically scale and resize containers. The only way to change this was to redeploy our container instances and groups. With Kubernetes, this dynamic changes as you can change the scale settings before and after your deployment, and they can be configured to scale manually or automatically. For this exercise, we will run through changing the auto-scale settings of our AKS cluster. Proceed as follows:
- Sign in to the Azure portal at https://portal.azure.com.
- Navigate to the AKS cluster you created in the previous section. On the left menu, select the Node pools option and click on your deployed agentpool node pool, as illustrated in the following screenshot:

Figure 11.56 – Configuring a Kubernetes cluster: Node pools
- Selecting either the Overview or Configuration pane will present you with the option to change your pool scale settings. Click Scale node pool, as illustrated in the following screenshot:

Figure 11.57 – Configuring a Kubernetes cluster: Overview
- To change the automatic scale option, set the Scale method type to Autoscale, enter a value for your Min and Max node count, then click Apply. The process is illustrated in the following screenshot:

Figure 11.58 – Configuring a Kubernetes cluster: Scale node pool
- For the manual scale option, set the Scale method type to Manual, enter a Node count value (this will be the number of nodes you want to run), and click Apply. The process is illustrated in the following screenshot:

Figure 11.59 – Configuring a Kubernetes cluster: Scale node pool (continued)
- After applying the settings, you will notice your agent pool goes into an Updating state, as illustrated in the following screenshot:

Figure 11.60 – Configuring a Kubernetes cluster: Updating
You now know how to scale your agent pools within AKS and can feel confident about managing this aspect. If you would like to change the VM size for the agent pool, you will need to redeploy the pool. In the next section, we will look at managing network configurations on your AKS cluster.
Configuring network connections for AKS
We have covered AKS cluster deployment in one of the previous exercises. In this section, we will elaborate on some networking configurations to give you a better understanding of the options available to you.
Network configuration
The first component in your network configuration is the different types of networks that are available for you to deploy.
kubenet
This is the most basic networking service for AKS. With kubenet, an IP address is allocated from an Azure VNet to the nodes for a Pod. The Pods receive an IP address from an internal network that is deployed in a logically different address space from the VNet. Connections to these Pods are then performed through NAT connections that allow Pods to communicate to resources on the Azure VNet. This approach reduces the number of IP addresses required for your solution but disables the ability to directly connect to your containers.
Azure CNI
This is a more advanced implementation networking service for AKS. Azure CNI enables Pods to be directly connected to an Azure VNet, and therefore every Pod is allocated an IP address on the VNet. Without careful planning, you may exhaust your IP allocation on the subnet you are connecting to.
Regardless of the solution you choose, external traffic is still conducted over a NAT connection to nodes within AKS from a public IP interface.
Traffic routing
Traffic routing comprises the load balancing and application routing configurations available to your AKS cluster.
Load balancer
The AKS cluster can be deployed using both a standard SKU and a basic SKU. A standard SKU enforces traffic securely, restricts traffic by default, and requires explicit allow rules to enable traffic flow. The default option is Standard and is the recommended choice unless there is a specific reason for Basic, such as your organization only allowing private IP access. Basic can only be deployed using the Azure command-line interface (CLI), PowerShell, or an ARM template.
Enabling HTTP application routing
Please note before enabling this feature that it is currently not designed or ready for production environments and is something I would advise being cautious about enabling until Microsoft's documentation reflects that this is ready for production use.
The solution deploys two components, one being an External-DNS controller component, which creates DNS host A records for the cluster DNS zone, and the second resource being an ingress controller component, which is responsible for routing ingress traffic to application endpoints.
Security
When configuring your network for AKS, you should consider the security components that also impact your design and management decisions. There are several items to consider (which we discuss in the following sections) that can improve the security of your containers.
Enabling a private cluster
For enhanced security, you can enable a private cluster. This ensures that traffic between your application programming interface (API) server and node pools is conducted over private network paths only. When configured, the control plane (API server) is run within the AKS-managed Azure subscription while your AKS cluster runs in your own subscription. This separation is key. Communication will then occur over a private endpoint (private link) from your AKS cluster to the private link service for the AKS VNet.
Setting authorized IP ranges
These are ranges that you will limit to accessing your AKS cluster. This can be specified as a single IP, as a list of IP addresses, or as a range of IP addresses in classless inter-domain routing (CIDR) notation.
The following screenshot is an example of setting authorized IP addresses:

Figure 11.61 – Authorized IP addresses
You now understand the role that authorized IP ranges play in your AKS deployment. Next, we will explore the impact that network policy has on deployments.
Network policy
This is used to manage traffic flow between Pods in an AKS cluster. By default, all traffic is allowed, and by utilizing network policy, you enable the mechanism to manage this traffic using Linux iptables. Two implementations can be followed: Calico and Azure Network Policies. Calico is an open source solution provided by Tigera, whereas Azure has its own implementation of the same type of technology. Both services are fully compliant with the Kubernetes specification. The choice of network policy provider can only be chosen on the creation of the AKS cluster and can't be changed, so it's pivotal that you understand the differences between the solutions prior to making your choice.
The key differences between the solutions are presented here:

Upgrading an AKS cluster
You have the choice to automatically upgrade your AKS clusters or to manually manage upgrades yourself. As part of your upgrade decisions, you can decide if you would like to upgrade both the node pools and control plane or the control plane only. Automatic upgrades have the option of choosing different channels that best apply to your requirements; these are listed as follows:
- None: Used for disabling auto upgrading.
- Patch: The cluster is automatically updated to the latest support patch version.
- Stable: The cluster is automatically updated to the latest stable version.
- Rapid: The cluster is automatically updated to the latest N-2 minor version.
- Node-image: The cluster is automatically updated to the latest version available.
Top Tip
It's important to note that when upgrading your AKS clusters, you will upgrade to a supported patch version for your cluster, one version at a time where more than one version upgrade exists.
We will now perform the exercise of upgrading your cluster with the following steps:
- Sign in to the Azure portal at https://portal.azure.com.
- Navigate to the AKS cluster you created in the previous section. On the left menu, select the Cluster configuration option and click Upgrade version on the right, as illustrated in the following screenshot:

Figure 11.62 – Cluster configuration
- Select your desired Kubernetes version and select an Upgrade scope type, then click Save. The process is illustrated in the following screenshot:

Figure 11.63 – Upgrading the version of Kubernetes
You have just successfully upgraded your Kubernetes version and understood the various automated options also available to do this. Next, we will run through the chapter summary and all that we have covered in this chapter.
Summary
In this chapter, we discovered what containers are and how we deploy and manage them, we learned about Docker, the limitations of Docker, and container deployments, and finally, we found out how we can extend default container services through orchestration tools such as Kubernetes that greatly enhance the way we manage and scale containers. As part of your learning, you have discovered how to work with ACI Instances and learned how to also attach persistent storage to containers using AKS, how to enhance the security around containers, and about the various networking options available to you as part of AKS. You also experienced working with deployments and administrative tasks such as creating an Azure container registry, deploying Azure container instances, and creating and configuring Azure container groups.
You should now feel confident about the administration of containers within Azure, the methods of deployment, and how to orchestrate and manage these.
In the next chapter, we will explore Azure App Service, what this is, how to configure and deploy it, and becoming confident in how to use this on Azure.