
Chapter 17: Integrating On-Premises Networks with Azure
In the previous chapter, we covered load balancing services in Azure and explored the configuration of services such as Load Balancer and Application Gateway.
This chapter continues with this objective by covering how to integrate your on-premises network with an Azure virtual network. In this chapter, we are going to focus on virtual private network (VPN) connections from your on-premises environment to Azure. You will learn how to create an Azure VPN gateway, and you will learn how to configure a Site-to-Site (S2S) VPN using an on-premises server and Azure VPN Gateway. At the end of the chapter, we will explore Azure Virtual WAN and the capabilities this introduces.
In this chapter, we are going to cover the following main topics:
- Azure VPN Gateway
- Creating and configuring an Azure VPN gateway
- Creating and configuring Azure ExpressRoute
- Azure Virtual WAN
- Configuring Azure Virtual WAN
Technical requirements
To follow along with the hands-on material, you will need the following:
- Access to an Azure subscription with owner or contributor privileges. If you do not have access to one, you can enroll for a free account at https://azure.microsoft.com/en-us/free/.
Azure VPN Gateway
Azure VPN Gateway provides a secure gateway that can be used for sending encrypted traffic over the internet between an Azure virtual network and an on-premises location. This gateway can be used for sending encrypted traffic between different Azure virtual networks and the Microsoft networks as well.
For each virtual network, you can only have one VPN gateway. You can, however, create multiple connections to the same VPN gateway. When creating multiple connections, all the VPN tunnels will share the available gateway bandwidth.
A virtual network gateway is created with two or more virtual machines (VMs) that are deployed in a gateway subnet. This is a specific subnet that is created for the VPN connection. The VMs that are deployed in the gateway subnet are created at the same time as the virtual network gateway is created. The VMs are then configured to contain specific gateway services and routing tables to connect to the gateway in Azure. It is not possible to configure the gateway services and routing tables manually. All gateway stock keeping unit (SKUs) except for the Basic SKU include 128 Point-to-Site (P2S) connections in the price.
Azure VPN Gateway offers the following pricing tiers:
- Basic: This tier provides a maximum of 10 S2S/virtual network (VNet)-to-VNet tunnels (10 are included in the price) and a maximum of 128 P2S connections. The average bandwidth is 100 Mbps.
- VpnGw1: This tier provides a maximum of 30 S2S/VNet-to-VNet tunnels (10 are included in the price) and a maximum of 250 P2S connections. The average bandwidth is 650 Mbps.
- VpnGw2: This tier provides a maximum of 30 S2S/VNet-to-VNet tunnels (10 are included in the price) and a maximum of 500 P2S connections. The average bandwidth is 1 Gbps.
- VpnGw3: This tier provides a maximum of 30 S2S/VNet-to-VNet tunnels (10 are included in the price) and a maximum of 1,000 P2S connections. The average bandwidth is 1.25 Gbps.
- VpnGw4: This tier provides a maximum of 100 S2S/VNet-to-VNet tunnels (10 are included in the price) and a maximum of 5,000 P2S connections. The average bandwidth is 5 Gbps.
- VpnGw5: This tier provides a maximum of 100 S2S/VNet-to-VNet tunnels (10 are included in the price) and a maximum of 10,000 P2S connections. The average bandwidth is 10 Gbps.
There is also the option for an availability zone (AZ) variation of each Gateway SKU, except for Basic, denoted with a suffix of AZ, for example, VpnGw4AZ. They offer similar specifications and are as follows:
- VpnGw1AZ: This tier provides a maximum of 30 S2S/VNet-to-VNet tunnels (10 are included in the price) and a maximum of 128 P2S connections. The average bandwidth is 650 Mbps.
- VpnGw2AZ: This tier provides a maximum of 30 S2S/VNet-to-VNet tunnels (10 are included in the price) and a maximum of 128 P2S connections. The average bandwidth is 1 Gbps.
- VpnGw3AZ: This tier provides a maximum of 30 S2S/VNet-to-VNet tunnels (10 are included in the price) and a maximum of 128 P2S connections. The average bandwidth is 3 Gbps.
- VpnGw4AZ: This tier provides a maximum of 100 S2S/VNet-to-VNet tunnels (10 are included in the price) and a maximum of 128 P2S connections. The average bandwidth is 6 Gbps.
- VpnGw5AZ: This tier provides a maximum of 100 S2S/VNet-to-VNet tunnels (10 are included in the price) and a maximum of 128 P2S connections. The average bandwidth is 10 Gbps.
For better redundancy (high-availability) options, it is, of course, better to select the AZ variant, but understand that it costs significantly more than the standard SKU. This would be desirous for customers and workloads where constant connectivity is essential to operations and downtime would be costly to the client. Next, we will explore S2S VPN connections.
S2S VPN connections
An S2S VPN gateway connection is a connection over an IPsec/IKE (IKEv1 or IKEv2) VPN tunnel. These connections can be used for hybrid configurations and cross-premises configurations. It is designed to create a secure connection between a location and your virtual network over the internet. The location can be an office or even another VPN gateway, as an example. Once the S2S VPN connection is configured, you can connect every device from that location to Azure using the same VPN location.
An S2S connection requires a compatible VPN device located on-premises that has a public IP address assigned to it. It should not be located behind a NAT. S2S connections are designed to be persistent in nature and always on; this is not required, of course, but important to understand the intended design.
Top Tip
For more information about the compatible VPN devices, you can refer to the following documentation: https://docs.microsoft.com/en-us/azure/vpn-gateway/vpn-gateway-vpn-faq#s2s.
The following diagram shows an S2S VPN connection from an on-premises environment to Azure:

Figure 17.1 – S2S VPN tunnel
In the next section, we are going to look at multi-site VPNs.
Multi-site VPN connections
A multi-site VPN connection is a variation of the S2S connection. You use this type of connection for connecting to multiple on-premises sites from your virtual network gateway. It is required that multi-site connections use a route-based VPN type gateway. All connections through the gateway will share the available bandwidth. This is because each virtual network can only have one VPN gateway.
The following diagram shows a multi-site VPN connection from an on-premises environment to Azure:

Figure 17.2 – Multi-site VPN tunnels
In the next section, we are going to look at the P2S VPN.
P2S VPN connections
A P2S VPN gateway connection is designed to create a secure connection between an individual client and your virtual network over the internet. It is established from the client's computer and is useful for people who are working from different locations, such as from their home or from a hotel. A PS2 VPN is also the best solution if you only have a few clients to connect to a virtual network.
A P2S connection does not require an on-premises, public-facing IP address as S2S VPN connections do. You are able to use P2S connections together with S2S connections over the same VPN gateway. You need to make sure that the configuration requirements for both connections are compatible so that you can use both connection types over the same gateway.
The following diagram shows a P2S VPN connection from an on-premises environment to Azure:

Figure 17.3 – P2S VPN tunnel
In the next section, we are going to look at ExpressRoute.
ExpressRoute
ExpressRoute offers a private connection that is facilitated by a connectivity provider. ExpressRoute connections don't go over the public internet, but they use a more reliable connection. These types of connections offer lower latencies, higher security, and faster speeds than connections that go over the internet. You can use it to extend your on-premises networks to Azure and Office 365. Connections can be made from an any-to-any (IP VPN) network, a virtual cross-connection at a co-location facility, and a point-to-point Ethernet network connection.
ExpressRoute uses a virtual network gateway, which is configured with a gateway type of ExpressRoute instead of a VPN. By default, the traffic is not encrypted, but you can create a solution that encrypts the traffic that goes over the ExpressRoute circuit.
The following diagram shows an ExpressRoute connection from an on-premises environment to Azure:

Figure 17.4 – ExpressRoute VPN tunnel
Now that we have looked at the different types of VPN connections you can configure, we are now going to create and configure an Azure VPN gateway.
Creating and configuring an Azure VPN gateway
In the upcoming sections, we are going to configure an Azure VPN gateway, configure an S2S VPN, and verify the connectivity between Azure and the on-premises environment.
We are going to use Windows Server 2019 with the Routing and Remote Access Service (RRAS) enabled to serve as the compatible VPN device that is installed on the on-premises environment.
Creating and configuring an Azure VPN gateway
To create a VPN gateway, you can perform the following steps to follow along in our example:
- Create a new resource group named AZ104-VPNGateway.
- Click + Create on the Overview screen for the resource group.
- Type vpn gateway in the search bar and press the Enter/Return key. Click Virtual network gateway from the options that are returned:

Figure 17.5 – Choosing VPN gateway
- Click Create.
- Enter the following and click Review + create:
- Subscription: Select your Azure subscription.
- Name: az104gateway.
- Region: West Europe (or select what you prefer).
- Gateway type: VPN.
- VPN type: Route-based.
- SKU: Basic.
- Generation: Generation1.
- Virtual network: Use an existing VNet or create a new one named az104gatewayvnet.
- Public IP address: Create new.
- Public IP address name: az104gatewayip.
- Public IP address SKU: Basic.
- Assignment: Dynamic.
- Enable active-active mode: Disabled.
- Configure BGP: Disabled.
- The creation of the resource takes about 45 to 60 minutes so it's a good time to grab some coffee and reflect on your learnings so far.
You have now deployed a VPN gateway. Next, we will explore the creation of an S2S VPN connection using the Gateway service. First, we will need a VM to act as the VPN server.
VPN server deployment
To deploy your VPN server, you will need to perform the following steps:
- Navigate to your VPN resource group.
- Click + Create on the Overview screen for the resource group.
- Type custom deployment in the search bar and click Template deployment (deploy using custom templates) from the options that are returned:

Figure 17.6 – Custom deployment
- Click Create.
- Click Build your own template in the editor:
Figure 17.7 – Use your template
- Paste the following and click Save:
{"$schema": "https://schema.management.azure.com/schemas/2019-04-01/deploymentTemplate.json#",
"contentVersion": "1.0.0.0",
"parameters": {"vmName": { "type": "string", "defaultValue": "az104vpnserver" },"adminUsername": { "type": "string", "defaultValue": "Packtadmin" },"adminPassword": { "type": "securestring", "defaultValue": "P@55w0rd()" },"windowsOSVersion": { "type": "string", "defaultValue": "2019-Datacenter" },"vmSize": { "type": "string", "defaultValue": "Standard_D2s_v4" },"resourceTags": { "type": "object", "defaultValue": { "Application": "AZ104 VPN Gateway" } },"vnetName": { "type": "string", "defaultValue": "vpnvnet" },"subnetName": { "type": "string", "defaultValue": "vnpsubnet" }},
"functions": [],
"variables": {"diagnosticsStorageAccountName": "[concat(parameters('vmName'),'sa01')]","nicName": "[concat(parameters('vmName'),'-nic01')]","nsgName": "[concat(parameters('vmName'),'-nsg-01')]","publicIPName": "[concat(parameters('vmName'),'-ip-01')]"},
"resources": [
{"name": "[toLower(variables('diagnosticsStorageAccountName'))]","type": "Microsoft.Storage/storageAccounts",
"apiVersion": "2021-04-01",
"location": "[resourceGroup().location]",
"tags": "[parameters('resourceTags')]","sku": { "name": "Standard_LRS" },"kind": "Storage"
},
{"name": "[variables('publicIPName')]","type": "Microsoft.Network/publicIPAddresses",
"apiVersion": "2020-11-01",
"location": "[resourceGroup().location]",
"tags": "[parameters('resourceTags')]","properties": { "publicIPAllocationMethod": "Dynamic", "dnsSettings": { "domainNameLabel": "[toLower(parameters('vmName'))]" } }},
{"name": "[variables('nsgName')]","type": "Microsoft.Network/networkSecurityGroups",
"apiVersion": "2020-11-01",
"location": "[resourceGroup().location]",
"properties": {"securityRules": [ {"name": "nsgRule1",
"properties": { "description": "description", "protocol": "Tcp", "sourcePortRange": "*", "destinationPortRange": "3389", "sourceAddressPrefix": "*", "destinationAddressPrefix": "*", "access": "Allow", "priority": 100, "direction": "Inbound" }} ]
}
},
{"name": "[parameters('vnetName')]","type": "Microsoft.Network/virtualNetworks",
"apiVersion": "2020-11-01",
"location": "[resourceGroup().location]",
"dependsOn": [ "[resourceId('Microsoft.Network/networkSecurityGroups', variables('nsgName'))]" ],"tags": "[parameters('resourceTags')]","properties": {"addressSpace": { "addressPrefixes": [ "99.0.0.0/24" ] },"subnets": [ {"name": "[parameters('subnetName')]", "properties": { "addressPrefix": "99.0.0.0/24", "networkSecurityGroup": { "id": "[resourceId('Microsoft.Network/networkSecurityGroups', variables('nsgName'))]" } }} ]
}
},
{"name": "[variables('nicName')]","type": "Microsoft.Network/networkInterfaces",
"apiVersion": "2020-11-01",
"location": "[resourceGroup().location]",
"dependsOn": [ "[resourceId('Microsoft.Network/publicIPAddresses', variables('publicIPName'))]", "[resourceId('Microsoft.Network/virtualNetworks', parameters('vnetName'))]" ],"tags": "[parameters('resourceTags')]","properties": {"ipConfigurations": [
{"name": "ipConfig1",
"properties": {"privateIPAllocationMethod": "Dynamic",
"publicIPAddress": { "id": "[resourceId('Microsoft.Network/publicIPAddresses', variables('publicIPName'))]" }, "subnet": { "id": "[resourceId('Microsoft.Network/virtualNetworks/subnets', parameters('vnetName'), parameters('subnetName'))]" }}
}
]
}
},
{"name": "[parameters('vmName')]","type": "Microsoft.Compute/virtualMachines",
"apiVersion": "2021-03-01",
"location": "[resourceGroup().location]",
"dependsOn": [ "[resourceId('Microsoft.Storage/storageAccounts', toLower(variables('diagnosticsStorageAccountName')))]", "[resourceId('Microsoft.Network/networkInterfaces', variables('nicName'))]" ],"tags": "[parameters('resourceTags')]","properties": {"hardwareProfile": { "vmSize": "[parameters('vmSize')]" },"osProfile": { "computerName": "[parameters('vmName')]", "adminUsername": "[parameters('adminUsername')]", "adminPassword": "[parameters('adminPassword')]" },"storageProfile": {"imageReference": { "publisher": "MicrosoftWindowsServer", "offer": "WindowsServer", "sku": "[parameters('windowsOSVersion')]", "version": "latest" },"osDisk": { "name": "[concat(parameters('vmName'),'osdisk')]", "caching": "ReadWrite", "createOption": "FromImage" }},
"networkProfile": { "networkInterfaces": [ { "id": "[resourceId('Microsoft.Network/networkInterfaces', variables('nicName'))]" } ] },"diagnosticsProfile": { "bootDiagnostics": { "enabled": true, "storageUri": "[reference(resourceId('Microsoft.Storage/storageAccounts/', variables('diagnosticsStorageAccountName'))).primaryEndpoints.blob]" } }}
}
]
}
- Notice all your values are prepopulated; click Review + create.
- Click Create.
- Log in to your server using a Remote Desktop Connection (RDC). Use the following credentials:
- Username: Packtadmin
- Password: P@55w0rd()
- On the Server Manager window that appears, with the default being on the Dashboard menu, click Add roles and features:

Figure 17.8 – Add roles and features
- On the Add roles and features wizard, click Next.
- Select Role-based or feature-based installation. Click Next.
- Click Next again.
- Select Remote Access and click Next:

Figure 17.9 – Remote Access feature
- For the Features and Remote Access pages, click Next.
- For Role Services, select Direct Access and VPN (RAS). Then, click Add Features on the pop-up window that appears. Click Next.
- Click Next until you get to the confirmation screen and click Install.
- Before closing the wizard, click Open the Getting Started Wizard:

Figure 17.10 – Open the Getting Started Wizard

Figure 17.11 – Right-click on Start
- Click on Device Manager, then click on Action on the top menu, and click Add legacy hardware:

Figure 17.12 – Device Manager
- On the wizard, click Next. Then click Install the hardware that I manually select from a list (Advanced) on the subsequent screen. Click Next:

Figure 17.13 – Installing hardware
- Scroll down to select Network adapters and click Next.
- Select Microsoft under Manufacturer, and then Microsoft KM-TEST Loopback Adapter under Model:

Figure 17.14 – Adding a loopback adapter
- Click Next, then click Finish on the screens that follow. Close the Computer Management window.
- On the Routing and Remote Access window, right-click on your server and click Configure and Enable Routing and Remote Access on the pop-up window:

Figure 17.15 – Configure routing feature
- On the next wizard, click Next. Select the Virtual private network (VPN) access and NAT option. Click Next:

Figure 17.16 – VPN and NAT

Figure 17.17 – Ethernet interface
- For IP Address Assignment, select From a specified range of addresses. Click Next:

Figure 17.18 – IP Assignment on VPN
- Click New…. Specify as follows and click OK. Click Next:

Figure 17.19 – New IPv4 range
- Leave the next selection as No and click Next:

Figure 17.20 – RADIUS server configuration
- Click Finish. You will get warned about your firewall and you will be required to open port 4500 and 500 UDP on both inbound and outbound on the server through the Windows Defender Firewall with Advanced Security window.
- When the following screen pops up, click OK:

Figure 17.21 – DHCP option
- Click the Start button and then Windows Security:

Figure 17.22 – Windows Security

Figure 17.23 – Firewall and network protection
- Click Inbound Rules on the left and then New Rule… on the right:

Figure 17.24 – New Inbound Rule
- Select Port and click Next.
- You can configure the rule as follows, and click Next:

Figure 17.25 – UDP rule
- Click Allow the connection and then click Next.
- Click Next again, leaving Domain, Private and Public selected.
- Enter Name as VPNGW-inbound. Click Finish.
- Repeat the process for outbound, changing the name to VPNGW-outbound, and ensure that you select Allow the connection.
- Navigate back to the Routing and Remote Access window. Right-click on Network Interfaces and click New Demand-dial Interface…:

Figure 17.26 – New Demand-dial Interface
- Click Next, then change the name to Azure VPN, and click Next.
- Select Connect using virtual private network (VPN) and click Next.
- Select IKEv2 and click Next.
- Enter the IP address of the VPN gateway from Azure. Click Next on this and the next screen.
- Click Add, then enter the following and click OK (if your VNet associated with the VPN gateway is a /16 range, then your subnet is 255.255.0.0; if it is a /24 range, then it is 255.255.255.0). Click Next:

Figure 17.27 – Static route
- Click Next, then Finish.
- Right-click Azure VPN and click Properties.
- Click the Security tab and then click Use preshared key for authentication. Generate a key you would like to use as a secret for the S2S connection, paste it into the Key field, and click OK:

Figure 17.28 – IKEv2 key
You have just configured your VPN server for the VPN gateway in Azure. Next, we will configure the Azure VPN Gateway side to establish an S2S connection.
S2S VPN Configuration
To configure an S2S VPN tunnel using Azure VPN Gateway, we will use a Windows server with RRAS features installed. This will work as the equivalent of an on-premises appliance that would typically run a persistent connection with the VPN gateway. An S2S tunnel is typically designed to be persistent:
- Navigate to your VPN resource group.
- Click + Create on the Overview screen for the resource group.
- Type local network gateway in the search bar and press Enter/Return. Click Virtual network gateway from the options that are returned:

Figure 17.29 – Choosing Local network gateway
- Click Create.
- Enter the following and click Review + create:
- Subscription: Select your Azure subscription.
- Resource Group: AZ104-VPNGateway.
- Region: West Europe (or select what you prefer).
- Name: VPNServer.
- Endpoint: IP address.
- IP address: Enter the IP address of the VM you spun up in the previous exercise.
- Address Space(s): 99.0.0.0/24.
- Click Create.
- Navigate to the VPN gateway you deployed earlier in the chapter.
- Click on Connections under the Settings context.
- Enter the following and click OK:
- Name: Azureto2019.
- Connection type: Site-to-site (IPsec).
- Virtual network gateway: The gateway you configured earlier.
- Local network gateway: Select the one you created in the previous steps.
- Shared key: Paste your key used in the previous exercise.
- Use Azure Private IP Address: Unselected.
- IKE protocol: IKEv2.
- Now that you have configured the S2S components, go back to your VPN server and navigate to the Routing and Remote Access window.
- Click Network Interfaces and right-click on your Azure VPN interface and click Connect. If all is configured correctly, you should successfully connect:
Figure 17.30 – RRAS VPN connection
Now that you have configured your Windows VPN server, we will test it in the next section.
Verify connectivity via the Azure portal
To verify connectivity, follow these steps:
- Navigate to your VPN Gateway resource on the Azure portal.
- Click Connections under the Settings context. Note the connection on the right-hand side of the screen; a status of Connected shows that the tunnel has been successfully established. If the view does not update, there is also a refresh button at the top of the page:

Figure 17.31 – S2S connected in Azure
In the next section, we will explore VNet to VNet connectivity.
VNet to VNet connections
Configuring a VNet-to-VNet connection is a simple way to connect VNets. Connecting a virtual network to another virtual network is similar to creating an S2S IPSec connection to an on-premises environment. Both the connection types use Azure VPN Gateway. The VPN gateway provides a secure tunnel IPsec/IKE and they communicate in the same way. The difference is in the way the local network gateway is configured.
When you create a VNet-to-VNet connection, the local network gateway address space is automatically created and populated. If you update the address space for one VNet, the other VNet automatically routes to the updated address space. This makes it faster and easier to create a VNet-to-VNet connection than an S2S connection.
Top Tip
To create a VNet-to-VNet connection from the Azure portal, you can refer to the following tutorial: https://docs.microsoft.com/en-us/azure/vpn-gateway/vpn-gateway-howto-vnet-vnet-resource-manager-portal.
Create and configure Azure ExpressRoute
In the following exercise, we will explore the creation of an ExpressRoute circuit. We will only emulate the deployment as it typically includes involvement from a provider with a corresponding circuit configuration at the edge to join Azure:
- Create a resource group named AZ104-ExpressRoute in West Europe.
- Click in the search bar at the top of the Azure screen and type express route, and then press Enter/Return. Click ExpressRoute circuits from the options that appear:

Figure 17.32 – Deploying an ExpressRoute circuit
- Enter the following and click Next : Configuration >:
- Subscription: Select your Azure subscription.
- Resource Group: AZ104-ExpressRoute.
- Region: West Europe (or select what you prefer).
- Name: az104expressroute.
- Depending on how you have procured your ExpressRoute circuit, this will determine what options you select next. Since this demonstration will not really be an ExpressRoute connection, we will configure it as follows and click Review + create:
- Port Type: Provider.
- Create new or import from classic: Create new.
- Provider: Select a provider.
- Peering Location: Select a location.
- Bandwidth: 200Mbps.
- SKU: Standard.
- Billing model: Metered.
- Allow classic operations: No.

Figure 17.33 – ExpressRoute configuration
- Click Create.
For the completion of setting up an ExpressRoute circuit connection, you will need to contact your ExpressRoute provider and confirm the circuit numbers as part of your deployment. You will provide them with the service key associated with the circuit you have deployed in Azure.
For additional reading and guidance on the deployment steps, you can read these articles:
- ExpressRoute overview: https://docs.microsoft.com/en-us/azure/expressroute/expressroute-introduction
- Create and modify an ExpressRoute circuit: https://docs.microsoft.com/en-us/azure/expressroute/expressroute-howto-circuit-portal-resource-manager
Now that you understand how to configure an ExpressRoute circuit, you can feel confident in starting the deployment in your organization. Next, we will explore Azure Virtual WAN.
Azure Virtual WAN
Azure Virtual WAN provides a mechanism for a managed hub-and-spoke network within Azure. It consolidates all your endpoint connection types into a single service that simplifies the management of your complex networks and enables transitive network functionality.
The following diagram shows an illustration of the various interconnections that may be employed in a typical environment:

Figure 17.34 – Azure Virtual WAN illustration
As illustrated in the preceding diagram, you could have a variety of connection types, such as ExpressRoute, S2S connections, P2S connections, and even VNet peering. All the traffic flow configurations are managed through Azure Virtual WAN, which will also configure your transitive network flows, eliminating the need for an additional Network Virtual Appliance (NVA). The deployment of Virtual WAN also allows for the deployment of a firewall in the solution, allowing you to secure traffic natively through your hub-and-spoke model.
There are two SKUs that you can purchase as part of the service:
- Basic: The following connections are supported:
- S2S VPN connections
- Branch-to-branch
- Branch-to-VNet connections and VNet-to-branch
- Standard: The following connections are supported:
- P2S connections
- S2S connections
- ExpressRoute (ExpressRoute to ExpressRoute connections are only supported through ExpressRoute Global Reach)
- VNet-to-VNet connections (including Hub Transit)
- VNet-to-Hub and Hub-to-VNet connections
- Branch-to-branch
- Branch-to-VNet connections and VNet-to-branch
- Azure Firewall
- NVA in a Virtual WAN
Effectively, the intention of Virtual WAN is to act as a head-end for your network being the primary routing service for all your interconnections required.
Top Tip
While you can upgrade from the Basic to Standard SKU, you cannot downgrade from Standard to Basic. This is important in deciding your direction for implementation and upgrading.
Now that you understand what Virtual WAN is, we will look at the deployment of the service next.
Configuring Azure Virtual WAN
In order to configure Azure Virtual WAN, you will need to perform the following steps:
- Create a new resource group named AZ104-VirtualWAN.
- Click + Create on the Overview screen for the resource group.
- Click Networking on the left menu, then select Virtual WAN from the options on the right:

Figure 17.35 – Virtual WAN
- Enter the following and then click Review + create:
- Subscription: Select your Azure subscription.
- Resource group: AZ104- VirtualWAN.
- Resource group location: West Europe (or select what you prefer).
- Name: az104virtualwan.
- SKU: Standard.
- Click Create.
- Navigate to your Virtual WAN and click Hubs under the Connectivity context.
- Click + New Hub.
- Enter the following details and click Next : Site to site >:
- Region: West Europe (or select what you prefer)
- Name: vwanhub
- Hub private address space: 110.0.0.0/24
- Select Yes for Do you want to create a Site to site (VPN gateway)?, select 1 scale unit – 500 Mbps x 2, and set Routing preference as Microsoft network:

Figure 17.36 – Hub site
- Click Review + create, then click Create.
Now that you have a Virtual WAN deployment, you will create a VPN site next.
Creating a VPN Site
In this exercise, you will create your first VPN site for the Virtual WAN:
- Navigate to your Virtual WAN and click VPN sites under the Connectivity context.
- Click + Create site.
- Enter the following details and click Next : Links >:
- Region: West Europe (or select what you prefer)
- Name: Windows_RRAS
- Device Vendor: Windows RRAS
- Private address space: 99.0.0.0/24
- Enter the following details and click Next : Review + create >. Here, Link Speed refers to the speed in MBps of the line, and Link IP address/FQDN is your VPN server/NVA device that you are connecting to:
- Link Name: rraslink
- Link Speed: 50
- Link provider name: rras server
- Link IP address/FQDN: Public IP of your VPN VM
- Click Create.
Now that you have created your VPN site, you will need to connect this to the hub next.
Connecting your VPN site to the hub
Now that your site is configured, you will need to connect to your VPN connection using your VPN server:
- Navigate to your Virtual WAN and click Hubs under the Connectivity context.
- Click on your Virtual WAN from the options on the right.
- In the Virtual Hub pane, click VPN (Site to site) under the Connectivity context.
- Click Clear all filters to view your VPN site:

Figure 17.37 – Clear all filters
- Select your VPN site and click Connect VPN sites:

Figure 17.38 – Associate VPN site

Figure 17.39 – S2S VPN configuration
- You will see Connection Provisioning status stating Succeeded:

Figure 17.40 – Connection Provisioning status
Now you have a VPN connection, you will attempt to connect to this next.
Connect to your VPN site
Now that your site is connected to the hub, you can connect to this using your VPN server:
- Log on to the server you provisioned for the Creating and configuring an Azure VPN gateway exercise. Navigate to Routing and Remote Access and create a new demand-dial interface.
- Click Next, then change the name to Azure VWAN VPN, and click Next.
- Select Connect using virtual private network (VPN) and click Next.
- Select IKEv2 and click Next.
- Navigate to your Virtual WAN and click Hubs under the Connectivity context.
- Navigate to your Virtual WAN and click VPN (Site to site) under Connectivity.
- Click on the text next to Gateway scale units:
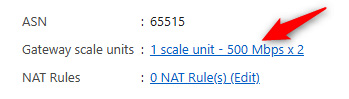
Figure 17.41 – Gateway scale units
- Note the public IP address under VPN Gateway Instance 0:

Figure 17.42 – Public IP Address
- Enter this IP address of the VPN gateway from Azure in the Demand-Dial Interface wizard on the RRAS server. Click Next on this and the next screen.
- Click Add, then enter the following and click OK. If your VNet associated with the VPN gateway is a /16 range, then your subnet is 255.255.0.0; if it is a /24 range, then it is 255.255.255.0. Click Next:

Figure 17.43 – Static route
- Click Next, then Finish.
- Click Network Interfaces, right-click Azure VWAN VPN, and click Properties.
- Click the Security tab and then click Use preshared key for authentication. Use the key you generated earlier, paste it into the Key field, and click OK:

Figure 17.44 – IKEv2 key
- Right-click on your Azure VWAN VPN interface and click Connect. If all is configured correctly, you should successfully connect:
![]()
Figure 17.45 – RRAS VPN connection
You have now experienced connecting a S2S VPN using both Azure Virtual WAN and Azure VPN Gateway. You should feel confident in implementing the basic network structures you need within your Azure environments.
Summary
In this chapter, we covered various services for connecting on-premises networks to Azure, such as through Azure VPN Gateway and Azure Virtual WAN. You have learned about the various types of VPN connections available to you and the difference between each of them. You have also experienced the configuration of several of these. You should now feel comfortable in connecting your networks to Azure and what services to use. In the next chapter, we will explore monitoring and troubleshooting for networks in Azure in detail.