
Chapter 12: Creating and Configuring App Services
This chapter focuses on how to create and configure app services in Azure. We will explore what app services are, the relevance they have, and why you should consider using them. You will also learn about the administrative functions you will need to perform concerning app services, such as configurations, scaling, backups, and networking integrations. After reading this chapter, you should be confident in how to administer these services and how to present solutions when needed.
In this chapter, we are going to cover the following main topics:
- Understanding App Service plans and App Service
- Creating an App Service plan
- Creating an app service
- Configuring the scaling settings of an App Service plan
- Securing an app service
- Configuring custom domain names
- Configuring a backup for an app service
- Configuring network settings
- Configuring deployment settings
Technical requirements
For this chapter, you will need the following:
- Access to an Azure subscription with owner or contributor privileges. If you do not have access to one, you can enroll for a free account: https://azure.microsoft.com/en-in/free/.
- PowerShell 5.1 or later must be installed on a PC where this chapter's labs can be practiced. Note that many of this chapter's examples can only be followed from a PC or by going to https://shell.azure.com (PowerShell 7.0.6 LTS or above is recommended).
- The Az PowerShell module must be installed.
Understanding App Service plans and App Service
When discussing Azure app services and understanding what they are, compared to traditional servers, it's important to understand the relationship between Infrastructure as a Service (IaaS), Platform as a Service (PaaS), Software as a Service (SaaS), and serverless (such as Function as a service (FaaS)). As you move through the different service offerings, you have different layers of responsibility that you manage. This is also the easiest way of understanding the differences between the services. IaaS, PaaS, SaaS, and serverless are cloud-based services and fit well into the Azure platform since Microsoft has developed some great ways to manage the services you deploy. This also allows you to choose the level of control you would like to adopt. There are limitations to each model, which is a much deeper topic, but understanding these limitations at a core level will help you succeed in your Azure journey. The following diagram illustrates the management relationships between the cloud-based services:

Figure 12.1 – Shared responsibility model
As you can see, the closer you approach SaaS, the fewer components you are required to manage and, subsequently, can manage. Finally, the serverless component can be a little confusing as it falls between the PaaS and SaaS layers; you can only manage your code and, ideally, split your code into single repeatable components called functions. Serverless components are also classified as microservices since the services are broken down into their most basic forms. Here, you define the functions you need to run your code; you can deploy the code and forget about which server it runs on. This approach does lead to more in-depth and complex discussions that are beyond the scope of this book; you just need to understand that this exists and that in Azure, we often refer to it as FaaS. Now that you understand the relationship between these services and what you manage, we can classify Azure app services. They fall into the PaaS category; therefore, you only have to worry about how you manage your application and its data. You also have the choice to secure your application using controls that have been exposed to Azure. The rest is taken care of by the platform itself.
App Service plans
To run your applications, you must deploy and configure your server infrastructure appropriately to suit your applications. For example, your applications may require the Windows operating system and the .NET Framework. To accommodate these configurations, Azure has App Service plans. This is a server that's related to your application deployments, where you can choose an operating system, the number of nodes in your cluster, server-related security configurations, and operations. It also allows you to run several applications against a server with the chosen specifications for memory and CPU resources and only scales as per your requirements or budget.
Top Tip
Although Azure Functions falls into the serverless category, when assigned to an App Service plan, it becomes a PaaS service since it is linked to a server. This increases what you can manage on the service and allows better control over, for example, security features.
Now that you understand more about Azure App Service and App Service plans, let's dive into some exercises where we will work with these later. In the next section, we will deploy an App Service plan and dive into the available configuration options.
Creating an App Service plan
In this exercise, you will be creating an App Service plan for Azure. This will act as the server configuration for hosting your Azure web applications and function applications. Follow these steps to do so:
- Sign in to the Azure portal at https://portal.azure.com.
- Open the resource group you will be using for this exercise, click Overview via the left menu, and click Create.
- Type app service plan in the search bar and click App Service Plan:

Figure 12.2 – App Service Plan
- On the next screen, click Create:

Figure 12.3 – App Service Plan – Create
- Enter the name of your Resource Group, then enter a name for your App Service plan. Here, we have used myappserviceplan. Next, choose an Operating System. For this demo, we will deploy a Windows App Service plan. Finally, select your Region and SKU and size; we will select Standard S1. Click Review + create, then Create:

Figure 12.4 – Create App Service Plan
With that, you have configured your first App Service plan and are ready to host your first application on the service. In the next section, you will learn how to create an App Service in your newly deployed App Service plan.
Creating an app service
In this exercise, you will deploy your first web application in Azure using the Azure Web Apps service. Follow these steps:
- Sign in to the Azure portal at https://portal.azure.com.
- Open the resource group you will be using for this exercise, click Overview via the left menu, and click Create.
- From the left menu bar, click Web, then click Create under Web App:

Figure 12.5 – Web App
- Enter the name of your Resource Group, then enter a name for your web app. Here, we have used myfirstwebapp221221. Next, choose the type of deployment you would like. We will select Code. Note that you could also select a Docker Container. Then, select a Runtime stack – this will support the code you are deploying. Now, choose an Operating System. For this demo, we will deploy a Windows web app; we did this for the App Service plan we deployed previously. Select your Region, this will also be the same as what you selected for your App Service plan:

Figure 12.6 – Create Web App – Basics
Finally, select a Windows Plan – this is the App Service plan you created previously. Note that when you select this, it automatically configures your SKU and size, which will match what you chose for your App Service plan. Also, note that you have the option to create your App Service plan directly in the Deployment menu. Click Next : Deployment >:

Figure 12.7 – Create Web App – Basics 2
- Here, you have the option to do a Continuous deployment. We won't be configuring this in this exercise. Click Next : Monitoring >:
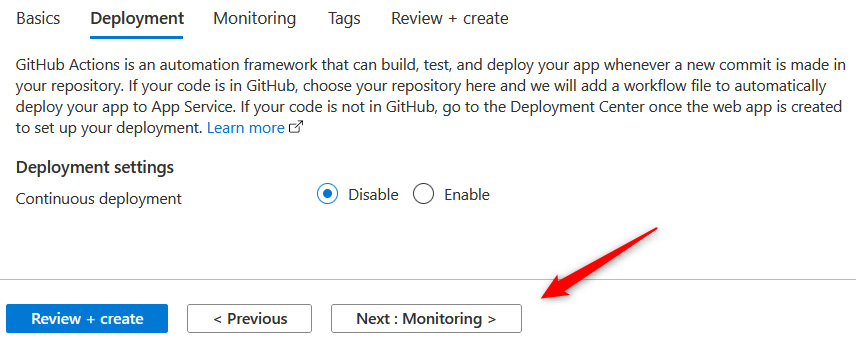
Figure 12.8 – Create Web App – Deployment
- On the Monitoring tab, you will have the option to deploy Application Insights for your application. Note that you can either create a new Application Insights deployment through this blade or create it as part of the deployment. For this exercise, we will select No for Enable Application Insights. Click Review + create, then Create:

Figure 12.9 – Create Web App – Monitoring
- Navigate to your application, click on Overview via the left-hand menu, and note your URL for your application. This blue text is clickable; you can either click on this or copy it into your browser to navigate to your application to confirm that it's working:

Figure 12.10 – Web App – Overview
You will be presented with a screen similar to the following for your application. Congratulations – you have successfully deployed your application using the Azure portal!

Figure 12.11 – Web App – running in your browser
Now that you know how to deploy a web application using the Azure portal, let's learn how to do the same using PowerShell. This time, we will create a Linux service plan.
PowerShell scripts
Please ensure that the Az module is installed, as per the Technical requirements section at the beginning of this chapter.
Here, we are going to create an App Service plan and Web Apps service via PowerShell. To do so, follow these steps:
Note: Change the parameters to suit your requirements
# First connect your Azure account using your credentials
Connect-AzAccount
# Parameters
$ResourceGroup = "AZ104-Chapter12"
$Location = "WestEurope"
$SubscriptionId = "xxxxxxx"
$WebAppName = "mysecondwebapp10101"
$AppServicePlanName = "mylinuxappserviceplan10101"
# If necessary, select the right subscription as follows
Select-AzSubscription -SubscriptionId $SubscriptionId
# Create a resource group for the Availability Set as follows
New-AzResourceGroup -Name "$ResourceGroup" -Location "$Location"
# Create an App Service Plan for Linux
New-AzAppServicePlan -Name $AppServicePlanName -Tier Standard -Location $Location -Linux -NumberofWorkers 1 -WorkerSize Small -ResourceGroupName $ResourceGroup
# Create a Web App
New-AzWebApp -Name $WebAppName -ResourceGroupName $ResourceGroup -Location $Location -AppServicePlan $AppServicePlanName
Just as you did previously, you can browse to the web application's URL and see the same screen you did prior. With that, you have just completed your first few web application deployments to Azure using the Web Apps service. You should now feel confident in deploying web applications when required in Azure, either through the portal or through PowerShell. Next, you will learn how to scale your applications.
Configuring the scaling settings of an App Service plan
In this exercise, you will configure the scaling settings for the App Service plan you created previously. Recall that we mentioned that there are two different types of scaling options you can choose from. Horizontal scaling (Scale out in the application menu) refers to the number of app services that have been deployed, while vertical scaling (Scale up in the application menu) refers to the size of the VM hosting the web app service. The VM refers to the App Service plan. As you may recall, we have the option to choose an SKU and size when we deploy that refers to the specifications for the App Service plan that we would like to have. First, we will explore Scale up:
- Navigate to the App Service plan you worked on in the previous exercise.
- From the left menu blade, under Settings, click Scale up (App Service plan).
- You will be presented with a screen containing different SKU sizes that you can choose from. The top bar represents the category that identifies the SKUs that are suitable for the type of workloads you will be deploying, such as dev/test and production.
The Isolated environment is a more secure environment that deploys a set of resources that are isolated from the shared server environment you typically consume from; this will cost more to deploy as you will be the only one utilizing the server resources you are looking to consume for the applications in your service plan. Select Dev / Test and then select B1 as the SKU size. Note that the bottom part of the screen will display the features and hardware that are included related to the SKU you've selected. Also, note that under the SKUs, you have the option to See additional options. Click Apply:

Figure 12.12 – Scale up
Here, you scaled down your application from the S1 SKU to the B1 SKU, which shows how easy it is to change its size. Note that the application will restart upon being resized. You will need to resize the application so that it's a production SKU for the next exercise. When changing its size, select Production and click See additional options. Click S1 and then Apply:

Figure 12.13 – Scaling up to S1
Now, let's learn how to scale out horizontally:
- Navigate to the App Service plan you worked on in the previous exercise.
- From the left menu blade, under the Settings context, click Scale out (App Service plan).
- Note that you can choose either Manual scale or Custom autoscale. Here, it would be best to manually scale since you are working on Dev / Test workloads, but for production workloads, you should choose Custom autoscale. Change Instance count to 2 and click Save:

Figure 12.14 – Manual scale
- Now, change the setting to Custom autoscale. Enter a name for your Autoscale setting name and select your Resource group:

Figure 12.15 – Custom autoscale
For our Default scale condition, we will create the first one using Scale based on a metric for Scale mode, and we will set Instance limits to 1 for Minimum, 2 for Maximum, and 1 for Default. Then, click Add a rule:
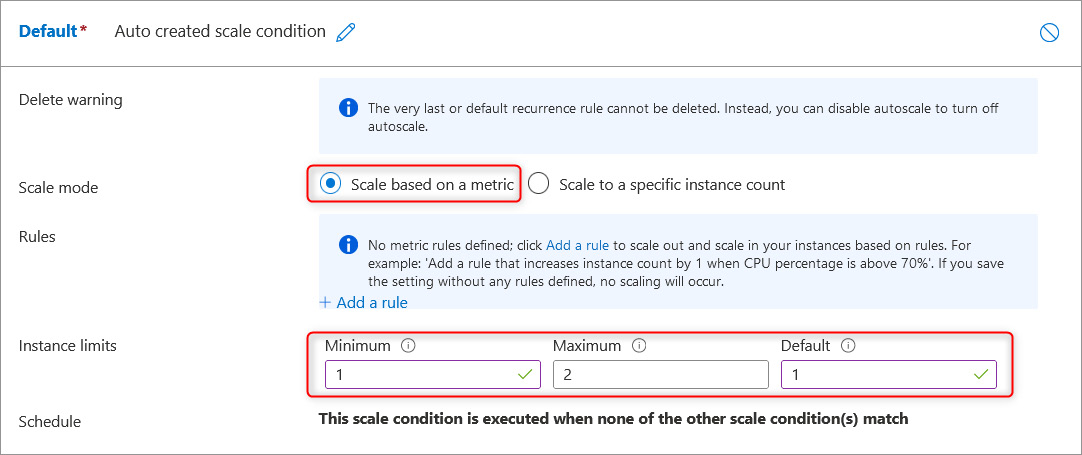
Figure 12.16 – Scale condition setup
- For the Criteria section, set Time aggregation to Average, Metric namespace to App Service plans standard metrics, and Metric name to CPU Percentage. Set Operator to = and Dimension Values to All values (this means any web app). Note the timeline chart at the bottom of the screen, which indicates the average CPU percentage that you have experienced over time, with the average also written below it. In this case, it is 3.78 %:

Figure 12.17 – Scale rule
- Below the CPUPercentage (Average) section, you will notice some other configuration options. Set Operator to Greater than and Metric threshold to trigger scale action to 70. Then, set Duration (minutes) to 10 and Time grain statistic to Average. This will define a rule that states that when the CPU average percentage reaches greater than 70% usage over 10 minutes, it will trigger an Action.
- For the Action section, set Operation to Increase count by, Cool down (minutes) to 5, and Instance count to 1. This will increase the instance count of the running web applications by 1 when the criteria that we configured in step 7 have been identified. Once triggered, a cooldown period will occur, where no further actions can be performed until the cooldown window has elapsed. In this case, it is 5 minutes. If the criteria for scaling are observed again after this cooldown period, then the action will be triggered again. Click Add:

Figure 12.18 – Configuring a scale rule – Thresholds
- You have just configured a rule for scaling your application up in terms of its instance count, but what if you would like the application to scale back down when you don't need as many instances anymore? You would need to configure a new scale condition to trigger a scale-down action you would like to perform. Click + Add a rule below the Scale out rule you just created:

Figure 12.19 – Add a rule
- For the Criteria section, set Time aggregation to Average, Metric namespace to App Service plans standard metrics, and Metric name to CPU Percentage. Set Operator to = and Dimension Values to All values (this means any web app). Note that the timeline chart at the bottom of the screen indicates the CPU percentage average that you have experienced over time, with the average also written below it. In this case, it is 2.55 %:

Figure 12.20 – Scale rule
- Below the CPUPercentage (Average) section, you will notice some other configuration options. Set Operator to Less than and Metric threshold to trigger scale action to 30. Then, set Duration (minutes) to 10 and Time grain statistic to Average. This will define a rule that states that when the CPU average percentage reaches less than 30% usage over 10 minutes, it will trigger an Action.
- For the Action section, set Operation to Decrease count by, Cool down (minutes) to 5, and Instance count to 1. This will decrease the instance count of the running web applications by 1 when the criteria that we configured in Step 11 have been identified. Once triggered, there will be a cooldown period where no further actions can be performed until the cooldown window has elapsed. In this case, it is 5 minutes. If the criteria for scaling are observed again after this cooldown period, then the action will be triggered again. Click Add:
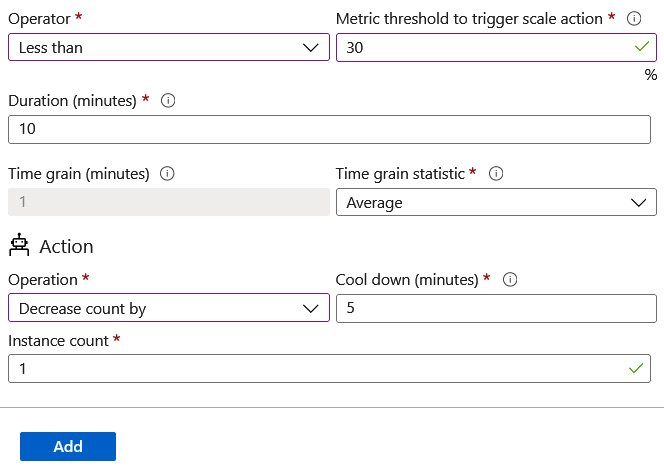
Figure 12.21 – Scale rule – Threshold and Action sections
- Click Save.
Now that you have configured your autoscale rules using the Azure portal, let's learn how to use PowerShell to do the same.
PowerShell scripts
Please ensure that the Az module is installed, as per the Technical requirements section at the beginning of the chapter.
Here, we are going to create an App Service plan and Web Apps service via PowerShell. To do so, follow these steps.
Note: Change the parameters to suit your requirements.
# Parameters
$ResourceGroup = "AZ104-Chapter12"
$Location = "WestEurope"
$SubscriptionId = "xxxxxxx"
$WebAppName = "mysecondwebapp10101"
$AppServicePlanName = "mylinuxappserviceplan10101"
# If necessary, select the right subscription as follows
Select-AzSubscription -SubscriptionId $SubscriptionId
# Create an App Service Plan for Linux
$AppServicePlan = Get-AzAppServicePlan -Name $AppServicePlanName -ResourceGroupName $ResourceGroup
# Create an Autoscale Rule
$AutoScaleRule = New-AzAutoscaleRule -MetricName "CpuPercentage" -Operator "GreaterThan" -MetricStatistic "Average" -Threshold 70 -TimeAggregationOperator "Average" -TimeGrain "00:01:00" -TimeWindow "00:10:00" -MetricResourceId $AppServicePlan.Id -ScaleActionCooldown 00:10:00 -ScaleActionDirection Increase -ScaleActionScaleType ChangeCount -ScaleActionValue 1
# Create an Autoscale Profile
$AutoScaleProfile = New-AzAutoscaleProfile -Name "Default" -DefaultCapacity 1 -MaximumCapacity 2 -MinimumCapacity 1 -Rule $AutoScaleRule
# Assign the Autoscale Profile to the App
Add-AzAutoscaleSetting -Location $Location -Name "Auto Scale Setting" -ResourceGroupName $ResourceGroup -TargetResourceId $AppservicePlan.Id -AutoscaleProfile $AutoScaleProfile
You should now understand how to scale your applications via Azure App Service. You have learned how to perform manual scaling, as well as autoscaling, using the Azure portal and PowerShell. Autoscaling allows you to manage your applications and accommodate varying workload requirements. Next, you will learn about the security configurations that you can use to secure your application.
Securing an app service
There are several mechanisms you can use to enhance the security of your application on Azure. As part of the AZ-104 exam, we will explore the configuration options that are native to the web application directly. However, note that for real-world implementations, you should investigate additional measures for enhancing the security of your applications, such as employing a firewall – especially a web application firewall – for your web-based applications. These services provide traffic that's in line with your application and scan for disallowed or heuristic behavior.
In this exercise, we will look at various native application configurations that can be used to increase the security level of your app services:
- Navigate to the App Service plan you worked on in the previous exercise.
- From the left menu blade, under the Settings context, click Configuration. The first tab you will be greeted with is called Application settings. Application settings are variables that are presented securely to your application, but they can be configured externally from the application code. This enhances security by obfuscating the password from code and prevents developers that don't have RBAC permissions on the Azure portal for the App Service resource from seeing sensitive data, such as secrets that may be stored under Application settings. The other item that can be configured is Connection strings:

Figure 12.22 – Application settings
- The next tab is General settings. Here, you will want to ensure File Transfer Protocol (FTP) traffic is conducted securely if it's allowed by your organizational policies. FTP is a technology that enables file transfer operations for your systems. It is commonly used by developers to upload code to the system; an alternative, as we explored in the previous chapter, is to use a source code repository such as Git. The most secure option is to disallow all FTP-based traffic as prevention is better than a cure. However, since many applications require developers to be able to upload their code, changing the FTP transfer protocol that's being used is the next best option. Setting traffic to FTPS only ensures that the FTP traffic is conducted over an HTTPS tunnel, meaning that all the data is encrypted. So, even if it is intercepted, it is less likely to be compromised. Set this to FTPS only for this exercise:

Figure 12.23 – FTP state
- Click Save at the top of the screen:
Figure 12.24 – Options menu
Note that after clicking Save, you will be warned that the application needs to be restarted.
- The last tab that can be configured in the General settings menu is Path mappings. We won't explore this here.
- From the left menu pane, click Authentication. This blade contains the configuration settings related to authentication, the type of identity provider service that's being used, and the authentication flow. To explore the available configurations, click Add identity provider:

Figure 12.25 – Add identity provider
- At the time of writing, you can choose from several identity providers – that is, Microsoft, Facebook, Google, Twitter, and OpenID Connect. Click Microsoft:
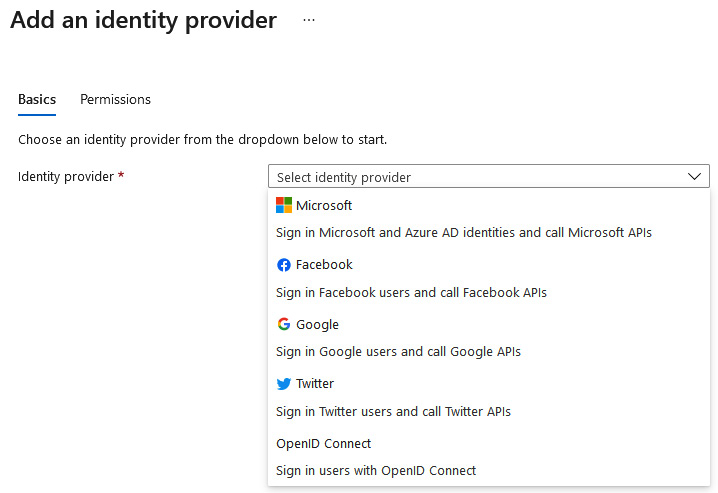
Figure 12.26 – Add an identity provider
- You will see a screen with additional configuration settings. The first item to configure is the application registration. This can be used to assign permissions and will configure a service principal account in Azure AD called an app registration. For this exercise, select Create new app registration and assign a name. Next, select the option for supported account types for your application. Depending on how and where your application is used, this will dictate the configuration that best suits your security requirements. For instance, if you are looking to deliver an internal application such as something that lists the mobile numbers of employees within your organization so that you can contact someone urgently (where sharing this information is disallowed publicly), then you would want to restrict public access (that is, anyone external to your organization).
Using your identity provider will help you determine if they have an account with your organization or not. In such cases, you can select Current tenant – Single tenant. Any Azure AD direction – Multi-tenant will allow you to accept user logins from any other Azure AD directory. The next option, Any Azure AD directory & personal Microsoft accounts, opens access to public accounts too, where personal accounts can be used. Finally, Personal Microsoft accounts only removes access from other Azure accounts and limit this to personal Microsoft accounts. This is typically used for gaming services, where you want to allow friends to connect but you also want to restrict business accounts from accessing the service. As you can see, the most secure option is Current tenant – Single tenant. You can also configure Restrict access, where you can force authentication to be conducted before access is granted to your application. Unauthenticated access allows users to log in anonymously. Choose Require authentication since this is the most secure option. Finally, you can choose what kind of error handling you would like to deliver upon detection, such as delivering an HTTP 401 Unauthorized error message. Select HTTP 302 Found redirect. Then, click Next : Permissions >:

Figure 12.27 – Identity provider configuration
- The next blade relates to the Permissions options you would like to grant. The default option is User.Read, which allows the application to read the user's profile. These permissions can be modified as needed to deliver the required information to your application. These permissions will be prompted by the user when they access the application and are being authenticated. They will need to consent to this permission request if they wish to access the application. Click Add:

Figure 12.28 – Identity provider – Permissions
- Click Identity from the left menu pane for the application. You will be presented with two tabs – System assigned and User assigned. Here, you can choose which deployment configuration you would like to use. System assigned allows you to create a managed identity whose life cycle is controlled and managed by Azure. A managed identity allows you to grant RBAC permissions to the application as if it were a user, which gives them better control over resources and prevents user management issues such as abuse of privileges or mistakes being made. Enabling this setting increases the security of your application and prevents credentials from being injected directly into code, which would allow account and system compromise to occur. User assigned is managed manually but can be configured more granularly for control over the specific RBAC permissions you would like to grant to the application. On the System assigned tab, click On under the Status option, then click Save:

Figure 12.29 – System assigned
- After clicking Save, you will see a new configuration option, where you can configure the Azure RBAC permissions for your application:
Figure 12.30 – Adding a role assignment
- You can also consider using backups and disaster recovery (DR) for your applications. But why? If your application becomes compromised and you need to perform restoration tasks, without backups, you would potentially lose all your critical data. Therefore, anything that could cause the application to go offline or become inaccessible would compromise the security of the application. The same is true for DR; if you can't restore an active instance of the application, its security is compromised as potential usage of the application will be restricted, which could lead to several other issues for an organization and a loss of revenue.
- The next menu you should click through is TLS/SSL settings. On this blade, select the Bindings tab and ensure that HTTPS Only is set to On. This ensures that all your traffic is encrypted and secured to the application, where HTTP traffic allows compromises to occur and should always be configured to forward all HTTP requests to HTTPS. HTTP communicates in clear text, so any credentials or sensitive information that's sent would be visible to anyone that could intercept the traffic, which is highly insecure. HTTPS requires a certificate, which can be configured within the same blade. Azure offers one free certificate per web application for a single domain:

Figure 12.31 – Protocol Settings – TLS/SSL bindings
- Next, click on the Networking option from the left menu of the application. Networking is an interesting topic for your applications and can result in many sleepless nights if it's not planned and managed correctly. The rule of thumb for hardening your network is to secure your perimeters and isolate traffic via perimeters, as well as by adopting the Zero Trust model (where you don't trust any application or service that doesn't intend to communicate with the application). It should only be public-facing if your application requires public access. You will also want to consider a Web Application Firewall (WAF) and firewall service for public traffic, as well as something internal. Azure provides several options for privatizing traffic for your application and it's important to understand your traffic flow when you're considering your implementation. The first item you must configure here is Access restriction, which applies to inbound traffic. This will act as a whitelist or blacklist for your traffic, depending on how you configure your rules. To configure this, click Access restriction:

Figure 12.32 – Network settings – Inbound Traffic 1
- As the most secure option, you should restrict all traffic except for your allowed rules. You will notice that you can configure your restriction rules for two different endpoints. The first is the public endpoint for your application, while the second has a suffix starting with scm, which is used for the Kudu console and web deployments. To see the available configuration options, click + Add rule:
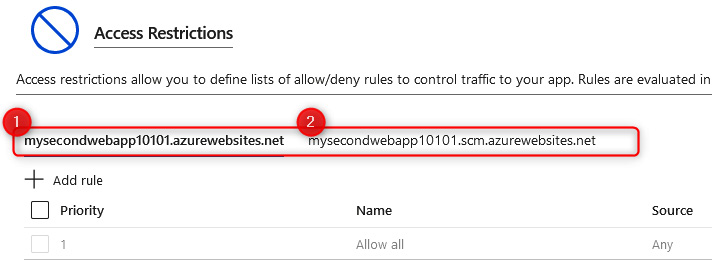
Figure 12.33 – Network settings – Access Restrictions
- On the Add Restriction pane that appears, you can set a Name; enter something meaningful. Next, you must decide on an Action, which can be either Allow or Deny; click Allow. You can also enter a Priority and, optionally, a Description. The next option, Type, is very important as it is used to determine the type of restriction that's being implemented and how the rule is invoked. The default configuration is IPv4, which is limited to a known IPv4 address or range (usually a public address or range) and is added to the IP Address Block text box. When entering a range, you can enter it in CIDR notation, with a single IP being /32 for the CIDR. Enter an IP address. IPv6 works in the same fashion except for IPv6 addresses or ranges. The Virtual Network source option allows you to select a network that you have configured previously to allow traffic through. The final option is Service Tag. Click Add rule:

Figure 12.34 – Add Restriction
- The next configuration for inbound traffic is App assigned address. Clicking this option will take you to the TLS/SSL settings blade. This is used to determine your Custom Domain, which we will configure in the next section. This is another method of enhancing security as the domain can be configured to something that is trusted by your organization or users. It will confirm that you are using certificate delivery to enhance the security of your application:
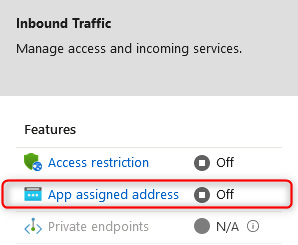
Figure 12.35 – Network settings – Inbound Traffic 2
- The last inbound configuration option is Private endpoints. Selecting this allows you to completely remove all public access to your application. Your application will be assigned an NIC with a private IP from the associated VNet and subnet you connect it to. To enable public access for this configuration, you would need some form of network address translation (NAT) configuration to reach your application. This can be achieved by deploying an Application Gateway or using Azure Front Door, or by using your firewall service to translate traffic from one of its public IP addresses to your application over the private endpoint. This is a great way to secure traffic to your application, but as you can see, it can quickly cause complications. This setting will force you to consider how other components of your application communicate with each other and the outside world.
- For outbound communication, you can perform VNet integration, which will associate your application with a designated subnet. Note that to assign a web app to a subnet, it will need to assume delegated access for the subnet. This means that it can manage the DHCP deployment for the subnet and will be responsible for IP assignment on the subnet. Furthermore, it restricts what can access the subnet and limits you to which subnet can be used for what service as only a single service can have delegated administration. Note that this is for outbound communication only and will not protect inbound communication. The subnet should also be allowed to communicate with the relevant services within Azure. Click VNet integration:

Figure 12.36 – Network settings – Outbound Traffic 1
- Click + Add VNet:

Figure 12.37 – VNet Configuration
- You can also select an appropriate Virtual Network, which will give you the option to either create a new subnet or use an existing one. Use whichever best suits this demo and click OK:

Figure 12.38 – Add VNet Integration
Note that your application is now connected to the VNet and subnet you selected. Note the address details as well. Traffic from your application can now be controlled for outbound traffic using user-defined routes (UDRs) on the network:

Figure 12.39 – VNet Configuration
- The last configuration item for outbound traffic is Hybrid connections. This feature is a service that enables endpoint connectivity for your application and provides a connection solution where you don't have direct access paths to your on-premises environments or other environments from Azure. It enables a mechanism for TCP communication that's mapped to a port number for that corresponding system or service. Each hybrid connection is associated with a single host and port that enhances security as it's easier to manage and correlate the traffic:

Figure 12.40 – Network settings – Outbound Traffic 2
The final security configuration item to be aware of is the CORS option under API context on the left menu pane. CORS should be disabled unless it's required as it exposes more vulnerabilities to your application, especially when it's not managed correctly:

Figure 12.41 – Network settings – CORS
Now that you have reviewed the different security settings, you should feel more familiar with the controls that are available and when to use them. It's especially important to understand the configurations that are relative to traffic flow. In the next section, you will learn how to configure custom domain names.
Configuring custom domain names
Custom domains allow you to connect to your web application using the public DNS name that you have chosen for your application. To do this, you need to own the respective domain and prove that you have authority over it. Your custom domain could be, for example, www.yourapp.com. There are several providers for purchasing a domain, though this is outside the scope of this book. For suggestions on getting started, you could buy directly from Microsoft, which also leverages GoDaddy. To configure a custom domain, follow these steps:
- Navigate to the App Service plan you worked on in the previous exercises.
- From the left menu blade, the Settings, click Custom domains. From the blade that appears, click + Add custom domain.
- Enter a Custom domain name of your choice, such as www.yourapp.com (this must be for a domain that you own). Click Validate:

Figure 12.42 – Add custom domain
- You will be presented with a screen that gives you a Custom Domain Verification ID:

Figure 12.43 – CName configuration
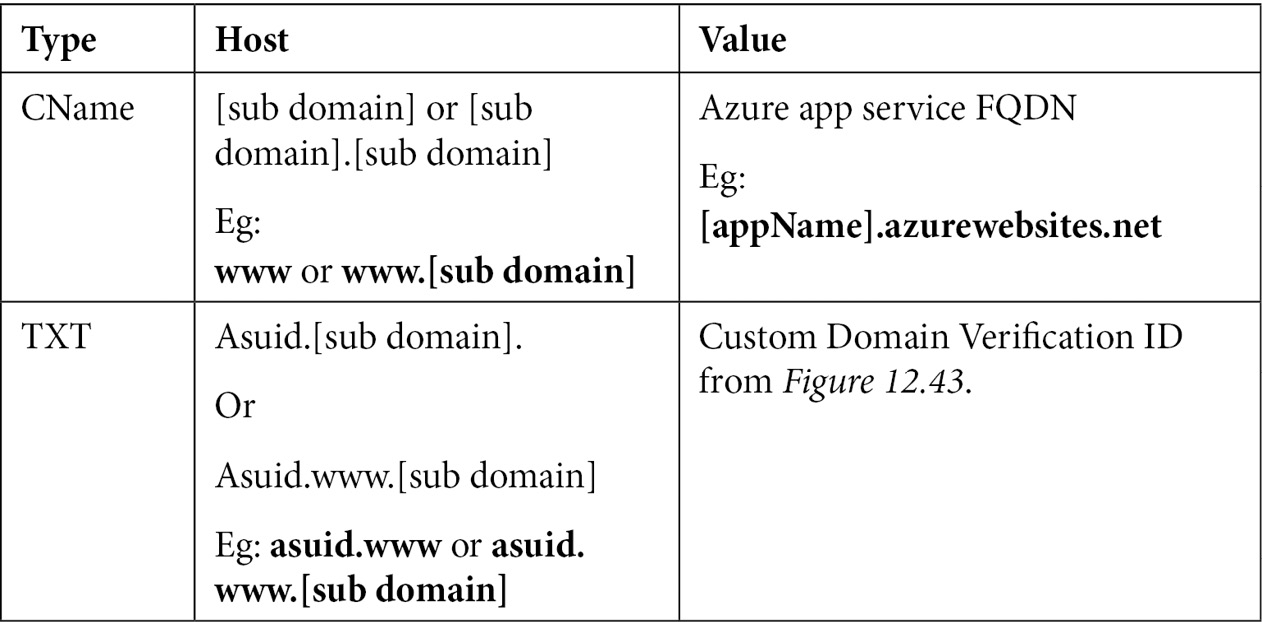
Copy this ID and create a new CName and TXT record for your domain, as follows. These values will be used to determine that you have authority over the domain you have specified:
Top Tip
You can also map custom domains using A records or a wildcard (*) CNAME record. Go to https://docs.microsoft.com/en-us/azure/app-service/app-service-web-tutorial-custom-domain?tabs=a%2Cazurecli#dns-record-types for more details.
- Once completed, click the Validate button again.
- The following screenshot shows an example of the TXT and CName records that you may have created with your domain host (all the providers have slightly different configurations):

Figure 12.44 – TXT and CName records
- You will get two successful messages after clicking the Validate button. Now, click Add custom domain:

Figure 12.45 – Add custom domain
- With that, your custom domain has been added. However, you now have an entry on your screen that shows that this endpoint is not secure. You will need to add a certificate to make it secure. Click TLS/SSL settings from the left menu:

Figure 12.46 – Insecure custom domain
- Click the Private Key Certificates (.pfx) tab. Then, click + Create App Service Managed Certificate:

Figure 12.47 – Private Key Certificate
- Once Azure has analyzed the eligibility of the hostname, click Create. Azure allows one certificate per web app to be generated by the platform for your custom domain. This can save you a lot of money as, typically, you will need to procure a certificate from a third-party vendor. Your certificate will be valid for 6 months once it's been created.
- DNS propagation can take up to 48 hours to occur, though sometimes, this can happen within minutes, depending on whether your DNS was used and the Time to Live (TTL) setting has been configured. You should now be able to browse your web app using the custom domain you configured. Note that you can connect using HTTPS and get a valid certificate check:

Figure 12.48 – Browsing to your custom domain
You now know how to configure a custom domain for your web app within Azure, as well as how to generate a valid certificate using the platform for a certified secure HTTPS connection. Typically, this can be done for production-based applications that are exposed to the internet and it is a common administrative duty for those that work in organizations that utilize many web applications. In the next section, you will learn how to configure backups for your applications.
Configuring a backup for an app service
Your application is running well, but you're concerned that if something should fail or data is lost, you can't restore your application. You decide that backing it up is a good idea and start to explore different ways to back up your application. Thankfully, Azure makes this a simple process, where you just need to think about what your backup strategy needs to look like and then configure the service accordingly. Remember that using a backup is different from performing DR in that DR restores operational services, whereas backups enable point-in-time restorations of data to recover from loss or accidental deletion. Follow these steps to configure a backup for your application:
- Navigate to the App Service plan you worked on in the previous exercises.
- From the left menu blade, under Settings, click Backups. From the blade that appears, click Configure at the top of the screen. The Backup Configuration blade will appear.
- You will need a storage account to store your backups. Since we haven't pre-created an account, we will create it as part of this exercise. Click the Storage Settings button:
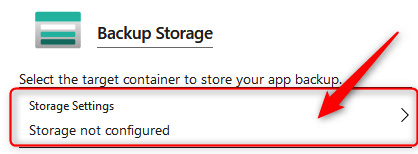
Figure 12.49 – Storage Settings
- Create your storage account and click OK. Next, you will be prompted for a container. Currently, this doesn't exist since we created a new storage account. Click + Container, name the container backups, and click Create. Click the new container and click Select.
- For backups, you have the option to decide if you would like an automated schedule or if you would like to manually back up as and when needed. Preferably, you would like an automated schedule that prevents mistakes from occurring, such as forgetting to back up. Enable Scheduled backup. Configure your backup so that it runs every day at a set time from the date you would like this to start. In this example, we have set this to 28/12/2021 at 7:05:38 pm. Set your Retention period (in days) and set Keep at least one backup to Yes:

Figure 12.50 – Backup Schedule
- Note that you also have the option to configure a backup for your database. We won't configure this for this exercise. Click Save:

Figure 12.51 – Backup Database
- You will see that your first backup is currently in progress and that the light blue box reflects the configuration for your backup schedule. You will also see two other blue buttons; the first, Backup, is for manually initiating a backup to be performed, while the other, Restore, allows you to recover data when required:

Figure 12.52 – Backup overview
You now understand how to back up your Azure App Service and should feel confident in configuring this going forward. In the next section, you will learn about the various network settings. Since we covered some of the available networking configurations in the previous sections, we will focus predominantly on how to configure a private endpoint.
Configuring networking settings
You learned how to perform VNet integration in the Securing an app service section. In this section, you will learn how to configure behind a private endpoint:
- Navigate to the App Service plan you worked on in the previous exercises.
- From the left menu blade, under Settings, click Scale up (App Service plan). On the blade that appears, ensure that you have chosen the Premium V2, Premium V3, or Elastic Premium SKU to continue with this exercise. Click Apply.
- From the left menu blade, under Settings, click Networking. From the blade that appears, click Private endpoints in the Inbound Traffic section:

Figure 12.53 – Private endpoints
- Click Add:

Figure 12.54 – Private Endpoint connections – Add
- Enter a Name, ensure that you have the right Subscription selected, and select the correct Virtual network your private endpoint will be connecting to. Then, select a Subnet you would like to connect to. Finally, select Yes for Integrate with private DNS zone. This feature allows Azure to create a Fully Qualified Domain Name (FQDN) for your private endpoint that can be reached by your resources. If you select No, then you will need to ensure that your DNS zone is maintained by another DNS service, such as Active Directory (on-premises version), and configured on your VNet for DNS lookup queries to forward to your DNS server(s):

Figure 12.55 – Add Private Endpoint
- On the Private Endpoint connections screen, which you will see after deploying your resource, click on the new endpoint you have created. Click the name of your Private endpoint (where the text is highlighted in blue) to open the Private endpoint blade:

Figure 12.56 – Backup overview
- From the left menu blade, under the Settings context, click Networking. From the blade that appears, scroll down to Customer Visible FQDNs and note the FQDN names associated with your service. Note that these are now associated with a private IP that belongs to the subnet you selected previously:

Figure 12.57 – Customer Visible FQDNs
- Scrolling down further, you will see Custom DNS records. Note that the FQDN variable that's been assigned is very much the same as the website FQDN you have for azurewebsites.net, except it also contains privatelink as a prefix. So, you now have an FQDN of [app name].privatelink.azurewebsites.net. This is also associated with the private IP we saw previously. Note that if you performed an NSLookup on the preceding FQDNs, you will get a public IP address for your service:

Figure 12.58 – Custom DNS records
- Attempting to access your site now will deliver a 403-Forbidden error since public access is now revoked:

Figure 12.59 – Error 403 – Forbidden
Top Tip
If you have applied DNS to the VNet you are associating with and have configured a private DNS zone, you will need to ensure that your DNS servers have been configured to forward lookup to Azure for the private endpoint namespace related to your service.
With that, you have just configured a private endpoint and should feel confident in how to deploy one. You are also aware of some of the DNS complexities you should look out for to ensure you can resolve the host correctly by your resources.
Configuring deployment settings
There are several deployment settings related to your app service that you should be aware of. These allow you to upload your code or manage source control and deployment slots.
Deployment slots are logical segmentations of your application that can pertain to different environments and versions. Let's say you have an application that is running in production mode (meaning it's live and operational), and you want to work on some new code updates to introduce new features to the next version of your application. Typically, you would work on this in a test environment and deploy it accordingly to the production environment, once you felt that adequate testing had been performed before deploying anything to production.
Well, deployment slots provide a solution that allows you to deploy code to these slots to test the different functions and features of your applications, as well as code updates. You can run your primary deployment slot as the native application and deploy additional slots, such as TEST, that can be used for your new code. You have the option to swap deployment slots and revert at any time. The transition period is quick and enables a different paradigm in app management. You can, for instance, switch to the TEST slot and find that your application is not connecting to the required services and is slow. In this case, you can quickly flip back to the original code you had before any changes were made.
Let's look at a brief configuration of a deployment slot before proceeding to the next part of this section:
- Navigate to the App Service plan you worked on in the previous exercises.
- From the left menu blade, under Deployment, click Deployment slots.
- From the top of the blade, click + Add Slot. Enter a Name – in this case, TEST – and leave Clone settings from set to Do no clone settings. Click Add, then Close:
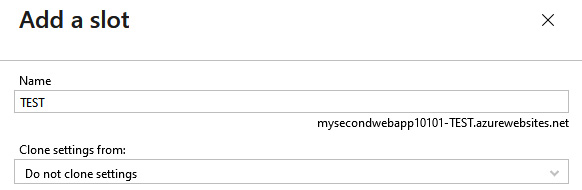
Figure 12.60 – Add a slot
- The name you chose previously will form part of the FQDN for the deployment slot so that it can be accessed as a normal application, as shown in the preceding screenshot.
- Click Swap and set your Source as the new deployment slot you just created, and Target as the current slot. Click Swap, then Close:
Figure 12.61 – Swap
Now that you know about deployment slots, let's explore the Deployment Center:
- Navigate to the App Service plan you worked on in the previous exercises.
- From the left menu blade, under Deployment, click Deployment Center. Click the Settings tab.
- Here, you have the option to deploy code from a Continuous Integration/Continuous Deployment (CI/CD) tool. At the time of writing, the available options are GitHub, Bitbucket, and Local Git. Once you have chosen your Source CI/CD tool, you must Authorize your account and click Save:

Figure 12.62 – Deployment Center – Settings
- Click the FTPS credentials tab and note FTPS endpoint. Application scope is an automatically generated Username and Password that's limited to your application and deployment slot. You can use this to connect to your FTPS endpoint. You can also define a User scope and create a username and password:

Figure 12.63 – Deployment Center – FTPS credentials
With that, you have learned about the deployment settings that are available to you for your app services. You should now feel comfortable navigating this component of Azure App Service as you know where to integrate CI/CD and where to find your FTPS credentials so that you can modify your application code. Next, we will summarize what we covered in this chapter.
Summary
In this chapter, we covered what an App Service is within Azure, the role of App Service plans and why they are essential to your App Service, and how to deploy an application, including how to manage its settings and configurations and how to secure it. Then, we explored and discussed various networking configurations for your application and the considerations you need to have when configuring these settings. You should now feel confident working with applications on Azure using App Service.
In the next chapter, we will cover some examples of deploying and managing compute services within Azure. There will be a VM lab, a container lab, and an App Service lab. After following these examples, you will feel more comfortable working with Azure compute services.