
6
Making SharePoint More POWERful
Home improvement stores have done big business over the years thanks to our desire to do more and more work by ourselves. My wife is an interior designer, so I’ve resigned myself to treating this as something of a hobby. Many of us choose to do it ourselves, however, to avoid the time and expense it may take for a professional to do the work instead. The Power Platform from Microsoft can be a powerful way to address business process automation and low-code development needs by adopting the DIY, self-service mindset.
In this chapter, we’ll explore how SharePoint can be augmented, extended, and strengthened by using Power Automate and Power Apps. We’ll also explore Power BI in a limited way as a means of building richer user interfaces for list metadata. Considering how the Power Platform can connect to the entire toolbox of M365 and well beyond, we’ll also discuss leveraging these tools outside of the SharePoint context as well by looking at these topics together:
- The low-code revolution – introduction to Power Platform
- Workflow implementation with Power Automate
- Forms customization with Power Apps
- Visualizing data with Power BI
- Using connectors to extend Power Platform across M365
- Power Platform governance
By the end of the chapter, we will have explored the tools within the Power Platform, what they’re capable of, and how they are designed to integrate with SharePoint Online. These integrations will enable us to customize forms, create workflows, visualize data, and connect SharePoint to other tools and services.
The low-code revolution – introduction to Power Platform
Let’s face it. Users of technology have always looked for ways to get their work done with the least difficulty and delay possible. When we meet barriers that slow us down, we naturally want to find creative ways around them. This is often referred to as shadow IT and can lead to a variety of unknown, unmanaged, and untrusted apps, sites, and tools. It’s only natural that IT professionals will seek to protect the organization and themselves by restricting access and limiting features.
SharePoint has been no exception. When reporting on data was limited, we just connected Excel to a list. When we needed business logic in forms, we turned to InfoPath. When we wanted a more complete app experience, we built access databases for critical business processes and maybe even hosted them in SharePoint. People in our organizations have often become citizen developers, despite efforts to limit their toolset or contain their curiosity.
Microsoft’s Power Platform is a suite of tools designed to help make our IT DIY dreams a reality. Let’s start by looking at an overview of each tool, and then we’ll dive deeper into how they work and how our architecture planning is impacted by each tool:
- Power Automate – Workflow and process automation tool, useful as a SharePoint Designer (SPD) replacement
- Power Apps – Low-code/no-code development tool, useful for customizing List forms and building standalone apps, especially for mobile
- Power BI – Reporting and data visualization tool, useful as SQL Server Reporting Services (SSRS) replacement or to enhance List views
- Power Virtual Agents – Chatbots largely accessed through Teams, useful as a Q&A replacement, but mostly out of scope for this chapter since these are not surfaced in SharePoint
These tools together are designed for IT professionals, developers, and everyone else in the organization to build the apps and automated processes that boost productivity and empower users. These tools also integrate with SharePoint Online. Across the top of any modern list or library, we’ll find menu items related to the Power Platform. We can choose to initiate our integration with SharePoint data from here or start from the Power Platform apps themselves and create a data connection. In the first section, let’s take a look at how to enable process automation around our SharePoint data with Power Automate.
Workflow implementation with Power Automate
For Power Automate, think workflows. Power Automate is the cloud replacement for SharePoint Designer workflows but is much more capable and extensible. While there are integrations with SharePoint Online, and that is where our primary focus will lie, Power Automate is its own M365 app that is capable of a variety of flows that connect and control cloud tools and processes as well as those on a device running Windows.
We get a glimpse of the capabilities by logging into the web app and creating a new flow. This shows the options for creating workflows in Power Automate, which we will explore next:
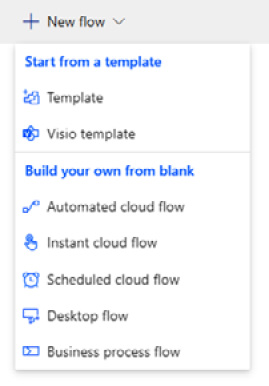
Figure 6.1 – The list of options when creating a new flow
First of all, we see five different types of flows that can be created:
Automated cloud flow – Similar to an SPD workflow that triggers automatically based on an action, such as creating a new list item or receiving a new email.
Instant cloud flow – Manually triggered workflows from the Power Automate site, via a hyperlink, or from a flow button in the Power Automate mobile app.
Scheduled cloud flow – Probably most like a timer job in SharePoint on-premises. We can run a set of actions at specific times on a recurring schedule.
Desktop flow – Otherwise known as Robotic Process Automation (RPA), these flows are created using a downloaded app and can work with a variety of scripting languages and local computer resources such as peripherals and files, and integrate with UI elements such as message boxes, windows, and form completion. We might think of these like macros, as a screen recorder can generate actions dynamically.
Business process flow – These flows originate from Dynamics 365 and create a visual canvas composed of up to 30 stages, each containing steps to guide users through a process to completion. Per-user licensing is required, as is the usage of Dataverse.
While the capabilities are vast and varied, automated cloud flows and instant cloud flows are the most likely to be used to provide process automation where SharePoint data is concerned. Scheduled flows are also very common when trying to reproduce long-running SPD workflows or timer jobs. With SharePoint on-premises, there was a direct 1:1 link between an SPD workflow and the list, library, or content type it was designed to integrate with. With Power Automate, SharePoint is merely one of the many available connectors.
SharePoint integrations
One common request I see repeatedly is using Power Automate to implement an approval process for things such as requests or document publishing. Let’s walk through a scenario of adding that workflow to a SharePoint list.
We can start with the Travel requests list template as seen in the following figure. The list tracks requests for company travel, which would certainly require approval since planning and costs are involved. A column called Approved? is already part of the template, but is manually set to yes or no.
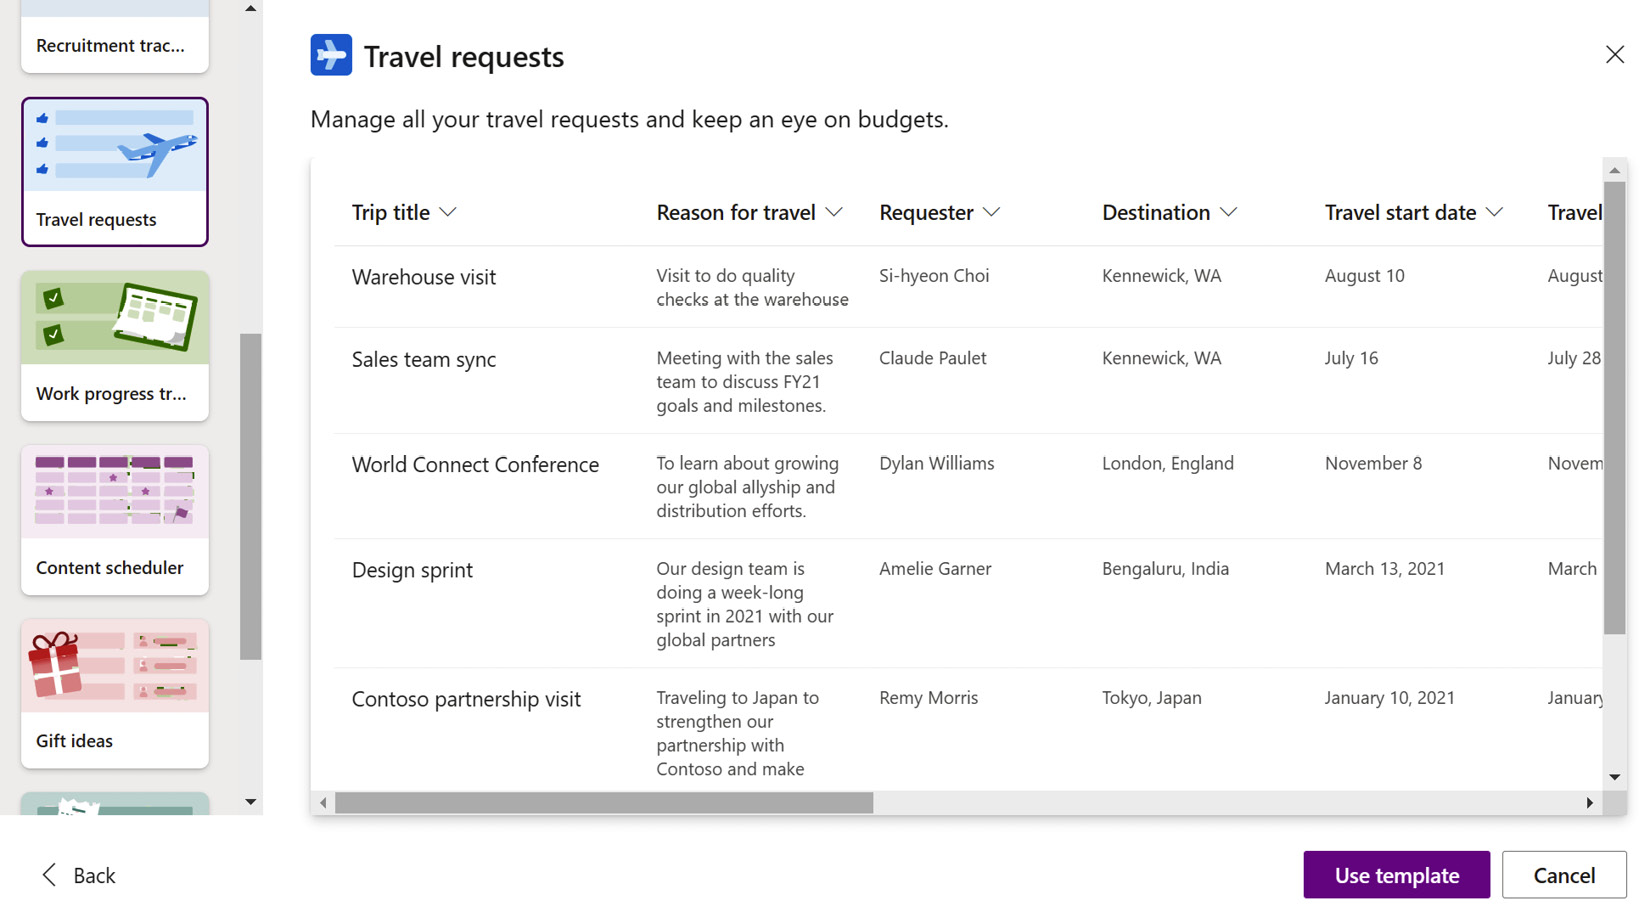
Figure 6.2 – The Travel requests template used to build a SharePoint list
To automate the approval process, we need to create a flow that will run whenever a new request item is added. Depending on the actions that we want to run when the item is added, we can either choose the Automate menu item or the Integrate menu item, both of which are seen in the following figure:

Figure 6.3 – The UI for the Automate and Integrate menus on modern SharePoint Online lists
Automate options change based on column data types present in the list and generally are for built-in tasks created by Microsoft or flows we create with selected triggers. For example, since we have start and end date columns in the template, a Set a reminder option exists for both start and end dates. Clicking this would automatically create a scheduled flow in Power Automate to send an email notification in advance of the dates, based on the number of days in advance that we provide.
The Rules menu option allows us to create simple sets of actions based on triggers. These are automated cloud flows that avoid the Power Automate canvas for those whose needs are simple or whose appetite to build flows is limited. A trigger for a rule could be based on the following:
- A column changes
- A column value changes
- A new item is created
- An item is deleted
Since our example is an approval process that starts when a new request is added, we could choose option three. This is just a simple notification workflow, so all we can provide is the email address of someone who should get notified of the item creation. This isn’t dynamic or based on list data, but rather a hardcoded value. If that’s all we need because only one person in the company ever approves travel requests, then we need to go no further. For more complex workflows, we need to turn to the Integrate menu option instead.
Under Integrate, we would choose Power Automate | Create a flow. This opens a panel on the right where we are prompted to choose a template. Chances are, we’ll find one that fairly closely matches our needs or could be edited to do so. There is, in fact, a Start approval when a new item is added template as the second choice in the list. If we want to start from scratch with a blank canvas, we will need to visit the Power Automate app instead.
Each tool or system we integrate with requires a connector. Having chosen the workflow template noted previously, we now notice there are four connectors required for the flow to function (as seen in Figure 6.4). The connections are made using the credentials of the user creating the flow. Since this flow sends emails, retrieves SharePoint data, creates an approval within Power Automate, and gets user attribute data, the four connectors are necessary for that work to complete:
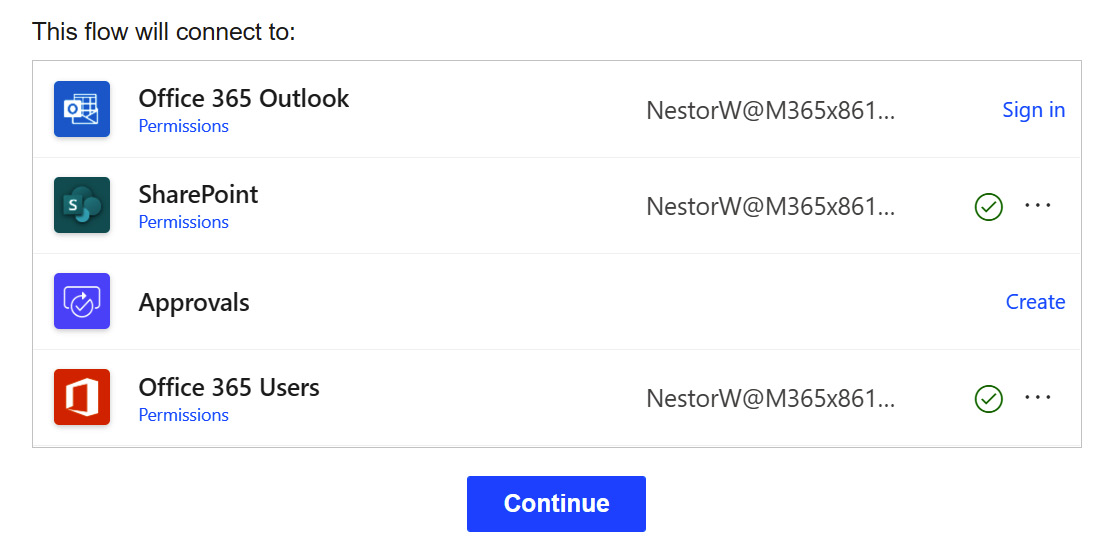
Figure 6.4 – The connectors required for a flow to gather and process data
Flows are a combination of a single trigger with multiple actions, and optional steps to group actions together. As we continue with the flow, the trigger is already set to look in our site at the list from which we initiated the flow. If we began from a blank canvas, we would have to choose the SharePoint connector and manually supply that information. The first action is the approval action, which starts upon the creation of the item. This will result in an entry into the Approvals section of the Power Automate web app and an email being sent to the person the task is assigned to. That email will contain an actionable link that will allow the recipient to approve or reject the request without having to go to SharePoint or the Approvals Center at all.
In the action, we can specify the approver by entering a name or email directly or by using dynamic content that allows us to get data from the SharePoint list item or another connected source (shown in the following figure):
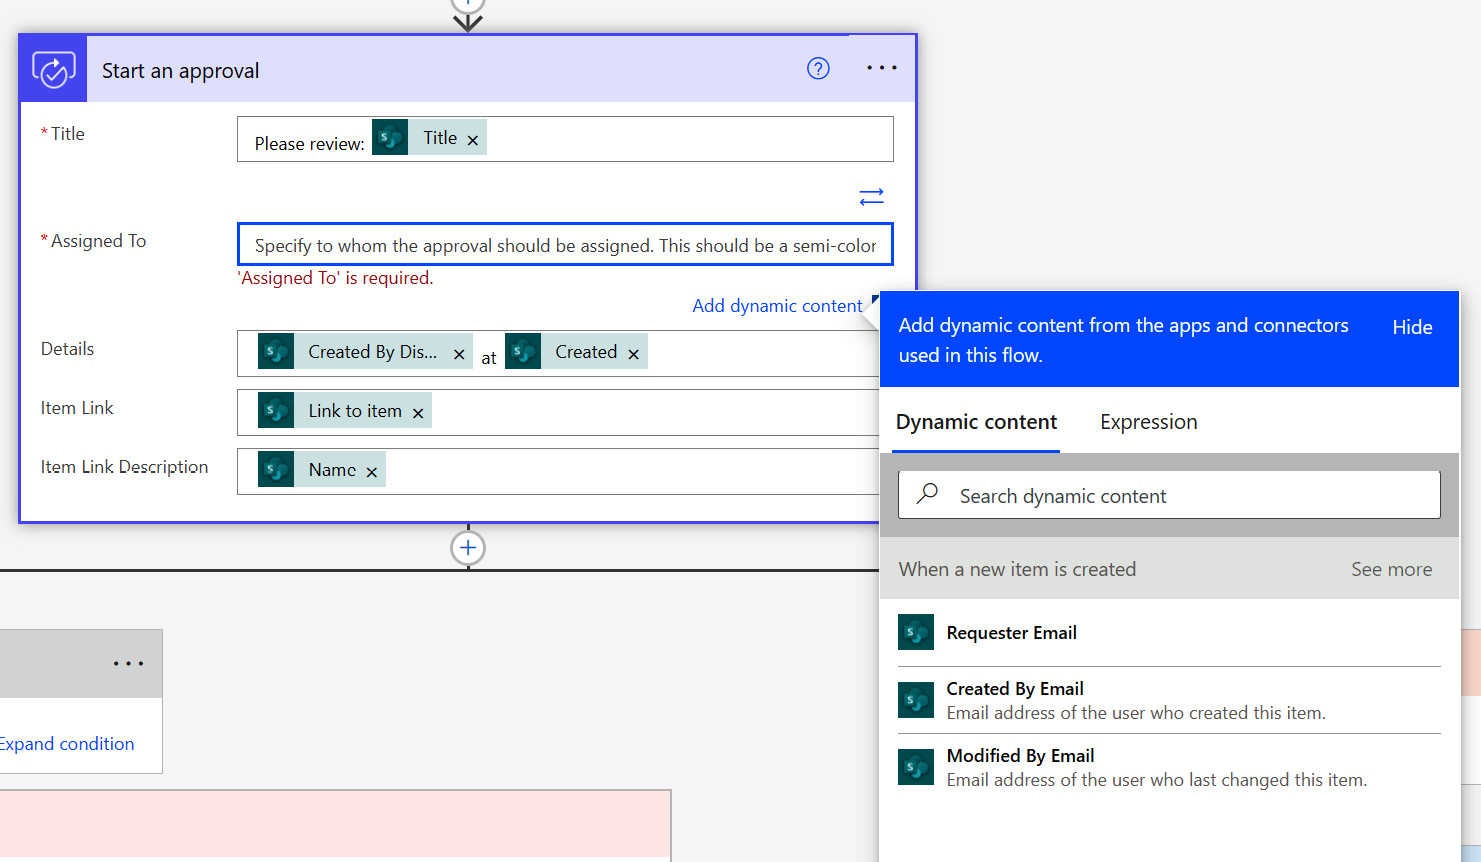
Figure 6.5 – Dynamic lookup for the Assigned To field in the approval workflow
There are three people fields in the SharePoint list so we could choose any one of those. Since there is no approver column in the list, we could go back and add one. Upon refreshing the workflow, we could then choose it in the action. We could also send the request to the manager of the requestor. There is an action in the template to get the user profile of the person who made the request. Since that action is introduced after the approval action, it doesn’t provide that data in the dynamic lookup. This is where altering the flow created from the template would make sense.
We may also make other changes. We could (and should) replace the Start an approval action with Start and wait for an approval, which would allow us to have multiple approvers and decide whether we need all of them or only one of them to approve or reject to move things forward. Start an approval is also deprecated and only available if we start with a template. This action would also allow us to create our own values for custom responses, in case the words approve and reject don’t capture our requirements. To add actions, we can click on the plus icon on the canvas and choose an operation, as seen in the following figure.
By filtering with the word approval, we can avoid searching through hundreds of available actions:
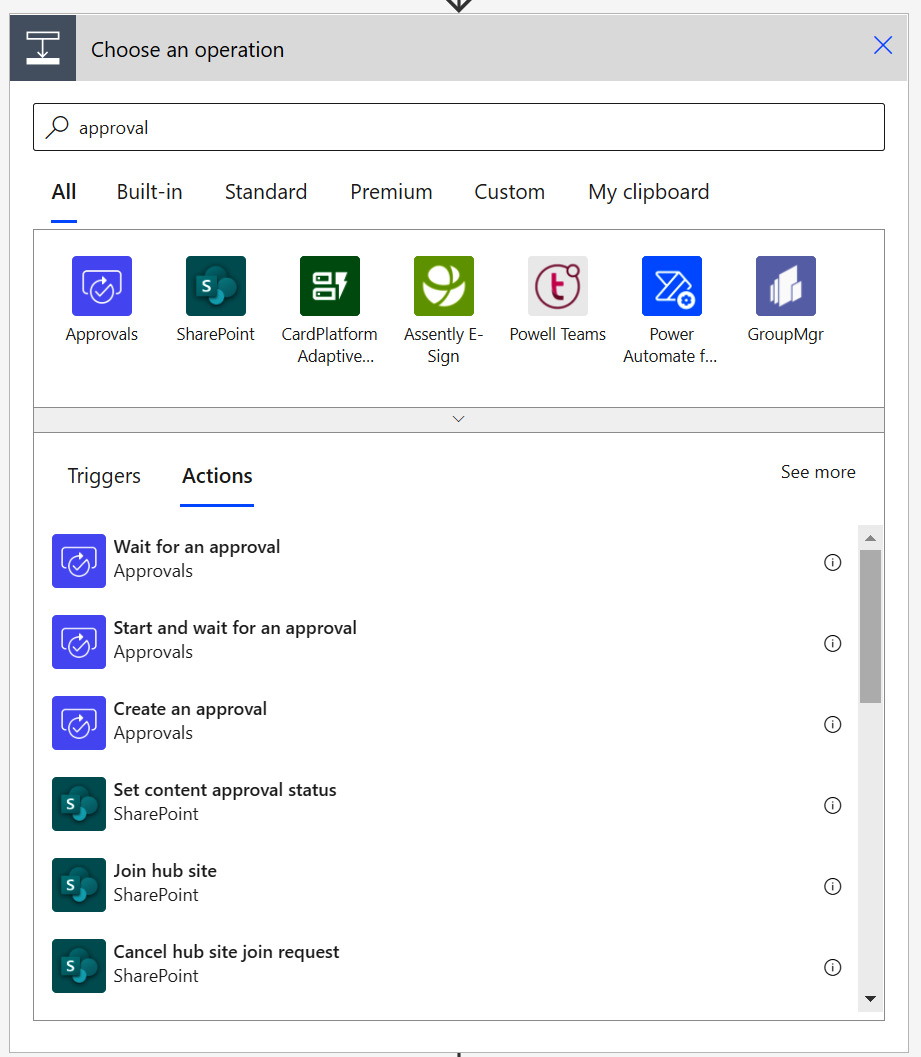
Figure 6.6 – Adding a new action to a workflow, filtered by a search term
Once the workflow is completed and saved, we can test it from the design canvas or by adding new data to the list. We can view a history of the flow’s execution as well by leaving our design view and looking at our cloud flows. Each run of the flow over the last 28 days can be clicked on to see the steps that were taken, data that was exchanged, duration of each step, and overall status.
Once our flow is tested, a good governance idea is to share the flow with someone else as a co-owner. This could be one or more individuals or user groups. Once that sharing has happened, others can make edits, if necessary, when the initial creator can’t be reached or if they leave the organization. A note to remember that may save you some time and aggravation – when shared, the flow no longer appears under Cloud flows, but instead Shared with me, which is the case even if you are the one that did the sharing.
In this section, we’ve seen that the Power Automate tool allows us to configure automated processes to run as we interact with data in SharePoint, replacing tools such as SPD. Another common need is to customize the look and feel of the form associated with adding and editing items to lists. For that, we need Power Apps.
Forms customization with Power Apps
Power Apps is a tool that can be used to customize the UI for SharePoint list forms, in a similar way that first-party tools such as InfoPath, or third-party tools such as Nintex Forms may have done with classic SharePoint. It’s important to keep in mind that Power Apps is not just a way to extend SharePoint, but so much more as well. Power Apps is essentially a low-code developer tool to create the frontend of an application that can run through the web, in Microsoft Teams, or on mobile devices. Power Apps supports connectors in the same way that Power Automate does, so it can connect to SharePoint along with hundreds of other sources, tools, and apps.
Power Apps can be used to create the following:
- Canvas apps – Apps built by dragging controls onto a design canvas and connecting those controls to data through connectors. This is what gets created when we customize SharePoint list forms. Canvas apps support PowerFx formulas.
- Model-driven apps – Suitable for more complex application scenarios, but data-first, based on underlying data defined in Dataverse.
- Portals – A website where both internal and external users have secure access to your data in Dataverse. Identities don’t need to be tied to Azure AD. Power Apps portals support an anonymous license model, but if the user logs in, their identities are tied to Azure AD either as an internal user or external B2B user.
So, Power Apps really is a developer’s tool that doesn’t require all the developer’s knowledge. Let’s focus on how Power Apps and SharePoint lists work together to create a customized UI for new and edited item forms.
Power Apps and SharePoint
Similar to Power Automate, the integration between SharePoint and Power Apps is built into the menus of modern lists and libraries. It is also a standalone site, desktop app, or mobile app that can start with a blank canvas and be connected to SharePoint data. If we continue with our customization of the Travel requests list built from a template, we can change the look and feel of the forms that open in the right-hand panel by choosing the Integrate menu and selecting Power Apps.
We have the option to create an app or see all apps, but the real magic is with the menu option to customize forms. We can find the same link by creating a new item or editing an item and selecting the icon in the upper right. Here, we have the option to edit columns or configure the layout, which would not involve Power Apps, or to use Customize with Power Apps (shown in the following figure):

Figure 6.7 – Viewing customization options from a new list item form
Upon clicking the button to customize, we’ll be taken to a new Power Apps screen and a canvas app will open. With custom forms, we have a SharePointIntegration object in the tree view. In canvas apps, the connection to the SharePoint list is there from the beginning, and controls for our list columns have been added. If we select SharePointForm1 in the tree view on the left, we’ll see the form in its default state. On the right, the Data source property has been set to our list. This connection is defined on the left side, under Data. Additional lists or other connections can be added here as well.
Below the data source, the list of fields may be edited along with the type of control. In the following screenshot, we can see that the Title field, which is text, can be formatted for a phone number, email, multiline, or even a dropdown of allowed values, all while keeping the column type the same on the list. We can also reorder the elements on the form, and change the fonts, sizes, visibility, and colors:
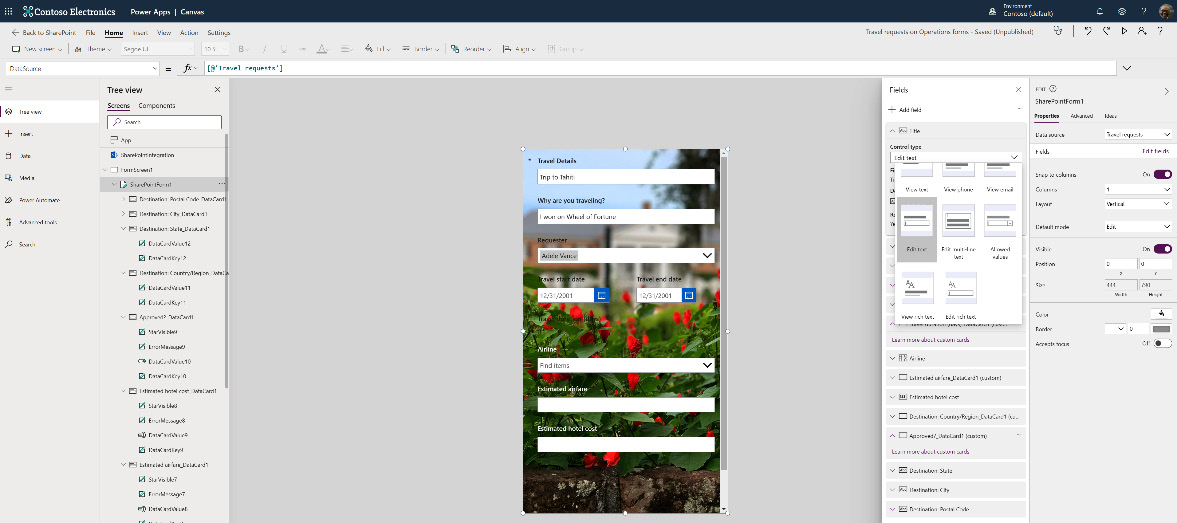
Figure 6.8 – Editing a list item form in Power Apps with fields selected and customizations applied
When our customizations are complete, we can click the play icon to preview the form in Power Apps or save it from the File menu. Clicking Back to SharePoint in the upper left allows us to publish to SharePoint to enable the new form to replace the default. Our Power Apps app now displays when we edit an item or when we add a new one.
A connected app
If we want to provide users with an app experience seemingly separated from SharePoint, we can also build a new app from a blank canvas app template. When taking this route, we must choose either tablet or phone layout, as canvas apps are not responsive by default. The primary UI elements in our canvas app (or the integrated form) will be galleries, forms, and cards, each of which may be connected to our list data:
- Galleries – A gallery is a list of records or items built from one of the built-in gallery templates. Layouts can be changed after creation and we can change the sorting, filtering, and highlighting options. What’s possible with layouts is depicted in the following screenshot, including the image, title, and subtitle option:
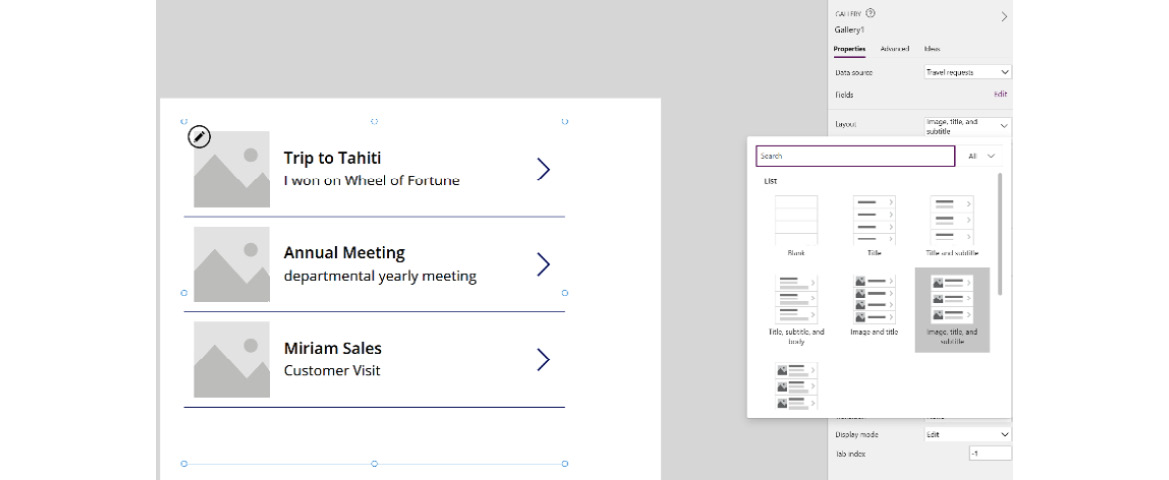
Figure 6.9 – Changing the layout of a vertical gallery control
- Forms – Whereas a gallery displays a list of items, a form displays a specific item to either view or edit. We can add a form to the app through the tree view by first adding a new screen to the app. Adding an item from the Insert pane will allow us to add a Display form from the Input category, which may then be connected to data. In this case, that’s our Travel requests list. We can edit the connected fields we want to display.
- Cards – A form is comprised of multiple cards, each connected to a data element. In our example, we have a card for each list column that we’ve selected to display. In the fields list, we can change the control to render the data. If we need to customize further, we can unlock each card and interact with the Advanced tab for that card. This also enables the Display mode, which can be changed from View to Edit or Disabled.
To add our SharePoint data, we can select an object (such as our gallery) and choose the data source dropdown. Under Connectors, we should find SharePoint, where we can select the site and list that we’ll use to build out the app. Recent sites may display the site we need, or it may become necessary to enter the URL. The lists will automatically populate after the site is connected. We can also add the data initially before building any screens from the Data section on the left of the canvas designer.
The gallery may be the place we start interacting with the app. To interact with each list item on its own, the next arrow icon to the right of each item in the gallery could be configured to open our form, which displays the entire item. We could add some Power Fx code to the OnSelect property of the icon, something like this: Navigate(Screen2), where Screen2 contains our form control.
We would continue down this path to build out the forms that allow us to fully interact with our data. We’ll also need to build out the navigation and interaction elements as well. For example, even though the Navigate function mentioned previously would take us to the display form, we’ll need to make sure we provide a way to get back to the home gallery. We’ll also need to add buttons to submit data back to SharePoint if we make changes.
Generated apps
Taking the approach we’ve just walked through together will provide you with the most granular control over building your canvas app. It is, however, not the fastest way to build a new app. We can take a more data-first approach. While model-driven apps are usually defined in this way, we are going to stay in the canvas apps world but allow Power Apps to build out the basic UI from the data we have in our list.
In Power Apps, we can select SharePoint under the Start with your data section. We can choose our connection to SharePoint and our Travel requests list. Note that the layout is for phones by default. We can change this to tablets instead to have a larger design surface. The result of this effort is what’s commonly referred to as a three-screen app.
We’ll get a browse screen with a gallery control, a detail screen for viewing item information, and an edit screen for making changes or entering new items. Controls for sorting, refreshing, adding data, searching data, and navigation will be created and supplied with the necessary Power Fx code to make the app functional. All the forms and cards will be connected to data, though we can make whatever changes we would like. In the following figure, we can see the default state of the three screens side by side.

Figure 6.10 – Screenshots of a three-screen app generated from a SharePoint list
Generated apps give us a very rapid way to present and interact with the connected list data from SharePoint. Generated apps or custom canvas apps need to be deployed in order to be used.
Deployment
When we customize SharePoint forms with Power Apps, the changes we make are directly connected back to the list, so the deployment strategy is simple – just change, save, and publish. If we create our own apps from scratch or from data, we need to make the app available using one of the available deployment options.
First, we should make sure that the app is saved to the cloud so we can open and make changes to it from the Power Apps web app wherever we are. Once saved, we can then share the app. We can share the app with others as co-owners or users. Co-owners can make changes with us. To make the app available for everyone in the organization, we can choose Everyone when sharing. We also need to verify that everyone also has the necessary access to the underlying SharePoint list.
So now, how will users get to the app we’ve created and shared? The following figure gives us some hints:
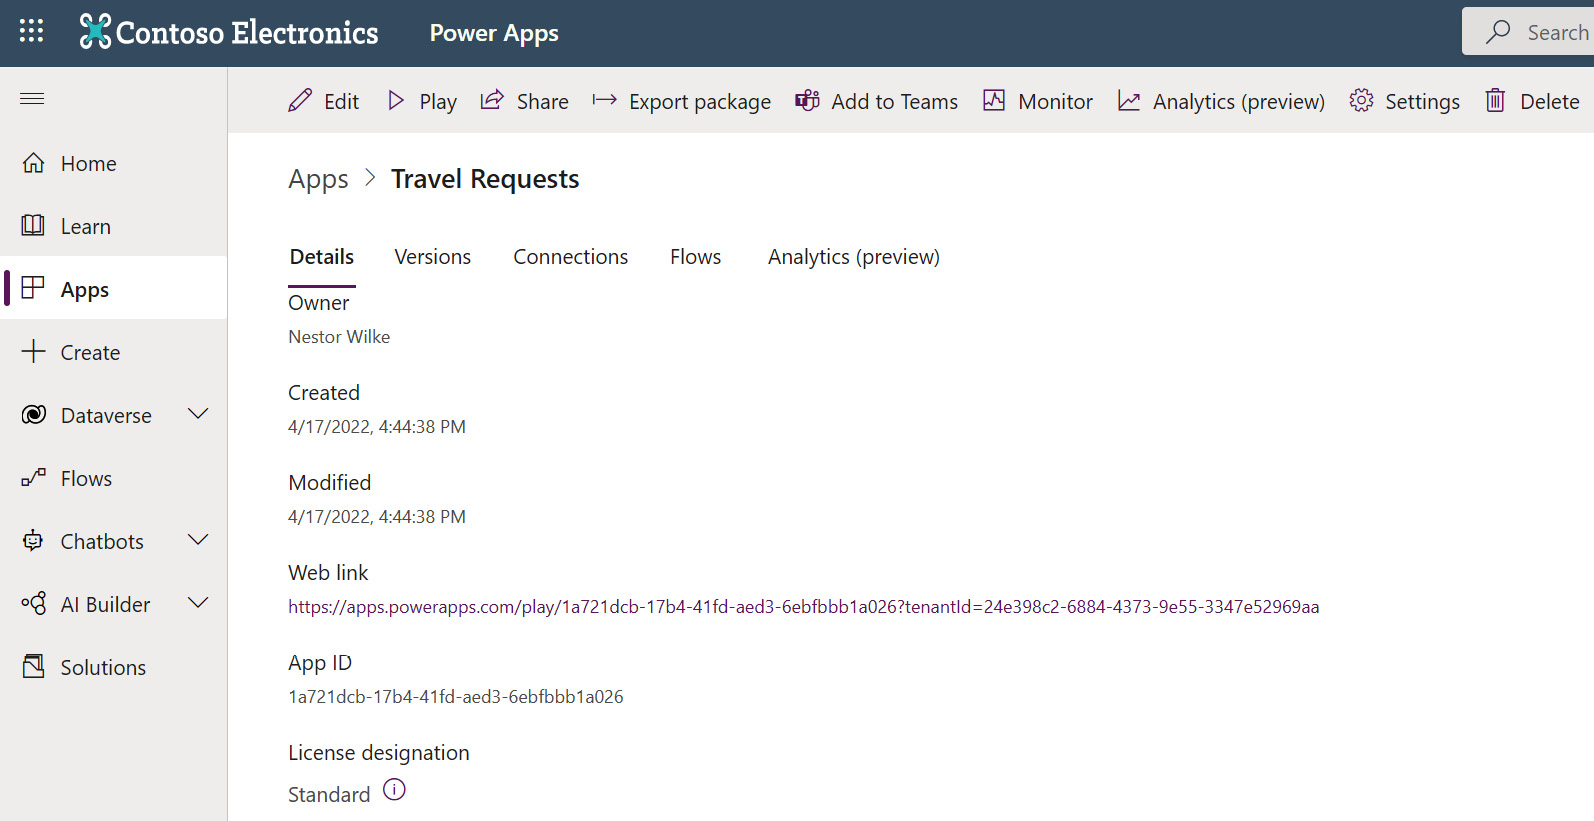
Figure 6.11 – The details for our Power Apps app with settings and options to deploy
Let’s take a look at the options we have to get our apps into the hands of our users:
- As a web app via a link – A web link will be provided (depicted in the preceding figure), which we can use like any other URL. Maybe we can add a hyperlink to the site navigation so that users open the web app directly instead of going directly to the SharePoint list.
- From the Power Apps site – We can see any apps that we’ve created or that have been shared with us when we go to the Power Apps app from the app launcher in M365. Clicking on the app will give us the same experience as clicking the web link option we just noted. If we want to further the awareness and adoption of Power Apps, sending users to a listing in a place where they can create apps of their own may be preferable.
- From Microsoft Teams – The Add to Teams option is visible across the top of the app details page. Clicking here allows us to configure an app manifest, a JSON deployment file with details about our app, enabling deployment to Teams. This can happen by downloading the app package and uploading it as a custom app in the Teams app or admin center. We can also deploy directly to a team by clicking the Add to Teams button in Power Apps. We can then choose to add the app to a team as a tab in a channel or a private chat. The following figure shows us the deployment screen to add the app to Teams, either to a team or to a 1:n chat:
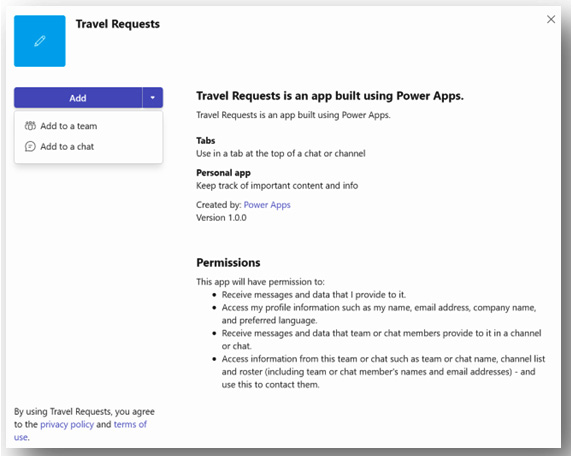
Figure 6.12 – Deploying a Power Apps app to Teams
The app then loads directly inside of Teams when we click on the tab.
- From Power Apps Desktop – For users on Windows, Power Apps Desktop can be a way to view and interact with Power Apps or to create them. When we authenticate with our M365 credentials, we’ll see the same list here as on the Power Apps site. We can click to download any of the apps on the list. Once downloaded, the app can be pinned to the Windows start menu just like any other locally installed app or progressive web app.
- From a mobile device – We can interact with the Power Apps app from a mobile device by opening the link on a mobile browser or by opening the Power Apps app from Microsoft. Similar to the Desktop app, we’ll see a list of available Power Apps apps. We can open the app from the list or add it to Favorites for quicker access. We can also create a shortcut or pinned app to open the app directly on our mobile device. On iOS, that takes the form of a shortcut, either by tapping or invoking Siri. On Android, we can pin the app icon to the home screen.
For mobile app deployment as described previously, we must use the Power Apps app to either open our canvas apps or to deploy them by using Power Apps to create a shortcut. As of April 2022, additional capabilities are in preview that will allow Power Apps to become a Mobile Application Development Platform (MADP). A feature named Wrap(preview) for Power Apps is not installed in tenants by default but can be added to Power Apps in the admin. Once installed, we can create canvas apps (or combine several) and then wrap them as custom native mobile apps complete with our branding and enterprise governance with Microsoft Intune. More information can be found here: https://docs.microsoft.com/en-us/power-apps/maker/common/wrap/overview.
This section has hopefully helped you to realize the capabilities of Power Apps to extend the UI associated with SharePoint list interactions, but so much more as well. We can connect to SharePoint along with hundreds of other sources to create our own apps to be consumed in a variety of ways. These apps give SharePoint a whole new dimension as a data source to be surfaced and consumed in heavily customized UIs, all while using a low-code or no-code approach. Next, let’s take a look at one more option for presenting list data, but this time, as a report or dashboard, giving us new ways to view and summarize all the data in our lists.
Visualizing data with Power BI
Power BI is a Power Platform tool designed to create interactive data visualizations in the form of reports or dashboards. As with the other tools we’ve seen, Power BI is a tool available as its own app in M365, usable from the web, or as a downloadable Windows or mobile app. Power BI is licensed differently from the rest of the Power Platform. Power BI Pro is only included with M365 E5 licenses, not all licenses like the rest of the Power Platform. The app allows us to both create and consume content. In SharePoint on-premises, tools such as SQL Server Reporting Services were commonly used to create reports from SharePoint list data. Those reports no longer work with SharePoint Online, but their outputs can be replaced with Power BI.
While Power BI is a vast subject certainly deserving of a book all its own, let’s focus on how Power BI can be used to quickly visualize list data in SharePoint. We can begin with the built-in integration within the Integrate menu on our Travel requests list (as seen in the following figure):

Figure 6.13 – Creating a SharePoint-connected report in Power BI from the Integrate menu
Clicking on Visualize the list will open a quick summary report (if you have an E5 license). This provides us with instant visualizations and insights that would not be possible just by using SharePoint list views, as powerful as they may be. For Travel requests, we automatically get summaries of hotel costs by month and year, the same for airfare, and a count of destinations for each time period as well. Each visualization can be personalized by changing the type of chart, the axes, and the values displayed.
The Your data section of the report is automatically provided using the list columns. Clicking additional columns creates new visualizations as part of the report. The Filters section allows us to further refine the data. The following figure is an example report that has been modified to show the data table and some additional reports on who is making requests, along with how many are made each month:
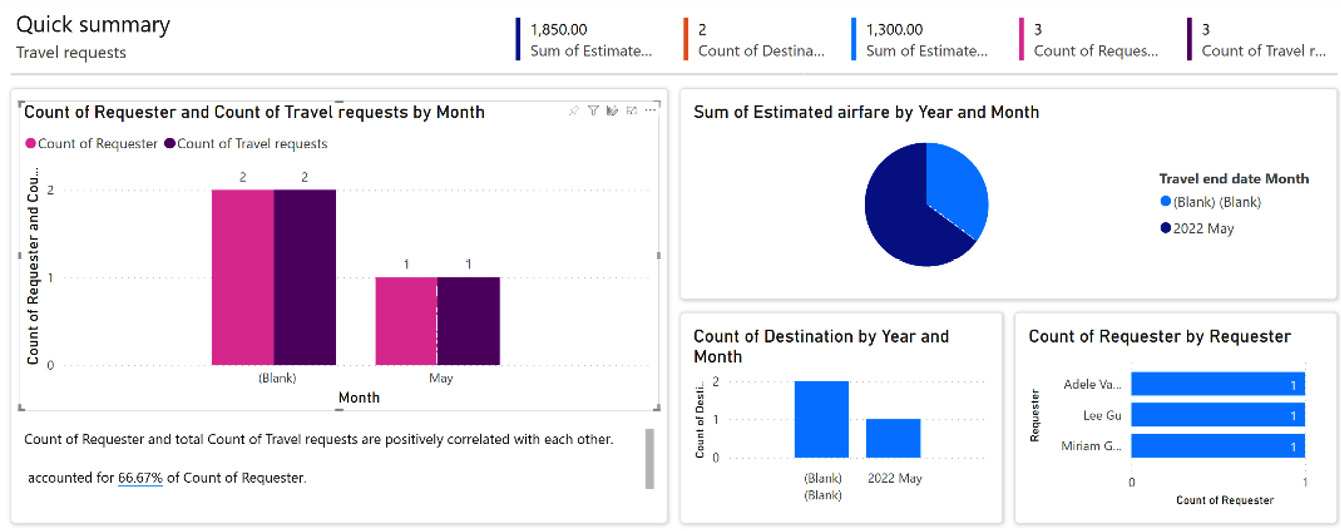
Figure 6.14 – An example Power BI report from SharePoint list data
In addition to what gets generated from the selected data, we can also choose the Edit button in the upper left of the report. This is part of what we see in Figure 6.15. When we switch to edit, we will have a much more elaborate design surface where we can add objects and visualizations, change colors and other visual details, remove unwanted visualizations, and add more data filtering options based on selected fields. The visualizations should be based on business requirements and provide the insights that are most pertinent. Multiple reports per list can be generated so we can choose to create several reports with fewer visualizations rather than one large dashboard.
When we complete our changes to the report, we can publish it back to SharePoint. The report is then visible as an option under the Integrate menu and opens in a new browser window in Power BI. Of course, we can always build new reports from scratch and connect to SharePoint data in the same way we’ve discussed with Power Automate and Power Apps, but the integrations out of the box with SharePoint allow us to create useful and insightful reports with minimal effort.
Next, let’s briefly discuss the role of connectors to allow us to work with data across M365 and beyond.
Using connectors to extend Power Platform across M365
We’ve seen across the Power Platform tools that there is no intrinsic connection to SharePoint or any other tool or platform. This means that being able to connect to data, and to more than one source of data, makes these tools valuable for purposes well beyond SharePoint usage scenarios. We discussed connectors previously in the context of Groups, and the concepts are still the same. A connector allows us to interact with online tools and services in M365 and with other web-based tools such as Twitter, Trello, Bing, and Asana.
The AppSource site at https://appsource.microsoft.com gives us the most up-to-date information about apps built with connectors. If we filter AppSource on the three Power Platform tools highlighted in this chapter, there are 1,490 results at the time of this writing. We also have a listing of connectors available here: https://docs.microsoft.com/en-us/connectors/connector-reference. Given that we can include multiple connectors in a single app, flow, or report, we have the option to truly build applications that could be enterprising in scale and benefit.
For example, we could have a Power Apps app that gets drop-down list values from a local SQL server instance but gets written back as a choice option or text to a SharePoint list. We could build a form to gather employee satisfaction survey results and visualize those in a Power BI report. We could build a flow that could trigger whenever a task in Planner is created and send a notification to a Teams channel. We can leverage templates such as the COVID-19 US Tracking Report template app (https://app.powerbi.com/groups/me/getapps/services/pbi-contentpacks.covid19ms), which connects to USA Facts as a data source. The possibilities are endless.
Power Platform governance
With so many possibilities and so many ways to deliver value quickly to the organization, it is only natural that Power Platform adoption increases as those in your organization become more aware of its value and ease of use. We’ll begin to see both champions and citizen developers. Champions will promote the business value of self-service tools that can make enterprise connections without the need for a developer or IT involvement. Citizen developers will be a community of makers that embrace the tools and create utilities for themselves and their departments that may become embraced across the enterprise.
Before that adoption and usage begin to take hold and grow, it is ideal to set some rules and best practices for the tools in the platform. We need to make some decisions on how the tools are to be used, which of those hundreds of connectors can be leveraged, and where apps, flows, and reports should be built. This is Power Platform governance.
Microsoft’s Power CAT Adoption Maturity Model is a great guide for assessing and driving Power Platform adoption. It defines five stages of maturity, levels 100–500 at https://powerapps.microsoft.com/en-us/blog/power-cat-adoption-maturity-model-repeatable-patterns-for-successful-power-platform-adoption:
- Initial – Organic growth, chaotic implementation, ad hoc usage, and focused on individuals
- Repeatable – Documented processes, some central control, gathering metrics, and some policies
- Defined – Emerging standards, consistent environments, Data loss prevention (DLP), and process automation
- Capable – Defined metrics and monitoring, enterprise-scale, and established champions
- Efficient – Experts community, AI and other advanced features, Application Lifecycle Management (ALM), and promote ideas
An organization may fall into one of these stages as a whole, or different groups within the organization may be more or less mature in their usage of Power Platform. I think one of the primary outcomes of this model is to identify how effective and formal our governance is. Within the five phases, we often see organizations taking one of three common approaches to adoption and proficiency:
- Minimal governance – The following characteristics are usually true:
- Citizen developers train themselves and begin to fill immediate needs.
- Default licensing for Power Platform allows everyone access to the tools.
- Apps are more local and less enterprising in scope.
- All artifacts are created within the default environment.
- Citizen developers have not formed a community of practice.
- Very little formal documentation or strategy.
- Standard governance – The following characteristics are usually true:
- Formal training for citizen developers.
- IT sets standards for DLP and connector usage.
- Multiple environments are actively used (usually dev, test, and prod).
- The size of team driving app needs is growing in size.
- A community of practice or Center of Excellence has started.
- Strict governance – The following characteristics are usually true:
- More IT-focused with tighter licensing.
- Citizen developers request apps that IT or CoP approves.
- The number of citizen developers is smaller and more official.
- Restricted access to lower environments.
- The process from requirements to the app is more restrictive.
Within these descriptions, there are some key elements that factor heavily in the level of maturity and the scope of governance. One of the first concepts to be mastered is environments.
Environments
In its default state, Power Platform licenses in M365 allow any user to create what they need in a self-service way. Power Apps and Power Automate flows that we have spoken about so far have been created in the default environment. An environment is an area for hosting Power Platform artifacts. While all our environments are part of the same tenant, they do create a boundary for security and for limiting connections to data sources.
Each tenant gets a single default environment, created automatically when the first Azure AD user is created, where all licensed users create apps and flows by default. When we use the SharePoint list integrations, the default environment is the location where the items are built. If you have a license to Power Apps, you have access to the default environment in the Maker role. The Maker role means you can create and distribute resources within an environment. The other role is that of an admin who can define permissions and policies as well.
Automatic access to the default environment allows everyone to create what they need, though admin access is still granted explicitly. The default environment can’t be deleted, nor can we remove the Maker role from users who are licensed there. The default environment can have only one Dataverse database, also true for other environments.
Additional environments may be created from the Power Platform admin center. These could serve the purpose of traditional application life cycle management where we have a development or sandbox space, a testing space, and one or more production spaces. We might also create additional environments as a means of allowing only certain permissions for users to be in the Maker role.
Though our intents for the environment may vary, the types are either Sandbox, Trial, or Production. Users with a Developer Plan license can create a Developer type as well. Additionally, each team in Microsoft Teams automatically gets an environment when the first app or bot is created, up to a limit of five environments plus one additional environment for every 20 eligible Microsoft 365 user licenses in your tenant. It can then be the target of the app or flow deployment and a more limited Dataverse for Teams database. Some limitations in Teams environments include lack of API access, permissions limited to team owners and members, and a significantly smaller database size (2 GB versus 4 TB or more for Dataverse).
Environments are also tied to a geographic location, so multiple environments may be needed in multi-geo tenants. The creation of additional environments can be restricted to only global or Power Platform admins, who also control the assigned users. Each environment should also be seen as an opportunity to implement good governance by limiting which connectors are available.
Environment DLP
DLP policies in environments are really data policies that configure or restrict which connectors are available and for what purpose in each environment. Business and non-business classifications create definitions around what connectors can be used together in a Power Apps app or flow. When we define data policies, we can also choose to limit the available connectors by blocking them. This can only be done for blockable connectors. Core ones such as SharePoint, Approvals, Dataverse, and other M365 tools and services can’t be blocked.
For other third-party connectors, we can decide which ones to block by selecting the connector and blocking it entirely or by configuring the connector to decide which actions are allowed. For example, we can select the SalesForce connector and block it altogether, which would prevent it from being shown at all to makers in the given community, or we can configure it and choose from about 16 actions to mark as allowed. This is shown in the following figure:
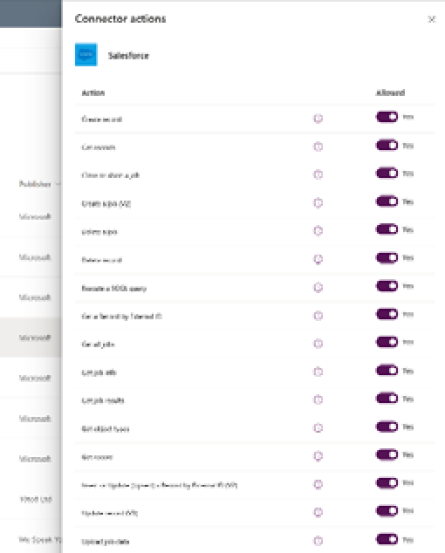
Figure 6.15 – Configuring connector actions in the Power Platform admin center
Being able to block connectors may also help to reduce inadvertent costs for using outside services in the Power Platform. Some connectors are standard while others are premium, which may not only have associated subscription costs but may also involve additional licensing costs in M365. Choosing to block these in a data policy for an environment makes sense. The Class column shows whether a connector falls into one or the other category.
In the configuration of a data policy, we can also choose which data group a connector is part of, Business or Non-business. Each connector begins life in the environment in the latter state, though that can be changed or set to blocked by default to limit the accidental impact. Making this distinction allows us to group connectors together based on whether they are more personal in nature or more suited for an organization’s business needs. No business data should be allowed in personal apps or flows. With connectors grouped, they travel and work together, so a connector in the business data group can only work with other connectors in that same group.
Once defined, policies can be applied to one or multiple environments. We can also choose to exclude certain environments from a data policy. Environment creation should eventually become automated with approval flows that can be reviewed with environments created upon approval, rather than having to return to the admin center each time a new environment is requested.
The environment used by a specific app or flow can be changed. Apps, flows, and bots are stored when created in a specific environment. In the top-right corner, the environment currently used should be displayed. When clicked, a drop-down list of other environments available to a user is presented. Changing the environment will show the artifacts created in that environment. To switch environments, we need to export an app solution from one and import it into another.
This may be a better scenario for tasks such as ALM. Perhaps we’ve created an artifact in a sandbox and now want to move it to testing and then on to production. Clicking Export allows us to package things up in a .zip file that can then be uploaded in the new environment or even to a different tenant. We just need to make sure the credentials used for the connectors are still the same in the new spot.
Center of Excellence
To assist with the adoption and governance aspects of a successful implementation of Power Platform, Microsoft provides a free set of tools and components called the Center of Excellence (CoE) Starter Kit. The kit may be downloaded from here: https://aka.ms/CoeStarterKitDownload.
The kit is built on a Dataverse database (which means you’ll need a Premium license) and provides automation and tools that help with monitoring, governance, reporting, and inventory. Not all components are required, but the Starter Kit is designed to assist with all aspects of Power Platform adoption. The core components first help you to establish an inventory of all apps and flows that makers may have already created. Admin components help with ongoing tasks such as DLP editing and permission assignment.
For the most effective results, these tools assist admins and makers to follow good governance practices, but the community of makers must also be able to support and inform one another. A Maker community should be established as well in Yammer or Teams to allow information to be communicated from admins and for makers to collaborate with one another.
Let’s take a brief look at each of the components to understand the value each provides:
- Core components:
- Inventory – What do we already have? All flows and apps are synced into tables in Dataverse and admin functions are built on top of the inventory data. The DLP editor and Set App Permissions are enabled as well. Multiple admin flows support the inventory gathering process. A daily sync keeps the inventory up to date.
- Environment request management – Who needs to create what? This tool automates the request and approval process for environments and connectors. This app should be open to all makers.
- Governance components: Are we following the rules? These components work with the app auditing process to verify that apps with more than 20 users or frequently used chatbots have a business justification provided, that apps have been published within the last 60 days, and other thresholds are met. A traffic light indicates the level of compliance for each app. Business process flows provide a visual guide through the approval process but do require a Premium Power Apps license. Archival and cleanup tools are also available.
- Nurture components – Are we sharing best practices and examples? These components are all about the knowledge and reinforcement aspects of adoption. Training content as well as the ability to share templates and best practices for admins, makers, and users are defined here. The app can help coordinate events such as App in a Day and facilitate the desires of a maker to build a new solution:
- Maker assessment app – Why are you building an app? We can ask a series of questions about the data, people, and support for a potential solution including licensing considerations.
- Template catalog – This canvas app creates a repository for reusable templates that makers might generate. Templates will help us to enforce architecture best practices and reduce overall development time.
- Theming components – Does the app reflect our branding? A theme is built from a set of styles that define color, font, and other visual attributes for controls and components. A theme can be applied to the app that will automatically inherit the properties. A theme editor app may be used to create new ones and a theme gallery allows us to share our designs across the maker community.
- Innovation Backlog components – How do we develop ideas? The Innovation Backlog component helps us to gather and manage ideas and to estimate ROI. Makers may submit their ideas or vote on others, while also explaining the people, effort, and business impact of their proposals. This component can help us facilitate well-considered and designed apps before any type of development activities begin.
One additional and crucial part of the solution is the CoE dashboard. Here, we ask what metrics can we measure and what insights can we gain? The dashboard is built on Power BI and shows adoption insights such as how many flows, bots, makers, apps, and environments we have. We see usage patterns such as how many items were created in the last month and how many apps may be at risk of oversharing or being abandoned. We can also identify our top makers and which apps have the greatest usage and adoption. The dashboard delivers data related to each of the three primary areas of the CoE – monitor, govern, and nurture.
A CoE is all about the people who are making and using apps, implementing and following best practices, and sharing knowledge and information with each other. We can develop these concepts and processes on our own, but the CoE Starter Kit is a great way to implement a standard from which we can add our own flavor or customization. It’s a highly recommended tool for driving any governance and adoption effort for Power Platform going forward.
Summary and planning document
In this chapter, we’ve looked at several ways that the Power Platform provides a replacement for on-premises SharePoint functionality. It is also a much broader and more potent way to enhance, automate, and visualize data and processes from across the M365 toolbox.
Power Automate provides workflow and process automation capabilities. Power Apps provides a way to build no-code/low-code solutions complete with business logic and data interactions. Power BI provides reporting and dashboard capabilities to visualize data quickly but robustly. Connectors provide the underlying capability that each tool relies upon to connect to M365 and third-party systems to provide either personal productivity or enterprise-scale applications.
The Power Platform is a set of tools on its own but integrates thoroughly with SharePoint, either from within the SharePoint Online UI or through the tools directly in their own apps and sites. When we plan for Power Platform integration with SharePoint, here are some questions to ask and details to consider:
Power Automate:
- Are there any SharePoint Designer workflows that need to be rewritten using Power Automate?
- What are some likely approval workflows that could be implemented?
- What are the most common data connections for workflows both within and outside M365?
Power Apps:
- Which lists would benefit from form customization with Power Apps?
- Do users in the organization consume corporate data through mobile devices?
- Who are the most likely citizen developers from both a business and IT perspective?
Power BI:
- Which lists provide business-critical data that would benefit from greater reporting functionality?
- Are there legacy SSRS reports that could be refactored as Power BI reports?
- Do report designers have knowledge of the underlying SharePoint list data structure?
Governance:
- Is everyone in the organization allowed to make flows and apps or should there be restrictions?
- Have citizen developers or makers been formally identified?
- Have Power Platform champions been identified?
- Has a Maker community been created in Yammer or Teams?
- Who will be the coordinator for the Maker community?
- Does IT control the creation of additional environments?
- Has the organization launched a community of excellence?
- Is training material available for potential makers to learn more?
In the next chapter, we will introduce a new section that will help us to understand and plan for the SharePoint site and compliance architecture. We’ll start by discussing a feature called hub sites, only available in SharePoint Online, to group multiple disparate sites together in a flexible way.