
5
Integrating SharePoint Online and Other Collaboration Tools
I enjoy cooking. I have since I was a child, though I’m better at it now than I was then. Making something tasty that I enjoy that also makes others happy is very rewarding. To make a meal, there are only two required components – the ingredients and a heat source of some kind. You also need the skills to bring those two together successfully, which is why you’re reading this chapter right now.
The process of cooking would be less enjoyable and the results less desirable if the only tools I had were my hands. I rely on several tools coming together, each playing a role in successfully preparing a meal. I need knives, spoons, spatulas, pots, and pans. I might also use a stand mixer, a spice grinder, or a steamer basket. Each tool adds its own unique value and I quickly come to rely on them all being available.
SharePoint has been known as a document management system or intranet tool for years. In the cloud, it still has a core set of functions it does well, but it is not the only tool in the toolbox. Some functions it used to provide, such as surveys, are deprecated. Other features, such as lists, have become a service of their own. Functions such as task management and tracking have moved to their own service as well. In this chapter, we will look at how SharePoint is not only a powerful tool in the toolbox but also the core of a set of tools that come together to cook up something hot and tasty in M365.
Our ingredient list for this chapter is SharePoint as the master sauce for making teams and communities, lists as the flavorful drops of data we can get to from SharePoint or via the Lists app, and we’ll drop in a little Forms, Stream, and Planner to taste:
- SharePoint behind every Microsoft team and Yammer community
- Using Microsoft Lists to store and view data
- Using Forms for surveys and polls
- SharePoint, Stream, and video files
- Making plans and managing tasks
By the end of the chapter, our plan is to understand how SharePoint is the foundation of many M365 services, but also a place where those services can also shine and provide support to the core collaboration tool.
SharePoint behind every team and Yammer community
In the previous chapter, we discussed how M365 Groups provides the foundation for many connected services in the cloud. SharePoint Online sites are always created whenever a Groups-connected artifact is created. SharePoint becomes the place where files are stored for these services. Nowhere is this more visible or more important perhaps, than two of the other key collaboration tools in M365 – Microsoft Teams and Yammer.
Teams and SharePoint
Microsoft Teams is a chat-forward collaboration tool with a desktop, web, and mobile client experience that leverages storage in both Exchange Online and SharePoint Online. All chat messages are stored in mailboxes. If we have a 1:n private chat or private chat group, each individual message is stored in a hidden folder in the mailbox of the chat participants. Any file shared is uploaded to the sharer’s OneDrive for Business location. If there is a chat within the Posts area of a team, those are stored in the mailbox for the group. All documents are stored in SharePoint. Each channel has a Files tab, which displays the set of files stored for that channel.
Each time a team is created, the SharePoint site serving the M365 group is created, and the Documents library is connected directly to that team – one team to one site to one library. Within that library, a folder is created automatically for each channel that is created in the team. Folders that are created directly within the document library don’t automatically create new channels, so the obvious intent is that Teams becomes the frontend experience for the user with SharePoint there to support it. It’s also worth pointing out that an additional SharePoint site is created for each private channel in a team, of which we can have 30 per team.
SharePoint sites can still have as many libraries as we need, however. Only one gets a direct connection to the structure of the team. To make additional folders or libraries visible to team members, we can either jump over to the site directly or leverage tabs in Teams channels. The link to the site is always visible on the Files tab menu, on the right-hand side, labeled Open in SharePoint. This takes us into the folder mapped to the channel, but we can use SharePoint navigation from there. The tab options are as follows:
- Website: This tab allows us to enter virtually any URL as long as it starts with https. Using this option, we can display any view from any library or link to a specific folder.
- Document Library: Here, we can either connect to relevant sites (the four sites used last or most often are likeliest to display here or we can enter a URL just like with the Website tab).
- SharePoint: This tab is more flexible still as we can add a page, list, or document library from the same site that is linked to the team, or any SharePoint site we have access to. The latter option is essentially the same as the Website tab because we must supply the URL. In the following figure, we see the options for adding a tab to display this content:
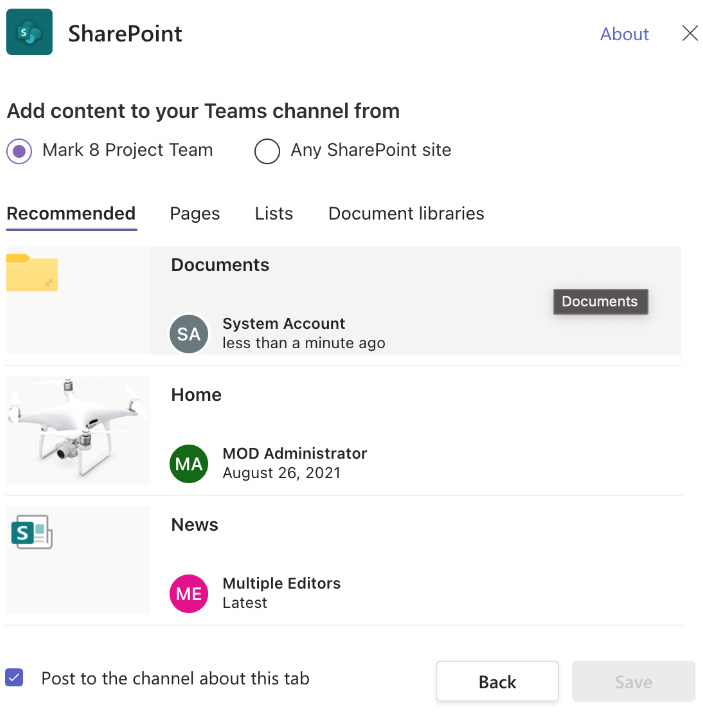
Figure 5.1 – The UI for the SharePoint tab in Teams
Having ready access to your document content in Teams is very important, but there is one more advantage of Teams and SharePoint working together. In SharePoint on-premises, there was a feature that allowed us to configure libraries to receive mail, allowing attachments to be saved as documents. For a while, this feature disappeared. With Teams, we now have an email address for each channel, which allows us to send messages with attachments and have those added as channel messages with attachments automatically being added to the SharePoint library and exposed in the Files tab. We can then continue the chat interaction in Teams as we collaborate on the files. Since this tight integration between channels and files exists, there are also some pitfalls to be mindful of.
Potential pitfalls
What if I delete a channel? What happens to the files? The channel is removed from the list on the Teams side but the folder in the library remains. If you try to create a new channel with the same name, however, you’ll see the following message:
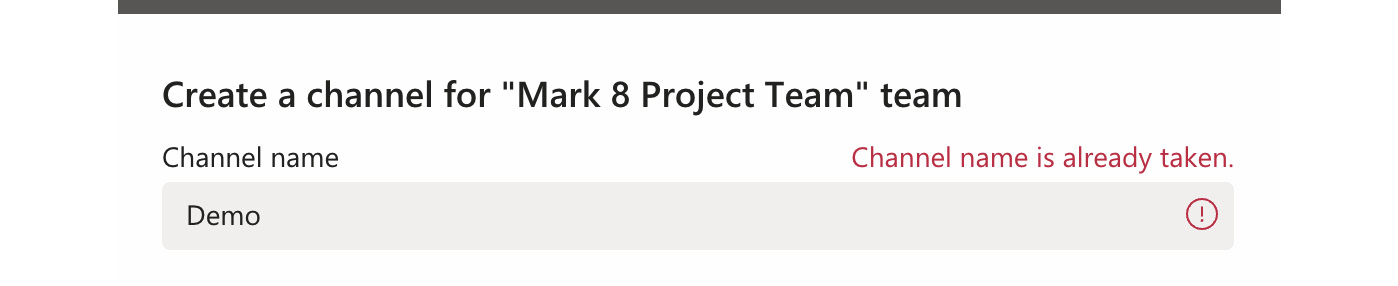
Figure 5.2 – Teams message when trying to reuse a channel name
For 30 days, that channel will remain available. A team owner can go into Manage Team on the ellipses next to a team name, to the Channels tab, and select Restore. The conversations will be rehydrated and the link to the library will be restored.
What if I change the name of the folder in SharePoint? This could be a common problem since there is a link between the channel and the folder, but any member can rename a folder in SharePoint. This action will not rename the channel in Teams. It will still exist, and conversations will be untouched. However, when we click on the Files tab, we’ll see what I lovingly refer to as the bicycle of doom, the message as follows:
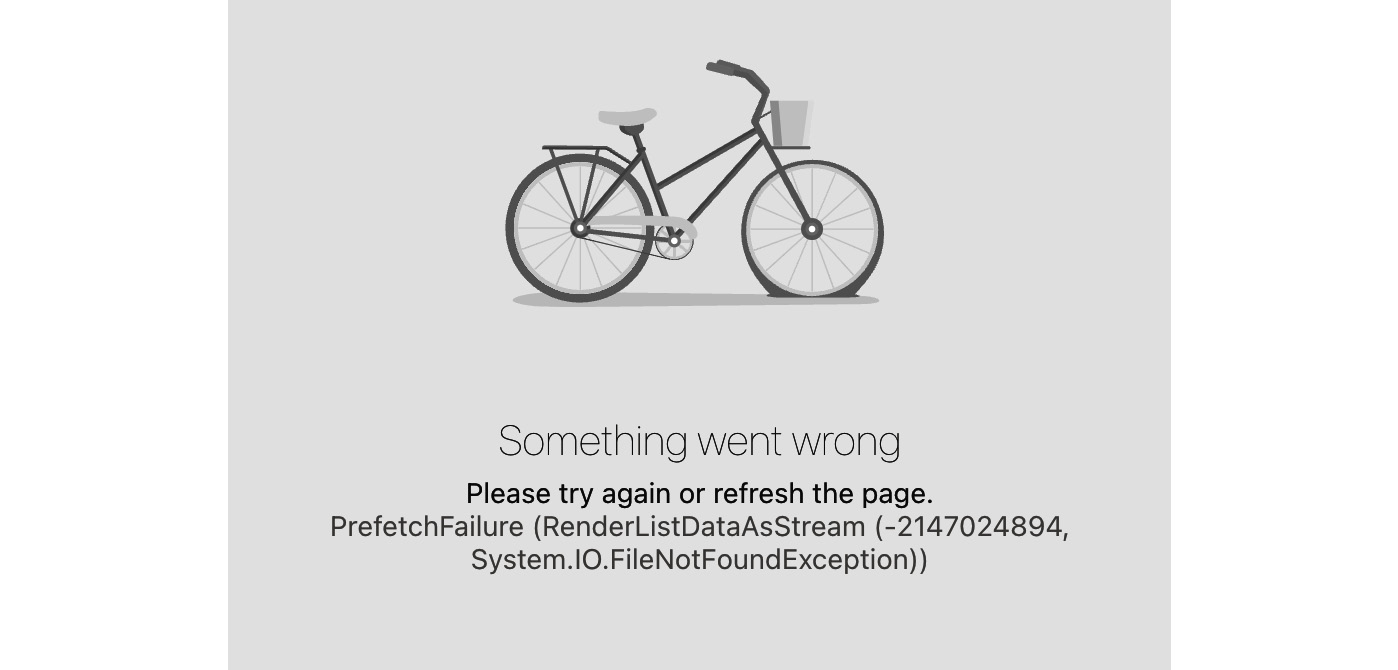
Figure 5.3 – An error message in Microsoft Teams
Changing the folder name back to the name of the channel should restore everything and resolve the issue. What if we look at the issue from the other direction, however, and rename the channel in Teams? In this case, the files will still display without issue in Teams. In SharePoint, the folder name will still keep its original name. This can cause confusion if some users navigate your content in SharePoint, while others go through the Teams UI. Preventing that confusion isn’t easy though, as the rename command is no longer visible on that folder in SharePoint (you can still rename folders not connected to a channel though).
Yammer communities
Yammer is a communication and social networking tool for web and mobile that comprises conversations and files. Multiple discussion types such as announcements, questions, polls, and praise create a more robust way to communicate within a private or public community than Teams channel messages and chat. Yammer has been around for a while and has gone through quite a few technical architecture changes in recent years.
Today, modern Yammer is an M365 Groups-connected service just like Teams. As a matter of fact, the two services compete for the same set of groups. You can’t connect a group to both Yammer and Teams at the same time – only one or the other. Since Yammer connects to a group, that instantly means that we’re going to get a SharePoint Team site to store our files. Even though those files get stored in SharePoint, we can still use the Yammer UI to interact with them (seen here):
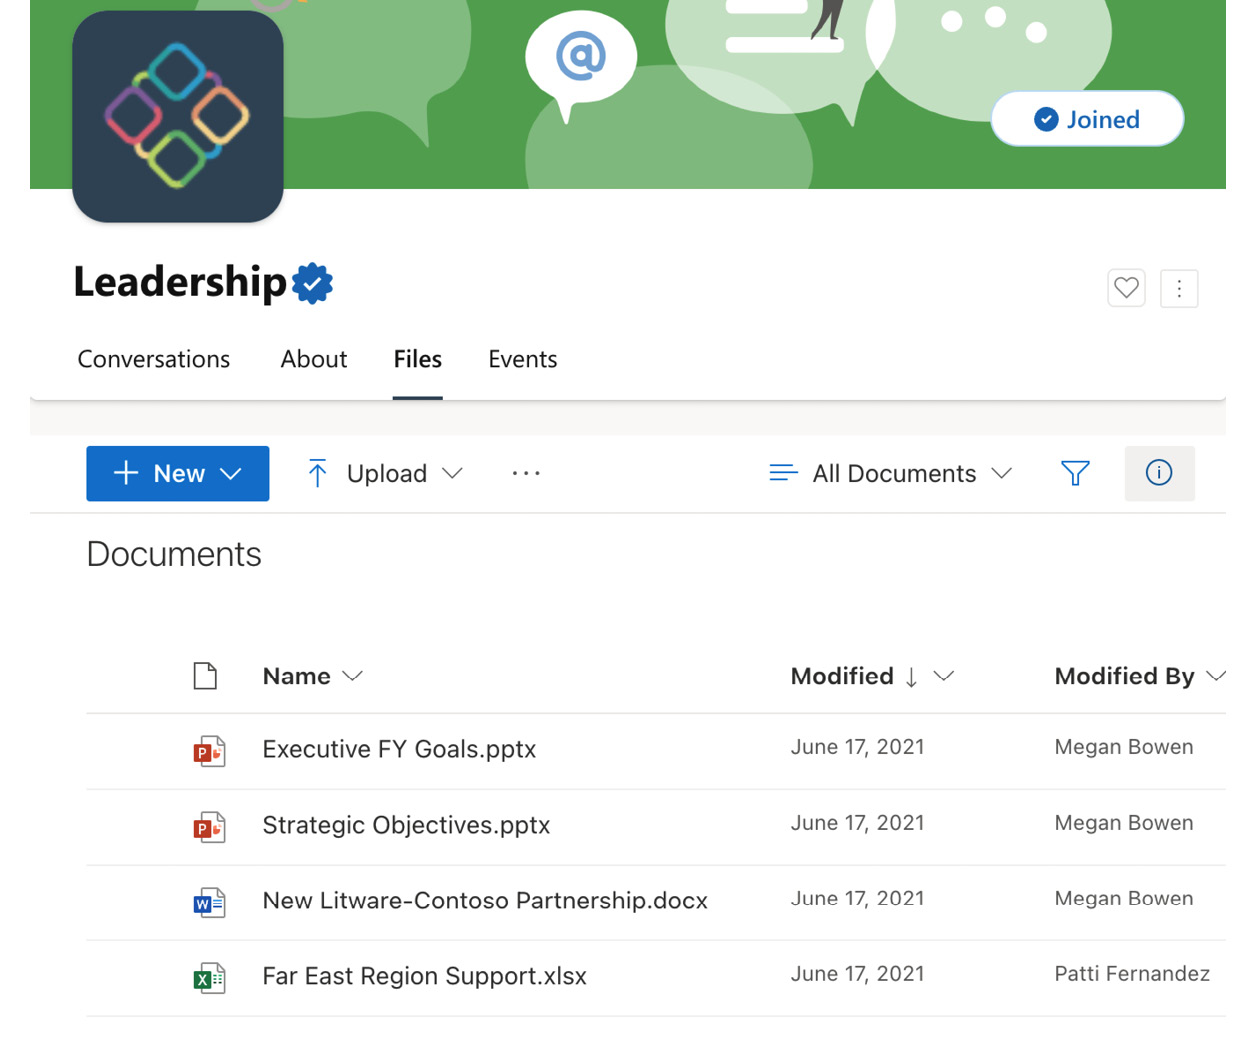
Figure 5.4 – A view of files in the Yammer UI
The Files menu opens a screen that displays the documents stored on the SharePoint site. In a similar manner to Teams, this reveals a folder in the Documents library. The path is Apps/Yammer and gets automatically created and connected when the community is built. Only documents in this folder will appear in Yammer. Any files that we add as attachments to discussions will also get added to that folder automatically.
We clearly see that SharePoint plays an important role in the structure of a team or community by providing a place to store files and a place to store pages. The latter can provide us with a richer UI to connect links, text, images, videos, and other content in a single location. Teams and Yammer both have their own organizing structure, which can sometimes feel fractured, so SharePoint pages can still be very helpful, even if the front door to collaboration is not SharePoint directly. Now, let’s take a look at how list data in SharePoint is driving a new tool in the enterprise and even at home.
Using Microsoft Lists to store and view data
Our next tool to help us make a savory and desirable solution is Lists. SharePoint lists have long provided a mechanism for data storage. They’re reminiscent of Excel spreadsheets in the cloud, with rows and columns of data. We know that lists and libraries are functionally similar behind the scenes. Libraries start with a document and can have additional metadata columns to further describe it. Lists are a collection of metadata columns that may also have optional documents as attachments.
List views have allowed us to sort, filter, and group data by this metadata, providing several ways to best consume the information. Prior versions of SharePoint have included special kinds of lists such as calendars, contacts, tasks, and more. That provided us with a starting point for applicable metadata by provisioning specific fields for us. Lists such as calendars also come with their own special views of visual data in specific ways.
Generally, if we’ve wanted to interact with the data in a list, we’ve needed to first go to the SharePoint site that contains it. Assuming we have permission to do so, we can find the list and view, edit, update, or delete its contents. While we can create views of the data that are private for just one person to see, most views are public, as is the data inside the list.
Microsoft Lists is an app in the M365 app launcher, just like Teams and SharePoint, which provides a unifying UI around multiple lists that we as users connect and interact with. It is not a separate storage location but a potentially better way to get to list data quickly and easily. You can create lists in Microsoft SharePoint, the Lists app in Microsoft 365, or Teams. The Lists app can also be installed as a progressive web app.
Wherever you start, the list will either end up in a SharePoint site if it is shared or in your OneDrive if it is part of my lists. Since OneDrive for Business is built on SharePoint, lists are stored on a site either way. We can view the UI that greets us when opening the Lists app here:
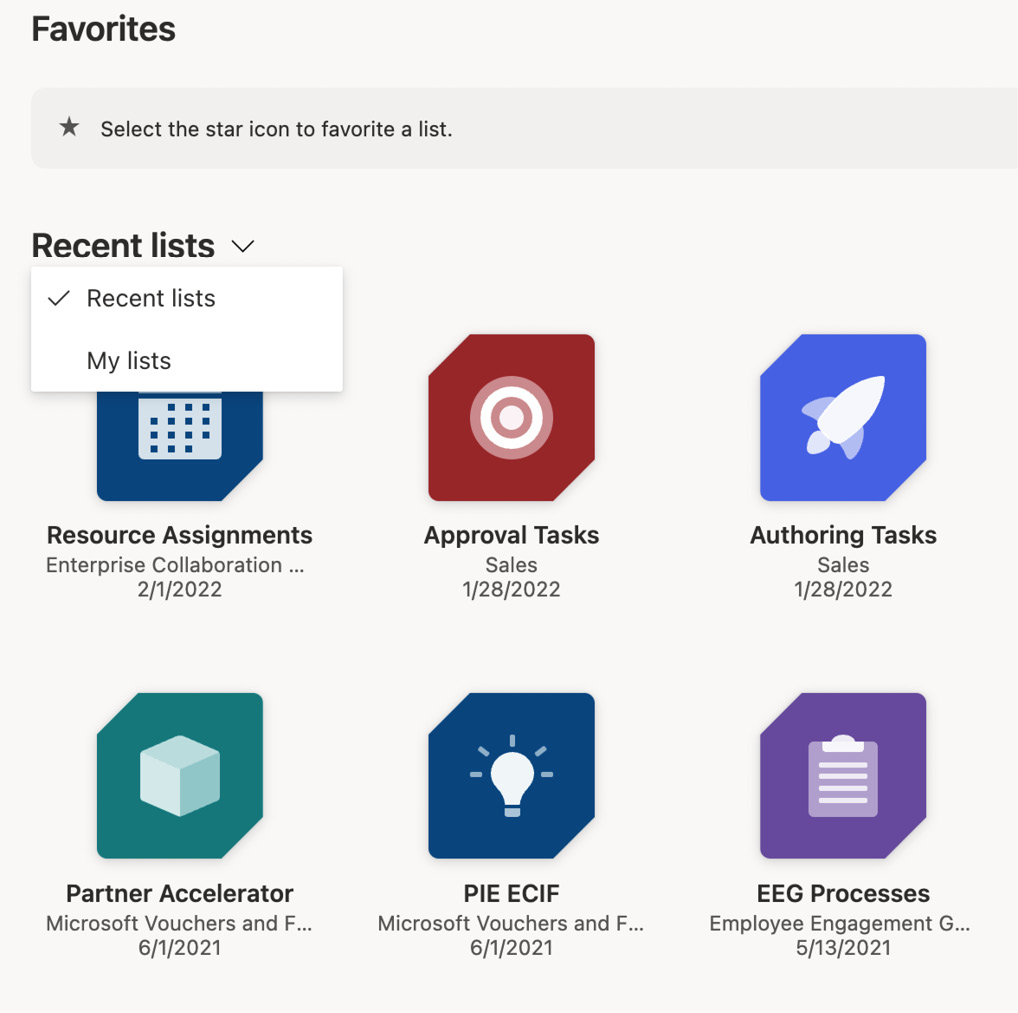
Figure 5.5 – An example of the landing page for Microsoft Lists
In the preceding screenshot, the lists are shown in one spot, but each one is actually residing in different SharePoint Online sites. If we click on the list from the Microsoft Lists landing page, however, we actually remain in that UI, rather than viewing a list within the context of the containing site. Just above the list title, there is a hyperlink to the underlying site. Clicking there takes us to the home page of the site. If we look for the list in the site contents, it will then open up with the site’s theme, rather than the lists.
This represents two completely different ways for users to access the list data they need. If their work is in a handful of sites (think of people in human resources only working in the HR or benefits site), then it would make sense to have links to the lists on the home page for quick access. If someone interacts with lists coming from several sites and business units across the organization (think of a project manager who is getting data from multiple project sites), then it may save time to have all of those lists in one spot (possibly marked as favorites) on the Lists landing page.
Let’s explore how and where to create a list, options for building different views of the data, and how to customize the views and data entry forms for the lists with a new JSON formatting standard.
Creating a list
When creating a list from Lists, SharePoint, or Teams, we are greeted with a screen that allows us to create a list from scratch, build one from Excel or another list, or we can select a template that will come with prepopulated metadata columns and some ready-made formatting. In the following screenshot, we see creating a list from the Event itinerary template. We can choose a color and icon to show up when using the Lists app:
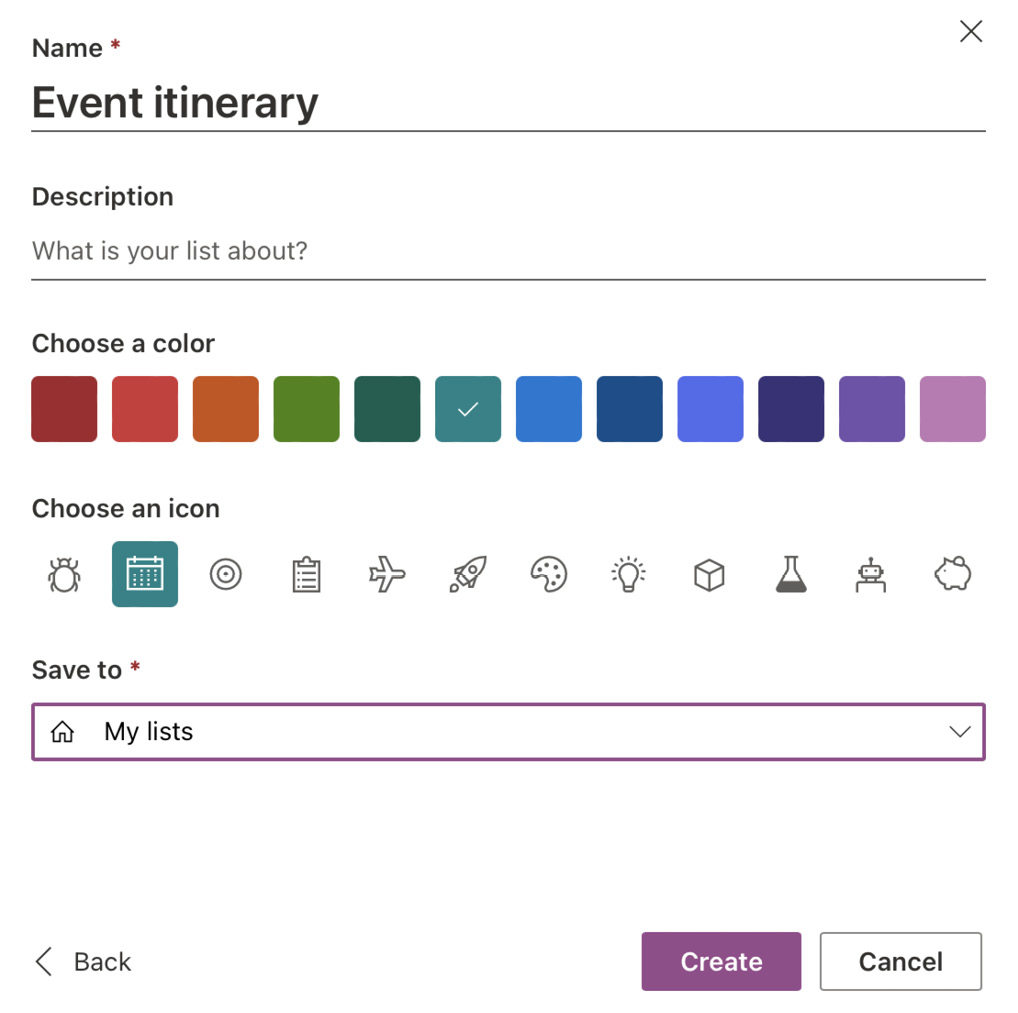
Figure 5.6 – The UI of Lists after choosing a template
If we choose My lists as the save location, the list will be stored in our OneDrive for Business site, and we’ll need to share it with other people if and when the time comes to do so. Saving to SharePoint automatically shares the list with those who can access the site.
The templates are limited but may provide some what’s possible thinking if lists are new to you. It is probably worth noting that in order to create a list from Excel, you’ll need to have the data in a table, not just a worksheet. One table may be selected to generate a Microsoft list. Whether we create a list from scratch or from a source, the option to add visual formatting to the list is a significant contributor to usability and adoption.
The availability of My lists and specific templates may be disabled if desired by using PowerShell as noted here: Control Microsoft Lists - SharePoint in Microsoft 365 | Microsoft Docs.
List views
The building blocks of lists are columns and rows. Each column is a piece of metadata containing a value that explains and relates to the list’s purpose as a whole. For example, in the Event itinerary list we started previously, the template starts with columns such as session name, session type, speaker(s), and start date and time. Each column has a data type:
- Session name is a text column and is marked as required.
- Session type is a choice field providing a drop-down selector of values such as keynote, breakout, and workshop.
- Speaker(s) is a people field where one or more names or emails may be entered and resolved to a person known to Azure AD and SharePoint Online.
- Start date and time is a DateTime field. We have two data entry areas – one for the date driven by a calendar control and another selector for the time in half-hour increments.
We can add any new columns that are needed in addition to the ones provided by the template. The type of the column begins to define the UI when we add new items or edit existing ones. The details panel on the right side, or the entire screen showing the list in an editable grid, is where we see that interaction.
Views are the mechanism by which we see the presentation of the list columns as a unit. There is always one default view, but then additional views can present a subset of the columns of the list or provide a way to sort, filter, group, and/or total columns or groupings of columns. Views also provide a way to limit what is retrieved so SharePoint can work with large lists or lists with a large number of Lookup columns. The following figure shows the options for viewing a list. List, Compact List, and Gallery are predefined options that allow us to see primarily text or images when viewing the data:
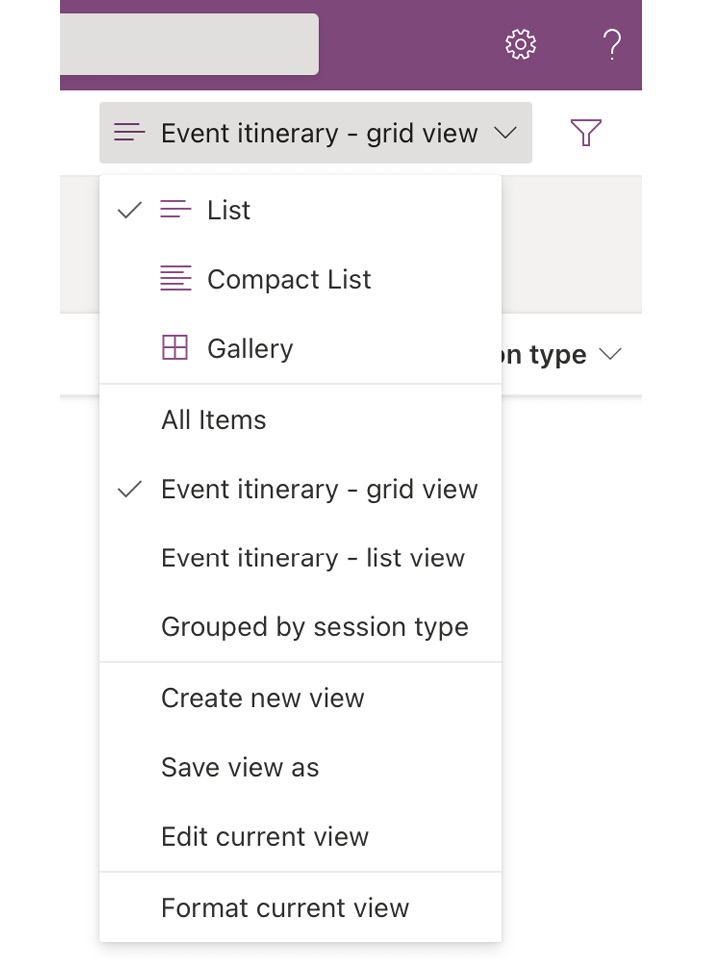
Figure 5.7 – Viewing the views
Four views are defined in the figure, but additional ones could be added as well. Creating a new view is as easy as clicking on the column headers, applying our change, and then saving the view (overwriting or as a new view with a different name) or by clicking Create new view. Here, we get four choices:
- List view – A tabular view in keeping with our discussion so far
- Calendar view – As long as we have a start and end date available for each item, it can be displayed as a calendar
- Gallery view – Perhaps more useful for libraries, but will allow us to see a view where an image is prominent, followed by other list data on a card view
- Board view – Very similar to Planner, showing a board view with different containers that list items can be dragged into
List formatting
The lists service has brought easy but powerful visual customizations for our lists, allowing us to build from what Microsoft provides, but creating our own formatting and enhanced visualizations. To accomplish this, let’s explore list formatting for entire views in both the List and Gallery layout, and individual column formatting.
At the bottom of Figure 5.7, we saw the menu item to format the current view. Clicking there opens the details panel, which begins with a designer for views and columns. For list views, we can select alternating row styles to format the view table or conditional formatting, which allows us to provide color-coding to rows based on rules. In the following figure, we see that the row is highlighted in red if the capacity is over 100. This is in addition to formatting in the columns:

Figure 5.8 – A formatted list view
The card designer is available for Gallery layouts. We are presented with a checkbox list of all columns and can decide which are visible and the order in which they appear. We can choose whether the column title appears as a label above the text. For columns, we can choose from a drop-down list of formattable columns. The formatting options for a column are determined by its data type. For choice fields, for example, we have the ability to apply a background color to the cell, a colorful pill around the data (as we see in Figure 5.8 for Session type), and a conditional formatting option that works like the previous option seen with view rules, except applying formatting to the column only.
While this is a powerful way to visualize data in Lists, we can also choose the advanced mode in each scenario. This opens up exciting possibilities to create our own visualizations from a standardized JSON schema. An example of that is seen here:
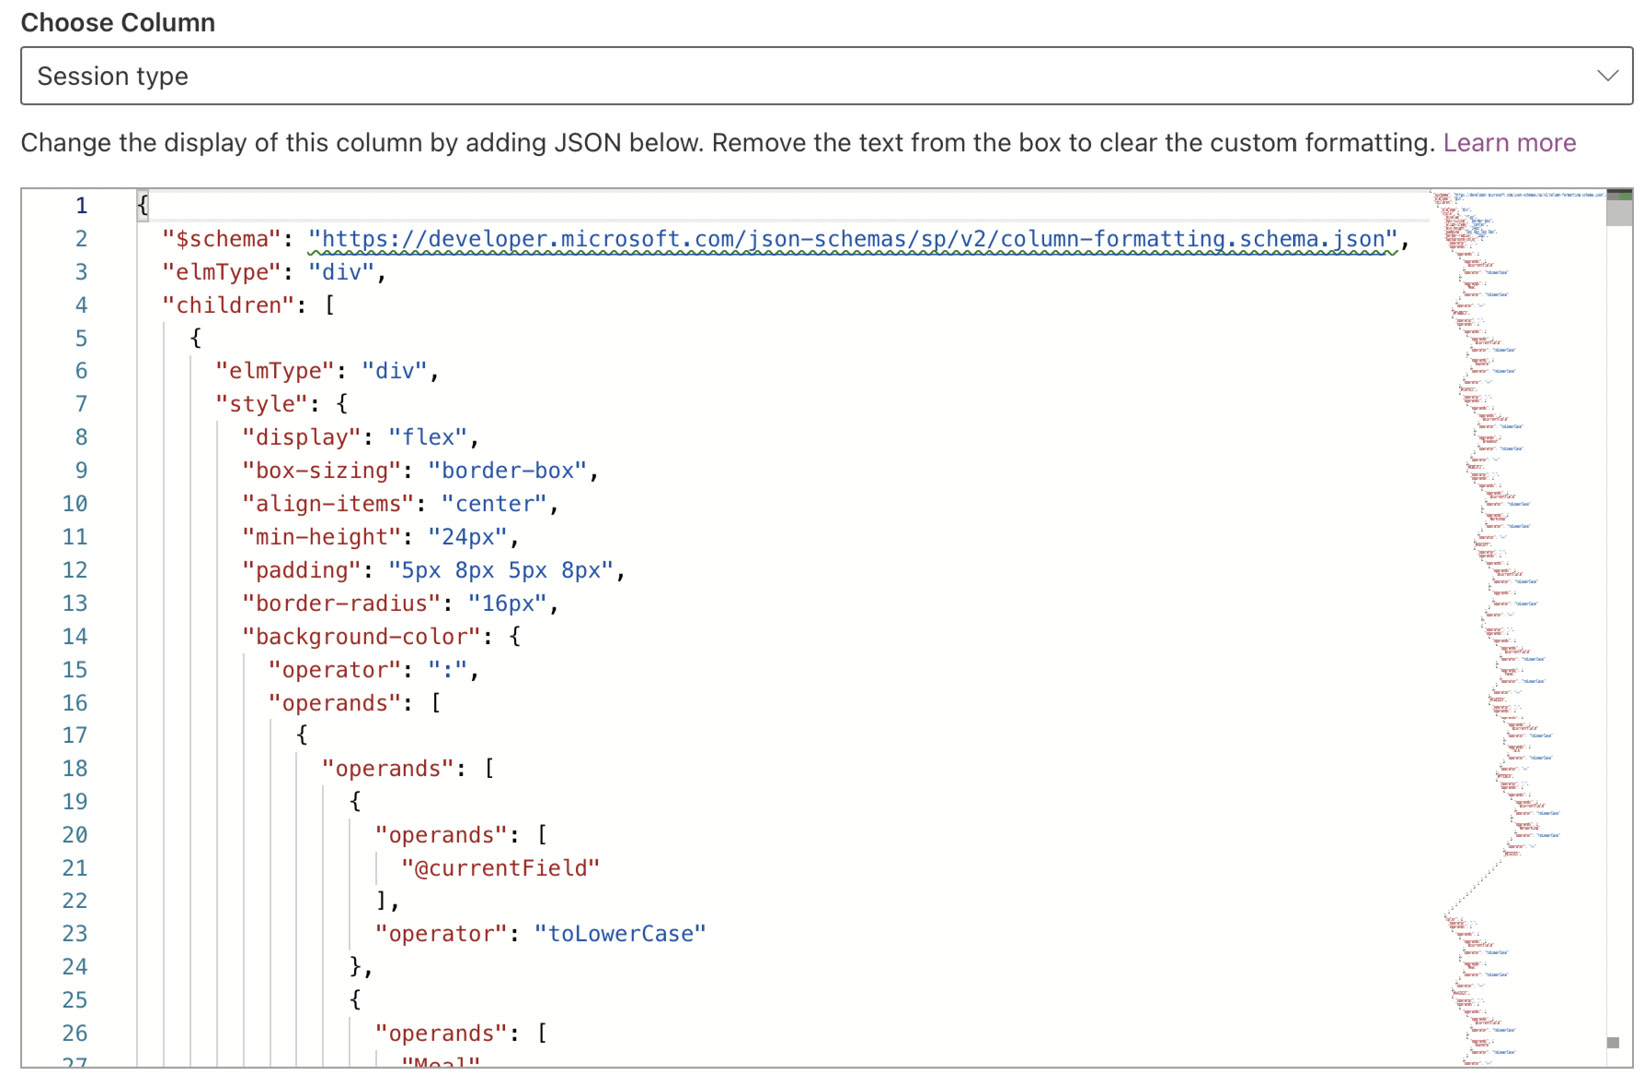
Figure 5.9 – Viewing the advanced mode JSON editor for list formatting
We can view guidance on this JSON standard and see examples by visiting this page: https://docs.microsoft.com/en-us/sharepoint/dev/declarative-customization/view-formatting. There, we find some excellent documentation and a link to the GitHub repository where several compelling examples may be found. So, we see that SharePoint lists have come a long way over the years. The possibility of formatting data in columns and views to create rich, compelling user experiences is a better, more scalable, and simpler approach than custom development may have afforded us in the past. Let’s turn our attention to the one component of lists we haven’t discussed so far, New and Edit item forms.
Data entry
What about the data entry forms? In SharePoint on-premises, it was very common to leverage InfoPath or to customize the list form pages with SharePoint Designer. While both tools still work with SharePoint Online, both are deprecated, and neither work with modern lists and libraries. We’ll discuss another option shortly, but in keeping with formatting options that SharePoint provides directly, we can determine which columns are visible or use the JSON formatting discussed earlier to change the header, body, and/or footer of the list data entry forms.
We see those options in the following screenshot, along with the option to use Power Apps, which we will discuss in Chapter 6:
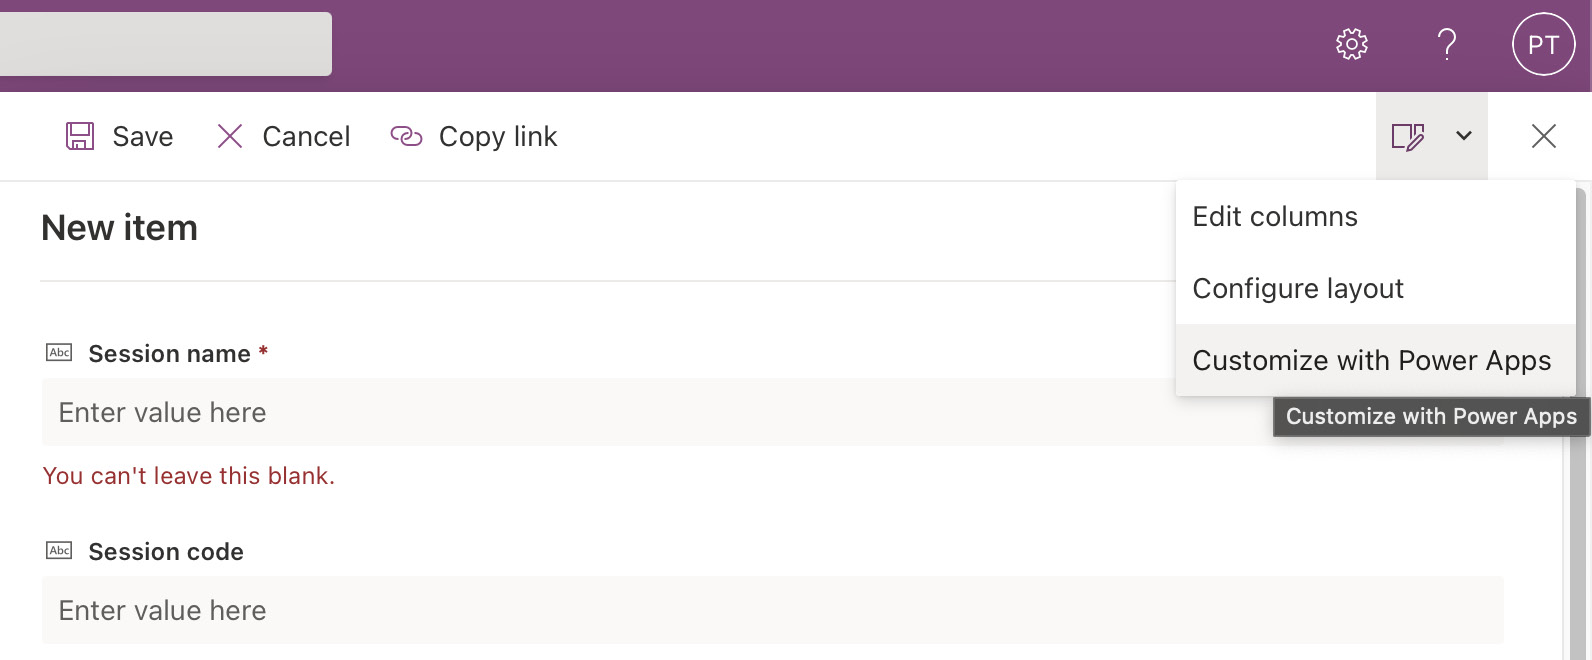
Figure 5.10 – Customizing the new item form
The Configure layout option opens a screen where we can paste the JSON formatting code. This provides a way to change the layout and order of the list forms as well as to have elements show and hide dynamically based on rule conditions. There is, unfortunately, no designer as we have with list views. This page provides a good introduction to the process and syntax: https://docs.microsoft.com/en-us/sharepoint/dev/declarative-customization/list-form-configuration.
While JSON formatting opens up a world of possibilities, it does require comfort with development concepts and the syntax of JSON as a language in general. For simpler forms, such as polls, quizzes, and surveys, Microsoft Forms may provide a more user-friendly alternative.
Using Forms for surveys and polls
Microsoft Forms is a separate app that is part of your M365 toolbox. If JSON formatting is the chef-prepared four-course meal requiring some skill that not everyone possesses, then Microsoft Forms may be the higher-end microwave meal. It still hits the spot but requires minimal effort on our part.
Forms provides a quick and easy way for users who are not especially technical to build data entry forms and view the data that results, both in a raw form and via some automatic data visualizations. We’ve probably all seen and completed a Survey Monkey survey on the web. This is essentially the Microsoft answer to that technology.
Given that surveys in classic SharePoint don’t have a modern equivalent, Microsoft Forms provides a viable alternative. For simple data entry forms, this tool can also be considered a partial replacement for InfoPath. Let’s take a look at creating a new form and the options we have.
Creating forms
All users who have Forms turned on as part of their M365 license can create a new form to share within and outside the organization. Forms may be created and completed in either a browser or as a tab inside a team. A form is created by adding a sequence of questions using one of the built-in data types. Some of these are like SharePoint data types, while others provide a bit of a richer interaction. The data types are as follows:
- Choice
- Text
- Rating (1-5 using either stars or numbers)
- Date
- Ranking (basically a choice field where the options can be ordered to indicate rank)
- Likert (a matrix of statements and value choices 1-5 that can be customized)
- File upload
- Net promoter score (a 1-10 how likely are you score range)
These questions can be added into one or more sections. Initially, a single section is provided, but additional ones may be added. Questions and sections both support branching so can skip forward based on the answers that are provided.
When a form is ready to be distributed to potential respondents, we have a few options that can be found on the settings for the form accessed via the gear icon:
- Share to collaborate: Allows others to own the form with you as an editor or respondent
- Share as a template: Allows others to use your form as a template but excludes responses
- Send and collect responses: Sends the form to be completed
We can specify who our respondents are. We can allow anyone to respond, which is an anonymous survey. Anyone inside or outside the organization can respond to the survey, but we can’t track responses against respondents. We can open the responses to everyone in our organization. This means that any licensed user could complete the survey. We have the option to capture the names of the respondents or allow anonymity. The last option is to provide a specific set of people in the organization to be respondents.
We can also set a start and end date for the survey. We can shuffle questions, show a progress bar, customize the post-response thank you message, and limit the responses to one per person. The responses for the survey can be seen by the creator or owners by clicking on the Responses tab. Each question is displayed with a visualization in keeping with the data type and is interactive. In the following figure, we see an example of the Responses page:
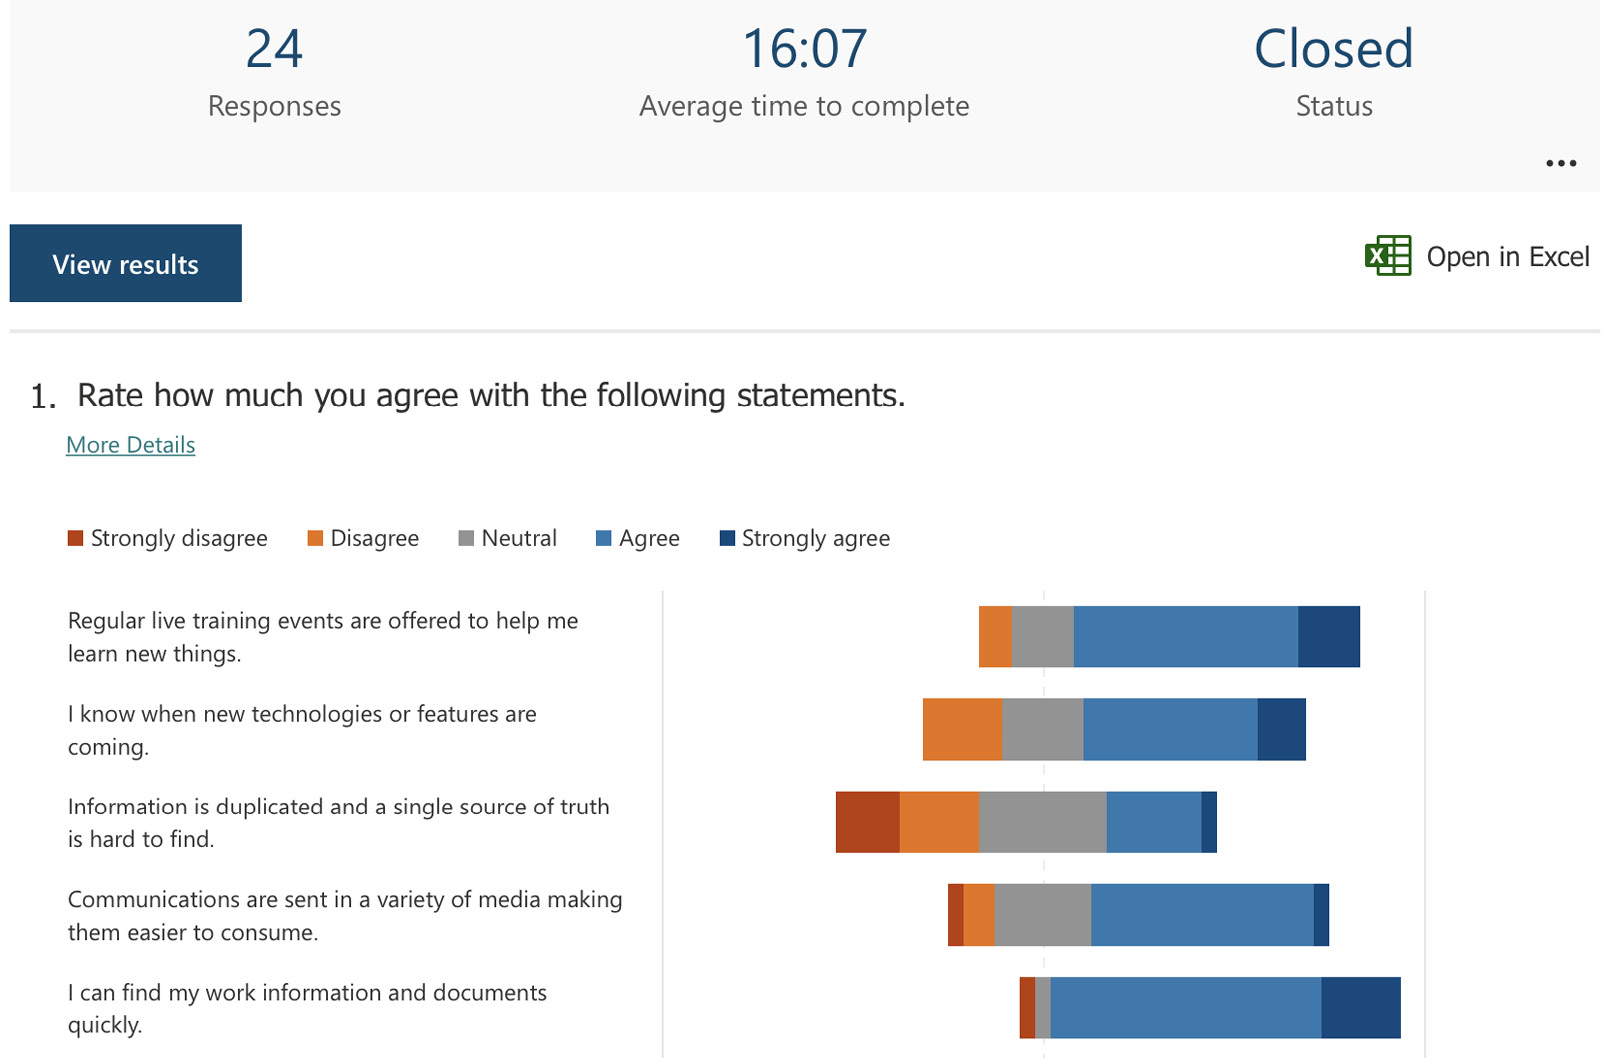
Figure 5.11 – A Likert scale question results
Rather than saving the data to a SharePoint list or a file that resides in SharePoint or OneDrive for Business, the data is saved in what is essentially a spreadsheet in the cloud. We can export and download the responses to an Excel file, but the visualizations are only available when viewing the responses on the web. A very common request I hear is to have the data from Forms written to a SharePoint list. While this isn’t possible out of the box, we can use Power Automate to connect to both services allowing Forms to be your frontend and SharePoint to be your backend. We’ll explore Power Automate in Chapter 6.
Microsoft Forms is a great option for non-technical users to create simple data entry forms and to get useful data visualizations without a tool like Power BI. The option to add a form as a Teams tab or to embed a form into a SharePoint page via a web part allows the form to be accessed from a variety of places. Next, let’s turn our attention from Forms to media, and discuss the role of Stream in our collaboration toolbox.
SharePoint, Stream, and video files
Microsoft Stream is the video streaming service and has been a part of the M365 toolbox since 2017. Until recently, it was a standalone service that could partially integrate with M365 Groups. It replaced a deprecated (and short-lived) SharePoint video service. The idea was that we would have a central repository for video files within our tenant and a way to create and attend live events. That central repository was the Stream website, web.microsoftstream.com. Videos could be organized and searched in a few ways:
- By the groups that owned them (tied to M365 Groups)
- Into channels (a curated list of videos that could be followed)
- By people who posted them (search by someone’s name)
- From meetings (recorded meetings from Microsoft Teams)
In addition to its own site, Stream also provides a web part that can be added to modern SharePoint pages.
The Stream service brought some intelligent features such as noise suppression, autogenerated captions, automatic transcription, and deep search capabilities that allowed us to perform a text search on the transcript. These video files were stored in their own dark corner of Azure Storage, however. This meant that the files were not subject to the same retention and compliance as other files in M365. It also meant that sharing a Stream video outside the organization was impossible without downloading a copy and sharing it from somewhere else.
To be fair, we’re speaking of Stream in the past tense, but it’s not entirely gone. Many of my customers have a substantial amount of content in what we are now calling Stream Classic, which will eventually be retired and replaced by Stream 2.0 or Stream on SharePoint. Let’s be forward-facing and explore how Stream and SharePoint are going to be better together.
Stream on SharePoint
The transition is already taking place, but the future state is one in which audio and video files will be stored in either SharePoint Online or OneDrive for Business. So, we’ll be able to work with videos from Teams and Yammer just like Word documents or PowerPoint slide decks.
Another immediate advantage is that these files will be brought in line with retention and compliance tools and can be shared easily with the organization or with guests just like any other file type. This also means that SharePoint once again becomes the scaffolding and backbone of another collaboration service in the cloud. To come back to our cooking metaphor, we can consider that Stream Classic was a single-use tool, like an avocado slicer or a garlic press. Rather than taking up space with limited tools, we can just use a knife to do both tasks and several more. SharePoint continues to be our multi-use tool.
While the transition is taking place, we will have video files that live in multiple places. We may have videos in the classic service that will need to be migrated. We may have new video files that are being uploaded directly to document libraries or through the new Stream application in preview at stream.office.com. This new page shows video files across sites, Teams, and OneDrive locations that we have access to. The following figure shows the UI of the Stream on SharePoint application:
Figure 5.12 – The new Stream application showing content from multiple sources
In the screen capture, we see videos sourced from OneDrive locations and a public team. We can mark videos as favorites or filter them via keyword search and sort by name, date opened, owner of the content, or last activity.
One of the most likely sources of video content in this new world of Stream is from Teams meetings. When using Stream on SharePoint, a standard (non-channel) Teams meeting that is recorded is saved to the OneDrive of the organizer if automatic recording is enabled, or to the location of the person who clicks the record button otherwise. If external users are in the meeting, they will not have immediate access, but the owner of the recording can share it readily from OneDrive. We can find the .mp4 file in a folder called Recordings.
For channel meetings, the file is going to go to the Documents/Recordings path in the team channel that contains the meeting. The member who clicked record will have edit rights; every other member will automatically have access to the recording file as well.
Viewing videos
In addition to viewing a video on the new Stream application page or viewing a Teams meeting recording from the recording link, we also need to explore new options for viewing videos on SharePoint site pages. The Stream web part exclusively works with Stream Classic, so if our videos are stored in SharePoint, we need another option.
For single videos, we can use the File Viewer web part. This will play the video file on the page with the ability to pop out to a full-screen experience. To replicate the ability of the Classic Stream web part to connect to a channel and display thumbnails of multiple videos, we’ll need to use the Highlighted Content web part.
For example, if a department has a monthly all-hands channel meeting in Teams that is recorded, we can add a Highlighted Content web part to the page and choose the filter option. Our content sources could be multiple sites, but a channel meeting is connected to a team that has a team site running behind it. We can select that team site and use our filter to only find videos with all-hands in the title. We’ll sort by the most recent so we can view the last few recordings. Our layout will determine how video thumbnails and descriptions will display, and we can choose a certain number to include. A See all link will automatically be generated to view more. Other options and additional configuration details may be found here: https://docs.microsoft.com/en-us/stream/streamnew/portals-set-of-videos.
Islands in the Stream – making the transition
Given that we are in a period of transition for Stream, what flows on through to the other side of that transition and what stands in the middle blocking our way? Let’s take a look at some features that no longer work, have been replaced, or provide new functionality.
What stays behind in Classic Stream (or at least isn’t currently available in Stream on SharePoint)?
- Editable transcripts of recordings and manually adding a caption file to an existing video: A VTT file where you can tweak your transcript
- Embed codes for videos: The ability to use an embed element on web pages
- A rich video player with comments and transcription: such as videos on YouTube
- A dedicated mobile app: A downloadable Stream app for viewing video
- A tool to trim the beginning or end of a video: Without needing a separate tool
- The concept of video channels: A way to organize videos topically
What flows through or is new to Stream on SharePoint?
- Videos as a content type for content filtering: Filtering documents in a library and only choosing videos
- Organizing videos by folder, metadata, or enterprise keyword: The same capability for any other document
- A new player page that will restore searchable transcripts: A web part that restores some lost capability
- Jumping to a part of a meeting where a specific slide was presented or something was said: Not having to slowly scroll through but jumping straight to a point of interest
- Transcript editing in a dedicated pane: Editable transcripts are restored and have their own spot for the work to be done
- Playlists as an alternative to channels: A new and improved way to organize video content
A migration tool is currently in preview to help us move videos from one Stream to another. We’ll be able to connect a source to one or more targets in SharePoint and OneDrive. The tool will include reporting along with migration assistance for content, organization, metadata, and permissions. Content will be scanned to produce a list of videos available for migration in one of five container types:
- Microsoft 365 groups (videos in a group)
- User containers (videos in MyContent)
- Stream group (videos in a classic Stream group)
- Company-wide channel (videos in a company-wide channel)
- Orphaned container (videos with no owner)
The Stream migration tool will be available from either the Stream or SharePoint admin center and will essentially work as a connector in the Migration Manager tool. The following figure shows the Migrations tab of the tool after scanning and mapping have already taken place:
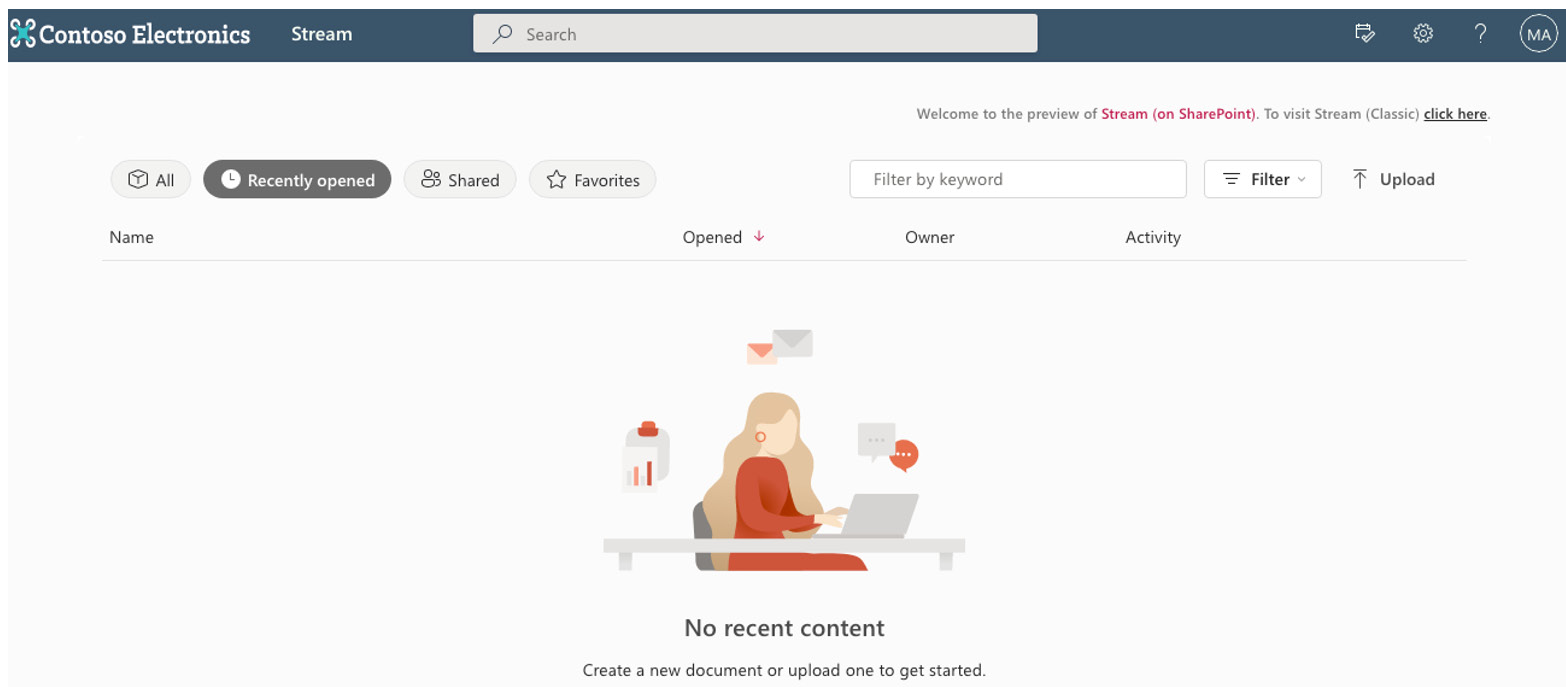
Figure 5.13 – A screen capture of the Stream migration tool
CSV templates can also be used for bulk uploading to destination paths, as we discussed with SharePoint migrations in Chapter 2. Migration logs and a migration summary report will help us to verify the videos that have been migrated.
In this section, we’ve seen that Stream is changing the backend storage to one based on SharePoint. Video files will be like any other file, and enhancements to viewers, transcriptions, and sharing will be released over time. Next, let’s look at one more service built on M365 Groups that helps us manage our tasks and work.
Making plans and managing tasks
There are different styles of cooking, different methods of preparation, and different appeals for varying meals. Yet, a common goal exists of providing nourishment and enjoyment whenever and however we cook. While streaming video is a very different type of service than meetings, document management or coordinating on tasks and work, they all function together to produce a highly collaborative and informed workforce. The tools each provide their own flavor to the overall dish.
Planner is a service that helps groups of people collaboratively complete projects and work on tasks on the web at tasks.office.com or on the Planner mobile app. Each plan is a kanban board containing buckets for organizing tasks. Each task contains data elements to indicate assignment, completion status, notes, checklists, and color-coding/tagging. The following figure is an example of a Planner plan in action. This view is the same whether we are on the Planner website or when a Planner tab is added to a Microsoft team:
Figure 5.14 – A Planner plan in board view grouped by bucket
In the figure, we see three buckets to organize tasks. All we must do is drag the task between buckets to reorganize them. Another organizing concept is the label, which can be defined by each group to provide metadata for their tasks. One or more people may be assigned to complete a task, and images on each card show the progress. The red background on dates lets us know that a task is overdue. Toward the upper left, we see that this is a Linked plan. That means that the plan is linked to other content, more specifically, it is a plan that is linked to a channel in Microsoft Teams.
The Charts view shows visualizations to let us know how we’re doing on the status of tasks, how many tasks there are per bucket, how many have been completed, and how many tasks have high versus low priority. A Members view allows us to see whether a member is overloaded, underworked, habitually on time, or past due on completion. The Schedule view displays a calendar layout where task due dates are displayed. There is a panel there that also allows us to see unscheduled tasks.
Every M365 group gets a Planner plan, whether it’s used or not. That means the people who can be assigned tasks are all members of the team. Since we also know that an Exchange Online calendar, email, and a SharePoint site are always provisioned for a group, we can be certain they are there to support the plan as well. These additional resources and functions can be found by clicking on the ellipses next to Schedule, as seen in the following figure:
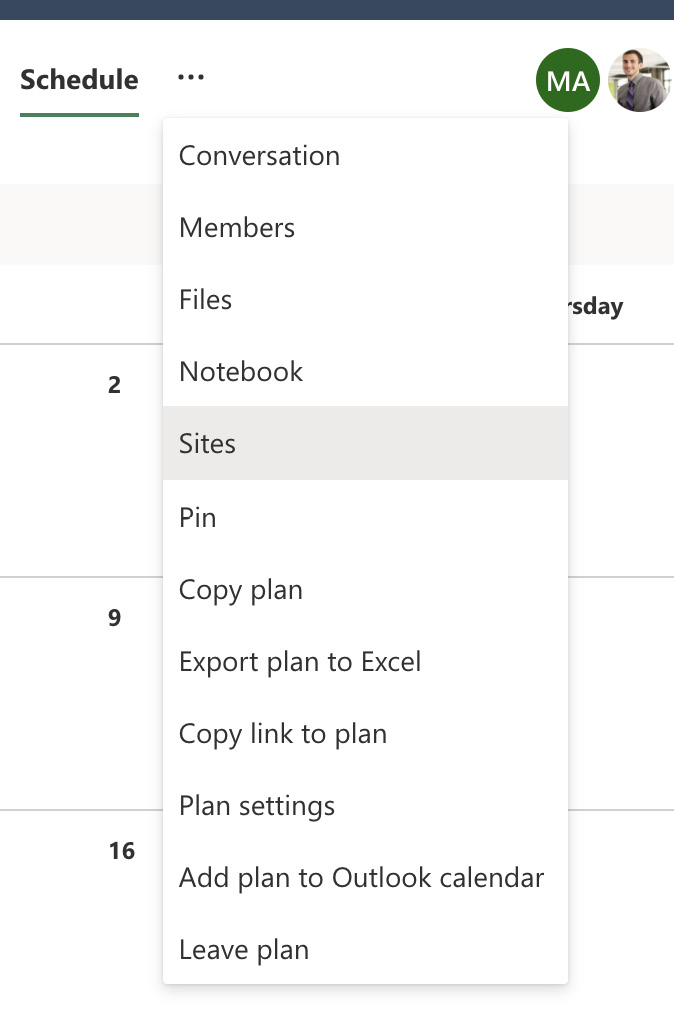
Figure 5.15 – Accessing Exchange and SharePoint resources for a Planner plan
The Conversation menu item opens the shared Group mailbox. Since the plan we’ve been viewing is connected to Teams, it may make more sense to have conversations take us into channel chat, but this is one of the few places that mailbox gets exposed. The Files tab, as may be expected, opens the Documents library in the associated team site. Although we do have a plan connected to a Teams channel, the library opens to an All Documents view at the top level, displaying all folders and files.
While we may simply go to the site to view any documents, there may be some that have a close relationship to individual tasks. Each task does have an Attachments area where files may be linked to the task. We can choose to have the document displayed on the card, which adds a live preview of the document. It also adds these attachments directly to the root of the library. This means that SharePoint stores the documents for us, but those files have no visible connection back to the plan tasks from the SharePoint side.
In the menu of the plan, there is also a link to Sites. This takes us to the home page of the team site. We can add a Planner web part there, configured to show the board, all charts, or a single chart. This allows the site to be the only UI we need to manage our plan if desired. Of course, other modern web parts may also be added so that we have elements such as the Events web part showing key milestone dates, a file viewer showing the project charter, and so on.
So, we see that Planner is an excellent tool built on M365 Groups and SharePoint for allowing a set of people to collaborate on tasks and content together. There is also another tool in the toolbox focused on helping us track our individual tasks.
Personal tasks
The tool called ToDo is the personal task management tool in M365. We have a web (to-do.office.com), desktop, and mobile device apps to interact with. Assuming we log in using an M365 work account, we can view tasks that are manually added in the tool but also get flagged emails from Outlook and planned tasks from Planner. In the following screenshot, we see a task that comes from the Mark 8 Project Plan:
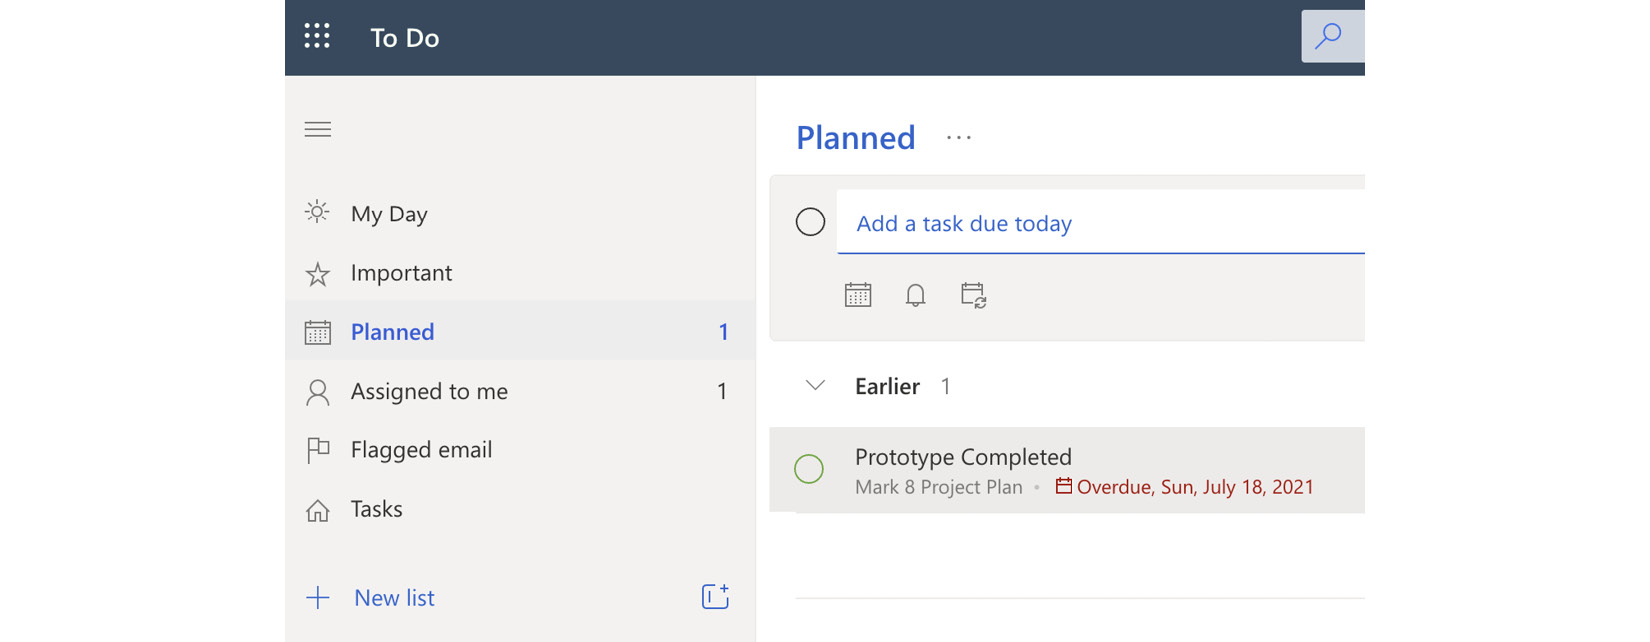
Figure 5.16 – Viewing planned tasks in ToDo
Clicking on the task allows us to mark it as complete in ToDo and have that update get passed back to Planner. We can add the task to the My Day view to help create a daily task planner, or we can open the task directly in Teams and interact with the Planner UI there.
ToDo is more of a personal application that can gather tasks from Planner. When we create tasks, we get the option to add files in a fashion similar to Planner. We may guess that those files would go into OneDrive for Business, as we have seen with tools such as Teams. However, Exchange Online is used in this instance.
The two task management worlds are so tightly linked together that they are a single app in Microsoft Teams. The app Tasks by Planner and To Do looks a great deal like the ToDo interface, but there is a Shared plans area where the Planner plan tasks that have been assigned to me reside. This is a great workaround if you need a single place to view all Planner tasks assigned to you. This is a notably missing feature for project and program managers who need to see this for any member they choose, but individuals can see their own.
Summary and planning document
In this chapter, we’ve seen that SharePoint is no longer a standalone platform. Site pages and document libraries provide direct and indirect support to anything M365 Groups-related, but play a special role in the successful implementation of Teams, Yammer, Lists, and Planner. The question is never whether we should use SharePoint or something else. The answer is almost always SharePoint plus something else. SharePoint is like salt and pepper. It’s hard to cook without it and why on earth would you want to?
Here are some things to consider when preparing our planning document where SharePoint and related services are concerned.
Teams and communities
- For each need, should we create a community for org-wide communication or a team for tighter collaboration?
- Do we have a need to have both? Remember that an M365 group connected to a Microsoft team can’t be used for a Yammer community and vice versa.
- Should the same people who have access to chats and discussions have access to the site and documents?
- Would we like to share a SharePoint site with certain people without giving them access to all the other Groups-related content?
- Do we need to create an all-company team or community for the entire organization?
Microsoft Lists
- Have lists been widely used in SharePoint in the past? If not, why not?
- Do people own spreadsheets or Access databases that could be converted to a list instead?
- Do people know they have the option to create private work-related lists in the Lists app using OneDrive for Business?
- What are some visualizations that would help with the adoption and consumption of lists?
- Are there list input forms or views that would benefit from JSON-based customizations?
Forms for surveys and polls
- Are there any other survey tools that are being used in the organization that may have a subscription cost associated with them?
- Which people and departments may have recurring needs to create simple forms, surveys, or polls?
- Are people aware that Forms can be used as messaging extensions in Microsoft Teams meetings to embed a poll directly in meeting chat?
Video files
- Is the organization currently using Stream for video?
- Which videos and channels would be the easiest or quickest to migrate?
- Do people in the organization know how to share video recordings?
- Which sites would benefit from linking to or embedding video content on their site pages?
- How important are editable transcripts and captions for your video assets?
Managing tasks
- How widespread is the adoption of Planner? It’s hard to tell just looking at Groups usage because they all have associated plans.
- Are there other project management tools such as Trello in use that may be costing money that could be replaced by Planner?
- Are the project managers aware of Planner as a tool and its advantages?
- Do people know they can use the Tasks by Planner and To Do app in Teams for a unified task management experience?
In the next chapter, we’ll continue to further explore how the toolset in M365 can help us leverage the power and capability built into SharePoint and to take it to the next level of functionality and productivity. We’ll explore the tools within the Power Platform.