
In this chapter, you will first learn about the different types of user accounts available in macOS in a section divided into two parts: Local user accounts and Other user accounts. Next, you will learn how to manage the different user accounts, as well as how to use login options and other practical features such as fast user switching and Screen Time. Finally, you will understand how user home folders are organized. By the end of this chapter, you will be able to add any type of account to a Mac, as well as manage them and configure the different options available to enhance the user experience and increase security. In the latter half of the chapter, you will gain a good understanding of user home folders and their structure, as well as how to restore them in case of accidental deletion.
The following main topics will be covered in this chapter:
- The types of user accounts available in macOS
- Managing user accounts
- Understanding user home folders
Let's begin this chapter with the technical requirements.
Technical requirements
To work through the examples in this chapter, you will need the following:
- Basic knowledge of the macOS environment
- A Mac computer with administrative privileges
Types of user accounts
Mac computers can have one user, or they can have multiple users. macOS offers several types of user accounts with different privileges. You can add accounts depending on the flexibility and level of permission the users need. This is why it is important to know the access levels and limitations that each of these types of accounts has to avoid unnecessary security risks and allow only the strictly necessary access.
We can divide user accounts into two categories:
- Local
- Other
Both categories of user accounts have several types available. We will start by exploring local user accounts.
Local user accounts
Local user accounts are the type of accounts that live on a Mac computer. You would add a local account for each user who will be using the computer. Each account will have its own configuration and can also be customized in terms of appearance, functionalities, and permissions.
Local user accounts in macOS can be of the following types:
- Standard
- Administrator
- Root user
- Guest
- Sharing-Only
- Group
The Standard and Administrator accounts are the most common, and they are the ones you will be using for most regular and administrative tasks on a Mac.
Let's examine each of them to understand when and how they should be used.
Standard user account
Standard accounts are for regular users who don't need to manage the system. These users just need to use the computer and the applications installed on it. They have access to almost all the resources and features of a Mac, with certain limitations. Standard accounts are created by an administrator and this type is selected by default during account creation.
The following are the main characteristics of this type of account:
- It has read access to most items, preferences, and applications.
- It can manage its own configuration.
- It has full access to its home folder; therefore, it can manage its own files and folders.
- It has access to shared resource locations.
- It can install application and system updates from the Mac App Store.
- It can access the Terminal app.
What the Standard account cannot do is the following:
- It cannot create or modify users or create or modify other users' files, folders, and settings. In order words, it cannot change anything that would affect other users.
- It cannot manually modify the Applications folder or use other installation methods because they can affect shared parts of the system.
- In general, it cannot install applications available outside the Mac App Store; this means it cannot bypass the Gatekeeper security application (you will learn more about Gatekeeper in Chapter 15, Managing Security in macOS, of this book).
Even though the Standard account is the most common one, other types of accounts can be used for specific purposes, as we will see in the following sections.
Administrator user account
An Administrator account, or admin, is the type of account you need to perform administrative tasks, such as creating and deleting users. This account has most of the privileges you would need for managing your macOS system. An administrator can do everything a standard user can do, plus the following:
- They can unlock and modify the system preferences.
- They can create, modify, and delete users.
- They can change administrative rights for all user accounts.
- They have full access to all applications.
- They can install applications distributed outside the App Store, that is, using packages.
- They can create other Administrator accounts in the same system.
- They can turn standard users into administrators.
The Administrator account cannot access other users' items unless they are in a shared folder (such as the Public folder).
When you first install or reinstall macOS on your computer, this is the type of account created with the help of Setup Assistant as part of the setup process. It is the primary account.
As the name says, this account is intended for administrators. Many users never create other accounts and use this one as their primary account for their Mac's everyday use. This is not a problem unless you share the Mac with a family member or a colleague, in which case having only an Administrator account is a security risk for the system and the information stored on it. The ideal number of administrators is two or three.
The Administrator is the account with most of the privileges you will ever need to manage your system. However, there is another account with even greater privileges, as we will see next.
Root user account
The root user is the macOS system superuser, also known as System Administrator. This user bypasses all limitations imposed on the other user types we just saw, and it has unlimited access to all the system resources. In other words, it can control the whole system. This user is essential for macOS processes to run as root; therefore, it has to exist, or the system wouldn't work at all.
This user can do everything an Administrator user can do, plus the following:
- It has read and write privileges to all areas of the system.
- It has access to all files and folders, including those from all user accounts in that system.
- It can access the command line to execute commands restricted to the administrator and standard users.
- It can start and stop system services.
You should be aware of the risks of breaking something in the system if an action by the root user is performed incorrectly. The root user is to be used for very specific tasks and only when required. Also, take into account that most administrative tasks can be performed with an Administrator account.
We have seen the accounts with the most privileges in macOS. In the coming sections, we will see other types of user accounts, which are, in general, more limited.
Guest user account
This type of account is similar to the Standard account. The only difference is that it does not require a password. Also, something very important to consider is that when a Guest user logs out, its home folder is deleted, along with any items inside it. When the Guest user logs in again, a new home folder is created and deleted again when the user logs out.
Therefore, this is a temporary account for momentary activities. It is ideal for letting non-regular users utilize your Mac for activities such as checking their email or browsing the web, without having to create any type of account and, at the same time, protecting your data and personal information by not allowing access to your Standard or Administrator account to an external person.
These are the main characteristics of a Guest account:
- If enabled, anyone can log in to a Mac with it.
- No password is required.
- It has access to the Shared and Public folders.
- It can shut down and restart the Mac.
A Guest user cannot change any type of configuration or log in remotely.
The Guest account is disabled by default; it has to be enabled for use. We will see how to do that in the Managing user accounts section in this chapter.
If you need to share files but you don't need the user to access your Mac interface, there is another type of account that is better for that purpose, as we will see next.
Sharing Only user account
As its name suggests, this type of account has the sole purpose of letting you share files with another user on a different computer. This type of account does not have a home folder.
These are the main characteristics of a Sharing Only account:
- It can be used for screen sharing.
- It can access shared files and folders.
- It has access to the Public and Drop Box folders.
- It can access files remotely.
What a Sharing Only account cannot do is the following:
- It cannot access the user interface.
- It cannot log in to the Mac.
- It cannot change any configurations.
- It cannot access the Terminal app.
Finally, if what you need is to group users according to a common objective, for example, then you can use group accounts, as we will see in the next section.
Group user account
A group account is just a list of user accounts. The purpose of these groups is to facilitate custom access to certain files and folders according to a specific or common objective.
Actually, all the previous user accounts discussed belong to one or more groups already set up in macOS. The main default groups are as follows:
- Staff: All user accounts are members of this group when they are created (including administrative users).
- Admin: All administrative accounts also belong to this group.
- Wheel: Its only member is the root user.
However, other groups can be created with custom access and permissions for files and folders.
With this, we have concluded reviewing the first category of user account types available in macOS: local user accounts. Next, we will review the second category of user accounts: other, non-local user accounts.
Other user accounts
In the previous section, we examined the local user accounts available in macOS. But there are other types of non-local user accounts as well. They can be identified as follows:
- Network
- Mobile
Let's briefly describe what they are used for.
Network user accounts
These accounts are used in a network environment, typically stored on a directory server such as Active Directory, and are available to multiple computers. The main characteristics of this type of account are the following:
- It can be configured on multiple Mac computers.
- Typically stored in a shared directory server, such as Active Directory, for managed authentication.
- The home folder will usually be located in a network share or file server.
Let's see the other type of non-local user accounts.
Mobile user accounts
These are also network user accounts that are synced with the local user database. These are their main characteristics:
- They can be used even when it's not possible to contact the shared directory server.
- The home folder is usually located on the startup disk.
Now that you know which types of local and non-local user accounts can exist on a Mac running macOS and their privileges and limitations, you can now decide when it is appropriate to create each of these accounts.
In the following sections of this chapter, we will discuss the most common user administration tasks, such as creating the types of user accounts we just explored.
Managing user accounts
Managing user accounts is probably one of the tasks you will perform most frequently as a macOS administrator or support technician. This will include creating all the types of accounts we saw in the previous section, configuring and deleting them, and more.
In this section, we will perform different user management tasks. More specifically, we will cover the following topics:
- Creating standard user accounts
- Configuring additional account preferences
- What are account attributes?
- Deleting user accounts
- Restoring deleted user accounts
- Managing the root user
- Managing the Guest user
- Adjusting the login options
- Using Screen Time (macOS Catalina and later)
The main tool to manage user accounts is Users & Groups (Figure 4.1) in System Preferences. Remember that you need administrator permissions to manage user accounts. You can go to System Preferences via the Apple ( ) menu or through the desktop icon, as we have seen in previous chapters:

This is where all user accounts are created, managed, unlocked, and deleted. Also, local group accounts can be created here.
Let's start by examining the process of creating new Standard accounts.
Creating standard user accounts
In this section, we will see how to create a standard user account. For this example, we will create an account on a Mac with macOS Big Sur. Follow the steps given as follows:
- Go to the Users & Groups preferences, as shown in the previous section.
- If necessary, click the lock button to unlock access as an administrator (Figure 4.2).
- Click the + sign to create an account (Figure 4.2):

- In New Account, choose Standard (usually the default option), as seen in Figure 4.3.
- Enter the account details: Full Name (I've used Patrick Johnson), Account Name (a default account name will be assigned; you can change it if you want but we will leave it as is here), and Password. Indicate a password hint if you wish, and don't forget to write it down somewhere safe because you will need it later. If you want help with creating a strong password, you can also use the Password Assistant tool by clicking the key icon beside the password field (Figure 4.3).
- When ready, click on Create User:

Congratulations! You've just created your first user account. You will see the new user appear in the left-side panel, as seen in Figure 4.4:

- Log out from the admin account and log in as the new user to verify it has been correctly created. You can log out via the Apple (
 ) menu. If it has been correctly created, you should see the new user in the login window, as shown in Figure 4.5:

Once the user is created, the initial setup will take place, which is what we will see in the next section.
Initial setup of a new user account
Continuing from the previous section, we will see here the screens presented to you when you log in for the first time to an account that was just created. Remember that the screens you see in Setup Assistant will depend on the macOS version you have installed. In this example, we see the screen presented in macOS Big Sur:
- Log in to the new account with the password created (Figure 4.5). First, you will be presented with the Data & Privacy information. Make sure to read it, and then click Continue when ready.
- If you are prompted to log in with your Apple ID, just click Set Up Later (Figure 4.6). You might see a prompt asking whether you are sure; just click Skip for now. We will see how to link a new account with an Apple ID or iCloud account in the next section:

- If Find My is enabled for this machine, you might see a window indicating the Apple ID used to locate it. This is an informative window, so make sure the associated Apple ID is correct and click Continue. If it's not correct, you can change it in System Preferences later on.
- Next, you will see the Screen Time window. You will see it only if you are installing on macOS Catalina or later. You can click either Set Up Later or Continue, as any of those options will take you to the next screen.
- Then, you will be presented with the Siri screen. By default, the Enable Ask Siri option will be enabled. Uncheck it if you don't wish to use Siri. When ready, click Continue.
- In macOS Big Sur, you will have the choice to set up Siri at this point. You can do so and click Continue, in which case you will see a couple of extra screens where you will have to speak several phrases for this configuration, or you can choose Set Up "Hey Siri" Later, which is what we will do for this example.
- Next, you will see a screen where you can choose to share data with Apple to improve Siri and Dictation. The default option is Not Now, but you can change that if you wish to share your audio recordings.
- If you have a Mac compatible with Touch ID, then you might see a screen to set it up. If you do, then click Continue. If not, just skip to step 10.
- You will be able to set up Touch ID at this moment, or you can click Set Up Touch ID Later. If you choose to set up Touch ID later, you might see a prompt asking you whether you are sure; just click Continue.
- Next, you will be asked to choose a look, either Light, Dark, or Auto mode. The Auto mode is a new option available in macOS Catalina and later. When ready, click Continue.
- In Mac computers compatible with True Tone (Macs with Retina screens), you might see a screen informing you about this feature. You can click on See Without True Tone Display to see how your screen would look without it, or just click Continue.
And that's it! Now, the setup will finalize for the new account. You have created and configured your first Standard account.
In the next section, we will see how the set up flows when choosing to use an Apple ID.
Using your Apple ID or iCloud account
Standard and Administrator accounts can link their Apple IDs or iCloud accounts. When you do that, besides the normal setup, iCloud services are also set up and you gain an additional option to recover your local account password.
To link your Apple ID or iCloud account, follow all the steps described in the previous section to create a standard user account. Then, when you first log in with the newly created account, you will arrive at the Sign In with Your Apple ID screen, where you will see the following options related to the Apple ID (Figure 4.7):
- Create new Apple ID...
- Forgot Apple ID or password?
- Use different Apple IDs for iCloud and Apple media purchases?
Take into account that in macOS Mojave and earlier, the last option will be worded differently since in macOS Catalina, iTunes was replaced with other dedicated apps, as mentioned in Chapter 1, Overview of the macOS System, Architecture, and Features. The option will read as Use a different Apple ID for iTunes and iCloud?.
At this point, you can enter your Apple ID if you have one, recover it if you have lost your password, or create one. In the next section, we will see an example where we choose to create an Apple ID.
Creating a new Apple ID
Continuing from the previous section, you will arrive at the screen shown in Figure 4.7 after creating a new Administrative or Standard account and logging in for the first time in macOS Big Sur. For this example, let's assume we don't have an Apple ID, and we want to create a new one. If you already have an Apple ID, you can enter it at this time and skip to step 6. Follow the steps given as follows:
- Choose the Create new Apple ID... option:

- To start the process, you will be prompted to enter your birth date.
- Enter the information for the new Apple ID, including an email account. At this point, you can choose to create a free icloud.com email or provide another existing email. For this example, we will choose to create an icloud.com email by clicking on the Get a free iCloud email address... link, as seen in Figure 4.8:

- You will be prompted to enter the iCloud email address's details to be used as your new Apple ID, including a password. Enter the details and click Continue.
- Next, you will be asked to verify the email by providing a phone number for a text message or a phone call. I will enter a phone number and select Text message as the verification method (Figure 4.9):

- Next, accept the terms and conditions. At that point, iCloud will be set up.
- Next, depending on the macOS version, the process will continue with step 3 of the previous section on the initial setup of a new user account.
When the process finishes, you will confirm that iCloud has been set up by opening System Preferences. You will see that the Apple ID username appears now, as well as an additional icon to set up the Family Sharing feature, as seen in Figure 4.10:

And that's it! You can now use your Apple ID to recover your password and use the iCloud features set up for this account.
In the next section, we will explore how to turn a Standard account into an Administrator account.
Turning a Standard account into an Administrator account
Turning a Standard account into an Administrator account is very simple. Remember that it is good practice to have at least two administrators in a system. This action can only be done by another administrator:
- Go to the Users & Groups preferences.
- Authenticate as an administrator by clicking the lock in the lower-left corner.
- Ensure the account you want to convert is selected, and then enable the box that says Allow user to administer this computer, shown in Figure 4.11:

And that's it! It's that simple.
In the next section, we will see how we can further customize the user environment for a better experience.
Configuring additional account preferences
Once you have followed the steps to create an account, as explained in the Creating standard user accounts section, when you are logged in as the new user, you can configure additional recommended options to improve the user experience. To do this, follow the steps given as follows:
- Open the Finder, and choose Preferences from the top menu.
- Next, select the General tab. By default, the Hard disks option is not selected. Select it so that the default system volume (usually Macintosh HD) appears on your desktop for easy access to the system volume root, as shown in Figure 4.12:

- Now, click the Sidebar tab and select the folders you want to have in the sidebar's Favorites section. In this case, we will select the administrator's home folder so that it shows in the Finder's sidebar's Favorites section for easy access (Figure 4.13):

Next, you can also adjust the desktop's appearance:
- Open System Preferences and click on the Desktop & Screen Saver preferences icon marked in Figure 4.14:

- In the Desktop tab, from the dropdown, you can choose your desktop style: Automatic, Light (Still), or Dark (Still) (Figure 4.15):

- In the Screen Saver tab, you can choose your screen saver style and timing (Figure 4.16):

At the bottom right of Figure 4.16, you can see a Hot Corners... button. If you use a screen saver, configuring Hot Corners allows you to start the screen saver by setting a shortcut so that it starts when you move the pointer to a designated corner of the screen. Follow these steps to configure it:
- In the screen saver preferences, click the Hot Corners... button.
- Click the dropdown of any of the four corners you want to set as a trigger for the screen saver (Figure 4.17):

- You will see several options to choose from, as seen in Figure 4.18. For this example, let's choose Start Screen Saver and then click OK:
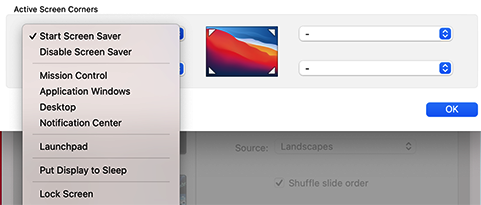
- You can also use the Control, Option, Shift, or Command keys with a hot corner. To use them, press one of those keys – for example, Option – while the drop-down menu is open and select an option such as Start Screen Saver (Figure 4.18).
- Once set, whenever you move the pointer to the corner of the screen you just configured (and press a key, such as Shift, if you configured one), the screen saver will start.
There are many other options to configure your account that you can explore, but we have seen the most important ones. In the next section, we will explore what account attributes are.
What are account attributes?
Account attributes are pieces of information related to each user account. These details are kept in XML-encoded files that are located in the users' folders. Only the system root user can read those files. But, most of these attributes can be seen by a user with administrator privileges. To see these attributes, take the following steps:
- Go to the Users & Groups preferences and click the lock icon to log in as an administrator.
- Next, right-click on the user for whom you want to see the attributes, and Advanced Options... will appear, as seen in Figure 4.19:

- The screen you will see looks like the one in Figure 4.20:
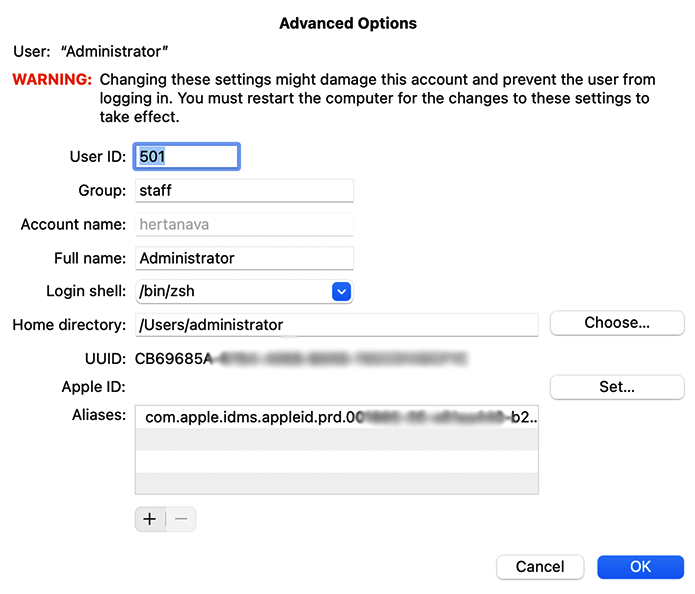
The following is a description of the account attributes visible in Figure 4.20:
- User ID: This is the user account ID. User accounts will normally start at 501, and root administrator accounts will start with a number under 100.
- Group: This is the primary group the user belongs to. In this case, this account belongs to the staff group, as most local user accounts do. We will see the types of groups available in more detail in Chapter 7, Understanding Ownership and Permissions.
- Account name: This is the name of the account and the user's home folder. It cannot have any special characters (, /; "), symbols, or spaces. However, it can contain periods, dashes, or underscores (.-_).
- Full name: This is a longer version of the account name. It can also be used to authenticate, but most users will use the account name for convenience since it's shorter. It can contain any characters. This name must be unique, and there cannot be other accounts with the same full name. It can also be changed at any time.
- Login shell: As we saw earlier, both Administrative and Standard users can access Terminal. The login shell specifies the default file path for the command-line shell used in Terminal. The shell is the programming language the command line uses. By default, it is /bin/bash in macOS Mojave and earlier but is being deprecated. From macOS Catalina and later, the default shell is zsh. Therefore, when you open Terminal, you might see a warning indicating that the default interactive shell is now zsh; check Chapter 16, Using the Command Line, for instructions on how to change it.
- Home directory: This shows the path for the user's home folder, except for Sharing Only accounts because, as we saw earlier, no home folders are created for this type of account. The default path is the following: /Users/[user account name].
- Universally Unique ID (UUID) or Globally Unique Identifier (GUID): This is a long, unique, alphanumeric number generated by the computer when the account is created, sort of like a serial number that can only be identified by the Mac the account was created in. This means that if you restore an account on another Mac, the number will change, and it will be unique to that Mac computer as well. It's also an alphanumeric attribute that serves to identify the account with the file and folder ownership.
- Apple ID: This is the Apple ID linked to this account. If there isn't an ID associated with it yet, nothing will show for the user, as is the case in Figure 4.20.
- Aliases: This is used to associate the local user account with other service accounts, such as iCloud.
In the following sections, we will see other important management actions, such as deleting and restoring user accounts.
Deleting user accounts
In this section, we will see how to delete a user account and the options we have to restore one. For this example, we will delete John Adams' account. But let's take some precautions before deleting his account:
- Open System Preferences and then the Users & Groups preferences.
- Right-click on John's account to see the Advanced Options... button, as we did in the previous section. Take a screenshot of the attributes you see here, in case you need that information later.
To delete the account, follow these steps:
- If not already, log in as an administrator and go to the Users & Groups preferences again (or click the lock icon to authenticate as an admin). Make sure John's account is selected, and then click on the – sign to delete the account, as shown in Figure 4.21:

- Now, you will have to define what will happen to the user's home folder. The options you can choose from are shown in Figure 4.22. They are as follows:
- Save the home folder in a disk image
- Don't change the home folder
- Delete the home folder
When you choose the last option (Delete the home folder), the user account and folder are fully deleted from the system, and the storage space is freed. Next, we will see what happens when we choose the other two options.
- For this example, let's choose the first option, Save the home folder in a disk image. Next, click Delete User:

- We can now close the System Preferences window.
That's it! The user account is deleted and the home folder, in this case, has been saved as a disk image. Next, let's see how to restore this deleted user.
Restoring deleted user accounts from a disk image
In the previous section, we deleted John's account. Now let's see what we need to do if it was deleted accidentally and we wanted to restore the account. Remember that we chose to save the home folder in a disk image in the options for what do to with the user account home folder (Figure 4.22).
To restore the user in this case, we need to go to our Mac's root folder:
- You can find the root folder through the Finder's side menu or the volume we configured to be visible on the desktop (usually Macintosh HD). Once you are there, you will need to go to the /Users/Deleted Users folder, where you will find the saved image, as shown in Figure 4.23:

- Double-click on John's image (the DMG file shown in Figure 4.23). The contents of the file will be shown, and a disk icon will appear, as you can see in Figure 4.24. You can close the containing folder but keep the image open (the disk icon to the right); don't eject it:
- Next, select the image and select Duplicate from the Finder contextual menu, as seen in Figure 4.25. This is an important step to ensure all folders, including the hidden Library folder, are copied for a successful restoration:

You might need administrator permissions to duplicate the image.
- Open another Finder window and go to the Users folder, as shown in Figure 4.26.
- Now, drag John's duplicated folder from the desktop to the Users folder, as shown in Figure 4.26. You will need to authenticate as an administrator again to do this:

And that's it! The home folder has been restored, but there are still a few more actions to complete the account restoration.
Follow these steps to complete the deleted user account restoration:
- In System Preferences, go to the Users & Groups preferences.
- Authenticate as an administrator by clicking the lock icon in the lower-left corner.
- Create a user with the same details used to create John's user account the first time (same account name and full name).
- Once you have entered all the details for the account and clicked Create User, a message will warn you that a folder with the same name already exists. Select the Use Existing Folder button shown in Figure 4.27:

Account restoration is now complete! You will see the user appear again in the Users & Groups side menu.
To verify the account details, follow the steps as follows:
- In the Users & Groups preferences, right-click the newly created account to see Advanced Options... as we saw earlier.
- Open the screenshot you saved before deleting John's account and compare the details.
- Both accounts' user IDs should be the same, but the UUID will be different because that is unique to every account created.
- If you now go to the Users folder and try to open John's restored account, you will not be able to do it since the folder now belongs to John, and not even the administrator has permission to access it.
As an extra verification step, log in as John Adams and verify that the hidden folders are there:
- Log in to John's account and open the Finder.
- Hold down the Option key and choose Go in the Finder menu to reveal the Library folder.
- Select the Library folder to open it, and you will be able to verify that all the contents are there.
That's it! We just saw how to carry out account restoration when the deleted account home folder was saved into an image (DMG). In the next section, we will see the second option presented when deleting a user account.
Restoring deleted user accounts kept in the Users folder
For this account restoration option, we will see how to proceed when choosing the second option we saw in Figure 4.22, Don't change the home folder, when deleting John's user account. This means that John's home folder will remain in the Users folder even if the account no longer exists, but (Deleted) will be appended to the folder name, as you can see in Figure 4.28. This is helpful if you want to keep that folder temporarily to restore it or migrate it to another Mac:

In this case, restoring the deleted account is even easier: just rename the folder and remove the (Deleted) part. Then, follow the steps to create an account with the same details, as we saw earlier, to complete the restoration. You will again see the prompt that will warn you that a folder with the same name already exists. As we did previously, select the Use Existing Folder button shown in Figure 4.27.
And that's it! You have now successfully restored a deleted account using two different methods. With this, we have completed the section on Standard account management. In the next section, we will explore the management of the root user.
Managing the root user
As mentioned earlier, the root user needs to exist and is rarely needed by the Standard user. It's only used by advanced users or administrators for specific tasks that require root permissions. Because of the security risk of enabling the root account, it is disabled by default. You would need to enable it to use it, and that is what we will see next.
In this section, we will cover the following:
- Enabling the root user
- Logging in as the root user
- Disabling the root user
Let's begin by exploring how to enable the root user.
Enabling the root user
You can enable the root user through the following:
- System Preferences
- Terminal
To enable the root user through System Preferences, follow these steps:
- Open System Preferences and go to Users & Groups.
- Click the lock and authenticate as an administrator.
- Click on the Login Options button, and next on the Join... button, as shown in Figure 4.29:

- Now, click on the Open Directory Utility... button (Figure 4.30):

- You will see the window in Figure 4.31. Once more, click the lock and enter your administrator name and password:

- In the Directory Utility menu bar, choose Edit, and then Enable Root User, as shown in Figure 4.32:

- Finally, enter the password you wish to use for the root user. And that's it!
You can also enable the root user through Terminal. Follow these steps to use that method:
- Open Terminal, located in the Applications/Utilities folder.
- Next, at the command prompt, enter dsenableroot, as seen in Figure 4.33.
- Now, you will need to enter the administrator password to authenticate, and next, you will be asked to enter a password for the root.
- Once the root password has been entered a second time to verify, you will see a message indicating that the root user has been enabled successfully:

Now that the root user is enabled, let's see how to log in with this account.
Logging in as the root user
There are two main methods to log in as a root user:
- Through the login window
- Through Terminal
To log in through the login window, take the following steps:
- Turn on the Mac, or if you are logged in, log out of the current account to see the login window.
- When the root user is enabled, you will see a new user with the name of Other... in the login window, as you can see in Figure 4.34. Click on that icon to log in:

- Next, enter root in the username field and the password you created for this user in the password field.
- Once you are in the desktop interface, if the option to show full names is enabled in fast user switching (this feature is covered in the What is fast user switching? section a little later in this chapter), you will see the name System Administrator at the top of the screen, as you can see in Figure 4.35. This tells you that you are logged in as root:

And that's it! You are now logged in as root with full access to the system.
To log in through Terminal, you can do so via the command line with the sudo command. It's actually safer to use the root user this way than it is to enable it for the whole system for an undetermined amount of time, as you may perhaps forget that you've left it enabled.
Enter the following command in Terminal to enter root mode, followed by any commands you would like to run:
sudo [command]
If you need to perform many tasks as root, you can also open a root shell:
sudo -s
If you use the previous command, you will stay in root mode until you enter exit to revert to your usual permissions:
exit
If you want to learn more about what you can do with sudo, you can enter man sudo in Terminal, as seen in Figure 4.36:

We have just seen how to enable the root user. Let's examine how to disable it.
Disabling the root user
After performing the tasks required with the root user, it is recommended to disable it to protect your system.
Just follow the same steps you did to enable it through Directory Utility, but in the menu bar, choose Edit, and then Disable Root User, as shown in Figure 4.37:

You can also disable it through Terminal, as shown below:
- Open Terminal and enter the dsenableroot -d command.
- After entering the administrator password, you will see a message indicating that the root user has been disabled, as shown in Figure 4.38:

And with this, we have finished the section on managing the root user. In the next section, we will explore another kind of user, the Guest user.
Managing the Guest user
A Guest user account doesn't need to be created, but it is disabled by default. All you need to do to use it is enable it and configure a few settings to allow users to log in as guests. For this, follow the steps shown:
- Open System Preferences and go to the Users & Groups preferences.
- Authenticate as an administrator.
- Select Guest User from the user list on the left, as seen in Figure 4.39.
- Check the Allow guests to log in to this computer box. As soon as you do that, the Guest user in the left panel will show the Login only status, and the Limit Adult Websites option will be enabled by default as well (this can be different in versions prior to Big Sur, where you probably have to enable the latter option manually):

- The next time you are at the login window, you will see the Guest User icon (Figure 4.40). Just click the icon, and it will automatically log in (there's no need for a password):

Finally, you could also allow guests to use shared folders in the network. For this, check the Allow guest users to connect to shared folders box (Figure 4.39). When you do that, the Guest account will have access to shared folders from another computer or user on the network.
That's it! Your temporary users can now use the Guest account without risking exposing your data or personal information.
In the next section, we will see other useful settings that help you adjust the user's login options.
Adjusting the login options
The login options are also configured in the Users & Groups preferences. Take into account that you will need to do this as an administrator. The login options you can configure are the following:
- Automatic login
- Account display options
- Fast user switching
Let's explore these options.
Automatic login
You can configure a user to log in automatically when the Mac is started. By default, this setting is disabled. To change that behavior, follow these steps:
- Open System Preferences, click on Users & Groups, and then click Login Options.
- Click the lock icon to authenticate as an administrator.
- Click the Automatic login drop-down menu, then choose a user, as shown in Figure 4.41:

- Once you select a user, you will be asked to enter the user's password.
- You might need to restart the Mac for the automatic login to become effective.
There are more login options you can use to improve your user experience, and we will see those next.
What is fast user switching?
Fast user switching is a feature that allows you to switch between user accounts without having to log out from your currently logged-in user. This means you can switch user accounts without having to quit any apps. To use this feature, take the following steps:
- Open System Preferences and click Login Options.
- Make sure the Show fast user switching menu as box is checked, as shown in Figure 4.42.
- You can configure how the names will show at the top of your screen (Figure 4.43); by default, Full Name is selected in the dropdown, but you can choose Account Name or Icon. Choose Icon if you are concerned about privacy:
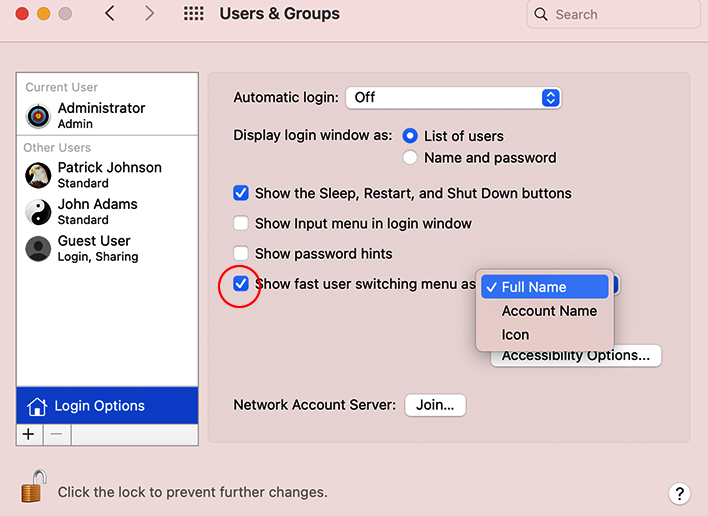
- Once that is done, you will be able to quickly switch users from the top-right corner of the screen, as seen in Figure 4.43:

With this, we conclude this section on the login settings you can use to improve the user experience.
In the next section, we will see a new feature called Screen Time used to control user access.
Using Screen Time (macOS Catalina and later)
Before macOS Catalina, there was the possibility to create accounts managed with parental controls, and there was a section in the Users & Groups preferences where the parental controls could be configured. Starting with macOS Catalina, the parental controls are replaced with the Screen Time feature.
Screen Time is not just a tool to restrict usage and schedule downtime; it also provides daily and weekly reports to analyze how you and others are using the Mac. In the following example, we see the feature in the macOS Big Sur interface:
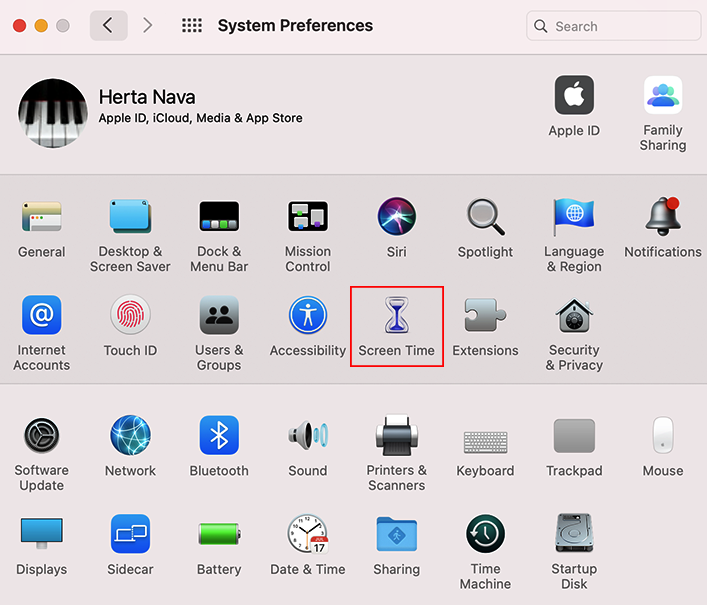
- The Screen Time options are managed from System Preferences, through the icon shown in Figure 4.44:
- To enable it, click Options in the lower-left corner, and click Turn On.... The same button can be used to Turn Off..., as you can see in Figure 4.45. You can even use a Screen Time passcode so that you can enter it to allow more time when limits are reached:

If you are using Family Sharing, you can turn on Screen Time on each of the devices and manage it from your Mac. Family Sharing is covered in Chapter 10, Managing Apps and Documents.
In the next sections, we will explore the options on the left menu of this tool, each having a specific function. These options can be divided into two main categories:
- Tracking usage
- Limiting usage
Let's begin exploring the options for tracking usage.
Tracking usage
In this section, we will see the options in Screen Time related to usage tracking. They allow you to track how apps are being used and the amount of time dedicated to specific apps so that you can make decisions on restricting certain apps. This part of Screen Time is not for configuration but rather for monitoring.
To track usage with the Screen Time feature, you have the following options:
- App Usage
- Notifications
- Pickups
Let's learn a little bit about each of these options.
App Usage
This feature is used to check how much time is spent on each app. You can see the data per day or week. You can also see all apps or view usage by category, such as productivity or entertainment (Figure 4.46):

The next item on this part of the menu is Notifications. Let's explore what it is for.
Notifications
Notifications are small boxes you see in the top-right part of your screen triggered from several apps, depending on your configuration. These notifications can be distracting or even annoying. The Notifications tab in the Screen Time tool helps you see statistics about how many notifications you get from each app (Figure 4.47):

If you want to configure notifications, for example, to pause or stop them, you can do that from the Notifications pane in System Preferences.
Let's explore the last tab in this tracking section, the Pickups tab.
Pickups
This feature allows you to see how many times you have "picked up" your device or, in the case of a Mac, how many times you "woke it up" after a period of inactivity or sleep, and which apps you used first after picking it up (Figure 4.48):

And with this, we have seen the section in Screen Time that tracks usage. In the next section, we will see the options that allow you to limit that usage.
Limiting usage
After analyzing the statistics you obtained in the Screen Time tabs we saw in the previous section, you can make decisions on how to optimize your usage by limiting it for yourself or other users or family members if using Family Sharing. Family Sharing is covered in Chapter 10, Managing Apps and Documents.
These are the options you have to limit usage with the Screen Time feature:
- Downtime
- App Limits
- Always Allowed
- Content & Privacy
Let's learn a little bit about each of these options.
Downtime
With this option, you can schedule time away from the computer. When this option is configured, you will only be able to use specific apps you have configured to be allowed, along with phone calls. First, make sure Downtime is selected in the left menu, and click on the Turn On... button to enable it. The same button will allow you to turn it off, as seen in Figure 4.49. Once enabled, you can set a schedule per day or set a custom one:

You can configure Downtime for your own account, for other accounts if you log in to their accounts as an administrator, or directly from your administrator account if using Family Sharing.
When Downtime is configured and in effect, the user will see a notification 5 minutes before it is activated, as seen in Figure 4.50:

If the user tries to use a restricted app in the Mac, a message will be displayed informing them that the Mac cannot be used. You can click OK or Ignore Limit to use the Mac despite the scheduled downtime, as seen in Figure 4.51. In the case of a family member, usually a child, an additional option will show through which they can request more time, which the organizer of the Family Sharing group can deny or approve.

If you click on Ignore Limit, you will be given the options shown in Figure 4.52:

While this option allows you to set a global downtime setting, the next option we will see allows you to set limits on specific apps.
App Limits
This option allows you to set limits on specific apps and even entire categories of apps. To use it, you need to enable it. Make sure App Limits is selected in the left-side menu, and then click the Turn On... button (Figure 4.53):

Next, you can add apps or categories of apps by clicking on the + button, as shown in Figure 4.53. When you do that, you will see the window shown in Figure 4.54. At that point, you can choose entire categories of apps to restrict, such as Games, or you can expand the category by clicking the arrow encircled in the following screenshot to select or deselect specific apps in that category:

When you activate this option, you will receive a notification similar to the one seen in Figure 4.51 when your time is up for a configured app restriction. Again, when you see that notification, you can click either OK or Ignore Limit. If you click on the last option, you will be given the options shown in Figure 4.52.
With this option, we have seen how we can configure app restrictions. With the next option, you will be able to specify which apps are allowed.
Always Allowed
This option allows using certain apps even when downtime is scheduled or when app limits have been configured. To use it, make sure the Always Allowed option is selected in the left-side menu (Figure 4.55). Next, select the apps from the list that you want always to be allowed:

The last option on the menu allows you to customize restrictions even further, as we will see in the next section.
Content and Privacy
In this tab, you can restrict content, purchases, and downloads. To enable it, make sure the Content & Privacy option is selected in the left-side menu and click the Turn On... button to activate it (Figure 4.56). In this tab, you have four additional tabs – Content, Stores, Apps, and Other – which allow you to fine-tune your content and privacy configurations by restricting explicit content, purchases, and downloads, and configuring privacy settings:

When you are using Family Sharing, you will see an extra option on the left menu, called Communication. To use it, Contacts has to be turned on in the iCloud preferences. With this option, you will be able to control who the members of the Family Sharing group you monitor can communicate with during the day. This option allows establishing limits on Phone, FaceTime, Messages, and iCloud contacts. Still, communication with specified emergency numbers is always allowed.
And with this, we have finished this section on the Screen Time feature and on managing user accounts. We saw how to create a standard user account, set it up, and configure additional preferences. We saw how to manage the root and guest users. We also saw login options and how to use the fast user switching feature.
In the next section, we will see a topic closely related to user accounts: user home folders.
Understanding user home folders
When we create a user account, a home folder is created for every user, except for the Sharing Only user. This home folder is the user-space default folder structure and organization for files, directories, sharing folders, and even apps. It is important for the administrator, support expert, or advanced user to become familiar with the home folder's contents to understand how user accounts are created, how files are saved, how to use the sharing spaces, and how apps interact with these folders.
In this section, we will cover the following topics related to home folders:
- The user home folder structure
- Deleting home folders
- Migrating and restoring home folders
Let's start by examining the user home folder structure.
The user home folder structure
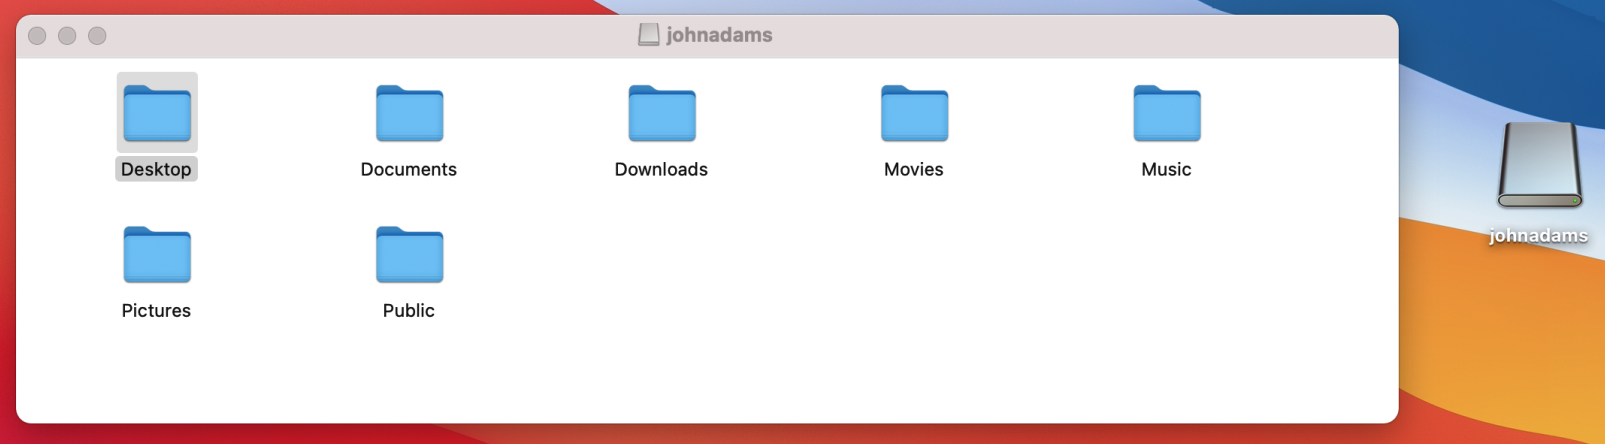
The user home folder's default location is usually the /Users folder in the root of the system volume (Macintosh HD). The name of the home folder is the name of the user account. The currently logged-in user's home folder will display with a home icon, as you can see in Figure 4.57:

The default home folder structure for any macOS user contains the following subfolders:
- Desktop
- Documents
- Downloads
- Movies
- Music
- Pictures
- Public
We can see this structure in Figure 4.58:

The content of these folders is pretty straightforward, as their names are self-explanatory. This structure can be browsed by other users, but the contents of most of these folders can only be accessed by the owner of that account. However, one folder is the exception as other users can see it: the Public folder, also visible in Figure 4.58, which has another folder inside it, the Drop Box folder.
An additional folder is hidden by default, the Library folder, which is why we don't see it in Figure 4.58.
There is also another optional folder that can be created manually by users, the Applications folder. This is where they can save their own applications, instead of using the system Applications folder, where all apps are usually kept by default. If created, this folder is recognized by the system. If you install apps in this folder in your home folder, they will be available for you only, instead of all the users in the system, as is the case with the usual Applications folder located at the root.
In the next section, we will see the folders that are not self-explanatory. That said, it's still important to mention that some applications have specifically dedicated folders for the files created with them. That's the case of the Music, Movies, and Pictures folders in the user home folder, which are used specifically for files created by applications such as iMovie, iTunes, and Photos; these folders are the default locations for those applications. Some third-party applications will even create folders inside those folders for their user-created files.
In the following sections, we will see more about the folders that are not self-explanatory.
The Desktop folder
The Desktop folder shows all the items that are in the user's main interface space. This space also has some features that allow you to manage it efficiently. We won't cover all of them, but we will explore two of these features: Stacks and Quick Actions.
Let's explore the Stacks feature first.
Using Stacks
It is not recommended to keep files in the Desktop folder unless it is temporary, but we all know that temporary usually becomes permanent, and very quickly your desktop becomes cluttered. You should have a nice folder structure to store all your files, instead of the desktop. However, if you like keeping things on the desktop, there is a useful tool introduced in macOS Mojave that comes to save the day: Stacks.
As we saw in Chapter 1, Overview of the macOS System, Architecture, and Features, Stacks is a new feature that helps you keep your desktop organized, and it is very easy to use.
To use Stacks, follow these steps:
- Right-click anywhere on the desktop and choose Use Stacks from the contextual menu (Figure 4.59):

- By default, the "stacks" of files will be organized by kind (images, PDF, video, and so on), but you can also organize them by tag, date of modification, or other criteria. To do that, with Stacks enabled, right-click on your desktop and choose Group Stacks By from the menu, as shown in Figure 4.60:

You can view the items that are organized in stacks very easily. Just click on a stack and scroll to find what you are looking for. When you find the correct file, just double-click to open it.
Let's see another feature available in the desktop space and that can be used in combination with Stacks: Quick Actions.
Quick Actions
You have many other options to choose from when you right-click on a stack, or on any file for that matter. You can choose Rename, Compress, or Share, or use one of the Quick Actions features (Figure 4.61), such as Rotate, Markup, Create PDF, or trim audio and video files:

We have just seen the Desktop folder and two important features you can use to make the most of it. Let's continue exploring the other user folders.
The Library folder
There are several Library folders in the macOS filesystem, and there is one inside the user's home folder, but it is hidden by default, which is why you cannot see it in the Finder. This Library folder is where apps keep their custom data files. It can also be used to store caches, resources, and preferences. The types of files stored here are user-specific preference files, fonts, contacts, keychains, mailboxes, favorites, screen savers, and other application resources.
The important subfolders in Library are the following:
- Application Support: This folder is used to store application data files that are not associated with the user’s documents.
- Caches: Application-specific support files that can be re-created easily by apps are stored here.
- Frameworks: Frameworks that are shared by multiple apps are installed here.
- Preferences: This folder includes application-specific preference files.
If you need to access this folder for any reason, you can use temporary and permanent methods to access it, all of which are covered in detail in Chapter 8, System Resources and Shortcuts.
The next folder we will discuss is the Public folder.
The Public folder
All users have a Public folder in their home folder structure. The purpose of this folder is to allow other users on the same Mac or on your local network to use it to share files with you by placing them in their Public folders.
At the same time, each Public folder has a subfolder called Drop Box. The purpose of this last folder is to allow you to share your files with other Mac users by placing them in their Drop Box folders. There are a few important things to consider about the Public and Drop Box folders because they can be a bit confusing if you don't understand the logic behind them. This is why I invite you to review how to use them for file sharing, which is covered in detail in Chapter 7, Understanding Ownership and Permissions.
And with this information, we have covered the user home folder structure. In the next section, we will learn how to delete and migrate the local user home folder.
Deleting local user home folders
When you delete a local user account, as we saw earlier, you need to define what will happen to the user's home folder in the Users & Groups preferences. You have three options:
- Save the home folder in a disk image
- Don't change the home folder
- Delete the home folder
What happens when you choose each of these options is covered with examples in the Deleting user accounts section earlier in this chapter. That said, let's see how to migrate and restore a user home folder.
Migrating and restoring local user home folders
You can migrate a home folder from another Mac or even a Windows computer, or you can also manually restore a deleted home folder. In the case of both procedures, you can keep all the account details and files, which will allow you to recover your or your users' data.
There are two ways to migrate or restore home folders. One uses a tool called Migration Assistant, and the other way is just to do it manually. Let's examine both methods.
Migration Assistant
Migration Assistant is a very useful tool that saves a lot of time since it allows you to restore user account details and data automatically; you don't have to do it manually.
Migration Assistant allows you to transfer the following:
- User accounts
- Settings
- A Time Machine backup
- Content from a Mac or Windows computer
At the same time, there are three common scenarios you will encounter when migrating data to a Mac through Migration Assistant:
- Your data is on a Windows computer.
- Your target Mac is running OS X Mavericks v10.9.5 or later.
- Your target Mac is running OS X Mountain Lion v10.8 or earlier.
We will see how the process works in the first two cases in the next section.
There are two ways to access Migration Assistant: when you are first setting up a newly installed Mac, Migration Assistant will appear (Figure 4.62) in case you want to transfer your data at that point:

The other way is through the Utilities folder in the Applications folder. In both cases, the process the tool follows is the same.
Let's go through the first scenario step by step.
Your data is on a Windows computer
You can transfer music, pictures, documents, and other data from a Windows PC to a target Mac computer through Migration Assistant.
Specifically, the data that you can transfer is the following:
- Email, contacts, and calendar information
- Outlook (32-bit, Windows 7 or later (contacts, appointments, mail settings))
- Pictures
- Files from the top-level folder (non-system files)
- Windows Live Mail (Windows 7 and later: IMAP/POP settings only)
- Windows Mail (Windows 7 and later: IMAP/POP, and contacts only)
- Bookmarks
- iTunes content
- System settings, such as language, location, and so on
Here are the requirements:
- Your PC must be running an updated version of Windows 7 or later.
- You need to know the name and password of the Windows PC administrator.
- The PC and the Mac must be connected to the same network (Wi-Fi or other). Otherwise, you can connect them both directly with an Ethernet cable.
- The appropriate version of Migration Assistant must be installed on the Windows PC. There are three versions, and which version you should install will depend on which macOS version your target Mac is using:
- Windows Migration Assistant for macOS Mojave (https://support.apple.com/kb/DL1978)
- Windows Migration Assistant for macOS Sierra/High Sierra (https://support.apple.com/kb/DL1913)
- Windows Migration Assistant for OS X El Capitan or earlier (https://support.apple.com/kb/DL1896)
Once you have verified that all the requirements are met, follow these steps:
- On your PC, close any open Windows applications.
- Open the Migration Assistant you downloaded and installed, and click Continue at the first window.
- Turn on your target Mac and open Migration Assistant, if not already open.
- You will see the screen shown in Figure 4.63 (macOS Big Sur). You will be warned that if you continue, all applications will be closed. Make sure you don't have any unsaved data and click Continue when ready:

- You will see the screen shown in Figure 4.62. Choose the From a Windows PC option and click Continue.
- Enter the PC administrator's name and password.
- Choose your PC from the list of available computers.
- Next, a matching passcode should appear on both computers.
- A list of data that can be migrated will be displayed for you to select; it will include full user accounts, data, and so on.
- Select the user account or individual files and settings you wish to migrate and click Continue.
- The process can take a while depending on how much data you are migrating, but you will able to monitor the progress.
- When the migration is complete, if you migrated a user account, you will be asked to set a password when you log in to the migrated account on your target Mac.
And that's it! Your data has now been fully migrated from a Windows PC to your target Mac.
Let's see the steps for the second option, migrating from a Mac to another target Mac.
Your target Mac is running OS X Mavericks v10.9.5 or later
Migrating data from a Mac to another target Mac will be the most common scenario. In this example, we will see how the process works with a target Mac running OS X Mavericks or later. Let's see the requirements first:
- Make sure your Mac is updated. If not, be sure to install any updates that may be pending before proceeding.
- The old Mac should be running OS X Snow Leopard v10.6.8 or later.
- The old Mac should have a computer name. To find out the name, go to System Preferences and click on the Sharing icon marked in Figure 4.64:

- Take note of the name in the Computer Name field, as seen in Figure 4.65. In this section, you can also change your computer's name if you like by clicking on the Edit button:

- Make sure both Macs are connected to a power source.
Follow these steps to perform the migration:
- If both Macs are running macOS Sierra or later, place them close together and make sure Wi-Fi is turned on on both of them.
- If either Mac is using OS X El Capitan or earlier, connect them to the same Wi-Fi network or through Ethernet:
- Another way to connect them is through Target Disk mode, which we will explore in Troubleshooting Tips, of this book.
- Another option would be to connect your target Mac to a volume containing a Time Machine backup. We will see all about Time Machine backups in Chapter 11, Backups and Archiving.
- On the target Mac, open Migration Assistant.
- Once Migration Assistant is open, you will see the same screens that are shown in Figures 4.62 and 4.63.
- Select From a Mac, Time Machine backup, or startup disk and click Continue.
- Now, let's switch to the old Mac. Open Migration Assistant and click Continue. You will be asked to authenticate as an administrator.
- You will be asked whether you want to transfer data. At this point, select the To another Mac option (Figure 4.62) and next, click Continue.
- Now, switch to the target Mac. Select the appropriate source of the transfer, in this case, the old Mac, and click Continue.
- You should see a matching security code appear in both Macs. Click Continue in the old Mac.
- On the target Mac, choose the backup source you want to use from the list, and click Continue.
- Choose which data you want to transfer. This data can be entire user accounts, folders, computer and network settings, apps, and so on. How long the process will take will depend on how much information you are transferring.
- And that's it! You can now log in to the migrated account on the target Mac.
In this section, we have seen how to migrate data using Migration Assistant. In the next section, we will see how this can also be done manually.
Restoring manually
You can manually restore a local user account in the same Mac or a different Mac. This is what you need to do:
- Copy the entire user home folder you want to restore to a temporary location, such as a USB or an external volume.
- Next, copy the home folder to the /Users folder of the Mac on which you want to restore the user account.
- Open System Preferences and go to Users & Groups.
- Create a new local user account with the same name as the user home folder you want to associate with.
- At this point, macOS will recognize the new home folder and ask you whether you want to associate it with the home folder with the same name.
- And that's it! The home folder is now restored and associated with a specific user account.
And this concludes this section on understanding user home folders. In the first part, we saw the home folder structure; next, we saw how to delete, migrate, and restore local user home folders through Migration Assistant and also manually.
This concludes the content for this chapter. Be sure to read the summary for a quick recap of the topics covered.
Summary
You now know the types of local user accounts available in macOS, what they are used for, and how to create and manage them, including creating, deleting, and restoring user accounts. You also know what account attributes are and how to configure login options, including fast user switching. You learned how to use the new Screen Time feature to track usage and set limits for user accounts and family members. In the second part, we saw the structure of the home folder created for each user, and how to delete, migrate, and restore user home folders with the help of Migration Assistant. You are now ready to manage all aspects of user accounts and home folders at a support level.
In the next chapter, we will explore the user security and privacy options available in macOS for the user's data security and protection of the user's privacy.