
As a macOS user or administrator, you will spend a lot of time managing apps and documents. Therefore, you must familiarize yourself with the tools and features macOS offers to facilitate those tasks. In this chapter, you will explore how apps work in macOS, how to use the App Store, how to install and manage apps and app extensions, how to share apps with family members, and how to use the features that macOS provides to manage documents on the spot. By the end of this chapter, you will be able to use all these features to work with apps and documents quickly and efficiently.
More specifically, the following topics will be covered in this chapter:
- Understanding apps in macOS
- Using the App Store
- Installing and managing apps
- Managing app extensions
- Sharing apps
- Managing documents
Before we start, let's look at the technical requirements for this chapter.
Technical requirements
This is what you will need for this chapter:
- Basic knowledge of the macOS environment
- A Mac computer with administrator privileges
Understanding apps in macOS
macOS benefits from a large and thriving community of developers. Most popular applications are available in versions for macOS and can be downloaded from the App Store or directly from the developer's website. As for the software that is still not available for macOS, you have alternatives as well. You can either use the built-in Boot Camp tool, which allows you to install and use Windows on Mac, or you can also use third-party alternatives, such as Parallels Desktop, which allows you to have a fully integrated virtual machine for using Windows on Mac without even having to leave your current user session. We will also explore the current state of macOS's app compatibility with 32- and 64-bit apps, Universal apps, and iOS apps.
To use apps in macOS, we need to know the types of apps that macOS supports, and we will talk about them in the following sections of this chapter. More specifically, we will cover the following:
- Supported macOS environments
- App compatibility
Let's begin by exploring the app environments that macOS supports.
Supported macOS environments
The primary application environments or frameworks supported by macOS fall into one of the following development categories:
- Native macOS
- Universal macOS binary
- Unix-based
- Open source
Let's briefly describe each of these categories.
Native macOS
Native macOS applications are developed in high-level application environments. Cocoa and Java are the most commonly used programming interfaces for bringing applications into macOS. Carbon was also used until some time ago, but because of its limitations with recently implemented features in OS X and macOS, it is officially deprecated, and Apple no longer recommends its use for app development. Apps developed with Carbon are considered legacy apps.
If you are (or plan to become) a developer, it is the style of your app that will determine what you should use as your core objects for its implementation. Apple developers have been developing native apps using the Cocoa framework, an object-oriented framework that supports the creation of single-window and multi-window apps, and the Swift programming language for some time now. With Cocoa, apps can have the following styles:
- Single-window utility app: A good example of this type of app is the calculator.
- Single-window library-style app: A good example of this type of app is the iPhoto app, which has only one window. From that single window, the user interacts with its collection or library of items.
- Multi-window document-based app: A good example of this is the Text Edit app, which uses a separate window for every document you open.
No matter which type of style you choose, all apps use the same core set of objects: model, view, and controller. Cocoa provides the default behavior for most of these objects.
However, bear in mind that Apple announced the introduction of a new framework called SwiftUI, specially created for Swift, since the Cocoa framework was created to work with Objective C. This created problems for developers. SwiftUI is a declarative way of declaring user interfaces for any Apple platform. Although it is still relatively new, it is clear that SwiftUI will grow and improve to become the main means of developing apps for Apple devices very soon.
The preferred integrated development environment (IDE) for writing the code for your Apple apps is Xcode, which is integrated with the Cocoa and Cocoa Touch frameworks and supports the development of apps for all of Apple's devices: Mac, Apple Watch, iPhone, iPad, and so on. The programming language that is most widely used in Xcode is Swift, but you can use other languages, such as Objective C, C++, and Python. XCode now supports SwiftUI as well.
The other native app development environment we mentioned is Java, which is used to create cross-platform applications. Java applications work in macOS by installing the Java Runtime Environment (JRE). In macOS, you are prompted to download and install the latest Java runtime directly from Oracle's site. If you need Java, in general, you should download the latest Java version for macOS directly from this link: https://www.java.com.
If you need to use legacy applications that require the older Java SE 6 runtime, you can go to this link and install Java for macOS 2017-001 (https://support.apple.com/kb/DL1572). This package installs the legacy Java SE 6 runtime for macOS 10.13 High Sierra, macOS 10.12 Sierra, macOS 10.11 El Capitan, macOS 10.10 Yosemite, macOS 10.9 Mavericks, macOS 10.8 Mountain Lion, and macOS 10.7 Lion. This package is only intended to support legacy applications. Otherwise, you should keep your software up to date by installing the latest Java version, as indicated here.
Once you've installed Java, you will be able to examine and customize some settings through the Java icon that will appear in System Preferences, as shown in the following screenshot:
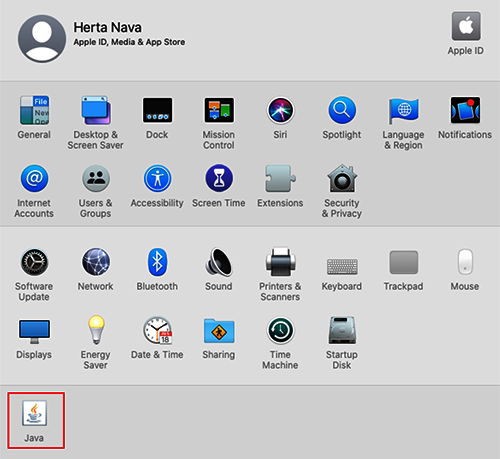
A separate panel will open, where you will be able to see all the available options for Java, as well as find out which version you have installed:

In the next section, we will explore macOS apps that run natively on both Apple silicon and Intel-based Macs.
Universal macOS binary
Developers can now create apps that run natively on both Macs with the Apple M1 silicon chip, as well as on Intel Macs. A universal binary contains executable code for both architectures. Actually, it is now recommended by Apple that all developers convert their compiled code into universal binaries that include executables for both 64-bit Intel and the arm64 architecture.
To update their code, developers can use Xcode 12.2 and later.
Now, let's explore the other supported environment in macOS: Unix.
Unix-based
macOS is compatible with most Unix software. However, Unix apps can only be accessed via Terminal. There is an open-source project called XQuartz, which developed a tool similar to the X.org X Window System, also known as X, a windowing system that provides the basic framework for a GUI environment, which is common in Unix systems. This version for Mac that's supported by Apple even came included in OS X at some point, but no longer is. If you wish to try it out, you will need to install it from the development site at www.xquartz.org. You could also search for other similar third-party solutions for Unix apps on macOS.
Finally, let's talk about open source.
Open source
Apple supports and encourages open source development, and it contributes to many projects of that type, such as the Swift programming language. If you would like to know more about these projects, you can visit the open source page on the Apple Developer site (https://developer.apple.com/opensource/). You can also visit the Mac Ports page (https://www.macports.org/), an open source community for designing, compiling, installing, and upgrading either command-line, X11, or Aqua-based open source software on the Mac operating system.
And with that information on supported macOS environments, you now have an idea of the potential of macOS apps. The next section will cover an important change in the compatibility of certain apps with macOS; namely, 32-bit apps.
App compatibility
App compatibility has gone through great improvements as Macs add new technology and new macOS versions are released. In this section, we will look at the current state of app compatibility with macOS and with Macs with the M1 silicon chip. The topics we will explore are as follows:
- Compatibility with 32- and 64-bit apps
- Universal and Intel apps
- iOS/iPadOS apps in Mac (Apple silicon only)
Let's start by exploring compatibility.
Compatibility with 32- and 64-bit apps
32-bit apps were the standard when there were 32-bit processors and 32-bit operating systems, but 32-bit apps are a thing of the past: it is an outdated technology. Today, 64-bit mode processes can perform high-precision functions faster and constitute the standard for app development. 64-bit apps offer the benefit of more memory and better performance.
macOS has been using 64-bit processing since Snow Leopard (2009), and although macOS still offers support for 32-bit legacy apps, it has been encouraging developers to transition to 64-bit for a long time to ensure that their apps take advantage of the latest macOS features and optimizations. For example, recently introduced Apple technologies, such as Metal graphics acceleration, only work with 64-bit apps.
This is also the reason why, when you launch a 32-bit app in macOS Mojave, an alert appears, warning you that the app has not been optimized for Mac. An alert also appears if you are trying to install a 32-bit app.
Starting with macOS Catalina, 32-bit apps are no longer compatible with macOS. You can still run your 32-bit apps in older versions of macOS. So, be sure to update your apps or contact the developer to enquire as to when they will provide a 64-bit version.
Universal and Intel apps
All Mac apps must now be of the Universal kind, which run natively on Macs with the Apple M1 silicon chip. Apps that have been created for Macs with an Intel processor and have not been updated to Universal yet will require the Rosetta 2 translation layer technology to run in Macs with the M1 chip.
If you are not sure whether your app is universal or Intel, you can do the following to find out:
- Go to the Apple menu (
 ).
). - Select About This Mac.
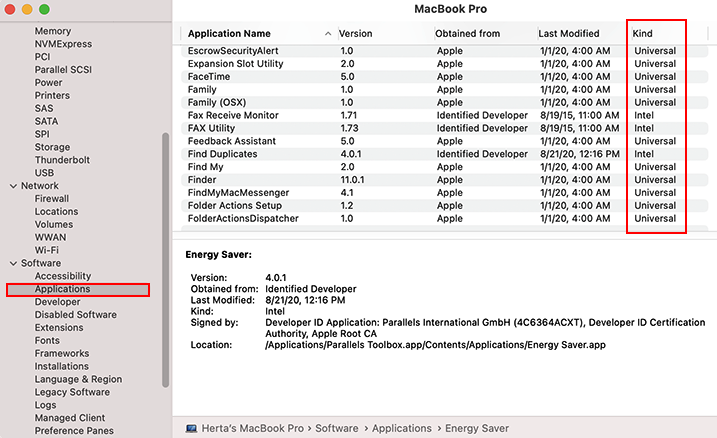
- Click on System Report.
- Scroll down to Software on the sidebar.
- Select Applications.
- Check the list on the right-hand side. You will be able to verify whether the app is Universal or Intel:
You can also ascertain whether an app is Universal through the Info window:
- Open the Applications folder.
- Select the app you want to obtain information for.
- Right-click on the app and select Get Info.
- You will see the information next to Kind, as shown in the following screenshot:

If you have a Mac with the Apple M1 silicon chip, you may be asked to install Rosetta to open apps that are not yet Universal. When you see the prompt, click on the Install button:

And that's it! Rosetta will run in the background; there is nothing else you need to do to use an app that is not yet Universal. Just open the app normally.
iOS and iPadOS apps (Apple M1 silicon)
Macs with the Apple M1 silicon chip can run iOS and iPadOS apps because they share the same arm64 architecture. We will learn how to install iOS and iPadOS apps in the Installing apps from the App Store section.
In this section, you learned which frameworks are supported on macOS so that you know which types of apps can be developed on the respective system. You also learned what 32- and 64-bit apps are, the status of compatibility of macOS with 32-bit apps, and what to do in the case of an incompatible app. At the same time, we learned how to run apps that are not yet of the Universal kind and optimized for Macs with the Apple M1 silicon chip. Finally, we learned how Macs with the Apple M1 silicon chip can even run iOS apps. We can now move on to learn how to use the App Store to download and install apps.
Using the App Store
The App Store provides a single interface platform for finding, downloading, and installing apps for Mac, iPhone, iPad, iPod touch, and Apple TV. This platform, available since OS X Snow Leopard (10.6.6), is very user-friendly since you don't need to enter license numbers or go through activation processes. At the same time, it is the most secure way to install apps since Apple reviews each app before it can be made available for download in the App Store.
The App Store also has an education program called the Apple School Manager (www.school.apple.com/), through which Apple helps schools obtain access to and experience Apple's technologies. In addition, there is a business program called Apple Business Manager (www.apple.com/business/it) that helps enterprises adopt Mac and helps employees make the most of those technologies. Both programs allow businesses and educational organizations to acquire multiple licenses for App Store software.
If you are an individual user, you need an Apple ID to install apps from the App Store. In the next section, you will learn how the App Store works with your Apple ID to provide you with a seamless app installation experience.
The App Store and your Apple ID
To install free or paid apps from the App Store, you need an Apple ID. If you don't have an Apple ID, you will learn how to create one easily in this section. More specifically, we will look at the following topics:
- Logging in to the App Store
- Creating an Apple ID
- Creating an Apple ID without a payment method
- Managing your account
Let's explore how to log in to the App Store.
Logging in to the App Store
You can find the App Store in the Applications folder, in the Dock, or you can use the Spotlight to find it quickly. Although you don't need an Apple ID to browse available apps, you do need it to download or purchase an app.
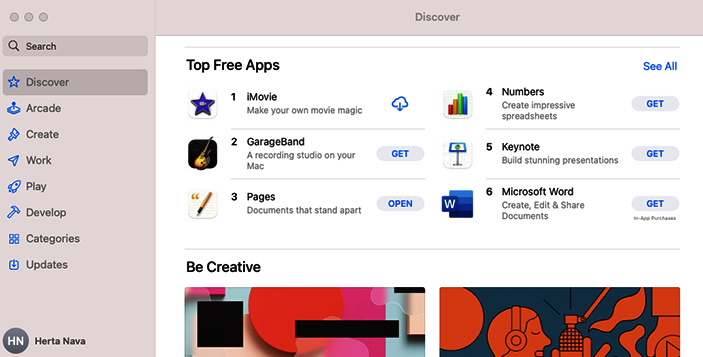
The first time you access the App Store, you will see the Discover page. Here, you will be able to browse categories and apps or use the search field to look for a specific app without signing in. However, you will need an Apple ID to install an app and view your purchases and history.
The following screenshot contains different icons that appear next to the apps:
- If you have already downloaded the app in the past with this Apple ID but not on this machine, a cloud download icon will appear.
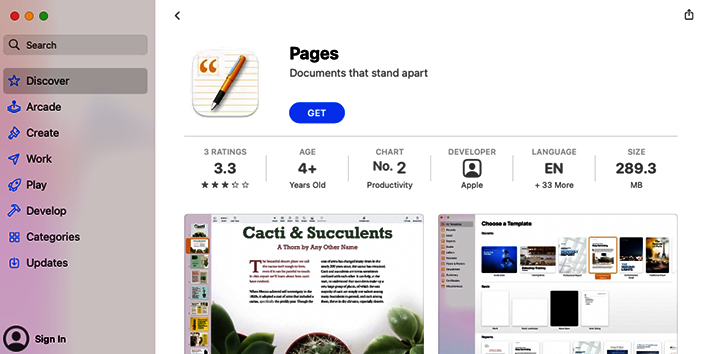
- If you didn't download the app, you will see a GET button.
- If you have downloaded the app to this machine, you will see an OPEN button. Here, you can see that there is a download icon for the iMovie app, which means it was downloaded in the past with this account, and an OPEN button for the Pages app, which means that it has already been downloaded and installed on this Mac:
If you attempt to download an app, the following will happen:
- You will be asked to sign in. If you don't have an Apple ID, don't worry; creating one is easy, and we'll cover this shortly. If you have an Apple ID, enter it, enter your password, and then click Sign In.
- If you have two-factor authentication turned on, you will need to enter the code from your second-factor device to enable your Apple ID on your Mac.
- And that's it! With the Apple ID set up, you are ready to download apps.
When your Apple ID has not been used with the App Store previously, the following will happen:
- You will be prompted to review your information.
- Then, you will need to enter your contact information and your payment method.
- Once your information has been reviewed and corrected if necessary, you will be ready to download an app.
If you don't have an Apple ID, you can easily create one. We will do this in the next section.
Creating an Apple ID
You can create an Apple ID through one of the following methods:
- On your Mac, iPhone, iPad, or iPod touch through the App Store
- On a PC through iTunes for Windows
- On the Apple ID web page (appleid.apple.com), from any device with browser support
To create an Apple ID, you would normally need to provide a payment method. At the time of writing this book, the accepted methods are as follows:
- Most major credit and debit cards
- Apple Pay (if available)
- Store credit (gift cards or using funds that have been added to your Apple ID)
Now, let's examine the process of creating an Apple ID through the App Store:
- Open the App Store and find a free app you would like to download.
- Click on the GET button.
- When you click the button, it will turn green and change to INSTALL, as shown in the following screenshot. Click that button:

- When you're asked to sign in, click the Create Apple ID button, as shown here:

- Next, enter an email and password, select your country, check the Terms and Conditions box, and then click Continue:

- Enter your name, date of birth, select your security questions, and then click Continue.
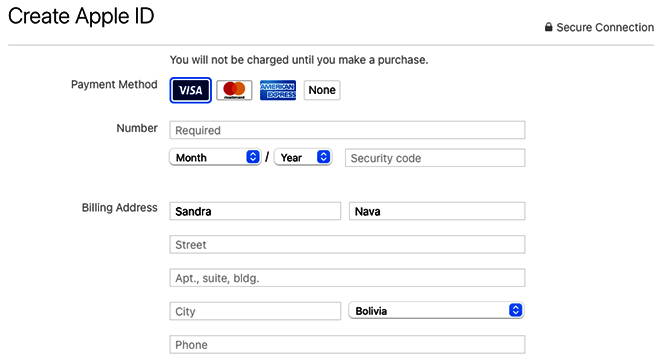
- Next, provide a payment method and billing address and click Continue:
- An email will be sent to the email provided, which will include a verification code that you have to enter here:

- And that's it! As soon as you enter the correct code, you will see a message indicating that this Apple ID can be used to access all Apple services on this Mac.
If you only want to install a free app and don't wish to enter payment information, there is a way to create an account without providing a payment method.
If you are using an existing Apple ID, you might be able to remove the payment method you provided when you sign into the App Store, iTunes Store, or Apple Books. However, you will need to provide one when you make a purchase. If you cannot remove your payment methods, see the next section, where we'll explain why that can happen.
Creating an Apple ID without a payment method
You can create an Apple ID without having to provide a payment method on the App Store on your iPhone, iPad, or iPod touch, or on a Mac or PC (iTunes for Windows).
Let's see how that works in the App Store:
- Follow the same process described in the previous section for creating an Apple ID up to Step 7.
- When you arrive at the window where you have to enter your payment information, choose None (Figure 10.10).
- Enter your billing address, even if you selected None; otherwise, you will not be able to proceed.
- Next, you might be asked to provide and verify a phone number if you're eligible to use two-factor authentication.
- Continue with Step 8 in the previous section to complete this process.
In some cases, the None option will not appear, or you may not be able to remove a payment method from your App Store account. There could be several reasons for that, including the following:
- If you're using an existing Apple ID with the App Store or iTunes for the first time, you will need to provide a payment method.
- If you have active subscriptions in that Apple ID, you need to have at least one valid payment method on file. If you want to remove your payment method despite the subscriptions, you will need to cancel the subscriptions first and then try again to remove it.
- If you have Family Sharing set up, and you are the family organizer, you must have at least one valid payment method. If you would like to remove the payment method anyway, you should turn off purchase sharing first. We'll explain how to do this in the Sharing apps section, later in this chapter.
- You must have a payment method valid in the country or region where you are physically located. Try changing an existing Apple ID to the country or region you are in (if you moved or are traveling, for example). You might be able to remove the payment method once you have changed your country or region.
- You won't be able to remove a payment method if you have a pending charge. As soon as the balance is paid, you will be able to remove it.
Now that you know how to create an Apple ID from the App Store, you will learn how to manage your account.
Managing your account
Once you have created your Apple ID, you can do the following to manage your account (what you see may vary, depending on the macOS version you have installed; this is what you will see on macOS Big Sur):
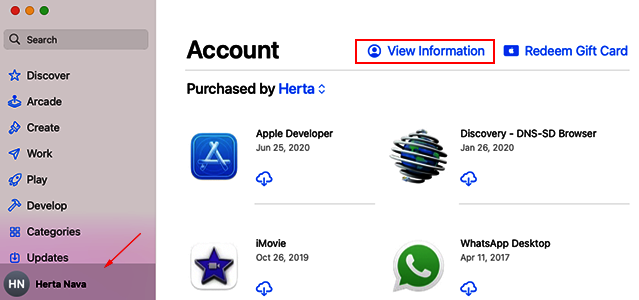
- Click on your name that appears in the bottom-left corner, as shown in the following screenshot.
- You will see your purchased apps and links labeled View Information and Redeem Gift Card:
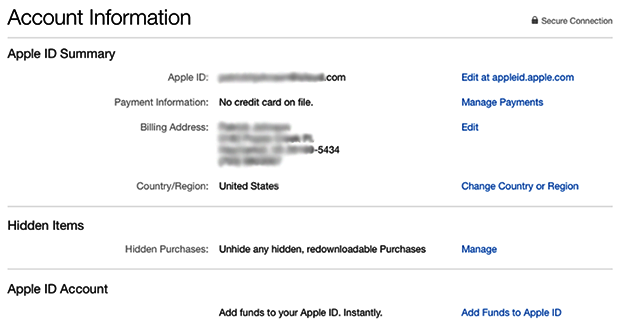
- If you click on View Information, you will be asked to sign in with your Apple ID. Enter your Apple ID and password, and then click Sign In.
- Here, you will be able to make any desired changes to your account. You will notice that the Payment Information field indicates No credit card on file since we created this Apple ID without a payment method. You will be able to add a payment method here in the future if you want to download paid apps:
In this section, you discovered how easy it is to use the App Store and log in with an Apple ID. You also learned how to create an Apple ID to be used with the App Store, with or without a payment method set up. You will now be able to sign in, manage your account, and start installing your favorite apps. There are several methods for installing apps, and that is what we will cover next.
Installing and managing apps
Installing and managing apps is a common task for administrators and users. Therefore, you need to know all the available methods as well as the related tasks, such as updating and uninstalling, in order to perform these actions effectively and provide support to other users. These are the topics that we will cover in this section:
- Installing apps
- Examining packages and bundles
- Updating apps
- Uninstalling apps
- Exploring installed apps and app preference files
- Monitoring open processes and apps
Let's start by learning about the methods for installing apps on macOS.
Installing apps
By default, macOS allows you to install apps using two main paths:
- The App Store
- Other traditional installation methods
The first option is the (default) recommended option for app installation in macOS. We will examine both paths in the following section.
Installing from the App Store
Since OS X 10.9 Mavericks and later, administration privileges are not required to install apps from the App Store. This means that anyone with a user account and an Apple ID can install or purchase apps on your Mac. If you want to restrict this behavior, you can disable the App Store for standard accounts through Screen Time. We covered Screen Time in Chapter 4, User Accounts Management.
To install apps from the App Store, the following are required:
- OS X Snow Leopard (version 10.6.6) or later
- An Apple ID
- A good internet connection (some apps can be several GB in size)
Installing apps from the App Store is straightforward. Just follow these simple steps:
- Open the App Store.
- Look for the app you want to install and click on the app's name to go to the app details page.
- If the app is free, you will see a GET button, as shown in the following screenshot. If it's not free, you will see the price instead. If you scroll down, you will find information about the app's version, download size, developer, the app description, and screenshots, if available:
- When you're ready to install, click the GET button to download it (or the price button to purchase it).
- The GET button will change to INSTALL. Click it to install the app.
- You may be asked to sign in again.
- The first time you download an app, you might be able to tell the system that a password is to always be required, never, or after 15 minutes, as shown in the following screenshot. You can change this setting later on from the Security & Privacy preferences in System Preferences, via the General tab:

- The app download will start immediately, and it will be saved directly in the Applications folder in the root system volume by default (usually Macintosh HD).
- You will be able to monitor the app download progress in several locations, including the Purchase page of the App Store, the Launchpad, and the Finder. Here, we can see the download's progress in the Launchpad:

In the next section, we will learn how to install iOS and iPadOS apps from the App Store for Macs with the Apple M1 silicon chip.
Installing iOS and iPadOS apps (Apple M1 silicon)
As we mentioned earlier, Macs with the Apple M1 silicon chip can run iOS and iPadOS apps. There might be more than a few methods to install these apps. Here, we will describe two methods of using the App Store:
- You can download apps you have previously purchased on your iPhone and iPad, which are linked to your Mac with the same Apple ID.
- You can search for apps.
Perform the following steps to use the first method:
- Open the App Store.
- Click on your profile tab in the lower-left corner (Figure 10.12).
- Below Account, select iPhone & iPad Apps.
- Install the app you want, just like any other app.
- Once installed, open the app as you would any other app.
Perform the following steps to use the second method:
- Go to the official website of the app you want to download.
- Click the download link, which will normally launch the App Store.
- Install the app, as indicated previously.
In this section, we saw how easy it is to install apps using the App Store, including iOS and iPadOS apps, if you have a Mac with Apple silicon. Next, we will look at the other installation methods that are available.
Other installation methods
The second path for app installation is done through other installation methods, normally from trusted developers. This is to protect you from unknown and potentially harmful apps.
When installing apps that are not in the App Store, the installation method will depend on the app developer. In general, installations are done using one of the two following methods:
- Drag and drop
- Installation packages
Let's review briefly how these two methods work.
Drag and drop
Although a drag and drop application will normally come with instructions for you to drop it in the Applications folder in the root system volume (usually Macintosh HD), although not recommended, technically, you could drop the app anywhere. As we saw in Chapter 6, The macOS File System: Disks, Volumes, and Partitions, you can create your own Applications folder in your home folder and drag the application there. The system recognizes this folder, and it will make the application available just for you, as opposed to all users on the Mac.
For example, this application comes with instructions to drop the app in the Applications folder:

As we mentioned earlier, only apps that have been installed from the App Store can be installed by anyone. If you are installing through any other method, you will be asked to authenticate as an administrator.
Let's examine another method for installing apps in macOS through packages.
Using packages
Custom packages using native installation assets will have the .pkg or .mpkg filename extension. Non-native installers will have the .app extension. Installing these packages will also require administrative privileges.
Perform the following steps to install a package:
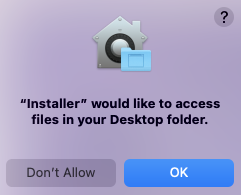
- Double-click the installer package.
- You will be asked for permission to access the required folders, as shown here:
- The package might run a compatibility verification to determine whether it can be installed on this Mac.
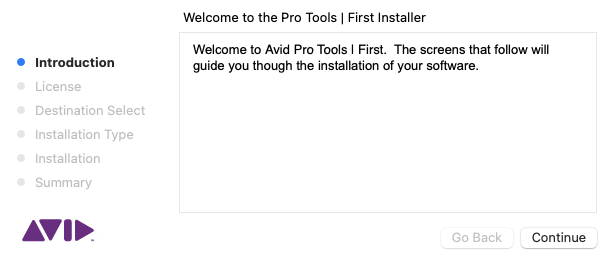
- If the software is compatible, you will see a custom installer open, as shown in the following screenshot. Observe the instructions to complete the installation:
- That's it! You have successfully installed an app using a custom package.
As you can see, installing an app with any of the two methods is very user-friendly. However, bear in mind that applications that are not in the App Store or are identified as being from "unknown developers" are subject to security measures implemented by macOS. However, if you are sure that an app from an unknown developer is secure and you wish to install it anyway, you can override this default behavior. We will examine the security measures that macOS implements and how to override them in Chapter 15, Managing Security in macOS.
When you install packages, you might want to see what is inside them. There is actually a way to examine those packages, as we will see next.
Examining packages and bundles
App installers can come in packages or bundles, and although both could be confused as being the same, they are not. A package is presented to the user as a single file, while a bundle is a folder that has a hierarchical structure containing executable code and the resources needed by that code in order for the application to run.
After downloading a package, you can examine its contents through the Finder:
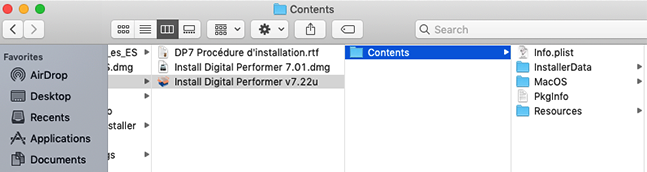
- With the package selected, right-click and select Show Package Contents, as shown in the following screenshot:

- Next, you will be able to browse the files the package contains as you would any normal folder, as shown in the following screenshot:
In this section, we saw the app installation options for macOS. Next, we will look at a task you will deal with afterward: how to update your installed apps.
Updating apps
In the previous sections, we learned how to install apps in different ways. The options to update them are as follows:
- The App Store
- Automatic updates
- Manual updates
Let's review each of these methods next.
App Store
This method is for apps that have been installed via the App Store. When there is an update available, a red number appears in the App Store icon, signaling the number of updates available. Just click on the icon, and you will be taken to the App Store Updates tab to apply those updates.
Automatic updates
You can configure how updates are automatically downloaded or installed without the need to do anything. We learned how to configure this option in detail in the Upgrading macOS section in Chapter 2, Installing and Configuring macOS.
Manual updates
For apps installed through the App Store, you can manually verify whether there are any updates available directly in the Updates section of the App Store, which is located on the left-hand side menu. You can also find and manually download all Apple software updates at this link: www.support.apple.com/downloads.
For apps that have not been installed through the App Store, you will have to manually verify this in the app itself (usually through their Help menus) or through the developer's website. Some applications have notification systems to communicate with you regarding updates through other means, such as email.
Besides installing and updating, another common action you might want to perform is to uninstall an app, which is what we will learn how to do in the next section.
Uninstalling apps
Users who are not used to Macs find that uninstalling apps on macOS is so easy that it seems they must be doing something wrong. This is because they are not used to Mac's app development model, which is different from other operating systems. Uninstalling apps in macOS can be achieved through any of these three straightforward methods:
- Through the Launchpad
- By dragging an app to the Trash
- Through an uninstaller package
Let's take a look at how to use these methods.
Launchpad
This option only works for apps that have been downloaded from the App Store. Perform the following steps to use it:
- Open the Launchpad from the Applications folder, or click on it from the Dock if you have it there.
- Click and hold on the app you want to uninstall until you see the icons begin to bounce and an X appear at the top-left of the icon, as shown in Figure 10.22.
- Click on the X icon of the app you want to remove:

- You will see a warning asking you if you are sure you want to remove the app. Click Delete if you are sure.
- You might have to authenticate as an administrator to proceed.
Now, let's examine the second method.
Dragging to the Trash
This is the most commonly used method to uninstall apps. It can be used not only with apps installed through the App Store, but with any app. However, bear in mind that with some apps, this method could leave some files behind. If you don't want any files to remain, you can use third-party software to help you remove all files.
To use it, just go to the Applications folder and drag the app you want to remove to the Trash, as simple as that.
Now, let's examine the last method.
Custom uninstaller
Although rare, some apps come with a built-in uninstaller included when the developer deems it necessary.
To use this method, you would normally have to ask app support to find out where this package is located, or sometimes it might be included in the app's contextual menu. For example, the Avast Security software we installed earlier provides its own custom uninstaller that can be accessed from the top menu, as shown in the following screenshot:

It's always important to verify the developer's documentation to ensure which is the best way to uninstall software in macOS.
So far, we have covered the important topics of installing and managing apps. In the next section, we will learn how to explore and monitor installed apps.
Exploring installed apps
The main tool for managing apps in macOS is the Finder tool. However, there are other tools that you can use for specific tasks related to apps, such as System Information and Activity Monitor.
If you need to know which apps are installed on your system, including third-party software, you can use the System Information tool to scan your apps to view a list of installed apps and their locations.
Perform the following steps to use the System Information tool to explore apps and their extensions:
- Open the System Information tool, as explained earlier.
- Scroll down to the Software section in the side menu, and then select Installations, as shown here:
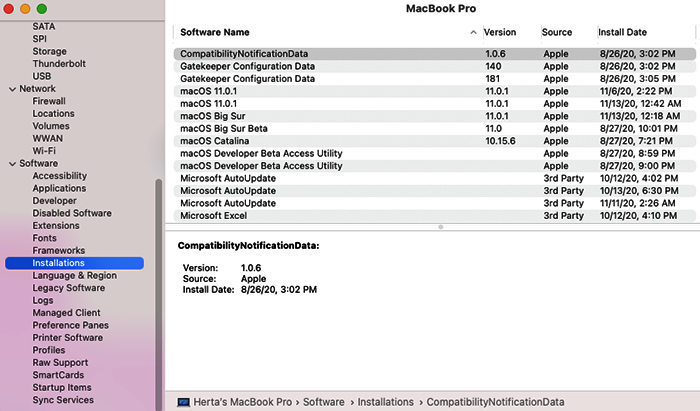
- You will be able to see the apps that have been installed on your Mac on the list, along with some pertinent information, such as the version that's been installed, the source (Apple or third party), and the installation date.
You can explore the extensions that have been installed on macOS through Extensions, right above the Installations section of the System Information tool.
Apps have preference files, and they can be explored through the Finder tool, as we will see next.
Exploring app preference files
Bear in mind that, in general, app preferences are stored in XML files in the form of property lists. These files have the .plist filename extension.
These files are stored in the user's Library folder, in the Preferences folder, at ~/Library/Preferences.
As we saw in Chapter 8, System Resources and Shortcuts, sandboxed apps store the preference files in the container folder, at ~/Library/Containers/[Bundle ID]/Data/Library/Preferences.
Here, [Bundle ID] is the name that identifies the app.
You can view and edit the content of those files through various methods. The following are the two that are most frequently used:
- The Finder Quick Look feature allows you to view the contents of the file. The Quick Look feature will be examined later in this chapter, in the Managing documents section.
- The Xcode app allows you to view and edit these files.
While you can explore apps through the System Information tool, macOS also has another tool for monitoring open apps and processes. Let's examine that next.
Monitoring open processes and apps
macOS provides a tool for inspecting running processes, managing them, and exploring how they affect your Mac's performance. This tool, called Activity Monitor, allows you to do the following:
- Close unresponsive apps and processes.
- Monitor the impact of apps and processes on your Mac's energy consumption.
- Monitor real-time CPU, memory, network, and disk status.
- Run diagnostics.
- Verify whether your Mac needs more RAM.
Perform the following steps to use Activity Monitor:
- Open Activity Monitor under Utilities in the Applications folder, or use Spotlight to find it quickly.
- In the View menu, you can configure which processes to show on each pane.
The types of processes you can see are as follows:
- Active: Processes that are running and not sleeping
- Inactive: Processes that are running but are sleeping
- Windowed: Processes that create windows (usually apps)
You can also filter processes according to the following criteria:
- All Processes: Processes running on your Mac
- All Processes, Hierarchically: Processes that belong to other processes (parent/child)
- My Processes: Processes owned by your user account
- System Processes: Processes owned by macOS
- Other User Processes: Processes not owned by the root or current user
- GPU Processes: Processes owned by the computer's GPU
- Selected Processes: Processes you selected in the Activity Monitor window
- Applications in last 12 hours: Only apps running processes in the last 12 hours
- Processes, by GPU: Processes that are running, grouped by GPU
Here, we can see the View menu, through which you can access all the filtering options mentioned previously:

There are five main areas you can examine:
- CPU
- Memory
- Energy
- Disk
- Network
All the panes show these three columns:
- Process Name
- PID: The process ID
- User: The user who owns the process
Now, let's look at the additional details you can examine in each of them.
CPU
The CPU pane, as shown in the following screenshot, shows the processes that affect the processor. The columns you have available for filtering are as follows:
- % CPU: Total CPU percentage x the number of processor cores a process is consuming
- CPU Time: Amount of time a process has been active since the Mac last started up
- Threads: Number of thread operations in a process
- Idle Wake Ups: Number of times a process awoke from sleep mode
If we examine the % CPU column shown in the following screenshot, we'll see that there is a process called macOS Catalina that is using 42.1% of one processor core:

In all panes, there is more key information you can examine at the bottom. In this case, we can see the following:
- System: Percentage of CPU capability being used by processes belonging to macOS
- User: Percentage of CPU capability being used by apps opened by the user or by processes opened by those apps
- Idle: Percentage of CPU capability not being used
In the next section, we will explore how Activity Monitor helps you gather data about the memory in your Mac, as well as ascertain whether you need to increase your RAM.
Memory
The Memory pane, as shown in the following screenshot, shows the memory resources being used. The main columns you have available for filtering are as follows:
- Memory: Amount of memory each process is using
- Threads: Number of thread operations in a process
- Ports: Number of ports in use by the process:
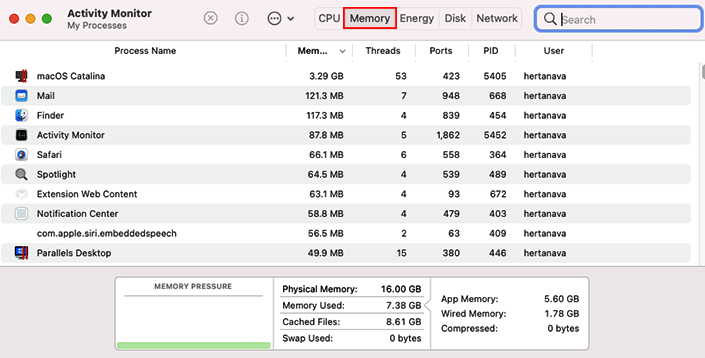
In the bottom section, we can see the following:
- MEMORY PRESSURE: This graphic shows how efficiently your memory serves your processes based on the data provided by the details to the right; for example, Swap Used or Wired Memory. The color represented helps you ascertain whether you require more memory:
- A green color means your Mac is using its RAM efficiently.
- A yellow color means your Mac may require more RAM soon.
- A red color means your Mac definitely needs more RAM.
- Physical Memory: Amount of installed RAM
- Memory Used: Amount of RAM being used
- Cached Files: Size of files cached into unused memory by the system
- Swap Used: Amount of space used on the startup disk to swap memory to and from RAM
- App Memory: Amount of memory being used by apps
- Wired Memory: Amount of memory required by the system to operate
- Compressed: Amount of memory compressed to have more RAM available
In the next section, we will explore how Activity Monitor helps you gather data regarding energy consumption.
Energy
The Energy pane, as shown in the following screenshot, shows the energy being used by each process. The columns you have for filtering are as follows:
- Energy Impact: Current app energy consumption; the lower, the better.
- 12 hr Power: Average app energy consumption in the last 12 hours, or since the Mac was powered on, whichever is shorter; the lower, the better.
- App Nap: A feature of some apps that allows them to consume very little energy when they are opened but are not in use. This feature can activate when an app is behind other active windows or in a space that is not being viewed. In this column, it shows whether App Nap is active for this app.
- Graphics Card: This shows whether a process requires a high-performance GPU. It only appears in Macs with one or more graphics cards.
- Preventing Sleep: Any apps that are preventing the Mac from entering Sleep mode:
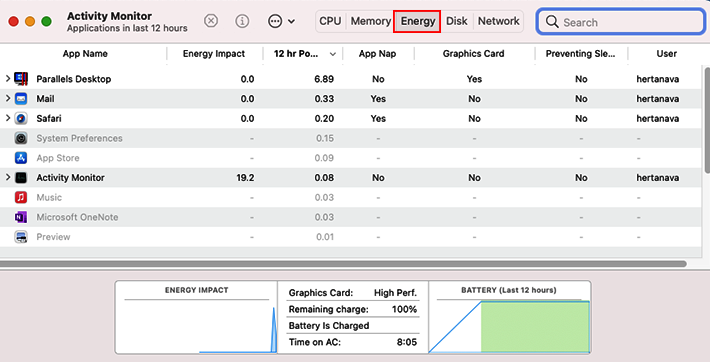
There is useful information about the battery at the bottom of the pane if you are using a Mac notebook.
In the next section, we will explore how Activity Monitor helps you gather data related to storage.
Disk
The Disk pane, shown in the following screenshot, shows the data that's been read and written to the disk by each process. The columns you have for filtering are as follows:
- Bytes Written: The total number of bytes written to storage by a process
- Bytes Read: The total number of bytes read from storage by a process:

In the bottom section, we can see the following:
- Reads in: Total number of times data was read from storage
- Writes out: Total number of times data was written to storage
- Reads in/sec: Rate of read operations
- Writes out/sec: Rate of write operations
- Data read: Total data read from storage
- Data written: Total data written to storage
- Data read/sec: Speed per second at which data is being read
- Data written/sec: Speed per second at which data is being written
In the next section, we will explore how Activity Monitor helps you gather data related to the network and the volume of data that travels through it.
Network
The last pane is the Network pane, as shown in the following screenshot, and it shows the data being sent or received over the network. The columns you have for filtering are as follows:
- Sent Bytes: Number of bytes sent by the process to the network
- Rcvd Bytes: Number of bytes received by the process from the network
- Sent Packets: Number of packets sent by an app to the network
- Rcvd Packets: Number of packets received by an app from the network:

In the bottom section, we can see the following:
- Packets in: Total number of packets received
- Packets out: Total number of packets sent
- Packets in/sec: Number of packets received per second
- Packets out/sec: Number of packets sent per second
- Data received: Total data received from the network
- Data sent: Total data sent to the network
- Data received/sec: Amount of data received from the network per second
- Data sent/sec: Amount of data sent to the network per second
In this section, we have covered some important tasks related to installing and uninstalling apps and the different methods available to accomplish this. We also learned how to explore and monitor apps and open processes using the System Information and Activity Monitor tools. In the next section, we will discover how to manage app extensions that have been developed to enhance apps' features and capabilities.
Managing app extensions
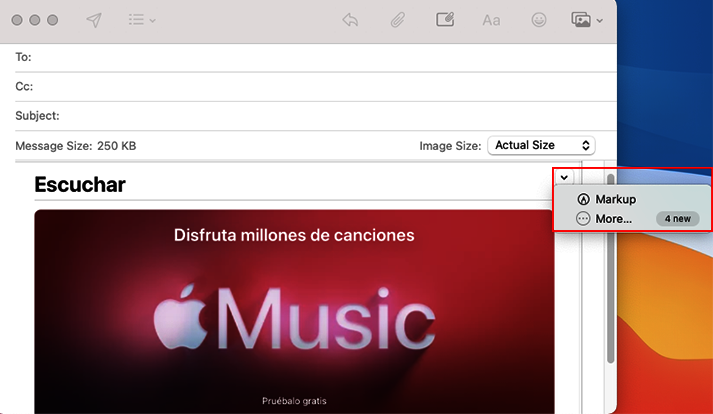
Apple has a vibrant community of developers and, as a result, there are many extensions available that you can take advantage of. App extensions have been available since OS X Yosemite, and they allow completely different apps to interact with one another, offering extended functionality, actions, and content to users. Apps make use of extensions and widgets to extend app functionality to other parts of the system. Developers can include these extensions to add sharing, photo editing, and document manipulation functionalities, among other, to their applications.
A good example of the use of these extensions can be seen in the Preview app, which includes markup features to allow you to manipulate images or PDF documents. These features are also available in other apps, such as the Mail app. For instance, when you include an attachment in an email, a button lets you access the Preview markup features, as shown in the following screenshot. This means that you will be able to mark up your attachment without the need to open any other app:
In this section, we will learn how to explore apps and extensions that have been installed on your system. More specifically, we will cover the following:
- Types of extensions
- Managing app extensions and widgets
Let's start by learning how to explore apps and extensions installed on your Mac.
Types of extensions
As we mentioned earlier, extensions allow different apps to interact with each other, offering extended functionality, actions, and content to users. Thus, it is important that we learn in which situations users can take advantage of them, which will save them time and make their work more efficient. These extensions can be categorized based on the locations where they allow features to be added, namely, the following two locations:
- Finder
- The sharing menu
Let's explore these two types of extensions.
Finder
These types of extensions allow a badge to be included on local folders, which lets us know the sync status of remote items, such as the one shown in the following screenshot:

They also allow us to include contextual menus in popular cloud storage apps to manage syncing and a menu in the Finder toolbar to manage sync settings, as shown in the following screenshot:

Now that you know how extensions can improve functionality in the Finder, let's discover the second location where they add functionality as well.
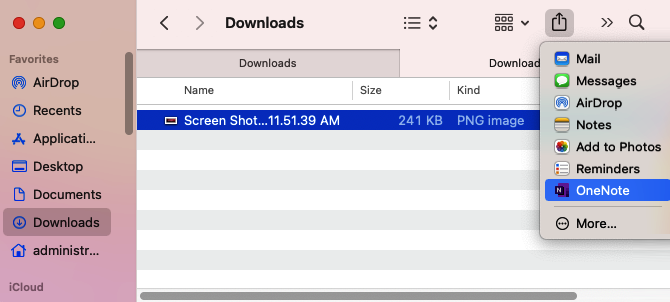
Sharing menu
The extensions for the Sharing menu provide more options, such as sharing photos, videos, and other content. Here, we can see these extensions in action from the Finder Sharing menu:
Now that you have a pretty good idea of the types of extensions you can use in macOS, let's explore how to manage them.
Managing app extensions and widgets
In macOS, app extensions are usually bundled in the developer's app offering the extension. This means that they are installed automatically when you install the main app.
You can inspect and manage those extensions through the Extensions preferences in System Preferences. Perform the following steps to view and manage your extensions:
- In System Preferences, click the Extensions pane.
- Select the Added extensions tab if you want to view all the extensions that have been added from the apps you've installed on macOS. Here, you can see that we have an extension from Microsoft OneNote enabled in the Share Menu, and other extensions that have not been enabled:

The other tabs in the left-hand side panel allow you to configure extensions in more specific sections of macOS, such as Finder, Photos Editing, and Share Menu. For example, the Actions tab allows you to select extensions for editing or viewing content, such as Markup actions, as shown in the following screenshot:

Let's explore the last option, which is a bit different from the rest. The Finder tab allows you to select quick actions and document providers to show in the Finder. Here, we can see several quick actions that have been selected for the Finder:

In portable Macs with a touch bar, you will see an additional tab where you can configure quick actions for the touch bar.
In this section, we learned how extensions are an important part of the macOS user experience and give us access to functionality, as well as sharing options. However, app sharing is also an important feature. Let's take a look at how we can share apps on macOS next.
Sharing apps
Sharing apps is a capability that macOS offers to users so that they can share purchased apps with family and friends through a feature called Family Sharing, which we will explore in detail in this section.
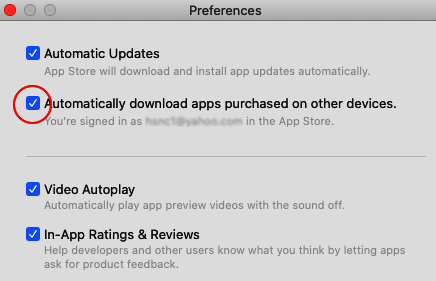
However, if you own more than one Mac, apps purchased on one of them can also be easily shared and installed on your other Macs as well. To do that, you will need to enable the ability for purchased apps to be automatically downloaded on your other Macs via the App Store's preferences:
- Open the App Store, go to the App Store menu, and then Preferences.
- Enable the Automatically download apps purchased on other devices option, as shown here. You will need to sign in with your Apple ID to configure this option; otherwise, this option will be dimmed:
That being said, let's examine the Family Sharing feature and learn how to take advantage of it.
Family Sharing
Family Sharing is a feature, available since OS X Yosemite 10.10, that offers users a great way to share apps with family or friends. Through this feature, you can create a Family Sharing group composed of a maximum of six members (or six Apple IDs), who can then take advantage of downloaded/purchased apps. Purchases that are made by any group member can be shared with the other members, as long as they enable them.
This is what you can do through the Family Sharing feature:
- Download and share eligible music, movies, TV shows, books, and apps from the iTunes, Apple Books, and App Stores.
- Get an Apple Music family subscription, and then invite family members to join. You can learn more about the family subscription here: https://support.apple.com/HT205595.
- Share family photos and videos.
- Set up a family calendar.
- Share an iCloud storage plan for your family's photos, videos, documents, and suchlike.
- Find your family members with the Find My Friends app.
- Find family members' devices with the Find My iPhone app.
- Manage your child's account, turn on Ask to Buy, or use Screen Time with Family Sharing.
To use Family Sharing, you need the following:
- A Mac with OS X Yosemite and later, or an iPhone, iPad, or iPod touch with iOS 8 and later
- An Apple ID
- To be signed in to iCloud with that Apple ID
- A valid payment method set up with the main Apple ID account
In a Family Sharing group, there is one organizer who will be the main account and will invite other Apple IDs into the group to share app purchases. If the organizer has multiple Apple IDs in iTunes, they can add each of their accounts to the group in order to share purchases from those Apple IDs as well. The organizer must also have a valid payment method set up in their account, as all purchases for this group will be made using that main account. Family Sharing members can also purchase apps using redemption codes. Bear in mind that unauthorized purchases or downloads can happen through Family Sharing. If you want to restrict app purchases or downloads, you can do so through the Screen Time feature. We covered Screen Time in Chapter 4, User Accounts Management.
Children under 13 must join a Family Sharing group to use Game Center and will have to ask for approval to make any purchases, even for free items. However, besides the organizer, another adult in the group can be designated as a parent or guardian and will be able to approve or reject purchases requested by the children in the group. For that to work, you will have to create Apple IDs specifically for the children in your family group, who will have restricted access to purchasing. You can use the restrictions options in Screen Time to limit the apps you want to allow per user. You can also choose an age requirement, which will limit purchases and/or opening applications to the users in that age range. All other regular Apple ID accounts require a member to be at least 13 years old.
Now that you have a good idea of what Family Sharing is, in the next few sections, we will explore the following key tasks related to Family Sharing:
- Enabling Family Sharing
- Purchase sharing
- Start sharing purchases
- Stopping purchases and Family Sharing
Let's begin by enabling this feature.
Enabling Family Sharing
Perform the following steps to enable Family Sharing. Bear in mind that the process may vary slightly in different versions of macOS. In the following example, we will be exploring the process on macOS Big Sur:
- Make sure you are signed in to iCloud with a valid Apple ID on your Mac. This will be the group's organizer.
- Open System Preferences, and then click the Family Sharing icon, as shown in the following screenshot. Bear in mind that this icon will not appear if you are not signed in to iCloud with a valid Apple ID:

- The first time you enable Family Sharing, you will see a screen similar to the following. Click Get Started to start the setup:

- Next, you will be asked to confirm whether you wish to invite members to this group or create a child account. For this example, we will choose Invite People:

- You will then be asked how you would like to send the invitation: by mail, message, or in person. For this example, we will choose Mail:

- At this point, you will need to enter the email of the person you want to invite and send the email:

- Once you've done this, you will see a confirmation that the family member has been invited and that you will be notified when they join. Then, click Done. The family member will have to accept the invitation from the email to be added to the group.
- Next, you will see the main Family Sharing preferences, where you will be able to invite more members through the Add (+) icon, circled in red in the following screenshot. You will also notice that you are shown as the organizer. Other members will appear on the list below the organizer as they are added:
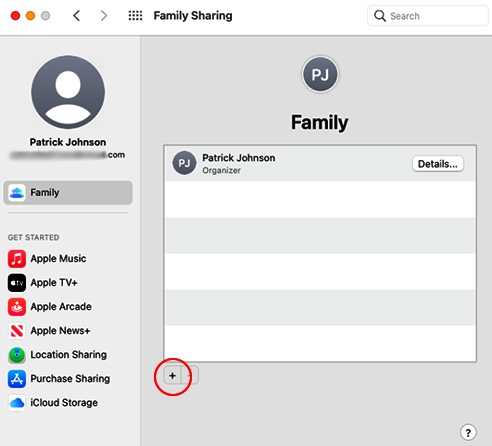
- And that's it! You have now set up Family Sharing.
In the tabs you see in the preferences, you will be able to set up access to different types of content for members, as well as configuring location sharing and purchase sharing. In the following section, we will learn how to set up purchase sharing.
Purchase sharing
If you wish to allow members to make purchases or subscribe to services through the Family Sharing feature, you will have to set up a payment method. Perform the following steps to do this:
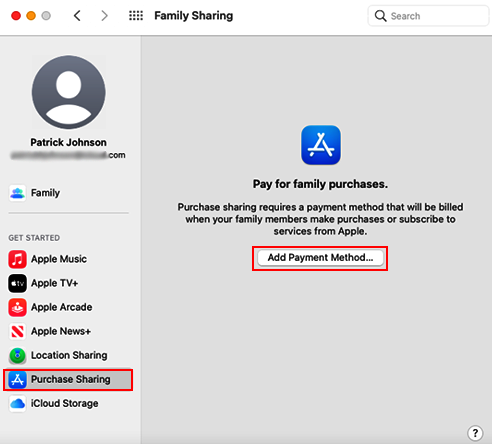
- Open the Family Sharing preferences in System Preferences.
- Select the Purchase Sharing tab shown in the following screenshot and then click Add Payment Method...:
- You might be asked to sign in again with your Apple ID.
- On the next window, click the Add Payment button:

- Next, you will be able to add a payment method, which includes credit cards and PayPal.
If you used PayPal as your payment method, you can verify it through a code you can obtain from your PayPal account by logging in and using this link: https://www.paypal.com/getcode. Once you've logged in to PayPal, you should obtain a code like the one shown in the following screenshot. You should enter this into the Verification Code field:

- Next, you will have to set up purchase sharing. While on the Purchase Sharing tab, click the Set Up Purchase Sharing... button, as shown here:

- You will be asked to confirm whether you want to use your current Apple ID for purchases or whether you want to use a different payment method, as shown here. Click Share Purchases to continue with the Apple ID displayed:

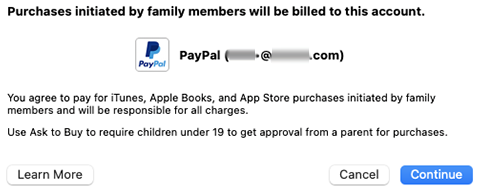
- You will then be shown the payment method that will be used for purchases that are initiated by group members. Click Continue:
- Next, you will be asked to accept the terms and conditions. Check the box to agree and click Agree.
- You will now see a confirmation dialog indicating that you are now sharing purchases. Click Done.
- And that's it! You are now ready to share and allow purchases in your sharing group.
Now that a payment method and purchase sharing have been set up, we can start sharing purchases with our group members.
Start sharing purchases
Once your members have accepted the invitations you've sent, you can start sharing your content. Perform the following steps to view shared content:
- Open the App Store (or another Apple app you want to download content from, such as Music) and make sure you are signed in with the Apple ID you're using with Family Sharing. To verify that, go to the Store menu and then click on View My Account [your Family Sharing Apple ID]....
- Go to the Purchased page. The location of this page depends on the app you are using:
- For iTunes: Click on Store. Purchased will be under Quick Links on the right-hand side.
- Apple Books: Click on Books Store. Purchased will be under Quick Links on the right-hand side.
- App Store: Click on the profile icon or your photo in the bottom-left corner, as shown in the following screenshot:
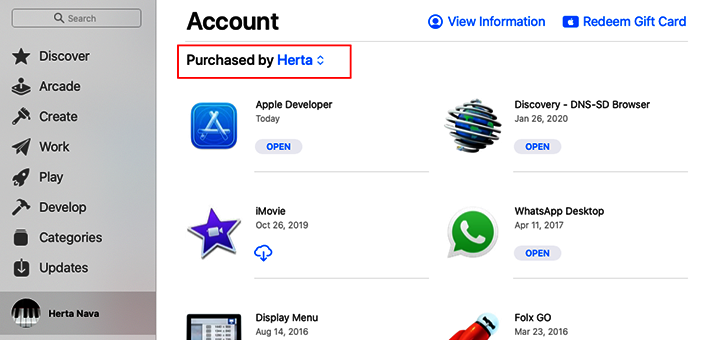
- Once you've logged in to the App Store, the family member will be able to see the content that's been shared by other members by selecting a member from the Purchased by dropdown, as shown here:

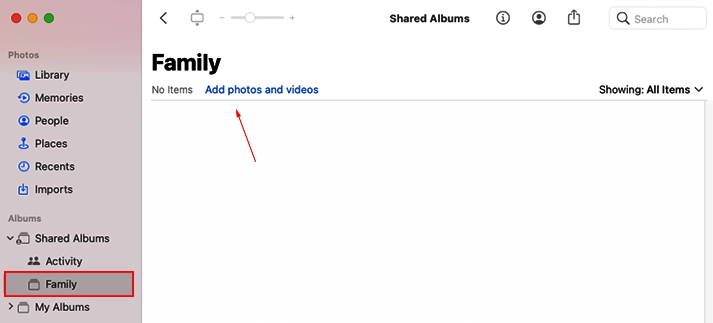
To share family photos and videos, do the following:
- Open the Photos app, tap the Albums tab in the left-hand menu, select Family under Shared Albums, and then add the photos and videos you want to share to that album, as shown here:
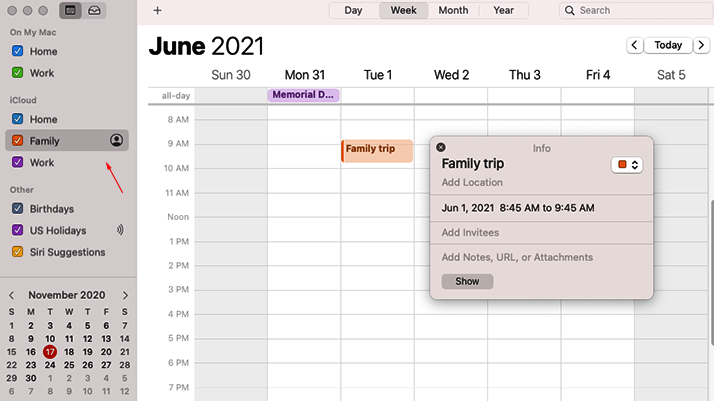
To set up the family calendar, do the following:
- Open the Calendar app and click the Family tab, as indicated in the following screenshot, to add, view, or change events and reminders in the family calendar:
If, for any reason, you don't want to share the family photo album, calendar, or reminders, you can unsubscribe from them on your Mac or also on iCloud.com.
Now that you know how to enable Family Sharing and purchases, let's explore how to disable these features.
Stopping purchases and Family Sharing
If, at some point, you realize you no longer wish to use Family Sharing or share purchases, then you can amend this.
To only stop allowing purchases, do the following:
- Open the Family Sharing preferences in System Preferences.
- Select the Purchase Sharing tab.
- Deselect the Share My Purchases checkbox:
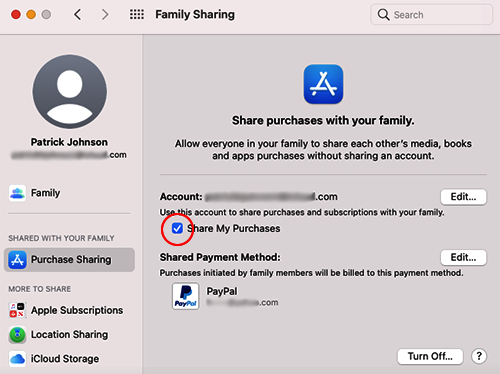
You can also stop family purchase sharing so that your group members lose access to all shared purchases and will not be able to make new shared purchases. To do this, perform the following steps:
- In the Purchase Sharing tab, click the Turn Off... button that appears in the bottom-right corner, as shown in the preceding screenshot.
- You will see a warning asking you to confirm this action. Click Stop Purchase Sharing if you are sure.
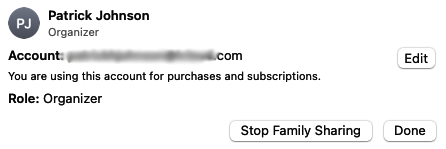
You can also disable Family Sharing altogether. Perform the following steps to do this:
- From the Family Sharing preferences page, select the Family tab.
- Click the Details... button to the right of the organizer's name.
- You will see a dialog where you can confirm the action. Click Stop Family Sharing if you are sure, as shown in the following screenshot:
In this section, we learned how to use the Family Sharing feature with groups of family members and friends. We saw how to enable it, as well as how to disable it. In the next section, we will transition from apps to documents as macOS also has many features that help make document management easier. We will cover those features next.
Managing documents
Managing documents is as important as managing apps for both administrators and users. In this section, we will review the macOS features that simplify document management for users. The features we will explore are as follows:
- Launch Services
- Quick Look
- Quick Actions
- Autosave
- Resume
- Versions
- Locking
I have divided the preceding features into two parts for your convenience, as features tend to be grouped together according to what you can do with a document before it's opened and what you can do while working with a document.
Using the Launch Services, Quick Look, and Quick Actions features
The first three features are intended to help you before you open a document. These features are as follows:
- Launch Services
- Quick Look
- Quick Actions
Let's take a look at these features.
Launch Services
Launch Services is a process that maintains a database of filename extensions and apps that can open documents with those extensions. This is how, when you double-click on a document, macOS knows exactly which app to use in order to open it.
If the application to open a specific type of file is not installed on your system, Launch Services can open the file using its built-in preview mode. Still, you can configure it to open the file with the application you indicate, which will override the Launch Services database.
By the way, macOS does not show file extensions. This is the default configuration. But if, like me, you find it useful to see the extensions since they help you identify the app the file should be opened with, you can configure that via the Finder Preferences:
- In Finder, go to the Finder top menu, and then select Preferences....
- Go to the Advanced tab and activate the Show all filename extensions box, as shown here:

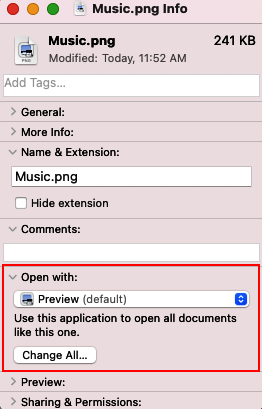
Bear in mind that this is a global setting; therefore, it will apply to all files. If you want to see extensions on a per-file basis, instead of using the previous procedure, select the file that you want to see the extension for and then open the Info window by pressing Command + I. You will see an option to hide the extension. Deselect it. You will now see the extension just for that file, as shown in the following screenshot:

Now, if you want to change which app a specific file will open with, you can do so from the same Info window. You will see that there is an Open with: section, as shown in the following screenshot. From the drop-down menu, you can select the application you want to use to open that file. Bear in mind that this change is permanent unless you change it back again via the same method:
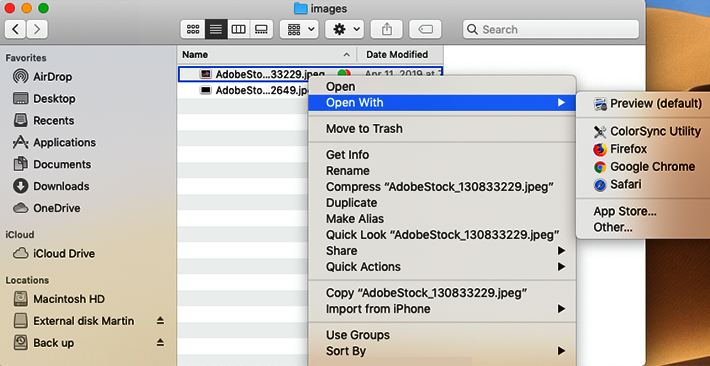
If you don't want this action to be permanent, you can use another per-file method. This can be achieved through the contextual menu. Right-click on the file and choose the Open With option, as shown here:
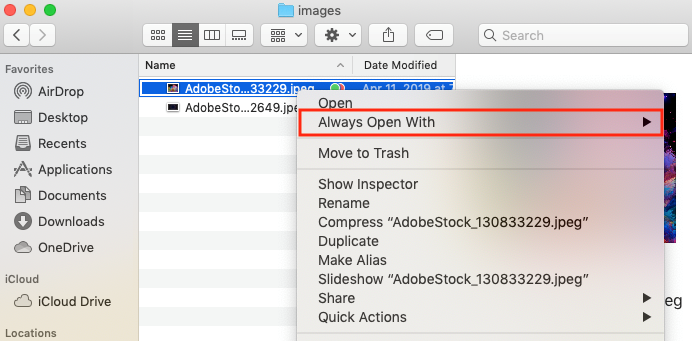
If you want the change to be permanent for this file, select the file while holding down the Option key to reveal the Always Open With option, as shown here, and save the change to the file's metadata:
You can also apply the change to all the files with that extension. For that, click the Change All button when you are presented with the warning prompt.
Now, let's examine the next feature, which allows you to preview many types of files.
Quick Look
This is a technology that, with the help of plugins, enables you to preview files of nearly any type without having to open the application. The application doesn't even have to be installed in order for this feature to work. The plugins that make this happen are located in the Library folders.
However, previewing files is not all you can do with this feature. You can also edit, mark up, or annotate these files without ever opening another application.
The plugins included by default in macOS allow you to preview and edit the following types of files:
- Audio and video that can be opened in QuickTime
- Graphic files (including digital camera files), as well as PDF, EPS, JPEG, and PNG files
- Text/script files
- Microsoft Office files
- Pages, Numbers, and Keynote files
- Internet files, such as web files and iChat transcripts
The apps that support this feature are as follows:
- Finder
- Time Machine
- Most open-and-save browser dialogs
- Printer queues
- Any application that supports Quick Look
To use the Quick Look preview feature, all you need to do is select a document and press the Space bar.
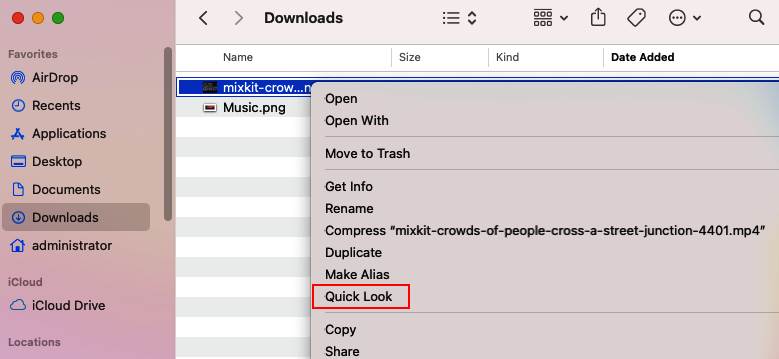
Another way to use the Quick Look preview feature is by right-clicking on the document and selecting the Quick Look menu option, as shown here:
To quit the Quick Look window, press the Space bar again or click the Close button.
The Quick Look technology is also used in other macOS features, such as the icon views in the Finder and the inspector or Info window:
- When multiple files are selected, you can navigate those files with the arrow keys near the top-left of the window or press the Left Arrow and Right Arrow keys.
- If a document has several pages, you can also navigate down.
- When Quick Look is engaged, you have other options you can use from the title bar menu, such as opening the item and using the share button. The sharing options will depend on the type of file, as well as other settings.
- As we mentioned earlier, you can perform several useful actions on a file with Quick Look engaged; these are called Quick Actions, which we will see in the next section.
Next, let's explore the last feature in this group; that is, Quick Actions.
Quick Actions
This feature allows you to perform quick actions on a selected file. The built-in actions that are available will depend on the type of file you're looking at. You can use the Quick Actions feature either with Quick Look engaged or without it being engaged:
- If Quick Look is engaged, the actions are available from the title bar menu.
- If Quick Look is not engaged, the actions will be available when you right-click on the file and select Quick Actions from the contextual menu.
- Quick Actions can also be used when you're viewing a file in Column or Gallery mode. In the following screenshot, the photo is being viewed in Gallery mode, and we can see the Quick Actions in the right panel, below the file details.
Here are the built-in actions that are available directly from the Finder:
- Rotate (image or movie)
- Mark up (document or image)
- Trim (movie or audio)
- Customize:

Let's learn how to use these options:
- To rotate a file, click Rotate Left. By default, you can rotate to the left, but if you press the Option key, you will be able to rotate to the right.
- To mark up an item, click the Markup button.
- To trim an audio or video file, perform the following steps:
- Click the Trim button, and then drag the yellow handles.
- To see a preview of your changes, click Play.
- Click Revert to restore your original version.
- Once you're satisfied with the changes, click Done to save them and choose to replace the original file or create a new one.
- Customize: This option appears when you click on More.... With this option, you can open the Extensions preferences and choose which Quick Actions will appear in the Finder's preview pane.
The next set of features are useful when you are already working with documents, as we will see next.
Using the Autosave, Versions, Locking, and Resume features
This section is concerned with another set of features that are useful for automating actions when you're working with documents. These features are as follows:
- Autosave
- Versions
- Locking
- Resume
Let's learn how to use each of these features in more detail.
Autosave
The Autosave feature allows certain apps to save a file when changes have been made. A user working on a document with this feature enabled only needs to save the document once; the rest of the time, it will be done automatically.
You can identify an app that supports autosave when it has the following options in its File menu:
- Duplicate
- Rename
- Move To
For example, if you open the Preview app and examine the File menu, you will notice that it has a Duplicate option instead of Save as..., and that it also has the Rename and Move To options.
Some apps in macOS, such as Photos, iTunes, and Preview, already use this feature by default because using autosave with these apps is very natural. Some of the applications that support this feature are TextEdit, Pages, Numbers, and Keynote.
When you create a new document with TextEdit, for example, when you want to close the document or quit the application, you will be asked whether you want to save the changes. You must choose the location and save the document the first time this happens. After that, the document will be saved automatically when you make a significant change, close the application, select the Finder, or attempt to access the document from another app. Also, if you are working on a document for a long period of time, without pausing, it will be saved every 5 minutes.
However, you should know that you can also use Save as.... by pressing the Option key to reveal it in the app's File menu.
If you have saved the original document at least once, when you use the Save as.... option, and you have made changes, you will be asked whether you want to apply the changes to the original document as well.
The duplicate option will create a copy of the same document in the same location, but with the word Copy appended to the name. It is useful to keep a copy of the original file without modifications and to make changes to the duplicate file.
If you don't feel comfortable using autosave, or if you prefer to save the file yourself, this feature can be disabled in System Preferences, in General Preferences, by selecting the Ask to keep changes when closing documents option (Figure 10.66).
The next feature we will explore is related to autosave, and allows the use of versioning.
Versions
The Versions feature works in combination with Autosave. Apps that support autosave also support document versions. This feature allows you to revert to any previously saved version of the document easily.
What's interesting about this feature is that you can navigate to a version of the document and restore the whole version or insert just sections of the document into its latest version.
To revert to a previous version of the document, just go to the app's File menu, and then select Revert To, Last Saved, or Last Opened.
You can see the whole history of a document by going to the app's File menu, selecting Revert To, and then choosing the Browse All Versions option. The interface you will see will be very similar to that of Time Machine. You will see the current version on the left side, and on the right-hand side, you will see the previous versions. You can use the arrows to scroll up or down the versions, or you can click directly on the date of the version you are looking for:
- Once you have found the version you are looking for, just click Restore.
- If you want to restore just a section of the changes, select the section, copy it, and paste it into the current version.
Locking
What this feature does is prevent a document from being changed or from autosaving unwanted changes. A locked document or folder cannot be moved, modified, or deleted. Any app that supports autosave can use the Locked feature.
To use this feature, select the document you want to lock and open the Info window. Next, select the Locked checkbox. We explored how to use this file flag in Chapter 7, Understanding Ownership and Permissions.
When a document is locked, you will see a warning that will suggest duplicating the file to create a new copy that you will be able to modify while keeping the original unchanged.
When a document is locked, this is indicated in the title bar, as shown in the following screenshot. You can also lock/unlock a document from the title bar:

Let's now examine the last feature in this group.
Resume
The Resume feature allows applications to be reopened automatically when you log out or shut down your computer, either on purpose or because of a power failure. When an application quits for these reasons, not only are any opened documents automatically saved, but the application's state is also saved. When the Mac is restarted, or the user logs back in, it returns to how the user left it when it was quit, including documents or windows being restored – even the position of where you last scrolled to on a window.
This feature is enabled by default on macOS for logging out actions. If you wish to disable it, you can do so by deselecting the Reopen windows when logging back in checkbox in the dialog that appears when you're logging out, as shown here:

You can also configure this from System Preferences by going to the General Preferences menu. If the Close windows when quitting an app checkbox is selected, as shown in the following screenshot, open documents and windows will not be restored when you reopen an app or log back in:

Finally, if the option is disabled, you can temporarily enable this option by holding down the Option key when logging out. In this case, it will only work the next time you log back in.
In the final section on managing documents, we will learn how to take advantage of iCloud so that you can have access to your documents from any device.
Using documents in iCloud
iCloud Drive is a storage and access solution that is part of the iCloud tools, available since OS X Yosemite. Documents saved in iCloud Drive remain available and up to date across all of your devices.
This is what iCloud Drive allows you to do:
- You can keep files and folders up to date across devices: iPhone, iPad, iPod touch, Mac, or PC, and iCloud.com.
- You can create new files and folders from apps using iCloud.
- You can work on a single file across multiple apps.
- You can access files from your Mac desktop and Documents folder.
- You can share files with anyone.
To enable iCloud Drive, you require the following:
- Your device should be updated to the latest macOS or iOS version.
- You will need to set up and enable iCloud on all of your devices.
- You will have to be signed in to iCloud with the same Apple ID on all of your devices.
- To access iCloud Drive from a Windows PC, make sure you have at least Windows 7 or later. You will need to download iCloud for Windows from this link: https://support.apple.com/HT204283.
You can store any type of file in iCloud Drive, provided that it is 50 GB or less in size. However, Apple recommends that you don't store app folders, libraries, or .tmp files. Also, make sure that you are not exceeding your iCloud storage limit. When you first set up iCloud, you automatically get 5 GB of free storage. If you need more space, there are plans that you can access for a fee to increase your storage limit.
Perform the following steps to set up iCloud Drive on your Mac (this procedure may vary, depending on the macOS version you're using):
- If you aren't already, sign in with your Apple ID.
- Open System Preferences and then click on the Apple ID icon.
- Select the iCloud tab and activate the iCloud Drive checkbox, as shown in the following screenshot:

- You will see an Options button appear beside iCloud Drive. Click on it, and then select the apps whose files you want to sync in iCloud Drive, as shown here:

Also, when you have iCloud Desktop & Documents enabled on one Mac and you then enable it on another Mac, the Desktop & Documents content on the other Mac computer will be moved into subfolders in the iCloud Desktop & Documents folder. For example, if you add a second Mac called Mac2 to iCloud Desktop & Documents, you will have a folder called Mac2 with a subfolder called Desktop, along with another subfolder called Documents, in the iCloud Desktop & Documents folder.
If you disable iCloud Desktop & Documents on your Mac, the items will be moved to a subfolder in iCloud Drive, and a new local empty desktop and Documents folder will be created in the local user account. If you want to copy your files to the new empty folder, you will have to do so manually.
And with this section on iCloud documents, we have reached the end of this chapter. Be sure to check out the summary for a quick recap on what was covered.
Summary
In this chapter, we explored a variety of supported macOS environments, including native macOS, universal binary, Unix, and open source-based app environments. We saw what happens with 32-bit apps in the latest versions of macOS. Then, we saw how to use the App Store and create an Apple ID to make the most of its features. In the following section, we saw how to install and manage apps, including app extensions. Next, we discovered how to share apps with family members and friends through a feature called Family Sharing. Finally, we looked at multiple features, including Quick Look, Quick Actions, Autosave, Versions, Locking, and Resume, that macOS offers to manage documents quickly and efficiently, including syncing your documents across devices through the use of iCloud Drive.
Now that you have finished this chapter, you are fully equipped to manage apps and documents, and also take advantage of all the features macOS provides you with in order to do so thoroughly and efficiently.
In the next chapter, we will examine the backup and archiving options in macOS, including Mac's proprietary tool, Time Machine.