
Ownership and permissions in macOS control authorizations to access filesystem resources. In other words, they control which users have what kind of access to which resources.
In this chapter, you will learn how macOS manages ownership and permissions, and how access rights priorities are assigned according to macOS's main policy. Also, you will learn how to manage file and folder access through the tools macOS provides. Finally, you will explore the options for sharing files through the default sharing folders available in the macOS filesystem.
By the end of this chapter, you will be able to describe file ownership and permissions in macOS, manage file and folder ownership and permissions and use the macOS default sharing folders effectively to share resources with other users.
This chapter is divided into three main topics:
- Understanding ownership and permissions
- Managing access and ownership
- Using macOS shared folders
Before we start, let's look at the technical requirements for this chapter.
Technical requirements
This is what you will need for this chapter:
- Basic knowledge of the macOS environment
- A Mac computer with administrator privileges
Understanding ownership and permissions
We need to review a few concepts to clearly understand how ownership and permissions are managed in macOS. More specifically, we need to understand what permissions and ownership are, the types of permissions macOS uses, and how they work in macOS. At the end of this section, you will be able to describe the macOS permissions and ownership model.
In this section, we will explore the following topics:
- What are ownership and permissions in macOS?
- Access Control Lists (ACLs)
- Access hierarchical rules
- File flags
- macOS's filesystem security policy
Let's begin by understanding what ownership and permissions are in the context of macOS.
What are ownership and permissions in macOS?
A "permission" is the granted right to perform an operation, which can vary from executing code to accessing certain data or resources, such as files and folders. macOS uses a combination of the UNIX ownership and permission model, POSIX Access Control Lists or ACLs, BSD file flags, and other features such as ownership verification.
In macOS, the permissions that can be applied to files and folders are as follows.
Permissions that can be configured from the Finder for the file level are the following:
- Read & Write: Users/groups can open, read, and modify files.
- Read only: Users/groups can open and read files but cannot modify them.
- No access: No access of any kind is allowed to the file.
Permissions that can be configured from the Finder for the folder level are as follows:
- Read & Write: Users/groups can explore the contents of the folder and modify its contents (add, edit, remove files).
- Read only: Users/groups can explore the contents of the folder, but they cannot make any changes.
- Write only (Drop Box): Users/groups are not allowed to explore the Dropbox folder, but they can drag, copy, or move items to it.
- No access: No access of any kind is allowed to the folder.
"Execute," the UNIX permission that allows executing a file, is assigned to folders when read access is granted, but it cannot be modified or configured through the Finder. This permission can only be managed by administrators through Terminal.
At the same time, the permissions we just described are applied to users based on a structure of three types of POSIX-style ownership tiers that define specific privilege rules. All files and folders have a permission level assigned to these ownership tiers, which are the following:
- Owner
- Group
- Everyone
This ownership model is common on UNIX systems, and it relies on the principle that every file and folder belongs to at least one owner and one group. Let's look at each of the three types of ownership tiers in more detail:
- Owner: By default, the owner is the user who created (or copied) an item. Users usually own all the items in their home folders. On the other hand, the "root" user owns items such as resources and applications.
- Group: An item inherits the group permissions from the folder it was created in. The group tier includes all users that are not owners of a specific item. There are three main groups of ownership already configured by default in macOS; however, you can add your own groups, which you create in the User & Groups preferences. You can explore Chapter 4, User Accounts Management, to review how. The groups that exist in macOS by default are the following:
-
- staff: Local users belong by default to this group, including administrators.
- admin: Administrators belong to this group.
- wheel: There is only one member of the wheel group: the root user. Most system resources and application items belong to the wheel group as well.
- Everyone: At the same time, each of the files and folders has a setting for everyone else who is not an owner. In other words, any user (local, sharing, guest) who is not an owner or does not belong to a group belongs to the Everyone tier.
Apart from the preceding ownership tiers, we have what are known as Access Control Lists or ACLs, which provide a filesystem ownership and permission structure with more flexibility and customization options.
Access Control Lists (ACLs)
In macOS, POSIX Access Control Lists (ACLs), or rules, are added to expand the standard UNIX ownership and permission model described earlier in order to have more flexibility and customization options for fine-grained access. In a nutshell, ACLs are a set of permissions or rules applied to a specific user or a group. These rules define the type of access (view, read, write) to folders and files for every administrative, standard, guest, and sharing user. At the same time, permissions in macOS can be granted at various levels, such as directories, subdirectories, files, applications, and even specific pieces of data.
This is very useful when you have departments in an organization. For example, you could create a Sales Department group and define a set of permissions for specific folders for that department, and a Marketing group with another set of permissions for that department.
If an ACL rule is defined for a user or group, this rule has precedence over the standard UNIX permissions. You will see the order of precedence a little bit later in this chapter. But now, let's see the types of permissions that can be configured in macOS and how they work in a hierarchical fashion.
Access hierarchical rules
Permission rules are applied hierarchically; that is, they are applied to a folder hierarchy structure. They are very effective, yet they provide a lot of flexibility since they allow users to have individual access permissions to every folder and file in the system. In that sense, they can also be quite customized and complex.
In summary, access to a resource is based on the following two factors:
- The item's permissions and ownership
- The permissions and ownership of the folder where the item resides
Let's look at some examples to better understand how this works in a real context.
Case 1
- We have a folder that belongs to the staff group.
- This group has Read & Write permissions for this folder.
- We have two files inside: one has Read & Write permissions, the other has Read only permissions.
With these permissions enabled, staff members can do the following:
- Explore the folder and make changes to it, that is, add, remove, or edit files.
- Read, and edit the file with Read & Write permissions.
- Open and read the file with Read only permissions, but not make changes to it. However, since they have Read & Write access to the folder where this file resides, they can copy, move, rename, or delete the file. Therefore, this file is not secure simply because it is Read only since the higher permissions at the folder level allow tampering with it. In fact, users could copy the file's contents in another file, and since they have full permissions for the folder, they could replace the file.
Case 2
- We have a folder that also belongs to the staff group.
- This group has Read only permissions on this folder.
- We have two files inside: one has Read & Write permissions, and the other has Read only permissions.
So, staff members can do the following:
- Explore the folder, but they cannot make any changes to it, such as adding, deleting, or editing files.
- Make changes to the file that has Read & Write permissions, but they cannot move it, copy it, rename it, or delete it because of the Read only permissions for the folder. However, users could delete the file contents and leave it blank because of the Read & Write permissions.
- View the file with Read only permissions. They could copy the file to another folder, but they wouldn't be able to replace it in the folder because of the Read only access; modifying this file is not possible.
These two cases are just an example of the possibilities, and sometimes complexity, that permissions offer in this model.
Now, besides permissions and ACLs, macOS uses other resources that also help manage access to items: file flags. In the next section, we will examine a practical case where file flags are used to control access.
File flags
macOS supports file flags, which are intended to override UNIX permissions in very specific situations. These file flags allow controlling access at a per-file level. They are very useful when permissions are assigned to a folder recursively, for example, but you want a specific file to be excluded from those permissions and to have its own, more restrictive access.
Let's consider this scenario:
- We have a folder with two files that belongs to the staff group.
- The folder has recursive Read & Write permissions.
- Because permissions are recursive, the two files in the folder have Read & Write permissions, but a lock flag has been enabled on the second file.
So, staff members can do the following:
- Access and modify the folder and the first file.
- Although the second file, and the folder where this file resides, have Read & Write permissions, users cannot make any changes to this file, nor at the folder level, nor the file level. They cannot edit it, nor move it, or delete it.
What happened in this case?
The file owner enabled the locked attribute for the second file. This flag prevents any user who is not the owner of that file from editing, moving, deleting, or renaming it until the owner clears the flag. The only one who can perform any modifications to the file is the owner. Actually, the owner could even delete the file, even if it was still locked.
The file could be copied to another folder, at which point the user who copied it would become the new owner and could disable the file lock, but the original file would still be locked, and it wouldn't be possible to replace it with this new, unlocked version.
macOS currently allows the use of the "locked" file flag only through the user interface. Other flags can be used in macOS, but that would require the use of Terminal.
To enable the locked file flag, follow these steps:
- Open the Finder and select the file you want to lock.
- Press Cmd + I to open the Inspector window.
- Enable the Locked checkbox circled in red in Figure 7.1:

Now that you know how file flags work in macOS, it is important to examine the macOS filesystem security policy, which details exactly how access rights are determined in the context of permissions and ACLs. In the following section, we will see the priorities determined by the application of this policy.
macOS's filesystem security policy
In macOS, the determination of access rights depends on UNIX permissions, which include the file flags and POSIX Access Control Lists described earlier. In addition, the macOS File System Security Policy determines which access rights (or ownership calling requests) have precedence in complex permission and ownership scenarios. The policy checks the following in order to grant or deny permission to a resource:
- If the application’s sandbox does not allow access, then the request is denied.
- If ownership checking is disabled for the volume, the request proceeds.
- If there is an ACL set for the file, it is evaluated to determine the access rights.
- If there is a file flag that denies access, the request is denied.
- If the user ID matches the owner of the file (the “user” or "owner" permissions), then those permissions are used.
- If the group ID matches the group for the file, then the “group” permissions are used.
- Otherwise, the “other” permissions are used.
In Figure 7.2, we can see a graphical representation of these priorities:

In this section, we saw what ownership and permissions in macOS are, how Access Control Lists or ACLs help to add flexibility to the UNIX model, how hierarchical rules work, how we can use file flags to restrict access at a per-file level, and the priorities the macOS File System Security Policy uses to grant or deny access to a resource. This information will help you manage ownership and permissions to customize access to your macOS resources if needed.
In the next section, we will see how to manage permissions and ownership using the tool available for all macOS users for that purpose, the Finder.
Managing access and ownership
In this section, you will learn how to verify an item's ownership and permissions and manage access and ownership to customize permissions according to your specific needs. The topics we will cover are the following:
- Verifying an item's ownership and permissions
- Changing an item's ownership and permissions
- Ownership in non-system volumes
- Granting and changing permissions
- Deleting permissions
- Permission customization examples
Let's begin by learning how to verify an item's ownership and permissions.
Verifying an item's ownership and permissions
In macOS, the Finder is the tool that lets you verify an item's ownership and level of permissions. It does this by displaying a secondary window called the Info or Inspector window, shown in Figure 7.1, which allows you to inspect the information regarding an item's owner, the groups it belongs to, and the permissions granted. The Info window provides a lot of information about a file, but we will only focus on the section related to ownership and permissions in this chapter.
There are several ways to display the Info window. With the item you want to inspect selected in the Finder, you can do the following:
- Press Cmd + I.
- Go to File in the menu and select Get Info.
- Use the secondary click to select the Get Info option.
This tool can also be used in Dynamic Inspector mode, which lets you inspect items dynamically. This means that if you select another item in the Finder, the Inspector window will change to show the new item's information, without having to close the Inspector window.
To use the Dynamic Inspector feature, do the following:
- Select an item in the Finder and press Cmd + Option + I.
- Select another item in the Finder, and the window will dynamically change to reflect the new item's info.
The ownership and permissions info is shown at the bottom of the window, in the Sharing & Permissions section, as seen in Figure 7.3:

This is how you should interpret the information you see:
- In the Name column, you will see the list of users and groups with access to this item. Remember, we said that all files and folders have permissions granted to the three ownership tiers by default: owner, group, and everyone.
- The Privilege column lists the permissions associated with ownership tiers listed in the Name column.
- The user at the bottom of the users list, before the groups, displayed in a circled icon (macOS Big Sur), is the item's owner. In Figure 7.3, hertanava (Me) owns this item and has Read & Write permissions.
- Other users are displayed with single-user icons. In the example, patrickjohnson is a user added to the permissions list with Read only access to this item.
- The groups that have access to this item are displayed with a two-user icon. In the example, there is only one group, the staff group, that has Read & Write permissions for this item.
- Every resource has a setting for everyone, which is displayed with a three-user icon. In this case, everyone has Read & Write permissions on this item.
The item's owner can change the item's permissions, but only administrators can change both an item's ownership and permissions. We will explore that next.
Changing an item's ownership and permissions
The default ownership and permissions settings are, in most cases, enough for any standard user. Although you might never feel the need to change them, you can do so from the Finder's Info window. For example, you might want to change who owns a specific item for security reasons or add an additional user and grant them permission to access an item for easy collaboration.
The user who created an item is usually the user who owns it. Take into account that to change permissions of items you don't own, you need administrator privileges. In the case of ACLs, the Finder only allows limited configuration options. If you need more complex permissions and ACLs, you can use Terminal.
To change an item's owner, follow these steps:
- Select the item in the Finder and open the Info window.
- Click the small lock icon in the lower-right corner (Figure 7.4).
- Enter your credentials to authenticate as an administrator, if necessary.
- You will need to add the user as an entry in the permissions list if it's not already in it. For that, click the Add (+) button in the lower-left corner (Figure 7.4). You can select a user already on the list of users or create a new user with the New Person button (Figure 7.8). By default, new users will be added to the list with Read only permissions, as you can see in the case of patrickjohnson in Figure 7.4:

- For this example, let's assign ownership of this item to patrickjohnson, who has already been added to the Name column.
- To make him the owner of this item, select him in the list, click the small gear icon at the bottom, and select Make "patrickjohnson" the owner, as seen in Figure 7.5:

- At this point, the new owner will move to the bottom of the users permissions list, and its icon will change, as you can see in Figure 7.6:

Notice that, although patrickjohnson is now the owner, he still has Read only permissions, but since he's the owner now, he will be able to change permissions for this item for any user without having to authenticate as an administrator. We will see how to change that in the Granting and changing permissions section.
The changes will be applied immediately, but as long as you keep the Info window open, you will be able to revert the ownership configuration by clicking the gear icon at the bottom of the window and choosing Revert changes (Figure 7.5). This option is useful if you made a mistake or if you want to test different configurations to see their effect on an item. Take into account that this is not an "undo" type option; it will revert to the original configuration in effect when the Info window was opened.
This ownership configuration we just customized works in resources in the system volume. But what happens if I want to extend the configuration to non-system volumes? This is what we will look at in the next section.
Ownership in non-system volumes
Many users still use external disks for file storage and transfer. However, most computers cannot identify ownership on those devices because they don't use the same user account database. This means that when a disk with files created on a Mac is used on another Mac, the second machine will not recognize the file ownership those files had on the first Mac. The default behavior of macOS for non-system volumes (internal or external) is to ignore the ownership of those disks to facilitate access. This is true, even if the user is exploring a volume that they did not mount initially; they will still be able to explore the volume. The only way ownership would be recognized is if you had a centralized network of users where all the Macs in your network share the same user database.
However, administrators can change this behavior and force macOS to recognize ownership in non-system external and internal volumes. To do this, follow the steps given here:
- Open the Finder, and select the non-system volume for which you want ownership to be recognized. Open the Info window for that volume.
- Next, click the lock at the bottom of the Info window to authenticate as an administrator.
- Next, you will see that the Ignore ownership on this volume checkbox is selected by default, as shown in Figure 7.7. Deselect it to change the behavior for that volume:

Let's now discover how to add additional permissions using the Finder and the Info window.
Granting and changing permissions
Granting new permissions would be necessary if you wanted to allow access to specific files and folders to additional users or groups for easier collaboration.
If you want to grant new permissions for a user or a group, follow these steps:
- Select the file you want to grant permissions for, open the Info window, and click the Add (+) button, as shown in Figure 7.4.
- A window will appear to allow you to search and select a user or group from the list. At this point, you will have the choice to create a new user as well. Take into account that using the New Person button will create a new sharing-only user account, the same way you would create it from the Users & Groups preferences.
- Click the New Person button to create a new sharing-only user or select a user from the Users & Groups list or a contact from your Contacts list. For this example, let's choose John Adams from the Users & Groups list and click Select:

- The new user in the list, John Adams, is added to the list with the default Read only permissions.
- To change the permissions, click on the Read only privilege for johnadams and select an available permission such as Read & Write, as shown in Figure 7.9:

- Once that is done, the list will reflect the new privileges for johnadams as Read & Write.
And that's it! You have successfully added a new user and granted them permission to an item.
Notice that the actions in the preceding example were performed without having to authenticate and with the lock engaged. This is because the user making the changes is the owner of this item. If I weren't the owner of this file and tried to change the permissions, I would get an error message like the one shown in Figure 7.10:

So, you see how adding permissions is very easy through the tools macOS provides. Deleting permissions is even easier, as we will see in the next section.
Deleting permissions
You might want to delete permissions to increase the security for certain sensitive items or remove permissions from users and groups that don't really need access to those resources.
Deleting permissions granted to a user or a group is straightforward. Just select the user or group and its permission or privilege from the list under the Sharing & Permissions section in the Info window and click the delete button (-) in the lower-left corner. If you are not the owner of the file, you will need to authenticate as an administrator.
When deleting permissions, take the following into account:
- You cannot delete the original owner of an item through the Info window.
- You cannot delete the everyone group permission through the Info window.
- To delete the staff group, you will need to authenticate as an administrator.
So far, we have seen how to add and delete permissions. In the next section, we will explore how to change permissions for items for specific scenarios.
Permission customization examples
Permission customization depends on the levels of sensitive information you have on your computer or network and the policies that secure that information. This chapter does not intend to cover those possibilities as there are many and they are beyond the scope of this book. But we'll describe the essential details so that you understand the tools to manage those permissions individually or in an enterprise setting.
macOS is pre-configured in a way that files and folders are normally secure for file and folder sharing. This means most users will never feel the need to change permissions. However, there are scenarios in which it is important to consider permission customization, especially with shared computers and shared environments.
The first detail to consider is that, to facilitate access, all new files and folders are created with Read only access for other users who are not the owners. This is of particular importance when users place items in the root of their home folders or if an administrator places an item in the root of the system volume, the local library, or the Applications folders. Although it is not a good practice to place items in those locations, if for any reason you or anyone else does, you should be aware of the default read-only access to those items.
Here, we will use two scenarios to exemplify how customization can help improve the security and privacy of certain resources. The first shows how to restrict access to an item, and the second, how to propagate folder permissions.
Example 1: Restricting access to an item
In this first scenario, we will discover how to restrict access to an item.
Let's place a file in the root of a user's home folder. We have seen earlier that users, even guests, can browse other users' home folders. Therefore, this file placed in the root of the home folder can be seen by all users. Let's change its permissions so that only the owner can see it.
For the first scenario, we will follow these steps:
- Select the file placed in the root of the user's home folder for which you want to change the permissions.
- Open the Info window, and scroll down to the Sharing & Permissions section.
- Start by removing all users and groups from the permissions list through the delete button (-) circled in red in Figure 7.11 (except for the original owner, who cannot be removed).
- To delete the staff group, you will need to authenticate as an administrator by clicking the lock icon at the bottom right.
- You will notice that you cannot remove the everyone group. This is because this group needs to be able to browse through the home folder to access the shared folders. But, you can restrict access to the file. To do so, change the file's permission setting to No Access, as shown in Figure 7.11:

And that's it! You have secured a file by customizing the permissions to restrict access to it. Now, only the owner will be able to see it and modify it.
In the next example, we will look at a second practical scenario.
Example 2: Propagating folder permissions
In this second scenario, we will discover how to propagate permissions granted to a folder to all files in it.
For this example, we will choose the Pictures folder.
First, let's change the folder's permissions:
- Select the Pictures folder and open the Info window. As mentioned earlier, you will notice that the permissions for the everyone group are Read only.
- Change the everyone permissions to Read & Write. You will notice that despite having changed the folder's permissions, the items inside still have the Read only permission for the everyone group. This is because permissions changed through the Info window do not propagate to the items inside the parent folder.
Follow the steps indicated here to propagate permissions applied to a folder to the items in it. Take into account that to do that, you will need administrator privileges:
- Change the Pictures folder permissions for everyone from Read only to Read & Write.
- Next, click on the lock icon at the bottom to authenticate as an administrator, if you've not already done so.
- Click on the gear icon at the bottom and select Apply to enclosed items... as shown in Figure 7.12:

- Also, take into account that this action is not easily reverted. This is why, at this point, you will see a warning before accepting this action (Figure 7.13). Click OK if you are sure this is what you want to do:

- Now, if you open the Pictures folder, you will be able to verify that the folder's permissions for the everyone group have been propagated to the items in it.
This section concludes our learning about managing ownership and permissions. In the next section, we will see how we can easily share files through the folders provided by default in the macOS filesystem and the permissions that allow this.
Using macOS shared folders
Sharing files with other users is a big part of our daily work as Mac users. As we saw in Chapter 6, The macOS File System: Disks, Volumes, and Partitions, there are folders in the default macOS filesystem that you can use to share files. Learning to use these folders will save you a lot of time when sharing resources among users on the same Mac or a network. By the end of this section, you will understand how these folders work, and you will be able to use them effectively to share resources.
Three folders are intended for file sharing in macOS:
- Public
- Drop Box
- Shared
Let's examine how they work.
The Public and Drop Box folders
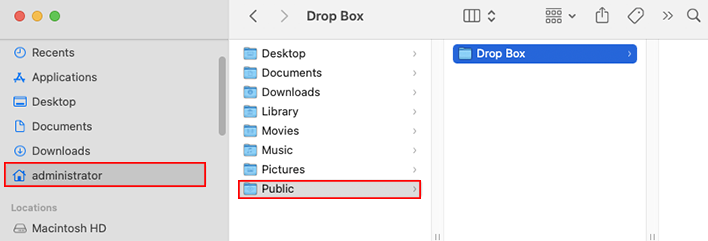
The Public folder is located in every user's home folder. The Drop Box folder is located inside the Public folder, as shown in Figure 7.14.
These are the two premises you need to take into account to use these two folders:
- Other users can view the contents of the Public folder, even users who connect remotely can see what's in this folder, but they cannot add items or make changes.
- Other users can add files to the Drop Box folder, but they cannot see its contents. Once a user "drops" a file in that folder, only the owner of that home folder will be able to recover it. In other words, it's a folder for other users to "drop" files for you (the owner of the home folder) to recover.
Let's examine the permissions of the Public folder. As you can see in Figure 7.15, this folder has Read only access for the staff and everyone groups. This means other users can read (explore) that folder. They can browse the contents of that folder, but they cannot place any files inside it. If I were an administrative user, I could authenticate and place files in it. However, any files placed in a user’s Public folder can be read by all Mac users but edited or deleted only by the file owner:

Now, let's examine the permissions for the Drop Box folder located inside the Public folder from the perspective of the home folder owner, Patrick Johnson. As you can see in Figure 7.16, it has a custom permission: Write only (Drop Box) for the everyone group. This means other users can write (drop items) to that folder. Also, notice there are two entries for the owner, patrickjohnson: there is a Read & Write permission, and there's a Custom ACL setting for this folder, which allows the owner of the home folder to have full access to the items in this Drop Box folder. The files created or copied into Drop Box are owned by the user who created or copied them, even if they are in another user's home folder.:

If another user, such as John Adams, would like to drop items for Patrick, they can browse the system folder to locate the Public and Drop Box folders from the root of the system volume (Macintosh HD), as seen in Figure 7.17:

Since John doesn't have Read permissions, he cannot see the folder's contents. But he has Write only (Drop Box) permissions because he is part of the staff group, so he can drop files for Patrick.
Also, notice that all other sub-folders in Patrick's home folder have a red icon, which means other users cannot access them.
Now that you understand how to get the most out of these two sharing folders, let's look at another folder that helps us share in macOS, the Shared folder.
The Shared folder
The Shared folder is another folder provided by the macOS folder filesystem structure to share files. This folder is located in the Users folder, and users can browse to it from the root of the system volume (usually Macintosh HD), as shown in Figure 7.18.

But there is something different and unique about this folder. If we examine this folder's permissions, in Figure 7.19, we can see that the owner of this folder is the system user, the everyone and wheel groups have Read & Write permissions, and there is no staff group in the list. This is an excellent example of custom permissions. Moreover, this folder has a permission configuration called "sticky bit," which prevents users from deleting any items they don't own. Only the user who owns the item is allowed to delete it. Take into account that sticky bit permissions can only be managed from Terminal.

As you can see from the permissions in Figure 7.19, everyone has Read & Write permissions, which means users on the Mac can access and recover files placed in the Shared folder, without the restrictions of the Public and Drop Box folders, but only the original owner can edit or delete a file placed in this folder.
And with this section on sharing through the default folders provided by the macOS filesystem, we conclude this chapter about ownership and permissions. Be sure to check the following summary to recap what we have learned here.
Summary
In this chapter, we understood how ownership and permissions work in macOS, how we can manage them, and how to use the folders provided by macOS for sharing files.
After reading this chapter, you should feel comfortable with understanding how ownership and permissions work in macOS, and be able to describe the types of permissions and ownership tiers used. Also, you will now understand how ACLs provide more flexibility to the permissions model and how to use flags, such as the "locked" flag, to restrict access to specific items. You can now manage items' permissions and change their ownership, as well as make ownership in non-system disks be recognized. Finally, you should be able to take advantage of the macOS shared folders to share files with other users effectively.
In the next chapter, we will explore system resources and shortcuts, including system resources such as preference files and fonts, and shortcuts such as aliases.