
The command line is an advanced and powerful way to interact with macOS without the use of the GUI. Although most fundamental administrative tasks can be done using the macOS GUI, sometimes it can be more practical to execute them through the command line. Some advanced administration tasks can only be executed through this tool.
The macOS command-line tool is based on the Unix operating system. Take into account that there are hundreds of Unix commands; there's a lot you could do! However, in this chapter, we will explore how this tool works in macOS. We will see some examples of some of the most used commands, when and why you should use the command line in macOS, when you should use the sudo command, and other common commands you can use to manage files and monitor the system.
The following topics will be covered in this chapter:
- Using the command-line tool
- Monitoring and diagnosing the system
Let's start by reviewing the technical requirements.
Technical requirements
This is what you will need for this chapter:
- Basic knowledge of the macOS environment
- A Mac computer with administrator privileges
- You should feel comfortable using the command line
Using the command-line tool
Let's review some basic aspects of the command-line tool in macOS. The command-line interface (CLI) is the most complete tool for executing and processing commands that look like text strings. Because most user interfaces like the one you see when you power on your Mac, also known as a GUI, only include commands through buttons and menus to make the interface user-friendly and to provide most users with the most commonly used functionalities, these interfaces could be limited for advanced users or administrators. For this reason, a CLI allows them to access many more commands, if not all the commands that are available. The CLI has been used for a long time, and it still remains a very powerful tool.
Regardless of how you connect to the command-line tool (we will explain the different ways you can access it shortly), you obtain access to the input and output of a Unix shell process or shell scripting. Different shells have different features and may use a different syntax. More specifically, this is what we will discuss in this section:
- When and why you should use the command-line interface
- Understanding the structure of a command-line string
- The sudo command
- The command-line interface in macOS
- The default shell in macOS
- Terminal shell commands
Let's start by examining when and why you should use the command line.
When and why you should use the command-line interface
The command line is to be used for administrative tasks when it makes more sense to use it rather than using the usual user interface; for example, when you need to run batch commands, change permissions system-wide, perform tasks as root, and so on. You should use the command line if you are an advanced user or administrator and feel comfortable using it. The following are some of the advantages of using the command line:
- More troubleshooting and administration options available
- Access to the full filesystem
- Remote login through SSH
- Running commands as a system administrator or root user
- Automation of repetitive tasks through scripting
- Remotely manage devices through MDM
- Remotely manage Mac computers through Apple Remote Desktop
Now, let's examine what a command string looks like in macOS.
Understanding the structure of a command-line string
Before we explore the actual command string, we must talk a little bit about the command prompt. The command prompt is the starting line where all macOS Unix commands are entered and run. It provides key information to the user. The information that's included in the command prompt is as follows:
- The machine's name
- The current directory
- The current user
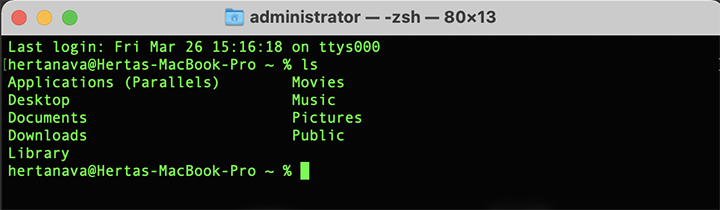
In the following screenshot, % is the default zsh prompt symbol. Other shells use other symbols; for example, bash uses $. We will learn more about the default shell in macOS later in this chapter. We can see that the machine name is macos-big-sur, the username is administrator, and the current directory is the home folder, represented by ~, which is a short way to point to the user's home folder:

Now that you know the command-line prompt's structure, let's talk about the command-line string. It has four parts:
- Name
- Options/flags
- Arguments
- Extras
The general form of a UNIX command can be represented in the following way:
[command] [-option(s)/flag(s)] [argument(s)] [extra(s)]
The different parts of the preceding command can be explained as follows:
- The command portion is the command name or the "verb." It describes what you want to do and what the command does.
- Think about the option(s)/flag(s) part as if they were the "adjectives," which modify how the command will run.
- The argument(s) are the objects that the command will act on, typically a directory path or a file.
- The extra(s) part is any extra options.
Let's analyze the following command, for example:
rm -r Desktop/folder-to-remove
If we break this down:
- rm is a command that stands for "remove."
- -r is a flag that stands for "recursively."
- Desktop/folder-to-remove is an argument that points to the directory (including the path) that should be removed.
What this command will do is remove the directory specified and all the contents in it, as indicated by the -r flag.
Now, take into account that if you want to run commands as a superuser or as a user different from the currently logged-in user, you will need to use the sudo command. Let's take a brief look at the sudo command.
The sudo command
This is a very important command. The sudo command, or "superuser do," allows us to run commands as a root user. It is a temporary way to grant a user administrative rights. You will use it when you need to perform an action as root; in other words, you will use it when you want to perform administration actions that will affect the system or other users and that only the root user or superuser can perform, such as installing software packages, editing configuration files, and so on.
You don't need to enable the root user account to use this command, but you do need to be at least an admin to use it.
To run commands using sudo, you need to access macOS's built-in command-line tool or use other tools that support shell scripting.
Let's analyze the following command, for example:
sudo ls -l /Users/johnadams/Documents
If we break this down:
- sudo is the command that grants this user administrative rights for this action.
- ls is the command or action that stands for "list."
- -l is the option that stands for "long," which means the command will be displayed in long filename format.
- /Users/johnadams/Documents is the argument that shows the path to the directory the command should run on.
Once the command is executed, we will see some output that provides information such as the owner of the files, the permissions, and the group they belong to. This can be seen in the following screenshot:

In the following section, we will explore Terminal, the utility provided in macOS to access the command line.
The command-line interface in macOS
macOS has its own built-in app to run command-line strings or, in other words, its own shell application: Terminal. You can also use other Terminal emulators or shell applications, such as iTerm (www.iterm2.com) or Hyper (www.hyper.is), for an enhanced experience, especially if you are a heavy command-line user.
In this section, we will explain how to access Terminal and configure the aforementioned features. We will cover the following topics:
- Using macOS Terminal
- Creating customized profiles
- Using marks and bookmarks
Let's start by learning how to use macOS Terminal.
Using macOS Terminal
There are many ways to use the command line in macOS. Many of them depend on the use of Terminal:
- You can access Terminal through the /Applications/Utilities folder, as shown in the following screenshot:

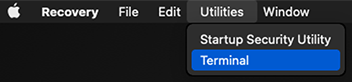
- You can access Terminal via the Recovery interface. Just to recap, you can do that by holding down the Command + R (Intel-based) key combination or by holding down the Power button (Apple M1) when your Mac is starting up. If you need to review more about the Recovery system, check out Chapter 2, Installing and Configuring macOS. When presented with the Recovery interface, go to the Utilities menu and select Terminal, as shown in the following screenshot:
- You can also use remote login, which will usually be an SSH connection that you can establish through an app such as WinSCP (www.winscp.net/). It is an open source software that will let you connect via SSH to a remote Mac, usually from a Windows computer. There are other configurations necessary to use remote login, and we talk about them in Chapter 14, Using macOS Sharing Services.
- Finally, you can use single-user mode, which shows you a minimal UNIX command-line environment that's useful mostly for attempting to repair the startup drive, mounting drives, reading and writing files, and starting some system daemons. We learned how to enter this mode in Chapter 3, The Start Up Process, if you want to review it.
If you will be using Terminal, you can take advantage of many features this tool offers. Here are some of the most useful ones:
- Customized profiles: macOS Terminal has predefined profiles, but you can use customized profiles as well. You can customize many elements of the Terminal experience, such as colors, fonts, background, and more.
- Marks and bookmarks: Terminal output can quickly become very long. You can add marks and bookmarks to navigate this output more easily.
- Customize windows: You can use the inspector or Info window to customize the windows, including changing their titles and background colors.
Let's look at some of these features in more detail.
Creating customized profiles
Profiles can be used to customize colors, font, background, and other Terminal window elements. macOS Terminal comes with a set of predefined profiles, but you can also create your own custom profiles.
Follow these steps to use profiles:
- Open the Terminal app, as indicated previously.
- In the Terminal top menu, select Preferences...
- Select the Profiles tab at the top and choose a predefined template from the left-hand side or add a new profile by clicking on the + (Add) button at the bottom, as shown in the following screenshot.
- Explore the options in the Text, Window, Tab, Shell, Keyboard, and Advanced tabs to customize your profile even further:

You can also apply a profile to a specific Terminal window. To do that, follow these steps:
- Go to the Shell top menu option.
- Select Show Inspector.
- Select the Profile tab, and then select a profile. In the following screenshot, we chose the Homebrew profile for this window:
Besides customizing your Terminal experience, you can also take advantage of some of the features to manage your Terminal's output by using marks and bookmarks, as we will explore next.
Using marks and bookmarks
Marks and bookmarks help you navigate your Terminal output to find a specific command prompt, select and copy parts of the output, and more. Let's take a look:
- Marks are used mostly to mark command-line prompts and lines in the Terminal's output. The Terminal app uses brackets [ ] as marks, as shown in the following screenshot:

You can change this behavior so that prompts are not marked anymore. To do this, with the Terminal app open, go to Edit in the top menu, next to Marks, and make sure Automatically Mark Prompt Lines is deselected.
- Bookmarks use heavier vertical bars, and they are mostly used to mark sections of content. However, you can also bookmark rows or insert them into specific parts of your output with either a timestamp or name/timestamp. The Terminal app uses vertical bars, |, to mark bookmarks, as shown in the following screenshot:

Do the following to add/remove marks and bookmarks:
- Open your Terminal app.
- Select the rows you want to mark, right-click, and then choose Mark from the contextual menu or the Edit top menu option. This will mark the text with brackets. To use vertical bar bookmarks, select Mark as Bookmark instead.
To remove a mark or bookmark, select the rows, right-click, and then choose Unmark from the contextual menu or the Edit top menu option.
Follow these steps to insert a bookmark with a timestamp or name:
- Open your Terminal app.
- Choose Edit from the top menu, then Bookmarks, and then Insert Bookmark to insert a bookmark with a timestamp. Alternatively, choose Insert Bookmark with Name to add a name as well:

- Note that the bookmark will be inserted just above the next available command prompt, as shown in the following screenshot:

To locate a mark or a bookmark, go to the Edit top menu option, select Navigate, and choose one of the options to jump to a bookmark, as shown in the following screenshot:

To locate a specific bookmark, follow these steps:
- Go to Edit, select Bookmarks, and choose a bookmark from the list, as shown here:

- You will notice that if either a mark or bookmark is selected, it briefly flashes with a yellow highlight. After that, it will be blue, as long as it remains filtered:

In this section, we learned how to customize the macOS Terminal to make advanced administration through the command line more convenient. If you are familiar with the command line, then you probably know that the macOS Terminal works with Unix shells. macOS has a default shell, but you can change it according to your requirements, as we will see next.
The default shell on macOS
As we mentioned earlier, to use the command line, you need a shell application. Let's say we will be using the built-in macOS Terminal. Next, you need to determine which Unix shell you will be using. By default, macOS uses the zsh shell since macOS Catalina. Before that, bash was the default shell (OS X 10.3 Panther and later), and tcsh was used before that. You can configure which one you will use, as we will see next. Each shell has a diverse set of features such as shortcuts, variable handling, better completions, and more.
zsh or the Z shell (www.zsh.org) is preferred over bash these days because it has many improvements. These are some of the most important ones:
- It has many plugins available.
- It has a large community of contributors and support guides.
- Directory change is automatic; all you need to do is type in the directory's name.
- Path expansion is recursive. For example, if you type /us/lo/bi, it will expand to the correct directory; that is, /usr/local/bin.
- It has automatic spelling and completion correction.
Remember that, since macOS Catalina, zsh is used as the default login and interactive shell. Therefore, if you've recently upgraded to macOS Catalina, you will see a warning similar to the one shown in the following screenshot:

There are at least two ways you can configure or update your shell:
- Through Terminal: By running the command indicated in the warning in the preceding screenshot.
- Through the Users & Groups preferences (this will change it for a specific user).
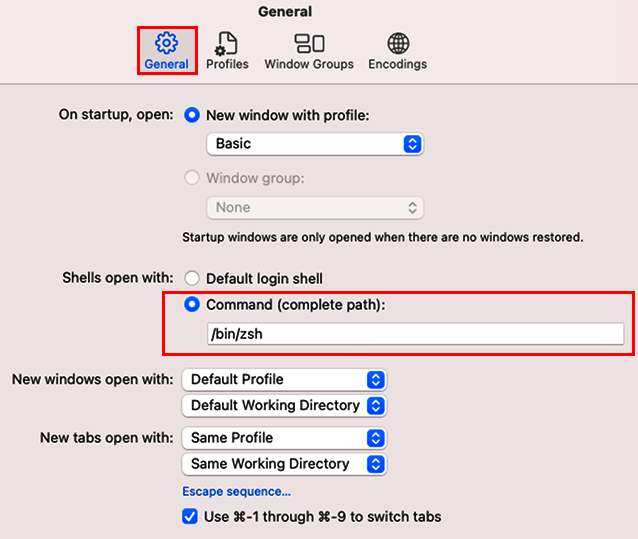
Follow these steps to configure the shell through the Terminal application:
- Open the Terminal app, as shown earlier.
- Go to the Terminal top menu and select Preferences....
- In the General tab, in the Command (complete path) field, enter the path to the shell you want to use. In the following screenshot, the path is /bin/zsh. Change it as you wish:
To configure the shell through the Users & Groups preferences, follow these steps:
- Open System Preferences.
- Click on the Users & Groups icon.
- Authenticate as administrator.
- Right-click on the username you want to configure the shell for and click on Advanced Options.... You will see the following window:

- Select the login shell you wish to use from the drop-down menu, as shown in the preceding screenshot.
Once you have the shell set up, you will be able to use the commands available for that shell. Many commands are available. In the next section, we will look at some of the most essential commands.
Terminal shell commands
There are many commands we can use in Terminal, and their availability depends on the shell you are using. Although this is not a chapter specifically on Terminal commands, in this section, we will look at some commonly used commands and some examples of how to use them to get a good idea of what you can do. In the next section, we will learn how to use Terminal with more complex commands to hide/unhide files and folders.
You can look at the list of commands built into the specific shell you are using, known as "builtins," by using the following commands for specific shells. These commands will return a list of the specific shell's built-in commands, as well as examples of their use:
| Shell | Command |
| tcsh | builtins |
| bash | help |
| zsh | man zshbuiltins |
In the following sections, we will cover the following topics:
- Common commands
- Uncovering hidden files and folders
- Hiding specific files and folders
Let's begin with the first section, where we will cover commonly used commands.
Common commands
You can use many commands with macOS Terminal, but the following are some of the most popular and commonly used commands and key combinations that you will probably learn off by heart very quickly. The following screenshot shows a table of commonly used commands:

The following are some key combinations you will also find very handy:

Let's look at some examples of the commands shown in Figure 16.17.
We will only look at some examples for a few commands, along with some screenshots, for you to get a good idea of how they are used. Let's get started:
- .: The ./file.doc string is used to indicate the file.doc file in the current directory.
- ..: The ../Documents string is used to indicate the Documents folder in the parent directory of the current directory; that is, a sibling folder of the current directory.
- ~: The ~/Documents string is used to specify the Documents directory of the currently logged-in user.
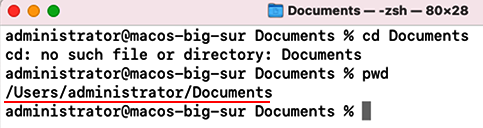
- cd: As shown in the following screenshot, by running the cd Documents command, we are changing from the current root directory to the Documents directory. You can tell that we have changed directory because the directory's name, Documents, appears before the prompt:

- chmod: Let's say we run the following command:
chmod 755 Documents
This will change the Documents folder's permissions to 755, which means read, write, execute permissions for the Owner; and Read Only for Group and Everyone.
In the following screenshot, in the Info window, we can verify that the file's permissions for the Documents folder have changed after running the chmod command:

-
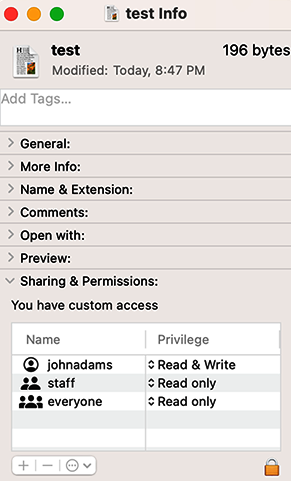
chown: This command is used as follows:
chown [username] [file]
For example, let's run the following command:
chown johnadams ~/Documents/test.rtf
This will change the ownership of the test.rtf file to make user johnadams the owner. In the following screenshot, in the Info window, we can verify that the file changed ownership to johnadams:
-
ls: In the following example, we will use the ls –l command. This allows us to see the file and folder permissions in a specific directory; in this case, the user's home directory:

- mkdir: The syntax for this command is very simple: mkdir [new directory].
- pwd: Earlier, we changed to the Documents directory. The following command shows the full path to that directory, as shown in the following screenshot:
In the next section, we will look at another very important use of the command line, which is to uncover hidden files and folders.
Uncovering hidden files and folders
macOS uses methods to keep things clean and tidy in the filesystem. One of these methods is hiding items. In Chapter 8, System Resources and Shortcuts, we learned how to access files and folders hidden by default by macOS through Finder.
In this section, we will learn how to uncover all hidden files and folders through Terminal. In the next section, we will learn how to pick specific items and hide them; perhaps a folder you don't want anyone to see.
To show all hidden folders, run the following command in Terminal:
defaults write com.apple.finder AppleShowAllFiles TRUE
Next, enter the following:
killall Finder
If you go to Finder now, you will see many other hidden files and folders, as shown in the following screenshot:

To revert to the original Finder with the hidden files and folders, just use Terminal again and type:
defaults write com.apple.finder AppleShowAllFiles FALSE
Next, enter the following:
killall Finder
This will reset the Finder window and show the files as usual again.
Just like you can access files and folders hidden by default by macOS or uncover them all through Terminal, you can also pick specific items and hide them yourself; perhaps a folder you don't want anyone to see. This is what we will see in the next section.
Hiding specific files and folders
You can hide specific items in macOS so that they won't be visible in Finder. There are two methods to do so, and you will need to use Terminal for both as it is not possible to use the Finder for this:
- Use Terminal to add a period at the beginning of an item's name
- Use the hidden file flag
The first is a Unix method, and it hides the item from Finder and Terminal when you're listing items.
The second is a Mac feature, which consists of enabling the file flag so that it's not visible in Finder. Take into account that this method will not hide the item in Terminal.
Follow these steps to use the first method. In this example, we will hide the file named test.rtf, located inside the administrator's Documents folder:
- Open Terminal.
- Change directory to the folder that contains the file you want to hide with the cd command (replacing this with your actual path) and press Enter when you're ready:
cd /Users/administrator/Documents
- Use the mv command to change the filename (replace the filename as appropriate), and also include a period at the beginning of it. Press Enter when you're ready:
mv file-to-hide.rtf .file-to-hide.rtf
- At this point, the file will immediately be hidden in Finder.
To undo what you just did and show the file again in Finder, follow the same steps you followed previously, but do the opposite to rename the file with the period to one without a period:
- After changing the directory to where your file is located, use the same command, but use the file with the period first. Then, press Enter when you're ready:
mv .test.rtf test.rtf
- The file will immediately be visible again in Finder.
Now, let's learn how the second method works. To hide a folder called Secrets inside the Documents folder, follow these steps:
- Open Terminal.
- Change directory to the Documents folder using the cd command.
- Enter the following command, followed by a space at the end (but don't press Enter yet):
chflags hidden
- Next, enter the folder's path if you know it, or drag and drop the folder into Terminal, as shown in the following screenshot, so that the path will be automatically entered:

- You should see the full path after dragging and dropping the folder, at which point you can go ahead and press Enter:

- The folder will now be hidden from Finder.
To view the hidden folder, you can do any of the following:
- Use the Go to folder... option in Finder. Click on the Go menu item and select Go to Folder.... Next, enter the exact folder path. You can type the whole path, or if the folder is located in your user's home folder, you can just use the abbreviated form; that is, ~/Desktop/Secrets:

- To quickly view the folder or any other hidden items, you can use the shortcut combination Command + Shift + . (period). As soon as you do that, the folder will appear again in Finder, but in a slightly lighter color:

To undo what you just did and make the folder permanently visible again in Finder, follow these steps:
- Open Terminal.
- This time, enter the chflags nohidden command, leaving a space at the end (and don't press Enter yet).
- You should now enter the path to the folder you want to uncover or use the temporary method to make it visible through the Command + Shift + . (period) key combination. Then, you should be able to drag and drop the folder into the Terminal.
- Once the path shows as complete in Terminal, press Enter; the folder will be visible again in Finder.
And that's it!
In this section, we explored the command-line interface, as well as when and how you can use it to perform a variety of advanced administration tasks in macOS. We also saw how the command line works in macOS, the default shell that's currently used, as well as additional shell commands. Moreover, we discovered how to uncover hidden files and folders using this tool.
In the next section, we will look at the commands we can use to monitor and diagnose the system.
Monitoring and diagnosing the system
There are useful commands you can use in Terminal to verify and repair the startup volume. fsck is a common UNIX command that's used for system checks and repairs. It is the equivalent of First Aid in the Disk Utility tool. For APFS volumes, you could also use the fsck_apfs command.
To use this command, you need to restart your computer in single-user mode so that the system disk is unmounted. You can review how to enter single-user mode by rereading Chapter 3, The Startup Process.
Through the use of flags, you can perform extra actions. For example, the -f flag forces journaled filesystems to be verified, such as HFS, while the -y flag answers with "Yes" to any prompts fsck might encounter, so use it with caution. In the case of APFS volumes, you can use the -n flag to verify without performing any repairs.
For example, once you are in single-user mode or you are sure your system disk is unmounted, you could run the following command:
fsck_apfs -y
If there is a problem or the filesystem was altered in any way, you will see a message stating File System Was Modified. -y is a flag that means "yes, repair any problems encountered," without you needing to enter any additional commands yourself.
As we explained in Chapter 3, The Start Up Process, you should repeat the command until the message "the volume appears to be OK" appears, as shown in the following screenshot:

Once you see that message, you can make use of the command line to make the necessary changes or fixes.
In this section, we looked at a brief, basic overview of the command line and how it works. If you want to learn more about it, or about zsh in macOS, I have left a few great resources in the Further reading section at the end of this chapter. You can also check out Mac Linux Command Line Kick Start in 4 hours (https://www.packtpub.com/product/mac-linux-command-line-kick-start-in-4-hours-for-beginnersvideo/9781789130713), which is available in the Packt library (https://www.packtpub.com/product/mac-linux-command-line-kick-start-in-4-hours-for-beginnersvideo/9781789130713), to learn more about Linux commands.
And with this section, we have reached the end of this chapter. Make sure that you review the summary for a quick recap of what was covered in this chapter.
Summary
Now that you have reached the end of this chapter, you know when and why you should use the command-line tool in macOS. You also understand the structure of a command line-string, when the sudo command should be used, and what the command-line interface in macOS looks like. You can also run several commands to perform a variety of advanced actions, such as for creating directories, changing permissions and ownership, uncovering hidden files and folders, and more. You also learned how to customize your Terminal app by using profiles, marks, and bookmarks. You also know that you can choose different shells that will let you access different "built-in" commands. Finally, you know how to verify the state of your startup disk through the use of the fsck command.
This is also the last chapter of this book. At this stage, you are fully prepared to install and configure macOS, manage users, manage user security and privacy, and manage files, apps, documents, network services, sharing services, and system security. If you will be taking the Apple Certified Support Professional examination, you are now well prepared to succeed!
In the Appendix, we will offer some troubleshooting tips that can be very helpful in a variety of situations.
Further reading
Falstad, P. (2014). The Z Shell Manual. Retrieved from http://zsh.sourceforge.net/Doc/Release/The-Z-Shell-Manual.html#The-Z-Shell-Manual.
Apple. (n.d.). Command Line Primer. Retrieved from https://developer.apple.com/library/content/documentation/OpenSource/Conceptual/ShellScripting/CommandLInePrimer/CommandLine.html.
Briegel, A. (2021). macOS Terminal and shell.