
Metadata is pieces of information that help describe and identify content. Metadata is important in every search system since it's this information that comes into play when users search using the search tools and what can make their searches relevant and satisfactory. In this chapter, you will learn what types of metadata macOS uses and how it uses this metadata. You will also learn about the different search tools available in macOS for efficient searching.
By the end of this chapter, you will be able to describe how macOS uses metadata and the metadata resources available in macOS (such as tags) that you can use to organize data and improve searching. You will use the Spotlight tool for efficient searching and Siri to perform hands-free tasks and searches with the help of Apple's voice recognition technology.
More specifically, the topics we will cover are the following:
- Understanding metadata in macOS
- Using macOS tags
- macOS searching tools
Before we start, let's see the technical requirements for this chapter.
Technical requirements
This is what you will need for this chapter:
- Basic knowledge of the macOS environment
- A Mac computer with administrator privileges
Understanding metadata in macOS
Metadata is bits of information about a file or folder used to describe data and stored in a separate document. Types of metadata can be names, content type, origin, creation date, modification date, ownership information, condition, and much more.
Simply put "metadata is data about data."
This phrase has been around for a while and it's an excellent, short way to describe what metadata is and what it does.
Metadata helps organize, locate, and manipulate data to make it easier to identify it and find it. This metadata can be stored in several locations and various formats. It can refer to any kind of information, such as documents, video files, images, sounds, and so on.
In macOS, filesystem metadata is used mainly to locate and manipulate files. Examples of filesystem metadata in macOS are file flags, extended file attributes (that is, tags, comments, and file extensions), and permissions.
In this section, we will explore the most important types of metadata used in macOS.
Types of metadata available in macOS
There are several metadata types in macOS that serve different purposes, from overriding permissions to letting you organize your data with flexibility and convenience. Those metadata types are the following:
- File flags
- File system tags
- The AppleDouble file format
- Additional extended attributes
Let's explore in more detail what each of the preceding metadata types does in macOS.
File flags
File flags are a remnant of the original macOS design and are used for additional access control since they can override applied permissions. This means that if a file flag that prohibits access is in place, access will be denied, regardless of the current permissions. Common file flags are the locked flag and the hidden flag. As we saw earlier, the locked flag can be activated from the Info window, and the hidden flag is activated from Terminal.
We saw in detail how to manage the locked flag in Chapter 7, Understanding Ownership and Permissions, if you would like to go back to review this.
Let's take a look at the next type of metadata: filesystem tags.
File system tags
Tags are a type of metadata known as macOS "extended attributes." They allow you to "tag" an item with specific keywords to identify and organize items without having to move them to special folders, or for quicky searching and finding those items, regardless of where they are stored in your Mac, even if they are in iCloud. Since OS X Mavericks, you can assign multiple tags and create custom colors and tag keywords. In Figure 9.1, we can see an example of a tagged file in macOS:

The next type of metadata we will examine is the AppleDouble file format.
The AppleDouble file format
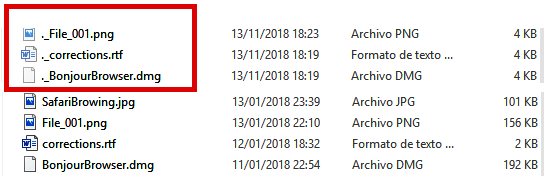
The AppleDouble file format is actually a flag that was implemented to deal with resource forks. The problem was that other file systems, such as FAT, didn't know what to make of the metadata attributes included with content since they are only supported in volumes formatted with APFS or Mac OS Extended. The solution for macOS (and OS X before that) was to store system metadata and extended attributes in a separate, hidden file. But in certain file systems, such as FAT, Xsan volumes, and NFS shares, a saved file containing metadata is split into two files with the same name, but one of the files has a ._ at the beginning. I'm sure you have seen those files before. Some file systems, such as Windows, now automatically hide those files so that users don't get confused. But you can still see them in external disks as we see in Figure 9.2:
There are additional extended attributes that are worth exploring since they can be very useful as metadata. Let's explore them.
Additional extended attributes
There are other types of extended attributes in macOS, besides hidden and locked flags, which help with file identification and searching. Some examples are Stationary pad, the Hide extension option, and Comments.
You can manage them from the Inspector or Info window (Figure 9.3). We learned how to use the Info window in Chapter 7, Understanding Ownership and Permissions, if you would like to go back to review it:

Let's take a look at what they do briefly:
- Stationary pad lets you use a file as if it were a template or stationary. When the checkbox is selected, a new file will be created from that file, and the one with the Stationary pad flag will remain unchanged (as long as the flag is enabled).
- When enabled, the Hide extension option prevents the file extension (such as .jpeg or .pdf) from being shown.
- The Comments attribute is also self-explanatory: you can add comments that will be used as metadata and, therefore, they can be used for searching.
Now that you understand the types of metadata that are available in macOS, let's see how to manage the ones that will be the most useful for users in regard to data organization and searching purposes: tags.
Using macOS tags
macOS provides multiple easy ways to view tagged files, tag a file, and customize a tag. You will find opportunities to manage tags practically all over the macOS environment. macOS already comes with custom ready-to-use tags, such as color tags and a list of common keyword tags, but you can also create your own as we will see here.
In this section, we will learn about the following:
- Viewing tagged items
- Using tags
- Creating tags
- Deleting tags
- Advanced tag management
Let's begin by exploring how to view tags.
Viewing tagged items
Tagged items can be viewed from many locations, including the following:
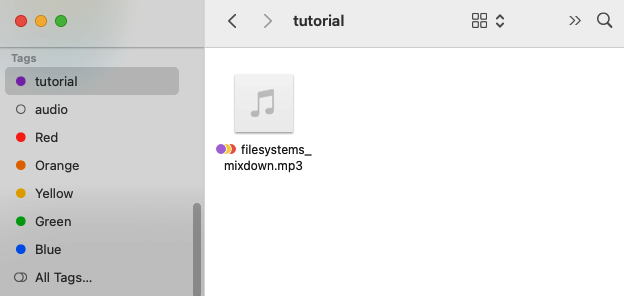
- The Finder Sidebar: When you select a tag in the left sidebar, the files tagged with that tag will appear in the right window, as shown in Figure 9.4:
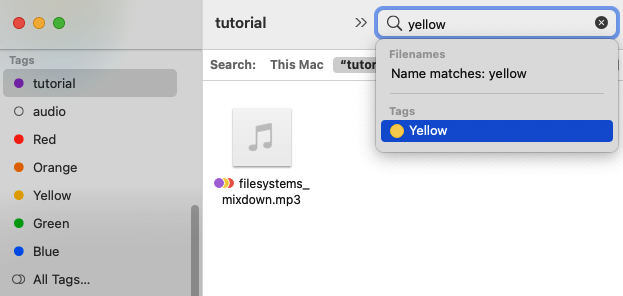
- The Finder search box: When you enter a tag in the search box, you will be able to select it from the search results, and appropriate tagged files will appear, as seen in Figure 9.5:
- Most Open or Save document dialogs: With an Open or Save document dialog open, select a tag from the left sidebar or the top dropdown, as shown in Figure 9.6:

Now that you know how to view tagged files, let's explore how to tag files.
Using tags
Tagging files is straightforward, and there are also multiple places where you can add tags to a file.
Take into account that you can add one or more tags to a file. To do so, follow any of these methods:
- Right-click on a file you want to tag and select the tags from the contextual menu. The selected tags will show a checkmark, as you can see in Figure 9.7:
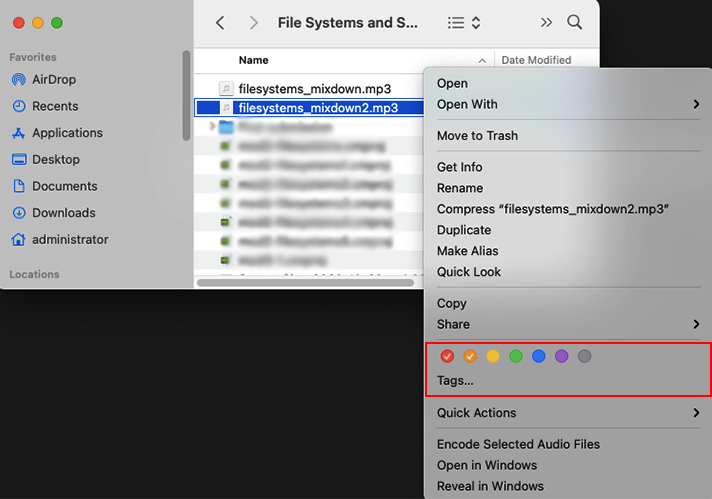
- If you don't see the tags you want to use, right-click on a file and select the Tags... option below the color tags (Figure 9.7). A prompt will appear, and you can start typing any tag in the input box (Figure 9.8), or click Show All... to see all the tags and select one from the list:

- You can also tag files from the Info window. Start typing any tag in the input box or select Show All... to see all tags and select one from the list.
Now that you know how to tag a file with the built-in color tags or from the list of common keywords, let's see how we can create our own custom tags.
Creating tags
Creating a new tag can also be done in multiple places. Basically, wherever you can view tags, you will also be able to create custom tags. Let's see the main methods for doing this.
Creating tags from the Finder
Let's see how to create tags from the Finder. Follow the steps given here:
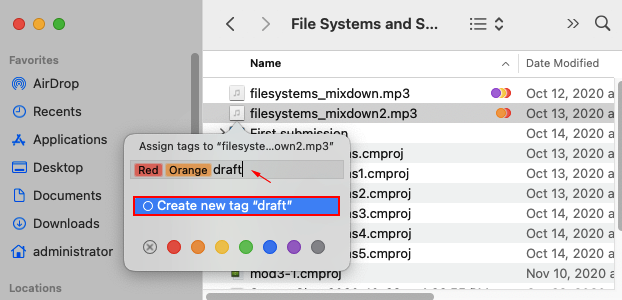
- Select a file in the Finder, right-click, and select Tags... from the contextual menu (Figure 9.7).
- Start typing the tag name you want to create next to the other tags. If the tag does not exist in the list, you will see Create new tag "[tag name]" (Figure 9.9).
- Assign a color if you want, and press Enter:
Let's see how to create tags from a preview file in the next section.
Creating tags from a file preview
To create tags from a file preview, follow the steps given here:
- Select a file in the Finder and select the Gallery view type from the icon circled in red in Figure 9.10.
- Scroll down the preview information to find the Tags section and click Add Tag (Figure 9.10):
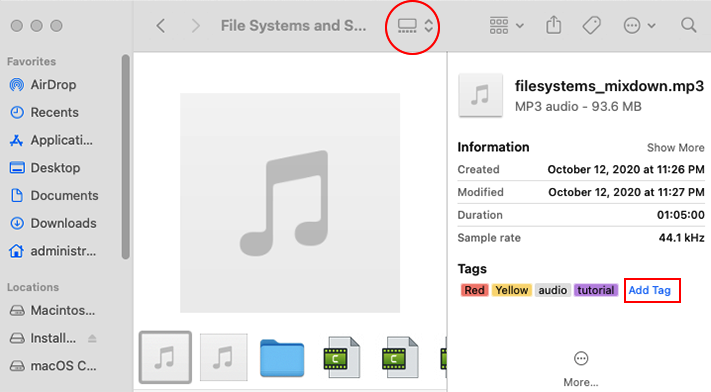
- Follow the same procedure to add a new tag as explained in the previous examples.
You can also create and/or assign tags in a similar manner in any document's Open or Save As... dialogs.
You now know how to add tags, so let's learn how to delete them next.
Deleting tags
Follow these steps to delete or remove a tag with the Finder.
To remove a tag from a file, do the following:
- Right-click on a file and select the Tags... option below the color tags (Figure 9.7).
- Position the cursor next to the tag you want to delete (Figure 9.8) and press the Delete key.
To remove a tag permanently, do the following:
- Open the Finder, and right-click on a tag you want to remove from the sidebar, as shown in Figure 9.11.
- Select Remove from Sidebar or Delete Tag "[tag name]"... if you want to delete it permanently:

Note that you can also rename a tag using this method.
You now know how to create and delete tags, but there's an advanced method to manage tags, and we will see it next.
Advanced tag management
This method provides you with a more advanced way to manage tags, including adding, deleting, customizing, and organizing tags. To use this method, follow these steps:
- Go to the top menu of the Finder.
- Select Preferences and then select the Tags tab, as shown in Figure 9.12:
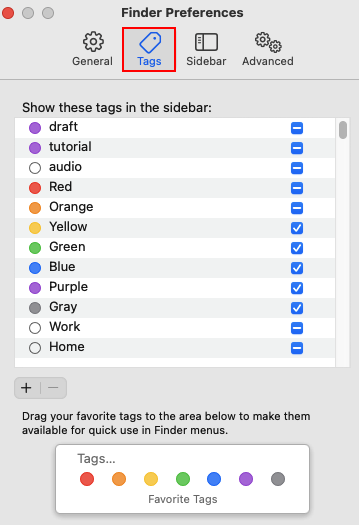
You can do the following:
- Arrange tags by dragging and dropping them into place.
- Select your favorite tags by dragging them to the Favorite Tags window.
- Add or delete tags with the Add (+) and Delete (-) buttons
- Select which tags you want to see in the sidebar.
You can also change the color of the selected tag in the preceding window. Just right-click on the tag and select any color you want to assign to it.
Now that we have learned how to view, use, create, and delete tags that help you identify and organize your files, you will see how to perform powerful searches in the next section about macOS searching tools.
macOS searching tools
Efficient searching is an important feature in any system. You will spend many hours of your computer time searching for files, folders, and other resources. macOS offers advanced technologies for the best searching user experience. In this section, we will explore the main tools macOS offers:
- Using Spotlight
- Using Siri
Let's explore Spotlight first.
Using Spotlight
Spotlight is an advanced macOS autocomplete search technology service. This service uses metadata to create index databases that enable you to perform instant and relevant searches. With Spotlight, you can find files, apps, images, and virtually anything you are looking for.
Spotlight lets you search metadata such as filenames, file flags (such as locked files, keywords in comments, and more), modification dates, tags, file content, and other information stored in files such as images and movies (for example, camera manufacturer).
Spotlight has sort of evolved into a search engine since it searches not only in the local macOS filesystem volume, Time Machine backups, and iCloud drive, but also in shared files on other Mac clients, servers, and disks shared via AirPort Wi-Fi access points. Since OS X Yosemite, the Spotlight service also suggests results from other locations, such as the web, the App Store, Maps, and more.
Spotlight's suggested results are called Spotlight Suggestions, and they are an intelligent combination of usage history, location, and authorized user information to provide accurate and relevant results.
To use Spotlight, just click on the magnifying glass in the upper-right corner of your Mac, as shown in Figure 9.13:
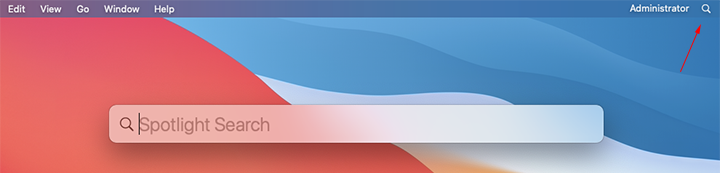
Actually, Spotlight is the quickest way to open an app, as we can see in the following example. As soon as you start typing the app name, the autocomplete function will show you the relevant results, with the TOP HITS at the beginning, as shown in Figure 9.14:
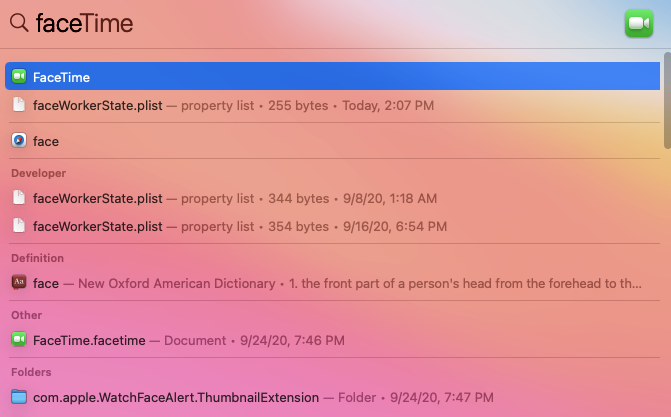
Notice that the preceding results include definitions, documents, folders, and more. But you can configure how the results are shown through the Spotlight preferences.
Follow these steps to do that:
- Open System Preferences, and click on the Spotlight pane.
- In the Search Results tab, you can select categories of information you want to include or exclude from your searches so that you get more relevant results (Figure 9.15):

- In the Privacy tab, you can tell Spotlight which locations, such as folders or volumes, you want to exclude from searches using the Add (+) and Delete (-) buttons, as shown in Figure 9.16:

- You can also click the Keyboard Shortcuts... button, which will take you to the Keyboard preferences where you can configure key combinations for frequent searches (Figure 9.17):

Besides searching, you can use Spotlight for other useful tasks, such as performing calculations and market-based currency conversions.
For example, to perform a currency conversion, we type 150 CAD, and we obtain the conversion to popular currencies, as seen in Figure 9.18. This feature works with any conversion type you want to attempt, such as longitude, volume, and so on:

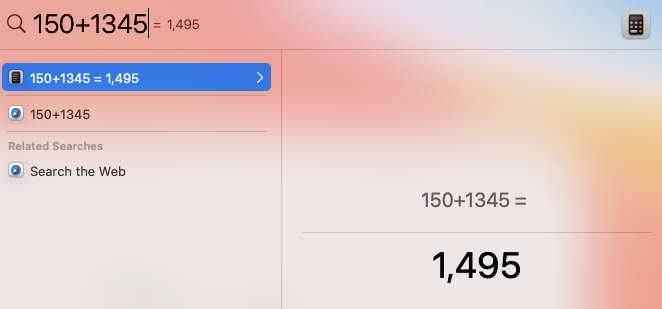
To perform a calculation, just type in the operation, as shown in Figure 9.19:
Now that you know what a practical and useful tool Spotlight is, let's see another equally useful tool in the next section: Siri.
Using Siri
Apple defines Siri as "an intelligent assistant that offers a faster, easier way to get things done." Siri is Apple's voice recognition technology tool for hands-free tasks, and it can be used on Mac models from 2018 and later.
Siri has many capabilities, but the most important ones are listed here:
- Making calls and sending texts
- Making proactive suggestions based on your routine and your information, such as sending a message or calling a colleague because you will probably be late for a meeting, or reminding you of important calls
- Performing everyday tasks, such as setting alarms, timers, and reminders, getting directions, and viewing your calendar
- Searching and playing the music you want
- Controlling home appliances
- Answering all kinds of questions
- Searching for all kinds of information, such as files, and even where your car is parked
- Using shortcuts for routine tasks to do things even faster
Follow these steps to activate Siri:
- Unless you disabled it during macOS installation, Siri is enabled by default.
- If it's not, open System Preferences and click the Siri icon.
- Make sure Enable Ask Siri is activated, as well as Listen for "Hey Siri", if you want Siri to activate every time you use that phrase (Figure 9.20):

Follow these steps to use Siri:
- Just say "Hey Siri," then make your request, or press the Siri button at the top right of your Mac screen. At that moment, Siri will start listening, and you can make your request while holding down the button (Figure 9.21):

- Siri will stop listening to your request when you release the button.
If you don't issue a voice command, Siri will show you suggestions for voice commands you can use for specific apps, such as Finder, System Preferences, and so on, as shown in Figure 9.22:

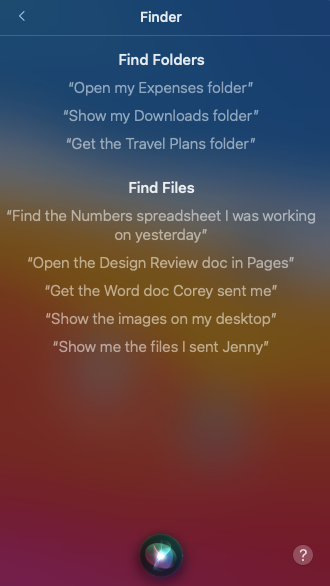
If you double-click on the arrow next to any of the options on the list (the Finder, for example), you will see more examples of phrases you can use, such as "Open my Expenses folder", as seen in Figure 9.23:
And with this, we have reached the end of this chapter on metadata and searching. Make sure to check the following summary to recap what we have learned.
Summary
In this chapter, you learned how macOS uses metadata and about the types of metadata available; namely, file flags, filesystem tags, AppleDouble, and additional extended attributes, such as the stationary pad and the locked attribute. You also learned how to manage tags to identify and organize your files. You learned about the macOS searching tools, such as Spotlight, for efficient and fast searching, as well as other practical tasks, such as calculations and currency conversions. Finally, you learned how to use Apple's voice recognition technology with Siri for the same purpose, in addition to assisting you with common daily tasks.
You are now fully equipped to use the types of metadata and search tools macOS offers and configure and manage them to improve the user experience for resource organization and searching.
In the next chapter, we will learn all about managing apps and documents.