
In this day and age, it is crucial to consider all the security measures and technologies available to protect our company's, clients', and users' security and privacy. We will see various security tools and features macOS has available to increase protection. Apple Platform Security ensures all Apple devices' operating systems are protected in all five main areas: hardware, system, data, applications, and services. In this chapter, we will explore the most important tools and features to understand how security is approached in macOS in those five areas. Take into account that most of the tools and measures we discuss in this chapter require administrative privileges.
The following topics will be covered in this chapter:
- System security
- Hardware security
- Application security
- Data security and encryption
- User and services security
By the end of this chapter, you will know how to use and apply these tools and features to improve security on the macOS machines you administer. Let's begin with the technical requirements for this chapter.
Technical requirements
This is what you will need for this chapter:
- Basic knowledge of the macOS environment
- A Mac computer with administration privileges
- An Apple ID (recommended)
- An iCloud account (recommended)
Understanding System Security
When we talk about system security, we mean the tools and features aimed at maximizing the operating system's security. This includes security during the Mac machine's boot-up process, operation, and access to key files and folders. macOS system security can be approached through the currently available features, as well as the application of specific measures and tools. By the end of this section, you will be aware of what you have at your disposal to protect macOS. This is what we will examine in this section:
- macOS security features
- Recommended security measures
- Bonjour/zero-configuration and mDNS security concerns
- What is System Integrity Protection (SIP)?
Let's review these features and measures and how they can help you.
macOS security features
macOS offers several features that are designed to improve security and privacy. Concerning this, the following are the latest features implemented.
Features implemented in macOS Big Sur:
- Signed system volume or SSV: macOS now uses a signed system using a cryptographic technology that prevents the execution of files (and/or access) that don't have a valid Apple signature. This means that the integrity of system content is verified at runtime, and any data that doesn't have a valid cryptographic Apple signature is rejected. This also allows software updates to run in the background without user involvement.
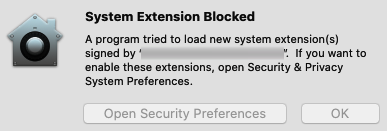
- System extensions: Since macOS Big Sur, Kernel Extensions (or KEXTs) are being deprecated and replaced by system extensions. This improves security because extensions will not have access to the macOS kernel anymore and will run in user space. Developers are now instructed to transition their software out from KEXTs and provide support to System Extensions. If an app is using a deprecated KEXT, this will trigger a prompt to contact the developer. And that's what you should do if this happens: The developer has to provide you with an alternative or, in some cases, if the extension is not deprecated yet, you will be able to temporarily allow it from the System Preferences, as shown in Figure 15.1.
- Safari Privacy Report: In addition to the cross-site tracking feature that prevents sites from tracking you through third-party content providers, macOS now provides a "Privacy Report" in Safari, which allows you to find out which websites are tracking you. More on this in Chapter 5, Managing User Security and Privacy.
- Privacy in the App Store: The App Store now features a section that describes the privacy practices of the developer whose app you want to download and install so that you know exactly how your data will be used and whether it will be shared in any form.
The following features are implemented in macOS Catalina or earlier:
- Read-only volume: macOS runs in a read-only, dedicated volume separate from the rest of the data. This considerably increases the security of your system files. There is nothing the administrator or user needs to do to take advantage of this feature, as it comes pre-configured in macOS. This is why when you use the Disk Utility (or the Terminal), you now see two default volumes: the Macintosh HD volume, which is the system read-only volume, and a separate volume called Macintosh HD - Data, where your data is stored.
- App permission: Apps now require your permission before accessing files in Documents and Desktop folders, iCloud Drive, and other external volumes. In Figure 15.2, we can see the prompt that appears when an app installer is trying to access files in your Desktop folder. You can choose to allow it according to whether you trust the application installer or not.

- Find My: This app allows you to locate a missing or misplaced Mac, even if it's offline or sleeping in some cases. And you could potentially lock the Mac and/or erase the system disk. We explore this feature in more detail in the Understanding User security section at the end of this chapter.
- Activation Lock: Works in combination with Find My, and it is covered in the same section mentioned earlier.
- macOS built-in firewall: Unlike other traditional network firewalls, the macOS built-in firewall allows or denies connections on a per-app basis and not based on network port numbers. It even has a stealth mode, which prevents the Mac from responding to unauthorized network connections, including ping, traceroute, and port scan. This tool is explored in more detail in the same section mentioned earlier.
- System Integrity Protection (SIP): This feature is covered in detail at the end of this section.
- Malware protection: macOS has two built-in technologies for malware protection: XProtect and the Malware Removal Tool (MRT). They are covered in more detail in the Understanding Application security section later in this chapter.
Besides these features, there are other measures and tools you can take advantage of. Let's begin by reviewing some recommended practices to increase security.
Recommended security measures
The measures and tools we will see here are intended for protecting the system's integrity. But take into account that all measures, whether aimed specifically at a system, application, data, or user security, ultimately combine to provide integral system protection.
Make sure you implement the following measures:
- Make sure automatic updates are turned on for system data files and security updates: In order to receive security updates, including XProtect and MRT, automatic updates must be turned on in the System Preferences. Review the section on System Updates in Chapter 2, Installing and Configuring macOS, for more information on the procedure.
- Require users to log in with their own accounts: Remember that the first account created after installing macOS is an administrative account. You should make sure that other users logging into the same machine have their own accounts so they can have their own files and settings separated from the other users. If it's a one-time use, you can always take advantage of guest accounts. User and guest accounts are covered in detail in Chapter 4, User Accounts Management.
- Require users to use secure passwords: Make sure users don't use passwords that are easy to guess (such as 1234 or 0000). The account creation process in macOS offers a tool to create secure passwords. Passwords are covered in detail in Chapter 5, Managing User Security and Privacy.
- Lock the machine when it is not in use: This is important so that no one can access your machine while you are away. This can be achieved by configuring your Mac to log out after being idle for a certain period of time. Follow these steps to configure this:
- Open System Preferences.
- Click the Security & Privacy icon.
- Make sure you are in the General tab.
- Click the lock to authenticate as an administrator.
- Click the Advanced tab at the bottom of the window.
- Enable the Log out after...minutes of inactivity checkbox and set an amount of time that makes sense depending on your environment, such as 5 minutes in a crowded environment or more time if there's less risk of other users accessing your computer, as shown in Figure 15.3.
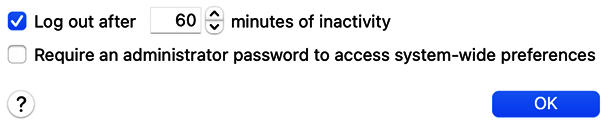
- Ensure users won't change system-wide settings: This is an important step to prevent users from changing system settings that will affect all users so that the lock is displayed for administrator authentication. Follow these steps to activate this option. Follow the steps in the previous procedure but, in this case, activate the Require an administrator password to access system-wide preferences checkbox(Figure 15.3).
- Requiring a password after waking up: You can also configure your Mac to require a password when it's picked up (woken) from Sleep mode or while the screen saver is running. Follow these steps to achieve that:
- Follow the steps from the previous procedure up to step 4.
- Enable Require password...after sleep or screen saver begins, as shown in Figure 15.4:

-
- Set the amount of time to something that makes sense according to your environment. You can choose up to 8 hours.
- Using hot corners to lock your screen: This will automatically start the screen saver when your Mac is inactive for some time, and it allows you to use a shortcut by placing the pointer at a corner of the screen to activate it yourself. Figure 15.5 shows the four hot corners that can be configured in macOS.

Follow these steps to configure hot corners:
-
- Open System Preferences.
- Click the Desktop & Screen Saver icon.
- Click the Screen Saver tab.
- Make sure the screen saver you wish to use is selected.
- Next, click the Hot Corners button, as indicated in Figure 15.6:

-
Figure 15.6 – Accessing hot corners
-
- Click the pop-up menu of the corner you want to configure and select the Start Screen Saver option or any of the actions available in the drop-down. In the example that follows, we choose the top-left corner. You can choose to configure one or all four hot corners. You can also configure to start the action by pressing the Control, Option, Shift, or Command keys with a hot corner; press the key you want to use (such as Shift) while clicking the configuration drop-down menu. In Figure 15.7, we configured the top-left hot corner to Start Screen Saver and the lower-left hot corner to Disable Screen Saver but with the Shift key. Click OK when ready.
- Now, whenever you position the pointer on the hot corner you just configured, the selected action will be executed. In the case of the lower-left hot corner, the action will execute when we position the pointer in that corner and press Shift at the same time.

- Limit the number of administrative users: You can have other administrative users, apart from the first administrative account created when you installed macOS. These users will have advanced permissions to create, manage, and delete other users, and also install and remove software, and modify configuration settings. Therefore, a good practice is to have 2 or a maximum of 3 administrative accounts. It's not a good idea either to have just one since if that user loses access to the account for any reason, you will probably have to take extreme measures to regain access to the machine, such as reinstalling the system, with the potential of loss of data. Having more than 3 administrators is not recommended either.
As we know, macOS also provides an easy network configuration, but certain concerns could impact security and that's what we'll address next.
Bonjour/zero-configuration and mDNS security concerns
Bonjour is Apple's zero-configuration protocol for easy network configuration of devices on a local network. This results in little or no administration or configuration required to set up networking on a Mac.
However, although its benefits are clear for users, developers, and administrators should be aware of the security implications.
Bonjour uses Multicast DNS (mDNS) for performing DNS-like operations on the local link in the absence of any conventional Unicast DNS server. It works even when no infrastructure is present and also during infrastructure failures.
In environments where security has to be closely monitored, other measures must be implemented to ensure the cooperation of participants and network administrators to distinguish suspicious Multicast DNS messages that could constitute a threat to the system and/or the company.
These are some of the recommended measures:
- WPA2-PSK (Wi-Fi Protected Access 2/Pre-Shared Key) or encryption should be used in wireless environments to ensure only authorized users are active on the network.
- In open network environments (such as Wi-Fi hotspots), administrators should make sure to implement the appropriate security measures.
- Using advertising services with unicast Wide-Area Bonjour, configured manually or automatically with the help of Bonjour Hybrid Proxy gateway products; or other Bonjour gateway products offered by Wi-Fi access point vendors.
Finally, let's explore a key component of Apple's security implementation for their devices: System Integrity Protection.
What is System Integrity Protection?
System Integrity Protection or SIP is a security mechanism designed to ensure system resources are secure. This technology, available since OS X El Capitan and later, protects the booter and kernel – in other words, all system resources – from malicious writes on a system running macOS.
It does this by preventing users and processes (including malicious software) from altering core macOS items, even if these users have advanced permissions (administrator or root privileges). It even restricts the root user account from certain actions on protected parts of the system. This system also protects core macOS apps (apps bundled with the OS), such as Safari, Messages, and so on.
SIP protects these specific items:
-
- /System
- /usr
- /bin
- /sbin
- /var
- Pre-installed core apps bundled with the macOS installer
If an app you want to use is not able to run because of compatibility issues with SIP, the best recommendation is to ask the developer to provide a compatible version. Otherwise, you can disable SIP following these steps:
- Restart the Mac and enter the Recovery interface as appropriate for your Mac model (Intel-based or M1 chip).
- Open the Terminal from the Utilities menu.
- Enter the csrutil disable command.
- Enter reboot to reboot the Mac.
Because of the security risk of disabling SIP, you should reenable it as soon as possible. To reenable SIP, follow these steps:
- Follow steps 1 and 2 indicated earlier.
- Enter the csrutil enable command.
- Enter reboot to reboot the Mac.
Take into account that the SIP setting is saved to the computer's firmware; therefore, resetting the Parameter RAM (PRAM) will also reenable SIP. Resetting PRAM is covered in Troubleshooting Tips. Performing a software update may also re-enable SIP.
And with this explanation, we have reached the end of this section. We reviewed the tools and features macOS offers to protect system security, including the latest features introduced in macOS Big Sur and Catalina, such as the Signed System Volume (SSV) and the Read-Only system volume. We also saw the recommended security measures that should be implemented, and what you could do if you are concerned about mDNS. Finally, we saw how System Integrity Protection (SIP) protects your system resources.
In the next section, we will explore the available tools macOS offers for hardware security.
Understanding hardware security
In the same manner, as we saw for the system in the previous section, security for Apple devices is built into the hardware as well. In this section, we will examine the tools and features macOS provides for increasing hardware security. By the end of this section, you will be able to configure and take advantage of these key features. The three main important tools we will explore in this section are the following:
- Firmware password
- T2 Security Chip (Intel-based Macs)
- Macs with the Apple M1 silicon chip
Both these tools are managed through the Startup Security Utility, which can be accessed through the Recovery system as we will see later in this section. Let's learn more about these features.
Firmware password
The firmware password is used to prevent your Mac from starting up from any disk other than the one configured as the startup disk. Its primary purpose is to prevent unauthorized users from using startup shortcuts (such as the Option key) to bypass other passwords in place to access the computer's operating system and make changes. Take into account that the firmware password is no longer supported in Macs with the Apple M1 silicon chip. We explained this tool in detail, as well as how to configure it in Chapter 5, Managing User Security and Privacy, if you would like to go back to review it.
The firmware password is not the only tool available at the startup level. In the next section, we will see another, more recent and more powerful, feature.
T2 Security Chip (Intel-based Macs)
The Apple T2 Security Chip is Apple's second-generation, custom chip for specific Mac computer models. The T2 chip works in combination with Startup Security Utility, which is accessible through the Recovery system.
The T2 chip enables your Mac to have the following capabilities:
- New levels of security by including a coprocessor that secures Touch ID data
- New encrypted storage capabilities through Full System Encryption in combination with FileVault (explained in the section about FileVault that follows)
- Secure Boot and External Boot capabilities (explained shortly)
- The T2 chip's image signal processor works in combination with the FaceTime HD camera for improved tone mapping, exposure control, and autoexposure/auto white balance based on face detection.
You can follow these steps to find out whether your Mac has the T2 chip:
- Go to the Apple menu and press the Option key to reveal the System Information option.
- On the left menu, look under the Hardware section.
- Select the Controller option; if you have the T2 chip, it will display here, as seen in Figure 15.8:

Here, we will explore the three main security features used in combination with the T2 Security Chip:
- Secure Boot
- External Boot
- Activation Lock
Let's start with the Secure Boot feature.
Secure Boot
This feature works only in computers with the Apple T2 security chip. Secure Boot ensures only a legitimate and trusted operating system loads at startup.
Secure Boot offers three levels of security:
- Full Security: This is the default setting, offering the highest level of security. It ensures only your current OS or, otherwise, an Apple trusted and signed OS, runs on your computer. The OS is verified during startup and, if it cannot be verified as legitimate, the Mac will connect to Apple to download additional information to verify it. If despite this attempt, the OS cannot be verified, this happens:
- In the case of macOS, an alert will be displayed to download a software update to reinstall macOS or choose another startup disk that will also be verified before allowing it to run.
- If you are attempting to run Windows, an alert will be displayed to inform you that you need to install Windows through Boot Camp Assistant.
- Medium Security: This allows any version of a signed OS (macOS or Windows) to run. This means that even an OS that once was trusted by Apple but no longer is will be able to run. If the OS cannot be verified, this happens:
- In the case of macOS, an alert will be displayed to download a software update to reinstall macOS or choose another startup disk that will also be verified before allowing it to run.
- In the case of Windows, an alert will be displayed to inform you that you need to install Windows through Boot Camp Assistant.
- No Security: If this option is selected, no verification is done at OS startup.
You can configure Secure Boot through a tool called Startup Security Utility:
- Turn on your Mac, or restart it, and press Command + R as soon as you see the Apple logo to start up from the macOS Recovery interface.
- When you see the Recovery interface, go to the Utilities menu at the top, and select Startup Security Utility.
- Authenticate as administrator.
- You will see the Startup Security Utility configuration window. You will notice that, by default, Full Security (Figure 15.9) is selected. You can leave this default, recommended setting, or change it according to your requirements.

Now that you understand what Secure Boot does and how to use it, let's examine another feature that is available with the T2 chip: External Boot.
External Boot
This feature allows you to control startup from external media, such as an external drive or a flash drive. It also works in combination with the T2 chip. By default, it is set to Disallow booting from external media.
In some cases, for example, when you need to reinstall from external media, you will need to modify this configuration to allow booting from external media. Follow these steps to modify the default, recommended setting:
- Follow the steps stated in the previous section to open Startup Security Utility.
- Next, in the External Boot section at the bottom, select Allow booting from external media and quit Startup Utility.
- Then, you can go to the Apple menu and choose the Startup Disk menu option.
- Select the external disk you want to boot from.
- You will now be able to restart the Mac to boot from the external disk. Alternatively, you can use the Option key at startup to choose a disk to boot from (if a firmware password is configured, you will need to provide it to continue).
Finally, let's explore the third feature that works when a T2 chip is available on a Mac machine.
Activation Lock
This is another feature that works in combination with the T2 security chip. It helps prevent anyone from using your Mac without authorization. This is useful if your Mac ever gets stolen, lost, or misplaced. It also works in combination with the new feature Find My. If you meet the requirements, just enable Find My, and Activation Lock will be enabled automatically. You will find more details on using the Find My and the Activation Lock features in the Understanding User Security section at the end of this chapter.
macOS also has technologies and features in place to protect apps, as we will discover next.
Next, we will explore how these features are different in Macs with the Apple M1 silicon chip.
Macs with the Apple M1 silicon chip
Hardware security works differently in Mac with the Apple M1 silicon chip. This chip verifies whether the version of macOS loaded during startup is authorized and continues to verify system integrity in the background while the Mac is functioning. This is why the T2 chip will no longer be present in Macs with the M1 chip since the security features it provided have moved to the new silicon chip.
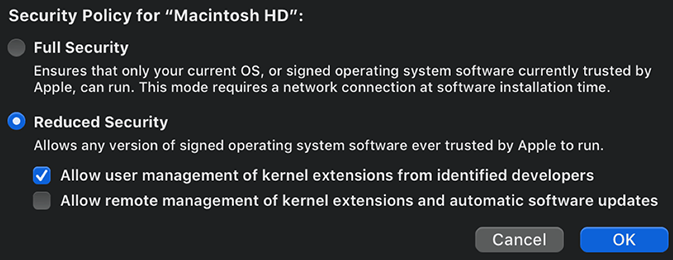
As a consequence, Startup Security Utility in Macs with the M1 chip has changed and been renamed Startup Security Utilities. You now have the following options:
- Full Security: Ensures only the current OS, or a signed OS trusted by Apple, runs. It requires a network connection at installation.
- Reduced Security: Allows any version of a signed OS, trusted at any point in time by Apple, to run. This option has two settings:
- Allow user management of kernel extensions from identified developers.
- Allow remote management of kernel extensions and automatic software updates.
You can configure these options through Startup Security Utilities:
- Turn on your Mac, or restart it, and press and hold the Power button until you see the Options gear icon.
- Select Options and click Continue.
- Select a known administrator and enter the password. Click Next to continue.
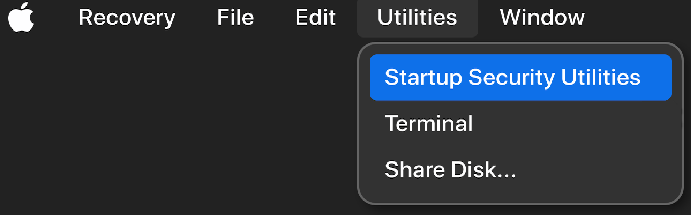
- When you see the Recovery interface, go to the Utilities menu at the top, and select Startup Security Utilities, as seen in Figure 15.10:
- You will see the Startup Security Utilities configuration window (Figure 15.11). As you can see, the Firmware password option no longer appears and we now see the options described earlier. You can leave the default, recommended setting (Full Security), or make changes according to your requirements.
In this section, we saw the tools provided for hardware-related security, including the firmware password, and the features used in combination with the T2 chip in Intel-based Macs. We also saw how these features change in Macs with the M1 silicon chip. In the next section, we will examine application security.
Understanding application security
macOS uses process security mechanisms, and built-in technologies such as System Integrity Protection (SIP), described earlier in this chapter, to protect the system resources and allow system-wide access to apps only when it's strictly necessary. Other technologies are employed to make apps more secure, such as app sandboxing, as well as features that protect your Mac from viruses and malware, compromised apps, and unauthorized access, in particular, when you wish to install third-party apps. In this section, you will learn about all these technologies and features, as well as how to configure them. By the end of this section, you will be able to configure them according to your specific security needs.
The topics we will explore will be divided into two main sections:
- Application security technologies
- Verifying app security settings
Let's start by exploring the macOS application security technologies.
Application security technologies
macOS uses several technologies for improving app security, and most of them are interrelated in some form or work in combination with each other. These specific technologies are the following:
- App sandboxing
- Code signing
- File quarantine
- Gatekeeper
- Malware detection
- Notarization
Let's explore briefly what they are, and how they help to protect the system and users.
App sandboxing
Through sandboxing, apps are isolated from the rest of the user and system resources and are allowed access only to the resources they need. In other words, this technology prevents apps from accessing user files and folders they don't need to carry out their functions. An easy way to explain how sandboxing works is that apps "play" inside a container that has no, or very limited, access to system and user files. Naturally, this technology increases system and user security. As of June 2012, it is a requirement for all apps available from the App Store to use app sandboxing. There is nothing the user needs to do to take advantage of app sandboxing; it is really developers who have to integrate it during development.
Besides sandboxing, macOS uses additional verification mechanisms to ensure app authenticity and integrity, as we will see next.
Code signing
The system uses code signing to verify software authenticity and integrity. It verifies whether the app is from a known developer and that it hasn't been tampered with since it was last signed. App developers have to take into account that before their apps can be submitted to the App Store, they must be signed with a certificate issued by Apple. Developers must obtain their unique Developer ID to be able to generate Developer ID certificates. The App Store verifies the certificate and makes sure it hasn't been altered. If it finds a problem, the app is removed. This is why the safest place to download apps is the App Store.
If you choose to download apps from the internet or directly from a developer's website, macOS still protects your Mac through two other technologies: File quarantine and Gatekeeper, which both work in combination with code signing; let's explore the first one next.
File quarantine
File quarantine is a feature that validates apps that download files from the internet. In this case, when a user attempts to open an item downloaded from an unknown source (the internet, for example), the system displays a warning, like the one seen in Figure 15.12.
Take into account that this feature only works with specific "quarantine-aware" apps that can include quarantine attributes in files from external sources:
- Quarantine-aware apps: Safari, Messages, iChat, and Mail.
- Attributes: Date, time, a record of the file's download origin.
When you open a file through any of these quarantine-aware apps, you will see a warning like the following:
If the user that downloaded the file opens it, the quarantine attributes are removed. However, if other users open the file, the warning will display every time. Take into account that the user who downloaded the file is the only one who can remove the quarantine attributes by opening the file.
Also, consider the following:
- Applications other than the ones mentioned previously will now display the quarantine warning.
- Copying a file from external media, such as a USB, to the Finder will not activate the quarantine warning.
- A code-signed app will not display a quarantine warning.
This feature works in combination with another feature that we will look at next.
Gatekeeper
Gatekeeper is another Apple technology that works in combination with file quarantine and code signing. It is designed to ensure only trusted software runs on your Mac and that it does not contain malware. A signed app will not trigger a warning when opened as it is considered to be safe. But, if you download apps from the internet or directly from a developer's website, macOS still protects your Mac through Gatekeeper. In this case, Gatekeeper checks the Developer ID signature to verify the developer's identity, and it verifies that the app has not been altered. If the app is not signed by an identified developer or notarized, Gatekeeper will prevent you from opening it. However, if you are sure the app you downloaded is safe, you can bypass this protection that prevents it from opening. The procedure is explained in the Verifying app security settings section.
Gatekeeper also protects your system from malicious plugins that may be included with apps. Gatekeeper opens the apps from read-only locations, which prevents the loading of harmful plugins included with apps.
Next, let's examine the built-in technology macOS uses for malware detection.
Malware detection
Malware detection works in combination with the quarantine and notarization features. Since Mac OS X Snow Leopard, the macOS update system automatically updates a list of known threats. When you open a quarantined file, the system verifies malware included in the list of updates.
macOS uses two technologies for malware protection: XProtect and the Malware Removal Tool (MRT):
- XProtect is macOS antivirus and malware technology. XProtect uses YARA signatures. YARA is a multi-platform tool that helps researchers identify and classify malware samples through signature-based detection. Signature-based detection involves having a predefined repository of signatures or fingerprints that represent known threats. When a match is found, the file is categorized as a "threat" and blocked. You can visit this link if you want to learn more about YARA: http://virustotal.github.io/yara/. Apple monitors new threats and updates signatures automatically and independently from the system updates, via automatic updates. XProtect verifies whether there is malicious content present whenever an app is first launched and when it has been changed. If your Mac detects malicious content, you will see a warning that will prevent you from opening the app, and it will give you the option to move it to the Trash.
- The Malware Removal Tool (MRT) is an engine that takes care of getting rid of any infections if it finds them. It does this based on the updates it receives from Apple via automatic updates. When it finds malware, it removes it and verifies the system on restart and login.
Finally, let's explore another technology that works in combination with malware detection.
Notarization
Notarization works in combination with malware detection. It is a process that informs you that Apple has carried out a security check and confirms that no malicious software was found. macOS Catalina and later requires software to be notarized and requests your approval before opening software that has not been signed or notarized to make sure you understand the risks of doing so.
When you open an app that has been notarized by Apple, you will see a message like the one in Figure 15.12.
In the next section, we will explore how to verify the configuration of the security settings related to the technologies we just saw and how you can make some changes to bypass the protections that prevent you from opening certain apps.
Verifying app security settings
You can verify the settings related to the technologies and features we just explored in macOS through System Preferences, as well as making the necessary changes to bypass the limitations it imposes on an app opening (at your own risk).
Follow these steps to verify the app security settings:
- Open the System Preferences.
- Click on the Security & Privacy icon, and select the General tab.
- You can see in Figure 15.13 that Allow apps downloaded from: App Store is selected by default. You can change this behavior here to also allow apps from identified developers not necessarily available just through the App Store.
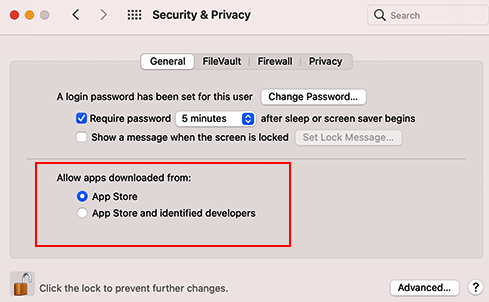
If your Mac is still configured with the default settings, and even if it's configured to Allow apps downloaded from: App Store and identified developers, you might not be able to install an app that was not downloaded from the App Store. Let's see next what to do in that case.
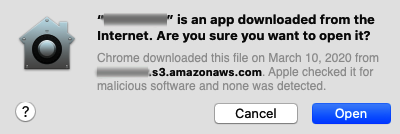
Opening a non-notarized or unidentified app
After you download and install an app that does not pass the notarization process, when you try to open it, you may receive a warning that the app cannot be opened, as shown in Figure 15.14:

Follow these steps if you still wish to open the app:
- Click OK in the notice in Figure 15.14.
- Go to Security & Privacy in System Preferences.
- You should see a notice at the bottom that indicates the app was blocked (Figure 15.15). Click the button to Open Anyway:

- A new warning will appear with the option to Open the app. Click on Open Anyway.
- In this case, we are sure this app is safe, therefore, we will go ahead and open it. When you choose Open Anyway, an exception will be recorded in the security settings, and you will be able to open the app from that point on.
In this section, we explored the technologies related to app security, such as app sandboxing, code signing, and more. Also, we saw how to verify your app security settings and make the necessary changes to open apps from unknown developers. In the next section, let's explore the technologies that allow you to keep your data safe.
Understanding Data security and encryption
Besides system, hardware, and application security, macOS also provides tools and features to protect your company's and users' data. In this section, we will explore the main technology macOS offers specifically for data security and protection: encryption. By the end of the section, you will understand how data security and encryption work in macOS and how to configure it. More specifically, we will explore the following:
- Types of encryption
- FileVault
- Encryption in Macs with an M1 chip
- Encrypting external media
Let's begin by learning the types of encryption available in macOS.
Types of encryption
macOS offers two types of encryption:
- Full-Disk Encryption: This type of encryption is available for Macs that don't have the T2 security chip. It provides XTS-AES-128 encryption with a 256-bit key. It is performed through the FileVault tool at the file system driver level, and it encrypts the startup disk. FileVault is explained in detail in the next section.
- Full-System Encryption: This type of encryption is available for Macs that have the T2 security chip (Intel-based only). The T2 chip uses an advanced built-in hardware-accelerated AES engine for 256-bit key encryption tied to a unique identifier in the T2 chip. You don't need to do anything to benefit from this encryption as it automatically encrypts and decrypts the SSD when connected to the Mac with the T2 chip. Because this encryption is integrated into the T2 chip hardware, if the chip becomes damaged, access to the encryption keys could be lost; therefore, it is recommended to have a backup of your data with Time Machine or other methods.
Although the SSDs of computers that have T2 chips are encrypted automatically, it is recommended to turn on FileVault for extra protection. This way, decryption is not performed automatically, but a password is required to decrypt the data instead. We will explore FileVault in the next section.
What is FileVault?
FileVault is a macOS encryption technology that helps to protect user data. It accomplishes this through the seamless conversion of the standard system volume into a protected system volume.
FileVault is available since OS X Lion (10.7) and later. The current version of FileVault is also sometimes referred to as FileVault 2, in order to distinguish it from the older version running in Macs with versions older than OS X Lion, now known as FileVault Legacy; however, most Macs now use the new version.
FileVault can be used both with Mac computers with the T2 security chip or without it. The difference will be the type of encryption available for the system volume:
- FileVault without the T2 chip uses full-disk encryption to protect data on your startup disk. This type of encryption is explained earlier in this section.
- On the other hand, FileVault with the T2 chip uses full-system encryption, which was explained earlier in this section.
When FileVault is enabled, what happens is that your Mac will always require your user account password to log in. The FileVault technology includes account password synchronization, and this means that if you change your user account password, it will automatically sync with FileVault. You won't need to do anything. There's no need to re-encrypt the volume when users change their password, and that's one of the advantages of this technology. Also, there's minimal impact on the user experience since you can continue to work on your computer while the encryption is being completed. In fact, most processes and applications will continue to behave as usual and won't be affected by the volume encryption. The time it takes to encrypt will depend on the amount of data in the disk.
In this section, we will learn how to manage FileVault, including the following:
- FileVault Recovery
- Enabling FileVault
- Turning off FileVault
- Changing your recovery key
- Recovering FileVault access
- Encryption with the Apple M1 chip
- Encrypting external media
Let's find out how to enable FileVault, but first, we need to decide which recovery option we will be using.
FileVault Recovery
There are a few methods, depending on your version of macOS, to unlock a system when the user forgets or lose their password so that they or an administrator can regain access to the computer and reset the user account password:
- OS X Mavericks (only): You can use a FileVault recovery key, which includes security questions and answers.
- OS X Yosemite or later: You can use the iCloud account to unlock your Mac and reset the password.
- OS X Lion or later: You can create a local recovery key and keep it safe in a secure place where you will remember where to access it if needed (not on your system disk!).
- Institutional recovery key (IRK): This key allows you to regain access to your data through a FileVault master keychain.
These methods will be explained in detail later in this section; we mention them here because you need to know which method you will use when you enable FileVault. If you need more detail on how each method works, you can review the section that details each method before you enable FileVault.
Enabling FileVault
In older versions of macOS, it was possible to enable FileVault during the initial configuration of a recently installed or upgraded Mac through the Setup Assistant. In macOS Big Sur, you can enable it by following these steps:
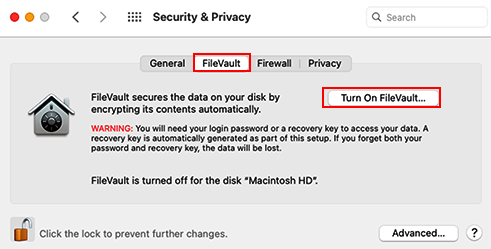
- Open System Preferences.
- Click the Security & Privacy icon.
- Click the FileVault tab.
- Authenticate as an administrator.
- Click Turn On FileVault... as shown in Figure 15.64:
- Next, you should select how you want to unlock the disk and reset your password if you forget it. This is very important since you won't be able to access the disk if you forget your password. For this example, we will choose the first option in Figure 15.17, Allow my iCloud account to unlock my disk:
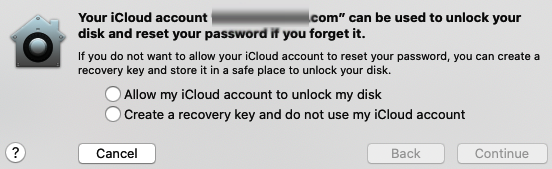
FileVault might take a while to encrypt, depending on the amount of data, but it will do it in the background, and you can continue to use your Mac while the process is completing. You will see the encryption progress in the FileVault tab in System Preferences.
- When the procedure completes, you will see the message FileVault is turned on for the disk "[disk name]".
- Restart the computer for FileVault to start asking for a password to log in and access the data.
Now, the next time you turn on your Mac, you might see the screen is now light gray, and you will need to enter your user account password for the system disk to decrypt. Login will take a little longer now as the disk has to be decrypted.
If there are other users on the same machine, they are authorized to decrypt the disk as well. However, in older versions of macOS, you may see a window prompting you to enable each user to access the protected disk. Just click the Enable User... button for each user.
If for any reason, you no longer need to encrypt your startup disk, you can turn off FileVault as easily as you turned it on. The procedure is explained next.
Turning off FileVault
If you want to disable disk encryption, perhaps because you sold your computer, follow these steps to turn off FileVault:
- Open System Preferences.
- Next, click on the Security & Privacy icon.
- Click the FileVault tab.
- Click the lock icon to authenticate as an administrator.
- Click Turn Off FileVault. The procedure will take more or less time, depending on how much data you have. You will see a progress bar that allows you to monitor the process.
- When the procedure completes, you will see the message FileVault is turned off for the disk "[disk name]".
And that's it! The next time your restart the Mac, you will no longer be asked to provide your user account password to decrypt the disk.
Now, if you want to change your recovery key, you can do it by following the procedure explained next.
Changing your recovery key
There is no way to change your recovery key while FileVault is turned on. As long as you know your user account password, you can change your recovery key at any time, but it will require turning off FileVault. Follow these steps:
- Turn off FileVault as indicated in the procedure explained in the previous section. Wait until the procedure finishes.
- When you see the message that indicates FileVault is turned off for the disk "[disk name]", you can proceed to turn on FileVault again following the procedure indicated earlier to enable it and choose a different recovery key.
If you have lost access to your Mac, for example, because you don't remember your user account password, you can recover access through the method you selected when enabling FileVault or even through other user account password recovery methods, as we will see next.
Recovering FileVault access
These are the methods you have available to recover access to your account if FileVault is turned on and you don't remember your password or have lost access to your account:
- Using your iCloud account to reset your password (default recovery method)
- Resetting with the local Recovery key
- Resetting using the regular user account password reset methods
These methods are explained in Chapter 5, Managing User Security and Privacy; we won't repeat them here. Please, feel free to go back to that chapter to review them in detail. Let's see a quick overview of each next.
Using your iCloud account
When you enable FileVault, you are asked to select a recovery method by choosing between two methods to set up a recovery key. Using your iCloud account is the default method, which sets up a recovery key that you don't see as it is saved in your iCloud account for you. All you need is to remember your iCloud account user name and password to use it.
The alternative recovery method is reviewed next.
Resetting with the local Recovery Key
When enabling FileVault, the alternative option you are offered as a recovery method is to set up a local Recovery Key, which you can use to reset your password. In this case, however, you do need to save it in a safe place and remember where you stored it, in case you need it later for recovery.
If neither method is useful for you because you lost access to your iCloud account or you don't remember where you stored the local Recovery Key, then you can try the regular account password reset methods explained below.
Resetting using the regular user account password reset methods
These methods are those you have available when trying to reset your user account password, and they are all explained in Chapter 5, Managing User Security and Privacy:
- Through the Users & Groups preferences: This method assumes you have lost access to your account, but an administrator has access and can help you through the Reset Password... button in the Users & Groups preferences.
- Using the Reset Password assistant: If FileVault is turned on and you forgot your account password, you can use the Reset Password assistant.
- Using the resetpassword command: This method requires you to enter Recovery mode and use Terminal.
- Using your Apple ID: If the option is enabled, you can use it as well to reset your user account password.
In this section, we saw how FileVault provides encryption for your system disk, how it works, how to enable it and turn it off, and how to recover access to your encrypted disk if you lose access to your account.
Encryption with the Apple M1 chip
In addition to full-disk encryption with FileVault, Macs with the Apple M1 silicon chip have dedicated hardware that protects the login password and enables file-level encryption. Third-party app developers can use this file-level encryption to help protect sensitive data.
Macs with the Apple M1 silicon chip don't require the T2 chip anymore, as the features it provided are transferred to the new chip. Therefore, Mac models that today have the T2 chip will not have it anymore when released in the M1 chip model version.
In the next section, we will see how we can also encrypt external disks with macOS.
Encrypting external media
In the previous section, we saw the main technology macOS uses for encrypting and protecting your system disk. However, you probably use removable media; despite the growing popularity of cloud storage, it is still quite often used, and you probably have sensitive information on it. macOS provides a method to encrypt your removable media as well.
Follow these steps to encrypt external media in macOS:
- Open Finder.
- Select the external volume/media you want to encrypt, either on the sidebar or on the desktop.
- Right-click the volume/media and select Encrypt.
- You will be asked to enter a password. IMPORTANT! Copy this password in a safe place so that you will remember it. This is not the same password as your user account. If you lose this password, you will permanently lose access to the data stored in the volume/media. There is no recovery method in this case.
- Verify the password by entering it again.
- Enter a password hint, which is not a bad idea. Use a meaningful hint to help you remember your password or a hint of where you stored it.
- When ready, click Encrypt Disk.
And that's it! When the process completes, your volume/media will be encrypted, and you will be required to enter a password to decrypt it and access the data on that media.
In this section, we explored the tools and technologies macOS offers for data security. We examined how macOS uses encryption, which types of encryption are available, and the main technology macOS uses to encrypt and protect the system disk, called FileVault. We also saw how to encrypt external media to protect your data further. You can now use these tools to ensure your clients' and your users' data is safe.
Now that we have examined most of the tools and measures for system, app, and data security, let's now look at some additional tools to enhance user security.
Understanding User security
In the previous sections in this chapter, we addressed the technologies, tools, and features that help you protect the system, hardware, application environment, and data. Adopting measures to protect user security and privacy are as important as those we have seen so far. Although we covered a great deal on user security and privacy, through the use of passwords, the keychain system, and more, in Chapter 5, Managing User Security and Privacy, there are additional tools and features you can take advantage of to enhance user security in a more general way. In this section, we explore these macOS features designed for that purpose:
- Two-factor authentication
- Login Options
- Firewall
- Screen Time
- Find My
- Guest account
- Family sharing
Let's examine each of these options.
The iCloud Security Code and two-factor authentication
The iCloud Security Code and two-factor authentication provide additional protection for your Apple ID account. This way, your Apple ID account can only be accessed by your Apple trusted devices, such as your Mac, iPad, iPhone, or iPod.
In the latest macOS versions, the iCloud Security Code is a number generated from a two-factor authentication device enabled for your Apple ID and iCloud. This is because now when you create an Apple ID, you are requested to provide a trusted phone number for verification purposes, and two-factor authentication is turned on by default. When you associate your Apple ID with your account on a Mac, iCloud is set up with two-factor authentication turned on as well in the same way, by providing a phone number.
The code generated will appear on the phone or another Apple device you provided and associated with your iCloud account. If you don't have access to either of those devices, then the code will be accessible on the first device, usually the Mac where you activated the Apple ID initially. But this code will most likely be pointless because if you forgot your login password, it is very likely that you won't be able to access that Mac. It's a good idea to have other devices associated with this Apple ID if you want to recover login access through the Apple ID.
When you are trying to authorize a new device to use your Apple ID, you will see a message like the one in Figure 15.18 on the device you provided as the second factor.

When you click on Allow, you will see a security code on the second-factor device, as seen in Figure 15.19:

Next, you will need to enter that code on the device you are trying to approve for using the Apple ID. In the example in Figure 15.20, we enter the verification code in the Mac we want to authorize:

In earlier macOS versions, iCloud Security Code was an additional technology intended to protect your iCloud Keychain when you used it with an Apple ID, but two-factor authentication was not enabled. When this was the case, macOS asked you to enter or create an iCloud Security Code to trust a specific device. This code could also be used to allow access to other devices with the same Apple ID, add more devices, and regain access to the iCloud keychain if you lost access to all your devices.
When you first enabled the iCloud keychain service for a given Apple ID, you were prompted to enter the security code. It was not mandatory to set it, but if you didn't, you would have needed to have physical access to the original device where the service was initially set up to authorize access to the information stored in the iCloud keychain for a new device. As mentioned earlier, if you lost access to all your devices, you could regain access to your iCloud keychain by adding a new device through this code. If you lost access to all your devices and didn't have a security code, the only option was to reset the iCloud keychain, but in this case, all the contents of your old keychain would be lost.
This is why the process has been simplified by using two-factor authentication by default to authorize other devices. However, we detail this information here since this change is recent, and there might be users using older versions of macOS.
There were several methods to set up this code:
- Code Plus Verification
- Complex Security Code
- Random Complex Security Code
Code Plus Verification was the default method for adding this code, and it works in combination with an SMS text message validation. With this method, you would be asked to choose a six-digit code and provide a phone number for the text messages.
Complex Security Code was an advanced method for a more complex and more secure code. It comprised a code of up to 32 characters.
Random Complex Security Code was also an advanced method where a random, complex code of up to 32 characters was generated. However, in this case, you would need to provide a phone number since the method was combined with text message validation.
To see, edit, or disable the iCloud security code, you would go to iCloud Preferences and click the Options button next to the keychain item. In macOS Catalina and later, the Options button no longer shows, but you can go to the Apple ID preferences, click the Password & Security menu, and click the Edit button to add trusted phone numbers, get a verification code, or turn on the Recovery Key feature (Figure 15.21):

Of course, you can also manage two-factor authentication from your Apple ID account on the Apple ID website: https://appleid.apple.com. Another way you can increase user security is by restricting the login options. Let's explore how that works.
Login options
In the Users & Groups preferences, you have extra options that can be used to enhance user security and privacy. These are as follows:
- Automatic login
- Display of usernames
Let's explore these options in the following sections.
Automatic login
This option allows you to automatically log in as a specific user when the Mac is turned on, without the need to enter a password. This option is disabled by default, and it should stay that way if more security is desired.
To verify whether this is the case, do the following:
- Open System Preferences.
- Click on the Users & Groups icon.
- Authenticate as administrator.
- Click on the Login Options tab at the bottom.
- Make sure Automatic login is set to Off, as seen in Figure 15.22:

You could also choose any user from the list and enable Automatic login for that user if you are certain that it does not constitute a security risk.
Let's explore another setting in the same location that you can use to protect your users' privacy.
Display of usernames
These extra options in the Users & Groups preferences allow you to protect your or your users' privacy better. For example, you can do the following:
- Change the login window to display as Name and password instead of List of users. This will show blank name and password fields instead of the username (Figure 15.22).
- Change the Show fast user switching menu option from Full Name to Account Name or even Icon for more privacy (Figure 15.22).
Fast user switching is covered in more detail in Chapter 4, User Accounts Management.
Next, we'll explore a built-in tool that protects against unwanted connections from outside.
Enabling the firewall
The macOS built-in firewall prevents unauthorized connections from the internet or other networks. It is preconfigured to work out of the box, but you can make changes if you are an advanced user with specific requirements.
Follow these steps to verify the firewall settings:
- Open System Preferences.
- Click the Security & Privacy icon.
- If the firewall is off, authenticate as administrator and click the Turn On Firewall button, as shown in Figure 15.23:

- After enabling it, you should be able to click on the Firewall Options... button.
- You will be presented with more options to customize the firewall (Figure 15.24):
- Block all incoming connections: If enabled, it will block all incoming connections from nonessential services and apps, allowing only essential connections such as DHCP, Bonjour, IPSec, and so on. If you enable this option, you might have problems using certain apps. For this reason, it is disabled by default. If you choose to use it, you have Add (+) and Remove (-) icons below to add applications for which you wish to allow connections.
- Automatically allow built-in software to receive incoming connections: This option is selected by default. It allows built-in apps and services signed with a valid certificate to be automatically added to the list of allowed apps.
- Automatically allow downloaded signed software to receive incoming connections: This option is selected by default. It allows downloaded apps and services signed with a valid certificate to be automatically added to the list of allowed apps.
- Enable stealth mode: This option is disabled by default. If enabled, it prevents your Mac from responding or acknowledging requests that reveal its presence in the network, including ICMP requests like pings.

The next feature we will explore is related to controlling and monitoring.
Screen Time
This feature, available since macOS Catalina, replaces the parental controls that were available in previous versions of macOS. This tool is very helpful for monitoring kids' screen time usage and restricting the type of content they can see. More specifically, Screen Time allows you to do the following:
- Track usage
- Limit usage
How to enable Screen Time and use its features is explained in detail in Chapter 4, User Accounts Management.
Next, we will see another important feature designed to offer you recovery options if your Mac is misplaced, lost, or stolen.
Find My
Find My is a feature (available since macOS Catalina) that combines Find My iPhone and Find My Friends to allow you to locate and even protect your Mac if it's misplaced, lost, or stolen.
To use this feature, you need the following:
- An Apple ID.
- An iCloud account.
- Location Services must be turned on.
- Access to iCloud on another device or the internet.
- Your Mac and devices must be updated to the latest macOS version (at least iOS 13 for devices and iPadOS for iPad) and watchOS if you plan to use your Apple Watch.
To enable this feature, we need first to make sure Location Services is turned on:
- Open System Preferences and click on the Security & Privacy icon.
- Select the Privacy tab and then Location Services, as shown in Figure 15.25.
- Next, click on the lock icon at the bottom to authenticate as an administrator.
- Activate the Enable Location Services checkbox at the top.
- Next, go to the bottom of the list and click on the Details... button next to System Services.
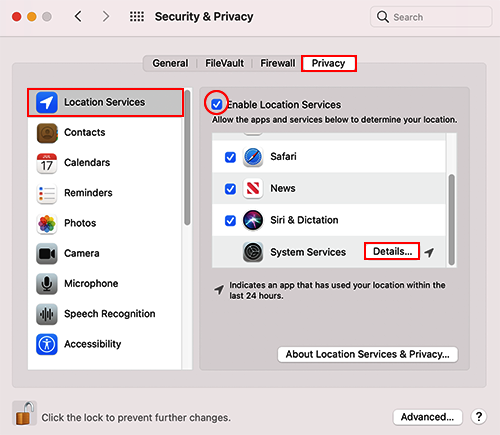
- Make sure the Find My Mac checkbox is enabled, as seen in Figure 15.26:

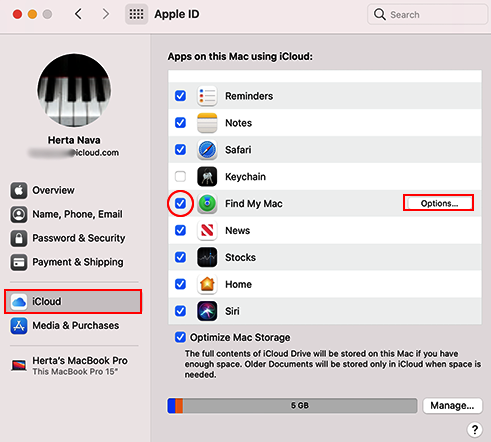
Next, we need to enable Find My Mac:
- In System Preferences, click on the Apple ID icon at the top.
- Click iCloud on the side menu.
- Activate the Find My Mac checkbox.
- If asked if you want to use the location of this Mac, click the Allow button.
- If you see a Details button besides Find My Mac, it means you need to enable Location Services, as indicated in the previous group of steps.
To configure Find My, follow the steps given here:
- After enabling Find My Mac in the previous steps, you will see an Options button besides Find My Mac (Figure 15.27). If you see a Details button instead, it means you need to enable Location Services, as indicated earlier.
- Click the Options button; you will have these options to configure (Figure 15.28):
- Find My Mac: This enables locating, locking, or erasing the Mac.
- Find My network: This new feature enables locating the Mac even if it's not connected to Wi-Fi or a data network. This is possible thanks to a crowdsourced network of millions of Apple devices that use Bluetooth technology to detect a nearby device and report the approximate location to the owner.

- Click Done when finished.
If your Mac is misplaced or stolen, and Find My is set up, this is what you can do:
- Locate your device on a map
- Play a sound
- Lock your Mac
- Erase your Mac
- Remotely lock your device
- Display a message onscreen for whoever has your Mac
Let's explore these options in more detail next.
Locating your Mac on a map
If your Mac is misplaced or stolen, and Find My is set up as indicated in the previous section, you can locate it on a map. Here's how you can do that:
- Sign in to iCloud.com (or open the Find My app on your iPhone, iPad, or iPod touch).
- Click on Find.... Don't worry if it says Find iPhone as in Figure 15.29; in this section, you will find all your Apple devices that have Find My enabled, including your Mac:

- By default, you will see the location of all your devices on a map, but you can select a specific device from the All Devices drop-down list, as seen in Figure 15.30:

- Select your device from the list. You will see a window open with actions to perform (Figure 15.31). We will see these actions in more detail in the next section. You can also choose Directions to open the location in the Maps app and obtain directions.
Let's examine another action we can perform after the Mac has been located on the map.
Playing a sound
Once you have located your Mac on the map, you can do a few actions; one of them is playing a sound. This is useful if your Mac is misplaced in a large office, for example.
For playing a sound to work, your Mac must be nearby and online. If your Mac is offline, it will play the sound when it connects to a network:
- Follow the steps indicated in the previous procedure.
- Select a device from the drop-down list.
- Click the Play Sound button (Figure 15.31).

As you can see in Figure 15.31, the Lock and Erase Mac options will also appear in the same location as the Play Sound button; however, there are specific requirements for locking and erasing that we will describe next.
Locking your Mac
This feature will mark your computer as lost and lock it with a passcode. You can also display a message on the screen for the person who finds it or has it. This feature works in combination with Activation Lock.
These are the requirements for this feature:
- A Mac with macOS Catalina or later installed
- The Apple T2 security chip (Intel-based Macs only)
- An Apple ID with two-factor authentication enabled
- Find My Mac enabled
- Secure Boot configured in the default setting Full Security
- External Boot configured in the default setting "Disallow booting from external media"
- Activation lock must be enabled
Follow these steps to verify whether Activation Lock is enabled:
- Go to the Apple menu and select About This Mac.
- Click the System Report... button.
- Make sure Hardware is selected in the left pane.
- Take a look at the bottom of the right panel. You should see Activation Lock Status with the value Enabled:

Activation Lock turns on automatically when you configure Find My. If you see Disabled instead, it means Find My is not enabled or your Mac does not have the T2 security chip.
Once these verifications are done, you can proceed to lock your Mac:
- Follow the steps to locate your Mac on a map.
- Click Lock or Mark As Lost (Figure 15.31). If asked, confirm you want to lock your Mac by clicking Lock.
- You might be asked to provide any of the following information:
- Passcode: This is a numeric password different from all your other passwords, used only for marking your device as lost or to erase it remotely. If you recover your Mac, you will have to unlock it with the same passcode.
- Family Sharing: You will have to enter a passcode for a family member's lost device, if a passcode is not set. For this, you will also need the family member's Apple ID password.
- Contact information: Enter a phone number if you want it to be displayed on your Mac's locked screen.
- Message: If you want, you can enter a custom message for the person who found it or has it to be displayed on your Mac's locked screen.
- Click Activate if required.
- You will see one of these two statuses in the Mark As Lost section:
- Activated: It means the device has successfully been marked as lost.
- Pending: Will show if the device is not connected to Wi-Fi and until it goes online again.
Make sure to disable Activation Lock if you sell or give away your Mac. This can be achieved through two methods:
- Through System Preferences:
- Open System Preferences.
- Click Apple ID and then iCloud.
- Deselect the Find My Mac checkbox.
- You will be asked to enter your Apple ID password. Enter it and sign out.
- If you don't have access to the Mac, you can go to the iCloud portal and follow the procedure to erase the Mac, which will also disable Activation Lock. This procedure is explained next.
Another action you can perform is to erase your Mac to protect your information if you have no other choice. Let's see how you can do that.
Erasing your Mac
In many unfortunate cases, users might not be able to recover their Macs. You can also remotely erase them to protect your data if this is the scenario you are facing.
Take into account the following important information if you decide to erase the Mac:
- The whole Mac will be erased, including data and information.
- You won't be able to attempt to locate your Mac with Find My later on.
- If using Activation Lock, it will be turned off. If this is the case, the person in possession of the Mac will be able to turn on and use the Mac.
Follow these steps to erase your Mac:
- Follow the steps to locate your Mac on a map.
- Click Erase Mac (Figure 15.31).
- Click on Next until the Mac is erased.
- Click the x icon that appears next to your Mac.
And with this, we have covered pretty much everything about the Find My feature. We saw how to enable it and use the actions enabled, such as locating your Mac on a map, playing a sound, locking it, and even erasing it.
Next, we will discuss a couple more features that require your attention to keep your users and data secure.
Guest accounts
Guest accounts allow any person to temporarily use your Mac without having to create an account, protecting your data at the same time. The important detail to remember about guest accounts is that all data and settings will be removed after the user logs out of the guest account. (Make sure anyone using a guest account knows that! Many users don't.)
Guest accounts are covered in detail in Chapter 4, User Accounts Management.
Family Sharing
Family Sharing is a feature that allows you to share App Store purchases and subscriptions with other family members without having to share your personal Apple ID. Besides protecting your Apple ID, it allows you to control children's permissions in combination with the Screen Time features. With Family Sharing and Screen Time, you can approve purchases and downloads.
Family Sharing is covered in detail in Chapter 10, Managing Apps and Documents.
And with this feature, we have reached the end of this section, where we explored tools, features, and practices to protect user security. We examined the iCloud Security Code, how to enable two-factor authentication, and the login options that can help you protect user privacy. We also reviewed features that are quite recent, such as Screen Time, and others that have been around for some time but have been improved, such as Find My.
We have also reached the end of the chapter. Be sure to check the summary below for a quick recap of what we covered.
Summary
In this chapter, we explored tools, measures, technologies, and features macOS offers to help you protect your security and privacy, as well as your users'. We saw them grouped into five main areas: system, hardware, application, data and encryption, and user security. You are now aware of which macOS security features protect the system, such as System Integrity Protection (SIP), and the recommended security measures that you should implement to promote a safe environment, such as always requiring the use of secure passwords. At the same time, you know how to enable a firmware password for extra security to avoid unauthorized users bypassing the system startup through keyboard shortcuts. You also know how to use FileVault for full-disk or full-system encryption to protect your data. Finally, you are now aware of the extra features that help you and your users be more secure, such as Screen Time and Find My.
In the next chapter, we will explore some advanced techniques for administration through the use of the command-line Terminal.