
Chapter 12: ServiceNow Integration
As you have read so far, Azure Sentinel is a powerful solution to gather logs and threat intelligence, and to discover threats across your entire environment. However, this is only part of the solution required to run a Security Operations Center (SOC). When a security alert is raised in Azure Sentinel, the SOC may need assistance from several other teams in order to investigate the issue, mitigate the threat, and remediate any impact caused.
In order to coordinate these activities, organizations utilize a service management platform, such as ServiceNow, to create cases and track the progress being made by each team. While this chapter is focused on the specifics of using the ServiceNow platform,the procedures may be modified for use on a different platform if it supports the integration with Azure Sentinel and Azure Logic Apps.
The process of case management begins by generating alerts within Azure Sentinel; then, those alerts are used to create a ticket in ServiceNow. We will walk through this process in this chapter so you can see the results from end to end.
In this chapter, we will cover the following topics:
- Overview of Azure Sentinel alerts
- Overview of IT Service Management (ITSM)
- Logging in to ServiceNow
- Creating a playbook to trigger a ticket in ServiceNow
Overview of Azure Sentinel alerts
The key benefit of using Azure Sentinel is the centralization of logs and alerts from multiple systems across your organization. By centralizing the information, and enhancing it with threat intelligence, it is possible to build a full picture of the potential malicious activities occurring in any system.
In Chapter 7, Creating Analytic Rules, we covered the ability to create analytic rules and queries, using Kusto Query Language (KQL), to monitor and detect activities across a wide range of data sources gathered by Azure Sentinel, and generate alerts based on these detections. The rules may be created manually to detect known activities and behaviors, or they may include machine learning algorithms to enhance detection capabilities.
To prevent overloading the IT and security teams with too much irrelevant information, the alerting rules can be configured to ensure a high degree of confidence that the issue is both relevant and important. It is imperative that a balance is found to reduce the number and frequency of alerts generated, while avoiding the potential of suppressing useful alerts that may indicate an early warning of a threat or successful compromise.
Once an alert is triggered, it needs to be assessed for prioritization and criticality; ideally, this is an automated process, otherwise, an analyst will need to do this manually. An incident is then created and sent to the individuals and teams who can assist. Appropriate notifications need to be sent to ensure awareness and enable them to take appropriate actions. Their responses need to be coordinated and clearly communicated to show progress and correlate any additional information as it is discovered through the investigations.
As soon as possible, mitigation actions need to be implemented to limit the impact and begin the resolution of the threat. Finally, there needs to be a comprehensive report of the incident, actions taken, lessons learned, and recommendations for improvement to prevent reoccurrence in the future.
All of this is made possible by sending accurate information from Azure Sentinel to the IT Service Management (ITSM) platform. In the next section, we will cover how this processis enabled, as part of the wider incident management framework, using an ITSM platform.
Overview of IT Service Management (ITSM)
In the security context, the ability to quickly identify and respond to threats is critical to reducing the risk of exposing valuable data and confidential information. However, in the day-to-day running of any large-scale IT environment, security isn’t the only concern. Demands from the business result in high-priority requests for modifications or new technology implementations. The IT department is usually made up of many different roles, which each have a part to play in the implementation and ongoing management of multiple complex systems, and, without their assistance, the security team will struggle to respond to threats at the speed required to prevent a major impact.
So, how then do we ensure everyone is made aware of requests and issues, and can quickly and effectively respond? The role of a service management platform is primarily to log, track, and communicate the coordination of efforts required by each of the solution areas and experts to resolve IT requests, issues, and, especially, security incidents. Each platform will offer a variety of additional services to assist with this goal, including workflow automation, and, potentially, the ability to act as a security, orchestration, automation and response (SOAR) platform (see Chapter 1, Getting Started with Azure Sentinel, for more information about the need for SOAR capabilities).
Security alerts generated in Azure Sentinel trigger the creation of a new security incident. Through the direct integration with an ITSM platform, Azure Sentinel can directly generate a new ticket – in this chapter, we use ServiceNow as the ITSM platform of choice. Once received, the Security Operations (SecOps) module of ServiceNow will take the appropriate actions, which may include sending notifications to inform key personnel and start to involve other teams as necessary. All actions and responses are then tracked as part of the evidence for investigation and remediation.
The workflow that follows is specific to the needs of your business. Ideally, it will enable the tier one personnel to perform the initial analysis and response actions before they need to escalate to tier two or tier three. For simple tasks, and if configured to do so, some automatic remediation will take place.
The SecOps module provides built-in flows, based on standards and recommendations from organizations such as the SysAdmin, Audit, Network and Security (SANS) Technology Institute and the National Institute of Standards and Technology (NIST), which are universally accepted as a great starting point.
If your procedures require modification to these flows, there is great flexibility with the options available, but do consider the potential impact of complex changes when the platforms are upgraded in the future. Record details of any modifications so they can be recreated if necessary.
In the next section, we will explore the basics you need to know about the ServiceNow platform to begin using it as the integrated ITSM platform for Azure Sentinel.
Logging in to ServiceNow
ServiceNow is offered as a fully customizable ITSM platform, running as a cloud-based Service as a Service (SaaS) platform (that is, there is no infrastructure to deploy in order to get started). As an extensive platform, many additional modules are offered via the ServiceNow store (https://store.servicenow.com), allowing you to choose solutions from first-and third-party solutions to fully expand the capabilities and integrations across your technology landscape.
While there are a lot of options to cover with ServiceNow, we are going to focus on the specific areas that we need in order to create the integration with Azure Sentinel, and confirm the incidents are correctly triggered.
When you first sign in to the ServiceNow portal (https://www.servicenow.com/products/service-portal.html), you will be presented with the following home screen:
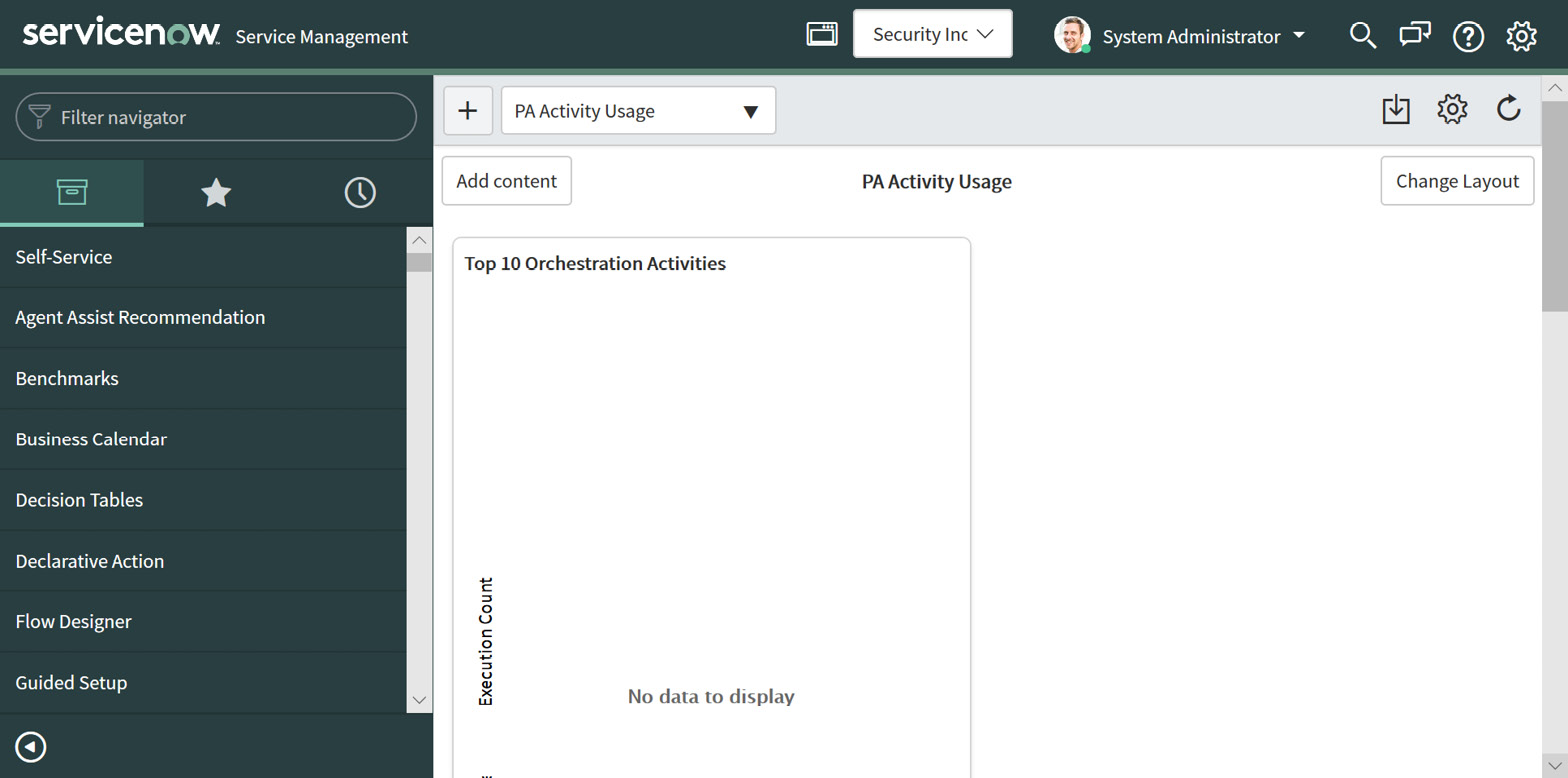
Figure 12.1 – ServiceNow home screen
You can use the menu on the left-hand side of the screen to navigate the various components. For this chapter, you will need to go to the Incidents page to view new incidents created by Azure Sentinel. You can find incidents by scrolling through the list, or you can search for it using the Filter navigator option at the top of the left-hand side menu.
Creating a playbook to trigger a ticket in ServiceNow
We have already covered what an Azure Sentinel playbook is, and how to create one, in Chapter 11, Creating Playbooks and Logic Apps. As a quick refresher, a playbook is a set of logical steps that are taken to perform an action. These are also called workflows in other applications. Playbooks use Azure Logic Apps technology; the only difference is that a playbook must use the Azure Sentinel connector’s trigger. After that, you are able to use any of the many actions that are provided by Azure Logic Apps.
We are going to take this one step further in this section and explain how to use a playbook to create a ServiceNow Security Incident Response (SIR) incident. If you do not already have the SIR module loaded in your ServiceNow environment, follow the instructions located at https://docs.servicenow.com/bundle/kingston-security-management/page/product/security-incident-response/task/t_ActivateSecurityIncidentResponse.html.
Note
While this section is dealing specifically with ServiceNow SIR incidents, the logic app connector for ServiceNow will create most, if not all, of the incidents that ServiceNow can handle.
Now that you are aware of what we are going to accomplish, let’s start looking at how we are going to do this.
Cloning an existing logic app
At the end of Chapter 11, Creating Playbooks and Logic Apps, you will find a step-by-step guide on creating a playbook that took the information from an incident and then wrote the incident’s number back as a comment (see the Creating a simple Azure Sentinel playbook section for more details). We are going to take that same playbook, clone it, add a ServiceNow action, and update the comment that is being written to the incident to show what the incident number is, from ServiceNow.
We will start by cloning that playbook. If you did not create it while reading Chapter 11, Creating Playbooks and Logic Apps, go back and follow the steps to create it now. Follow these steps to create a new playbook by cloning the existing one, which we can then modify:
- Go to Azure Sentinel’s playbook overview page. It should look something similar to what is shown in the following screenshot. Note that the Azure Sentinel menu has been minimized so that more of the screen can be shown:
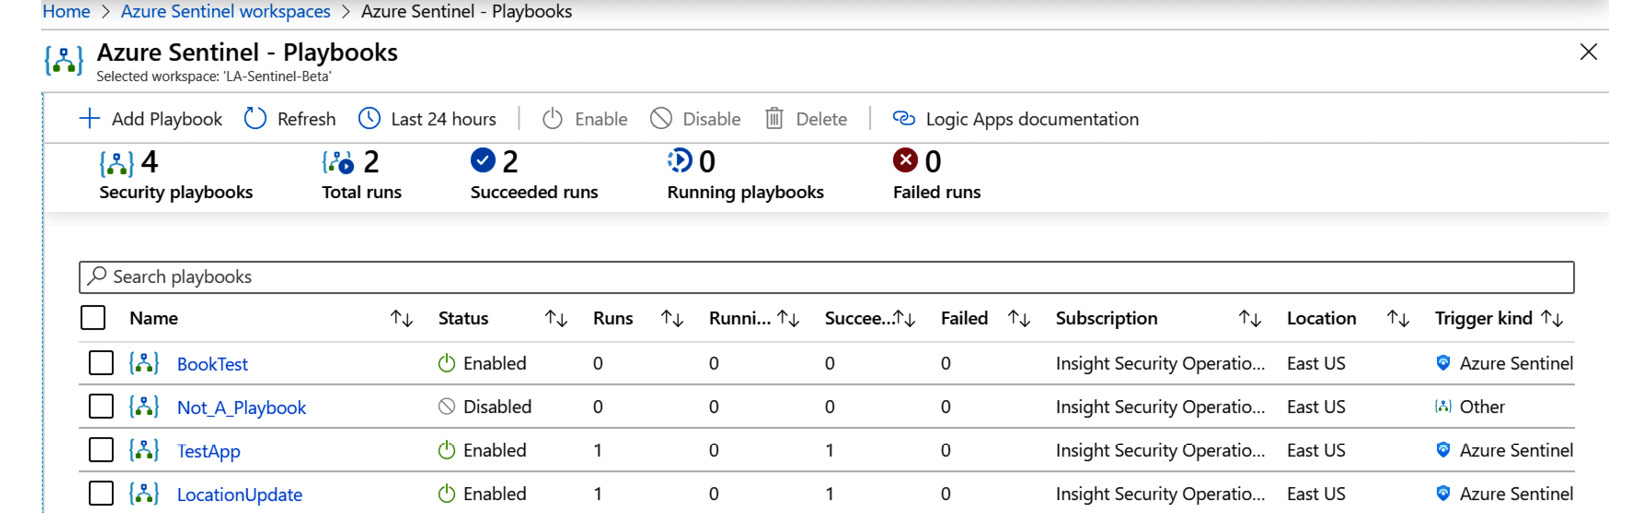
Figure 12.2 – Playbook listings
Select the playbook you want to clone. If you followed the instructions from the previous chapter, it will be called BookTest.
- On the playbook’s logic app overview page, in the header, select the Clone button:

Figure 12.3 – Playbook’s logic app overview header
- This will open a new pane, as shown in the following screenshot. Give the new logic app a descriptive name. For this example, we will be using ServiceNow_Incident_Creation. Leave the Logic App Status dropdown as Enabled, and click the Create button:
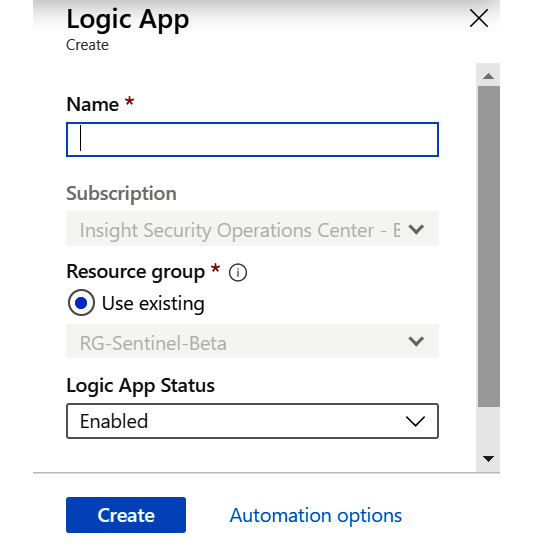
Figure 12.4 – Azure Logic Apps clone page
- Azure will then take you back to your Azure portal home page. Periodically check the status of your new playbook’s deployment. When it is complete, go back into your Azure Sentinel environment’s playbook page. You will now see the new playbook, as shown in the following screenshot:
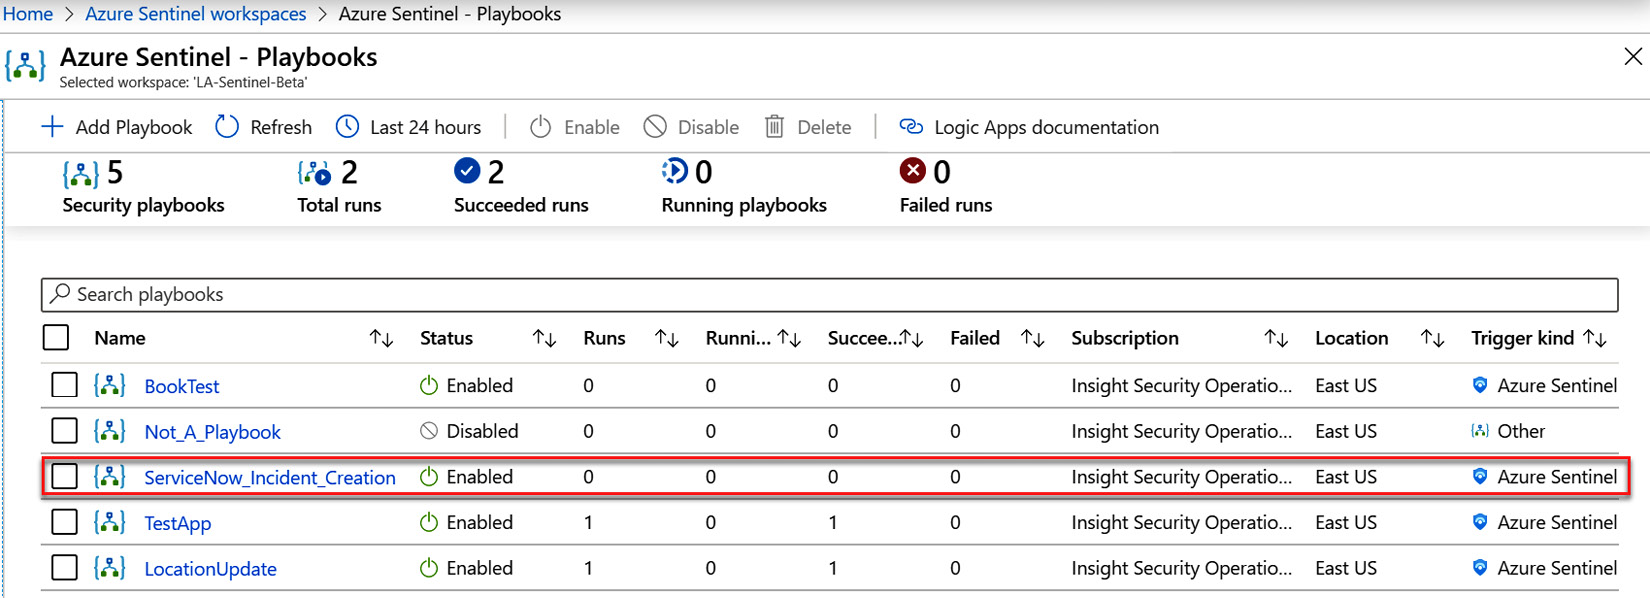
Figure 12.5 – Playbook listing with new playbook
Now that we have cloned an existing playbook, we can start to make the changes that we need to it. We will be changing it to add the actions needed to create the ServiceNow ticket.
Modifying the playbook
Now you have the new playbook, which is identical to the one you created earlier. Select it, and then, from the logic app overview, click the Edit button in the header to edit the playbook. When it opens, it will look as in the following screenshot. You can expand the various sections to ensure it is identical to the one you created earlier:
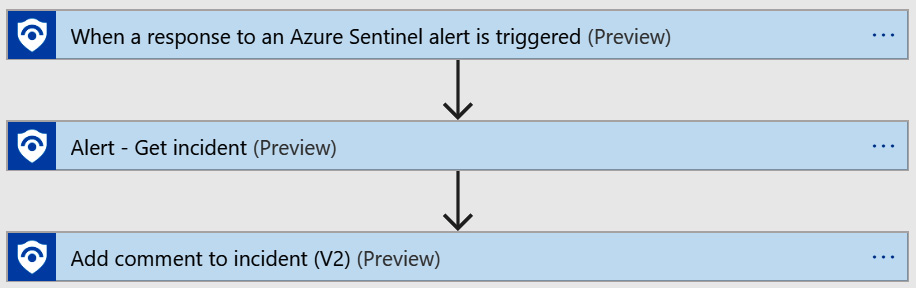
Figure 12.6 – Playbook workflow
What we are going to do now is to add a new step. This is the step that will create the ServiceNow incident. It will be added after the Alert – Get incident (Preview) and before the Add comment to incident (V2) (Preview) steps. Perform the following steps to add the new action:
- Move your mouse to the down arrow between the Alert – Get incident (Preview) and the Add comment to incident (V2) (Preview) steps. There will be a plus icon that shows up. Click it to see the drop-down list, as shown in the following screenshot, and select Add an action:
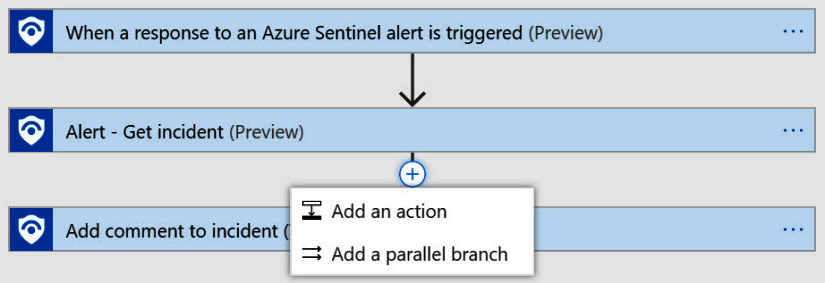
Figure 12.7 – Add a new step to the playbook
- The Choose an action window will show up, as shown in the following screenshot. If the ServiceNow connector is not listed under the Recent header, enter ServiceNow in the Search connectors and actions search box:
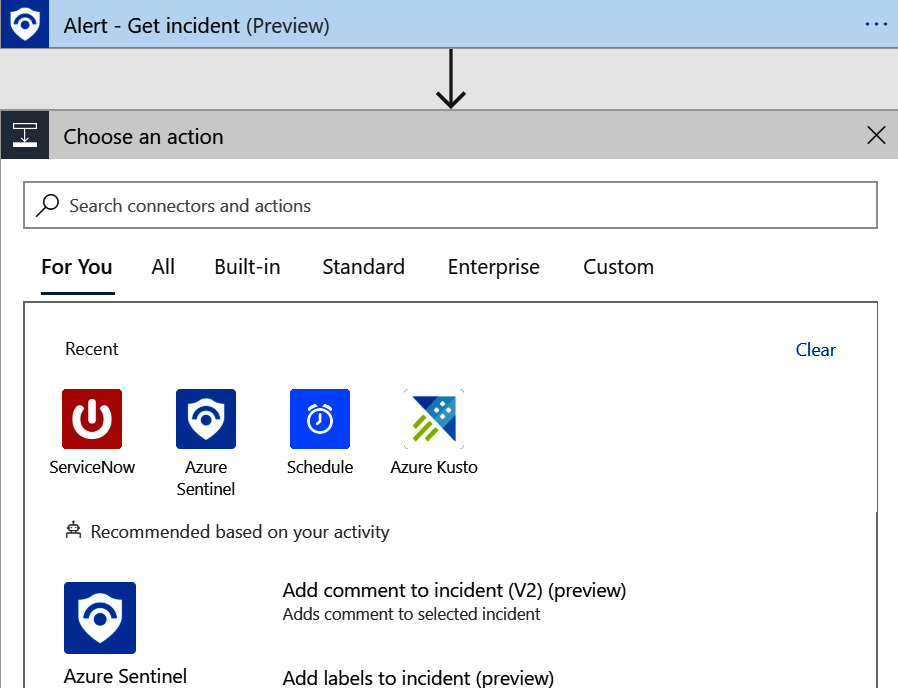
Figure 12.8 – Choose an action
- Select the ServiceNow entry from all of those shown. From the list of Actions, select Create Record:
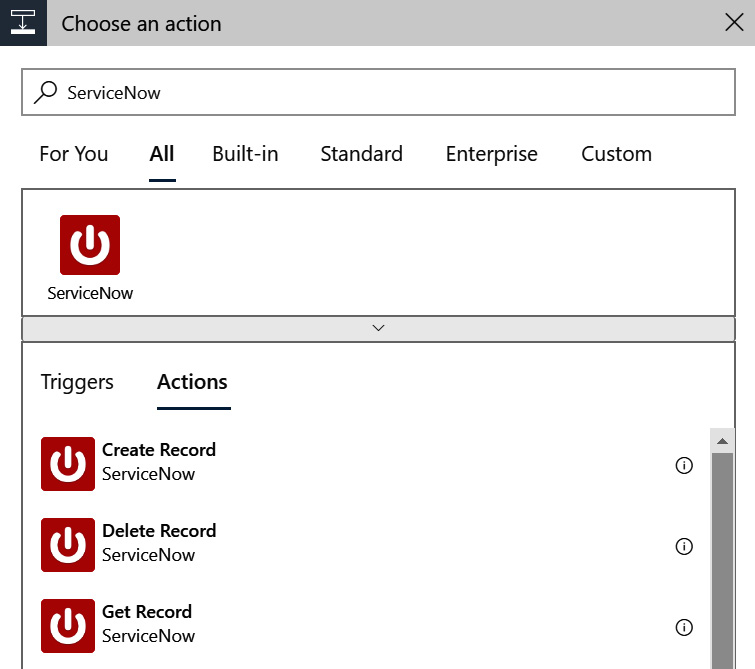
Figure 12.9 – ServiceNow connector
- Most likely, your connector will look as in the following screenshot. If you have already set up a connection to your ServiceNow environment, you can skip to step 6:
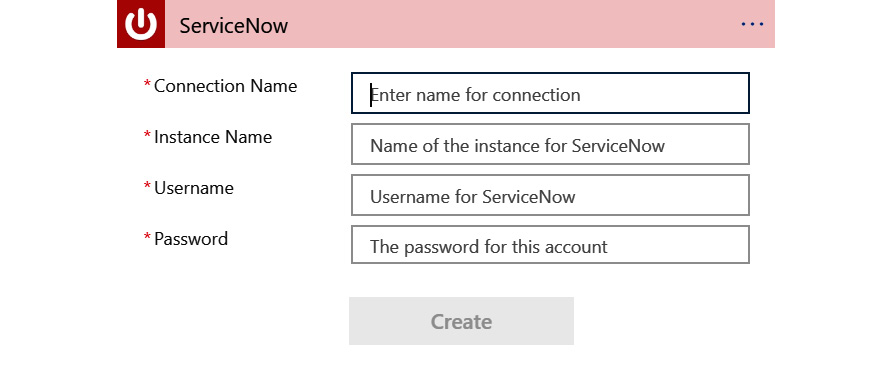
Figure 12.10 – ServiceNow needs a connection
Add the following information:

Click Create to create the new connection to ServiceNow.
- Now your logic app action should look like this:

Figure 12.11 – Connected ServiceNow action
- In the Record Type dropdown, scroll to locate and select Security Incident. Leave the other two fields as they are. Once you are done, your action should look as in the following screenshot:
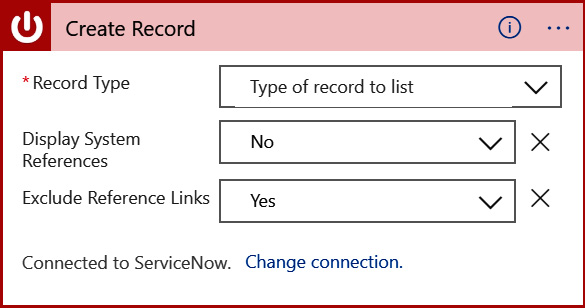
Figure 12.12 – ServiceNow security incident action
Now we have made the necessary modifications and we could, in theory, create the ticket. However, it would be better if we had more information, which is what we will add in the next section.
Additional incident information
This is actually enough to create a ServiceNow SIR incident, but it will not have enough information to be very useful. For the incident to be useful, there needs to be more specific information. How much detail and context is provided is up to you and your company standards. We will fill out several additional fields here.
In the following screenshot, we show some of the fields that we are going to be filling in in ServiceNow. These are the basic fields that define the ticket:
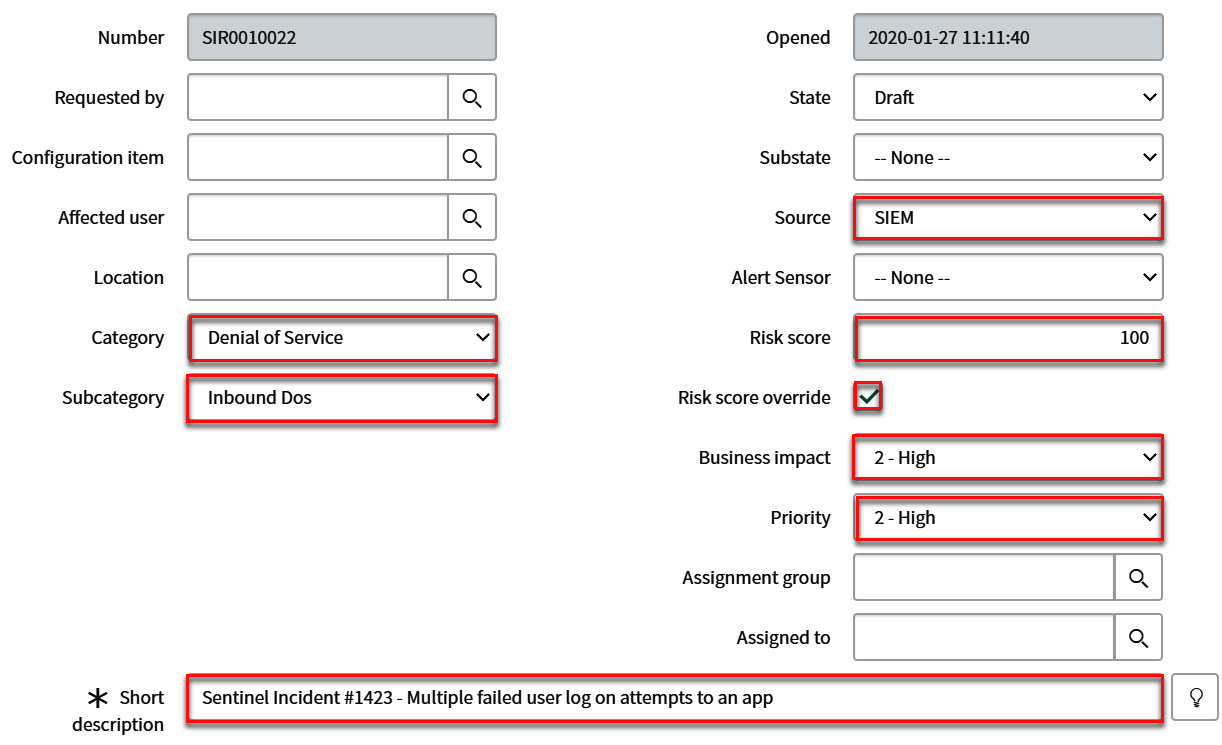
Figure 12.13 – ServiceNow updated fields
If you scroll down the page in ServiceNow, there are a couple more fields that make sense to fill in as well. We will be providing values for them, too:

Figure 12.14 – ServiceNow updated fields continued
In order to provide ServiceNow with the information for the selected fields, follow these steps:
- If you do not still have the Create Record action open so that you can edit it, click on it so that you can edit it, as shown in figure 12.11.
- Change the Display System References dropdown to Yes so that all the parameters will be displayed in the next step.
- In order to minimize the number of times you need to access the Add new parameter dropdown, since there are a large number of entries in it, use the following table of parameter names to select all the items at once. Just use the checkbox to select the entries you want, then click anywhere outside of the dropdown for the entries to be added. Note that the items will be listed in the order that they show up in the list. Don’t worry about adding values to these fields yet, which is taken care of in the following steps:
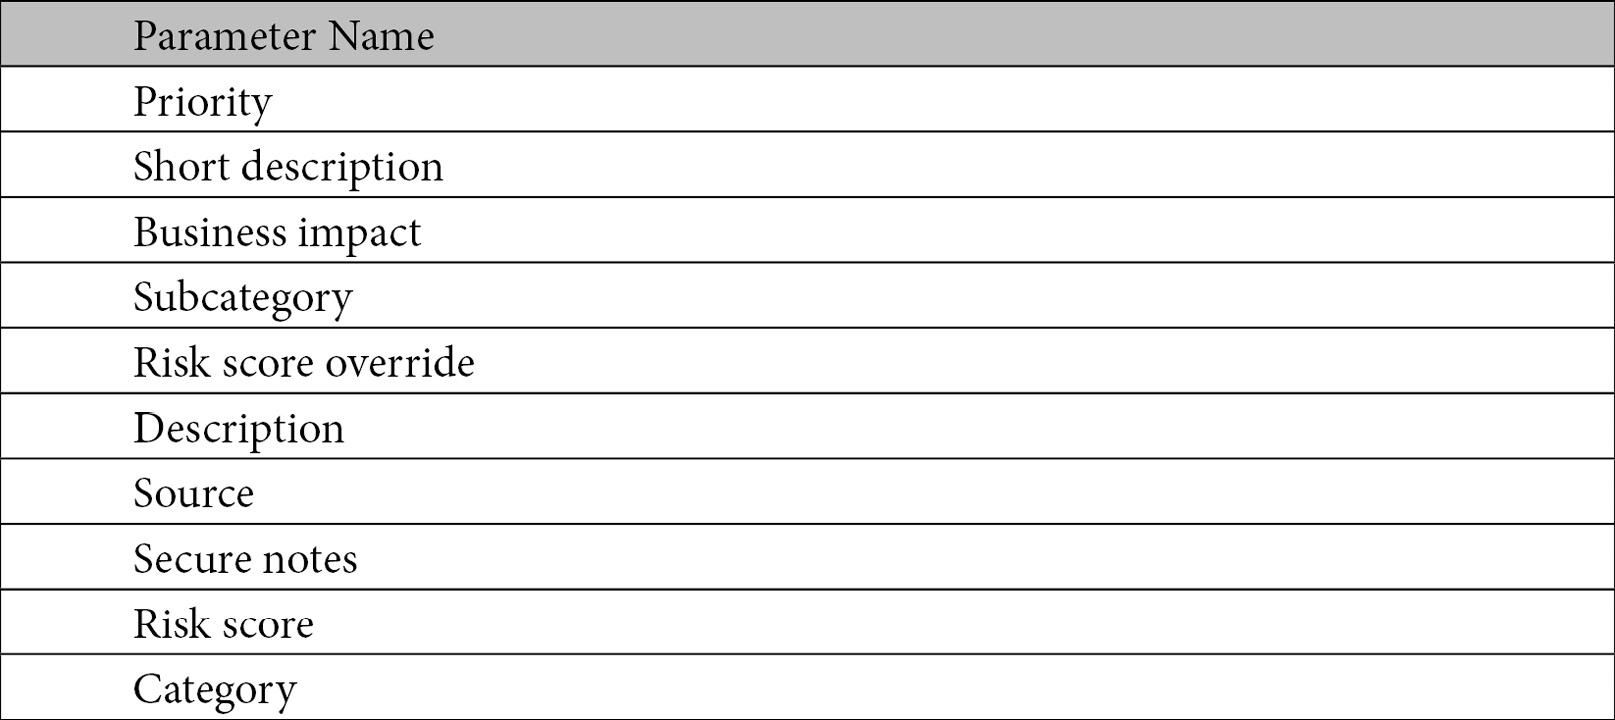
Category options
The listing of parameters has two entries called Category in it. Make sure to select the correct one. The one we want is almost at the bottom of the list of parameters.
- Once all the parameters have been added, your action should look as shown in the following screenshot:
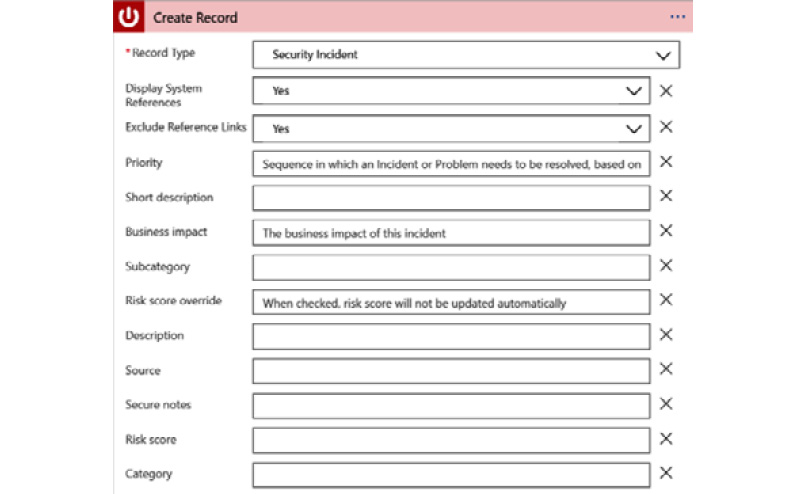
Figure 12.15 – ServiceNow action with parameters
Now you have all the fields that we are going to use to populate the ServiceNow ticket ready to go. The next sections will show you how to add the information.
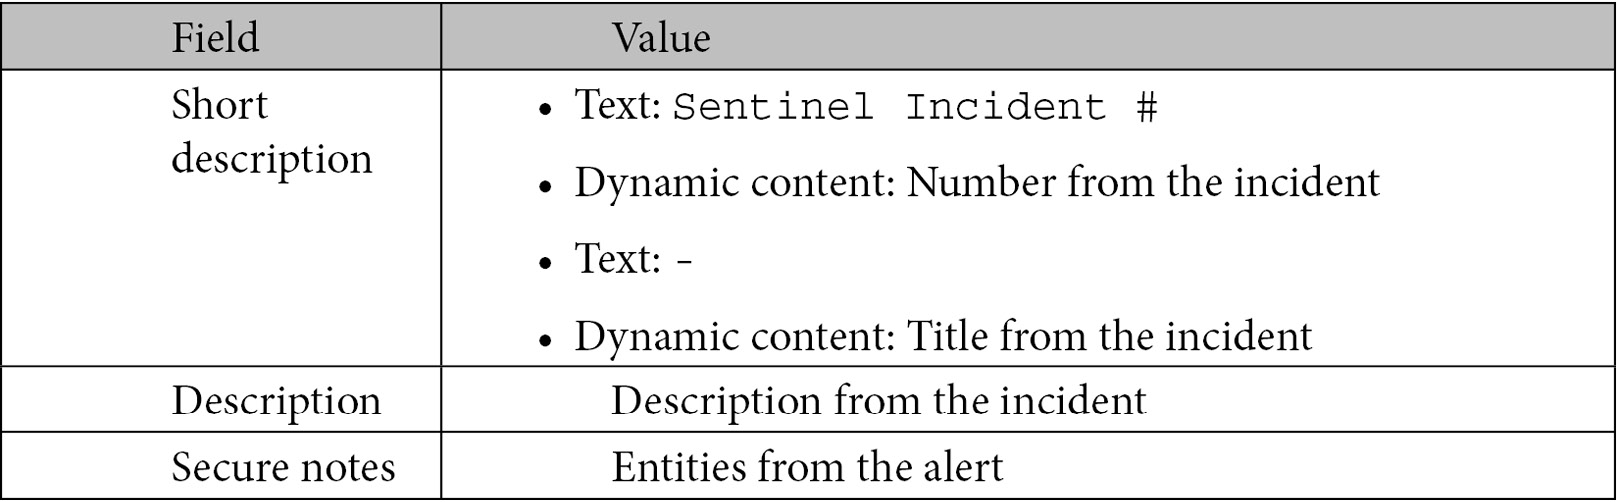
Adding dynamic content
Now comes the fun part: what values to put into the fields. We will handle this in stages. In this first stage, we will add the dynamic content that the previous actions give us. We will be using this for the Short description (more or less), Description, and Secure notes fields. Use the following table to fill out these fields:
When those fields are filled in, your action should look like this:
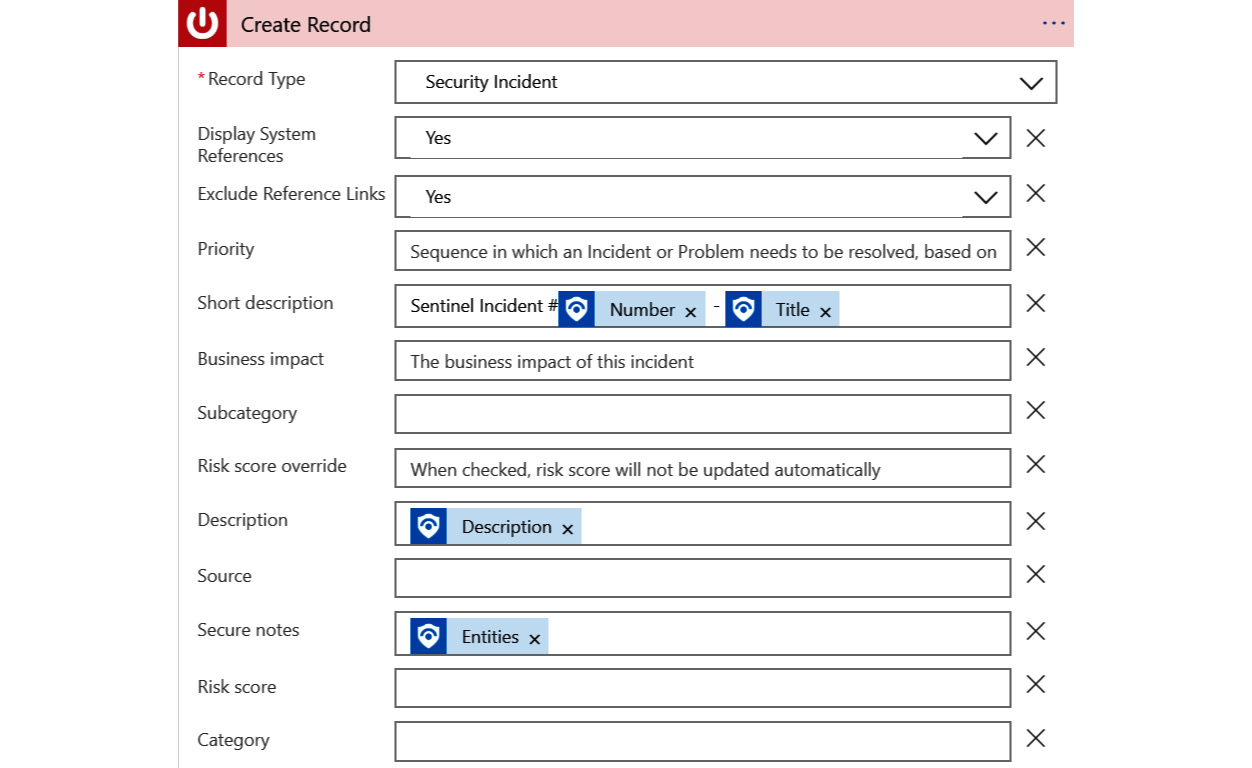
Figure 12.16 – ServiceNow action with dynamic content
That is all the dynamic content we will be adding. The next section will show you how to add the static content we will be using.
Adding static content
Now we will fill in the drop-down entries in ServiceNow. These are fairly easy to do as all it takes is the correct text to be passed through. The text matches a value in the respective drop-down list. In a production environment, these would vary depending on the incident’s value, but for now, we are hardcoding in the values. Use the following table to fill in those values. Make sure the text you enter matches exactly:
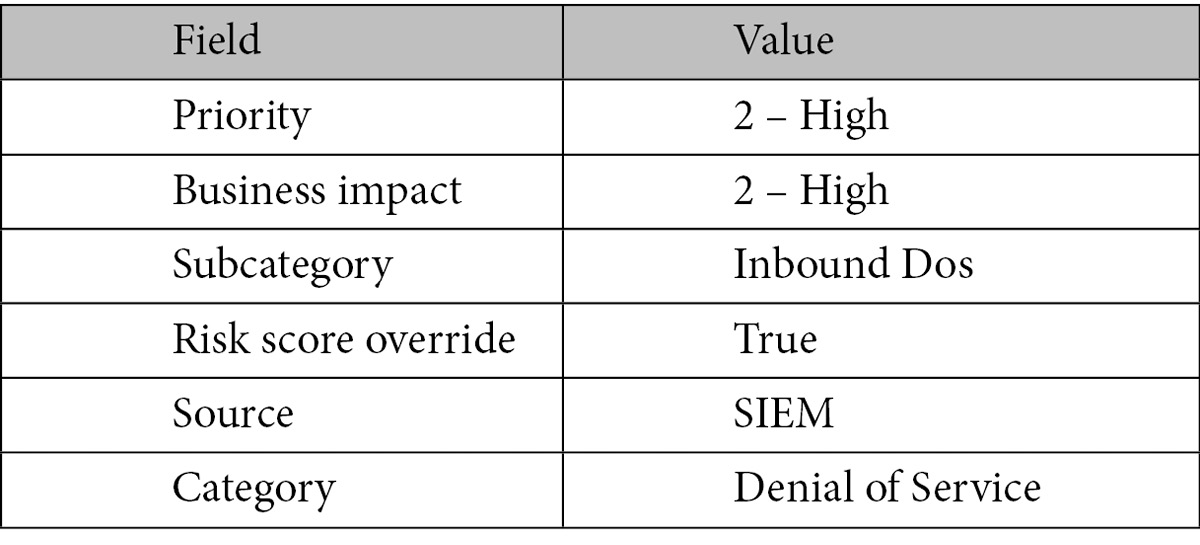
Text values
It does not matter what you enter for the actual text values as long as the text matches an entry in the respective drop-down list exactly. If you wish to use different values than what is listed here, look at the other entries in the drop-down list in question and choose one.
When these fields are filled in, and assuming you used the preceding listed values, your action should look like this:
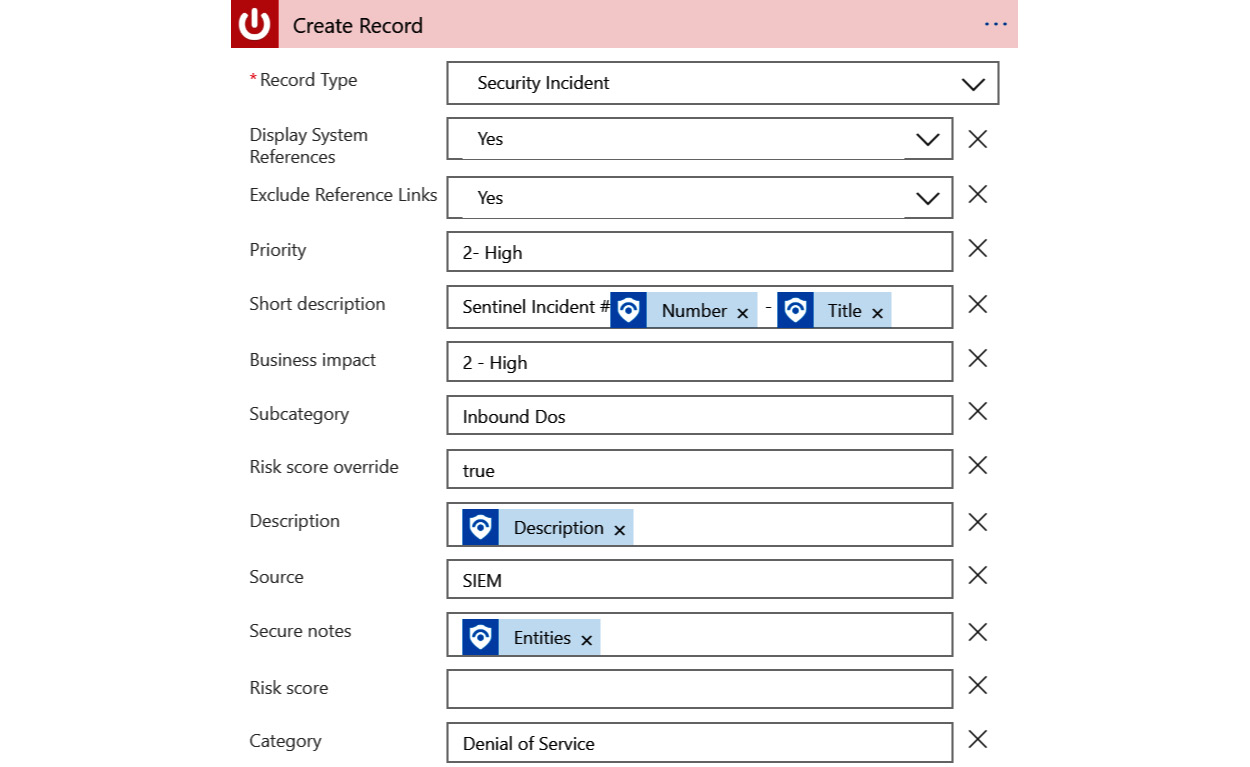
Figure 12.17 – ServiceNow action with textual content
So, we have the dynamic and static content ready to go. There is just one more thing we need to add, and that is an expression for Risk score.
Adding an expression
That just leaves the Risk score field. While you can just enter text into that field, we are going to do something a little different to show you some more the power that a playbook can offer.
We are going to enter an expression to determine what gets entered. If you have worked with Microsoft Excel formulas, you will be familiar with logic app expressions, as they are very similar.
The code we will be entering looks like the following. In a nutshell, it is checking the severity field of the incident. If the severity is High, it will pass in 100, if it is Medium, it will pass in 50, otherwise, it will pass in 0:
if (equals(body(‘Alert_-_Get_incident’)?[‘properties’]?[‘Severity’],’High’),100, if (equals(body(‘Alert_-_Get_incident’)?[‘properties’]?[‘Severity’]),’Medium’,50,0))
Azure Logic Apps provides an easy way to create these formulas. Use the following steps to complete this process:
- Click on the field, Risk score, in this case, and when the Dynamic content popup shows, click on the Expression tab. This will appear as shown in the following screenshot:
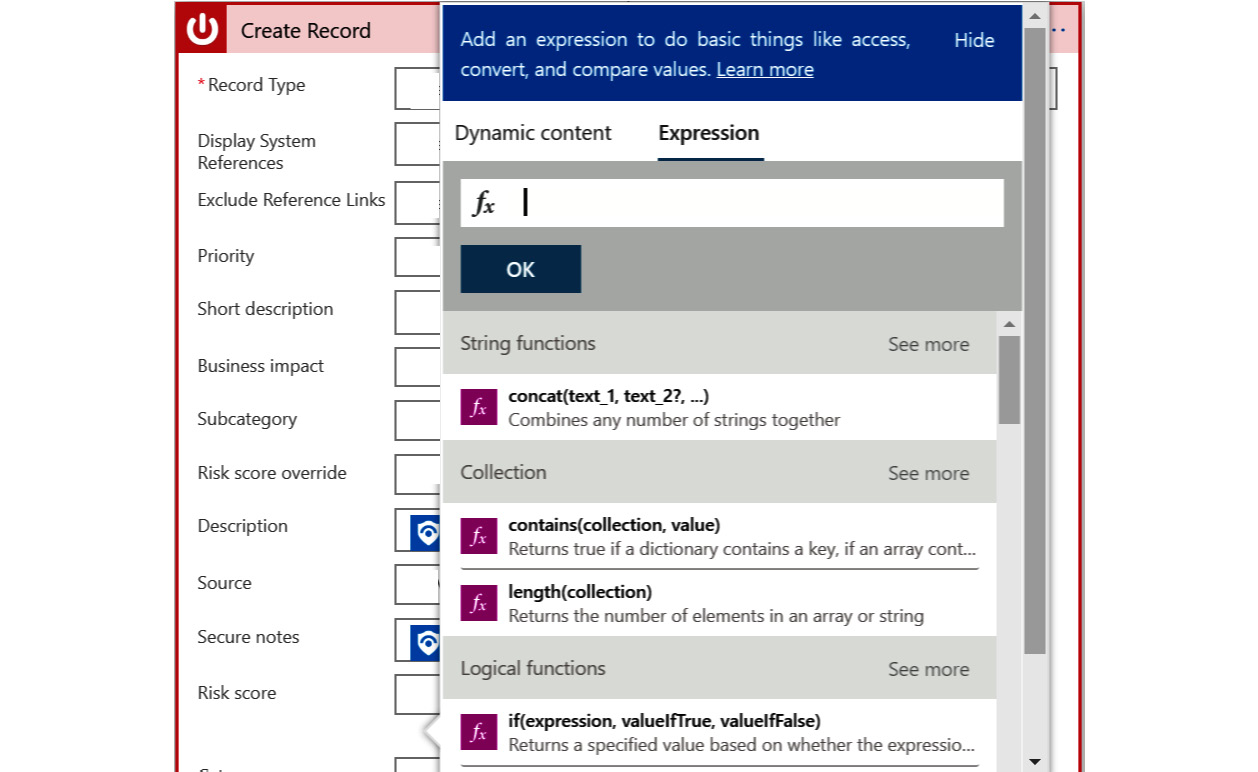
Figure 12.18 – Logic app expression tab
- From here, you can select the expressions you want. To enter a dynamic value, such as the incident’s severity, switch back to the Dynamic content tab to find and select the value, and then you can switch back to the Expression tab to add more expressions.
Warning
The Dynamic content pop-up window cannot be resized so you cannot see much of the expression at once, making it very easy for errors to occur. It may be easier to use an external program, such as Notepad, to see the entire expression at once.
- We will not be taking you through the steps to add the expression, but we will tell you that there is an if statement nested inside another if statement, and two equal expressions used. The rest should be easy enough to figure out.
- The last step is to modify the Add comment to incident (V2) (Preview) rule to add the ServiceNow number to your Azure Sentinel incident. Rather than telling you how to do this, look at the following screenshot to see what it should look like, and modify your action accordingly:
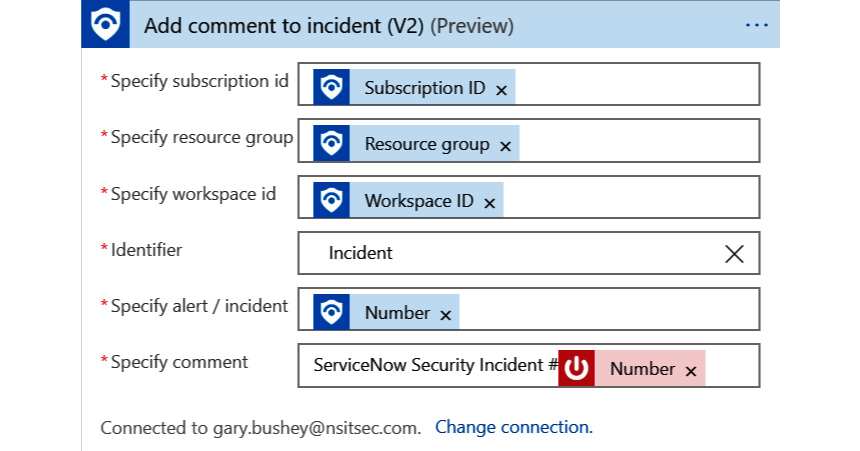
Figure 12.19 – Add comment action
That is it, your playbook is complete! Now you can assign it to an Azure Sentinel analytics scheduled rule. Remember only scheduled rules can run playbooks, to be run automatically whenever that rule generates an alert, or you can run it from the incident’s full details page (see Chapter 9, Incident Management, for more details).
As stated earlier, this is just the basis for a full-blown ServiceNow incident creation playbook. You will probably want to change at least some of the hardcoded values into items that make sense based on the incident, most likely using more expressions.
Summary
In this chapter, we explored the need to integrate Azure Sentinel with an ITSM platform to coordinate the response to threats detected across your organization.
The example used was the ServiceNow platform, due to its broad adoption; however, you can use this information to integrate with other ITSM platforms, if it can support the connectivity with Azure Sentinel and Azure Logic Apps.
In the next chapter, we will discuss the operational tasks required to ensure the appropriate maintenance and ongoing health of the Azure Sentinel platform and dependent solutions.
Questions
Answer the following questions to test your knowledge of this subject:
- What is the purpose of an ITSM platform?
- Why do we need to tune alerts?
- What is the risk associated with tuning alerts?
- What is the main requirement when populating a ServiceNow drop-down field with text?
- What is it called when you perform some computation on a value before using it in a logic app field?
Further reading
- ServiceNow main page: https://www.servicenow.com/
- Get a free developer instance of ServiceNow: https://developer.servicenow.com/app.do#!/home
- Logic apps overview: https://docs.microsoft.com/en-us/azure/logic-apps/logic-apps-overview
- Logic apps ServiceNow connector: https://docs.microsoft.com/en-us/connectors/service-now/