Chapter 16: Data Governance and Retention
Planning for data governance and retention is a crucial task for Microsoft 365 compliance administrators and it is vital to have the correct strategy in place to ensure that your organization is protected and compliant. There are a number of ways to govern and retain data that is hosted in your Microsoft 365 environment in order to ensure that the content cannot be lost either accidentally or due to the actions of a malicious insider.
In this chapter, we will introduce you to the principles of data governance and retention. You will learn how to configure retention tags and policies, how to use supervision policies to capture employee communications, and how litigation holds can be used to preserve electronically stored information. We will also explain how data such as user .pst files can be imported into Office 365 using the Security & Compliance Center, as well as show you how to configure in-place archiving and manage any inactive mailboxes.
We will cover these topics in the following order:
- Understanding data governance and the retention requirements for your organization
- Navigating data governance reports and dashboards
- Configuring retention tags, retention policies, and supervision policies
- Configuring litigation holds to preserve Office 365 data
- Importing data into Office 365 from the Security & Compliance Center
- Configuring archiving
Understanding data governance and the retention requirements for your organization
Planning for data governance in Microsoft 365 requires compliance administrators to understand any internal organizational policies that must be adhered to, along with any applicable industry regulations.
These requirements will obviously differ depending on the nature of the organization, but overall, the principles of governing your data to ensure that you can appropriately retain, or retain then delete, the content within emails and documents are essentially universal.
The logical starting point for compliance administrators when starting on this journey is retention. Having the correct set of retention policies configured and applied will enable the other components of data governance to logically fall into place. With retention policies in Microsoft 365, you can apply actions organization-wide or to specific locations or users, which will either retain or delete content in line with set retention periods.
When an email or a document is targeted by a retention policy, the user who is working on that content can make any necessary changes unimpeded, but the retention policy will make a copy of the original document and this will be retained for the duration of that retention policy. This works across the various Office 365 services, as follows:
- SharePoint Online and OneDrive: A copy of the original content will be retained in the Preservation Hold library.
- Email and public folders: A copy of the original content will be retained in the Recoverable Items folder.
- Teams: Chat content is stored in Exchange Online.
Should your organization be bound by more restrictive regulations, then you may be required to configure retention policies using the Preservation Lock feature. When Preservation Lock is applied to a retention policy, the policy cannot be turned off or set to lesser restriction settings by anyone (including Office 365 administrators).
Once a retention policy has been applied to OneDrive or SharePoint Online content, the following scenarios are possible.
The content is modified or deleted during the retention period
If changes or deletions are made to the content while a retention period is in effect and the retention policy is set to delete any data that is subject to that retention period at the end of the retention period, a copy of the original content is placed in the Preservation Hold library. The Preservation Hold library is scanned periodically to identify content whose retention duration is complete. That content is then moved directly to a second-stage recycle bin. Site collection administrators can restore content from here; otherwise, it is permanently deleted and unrecoverable after a period of 93 days.
The content is unchanged during the retention period
If no modifications are made to the content while a retention period is in effect and the retention policy is set to delete that content at the end of the retention period, the content is moved to a first-stage recycle bin when the retention duration is completed. Users will be able to purge the first-stage recycle bin, which moves the contents to the second-stage recycle bin. Users do not have access to the second-stage recycle bin. These two stages of recycle bins combined have a retention period of 93 days, after which the content is permanently deleted and unrecoverable.
Mailbox and public folder content
When working with retention policies concerning mailbox and public folder content, the Recoverable Items folder within the user's mailbox is regularly inspected and any content within it that is no longer subject to a retention period is permanently deleted 14 days after the end of the retention period that applied to that item.
Important note
Only users who have the eDiscovery role can view items in other users' recoverable items folder.
In this section, you have learned that retention is a core principle when it comes to data governance in Office 365. Once you have your retention policies defined and deployed, you can leverage further powerful features of Office 365 data governance, such as configuring inactive mailboxes and setting in-place and litigation holds. We will explore all of these features in detail later in this chapter, including how to configure retention tags and policies.
Next, we will show you how to view data governance reports and dashboards.
Navigating data governance reports and dashboards
Microsoft provides administrators with a great deal of information relating to data governance, which can be accessed from the Security & Compliance Center. Regularly viewing this information enables you to stay one step ahead in ensuring that your organization meets its compliance and regulatory obligations, as well as allowing you to make logical adjustments to the existing compliance settings that you have already configured. The Microsoft 365 information governance dashboard provides you with visibility on the following details:
- How the labels you have configured are applied
- The top five labels report
- Label trends over the past 90 days
- A snapshot of how much content is retained
- Information on how many users in your organization are protected by a retention policy
- Information on how many users have an online archive mailbox enabled
In order to view this information in the Security & Compliance Center, we need to take the following steps:
- Navigate to Information Governance | Dashboard and you will see the dashboard shown in the following screenshot:

Figure 16.1 – The information governance dashboard
- Scroll down to the Classify your data section to review the available reports, as in the following screenshot:
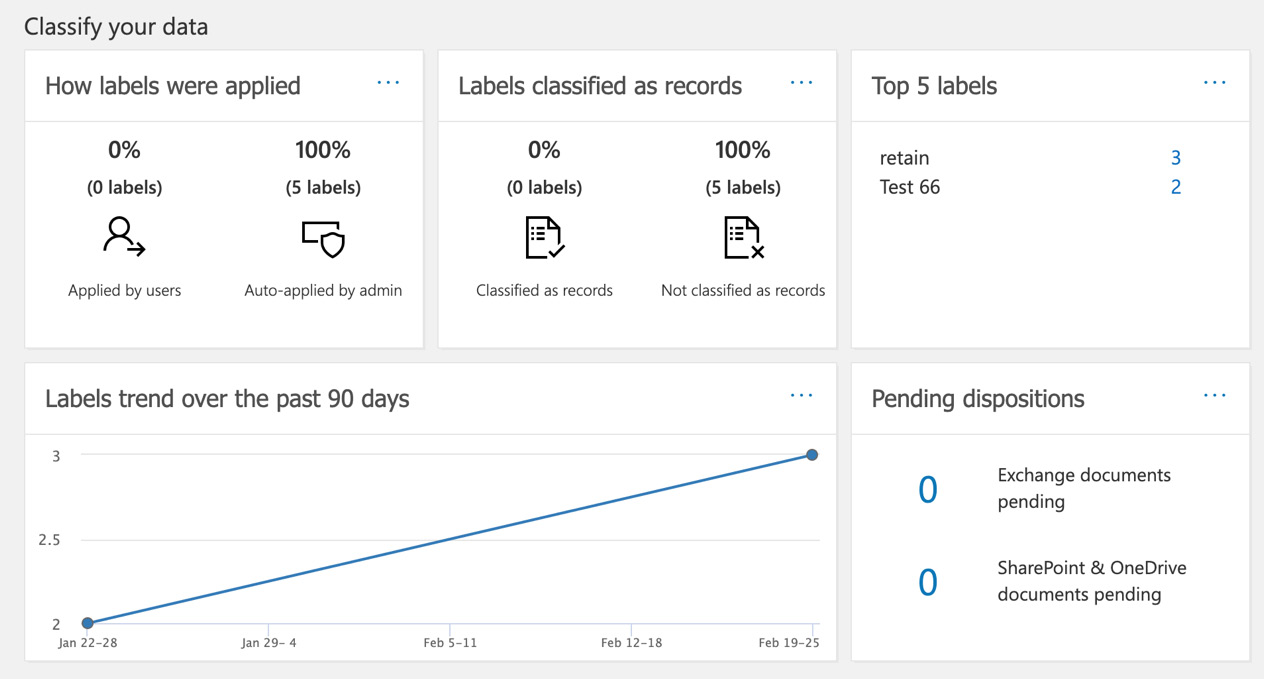
Figure 16.2 – The Classify your data reports
- We can open each of these reports individually to view them in more detail. The following screenshot shows what this looks like for the How labels were applied report:

Figure 16.3 – The How labels were applied report
- Clicking on View details table will show you this information, as shown:

Figure 16.4 – View details table
- You can also select the Filters option, where you can set the date range for your reports for up to 90 days and choose to filter between manually applied or auto-applied labels, as shown:

Figure 16.5 – Applying filters
- Under the Govern and stay compliant section of the information governance dashboard, you can also view the tiles shown in the following screenshot:

Figure 16.6 – Govern and stay compliant
- Clicking on the ellipsis icon next to each report and selecting Go to dashboard will take you to the dashboard for that report, as the following screenshot illustrates:

Figure 16.7 – The Go to dashboard option for each report
So, as you can see, there are a number of ways that you can keep track of your organization's compliance settings by accessing the reports and dashboards we described.
In this section, we introduced you to the information governance dashboard, which can be found in the Security & Compliance Center. This dashboard provides administrators with quick and easy access to a range of information and reports on how the compliance principles you applied to your Office 365 locations are enforced.
Next, we will show you how to set up retention tags and policies.
Configuring retention tags, retention policies, and supervision policies
When working with retention in Office 365, there are two distinctly different methods that you can use.
For Exchange Online email content, you can configure retention tags and retention policies using the Compliance section of the Exchange admin center. This method is particularly relevant to the settings that are applied to users when they have an online archive enabled for their mailbox (which we will examine in more detail later in this chapter).
It is also possible to configure retention policies for Exchange Online and other locations in Office 365, including SharePoint Online, OneDrive, and Teams, from the Security & Compliance Center.
While using the Security & Compliance Center is now the preferred method of creating retention policies, the Exchange admin center method remains important as it is the only way that retention tags can be configured. In this section, we will show you how to create a retention policy using both of the methods described here.
Creating a retention policy using the Exchange admin center
Creating a retention policy from the Exchange admin center allows you to manage the email life cycle of your Office 365 users by creating retention tags, associating these tags with retention policies that are then applied to your email users. To create retention policies using this method, you must have the Messaging Records Management permissions, which are assigned to the Compliance Management, Organization Management, and Records Management roles.
The policy can be created by first creating or using an existing retention tag by completing the following steps:
- Log in to the Exchange admin center at https://outlook.office.com/ecp and navigate to Compliance Management | Retention Tags, as in the following screenshot:

Figure 16.8 – Retention tags
- There are a number of pre-configured retention tags in Exchange Online, as shown in the preceding screenshot. To add a new retention tag, click on the + sign and choose from the following options:

Figure 16.9 – Adding a new retention tag
For this example, we will select the option to create a personal retention tag that users can choose to apply to email items and folders. When applied, this tag moves items from the user's mailbox to their archive mailbox (if enabled) after a period of 2 years. This, and the other available retention tag options (such as Delete and Allow Recovery and Permanently Delete), are shown in the following screenshot:
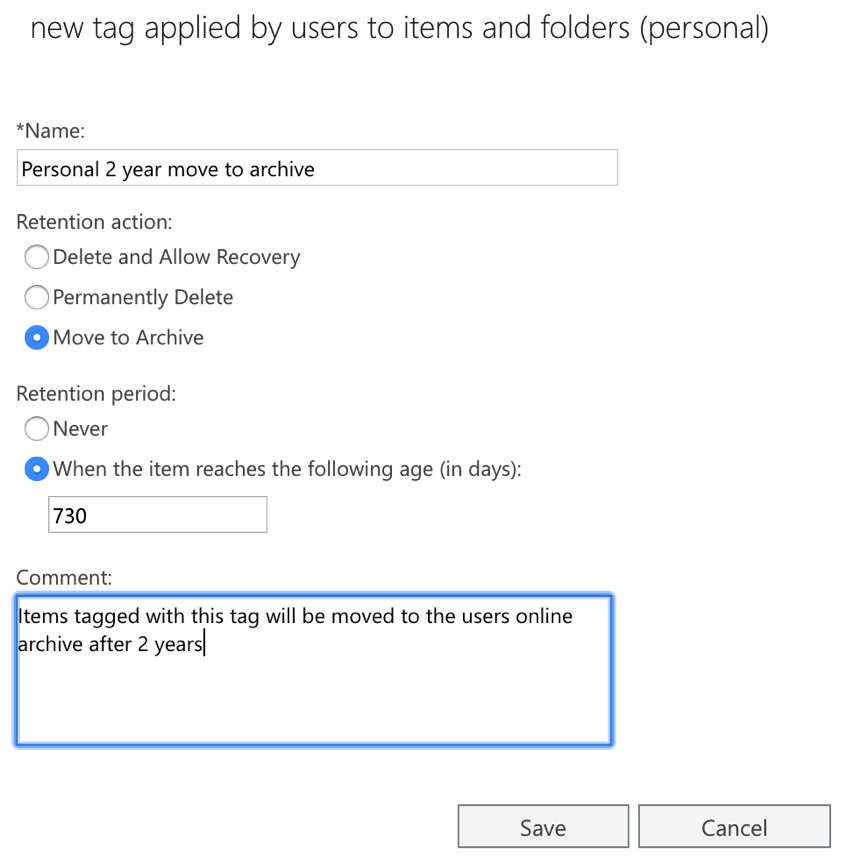
Figure 16.10 – The new retention tag settings
- Click Save to complete the setup of your retention tag.
- It is also possible to complete the setup of the retention tag through Exchange Online PowerShell by running the following command:
New-RetentionPolicyTag -Name "Personal-2-year-move-to-archive" -Type All -AgeLimitForRetention 730 -RetentionActionMoveToArchive
- Now that we have created our retention tag, we can create a retention policy from the Exchange admin center at https://outlook.office365.com/ecp under Compliance Management | Retention Policies. Click on the + sign and you will see the retention policy options, as in the following screenshot:

Figure 16.11 – A new retention policy
- In this example, we will set the name of the policy as Sales Team and add two retention tags. One of the tags will be a default tag that will delete items in the Deleted Items folder after 30 days. The other tag will be a personal tag that will allow users to manually tag items to be moved to their online archive after 2 years (this is the tag we created in the previous step). Click Save to complete the setup of your policy.
- It is also possible to complete the setup of the retention policy through Exchange Online PowerShell by running the following command:
New-RetentionPolicy "Sales-Team" -RetentionPolicyTagLinks" Personal-2-year-move-to-archive","Deleted-Items"
Now that you have a retention policy with retention tags created, you can associate it with your chosen mailbox users from either the Exchange admin center or Exchange Online PowerShell. Details on how to complete this process can be found in the References section at the end of this chapter.
Creating a retention policy using the Security & Compliance Center
Creating a retention policy from the Security & Compliance Center allows you to apply retention principles to all of your Office 365 locations, not just Exchange Online. The principles of retention using this method are described in the Understanding data governance and the retention requirements for your organization section of this chapter.
To create retention policies using this method, you need to complete the following steps:
- Log in to the Security & Compliance Center at https://protection.office.com and navigate to Information governance | Retention. You will then see the following page:

Figure 16.12 – Retention in the Security & Compliance Center
- Click on Create. You will need to enter a name and description for your policy, as in the following screenshot:

Figure 16.13 – Name your policy
- Click Next and you can set your retention settings based on your requirements, such as how long you wish to retain content, whether the content to be deleted after the retention period, and whether or not to retain the content based on when it was created or when it was modified. These options are shown in the following screenshot:
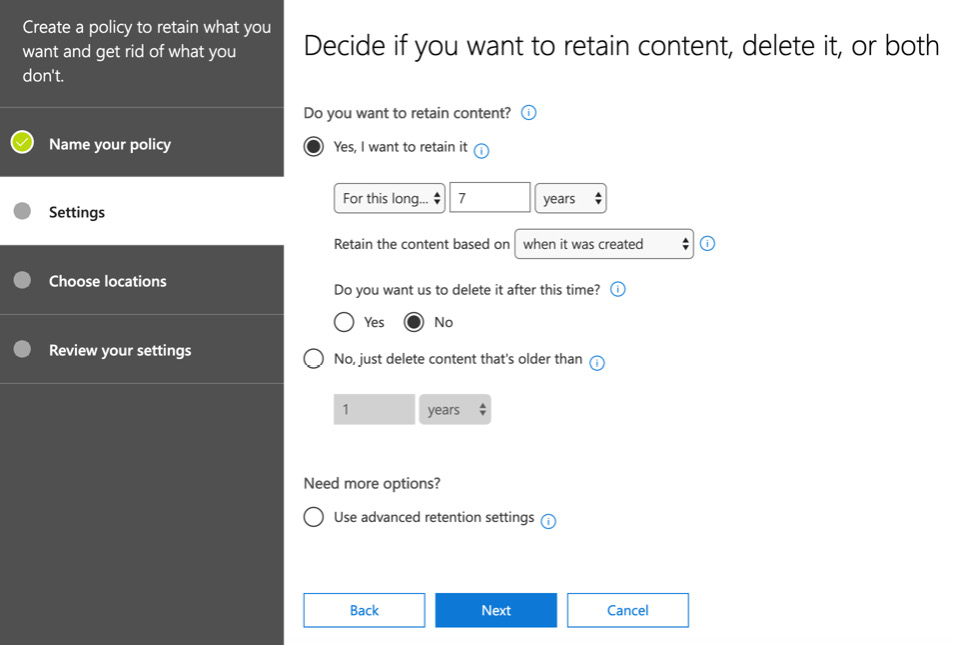
Figure 16.14 – The retention policy settings
- Click Next and you will now see the options to choose which Office 365 locations you can apply the policy to. These include Exchange Online, SharePoint sites, OneDrive accounts, Office 365 groups, and Skype for Business. You can filter the location selections to include or exclude accounts or sites as required. In addition, you can apply the policy to Exchange Public Folders, Teams Channel messages, and, finally, Teams chats. The following screenshot shows some of the options you will see here:
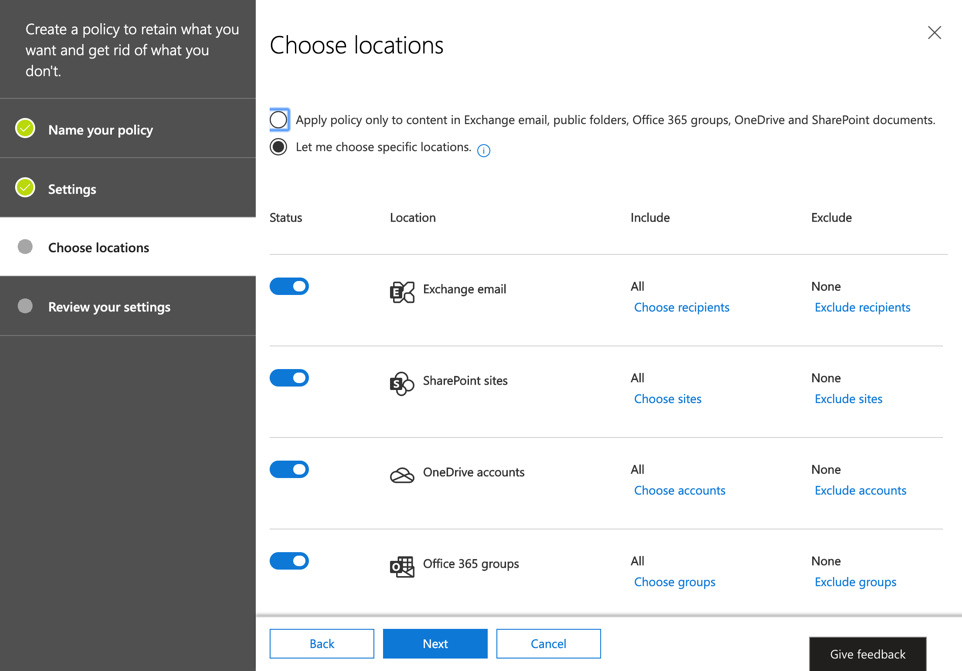
Figure 16.15 – Choosing locations
- Click Next and you can review the settings for your retention policy. If you wish to make any final changes to the policy before creating it, you can click Edit next to each section of the policy, as shown:

Figure 16.16 – Reviewing your settings
- Click on Create this policy to complete the setup of your new retention policy.
The preceding steps show you how to create a simple retention policy. In the Settings section of the preceding setup wizard, you can also choose Advanced settings, which gives you additional options, as in the following screenshot:

Figure 16.17 – Advanced retention settings
Important note
If you wish to set up a retention policy to apply to Teams channel messages and Teams chats, you need to set up a separate retention policy for Teams only. If you select the option to protect Teams content with a retention policy, you will see that the other Office 365 locations are automatically deselected.
Let's now learn how to create a supervision policy.
Creating a supervision policy
With Supervision in the Security & Compliance Center, you can define policies to record email and third-party communications so that they can be reviewed at a later time. In order to configure a supervision policy, we need to complete the following steps:
- Log in to the Security & Compliance Center and click on Supervision from the left-hand menu. You can see the Supervision options in the following screenshot:
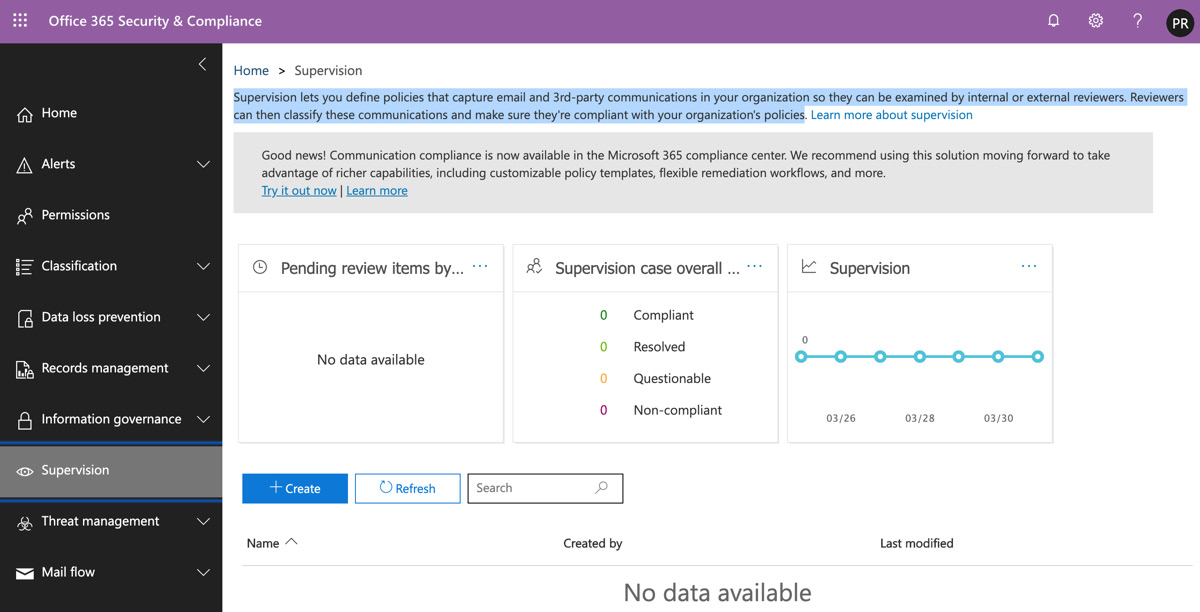
Figure 16.18 – Supervision in the Security & Compliance Center
- Click on Create, which will launch the wizard to create a policy to capture and review communications. In the following example, we will set up a policy to monitor the communications of one of our tenant users, Jane Bloggs. Enter a name and description for your policy and then click Next, as in the following screenshot:

Figure 16.19 – Naming your policy
- Now, you can choose users and groups to include or exclude from supervision. In this example, we will add a single user object (Jane Bloggs). If we added a group here instead of a user, we could also exclude any users from supervision by adding them to the Non supervised users section. These options are shown in the following screenshot:

Figure 16.20 – Choose users or groups to supervise
- Click Next and you now have the option to select which communications you wish to review, as in the following screenshot:

Figure 16.21 – Choosing communications to review
- You can add conditions by clicking on Add a condition. You will see the following options:
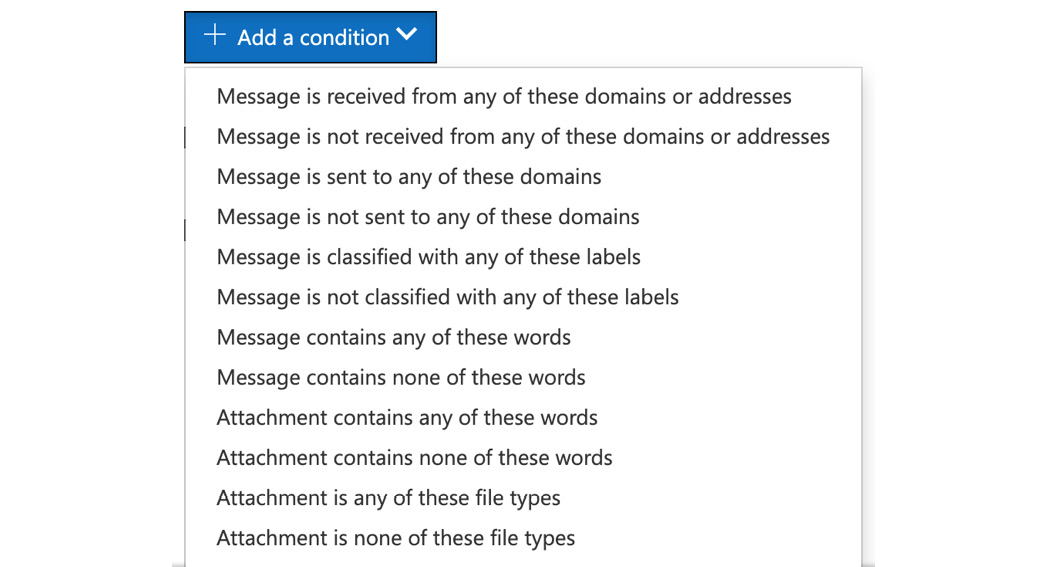
Figure 16.22 – Adding a condition
- In this example, we will not set any additional conditions. Click Next and you can now choose the percentage of communications that you wish to review, as in the following screenshot. The default setting is 10%:
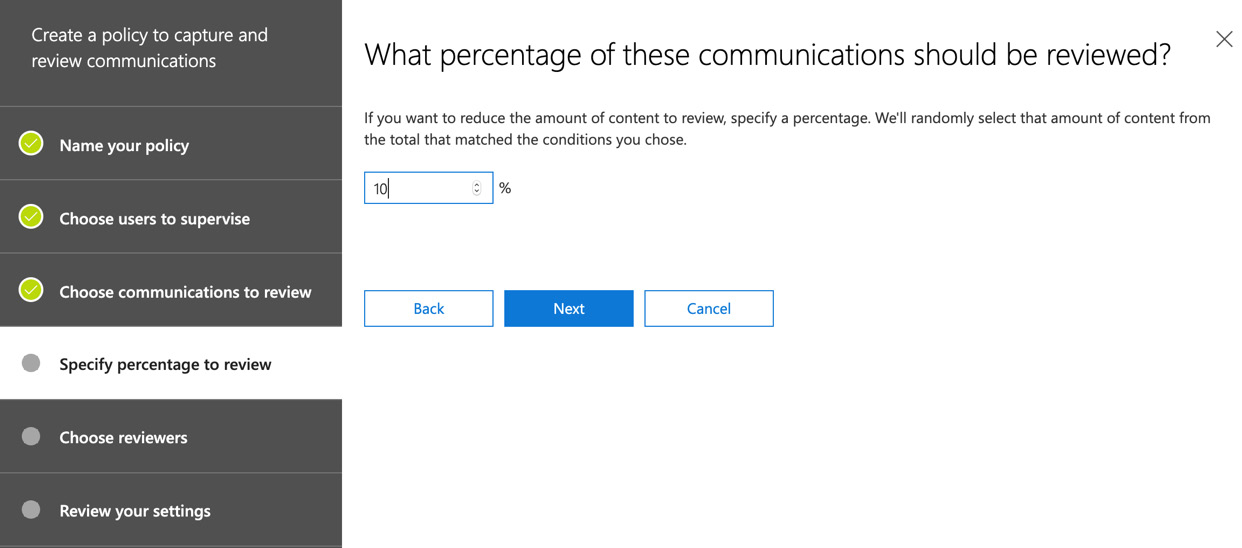
Figure 16.23 – Setting the monitor percentage
- Click Next and you will now be able to choose the users who can review these communications. I have added the Peter Rising user, as shown:

Figure 16.24 – Setting the reviewer
- Click Next, which takes you to the Review your settings page. Make any final changes to each section of your policy by clicking on Edit, as the following screenshot illustrates:
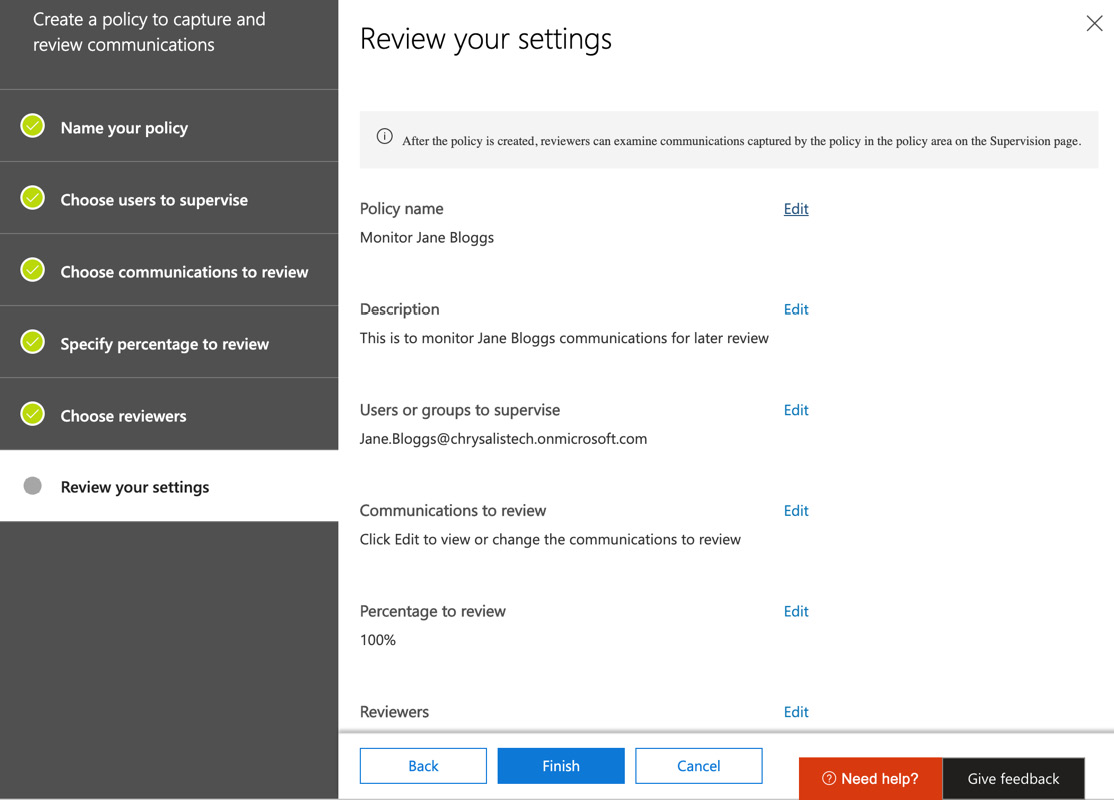
Figure 16.25 – Reviewing your settings
- Click Finish to complete the setup of your supervision policy.
- The reviewer that we set for the policy can now view the policy in the Security & Compliance Center by clicking on Supervision and clicking on the policy, as shown:

Figure 16.26 – Reviewer activity
- Click on Open, as in the following screenshot:

Figure 16.27 – Opening the review
- You will now see the reviewer dashboard, as in the following screenshot:

Figure 16.28 – Reviewer highlights
- Click on the Review option at the top of the screen and you will be taken to the list of items in the supervision review, as in the following screenshot:

Figure 16.29 – Reviewing items
- Highlight an item and you will see the content of the communication. You can take action to set the item to Compliant, Non-compliant, or Questionable, as well as adding any relevant comments. This is shown in the following screenshot:
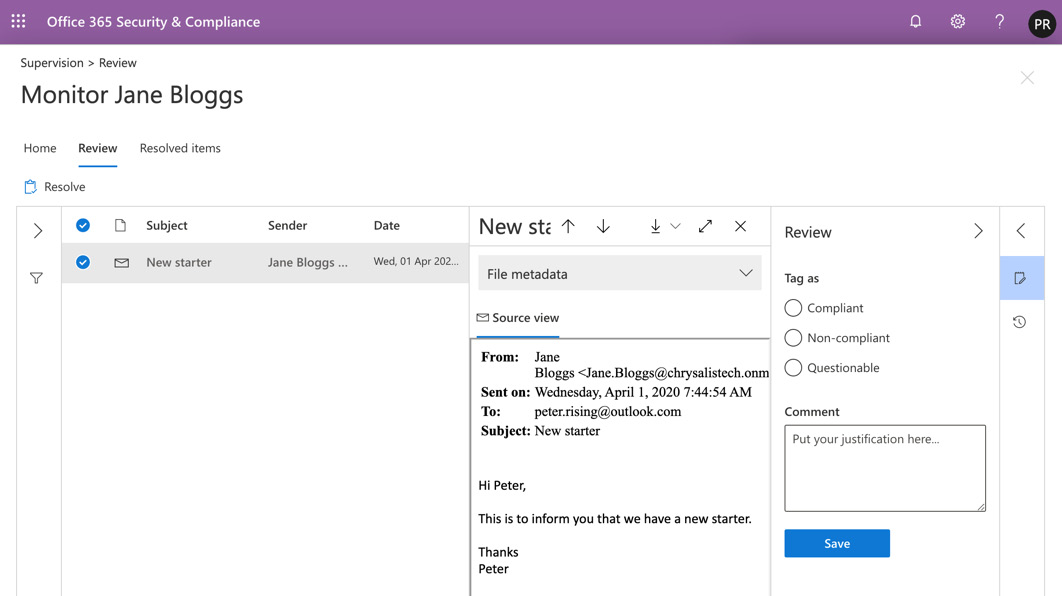
Figure 16.30 – Reviewing items
- For this example, we will mark the item as Compliant. Click Save, then click on the < symbol and you will be able to see the completed review items in the three sections broken down, as in the following screenshot:
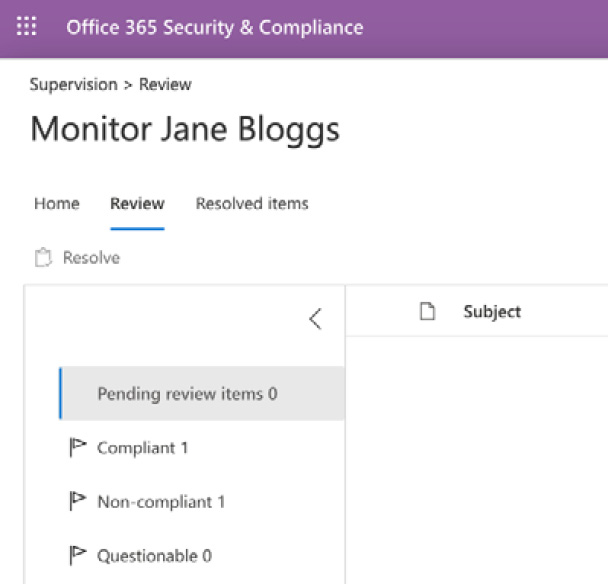
Figure 16.31 – Completed reviews
Important note
Any emails in policies will be processed in close to real time, while chats in Teams may take up to 24 hours to be visible to a reviewer.
In this section, we showed you how retention policies can be used to retain, or retain then delete, content across your Office 365 locations based on the criteria that you set in your policies.
You learned that email-specific retention policies can be configured in the Exchange admin center and set to use retention tags. We also showed you how you can use the Security & Compliance Center to set retention policies for the other Office 365 locations, including SharePoint Online, OneDrive, and Teams.
Finally, we showed you how reviewers can use supervision policies to monitor email and third-party communications in your organization.
Next, we will look at in-place holds and litigation holds and how these can be used to preserve or recover data.
Configuring litigation holds to preserve Office 365 data
The requirement to preserve electronically stored information is something that compliance administrators in any organization need to be prepared for. In-Place Hold and Litigation Hold are features that enable you to achieve the following:
- Place user mailboxes on hold
- Immutably preserve mailbox items
- Preserve mailbox content deleted by users
Important note
As of April 2020, the ability to create new in-place holds will be removed by Microsoft. From July 2020, the ability to manage existing in-place holds will also be removed. Therefore, in this section, we will only examine the process of configuring litigation holds
Litigation Hold
With Litigation Hold, you can preserve the content of your users' mailboxes. The preservation of content applies not only to the users' inbox and sent items but also to their deleted items and to the original versions of any items that may have been modified. Should the user have an archive mailbox, this will also be placed on hold.
In order to place a mailbox on Litigation Hold, you need to complete the following steps:
- Log in to the Exchange admin center at https://outlook.office365.com/ecp and navigate to recipients | mailboxes, as in the following screenshot:

Figure 16.32 – Exchange admin center
- Double-click to select the mailbox that you wish to place on hold and select Mailbox Features, as shown in the following example, where we will enable Litigation Hold for a user named Jane Bloggs:
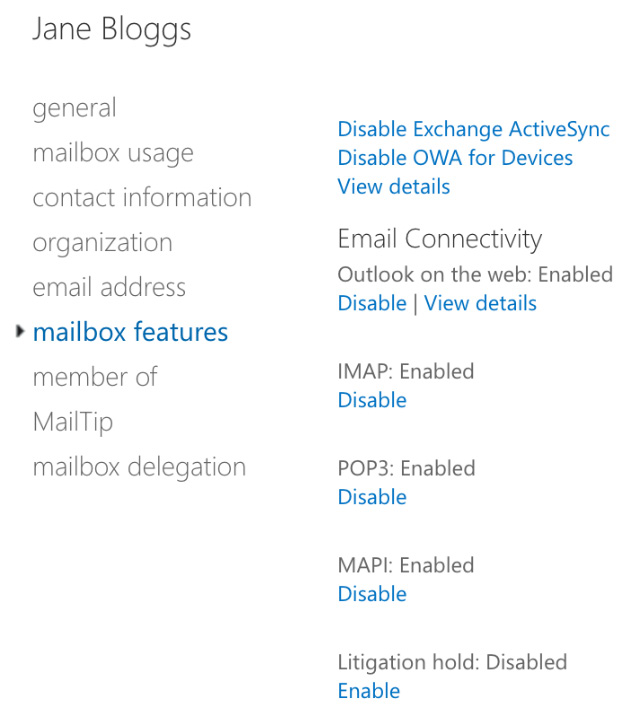
Figure 16.33 – Mailbox features
- Under Litigation hold: Disabled, click the Enable option and you will see the options in the following screenshot:

Figure 16.34 – The litigation hold options
- Under Litigation hold duration (days), enter the number of days that you wish to place the mailbox on hold for. If you leave this setting blank, the mailbox will be placed on hold indefinitely.
- Under Note, you can enter a description for a reason for the hold, which will be visible to users of Outlook 2010 upward.
- Finally, under URL, you can optionally add a link to provide the user with additional information relating to Litigation Hold.
- Click on Save, then Save again, to complete the Litigation Hold enabling for the user.
You can also enable Litigation Hold on a user mailbox by using the Exchange Online PowerShell. To do this for our example user, Jane Bloggs, we need to run the following command:
Set-Mailbox [email protected] -LitigationHoldEnabled $true
As the preceding command does not specify a hold duration, the mailbox will be placed on indefinite hold. Should we wish to specify a hold duration, we would enter the command as follows:
Set-Mailbox [email protected] -LitigationHoldEnabled $true -LitigationHoldDuration1000
The preceding command places the mailbox on hold for 1,000 days. Should you wish to place all of your user mailboxes on hold, you could use the following command:
Get-Mailbox -ResultSize Unlimited -Filter "RecipientTypeDetails -eq 'UserMailbox'" | Set-Mailbox -LitigationHoldEnabled $true -LitigationHoldDuration2000
Once Litigation Hold is enabled on a mailbox, any items that are purged by the user are automatically preserved in accordance with the hold duration settings that were specified when the hold was enabled. Should no hold duration have been specified, then the item will be indefinitely preserved.
Important note
In order for a user mailbox to be successfully placed on litigation hold, the user must be assigned at least an Exchange Online (Plan 2) license.
In this section, we described the principles of Litigation Hold and how it can be used to preserve the content within users' mailboxes in Exchange Online, even if they were deleted and purged by the user. We showed you how to use the Exchange admin center and Exchange Online PowerShell to enable or disable the Litigation Hold feature for either single users or all Exchange Online users.
You also learned that hold durations can be applied in days and if no duration is specified, then the content is preserved indefinitely or until the hold is explicitly removed.
Next, we will show you how to import data into Office 365 using the Security & Compliance Center.
Importing data into Office 365 from the Security & Compliance Center
When you have all of your mailboxes migrated to Exchange Online, it is possible—and highly likely—that some users in your organization will have one or more .pst files stored on their local computers. This is due to the fact that archiving older mailbox content from Exchange on-premises mailboxes used to be a standard operating procedure for most organizations due to the limited storage capacity of Exchange Mailbox databases.
This creates an issue in that although your users' main mailbox has been migrated and now resides in Exchange Online, there could also be a significant amount of mailbox data scattered across various devices within your environment and, as such, this data is not protected by the compliance features available within Office 365.
In order to help IT administrators solve this problem, Microsoft has provided the Import feature, which can be found in the Information governance section of the Security & Compliance Center, as shown in the following screenshot:

Figure 16.35 – The Import feature in the Security & Compliance Center
To use the Import feature, click on Import PST Files and you will then see the following options to import your PST files to Exchange Online:
- Network upload: This option allows you to upload .pst files yourself using Azure Storage to temporarily host the data. Once the files have been uploaded, you can import the .pst files to the relevant user mailboxes in Exchange Online.
- Drive shipping: This option requires you to copy all of the required .pst files to an encrypted hard drive. The drive will then be shipped to Microsoft, who uploads the data to Azure Storage on your behalf. Once uploaded, you can import the .pst files to the relevant user mailboxes in Exchange Online.
To run an import job from the Security & Compliance Center, you need to complete the following steps:
- When you click on the Import PST Files option, you are taken to the Import wizard, as follows:

Figure 16.36 – Importing PST files
- Click on the New import job option and you will see the options in the following screenshot:

Figure 16.37 – Naming your import job
- Enter a name for your import job and click on Next. You will see the options in the following screenshot:

Figure 16.38 – The Import data options
- For this example, we will choose the Upload your data option, as opposed to shipping hard drives to Microsoft. This shows you the options shown in the following screenshot:
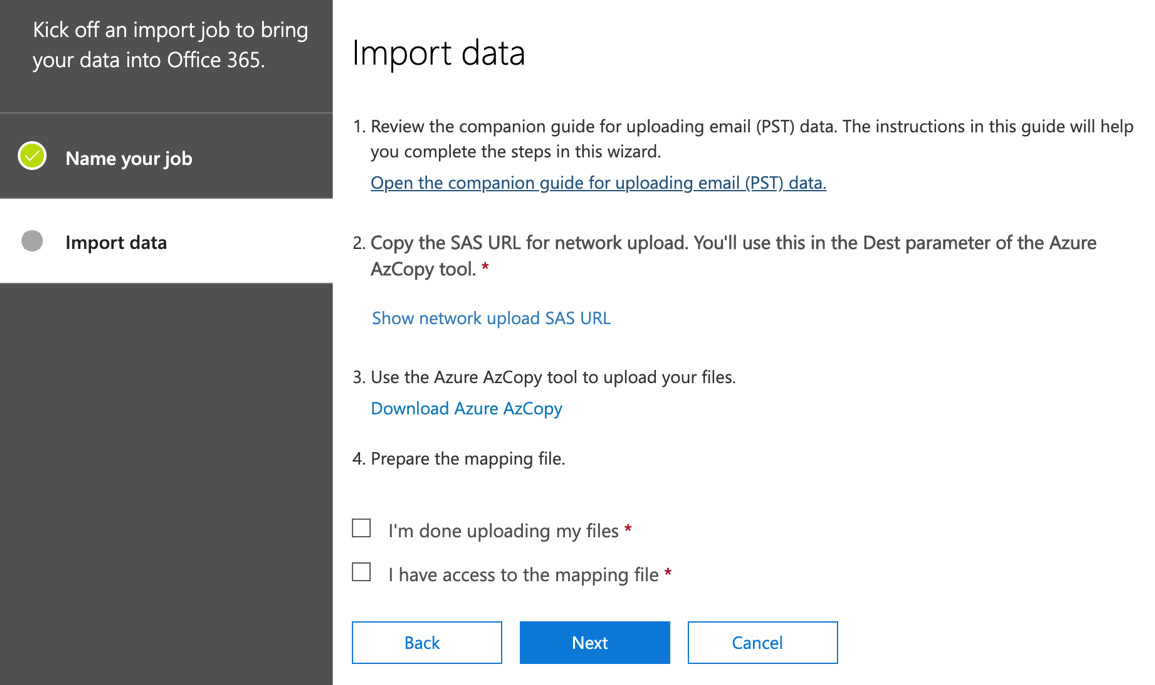
Figure 16.39 – The Import data options
- Next, we need to choose Show network upload SAS URL, which shows you a unique link that you need to use when you upload your .pst files. This displays as shown in the following screenshot:
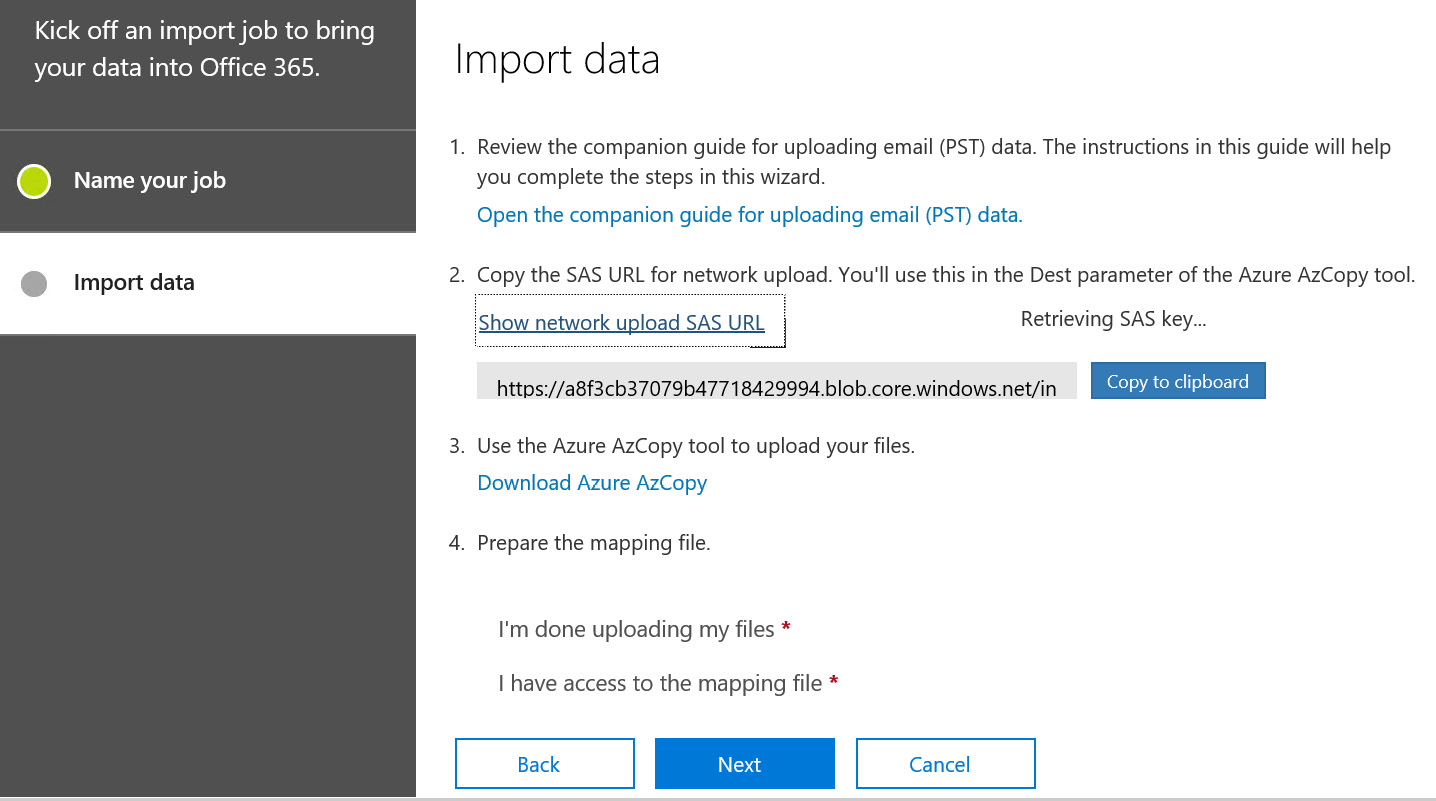
Figure 16.40 – The SAS URL
- Click Copy to clipboard, then paste this value into a .txt file for when you need it later in the process.
- Next, we need to click on Download Azure AzCopy. Once downloaded, you will need to install AzCopy, which is a short and simple install. Once installed, click on the Start button and search for Microsoft Azure Storage AzCopy. Double-click to open AzCopy, which will open a blue-colored command prompt.
- Now that AzCopy is open, we need to run a command that will upload the .pst files into temporary Azure storage. The command you will need to run is in the following format:
AzCopy.exe /Source:<PST file folder> /Dest:<SAS URL> /V:<Log file folder> /Y
An example of how this might look is as follows:
AzCopy.exe /Source:"\Filesharearchivepsts" /Dest:"https://3c3e5952a2764023ad14984.blob.core.windows.net/ingestiondata?sv=2012-02-12&se=9999-12-31T23%3A59%3A59Z&sr=c&si=IngestionSasForAzCopy201601121920498117&sig=Vt5S4hVzlzMcBkuH8bH711atBffdrOS72TlV1mNdORg%3D" /V:"c:uploadupload.log" /Y
- Once this command has been successfully executed, you will see that AzCopy has completed the upload task, as shown:

Figure 16.41 – The successful AzCopy upload
- Now that you have completed the upload, you will need to prepare a .csv file, which you will use to map .pst files that you imported using AzCopy to the target user mailboxes in Exchange Online. A sample .csv file can be downloaded from https://go.microsoft.com/fwlink/p/?LinkId=544717
- Once your .csv file is prepared, you can return to the Import Data wizard, which we should still have open from Step 6 of this process, and then click on Next. You will see the following:

Figure 16.42 – Selecting the mapping file
- Click on Select mapping file, then choose the .csv file that you prepared in Step 11. Click on Validate and you will see the following:

Figure 16.43 – Validating the mapping file
- Click Save, then click Close, as shown:

Figure 16.44 – The mapping file is successfully uploaded
The import job will now be shown as analyzed, as shown:

Figure 16.45 – The import job analysis
- Once the analysis is complete, you can then click on Ready to import to Office 365, as shown:

Figure 16.46 – The import job is ready to import to Office 365
- The .pst files that were uploaded to Azure using AzCopy, and then imported using the .csv mapping file, are now copied into the user mailboxes that you entered in the .csv file.
The process of using AzCopy and the .csv mapping file is quite complex, and more detailed instructions for both of these upload options can be found in the References section at the end of this chapter.
Important note
In order to create import jobs from the Security & Compliance Center, you must use an administrative account that includes the Mailbox Import/Export permission
In this section, we described the available options to upload .pst files to temporary Azure storage, then imported these into the required user mailboxes in Exchange Online. You learned that there are two methods available to upload the .pst files to the Azure Storage location; these are network upload and drive shipping. Importing stray .pst files into Office 365 will ensure that the .pst files are subjected to your organization's compliance policies and settings.
In the final section of this chapter, we will examine the archiving options available within Microsoft 365.
Configuring archiving
The Microsoft 365 platform now also provides administrators with the means to import and archive third-party data. Much like the Import function of .pst files that we described in the previous section, this feature can be accessed from the Security & Compliance Center by navigating to Information governance | Import.
Choosing Archive third-party data will now direct you to the dedicated Microsoft 365 compliance center, which can be accessed at https://compliance.microsoft.com.
By choosing Data connectors, you will see the options in the following screenshot:
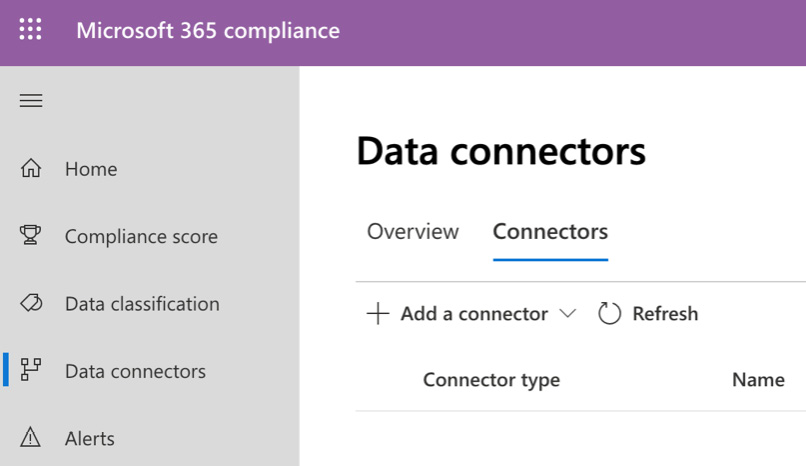
Figure 16.47 – Data connectors
By clicking on Add a connector, you will see the options displayed in the following screenshot:

Figure 16.48 – Add a connector
When you import third-party data, it can be subject to Microsoft 365 compliance principles, such as Litigation Hold and In-Place Archiving. Further details on how to complete the import of third-party data into Microsoft 365 can be found in the References section at the end of this chapter.
In addition to the ability to archive third-party data, administrators can also enable the In-Place Archive feature for users. Also referred to as Unlimited Archiving, this provides users with additional storage that is separate from their main mailbox. When enabled, the online archive triggers a retention policy tag in the default retention policy that is set to move mailbox items that are over 2 years old to the Archive mailbox. The In-Place Archive feature can be enabled from the Security & Compliance Center by navigating to Information governance | Archive. This will show you the full list of all the mailbox users in your Office 365 tenant. By selecting a user, you can click to enable the online archive, as in the following screenshot:
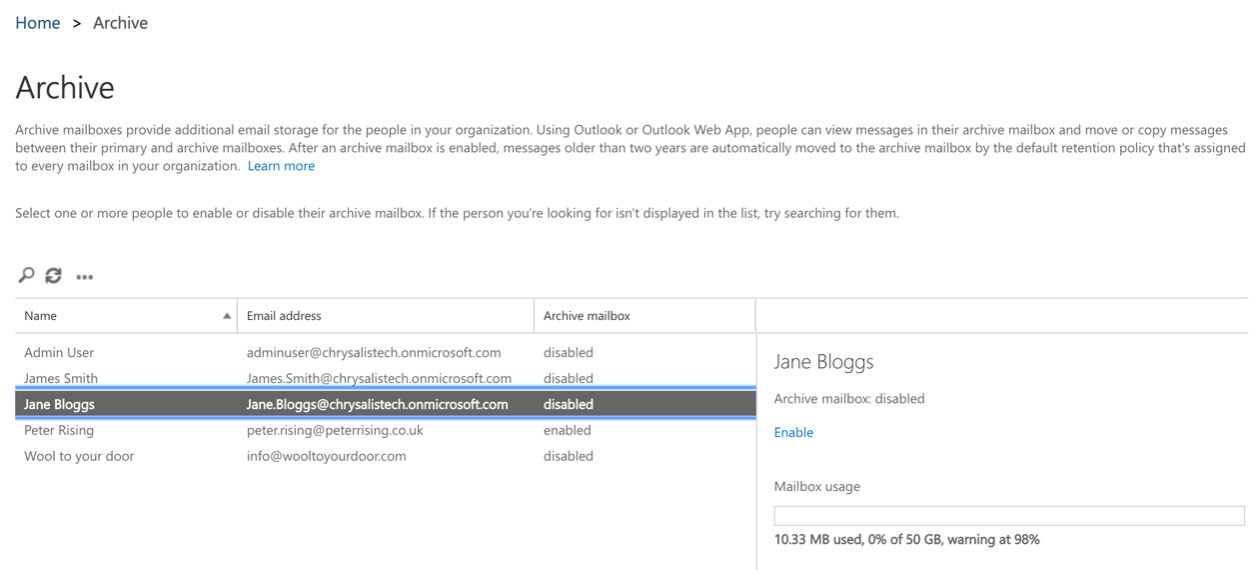
Figure 16.49 – Enabling the archive
Once the online archive is enabled for a user, they will see it appear in their email profile beneath their main mailbox in Microsoft Outlook. It is also accessible via Outlook on the web. As this is an online archive only, it is not possible to cache the contents of this mailbox; therefore, you must have an internet connection in order to view the contents of your online archive.
In this section, we explained how you now have the option to archive third-party data from the Security & Compliance Center so that content that is imported can be protected by the Microsoft 365 compliance features.
We also explained that the online (or in-place) archive can be enabled for your Exchange Online users to provide additional mailbox storage for your user mailboxes.
Important note
In order for a user to have an online archive enabled, they must be assigned either an Exchange Online (plan 2) license or an Exchange Online (plan 1) license with an Exchange Online Archiving license.
Summary
In this chapter, we introduced you to the principles of data governance and retention within a Microsoft 365 environment. We explained how to plan for the data governance and retention requirements for your organization by understanding your internal policies and industry obligations. We showed you how to navigate the Security & Compliance Center to view and interpret data governance reports and dashboards, and you also learned how retention policies can be applied from both the Exchange admin center and the Security & Compliance Center.
In addition, we explained how Litigation Hold can be used to preserve Office 365 data, even if a user has deleted it, how to import .pst files and third-party data into Office 365 via the information governance Import feature, and how the online archive can increase the capacity of Office 365 mailbox users with a separate archive mailbox.
In the next chapter, we will demonstrate the search and investigation tools available in Microsoft 365. You will learn how to use eDiscovery to carry out content searches, how to delegate eDiscovery permissions where appropriate, and how to manage eDiscovery cases.
Questions
- Where in the Security & Compliance Center would you go to enable the Online Archive feature for users?
a. Information governance | Archive
b. Records Management | Archive
c. Permissions | Archive
d. Mail flow | Archive
- True or false – Litigation Hold can be enabled for a mailbox user with only an Exchange Online (Plan 1) license?
a. True
b. False
- Which of the following locations cannot be used to configure retention policies in Microsoft 365?
a. The Exchange admin center
b. The Security center
c. The Compliance center
d. The Security & Compliance Center
- When enabling Litigation Hold for a user, what will happen if you do not specify a hold duration?
a. The hold will not be enabled.
b. The hold will be enabled with a hold duration of 365 days.
c. The hold will preserve content indefinitely.
d. The hold will be enabled, but will not apply.
- True or false – an internet connection is required to view the contents of online archive folders.
a. True
b. False
- Where can you set up data connectors to archive third-party application data into Microsoft 365?
a. The Security & Compliance Center
b. The Exchange admin center
c. The Compliance center
d. The Security center
- What will happen if you try to include Teams channel messages and Teams chats in the same retention policy as other services, such as Exchange Online, SharePoint Online, and OneDrive?
a. You will receive a warning that you should create separate retention policies, but you will be allowed to proceed.
b. The retention policy will successfully be applied to all selected services.
c. The other services will be automatically de-selected from the policy.
d. The Teams selections will automatically be de-selected from the policy.
- True or false – when creating a retention policy from the Security & Compliance Center, you can both delete and retain content based on the settings you configure?
a. True
b. False
- How should Litigation Hold be applied to users?
a. Globally
b. At the user level
- In order to create import jobs to import .pst files to Office 365, which of the following mailbox permissions must be assigned to your account?
a. Records Management
b. Mailbox Import/Export
c. Discovery Management
d. Recipient Management
References
Please refer to the following links for more information:
- Managing information governance: https://docs.microsoft.com/en-us/microsoft-365/compliance/manage-information-governance?view=o365-worldwide
- View the data governance reports: https://docs.microsoft.com/en-gb/microsoft-365/compliance/view-the-data-governance-reports?view=o365-worldwide
- An overview of retention policies: https://docs.microsoft.com/en-us/microsoft-365/compliance/retention-policies?view=o365-worldwide
- Creating a retention policy: https://docs.microsoft.com/en-us/exchange/security-and-compliance/messaging-records-management/create-a-retention-policy
- Applying retention policies to users: https://docs.microsoft.com/en-us/exchange/security-and-compliance/messaging-records-management/apply-retention-policy
- Creating supervision policies: https://docs.microsoft.com/en-us/microsoft-365/compliance/configure-supervision-policies?view=o365-worldwide
- In-place Hold and Litigation Hold: https://docs.microsoft.com/en-us/exchange/security-and-compliance/in-place-and-litigation-holds
- Using network upload to import .pst files to Office 365: https://docs.microsoft.com/en-gb/microsoft-365/compliance/use-network-upload-to-import-pst-files?view=o365-worldwide
- Using drive shipping to import .pst files to Office 365: https://docs.microsoft.com/en-gb/microsoft-365/compliance/use-drive-shipping-to-import-pst-files-to-office-365?view=o365-worldwide
- Archiving third-party data: https://docs.microsoft.com/en-gb/microsoft-365/compliance/archiving-third-party-data?view=o365-worldwide
- Enabling Online Archiving: https://docs.microsoft.com/en-gb/microsoft-365/compliance/unlimited-archiving?view=o365-worldwide