
Chapter 6: Configuring an Advanced Threat Protection Solution
When you consider the modern IT landscape, one of the biggest challenges for IT departments is how to protect your users and data from the ever-changing, ever-more-advanced complex threats that can target your environment. In the Microsoft 365 world, where you have users, email, and documents in the cloud—or on a hybrid cloud—this is particularly challenging. It is not possible to wrap a traditional firewall around your Microsoft 365 tenant or to deploy an old-style anti-virus solution, and yet it is absolutely crucial that you do everything that you can to prevent malicious actors from gaining access to and disrupting your business' data and intellectual property.
Azure Advanced Threat Protection (Azure ATP) provides IT departments with the means to take preventative measures against modern threats and, in this chapter, we will discuss how Azure ATP works, as well as what the prerequisites and processes for configuring and implementing Azure ATP are. We will also review the Azure ATP sensor settings, which are used to examine data within your ATP instance. We will examine the Azure ATP health center, where you can see how your Azure ATP instance is performing, as well as view alerts and reports when there are problems. Finally, we will examine how Azure ATP is monitored and how to interpret security alerts.
We will cover these topics in the following order:
- Identifying the organizational needs for Azure ATP
- Setting up an Azure ATP instance
- Managing Azure ATP activities
Identifying the organizational needs for Azure ATP
To identify your organization's needs in relation to Azure ATP, we first need to examine, in greater detail, exactly what Azure ATP is and what it can do. Essentially, Azure ATP is a security solution that is designed for use in hybrid cloud environments, where you have a mixture of on-premises and cloud users, data, and resources.
Azure ATP can monitor your on-premises domain controllers to identify and investigate advanced threats and compromised identities by using machine learning and behavioral algorithms to do the following:
- Identify suspicious activity.
- Detect and identify advanced attacks and malicious activities.
- Protect Azure Active Directory (Azure AD) identities and credentials.
- Provide incident reports.
Azure ATP can create behavioral profiles for your users and diligently analyze user activities and events to detect any advanced threats, compromised users, and malicious insiders that could threaten your organization. The information gathered by Azure ATP provides recommended security best practices and helps you significantly reduce the areas that are vulnerable to attack.
Let's look at Azure ATP in more detail, starting with how you can identify suspicious activity.
Understanding suspicious activity
Let's first examine what represents suspicious user activity from an Azure ATP perspective. To further understand this concept, you must first have an awareness of the cyber-attack kill chain, which is a series of steps to trace the progress of a cyber-attack from the beginning (which is referred to as the reconnaissance stage) to the end (which results in unauthorized data exfiltration).
Azure ATP focuses on the phases of the kill chain to detect suspicious activities, which can include the following:
- Reconnaissance: The attacker gathers information about the environment after gaining initial access.
- Lateral movement: The attacker works patiently to spread their attack and gain elevation of privileges.
- Domain dominance (persistence): The attacker gains control of your environment and ensures that they have multiple points of entry to the environment.
It is crucial to understand these phases of the kill chain in order to identify suspicious activities in your Microsoft 365 environment.
Next, let's look at how we can identify advanced attacks and malicious activities.
Exploring advanced attacks and malicious activities
By focusing on the phases of the kill chain, Azure ATP can protect your environment from attack vectors before they cause any damage or disruption. Decoy accounts can be set up and used to track any malicious activities within your environment and generate security alerts that can include the following:
- Suspected identity theft using pass-the-ticket
- Suspected identity theft using pass-the-hash
- Suspected brute force attacks
- Reconnaissance using Domain Name System (DNS)
- Unusual protocols
- Suspicious service creation
The malicious activities listed here are only a few of the many that can generate security alerts within Azure ATP.
Important note
Please see the References section at the end of this chapter for links to further information and greater details on the available Azure ATP security alerts.
Understanding the Azure ATP architecture
Before you can start working with Azure ATP, it is important to have an understanding of the Azure ATP architecture. Azure ATP is a combination of services and components that work together to provide your Microsoft 365 tenant with comprehensive protection from modern threats and attacks that may target your environment. The following diagram shows the architecture of Azure ATP:

Figure 6.1 – The Azure ATP architecture
Azure ATP can function to protect your hybrid identity by leveraging three key components, as follows:
- The Azure ATP portal: This is where you create your Azure ATP instance, as well as monitor and address any threats that have been reported.
- The Azure ATP sensor: This is installed onto your on-premises domain controllers and is used to monitor domain controller traffic.
- The Azure ATP cloud service: This runs on Azure infrastructure and shares data using Microsoft's intelligent security graph. The cloud service can connect Azure ATP to Windows Defender ATP.
When you create your Azure ATP instance using the Azure ATP portal, this enables you to integrate with Microsoft security services, configure your Azure ATP sensor settings for your domain controllers, and review the data retrieved by these sensors to interpret any suspicious and malicious activities.
The Azure ATP sensor can monitor on-premises domain controller ingress and egress traffic. It receives events from domain controllers, which can include information about on-premises users and computers. The information gathered is passed on to the Azure ATP cloud service.
So, how does this information help you to understand and plan for your organization's needs for Azure ATP deployment? Essentially, we can break this down by answering the following questions:
- What do you need to protect?
- How can you protect it?
- How can you be certain that the protection you have applied is working?
The simple answers to these questions are as follows:
- You need to protect your Microsoft 365 hybrid cloud users and resources by deploying an Azure ATP instance in the Azure ATP portal.
- You can apply protection by installing Azure ATP sensors onto your on-premises domain controllers.
- You can verify that the protection is working by diligently monitoring Azure ATP events and alerts to review and respond to any potentially suspicious and malicious activities.
It is Microsoft's recommended best practice to deploy Azure ATP in three stages.
Stage 1
The following steps should be completed for stage 1 of deploying Azure ATP:
- Set up Azure ATP to protect primary environments. Azure ATP can be deployed quickly to configure immediate protection.
- Set sensitive accounts and honeytoken accounts (a honeytoken account is an account specifically set up to trap malicious actors).
- Review reports and potential lateral movement paths.
Stage 2
The following steps should be completed for stage 2 of deploying Azure ATP:
- Protect all domain controllers and forests in your organization.
- Monitor all alerts and investigate any lateral movement or domain dominance.
- Use the security alert guide to understand threats.
Stage 3
The following step should be completed for stage 3 of deploying Azure ATP: Integrate Azure ATP alerts into your security operation's workflows if applicable.
Important note
For detailed guidance on implementing Azure ATP in line with Microsoft best practice, please refer to the An overview of Azure ATP link that is included in the References section at the end of this chapter
So, the preceding steps will help you understand the principles of Azure ATP and show you how you can prepare to configure it. Now, you are ready to set up your Azure ATP instance and start taking advantage of the various features and capabilities of the product.
Setting up an Azure ATP instance
In order to set up Azure ATP for the first time, you must first ensure that you have the required licenses. Azure ATP requires an Enterprise Mobility + Security E5 or Microsoft 365 E5 license in order to function. Azure ATP data centers are set up in the following locations:
- Europe
- North America/Central America
- The Caribbean and Asia
Your Azure ATP instance will be automatically provisioned in the data center that is geographically closest to your Azure AD tenant. To begin setting up Azure ATP, log in to the Azure ATP portal, which can be accessed at https://portal.atp.azure.com, as a global administrator (or with the appropriate Role-Based Access Control (RBAC)) and complete the following steps:
- Check to ensure that the domain controller or server can connect to the Azure ATP cloud service endpoints for the appropriate regions. These are as follows:
https://triprd1wceuw1sensorapi.atp.azure.com (for Europe)
https://triprd1wcuse1sensorapi.atp.azure.com (for the US)
- Click Create, as in the following screenshot:

Figure 6.2 – The Azure ATP welcome screen
- Next, select the Provide a username and password option to connect to your on-premises AD forest, as follows:
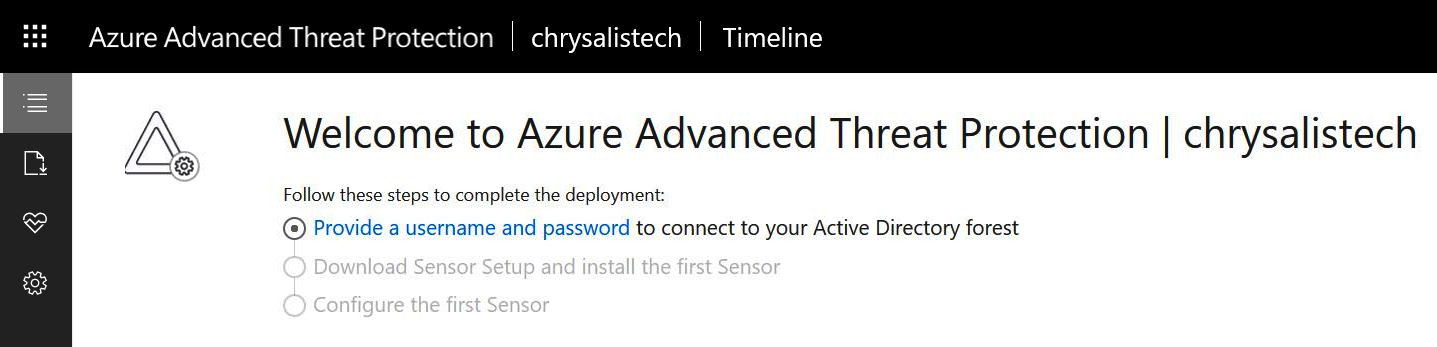
Figure 6.3 – Providing a username and password
- Enter the administrative credentials for AD into the Directory Services dialogue box, as shown:
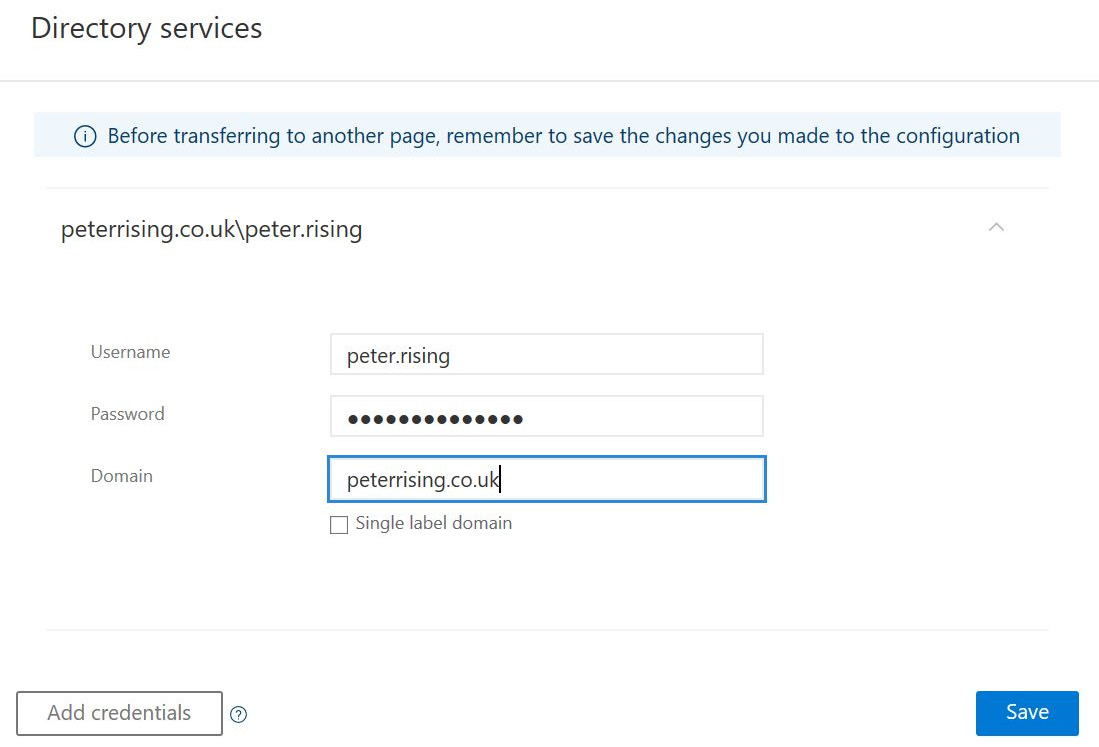
Figure 6.4 – Entering the on-premises credentials
- Once you have entered your credentials, click Save.
- Now, we need to download and install the sensor setup to your first domain controller. Click Download Sensor Setup, as in the following screenshot:

Figure 6.5 – Downloading the sensor setup
- Click Download and save the ZIP file to a location where you will be able to access it to install the sensor to your domain controller. You will also need to copy your access key as this will also be required during setup:
Important note
Should you ever need to regenerate your access key, as in the following screenshot, you can do so without affecting the previous Azure ATP sensor installations.

Figure 6.6 – Sensors
- Next, from your domain controller or dedicated server, extract the installation files from the ZIP file that you saved in Step 6, then run the setup.exe Azure ATP sensor to start the installation wizard. You will see the following:
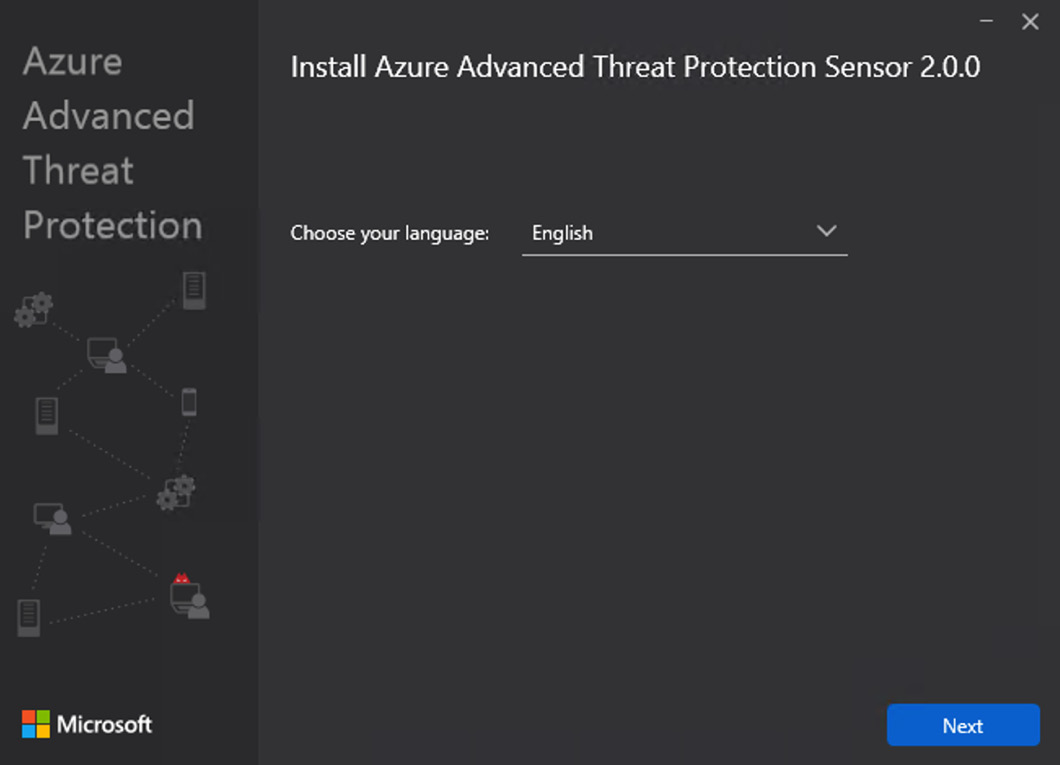
Figure 6.7 – Choosing the language
- Select your chosen language and click Next. This will take you to the following screen. The wizard will detect whether you are installing the sensor to a domain controller or a dedicated server. Click Next again:

Figure 6.8 – Sensor deployment type
Choose the installation path, as in the following screenshot. The wizard will alert you, at this point, if any of the prerequisites for installing the sensor are not met, such as insufficient disk space:

Figure 6.9 – Configuring the sensor
- Click Install and the installation will start, as follows:

Figure 6.10 – Installation progress
- When the installation is complete, you will see the following message. Click Finish to complete the setup wizard:

Figure 6.11 – Installation is complete
- Once the wizard has completed, you can click on Sensors from the Configuration menu of the Azure ATP portal and you will see the first installed sensor, as in the following screenshot:

Figure 6.12 – Sensors
The preceding steps complete the initial setup of your Azure ATP instance. Should you need more sensors, you can repeat the preceding steps to do so.
Important note
It is possible to install a sensor onto both a domain controller and a dedicated server. When you deploy a sensor to a domain controller, it is installed as an Azure ATP sensor. However, when you deploy a sensor to a dedicated server and use port mirroring, it is installed as an Azure ATP standalone sensor.
Additional configuration options
By logging into the Azure ATP portal at https://portal.atp.azure.com and choosing the Configuration tab in the left menu, you can see all of the configuration options available to you within Azure ATP, as shown:
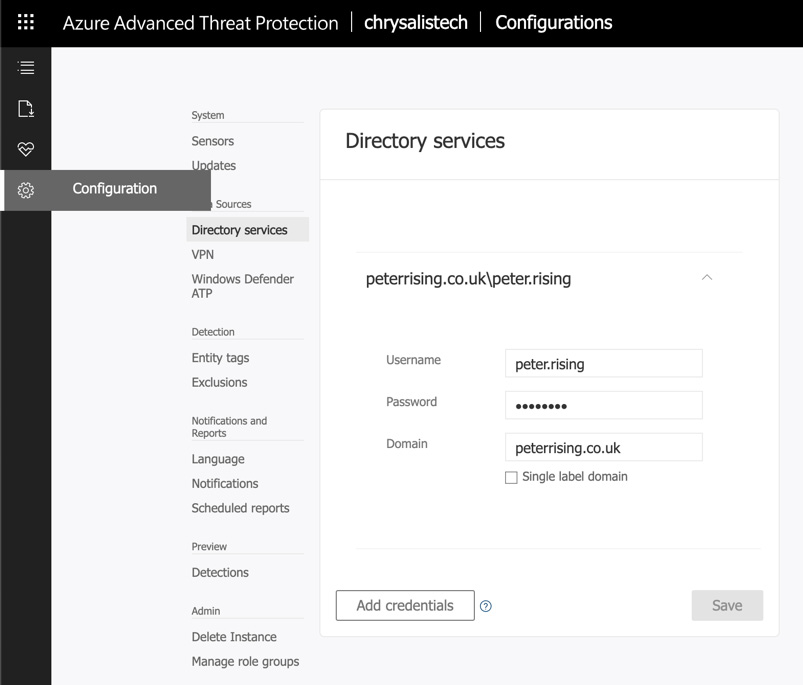
Figure 6.13 – The configuration options
The Configuration section is divided into the following sub-sections:
- System
- Data Sources
- Detection
- Notifications and Reports
- Preview
- Admin
Important note
Depending on your organizational requirements for Azure ATP, you may not need to configure all of the features within the preceding sub-sections. However, it is recommended that you familiarize yourself with all of the available options as you may be tested on these in the MS-500 exam.
So, we have now configured our Azure ATP instance and deployed the first Azure ATP sensor to a domain controller. Now that we have Azure ATP up and running in a basic form, we will look at how you can manage your Azure ATP instance and carry out monitoring and reporting tasks.
Managing Azure ATP activities
Now that we have deployed our Azure ATP instance, we can start managing and monitoring the service. It is important to review the Azure ATP portal regularly, in addition to creating alerts, to keep on top of all potential suspicious and malicious activities that may target your hybrid cloud identities.
There are a number of ways to manage and monitor the Azure ATP instance. Some of them are as follows:
- Through the security alerts timeline in the Azure ATP portal
- Through Azure ATP reports
- Through the Azure ATP workspace health center
We will now look at each of these in greater detail, starting with the security alerts timeline.
The security alerts timeline in the Azure ATP portal
When you first launch the Azure ATP portal, it opens the security alerts timeline, as follows:

Figure 6.14 – The security alerts timeline
Important note
There are no alerts in my own timeline at the moment because the Azure ATP instance has just been generated on my tenant.
In the security alerts timeline, you can see any security alerts that have been detected in chronological order.
Security alerts contain events relating to the following information:
- Compromised users, devices, and resources
- Timeframes associated with suspicious activities
- Alert severity
- Alert status
You can share any security alerts via email with other users in your organization and you can also export a security alert to Excel. Some examples of the types of activities you could see in your timeline are as follows:
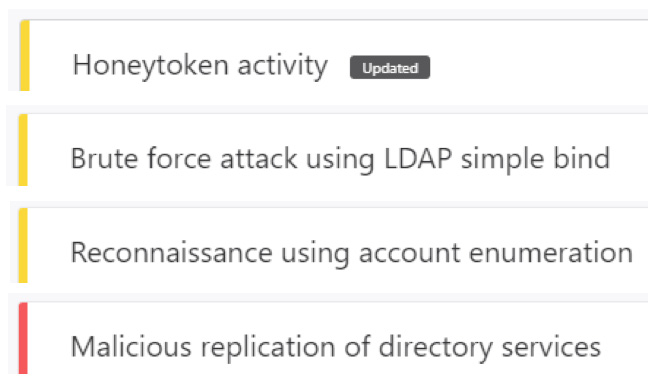
Figure 6.15 – Timeline activity types
You should review the security alerts timeline regularly in order to respond to and classify any recorded alerts. Microsoft has the following classifications for security alerts:
- True Positive: This is a genuine malicious action detected by Azure ATP.
- Benign True Positive: This is a non-malicious action detected by Azure ATP, such as a penetration test.
- False Positive: This is a false alarm.
If you have a large number of security alerts to review on your timeline, you can filter the alerts by All, Open, Closed, or Suppressed. You can also filter further by High, Medium, or Low.
Azure ATP reports
The Azure ATP Reports section is the second option visible on the sidebar from the Azure ATP portal, as follows:

Figure 6.16 – Azure ATP reports
In Reports, you can generate and download reports relating to suspicious activities and system health. You can also schedule regular reports from the top-right corner of the screen, as follows:

Figure 6.17 – See scheduled reports
Important note
You can also access Scheduled reports from the Notifications and Reports section of the Configuration screen within Azure ATP.
When you choose to schedule a report, you will see the following options for the built-in reporting options of Azure ATP:
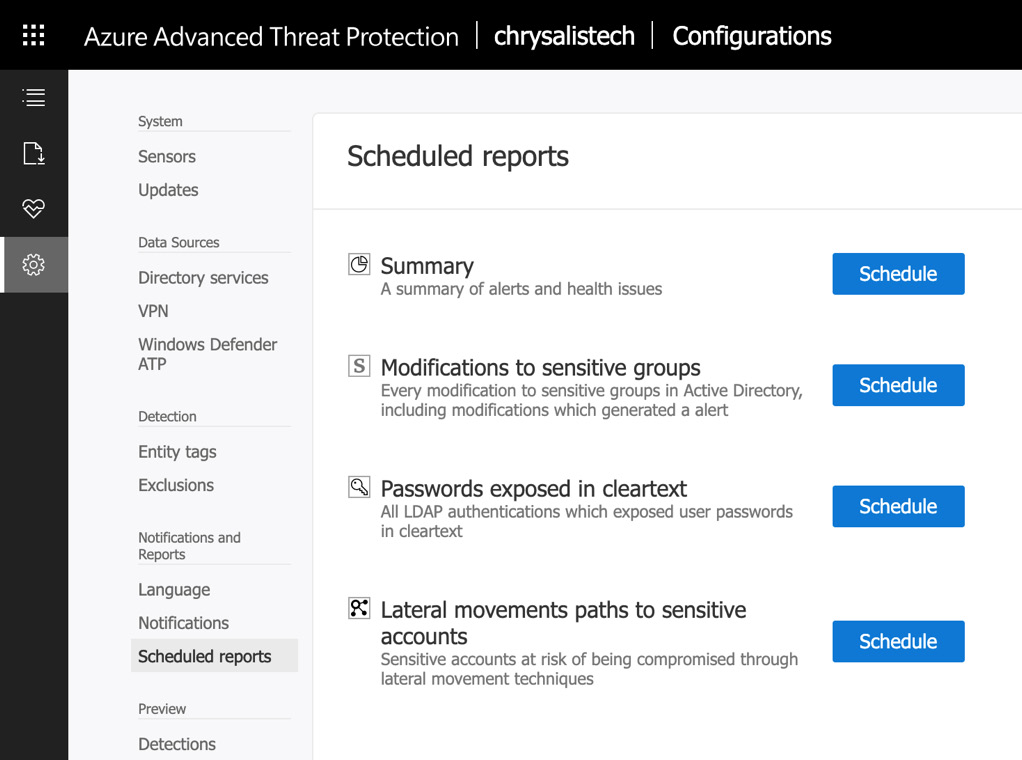
Figure 6.18 – Available scheduled reports
The reports available within Azure ATP are as follows:
- Summary
- Modifications to sensitive groups
- Passwords exposed in cleartext
- Lateral movements paths to sensitive accounts
When scheduling one of these reports, you have the following configuration options:

Figure 6.19 – Configuration options
You can choose to send a report on a daily, weekly, or monthly basis. You can also choose the time of day that the report will be sent and you can choose the recipients who should receive the report via email.
When you have configured your report schedule settings, they will be shown on the Scheduled reports page, as follows:

Figure 6.20 – Scheduled reports
If you choose to download one of the reports from the Azure ATP portal, the report is exported to Microsoft Excel, as in the following example, which shows the downloaded Summary report. There are two tabs available:
- The Summary tab:

Figure 6.21 – The Summary tab
- The Health issues tab:
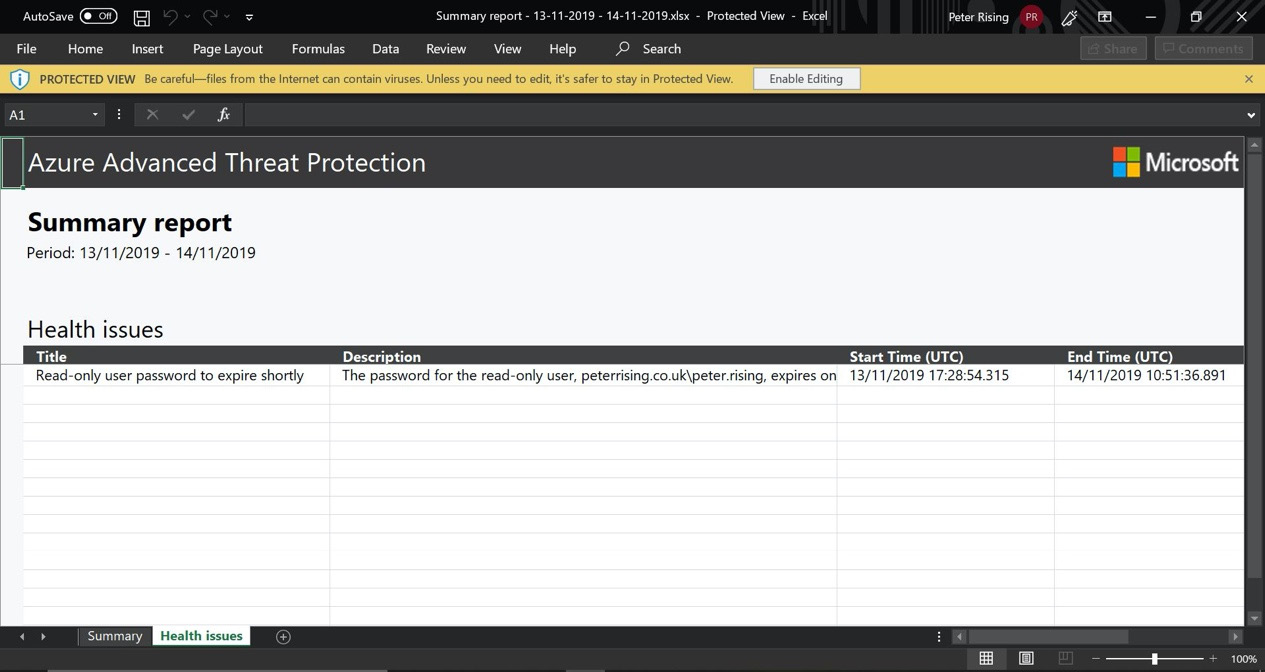
Figure 6.22 – The Health issues tab
When using Azure ATP in your environment, reports are an excellent way for you to diligently and proactively assess activities within your Azure ATP instance. It is highly recommended that you schedule regular reports to be emailed to administrators.
The Azure ATP workspace health center
The Azure ATP workspace health center can be accessed from the Azure ATP portal by clicking on the heart icon, as follows:

Figure 6.23 – Azure ATP portal
The health center shows you the performance information that relates to your Azure ATP workspace and alerts you on any issues. Should there be any potential problems, the health center icon will display a red dot, as in the preceding screenshot, so you have a clear visual indication when there are health issues that require your attention.
In the following example (which shows the health center of the Azure ATP instance that we set up in the previous section of this chapter), we can see that there is already a reported issue that requires attention. When we set up the Azure ATP instance on this tenant, we purposely selected an AD user account whose password is soon to expire, knowing that this would generate an alert:

Figure 6.24 – The Azure ATP health center
There are three alert types in the Azure ATP health center, which are as follows:
- Open: These are new or current alerts that require attention.
- Closed: These are alerts that have been successfully and definitively resolved.
- Suppressed: These are alerts that have been identified as safe to ignore, but that may reoccur.
Alerts provide you with a lot of detail as to what the issue is and also suggest corrective measures that can be taken. Any open issues that appear in your Azure ATP instance can be addressed by clicking on the ellipsis in the right-hand corner of the alert, as follows:

Figure 6.25 – Alert details
From the open alert, you can select from one of the available options, as follows:
- Close: Select Close if you are certain that you have diligently addressed and resolved the issue described in the activity.
- Suppress: Select Suppress if you are certain that the activity can safely be ignored at this time.
In the previous example, we closed the alert that was detected in the Azure ATP health center and it now shows in the Closed alerts section:

Figure 6.26 – Alert shown as closed
If we click on the ellipsis, we can reopen the alert if we need to, as follows:

Figure 6.27 – Re-opening an alert
If we chose to suppress the activity instead of closing it, the activity would move to the Suppressed alerts section. We would have the same option to re-open the alert from the Suppressed section as we did from the Closed section, if required.
Important note
If you close an activity and Azure ATP detects a reoccurrence within a short time frame, Azure ATP may automatically reopen the activity.
There are three levels of activity that detection can be assigned to depending on the severity of the issue. They are as follows:
- A high-level alert: This is the most severe type of alert and requires urgent attention. High-level alerts can indicate activities that can lead to high-impact attacks, such as identity theft or elevation of privilege.
- A medium-level alert: This can indicate that there has been an activity that could put identities at risk and result in a more serious attack.
- A low-level alert: This can indicate that a malicious actor could be attempting to gain initial access to your environment.
The Azure ATP health center is an extremely useful tool for Microsoft 365 administrators and will enable you to diligently and proactively respond to any suspicious or malicious activities detected in your environment. We have shown you how it can be used to monitor alerts recorded by Azure ATP and how to understand the different levels of alerts and their varying severity. You have also learned how to change the status of alerts by closing or suppressing them.
Summary
In this chapter, we examined Azure ATP, which is a feature included with Enterprise Mobility + Security E5 that enables you to protect your Microsoft 365 hybrid cloud environment against malicious actors who are attempting to access vulnerable user accounts and conduct reconnaissance activities in order to gain elevation of privilege and achieve domain dominance.
We showed you how to configure your Azure ATP instance in the Azure ATP portal and install sensors onto domain controllers or dedicated servers. We then examined how the Azure ATP portal establishes a timeline of suspicious and malicious activities, the steps you can take to review and resolve these within the Azure ATP health center, and how to use reports and report schedules.
In the next chapter, we will examine the principles of Windows Defender ATP. We will show you how to plan for and configure Windows Defender ATP, and how it can be used to protect your Windows devices.
Questions
- Which of the following can you not install an Azure ATP sensor onto?
a. A domain controller
b. A Windows 10 workstation
c. A dedicated Windows server
- Which of the following is not an option when scheduling Azure ATP reports?
a. Hourly
b. Daily
c. Weekly
d. Monthly
- True or false – in order to use Azure ATP, you need to have an Enterprise Mobility + Security E5 license or a standalone Azure ATP license.
a. True
b. False
- Which of the following are the components that make up Azure ATP (choose three)?
a. The Azure ATP portal
b. The Azure ATP sensor
c. The Azure ATP configuration manager
d. The Azure ATP cloud service
e. The Azure ATP cloud app security
- True or false – your Azure ATP instance is automatically created in the closest geographical data center.
a. True
b. False
- Which of the following are not types of alerts displayed in the Azure ATP health center (choose two)?
a. Open
b. Pending
c. Suppressed
d. Closed
e. Deferred
- Which of the following is not a built-in Azure ATP report?
a. Modifications to sensitive groups report
b. Directory services report
c. Summary report
d. Lateral movements paths to sensitive accounts report
- True or false – Azure ATP can integrate with Windows Defender ATP.
a. True
b. False
- When you export and download an Azure ATP report, what format is the report sent as?
a. Excel (.xlsx)
b. Word (.docx)
c. .txt
d. .xml
- True or false – when setting up Azure ATP for the first time, it creates some Azure AD groups.
a. True
b. False
References
Please refer to the following links for more information:
- Azure ATP prerequisites: https://docs.microsoft.com/en-us/azure-advanced-threat-protection/atp-prerequisites
- Azure ATP documentation: https://docs.microsoft.com/en-us/azure-advanced-threat-protection/
- An overview of Azure ATP: https://docs.microsoft.com/en-us/azure-advanced-threat-protection/what-is-atp
- Creating an Azure ATP instance: https://docs.microsoft.com/en-us/azure-advanced-threat-protection/install-atp-step1
- Connecting Azure ATP to an on-premises AD: https://docs.microsoft.com/en-us/azure-advanced-threat-protection/install-atp-step2
- Downloading the Azure ATP sensor package: https://docs.microsoft.com/en-us/azure-advanced-threat-protection/install-atp-step3
- Installing and configuring an Azure ATP sensor: https://docs.microsoft.com/en-us/azure-advanced-threat-protection/install-atp-step4
- Working with Azure ATP security alerts: https://docs.microsoft.com/en-us/azure-advanced-threat-protection/working-with-suspicious-activities
- Azure ATP FAQs: https://docs.microsoft.com/en-us/azure-advanced-threat-protection/atp-technical-faq#licensing-and-privacy
- The cyber-attack kill chain: https://www.microsoft.com/security/blog/2016/11/28/disrupting-the-kill-chain/