Chapter 7: Configuring Microsoft Defender ATP to Protect Devices
In the modern IT landscape, malicious actors who attack environments and devices use methods that are becoming more and more sophisticated, and unfortunately, the average time before a threat is detected is believed to be approximately 200 days. While traditional anti-virus and anti-malware software can still play an important role in defending against these threats, they are sadly not enough to effectively defend against modern attackers that are determined to cause disruption and implement malicious activities.
This is where Microsoft Defender Advanced Threat Protection (ATP) comes in. Microsoft Defender ATP is a cloud-based online service that provides prevention, detection, and investigation methods that you can use to respond to advanced threats within your organization. In this chapter, you'll learn how to configure and manage the Microsoft Defender ATP features to provide the best protection for your organization, as well as how to enable and configure always-on protection and monitoring.
In addition, we will examine how Microsoft Defender Application Guard can be used to protect your environment. You will also learn how Microsoft Defender Application Control can help administrators plan and implement control of specific applications, how BitLocker can be configured to manage Windows 10 device encryption, and how app protection policies for non-Windows device encryption can be applied. Finally, we will examine how the protection of enterprise data can be accomplished with Windows Information Protection (WIP).
We will cover these topics in the following order:
- Implementing Microsoft Defender ATP
- Managing and monitoring Microsoft Defender ATP
- Implementing additional Microsoft Defender features
- Managing device encryption for your Windows 10 devices
Technical requirements
Microsoft Defender ATP has a number of minimum requirements that must be met in order to use the service.
Licensing requirements
You will need one of the following licenses in order to use Microsoft Defender ATP:
- Windows 10 Enterprise E5
- Microsoft 365 E5
- Microsoft 365 E3 (with the Microsoft 365 E5 Security add-on)
Supported operating systems
The following operating systems are capable of supporting Microsoft Defender ATP:
- Windows 7 SP1 Enterprise
- Windows 7 SP1 Pro
- Windows 8.1 Enterprise
- Windows 8.1 Pro
- Windows 10 Enterprise
- Windows 10 Pro
- Windows Server 2008 R2 SP1
- Windows Server 2012 R2
- Windows Server 2016
- Windows Server 2019
- macOS X
- Linux
- Android
Implementing Microsoft Defender ATP
Microsoft Defender ATP enables organizations to investigate and respond to advanced threats that target their enterprise networks by providing information about advanced attack detections based on behavioral patterns. The threats detected by Microsoft Defender ATP are interpreted into a forensic timeline that is then used to build and maintain a threat intelligence knowledge base.
This is achieved by using endpoint behavioral sensors, which collect signals from the Windows 10 operating system and send that data to Microsoft Defender ATP.
Cloud security analytics then uses machine learning techniques to translate the collected data into insights and provide recommendations on how to resolve advanced threats.
Finally, threat intelligence activities are carried out by Microsoft hunters and security experts, which allows Microsoft Defender ATP to recognize the tools and methods employed by malicious actors and to alert administrators when this behavior is detected.
Microsoft Defender ATP provides both preventative and post-breach detection; it comprises the following features and components:
- Reduces the attack surface
- Provides next-generation protection
- Conducts endpoint detection and response
- Conducts automated investigation and remediation
- Provides a Secure Score reporting tool
- Carries out advanced hunting to provide custom threat intelligence
The Microsoft Defender ATP service can be installed and configured via a dedicated Windows Security Center cloud portal. Next, we will look at how we can configure Microsoft Defender ATP.
Important note
In many of the following screenshots, you will see references to Windows Defender ATP as opposed to Microsoft Defender ATP. The product was renamed when other platforms, such as macOS X, also became compatible. However, some of the installation experiences have not yet caught up with the name change.
Configuring Microsoft Defender ATP
Once you have acquired the required licenses to run Microsoft Defender ATP, you can start to configure the service by using the cloud portal:
- Go to https://securitycenter.windows.com/ and log in with your Microsoft 365 Global Administrator credentials. The portal will look as follows:
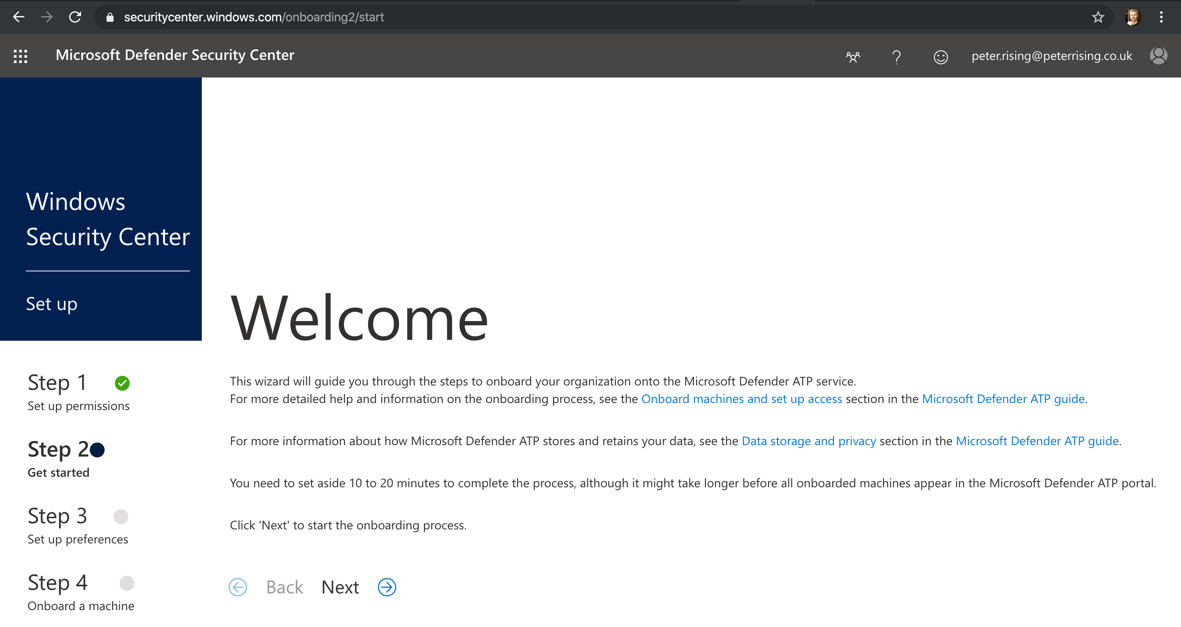
Figure 7.1 – Microsoft Defender Security Center
- Click Next to proceed to the next step of the setup wizard, where you will be asked to configure your preferred data storage location, data retention policy, and organization size. Retention can be set between 30 and 180 days. 180 days is the default setting:

Figure 7.2 – Data storage location
- When prompted to create your cloud instance, click Continue:

Figure 7.3 – Creating your cloud instance
- The wizard will proceed to create your Microsoft Defender ATP account, as follows:
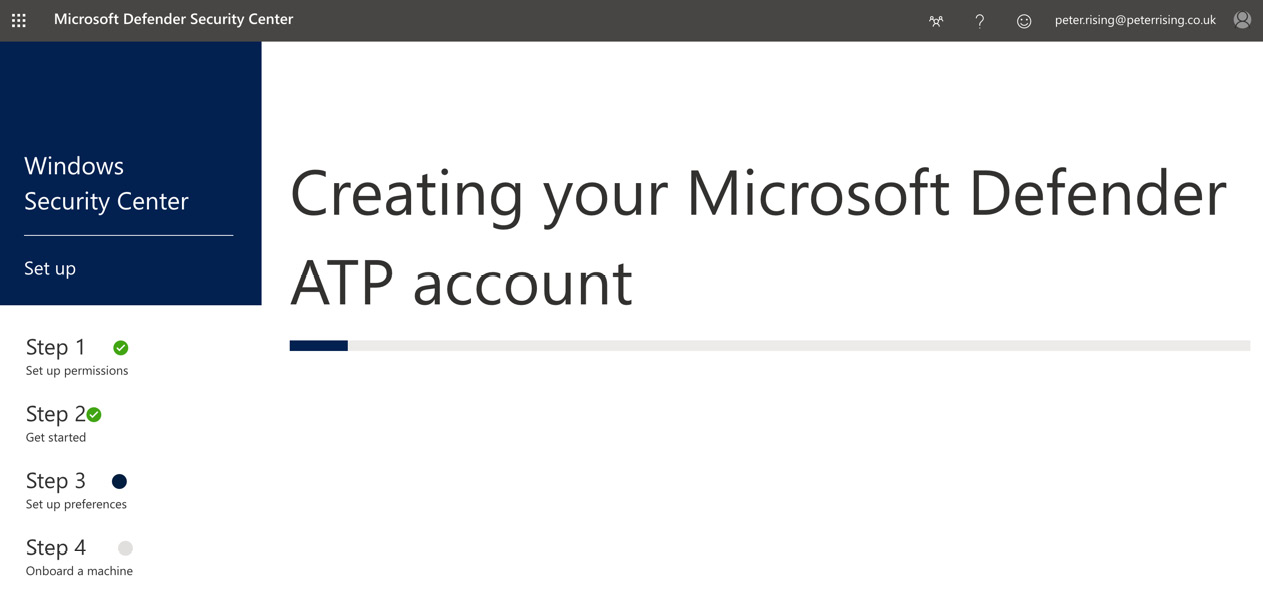
Figure 7.4 – Creating your Microsoft Defender ATP account
- Next, you will see the following screen:

Figure 7.5 – The next steps
- In this step, you need to choose your preferred deployment method. The options for deployment are shown in the following screenshot:
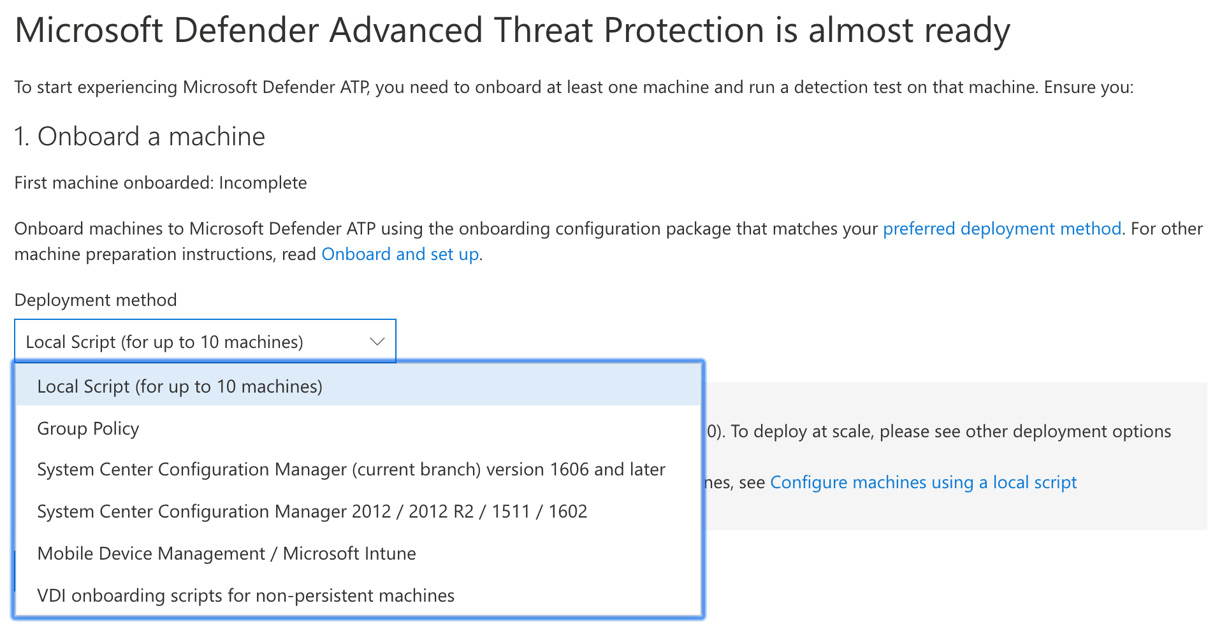
Figure 7.6 – Onboarding a machine
- For the purposes of this demonstration, we have chosen to deploy Microsoft Defender ATP to a Windows 10 computer using the Local Script (for up to 10 machines) option by clicking on the Download Package option. In a production environment, you will more likely choose one of the other options for bulk deployment of Microsoft Defender ATP.
- The downloaded package provides you with a ZIP file that contains a file named WindowsDefenderATPLocalOnboardingScript.cmd. This must be executed on the target workstation via an administrative command prompt, as in the following screenshot:
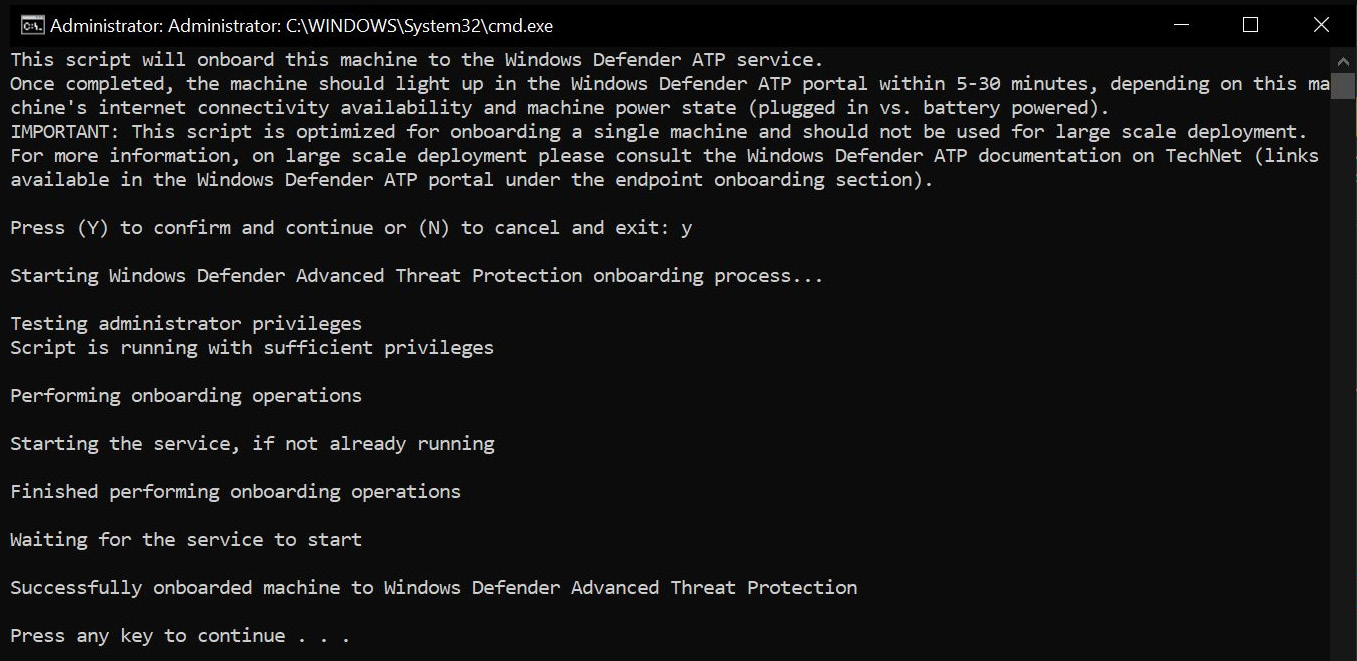
Figure 7.7 – Onboarding script
- Once the installation is successfully executed, you can verify the installation in the Microsoft Defender ATP service by executing the following command:

Figure 7.8 – Running a detection test
- Once completed, you will see the following message displayed in the setup wizard:

Figure 7.9 – Detection test completed
- You can now click on Start using Windows ATP, as shown:

Figure 7.10 – Start using Windows ATP
- You will now be taken to the cloud-based Microsoft Defender Security Center page, as shown in the following screenshot:

Figure 7.11 – Microsoft Defender Security Center
- By expanding the left-side menu, we can see the workstation where we deployed Microsoft Defender ATP by clicking on Machines list:

Figure 7.12 – Machines list
- If we click to select that workstation, we are presented with a dashboard that is specific to the machine, where we can view and assess any detected risks on the device and respond to them. This is shown in the following screenshot:

Figure 7.13 – Machine details
So, to recap what we have learned, we have now set up the Microsoft Defender ATP cloud service with our preferred settings and deployed Microsoft Defender ATP to a single Windows 10 Azure Active Directory (AD)-joined workstation.
We can see a vast amount of information and activities for the device. We also learned that there are a number of ways in which Microsoft Defender ATP can be deployed to both Windows and other devices in your organization.
Next, we will look at how you can use Microsoft Defender ATP to monitor and manage the protection and detection of threats in your environment.
Managing and monitoring Microsoft Defender ATP
Now that we have the Microsoft Defender ATP instance set up and deployed to one or more workstations, there are a number of capabilities that can be fine-tuned in Microsoft Defender Security Center.
It is hugely important to regularly and diligently monitor and manage your Microsoft Defender ATP instance in order to maximize security protection in your environment. Let's look at how you can make the most of some of the available options.
Attack surface reduction capabilities
From Security Center, selecting Configuration Management will show you the following options, where you can configure your Microsoft Defender ATP instance to connect to Intune:

Figure 7.14 – Machine configuration management
By clicking on Go to settings on either of the preceding options, you will be taken to Advanced features, where you can connect Microsoft Defender ATP to Microsoft Intune, as follows:

Figure 7.15 – The Advanced features settings
Once you have enabled the connection, the Machine configuration management options for Intune will change, as follows:

Figure 7.16 – Machine configuration management
You can also select the Machine attack surface management option from the configuration management settings, as follows:

Figure 7.17 – Machine attack surface management
By clicking on Go to attack surface management, you will be taken to the following page, where you will be able to view reports on attack surface reduction rules:
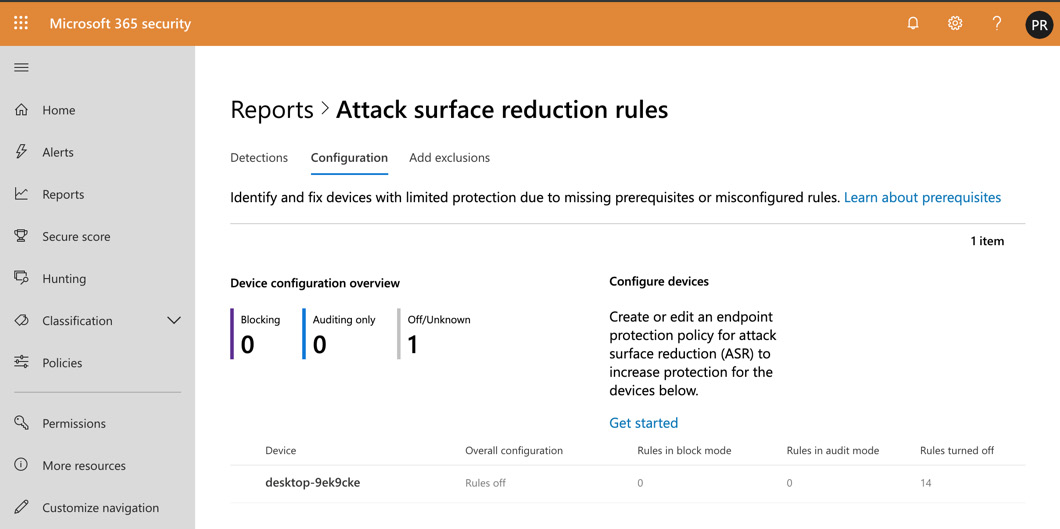
Figure 7.18 – Attack surface reduction rules
You can use the reports to identify and fix devices that may have limited protection due to missing prerequisites or misconfigured rules.
Now that you understand the attack surface reduction capabilities, let's look at the Secure score dashboard.
The Secure score dashboard
The Secure score dashboard can be used to view and filter a list of security recommendations, as follows:
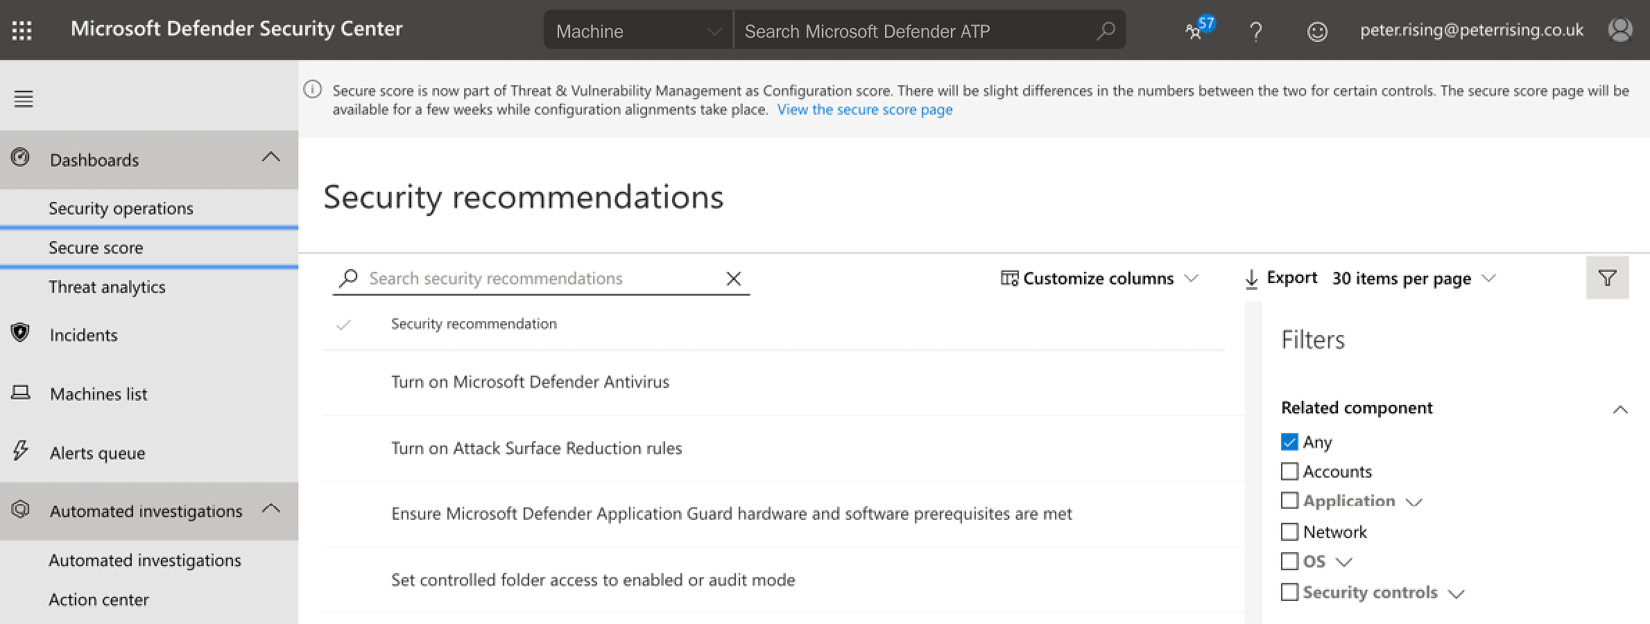
Figure 7.19 – Security recommendations
By selecting an individual item from the list, you can see detailed information on risk and remediation options, as follows:

Figure 7.20 – Remediation options
You should diligently review the Secure score section regularly and act on the recommendations to improve your score.
Next, let's look at how we can integrate Microsoft Defender ATP with Azure ATP.
Integrating with Azure ATP
It is also possible to integrate your Microsoft Defender ATP instance with your Azure ATP instance (which we discussed in Chapter 6, Configuring an Advanced Threat Protection Solution). This can be achieved from the Settings menu, as follows:

Figure 7.21 – Azure ATP integration
When you activate the integration, you will be directed to activate the feature from the Azure ATP portal as well, if it has not already been enabled. Log in to the Azure ATP portal at https://portal.atp.azure.com and activate the feature, as follows:
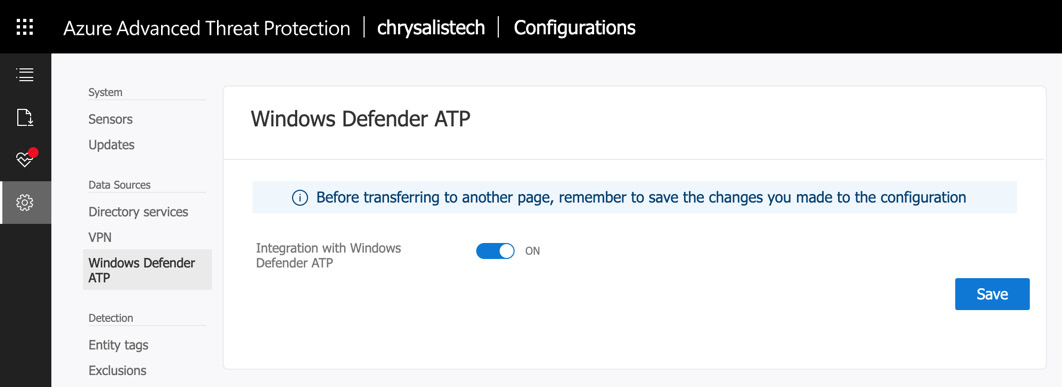
Figure 7.22 – Activating integration from the ATP portal
Click to save your changes, then return to the Settings section of Microsoft Defender Security Center, and then click to enable integration with Azure ATP once again. It should now activate without any problems, as in the following screenshot:

Figure 7.23 – Enabling integration
Enabling integration with Azure ATP retrieves user and machine data from Azure ATP and sends information from Microsoft Defender ATP in the other direction. This results in increased visibility and detections across both of these services.
The Microsoft Defender Security Center settings
There are a vast number of settings that you can review and leverage within the security center to effectively manage and monitor your Microsoft Defender ATP instance. The available options are as follows:

Figure 7.24 – The Security Center settings
The available options are described in greater detail in the following table:

Important note
Further details on all the settings described in the preceding table can be found in many of the links included in the References section at the end of this chapter.
So, to recap what we have learned so far in this chapter, we showed you how to install, configure, and monitor the Microsoft Defender ATP service within your Microsoft 365 environment. Next, we will show you how to further refine the service by implementing additional features, which include Windows Defender Application Guard, Application Control, Exploit Guard, and Secure Boot.
Implementing additional Microsoft Defender features
Now that we know how to manage and monitor Microsoft Defender ATP, let's look at some of its associated features, which are designed to complement Microsoft Defender ATP
Configuring Microsoft Defender Application Guard
Microsoft Defender Application Guard is a system designed to isolate devices in such a way that malicious actors are unable to use their attack methodologies against them. It protects your company's users on Windows 10, specifically on the Microsoft Edge browser, by providing isolation of untrusted sites when users browse the internet.
Microsoft Defender Application Guard empowers Microsoft 365 security administrators to explicitly define the following categories:
- Trusted web sites
- Trusted cloud resources
- Trusted networks
A zero-trust methodology is employed to ensure that anything that is not defined in the preceding categories is considered untrusted and is blocked. So, how does this work? Essentially, when a user who is protected by Microsoft Defender Application Guard attempts to access a website that is not trusted via Microsoft Edge or Internet Explorer, the site is opened in an isolated container.
The result of this is that if the website contains malicious code or content, then the user's PC is not affected in any way. Subsequently, a potential attack is prevented and malicious actors cannot carry out any reconnaissance that could lead to the elevation of privileges and domain dominance.
Microsoft Defender Application Guard can be deployed to domain-joined computers on your organization's network by using either System Center Configuration Manager or Microsoft Intune.
It is also possible to deploy Microsoft Defender Application Guard to Bring Your Own Device (BYOD) or personal Windows devices. While these devices are not domain-joined, it is possible to protect them with Application Guard if they are managed by Intune.
When you configure Microsoft Defender Application Guard to be deployed to your Windows devices, it enables the following features, which can be found under Control Panel | Programs and Features | Install Windows Features:

Figure 7.25 – Turning Windows features on or off
Once enabled, clicking on the menu bar within Microsoft Edge will show the following options:

Figure 7.26 – The Edge browser experience
When a user selects the New Application Guard window option, they can browse safely and any malicious code or content lurking on a website will not be able to harm the workstation as the browser session will be completely isolated.
Configuring Microsoft Defender Application Control
Microsoft Defender Application Control can restrict the applications on your network from accessing the system kernel. Microsoft Defender Application Control can also block scripts that are unsigned, as well as MSIs.
You can create Application Control policies directly on Windows 10 Enterprise computers or Windows Server 2016. It is also possible to deploy Microsoft Defender Application Control to any Windows 10 edition or Windows Server 2016 via a Mobile Device Management (MDM) solution, such as Microsoft Intune. It is also possible to use Group Policy to deploy Application Control policies to Windows 10 Enterprise computers or Windows Server 2016.
To create a Microsoft Defender Application Control policy using Intune, follow these steps:
- Open the Intune portal, click on Device Configuration | Profiles, and select Create profile. You will see the following:
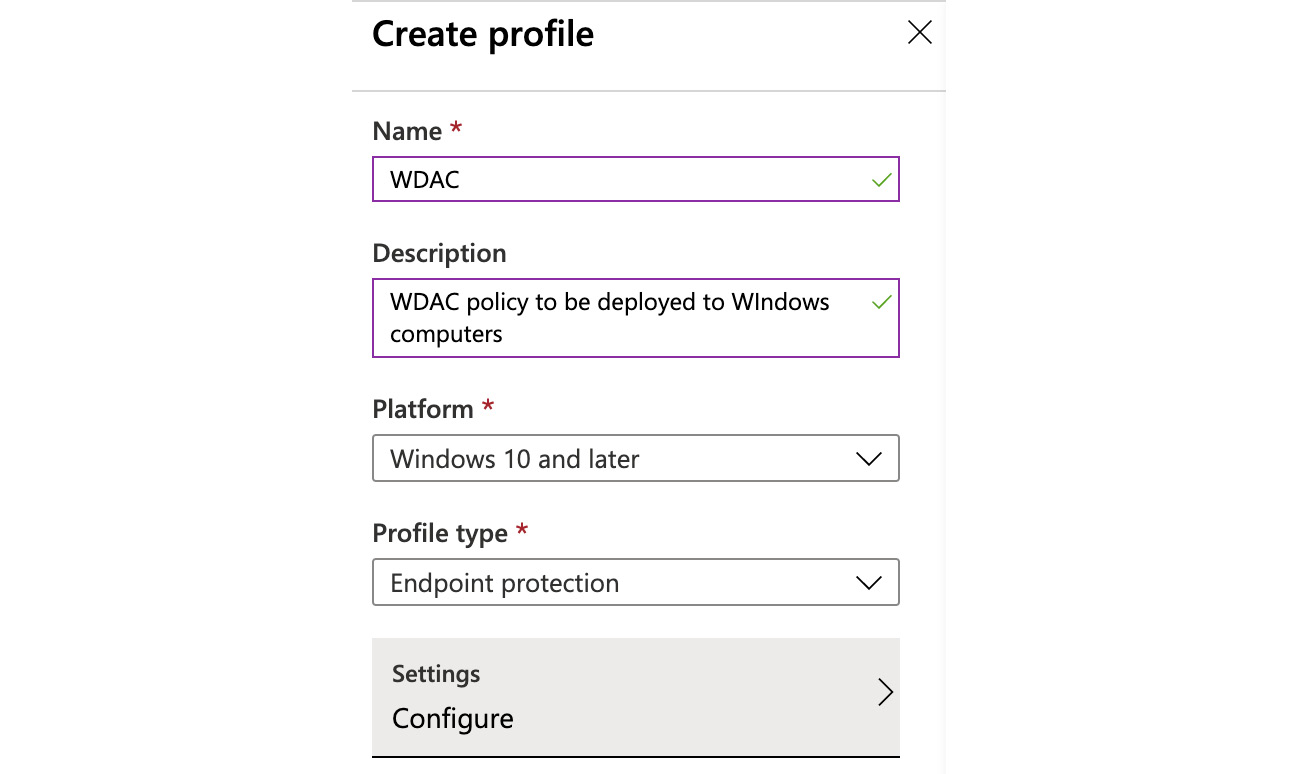
Figure 7.27 – Creating a profile
- Fill in the Name, Description, Platform, and Profile type fields, as in the preceding screenshot, and then click on Configure under the Settings menu. Then, click on Microsoft Defender Application Control, as in the following screenshot:

Figure 7.28 – Microsoft Defender Application Control
- This feature can be configured as follows:

Figure 7.29 – Policy options
- In this example, we will set the Application Control policy to Enforce and Trust apps with good reputation to Enable:

Figure 7.30 – Policy settings
- Click OK, then OK again, and finally, click Create to save the profile. The profile is now ready and can be assigned to users or groups, as in the following screenshot:

Figure 7.31 – Profile overview
You can monitor your Microsoft Defender Application Control profile from the Monitor section on the left-hand side of the profile.
Configuring Microsoft Defender Exploit Guard
Microsoft Defender Exploit Guard provides intrusion detection capabilities in Windows 10. You can use Microsoft Defender Exploit Guard to protect your apps and to reduce the attack surface of your apps by using rules that are designed to prevent malware attacks.
You can also use Microsoft Defender Exploit Guard to protect your users against social engineering attacks by using Windows Defender SmartScreen within the Microsoft Edge browser. Additionally, you can use Controlled folder access to protect files within your system folders to prevent them from being changed by malicious actors.
As with Application Control, Microsoft Defender Exploit Guard can be enabled and deployed by using the same method shown for Application Control, and the available configuration settings are as follows:

Figure 7.32 – Microsoft Defender Exploit Guard via Intune
There are a number of configuration settings that can be applied to your devices for Microsoft Defender Application Guard, Microsoft Defender Application Control, and Microsoft Defender Exploit Guard. You will find links to articles on how you can configure these features in the References section at the end of this chapter.
Next, let's look at how WIP can be used to protect data.
Using WIP to configure WIP policies and protect data
WIP is a feature that is designed to protect against the accidental leakage of data from both business and personal devices. WIP works alongside Azure Rights Management to control the data that leaves devices.
WIP is deployed by configuring policies in Microsoft Intune. This is shown in the following steps:
- Log in to the Azure portal and go to Intune, and then select Client Apps. You will see the following:

Figure 7.33 – Client apps
- Click on App protection policies, and then select Create policy, as in the following screenshot:

Figure 7.34 – App protection policies
- Choose Windows 10, and then complete the required fields as in the following screenshot:

Figure 7.35 – Policy settings
- Click Next, and then complete the setup wizard to include any targeted apps and required settings and to apply them to targeted users. Click Create to complete the setup of your policy.
You can use WIP to protect both recommended apps and apps from the Microsoft store.
WIP is a feature that can be applied in numerous ways. To learn more about WIP and how you can configure it to protect devices in your organization, please use the links included in the References section at the end of this chapter.
So, to recap, the features of Microsoft Defender Application Guard, Microsoft Defender Application Control, and Microsoft Defender Exploit Guard are available to complement the settings you configure for your environment using Microsoft Defender ATP. Next, we will look at how you can manage device encryption.
Managing device encryption for your Windows 10 devices
In the modern IT landscape, it is more crucial than ever to protect your organization's devices against data theft in case a device is stolen or lost. In this section, we will examine how BitLocker can be used to encrypt Windows 10 devices.
Introduction to BitLocker
BitLocker Drive Encryption provides integrated data protection features for your Windows 10 devices to combat the threat of stolen, lost, or poorly decommissioned Windows devices.
BitLocker is most effective when used with Trusted Platform Module (TPM) version 1.2 or later. However, it also works on computers that do not have TPM version 1.2 or later by using a USB start up key. You can also apply a form of multi-factor authentication with BitLocker with the ability to block device startup until one of the following responses has been provided:
- A user PIN number
- A removable device that contains a start up key
These methods help to ensure that the device doesn't start until the appropriate challenge has been issued and answered.
So, how is BitLocker configured? It can be deployed to devices using either Group Policy or Microsoft Intune. For deployment via Intune, you need to create a profile by taking the following steps:
- Go to portal.azure.com and go to the Intune portal. Then, go to Device Configuration | Profiles | Create Profile and fill in the fields, as in the following screenshot:
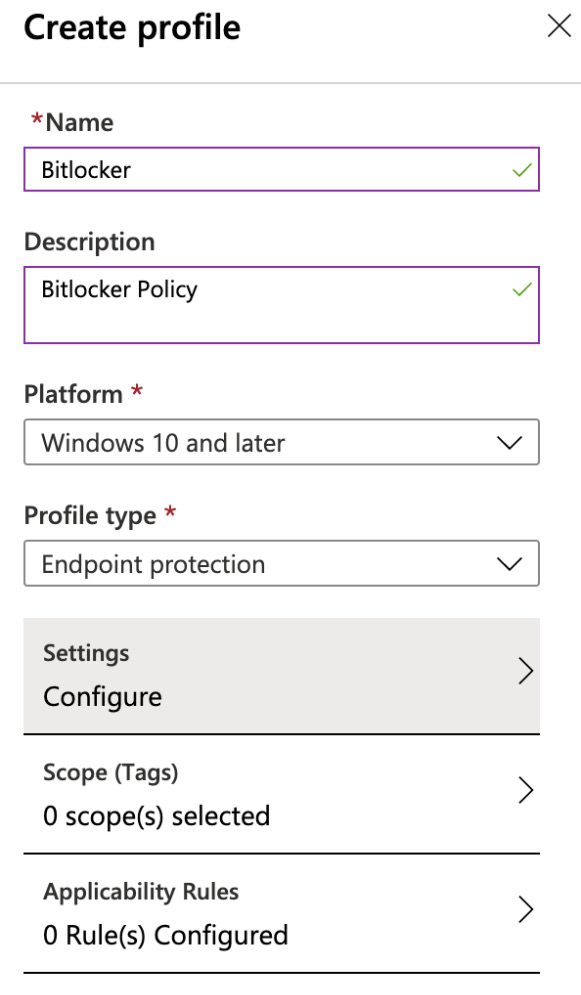
Figure 7.36 – Creating a profile
- Next, click on Settings | Configure | Windows Encryption and you will see the following options:
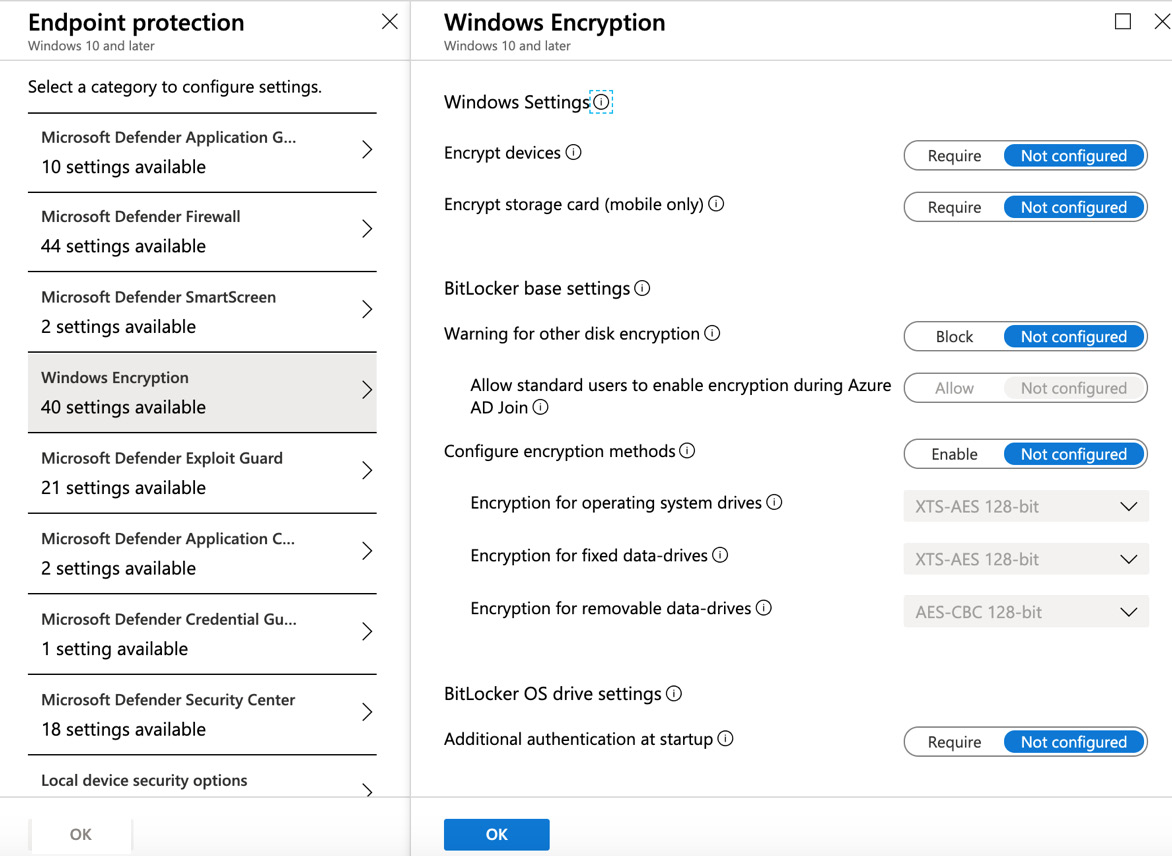
Figure 7.37 – Windows Encryption
There are a number of options to encrypt your Windows devices available in this section, and how you choose to configure these will depend on the security requirements of your organization.
Once you have configured the required settings for your BitLocker policy, click on OK, then OK again, and finally, click on Create.
The policy is now created and you can assign the policy to the required users and devices, as follows:

Figure 7.38 – BitLocker assignments
BitLocker is now deployed to your targeted devices and you will be able to monitor device and user status from within Intune to ensure that all required devices have the appropriate BitLocker data encryption settings applied.
So, to recap, BitLocker protects your Windows devices against loss or theft by ensuring that the devices are encrypted by settings that can be deployed by either Group Policy or Microsoft Intune.
Summary
In this chapter, we examined how Microsoft Defender ATP can be used to protect your organization's devices.
We showed you how to plan your Microsoft Defender ATP implementation, how to create your Microsoft Defender ATP instance, and how to manage and monitor the service.
We also examined how Microsoft Defender ATP can be integrated with Azure ATP and how the additional features of Microsoft Defender Application Guard, Microsoft Defender Application Control, and Microsoft Defender Exploit Guard can complement the core features, as well as how these features can be deployed by different methods, including System Center Configuration Manager, Group Policy, and Microsoft Intune.
Finally, we looked at how BitLocker can apply data protection and encryption to your Windows devices in order to safeguard them from loss, theft, or poor decommissioning practices.
In the next chapter, we will discuss message protection in Microsoft 365. We will show you how you can protect your emails in Exchange Online and apply anti-spoofing and anti-impersonation settings and anti-spam and anti-malware policies, as well as how to configure safe attachments and safe links within the Microsoft 365 Security & Compliance Center.
Questions
- Which of the following licenses are required to use Microsoft Defender ATP (choose two)?
a. Microsoft 365 E5
b. Microsoft 365 E3
c. Windows 10 Enterprise E5
d. Windows 10 Enterprise E3
e. Enterprise Mobility + Security E3
- True or false: Windows Defender Application Control can be deployed by Intune.
a. True
b. False
- Which of the following URLs are used to access Microsoft Defender ATP Security Center (choose two)?
a. securitycenter.windows.com
b. securitycenter.microsoft.com
c. securitycenter.windows.net
d. securitycenter.microsoft.net
- Which profile type do you need to configure in Intune in order to configure BitLocker deployment?
a. Network Boundary
b. Endpoint Protection
c. Identity Protection
d. Administrative Templates
e. Domain Join
- Where would you go on a Windows 10 device to enable Windows Defender Application Guard?
a. Control Panel | Windows Features
b. Access work or school
c. Settings
- True or false: Windows Defender Application Guard can be configured using System Center Configuration Manager.
a. True
b. False
- Where in the Microsoft Defender ATP Security Center would you go to configure Advanced Features?
a. Configuration Management
b. Settings
c. Advanced Hunting
d. Automated Investigations
- What is the minimum number of days that retention settings can be set in relation to Microsoft Defender ATP?
a. 30 days
b. 60 days
c. 90 days
d. 120 days
- True or false: You can download a package to manually onboard a limited number of machines to Microsoft Defender ATP.
a. True
b. False
- Which two options are available from the Service Health menu within Microsoft Defender ATP Security Center?
a. Current Status
b. Archived Events
c. Status History
d. Updates
e. Alerts
References
Please refer to the following links for more information:
- Microsoft Defender Advanced Threat Protection: https://docs.microsoft.com/en-us/windows/security/threat-protection/microsoft-defender-atp/microsoft-defender-advanced-threat-protection
- An overview of the Microsoft Defender ATP capabilities: https://docs.microsoft.com/en-us/windows/security/threat-protection/microsoft-defender-atp/overview
- Configuring attack surface reduction: https://docs.microsoft.com/en-us/windows/security/threat-protection/microsoft-defender-atp/configure-attack-surface-reduction
- Integrating Azure ATP and Microsoft Defender ATP: https://docs.microsoft.com/en-us/azure-advanced-threat-protection/integrate-wd-atp
- Microsoft Defender Credential Guard: https://docs.microsoft.com/en-us/windows/security/identity-protection/credential-guard/credential-guard
- Microsoft Defender Application Control: https://docs.microsoft.com/en-us/windows/security/threat-protection/windows-defender-application-control/windows-defender-application-control
- Microsoft Defender Exploit Guard: https://www.microsoft.com/security/blog/2017/10/23/windows-defender-exploit-guard-reduce-the-attack-surface-against-next-generation-malware/
- BitLocker Encryption: https://support.microsoft.com/en-gb/help/4028713/windows-10-turn-on-device-encryption
- WIP: https://docs.microsoft.com/en-us/windows/security/information-protection/windows-information-protection/create-wip-policy-using-intune-azure