Chapter 1: Planning for Hybrid Identity
Configuring a Microsoft 365 hybrid environment requires an understanding of your organization's identity needs, which will enable you to plan and deploy the correct Azure Active Directory (AD) authentication and synchronization method within your environment. This chapter covers planning your identity methodology and describes the process of monitoring and understanding the events recorded by Azure AD Connect.
By the end of this chapter, you will be able to determine your business needs, analyze on-premises identity infrastructure, and develop a plan for hybrid identity. You will understand how to design and implement authentication and application management solutions, how to enhance data security through strong identity, and how to analyze events and configure alerts in Azure AD Connect.
In this chapter, we will cover the following topics:
- Planning your hybrid environment
- Synchronization methods with Azure AD Connect
- Additional authentication security
- Event monitoring and troubleshooting in Azure AD Connect
Planning your hybrid environment
Identity is key when planning and implementing a Microsoft 365 environment. While the default identity method within Microsoft 365 is cloud-only, most organizations will need to plan for deploying hybrid identities when introducing Microsoft 365 to their organization. So, what is hybrid identity? Well, in simple terms, it is the process of providing your users with an identity in the cloud that is based on their on-premises identity. There are several ways that this can be achieved, and the available methods will be explained in detail later in this chapter.
The basic principles of hybrid identity in Microsoft 365 are shown in the following diagram:

Figure 1.1 – Hybrid identity
Let's examine how to start planning for hybrid identity in Microsoft 365.
The first step to establishing the correct identity lies in determining the business needs of your organization. It is important, at this stage, to recognize who your stakeholders will be in this process, understand their current working tools and practices, and assess how a modern and agile platform such as Microsoft 365 could be used to enable them to work more efficiently and securely.
The following are some examples of your possible stakeholders:
- Users
- Power users
- IT team
- Compliance team
- Business owners
Each of the given stakeholders will have their own specific challenges that you will need to address. However, your users will obviously account for the highest percentage of your stakeholders and your primary focus will need to be ensuring that any transitions to new ways of working are as seamless as possible. Many users can be very wary of change and how you introduce them to new technologies and working practices is directly tied to the success or failure of your project. If your users buy in to the changes you are introducing and can realize the benefits, then the rest of your stakeholders are also more likely to follow suit.
While your main users will be focused on doing their job, the remaining stakeholders will have a deeper interest in how a Microsoft 365 hybrid environment meets the requirements of the business.
Some of the common business requirements are as follows:
- The modernization of existing IT software
- Providing and securing cloud (SaaS) applications
- Reducing risk by providing a secure identity solution
Let's examine some approaches for addressing these requirements. Examining how on-premises identities are currently provided is a logical starting point that will give you a better understanding of what you need to plan and implement for identity authentication in the cloud. You need to be aware of any current on-premises synchronization solutions that may be in place, including any third-party solutions.
You will also need to consider any existing use of cloud applications in the organization. These will need to be identified and plans made for their continued use, integration, or possible replacement.
Important note
Microsoft Cloud App Discovery can be used to analyze existing SaaS app usage within your organization. Cloud App Discovery and security will be covered in a later chapter in this book.
Understanding your on-premises identity infrastructure will help you to plan for modernization. So, what is modernization considered to be in the world of IT? Well, essentially, it is based on the principle that IT users now wish and expect to be more mobile. They want quick and easy access to their emails and documents anywhere, anytime, and on any device.
This requirement creates the challenge of how to effectively secure and protect the services within the Microsoft 365 platform while ensuring that these services are highly available and accessible to the users.
So, how do we achieve this? It is not possible to wrap a firewall around Microsoft 365 in the traditional sense. Instead, we need to look at the various modern authentication security methods that are available within the Azure AD Premium licensing plans. We will address these methods later on in this chapter, but before this, we will examine the process of establishing your hybrid identity by synchronizing your on-premises AD to Microsoft 365.
Synchronization methods with Azure AD Connect
Now that you understand the concept of hybrid identity and authentication, we will turn our attention to the process that makes hybrid identity possible—directory synchronization. The tool used to configure directory synchronization is called Azure AD Connect (previously known as Azure AD Sync Service and DirSync). Azure AD Connect consists of three essential components, as follows:
- Synchronization services
- Active Directory Federation Services (AD FS)—an optional component
- Health monitoring
Azure AD Connect supports multiple AD forests and multiple Exchange organizations to a single Microsoft 365 tenant. It leverages a one-way process, where the tool is used to synchronize users, groups, and contact objects from your on-premises active directory to Microsoft 365.
The principles of Azure AD Connect are shown in the following diagram:

Figure 1.2 – Azure AD Connect
Once Azure AD Connect is configured and in place, the source of authority for these newly synchronized objects remains with on-premises AD and, therefore, these objects must be managed by on-premises tools, such as AD Users and Computers or Windows PowerShell. Microsoft 365 administrators will, therefore, not be able to make changes to cloud objects in the Microsoft 365 portal that are synchronized from on-premises AD.
When setting up Azure AD Connect for the first time, the installation wizard will guide you to select either an Express Settings installation or a custom settings installation. The Express Settings installation is the default setting for Azure AD Connect and is designed for use with password hash synchronization from a single AD forest. The Express Settings installation dialog is shown in the following screenshot:

Figure 1.3 – Express Settings
The custom settings installation provides a richer selection of optional features that can be configured to provide enhanced functionality if required. You can start a custom settings installation by clicking Customize:

Figure 1.4 – Custom settings
With the custom settings installation, you are provided with the following options for extending your on-premises identities into the cloud using Azure AD Connect:
- Password hash synchronization
- Pass-through authentication
- Federation with AD FS
- Federation with PingFederate
- Enable single sign-on
We will now examine each of these methods in turn.
Password hash synchronization
Password hash synchronization is the simplest method to establish a hybrid identity with Azure AD. Also commonly known as same sign-on, password hash synchronization can be set up using Azure AD Connect to synchronize a hash, of the hash, of user passwords to Azure AD from your on-premises active directory.
With password hash synchronization, users logging onto their cloud accounts via the Microsoft 365 portal will authenticate directly to Microsoft 365 cloud services as opposed to leveraging on-premises authentication and security:

Figure 1.5 – Password hash synchronization
So, how does this work? Here is the process in a few simple steps:
- The password synchronization agent within Azure AD Connect will request stored password hashes at 2-minute intervals from a domain controller. In response to this, the domain controller will encrypt the hash. This encryption is executed with a key that is acquired from the RPC session key and then salted.
- The domain controller will then send the result, along with the salt, to the sync agent using RPC. The agent can now decrypt the envelope. It is important to point out that the sync agent never has any access to the password in cleartext.
- Once decrypted, the sync agent performs a re-hash on the original password hash, changing it to a SHA256 hash by imputing this into the PKDF2 function.
- The agent will then sync the resulting SHA256-hashed password hash from Azure AD Connect to Azure AD using SSL.
- When Azure AD receives the hash, it will then be encrypted with an AES algorithm and then stored in the Azure AD database.
The result of all this is that when a user signs in to Azure AD with their on-premises AD username and password, the password is taken through the process we have just described, and if the hash result is a match for the hash stored in Azure AD, the user will be successfully authenticated.
Pass-through authentication
Pass-through authentication is an alternative to password hash synchronization. This method is commonly used when Microsoft 365 administrators require users to authenticate their Microsoft 365 logins on-premises as opposed to directly to Microsoft 365.

Figure 1.6 – Pass-through authentication
Unlike password hash synchronization, pass-through authentication does not synchronize passwords from on-premises active directories to Microsoft 365, but instead allows users to log on to both on-premises and cloud applications and services using the same password, which provides a far more cohesive experience to users, with the added benefit that on-premises passwords will never be stored on the cloud in any form.
A lightweight agent is all that is needed to set this up with Azure AD Connect and this agent is automatically installed on the Azure AD Connect server when you run the initial setup for pass-through authentication. In order to provide resiliency to your pass-through authentication solution, the agent can be installed onto additional domain controllers or servers in your on-premises AD sites.
Important note
It is recommended to configure a minimum of three authentication agents in your environment. The maximum number of agents that can be installed is 40. It is generally good practice to have at least one agent deployed to each of your AD sites to make pass-through authentication resilient and highly available.
The authentication agents must be able to make outbound requests to Azure AD over the following ports in order to function:

Federation
Federation, in simple terms, can be described as domains that trust each other in order to share access to resources across organizations, with authentication and authorization settings configured to control the trust.
It is possible to federate your on-premises AD environment with Azure AD to provide authentication and authorization. As is the case with pass-through authentication, a federated sign-in method will enforce all user authentication via on-premises methods as opposed to the cloud.
The main benefits of federation are that it provides enhanced access controls to administrators. However, the drawback of this method is that additional infrastructure will inevitably need to be provisioned and maintained.
In Azure AD Connect, there are two methods available to configure federation with Azure AD. These are AD FS and the more recently added PingFederate.
To explain the infrastructure requirements in more detail, we will use AD FS as an example. In order to configure AD FS in line with Microsoft's best practices, you will need to install and configure a minimum of two on-premises AD FS servers on your AD environment and two web application proxy servers on your perimeter network.
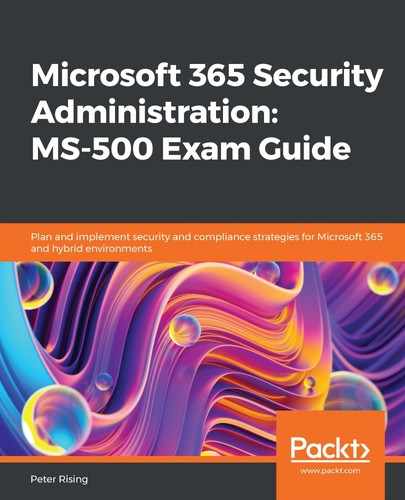
This configuration will provide the necessary security principles to ensure that both internal and (especially) remote users are authenticating to the services within your hybrid environment in a manner that provides appropriate authentication and authorization. The process of federation is shown in the following diagram:
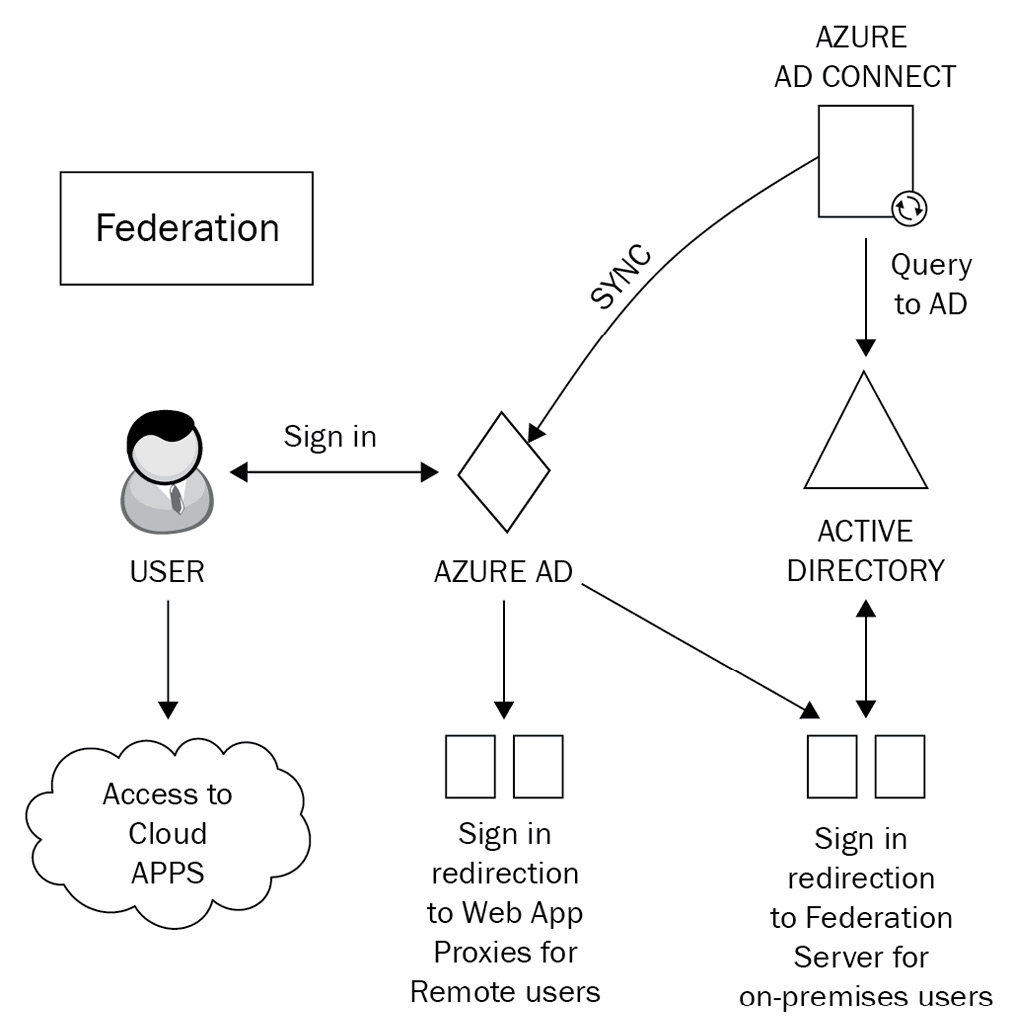
Figure 1.7 – Federation
So, how does federation actually work? Well, there are two main principles that you need to understand. These are claims-based authentication and federated trusts. We will examine each of these in detail now.
Claims-based authentication
Claims-based authentication works on the principle of users making statements about themselves in order to authenticate and gain access to applications by using industry-standard security protocols. User claims rely on the claims issuer, which is the Security Token Service (STS). The STS can be configured on your AD FS server. The statements provided by users can relate to name, identity, key, group, privilege, or capability.
A claim is issued by the user to the claims provider. It is then assigned values and packaged into a security token by the claims issuer (STS). This security token is essentially an envelope that contains the claims relating to the user. The token is sent back to the user and then passed to the application that the user wishes to access.
The claim relies on the explicit trust that is established with the issuer and the application that the user wishes to access will only trust the user's claim if it subsequently trusts the claims provider (the STS).
With claims-based authentication, you can configure a number of authentication methods. The more commonly used ones are as follows:
- Kerberos authentication
- Forms authentication
- X.509 certificates
- Smart cards
Although many older applications will not support claims-based authentication, the main use-case argument for those applications who can is that it simplifies the process of trust for those target applications. Instead of having to place their trust directly in the user making the claim, they can be secure in the knowledge that they can absolutely trust the claims issuer instead.
Federated trusts
Federated trusts expand on the capabilities of claims-based authentication by enabling your issuer to accept security tokens from other issuers as opposed to a user having to directly authenticate. In this scenario, the issuer can both issue and accept security tokens from other trusted issuers utilizing the federation trust.
This process essentially establishes a business relationship or partnership between two organizations.
Federated trusts enable trusted issuers to represent the users on their side of the trust. The benefit of this configuration is that should you need to revoke the trust, this can be achieved in a single action. Rather than revoking a trust with many individual external users, you can simply terminate the trust with the issuer.
So, what does this mean? Well, a good example would be if you need to authenticate remote users to your environment, a federated trust would remove the requirement to provide direct authentication for those users. Instead, you will have a trust relationship with the user from the remote user's organization. This enables these remote users to continue using their own single sign-on methodology and provides an efficient, decentralized way for the remote users to authenticate to your organization.
Important note
An alternative method of providing many of the features that federation offers is to use pass-through authentication in conjunction with the rich features of Azure AD Premium, such as Conditional Access and Identity Protection.
Although additional licensing may be required within Azure AD to deploy these features, this method offers simplified setup and administration and also removes the requirement for any additional infrastructure.
Azure AD Seamless Single Sign-On
Azure AD Seamless Single Sign-On (Azure AD Seamless SSO) is a free-to-use feature of Azure AD that can provide a single set of credentials for your users to authenticate to applications within Azure AD while connecting to your organization's network using a business desktop device. This essentially means that once connected to your network on their Windows 10 domain-joined devices, they will not be asked to provide further credentials when opening any available Azure AD applications. The principles of Seamless SSO are shown in the following diagram:

Figure 1.8 – Seamless SSO
Seamless SSO is configured via the Azure AD Connect wizard or Windows PowerShell and can be used in conjunction with password hash synchronization and pass-through authentication. It is not compatible with federations such as AD FS or PingFederate, however.
There are some prerequisites to be aware of when planning to implement Seamless SSO. These include the following:
- If you are using AD Connect with password hash sync, ensure that you are using AD Connect version 1.1.644.0 or later and, if possible, ensure your firewall or proxy is set to allow connections to the *.msappproxy.net URLs over port 443. Alternatively, allow access to the Azure datacenter IP ranges.
- Be aware of the supported topologies that are shown at https://docs.microsoft.com/en-us/azure/active-directory/hybrid/plan-connect-topologies.
- Ensure that modern authentication is enabled on your tenant.
- Ensure that your users' Office desktop clients us a minimum of 16.0.8730.xxxx or above.
Once you have verified these prerequisites, you can go ahead and enable the feature. This is most commonly done when setting up AD Connect for the first time by performing a custom installation using the Azure AD Connect wizard and, from the User sign-in page, ensuring that the Enable single sign-on option is selected:

Figure 1.9 – User sign-in methods
It is also possible to use PowerShell to set up Seamless SSO. This is a particularly useful method if you need to specify a particular domain(s) in your AD forest to use the feature.
If you need to enable the feature when you already have Azure AD Connect deployed, then you can re-run the setup wizard and choose the Change user sign-in option under the Additional tasks section:

Figure 1.10 – Additional tasks
Important note
You will need domain administrator credentials in order to complete the process of setting up Seamless SSO. However, these credentials are only required to enable the feature and will not be further required after the setup is complete.
To verify that the setup of Seamless SSO has completed successfully, log on as a global administrator to https://portal.azure.com and navigate to Azure Active Directory | Azure AD Connect.
From this page, you will be able to verify that Seamless SSO has a status of Enabled:

Figure 1.11 – User sign-in settings
Finally, when completing your custom settings installation of Azure AD Connect, you are presented with several additional optional features, as shown in the following screenshot:

Figure 1.12 – Optional features
The most commonly used of these features are Exchange hybrid deployment and Password writeback. Further information on all of the available optional features can be viewed at https://docs.microsoft.com/en-us/azure/active-directory/hybrid/how-to-connect-install-custom.
To deploy the feature to your users, you need to ensure that the following URL is added to the required user's Intranet Zone settings by using Group Policy:
https://autologon.microsoftazuread-sso.com
One of the advantages of deploying this setting with Group Policy is that you can roll out Seamless SSO to groups of users at your own pace.
Now that we have our directory synchronization taken care of, we have established our hybrid identity. Let's now examine how we can help protect that identity for our users with some of the additional authentication security methods we briefly referred to earlier in this chapter.
Additional authentication security
The authentication security methods available in Microsoft 365 are as follows:
- Multi-factor authentication (MFA)
- Self-service password reset (SSPR)
- Conditional Access
We will briefly introduce the principles of these methods; however, each of these will be described and explored in greater detail in Chapter 2, Authentication and Security, and Chapter 3, Implementing Conditional Access Policies, of this book.
Multi-factor authentication
MFA in Azure AD provides two-step verification to Microsoft services via a combination of approved authentication methods that are determined by Microsoft 365 administrators. The available methods can be based on the following:
- Something you know, such as your password
- Something you own, such as your mobile phone or an OAuth token
- Something you are, such as biometric identification (fingerprint or facial recognition)
When setting up MFA for users in your Microsoft 365 environment, users must first complete a registration process to provide information about themselves to Azure AD and set their authentication method preferences.
Once set, users will be challenged with an MFA prompt when accessing Microsoft 365 services and applications using their Azure AD credentials, as shown in the following diagram:

Figure 1.13 – Azure MFA
MFA can also be configured to work in conjunction with Conditional Access, with trusted locations that you define by entering the IP ranges of your business operating units so that users will not be issued an MFA challenge while working in these locations. Conditional Access with MFA also enables you to apply a further layer of security by ensuring that any access requests to specific apps and resources can be secured and protected by requiring that the requesting user completes an MFA challenge before being granted the access they require.
Important note
It is recommended that you configure MFA for all privileged user accounts within your Microsoft 365 environment, except for your permanent break-glass account, which should be a cloud-only account with the domain suffix of the .onmicrosoft.com domain name.
Self-service password reset
SSPR is a feature designed to remove the requirement of IT staff having to respond to user requests to reset their passwords in Azure AD. An initial registration process is required for each user to set up SSPR, during which time they must provide authentication methods to verify their identity.
SSPR can be used for both cloud-only and hybrid identity users. If the user is cloud-only, then their password is always stored in Azure AD, whereas hybrid users who use the feature will have their password written back to on-premises AD. This is achieved using a feature that can be enabled in Azure AD Connect called password writeback.
The basic principles of SSPR are illustrated in the following diagram:
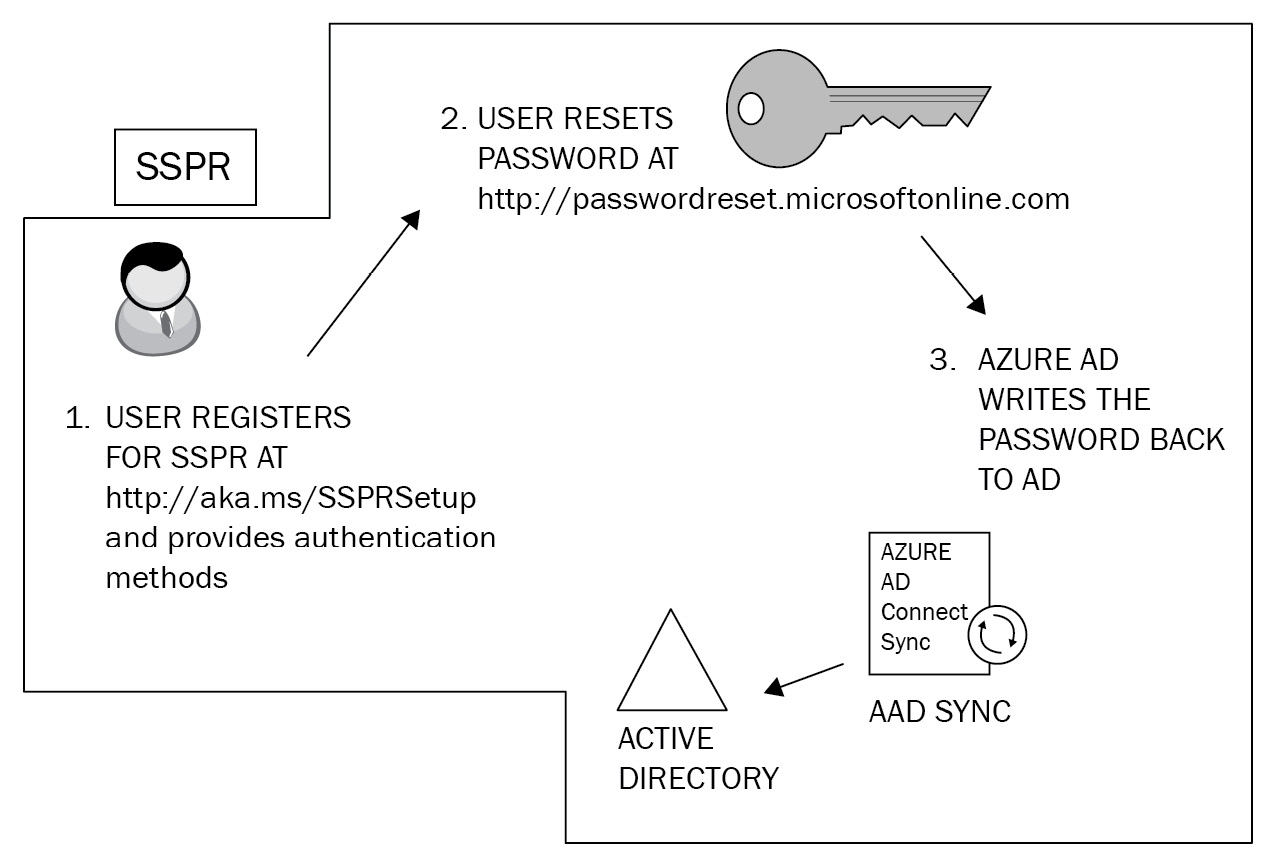
Figure 1.14 – Self-service password reset
The process of registering your users for SSPR is separate from that of MFA registration. This can lead to confusion and frustration for users who need to use both SSPR and MFA as they need to go through a similar registration process for both features.
Important note
There is now a Microsoft-combined security information registration process (which at the time of writing this book is in preview mode) that allows users to register for both SSPR and MFA at the same time.
When SSPR is enabled on your Azure AD environment, you can assist your users further by configuring helpful notifications so that they are aware when their passwords have been reset and also increase security by setting administrator notifications to monitor and alert whenever an administrator changes a password. It is also possible to customize a helpdesk email or URL to provide immediate guidance to users who experience problems when attempting to reset their passwords.
Important note
When using SSPR with password writeback for your hybrid identities, Azure AD Premium P1 licenses are required.
Conditional Access
Conditional Access is a powerful feature of Azure AD Premium P1 that allows Microsoft 365 administrators to control access to applications and resources within your organization. With Conditional Access, you can automate the process of controlling the level of access that users will have to these applications and resources by setting Conditional Access policies. Azure AD will then make decisions on whether to grant or deny access based upon the conditions that you set in these policies. The basic principles are shown in the following diagram:

Figure 1.15 – Conditional Access
While it is possible to apply some default security settings to your Microsoft 365 environment with a selection of legacy baseline policies and the more recently introduced security defaults, there will undoubtedly be a requirement for you to plan and define some custom policies with specific conditions and exceptions. For example, you would not wish to force MFA on your permanent break-glass global administrator account. We will examine Conditional Access in greater detail in Chapter 3, Implementing Conditional Access Policies.
Important note
Conditional Access settings will frequently require some additional features of Azure AD to be configured, for example Azure AD Identity Protection. This will have an impact on your decision-making process as it relates to licensing since Conditional Access is a feature of Azure AD Premium P1. The use of Azure AD Identity Protection features would necessitate Azure AD Premium P2 licenses.
Event monitoring and troubleshooting in Azure AD Connect
So, now that you have your hybrid identity method configured, hopefully it will all run smoothly for you. However, occasionally you may encounter some problems, and this is where the ability to assess and troubleshoot Azure AD Connect with tools and from the Microsoft 365 portal can assist administrators to quickly identify and resolve issues. Administrators will be able to perform the following tasks:
- Review and interpret synchronization errors by accessing the Microsoft 365 admin center via https://portal.office.com and examine the Azure AD Connect directory sync status. Here, you will see an overview of any directory synchronization errors. A common example may be a duplicate proxy address or UPNs causing conflicts and preventing an object from syncing. The following screenshot shows the Azure AD Connect tile you will see in the admin center. Any issues with your synchronization will be shown here in red:

Figure 1.16 – The Azure AD Connect status
- If you drill down further, you will see additional details about your directory sync status, as shown in the following screenshot. One of the tools you can download from here is IdFix, which you can run from any domain-joined workstation on your environment. It provides detailed information on synchronization issues and guidelines on how to resolve them:

Figure 1.17 – Directory Sync Status
- Receive and act on email notifications relating to an unhealthy identity synchronization. These email alerts are configured by default to alert only the technical contact who is defined in your Microsoft 365 tenant under Organization profile. These emails will continue to be sent to the technical contact until they are resolved.
- Check Synchronization Service Manager on the Azure AD Connect server to confirm that the operations required for a successful synchronization have been completed. If any errors occur, they will be displayed here with explanations as to why the operation has failed:
Figure 1.18 – Synchronization Service Manager
- Directory synchronization occurs every 30 minutes by default. However, you can generate a synchronization on demand by opening the Connectors tab and manually starting the process, as in the following screenshot:

Figure 1.19 – Synchronization Service Manager
- Click on Actions and select Run:

Figure 1.20 – Connector actions
- You will be able to run the desired connectors from here, as shown:

Figure 1.21 – Connector options
- It is also possible and far simpler to run a manual synchronization process using PowerShell from your AD Connect server with the following commands:
Start-ADSyncSyncCycle -PolicyType Initial (initiates a full synchronization)
Start-ADSyncSyncCycle -PolicyType Delta (initiates a delta synchronization)
In this section, we examined event monitoring and troubleshooting techniques in Azure AD Connect. You learned how to review, interpret, and respond to synchronization errors in the Office 365 portal and by checking the Synchronization Service Manager tool. We also showed you how you can manually trigger the synchronization process from the Synchronization Service Manager tool and by using PowerShell.
Summary
In this chapter, we discussed the steps and considerations for planning and implementing hybrid identity in Microsoft 365. You should now have an understanding of the synchronization methods available to you and how to choose the correct one for your environment, along with the principles of additional security authentication and how to understand and troubleshoot events and alerts when required.
In the next chapter, we will dive deeper into those security and authentication features within Microsoft 365, including MFA and SSPR. We will also take a look at Azure AD dynamic groups and managing access reviews.
Questions
- Which of the following is not one of the identity methods available with Azure AD?
a. Pass-through authentication
b. Federation
c. MFA
d. Password hash sync
- Which of the following tools could you use to assess your organization's readiness to synchronize their active directory to Azure AD?
a. The Remote Connectivity Analyzer tool
b. The IdFix tool
c. The OffCAT tool
d. Synchronization Service Manager
- True or false – with password hash synchronization, users will always authenticate to on-premises AD when logging onto Azure AD.
a. True
b. False
- Which of the following Microsoft 365 licenses allow users to use SSPR (choose two)?
a. Azure AD Premium P2
b. Intune
c. Azure Information Protection P1
d. Azure AD Premium P1
- Which of the following PowerShell commands could you use to run a full Azure AD Connect sync manually?
a. Start-ADSyncSyncCycle -PolicyType Initial
b. Start-ADSyncSyncCycle -PolicyType Delta
c. Start-ADSyncSyncCycle -PolicyType Full
d. Start-ADSyncSyncCycle -PolicyType Immediate
- True or false – Conditional Access is a feature of Azure AD Premium designed to give Microsoft 365 administrators control over user and device access requests to services and applications within Azure AD and to apply actions based on certain conditions.
a. True
b. False
- What is the maximum number of authentication agents that can be configured in Azure AD for pass-through authentication?
a. 5
b. 10
c. 30
d. 40
- How frequently does Azure AD Connect automatically synchronize on-premises AD changes to Azure AD?
a. Every 20 minutes
b. Once an hour
c. Every 30 minutes
d. Every 15 minutes
- Which two of the following methods can be used to authenticate users to Azure AD with MFA?
a. Code with the Microsoft Authenticator app
b. SMS messages to mobile device
c. Security questions
d. Email address
- When deploying federation with AD FS, what is the minimum number of web application proxy servers you should configure on your perimeter network?
a. 5
b. 2
c. 3
d. 7
References
Please refer to the following links for more information:
- Refer to https://docs.microsoft.com/en-us/azure/active-directory/hybrid/plan-hybrid-identity-design-considerations-business-needs?wt.mc_id=4039827 to help you to plan for hybrid identity.
- Information on how to select the most appropriate synchronization method for Azure AD Connect can be found at https://docs.microsoft.com/en-us/azure/security/fundamentals/choose-ad-authn.
- For help with additional authentication security, please refer to https://docs.microsoft.com/en-us/azure/active-directory/authentication/concept-mfa-howitworks, https://docs.microsoft.com/en-us/azure/active-directory/authentication/concept-sspr-howitworks, and https://docs.microsoft.com/en-us/azure/active-directory/conditional-access/overview.
- Further guidance on troubleshooting synchronization with Azure AD Connect can be found at https://docs.microsoft.com/en-us/azure/active-directory/hybrid/tshoot-connect-objectsync.