Chapter 17: Search and Investigation
Compliance administrators in organizations may often be required to respond to legal investigations to locate and preserve information contained in your Office 365 locations. eDiscovery and content search tools within the Microsoft 365 Security and Compliance Center will provide you with these capabilities.
In this chapter, we will show you how these tools can be used to manage the search and investigation capabilities within your Microsoft 365 environment. You will learn how to implement content searches and eDiscovery to manage any required legal investigations. We will also demonstrate how to delegate eDiscovery roles to other users so they can also use eDiscovery tools with appropriate permissions. Finally, we will look at how to place content locations on hold, as well as export and analyze the results of content searches.
We shall cover these topics in the following order:
- Understanding eDiscovery and content search in Microsoft 365
- eDiscovery delegated role groups
- Creating eDiscovery cases, placing locations in hold, and performing content searches
- Exporting content search results
First, we will examine eDiscovery and content searches.
Understanding eDiscovery and content search in Microsoft 365
eDiscovery is a feature within Microsoft 365 that allows you to identify and provide information that pertains to any legal cases that may be in progress within your organization. Compliance administrators are able to set controls for who is able to create and manage eDiscovery cases in your environment in order to search for content within the following Office 365 locations:
- Exchange Online mailboxes
- Office 365 Groups
- SharePoint Online
- OneDrive
- Microsoft Teams
- Skype for Business conversations
There are three main components of eDiscovery available in the Security and Compliance Center, as follows:
Let's look at each of these solutions in turn, starting with eDiscovery cases.
eDiscovery cases
eDiscovery cases allow you to control who is able to view and access an investigation. These cases are a collection of holds, searches, and exports, all contained within a single location. Cases can be created and executed from the Security and Compliance center by members of the eDiscovery Manager role group. Members of the Reviewer group can also view eDiscovery cases. Members of the eDiscovery Administrators role group have full access to all created eDiscovery cases. With eDiscovery cases, you can add sources, create holds and queries, export case results, and manage the life cycle of your case.
Content search
Content searches compliment eDiscovery cases and consist of searches and exports, but not holds. With content search, you are able to carry out powerful searches against your Office 365 services and locations, as well as associate your search with an existing eDiscovery case in order to identify specific information and preview, view, and export the results for analysis. This feature is particularly useful when you need to conduct large-scale searches across multiple Office 365 locations. In order to be able to perform searches, you must be a member of the eDiscovery Manager role group.
Advanced eDiscovery
Advanced eDiscovery is only available if you have Office 365 E5, Microsoft 365 E5, or Office 365 E3 with the Advanced Compliance add-on, and provides enhanced analytical and communication capabilities that will enable you to more effectively analyze your search results.
With basic eDiscovery, it is possible to apply holds to Office 365 locations, carry out searches for items relevant to a case, and export any search and case results.
Advanced eDiscovery provides additional functionality that allows you to do the following:
- Add Custodians who will be specified as users who may own content relevant to the eDiscovery case.
- Manage Communications to automate notifications for a legal hold.
- Add the results of individual content searches to Review Sets, which can be monitored with advanced analytics tools including themes detection, email thread identification, and near-duplicate detection.
- View a list of Jobs showing all the jobs contained in an eDiscovery case, as well as their status and creation and completion dates.
- Use additional Settings features such as the Case information tab, which allows eDiscovery managers to easily modify basic case information. You can also use the Access and Permissions section to add or remove users responsible for the case.
In this section, we introduced you to the principles of Content search, eDiscovery, and Advanced eDiscovery in Microsoft 365. We explained that eDiscovery comes in two flavors, basic and advanced, and that content searches can be executed in conjunction with the eDiscovery cases that may be set up by eDiscovery managers.
We will explain these features in further detail as we progress through this chapter. Next, we will show you how to assign eDiscovery permissions in the Security and Compliance Center in order to control who has access to the powerful search and investigation features within your Microsoft 365 environment.
eDiscovery delegated role groups
Before you start using the eDiscovery cases and content hold features, it is important to assign the appropriate permissions to the users who need to have access to these tools. In this section, we will demonstrate how to do this from the Security and Compliance Center by adding users to the correct role group from the permissions page. The role that is used to control access is called eDiscovery Manager. This role also contains two subgroups, as follows:
- eDiscovery Manager: Can only view and edit cases that the user has access to
- eDiscovery Administrator: Can view and edit all cases, regardless of permissions
In order to assign eDiscovery permissions, you will need to be a member of the Organization Management role. To assign such permissions from the Security and Compliance Center, we need to take the following steps:
- Log into the Security and Compliance Center at https://protection.office.com and navigate to Permissions in the left pane. You will see the options shown in the following screenshot:

Figure 17.1 – Permissions in the Security and Compliance Center
- Click on the checkbox next to the eDiscovery Manager role group. You will see the options shown in the following screenshot:

Figure 17.2 – eDiscovery Manager role group
- The preceding screenshot shows the name and description for this role group, along with the roles that have been assigned to the group. Scroll down through the role group options to see the two role subgroups, which are called eDiscovery Manager and eDiscovery Administrator. These are shown in the following screenshot:

Figure 17.3 – Role subgroups
- By clicking Edit next to either of the eDiscovery Manager or eDiscovery Administrator subgroups shown in the preceding screenshot, you can add the required users to these roles. This can be seen in the following screenshot, where we have edited the eDiscovery Manager role by clicking on Choose eDiscovery Manager:

Figure 17.4 – Editing subgroup members
- Choose Add and then select your chosen user, as per the example shown in the following screenshot, where we have selected a user called Jane Bloggs to be added to this role:

Figure 17.5 – Editing subgroup members
- Click Save when you have added the required users, as shown in the following screenshot:

Figure 17.6 – Editing subgroup members
- Finally, click Close to exit the role group settings.
It is also possible to assign users eDiscovery permissions by adding them to the following role groups:
- Compliance Administrator
- Organization Management
- Reviewer
Important note
More detailed information on all of the role groups that relate to eDiscovery can be found in the References section at the end of this chapter, under Assigning eDiscovery permissions in the Security and Compliance Center.
In addition to using the Security and Compliance Center to assign role groups to users, it is also possible to use the Security and Compliance Center PowerShell to set a mail-enabled security group. This group will be a member of the eDiscovery Managers subgroup within the main eDiscovery Manager role group.
However, the same ability does not apply to the eDiscovery Administrators subgroup, and there is a separate command called Add-eDiscoveryCaseAdmin that allows you to make a user an eDiscovery Administrator. This will only work if the user has already been assigned the Case Management role (which is a member of the Organization Management role).
An example of how to complete this task is shown in the following steps:
- Log into the Exchange admin center and go to the hybrid section. Click on the option to configure under the The Exchange PowerShell Module supports multi-factor authentication. Download the module to manage Exchange Online more securely heading. This is shown in the following screenshot:

Figure 17.7 – Downloading the Exchange Online MFA compatible module
- Complete the installation steps. After doing this, PowerShell will open. Next, you will need to use the Connect-IPPSession command to connect to the PowerShell session with administrative credentials. This is shown in the following example:
Connect-IPPSession -userprincipalname [email protected]
- Next, we will add the Discovery Case Admin role to a user called James Smith by running the following command:
Add-eDiscoveryCaseAdmin -User [email protected]
- The previous steps will appear in PowerShell, as shown in the following screenshot:

Figure 17.8 – Security and Compliance PowerShell
Important note
More detailed information on using the Security and Compliance Center PowerShell can be found in the references section at the end of this chapter, under Adding an eDiscovery Case Admin.
In this section, we have explained how to assign users to eDiscovery-related role groups from the Permissions section of the Security and Compliance Center. You also learned that you can assign these roles using the Security and Compliance Center PowerShell. We showed you the four main role groups that are related to eDiscovery and the two subgroups that exist within the eDiscovery Manager role group.
Next, we will look at setting up eDiscovery cases, how to perform a content search, and how to place locations on hold.
Creating eDiscovery cases, placing locations on hold, and performing content searches
Now that you understand the principals and prerequisites for creating eDiscovery cases and content searches within Microsoft 365, let's go ahead and demonstrate the process of creating an eDiscovery case, placing locations on hold, and performing a content search. We will start with eDiscovery cases, which will also incorporate the step of placing some locations on hold.
Creating an eDiscovery case and placing locations on hold
To create an eDiscovery case from the Security and Compliance Center, we need to complete the following steps:
- Go to https://protection.office.com, navigate to eDiscovery | eDiscovery, and click on Create a case. You will see the New case page, as shown in the following screenshot:

Figure 17.9 – New eDiscovery case
- Enter a unique Case name and an optional Case description, and then click Save. Your new case will then appear in the case list, as shown in the following screenshot:

Figure 17.10 – List of eDiscovery cases
- Now, we need to configure our eDiscovery case. To do this, click on Open next to the case name. You will see the options shown in the following screenshot:

Figure 17.11 – eDiscovery case settings
- The next thing we need to do is configure the Holds that will apply to our case. Click on Holds and enter a Name and an optional Description, as shown in the following screenshot:

Figure 17.12 – Name your hold screen
- Click Next. You now need to choose the locations that you wish to place on hold. For Exchange email, Office 365 group email, Skype for Business, Teams messages, and To-Do, you can filter your hold choices by users, groups, or teams.
For SharePoint sites, OneDrive accounts, Office 365 group sites, and Teams sites, you can filter your choices by Site.
Finally, if you wish to place a hold on Exchange public folders, you can move the toggle switch from None to All. These options are shown in the following screenshot:

Figure 17.13 – Setting hold locations
- When you have selected the settings for your hold, click Next. Once you've applied holds to locations, the content will be held until it's removed from that content location or the hold is completely deleted.
Important note
When a hold is applied, it will take up to 24 hours to take effect.
- Next, you will see the option to add Query conditions to your hold. This is shown in the following screenshot:

Figure 17.14 – Query conditions
- This is an optional step where you can configure keywords that will be searched against. Only that content will be placed on hold. You can also click on Add conditions, which will enable you to select from 19 built-in conditions that will also filter your hold applications. The available conditions are shown in the following screenshot:

Figure 17.15 – Add conditions screen
- Click Next. You will be taken to the Review your settings page, as shown in the following screenshot:
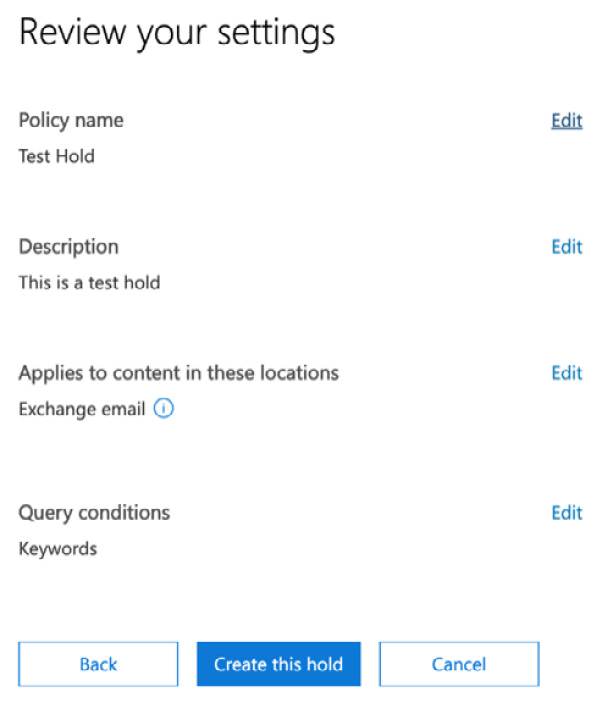
Figure 17.16 – Review our settings screen
- By clicking Create this hold, your hold will appear on the main details page for your eDiscovery case.
Next, we will examine how to create a content search that will be associated with our eDiscovery case.
Performing a content search
Now that we have created our eDiscovery case and applied holds to locations, we can perform a content search. This will be associated with the case.
Important note
We discussed content searches earlier in this book in Chapter 15, Personal Data Protection in Microsoft 365. Content searches that are created and associated with eDiscovery cases will not appear in the Search page of the Security and Compliance Center – they will only be accessible from the eDiscovery page.
In order to configure a content search and associate it with our eDiscovery case, we need to complete the following steps:
- To open the case that we created in the previous step, click on Searches, then New search. This will take you into the Search query options, as shown in the following screenshot:

Figure 17.17 – New content search
- Add any required Keywords and Conditions to your search query (in this example, we have added Credit and Debit). Then, under Locations, select Locations on hold and click on Save. Your search will now begin. The search results will be displayed in the details pane, as shown in the following screenshot:

Figure 17.18 – Search results
In this section, you learned how to set up eDiscovery cases and place content on hold, as well as how to run a content search associated with your eDiscovery case hold settings and view the results.
In the final section of this chapter, we will show you how to export the results of your eDiscovery associated content searches.
Exporting content search results
Now that you have run your eDiscovery case with content search, you can export the search results using a Windows 7 or above computer, using Internet Explorer or the Microsoft Edge browser, and with Microsoft .NET Framework 4.7 installed. Should your device not meet these requirements, you will be unable to complete this process.
In order to successfully export your search results, you must also be assigned the Export Management role in the Security and Compliance Center. This role is part of the eDiscovery Manager role group, so if you are a member of this group, you will have the required permissions.
In order to complete the export process, you will need to carry out the following steps:
- From the Security and Compliance Center, navigate to eDiscovery | eDiscovery and open the eDiscovery case that contains the content search that you wish to export. Click on Export results, as shown in the following screenshot:

Figure 17.19 – Export results
- Select your preferred Output options and click Export, as shown in the following screenshot:

Figure 17.20 – Export results screen
- Next, click on Export report, select your Output options once again, and click on Generate report, as shown in the following screenshot:

Figure 17.21 – Export report screen
- Change to the Exports tab within your eDiscovery case and click the reports to open them once they are available to you, as shown in the following screenshot:

Figure 17.22 – Export tab in the Discovery case
- Once you have opened the report, scroll down to the Export key section and click on Copy to clipboard, as shown in the following screenshot:

Figure 17.23 – Copying the export key to the clipboard
- Next, click on Download report. The eDiscovery Export Tool will download and install onto your computer. Paste the export key that you copied earlier into the top field and browse to the location where you wish to save your exported content. Then, click on Start, as shown in the following screenshot:

Figure 17.24 – eDiscovery Export Tool
- Once the files have been downloaded, click on Close, as illustrated in the following screenshot:

Figure 17.25 – eDiscovery export complete
- Now, open the folder where you exported the reports. You will see the content shown in the following screenshot:

Figure 17.26 – Downloaded reports
You can view and analyze the reports that you have downloaded in Excel. The two main files you can review are called Export Summary and Results. These CSV files will contain the details that were requested in the search.
So, in this section, you learned that once you have created an eDiscovery case and associated a content search with your case, you are able to export the results by using a Windows Computer with either Internet Explorer or the Microsoft Edge browser. When generating the report, the eDiscovery Export Tool is installed and opened on your computer. You can download your reports to the chosen folder by copying and pasting the export key provided by the report generator.
Summary
In this chapter, we introduced you to the principles of search and investigation within your Microsoft 365 environment. You learned that you need to assign the eDiscovery Manager role to any users who you want to manage eDiscovery cases, and that you can then create eDiscovery cases from the Security and Compliance Center in order to place holds on your Office 365 locations.
Once an eDiscovery case had been created, we showed you how content searches can be associated with your eDiscovery case and applied to the held locations. These content searches can be set up with additional keywords and conditions in order to narrow down your search results.
Finally, we demonstrated that once a search was completed, we are able to preview the search results, as well as export reports to our local computer using the eDiscovery export tool, and then open and analyze the downloaded reports in Excel.
In the next chapter, we will discuss the steps required to plan for data privacy compliance in Microsoft 365. You will also learn how to access and interpret reports and dashboards that contain relevant GDPR data. Finally, we will show you how to conduct data subject requests from users who wish to review the personal information that the organization has stored for them.
Questions
- Which of the following roles does not relate to eDiscovery?
a. Compliance Administrator
b. Security Administrator
c. Organization Management
d. eDiscovery Manager
e. Reviewer
- Which of the following licenses will allow you to use Advanced eDiscovery in your Microsoft 365 environment (choose two)?
a. Office 365 E5
b. Office 365 E1
c. Office 365 E3
d. Office 365 E3 with Advanced Compliance add-on
e. Office 365 F1
f. Exchange Online (Plan 2)
- The eDiscovery Manager role group includes two subgroups called eDiscovery Managers and eDiscovery Administrators.
a. True
b. False
- Where in the Security and Compliance Center would you go to configure a content search that is to be associated with an eDiscovery case?
a. Search | Content Search
b. eDiscovery | eDiscovery
c. Search | Audit Log Search
d. Permissions
- Users with the Reviewer role group permission can create eDiscovery cases.
a. True
b. False
- Which of the following can't be used with the eDiscovery export tool?
a. Internet Explorer
b. Google Chrome
c. Windows 7
d. Windows 10
e. Microsoft Edge
f. Microsoft Excel
- To export reports from eDiscovery cases, you must be assigned the Security Reader role.
a. True
b. False
- After creating a hold in an eDiscovery case, how long will it take for the hold settings to take effect?
a. 48 hours
b. 12 hours
c. 24 hours
d. 96 hours
- When a hold is applied to an item using an eDiscovery case, it will not be removed until either the case is modified to exclude the hold or the eDiscovery case is deleted.
a. True
b. False
- When using a query with an eDiscovery case content search, which location option should be selected?
a. Specific Locations
b. All Locations
c. Locations on Hold
References
Please refer to the following links for more information:
- eDiscovery in Office 365: https://docs.microsoft.com/en-us/microsoft-365/compliance/ediscovery?view=o365-worldwide
- Overview of Advanced eDiscovery: https://docs.microsoft.com/en-gb/microsoft-365/compliance/overview-ediscovery-20?view=o365-worldwide
- Assigning eDiscovery permissions in the Security and Compliance Center: https://docs.microsoft.com/en-gb/microsoft-365/compliance/assign-ediscovery-permissions?view=o365-worldwide#rbac-roles-related-to-ediscovery
- Adding an eDiscovery case admin: https://docs.microsoft.com/en-us/powershell/module/exchange/policy-and-compliance-ediscovery/Add-eDiscoveryCaseAdmin?redirectedfrom=MSDN&view=exchange-ps
- Keyword queries and search conditions for content search: https://docs.microsoft.com/en-gb/microsoft-365/compliance/keyword-queries-and-search-conditions?view=o365-worldwide
- Managing eDiscovery cases in the Security and Compliance Center: https://docs.microsoft.com/en-us/microsoft-365/compliance/ediscovery-cases?view=o365-worldwide