
Chapter 7: Understanding Angular Navigation and Routing
One of the most amazing things about Angular is that it is an entire ecosystem (a framework) rather than a library. In this ecosystem, the Angular router is one of the most critical blocks to learn and understand. In this chapter, you'll learn some really cool techniques about routing and navigation in Angular. You'll learn about how to guard your routes, listen to route changes, and configure global actions on route changes.
The following are the recipes we're going to cover in this chapter:
- Creating an Angular app and modules with routes using the CLI
- Feature modules and lazily loaded routes
- Authorized access to routes using route guards
- Working with route parameters
- Showing a global loader between route changes
- Preloading route strategies
Technical requirements
For the recipes in this chapter, make sure you have Git and Node.js installed on your machine. You also need to have the @angular/cli package installed, which you can do with npm install -g @angular/cli from your terminal. The code for this chapter can be found at https://github.com/PacktPublishing/Angular-Cookbook/tree/master/chapter07.
Creating an Angular app with routes using the CLI
If you ask me about how we used to create projects for web applications 7-8 years ago, you'll be astonished to learn how difficult it was. Luckily, the tools and standards have evolved in the software development industry and when it comes to Angular, starting a project is super easy. You can even configure different things out of the box. In this recipe, you'll create a fresh Angular project using the Angular CLI and will also enable the routing configuration as you create the project.
Getting ready
The project that we are going to work on does not have a starter file. So, you can open the chapter07/start_here folder from the cloned repository directly into the Visual Studio Code app.
How to do it…
We'll be creating the app using the Angular CLI first. It'll have routing enabled out of the box. Similarly, going forward, we'll create some feature modules with components as well, but they'll have eagerly loaded routes. So, let's get started:
- First, open the terminal and make sure you're inside the chapter07/start_here folder. Once inside, run the following command:
ng new basic-routing-app --routing --style scss
The command should create a new Angular app for you with routing enabled and SCSS selected as your styling choice.
- Run the following commands to open up the app in the browser:
cd basic-routing app
ng serve -o
- Now, let's create a top-level component named landing by running the following command:
ng g c landing
- Remove all the content from app.component.html and keep only router-outlet, as follows:
<router-outlet></router-outlet>
- We'll now make LandingComponent the default route by adding it to the app-routing.module.ts file, as follows:
import { NgModule } from '@angular/core';
import { Routes, RouterModule } from '@angular/router';
import { LandingComponent } from './landing/landing.component';
const routes: Routes = [{
path: '',
redirectTo: 'landing',
pathMatch: 'full'
}, {
path: 'landing',
component: LandingComponent
}];
...
- Refresh the page and you should see the URL automatically changed to http://localhost:4200/landing as the app redirected to the default route.
- Replace the contents of landing.component.html with the following code:
<div class="landing">
<div class="landing__header">
<div class="landing__header__main">
Creating an Angular app with routes using CLI
</div>
<div class="landing__header__links">
<div class="landing__header__links__link">
Home
</div>
<div class="landing__header__links__link">
About
</div>
</div>
</div>
<div class="landing__body">
Landing Works
</div>
</div>
- Now, add some styles for the header in the landing.component.scss file, as follows:
.landing {
display: flex;
flex-direction: column;
height: 100%;
&__header {
height: 60px;
padding: 0 20px;
background-color: #333;
color: white;
display: flex;
align-items: center;
justify-content: flex-end;
&__main {
flex: 1;
}
}
}
- Add the styles for the links in the header as follows:
.landing {
...
&__header {
...
&__links {
padding: 0 20px;
display: flex;
&__link {
margin-left: 16px;
&:hover {
color: #ececec;
cursor: pointer;
}
}
}
}
}
- Furthermore, add the styles for the body of the landing page after the &__header selector, as follows:
.landing {
...
&__header {
...
}
&__body {
padding: 30px;
flex: 1;
display: flex;
justify-content: center;
background-color: #ececec;
}
}
- Finally, to make it all look good, add the following styles to the styles.scss file:
html, body {
width: 100%;
height: 100%;
margin: 0;
padding: 0;
}
- Now, add a feature module for both the home and about routes by running the following commands in the project root:
ng g m home
ng g c home
ng g m about
ng g c about
- Next, import both HomeModule and AboutModule in your app.module.ts file as follows:
...
import { LandingComponent } from './landing/landing.component';
import { HomeModule } from './home/home.module';
import { AboutModule } from './about/about.module';
@NgModule({
declarations: [...],
imports: [
BrowserModule,
AppRoutingModule,
HomeModule,
AboutModule
],
providers: [],
bootstrap: [AppComponent]
})
export class AppModule { }
- Now, we can configure the routes. Modify the app-routing.module.ts file to add the appropriate routes as follows:
import { NgModule } from '@angular/core';
import { Routes, RouterModule } from '@angular/router';
import { AboutComponent } from './about/about.component';
import { HomeComponent } from './home/home.component';
import { LandingComponent } from './landing/landing.component';
const routes: Routes = [{
path: '',
redirectTo: 'landing',
pathMatch: 'full'
}, {
path: 'landing',
component: LandingComponent
}, {
path: 'home',
component: HomeComponent
}, {
path: 'about',
component: AboutComponent
}];
...
- We can style our Home and About components in just a bit. Add the following CSS to both the home.component.scss file and the about.component.scss file:
:host {
display: flex;
width: 100%;
height: 100%;
justify-content: center;
align-items: center;
background-color: #ececec;
font-size: 24px;
}
- Now, we can bind our links to the appropriate routes in the landing page. Modify landing.component.html as follows:
<div class="landing">
<div class="landing__header">
<div class="landing__header__links">
<div class="landing__header__links__link" routerLink="/home">
Home
</div>
<div class="landing__header__links__link" routerLink="/about">
About
</div>
</div>
</div>
<div class="landing__body">
Landing Works
</div>
</div>
Awesome! Within a few minutes, and with the help of the amazing Angular CLI and Angular router, we were able to create a landing page, two feature modules, and feature routes (although eagerly loaded) and we styled some stuff as well. The wonders of the modern web!
Now that you know how basic routing is implemented, see the next section to understand how it works.
How it works…
When we use the --routing argument while creating the app, or when creating a module, the Angular CLI automatically creates a module file named <your module>-routing.module.ts. This file basically contains a routing module. In this recipe, we just created the feature modules without routing to keep the implementation simpler and faster. In the next recipe, you'll learn about routes within modules as well. Anyway, since we've created the eagerly loaded feature modules, this means that all the JavaScript of all the feature modules loads as soon as the app is loaded. You can inspect the Network tab in Chrome DevTools and see the content of the main.js file since it contains all our components and modules. See the following screenshot, which shows both the AboutComponent and HomeComponent code in the main.js file:

Figure 7.1 – main.js containing AboutComponent and HomeComponent code
Since we've established that all our components in the recipe are loaded eagerly on the app start, it is necessary to understand that it happens because we import HomeModule and AboutModule in the imports array of AppModule.
See also
- Angular router docs (https://angular.io/guide/router)
Feature modules and lazily loaded routes
In the previous recipe, we learned how to create a basic routing app with eagerly loaded routes. In this recipe, you'll learn how to work with feature modules to lazily load them instead of loading them when the app loads. For this recipe, we'll assume that we already have the routes in place and we just need to load them lazily.
Getting ready
The project for this recipe resides in chapter07/start_here/lazy-loading-modules:
- Open the project in Visual Studio Code.
- Open the terminal and run npm install to install the dependencies of the project.
- Once done, run ng serve -o.
This should open the app in a new browser tab and you should see the app as follows:
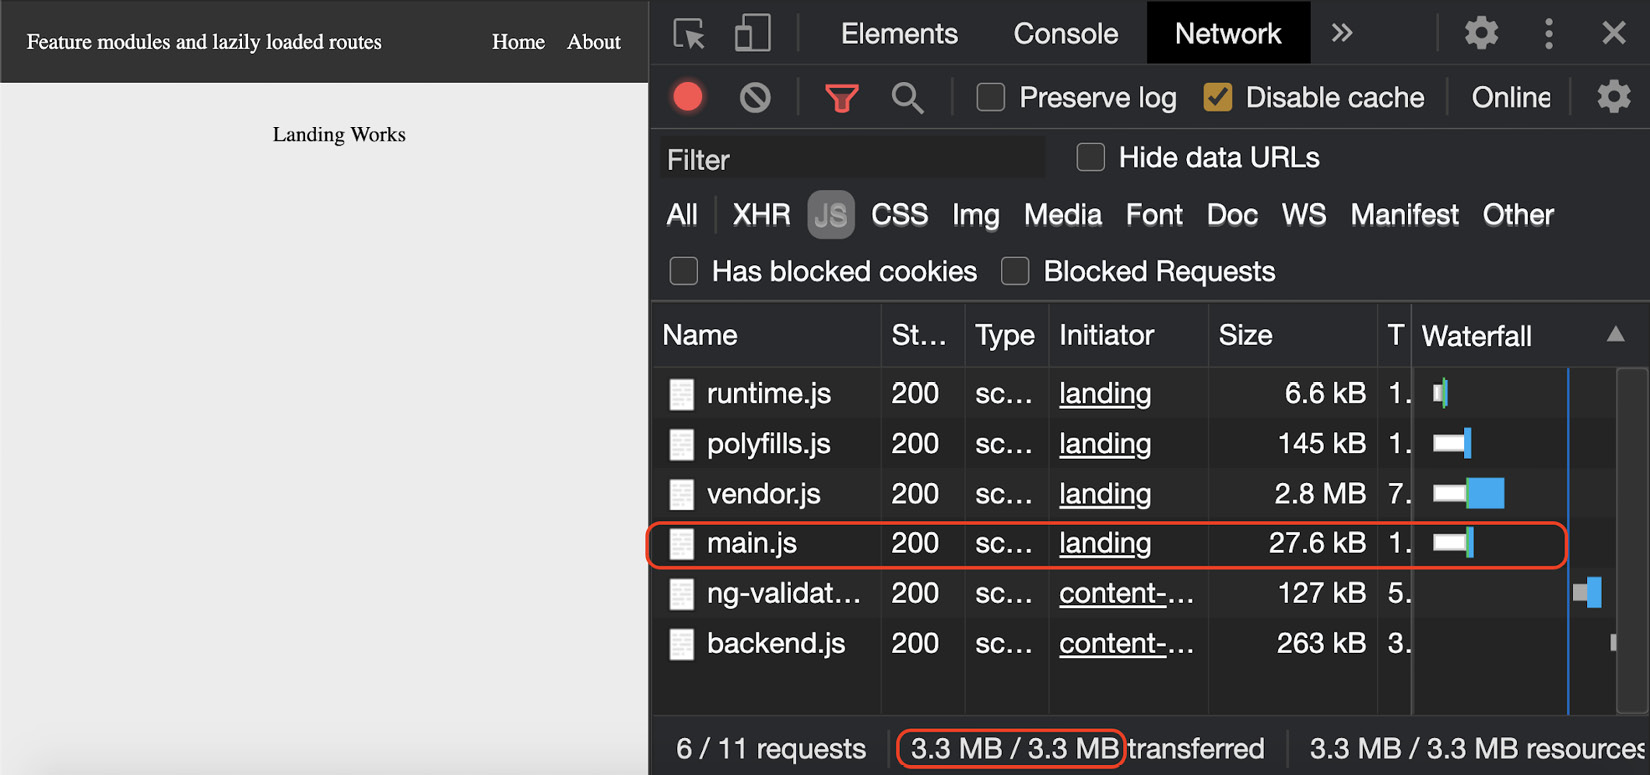
Figure 7.2 – lazy-loading-modules app running on http://localhost:4200
Now that we have the app running locally, let's see the steps of the recipe in the next section.
How to do it…
As shown in Figure 7.2, we have all the components and modules inside the main.js file. Therefore, we have about 23.4 KB in size for the main.js file. We'll modify the code and the routing structure to achieve lazy loading. As a result, we'll have the particular files of the routes loading when we actually navigate to them:
- First, we have to make our target modules capable of being lazily loaded. For that, we'll have to create a <module>-routing.module.ts file for both AboutModule and HomeModule. So, let's create a new file in both the about and home folders:
a) Name the first file about-routing.module.ts and add the following code to it:
// about-routing.module.ts
import { NgModule } from '@angular/core';
import { Routes, RouterModule } from '@angular/router';
import { AboutComponent } from './about.component';
const routes: Routes = [{
path: '',
component: AboutComponent
}];
@NgModule({
imports: [RouterModule.forChild(routes)],
exports: [RouterModule]
})
export class AboutRoutingModule { }
b) Name the second file home-routing.module.ts and add the following code to it:
// home-routing.module.ts
import { NgModule } from '@angular/core';
import { Routes, RouterModule } from '@angular/router';
import { HomeComponent } from './home.component';
const routes: Routes = [{
path: '',
component: HomeComponent
}];
@NgModule({
imports: [RouterModule.forChild(routes)],
exports: [RouterModule]
})
export class HomeRoutingModule { }
- Now, we'll add these routing modules to the appropriate modules, that is, we'll import HomeRoutingModule in HomeModule as follows:
// home.module.ts
import { NgModule } from '@angular/core';
import { CommonModule } from '@angular/common';
import { HomeComponent } from './home.component';
import { HomeRoutingModule } from './home-routing.module';
@NgModule({
declarations: [HomeComponent],
imports: [
CommonModule,
]
})
export class HomeModule { }
Add AboutRoutingModule in AboutModule as follows:
// about.module.ts
import { NgModule } from '@angular/core';
import { CommonModule } from '@angular/common';
import { AboutComponent } from './about.component';
import { AboutRoutingModule } from './about-routing.module';
@NgModule({
declarations: [AboutComponent],
imports: [
CommonModule,
AboutRoutingModule
]
})
export class AboutModule { }
- Our modules are now capable of being lazily loaded. We just need to lazy load them now. In order to do so, we need to modify app-routing.module.ts and change our configurations to use the ES6 imports for the about and home routes, as follows:
import { NgModule } from '@angular/core';
import { Routes, RouterModule } from '@angular/router';
import { LandingComponent } from './landing/landing.component';
const routes: Routes = [{
path: '',
redirectTo: 'landing',
pathMatch: 'full'
}, {
path: 'landing',
component: LandingComponent
}, {
path: 'home',
loadChildren: () => import('./home/home.module').then (m => m.HomeModule)
}, {
path: 'about',
loadChildren: () => import('./about/about.module'). then(m => m.AboutModule)
}];
@NgModule({
imports: [RouterModule.forRoot(routes)],
exports: [RouterModule]
})
export class AppRoutingModule { }
- Finally, we will remove the AboutModule and HomeModule imports from the imports array of AppModule so that we get the desired code-splitting out of the box. The content of app.module.ts should look as follows:
import { BrowserModule } from '@angular/platform-browser';
import { NgModule } from '@angular/core';
import { AppRoutingModule } from './app-routing.module';
import { AppComponent } from './app.component';
import { LandingComponent } from './landing/landing.component';
import { HomeModule } from './home/home.module'; ← Remove
import { AboutModule } from './about/about.module'; ← Remove
@NgModule({
declarations: [
AppComponent,
LandingComponent
],
imports: [
BrowserModule,
AppRoutingModule,
HomeModule, ← Remove
AboutModule ← Remove
],
providers: [],
bootstrap: [AppComponent]
})
export class AppModule { }
Refresh the app and you'll see that the bundle size for the main.js file is down to 18.1 KB, which was about 23.4 KB before. See the following screenshot:
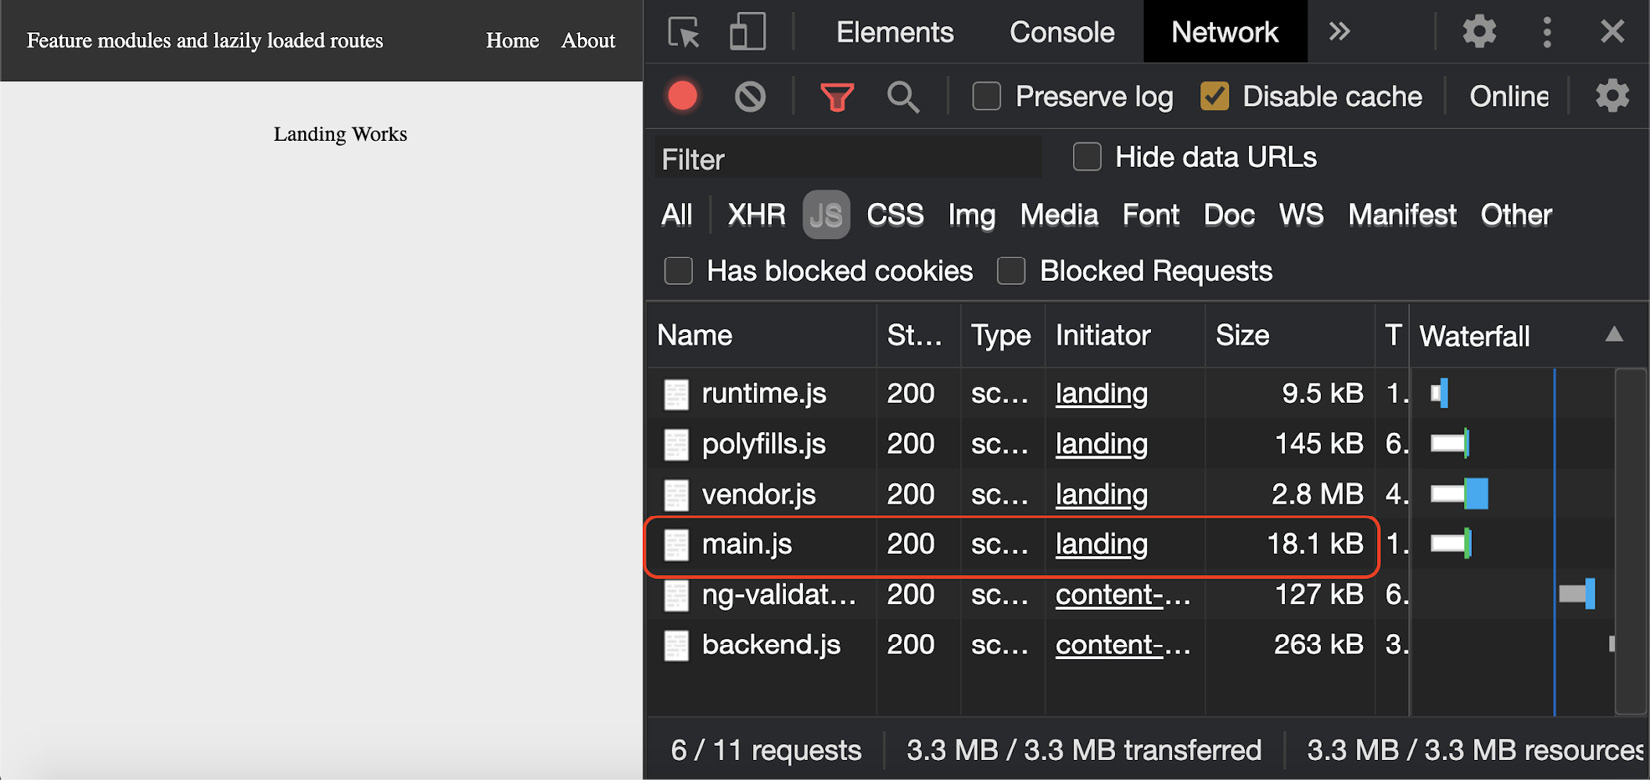
Figure 7.3 – Reduced size of main.js on app load
But what about the Home and About routes? And what about lazy loading? Well, tap the Home route from the header and you'll see a new JavaScript file being downloaded in the Network tab specifically for the route. That's lazy loading in action! See the following screenshot:
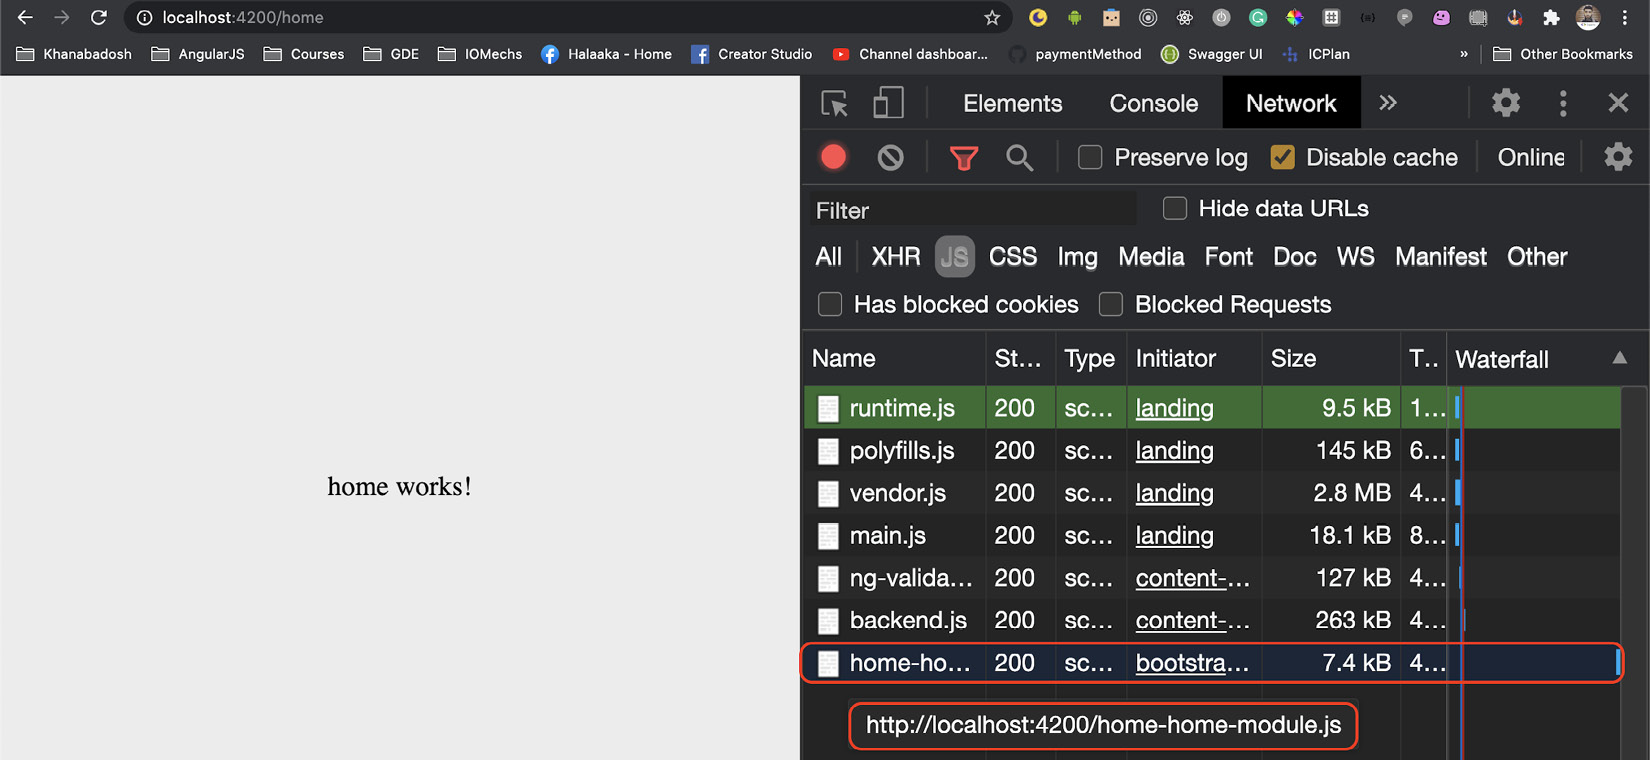
Figure 7.4 – home route being lazily loaded
Awesomesauce! You just became lazy! Just kidding. You just learned the art of lazily loading routes and feature modules in your Angular app. You can now show this off to your friends as well.
How it works…
Angular works with modules and usually the features are broken down into modules. As we know, AppModule serves as the entry point for the Angular app and Angular will import and bundle anything that is imported in AppModule during the build process, resulting in the main.js file. However, if we want to lazy load our routes/feature modules, we need to avoid importing feature modules in AppModule directly and use the loadChildren method for our routes to load the feature modules instead, on-demand. That's what we did in this recipe. It is important to note that the routes stayed the same in AppRoutingModule. However, we had to put path: '' in our feature routing modules since that'll combine the route in AppRoutingModule and then in the feature routing module to become what's defined in AppRoutingModule. That's why our routes were still 'about' and 'home'.
See also
- Lazy loading modules in Angular (https://angular.io/guide/lazy-loading-ngmodules)
Authorized access to routes using route guards
Not all routes in your Angular app should be accessible by everyone in the world. In this recipe, we'll learn how to create route guards in Angular to prevent unauthorized access to routes.
Getting ready
The project for this recipe resides in chapter07/start_here/using-route-guards:
- Open the project in Visual Studio Code.
- Open the terminal and run npm install to install the dependencies of the project.
- Once done, run ng serve -o.
This should open the app in a new browser tab, and you should see the app as follows:
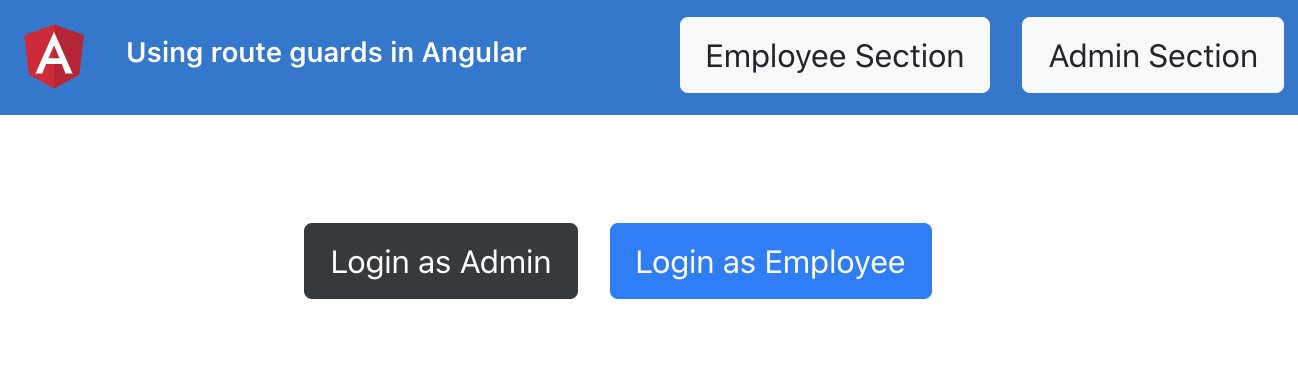
Figure 7.5 – using-route-guards app running on http://localhost:4200
Now that we have the app running locally, let's see the steps of the recipe in the next section.
How to do it…
We have an app with a couple of routes already set up. You can log in as either an employee or an admin to get to the bucket list of the app. However, if you tap any of the two buttons in the header, you'll see that you can navigate to the Admin and Employee sections even without being logged in. This is what we want to prevent from happening. Notice in the auth.service.ts file that we already have a way for the user to do a login, and we can check whether the user is logged in or not using the isLoggedIn() method:
- First, let's create a route guard that will only allow the user to go to the particular routes if the user is logged in. We'll name it AuthGuard. Let's create it by running the following command in the project root:
ng g guard guards/Auth
Once the command is run, you should be able to see some options to select which interfaces we'd like to implement.
- Select the CanActivate interface and press Enter.
- Now, add the following logic to the auth.guard.ts file to check whether the user is logged in, and if the user is not logged in, we'll redirect the user to the login page, which is the '/auth' route:
import { Injectable } from '@angular/core';
import { CanActivate, ActivatedRouteSnapshot, RouterStateSnapshot, UrlTree, Router } from '@angular/router';
import { Observable } from 'rxjs';
import { AuthService } from '../services/auth.service';
@Injectable({
providedIn: 'root'
})
export class AuthGuard implements CanActivate {
constructor(private auth: AuthService, private router: Router) { }
canActivate(
route: ActivatedRouteSnapshot,
state: RouterStateSnapshot): Observable<boolean | UrlTree> | Promise<boolean | UrlTree> | boolean | UrlTree {
const loggedIn = !!this.auth.isLoggedIn();
if (!loggedIn) {
this.router.navigate(['/auth']);
return false;
}
return true;
}
}
- Now, let's apply AuthGuard to our Admin and Employee routes in the app-routing.module.ts file, as follows:
...
import { AuthGuard } from './guards/auth.guard';
const routes: Routes = [{...}, {
path: 'auth',
loadChildren: () => import('./auth/auth.module').then (m => m.AuthModule)
}, {
path: 'admin',
loadChildren: () => import('./admin/admin.module'). then(m => m.AdminModule),
canActivate: [AuthGuard]
}, {
path: 'employee',
loadChildren: () => import('./employee/employee. module').then(m => m.EmployeeModule),
canActivate: [AuthGuard]
}];
...
export class AppRoutingModule { }
If you now log out and try to tap either the Employee Section or Admin Section buttons in the header, you'll notice that you're now not able to go to the routes until you log in. The same is the case if you try to enter the URL directly for the routes in the address bar and hit Enter.
- Now we'll try to create a guard, one for the Employee route and one for the Admin route. Run the following commands one by one and select the CanActivate interface for both the guards:
ng g guard guards/Employee
ng g guard guards/Admin
- Since we have the guards created, let's put the logic for AdminGuard first. We'll try to see what type of user has logged in. If it is an admin, then we allow the navigation, else we prevent it. Add the following code to admin.guard.ts:
...
import { UserType } from '../constants/user-type';
import { AuthService } from '../services/auth.service';
...
export class AdminGuard implements CanActivate {
constructor(private auth: AuthService) {}
canActivate(
route: ActivatedRouteSnapshot,
state: RouterStateSnapshot): Observable<boolean | UrlTree> | Promise<boolean | UrlTree> | boolean | UrlTree {
return this.auth.loggedInUserType === UserType.Admin;
}
}
- Add AdminGuard to the Admin route in app-routing.module.ts as follows:
...
import { AdminGuard } from './guards/admin.guard';
import { AuthGuard } from './guards/auth.guard';
const routes: Routes = [{
path: '',
...
}, {
path: 'auth',
...
}, {
path: 'admin',
loadChildren: () => import('./admin/admin.module'). then(m => m.AdminModule),
canActivate: [AuthGuard, AdminGuard]
}, {
path: 'employee',
...
}];
...
Try to log out and log in as an employee now. Then try tapping the Admin Section button in the header. You'll notice that you can't go to the Admin section of the bucket list anymore. This is because we have AdminGuard in place and you're not logged in as an admin right now. Logging in as an admin should work just fine.
- Similarly, we'll add the following code to employee.guard.ts:
...
import { UserType } from '../constants/user-type';
import { AuthService } from '../services/auth.service';
@Injectable({
providedIn: 'root'
})
export class EmployeeGuard implements CanActivate {
constructor(private auth: AuthService) {}
canActivate(
route: ActivatedRouteSnapshot,
state: RouterStateSnapshot): Observable<boolean | UrlTree> | Promise<boolean | UrlTree> | boolean | UrlTree {
return this.auth.loggedInUserType === UserType. Employee;
}
}
- Now, add EmployeeGuard to the Employee route in app-routing.module.ts as follows:
...
import { EmployeeGuard } from './guards/employee.guard';
const routes: Routes = [
...
, {
path: 'employee',
loadChildren: () => import('./employee/employee. module').then(m => m.EmployeeModule),
canActivate: [AuthGuard, EmployeeGuard]
}];
...
Now, only the appropriate routes should be accessible by checking which type of user is logged in.
Great! You now are an authorization expert when it comes to guarding routes. With great power comes great responsibility. Use it wisely.
How it works…
The CanActivate interface of the route guards is the heart of our recipe because it corresponds to the fact that each route in Angular can have an array of guards for the CanActivate property of the route definition. When a guard is applied, it is supposed to return a Boolean value or a UrlTree. We've focused on the Boolean value's usage in our recipe. We can return the Boolean value directly using a promise or even using an Observable. This makes guards really flexible for use even with remote data. Anyway, for our recipe, we've kept it easy to understand by checking whether the user is logged in (for AuthGuard) and by checking whether the expected type of user is logged in for the particular routes (AdminGuard and EmployeeGuard).
See also
- Preventing unauthorized access in Angular routes (https://angular.io/guide/router#preventing-unauthorized-access)
Working with route parameters
Whether it is about building a REST API using Node.js or configuring routes in Angular, setting up routes is an absolute art, especially when it comes to working with parameters. In this recipe, you'll create some routes with parameters and will learn how to get those parameters in your components once the route is active.
Getting ready
The project for this recipe resides in chapter07/start_here/working-with-route-params:
- Open the project in Visual Studio Code.
- Open the terminal and run npm install to install the dependencies of the project.
- Once done, run ng serve -o.
This should open the app in a new browser tab. As soon as the page is opened, you should see a list of users.
- Tap the first user, and you should see the following view:
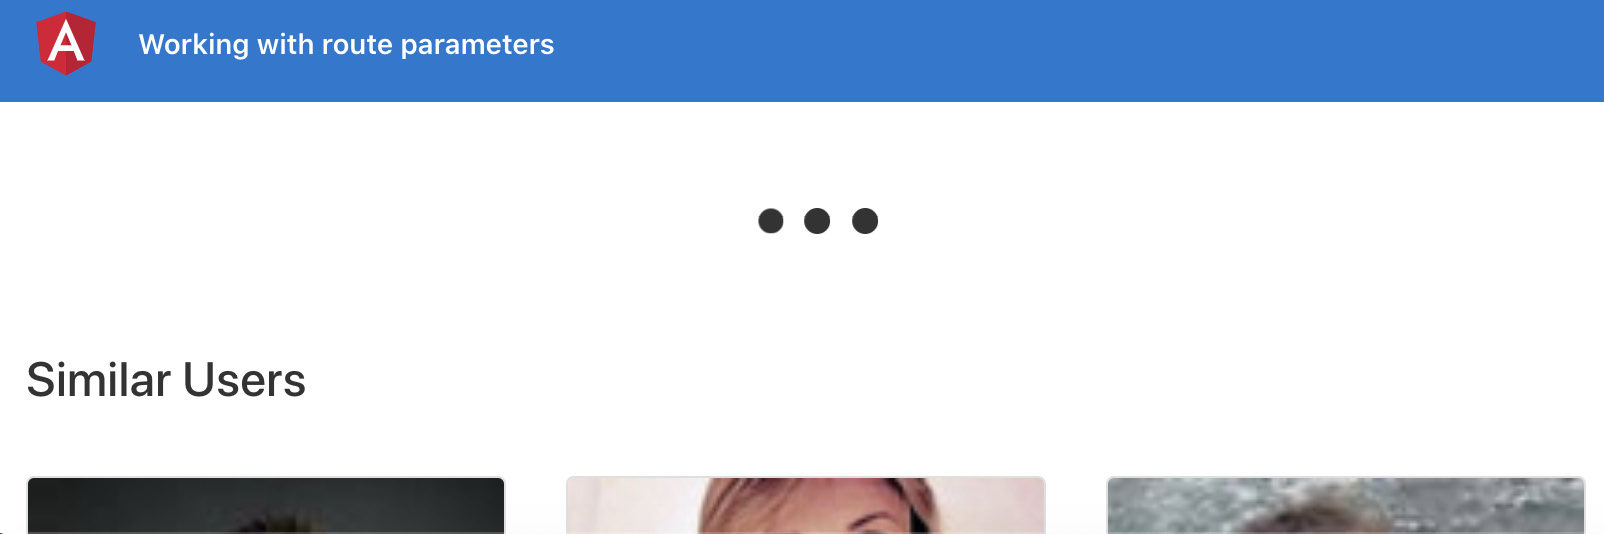
Figure 7.6 – user-details not bringing the correct user
Now that we have the app running locally, let's see the steps of the recipe in the next section.
How to do it…
The problem right now is that we have a route for opening the user details, but we don't have any idea in UserDetailComponent about which user was clicked, that is, which user to fetch from the service. Therefore, we'll implement the route parameters to pass the user's ID (uuid) from the home page to the user details page:
- First, we have to make our user route capable of accepting the route parameter named uuid. This is going to be a required parameter, which means the route will not work without passing this. Let's modify app-routing.module.ts to add this required parameter to the route definition, as follows:
...
import { UserDetailComponent } from './user-detail/user-detail.component';
const routes: Routes = [
...
, {
path: 'user/:uuid',
component: UserDetailComponent
}];
...
With this change, clicking on a user on the home page will not work anymore. If you try it, you'll see an error as follows and that's because uuid is a required parameter:
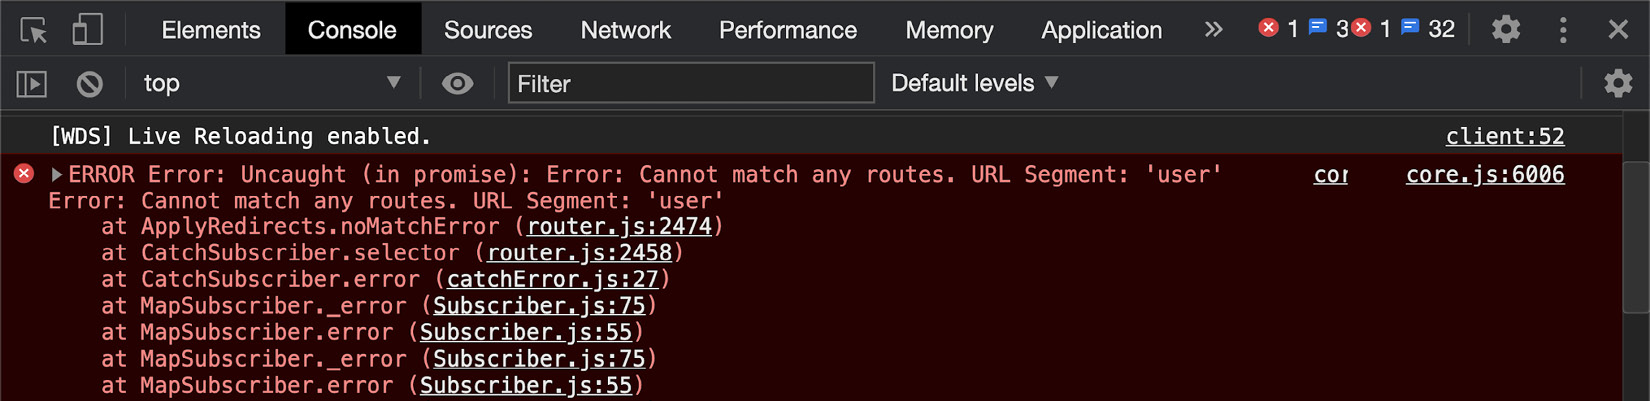
Figure 7.7 – Angular complaining about not being able to match the requested route
- The fix is easy for the error; we need to pass the uuid when navigating to the user route. Let's do this by modifying the user-card.component.ts file as follows:
import { Component, Input, OnInit } from '@angular/core';
import { Router } from '@angular/router';
import { IUser } from '../../interfaces/user.interface';
@Component({
selector: 'app-user-card',
templateUrl: './user-card.component.html',
styleUrls: ['./user-card.component.scss']
})
export class UserCardComponent implements OnInit {
@Input('user') user: IUser;
constructor(private router: Router) { }
ngOnInit(): void {
}
cardClicked() {
this.router.navigate([' /user/${this.user.login.uuid}'])
}
}
We're now able to navigate to a particular user's route, and you should also be able to see the UUID in the address bar as follows:

Figure 7.8 – The UUID being shown in the address bar
- To get the current user from UserService, we need to get the uuid value in UserDetailComponent. Right now, we're sending null when calling the getUser method of UserService from UserDetailComponent. In order to use the user's ID, we can fetch the uuid value from the route parameters by importing the ActivatedRoute service. Update user-detail.component.ts as follows:
...
import { ActivatedRoute } from '@angular/router';
...
export class UserDetailComponent implements OnInit, OnDestroy {
user: IUser;
similarUsers: IUser[];
constructor(
private userService: UserService,
private route: ActivatedRoute
) {}
ngOnInit() {
...
}
ngOnDestroy() {
}
}
- We'll create a new method named getUserAndSimilarUsers in UserDetailComponent and move the code from the ngOnInit method into the new method as follows:
...
export class UserDetailComponent implements OnInit, OnDestroy {
...
ngOnInit() {
const userId = null;
this.getUserAndSimilarUsers(userId);
}
getUserAndSimilarUsers(userId) {
this.userService.getUser(userId)
.pipe(
mergeMap((user: IUser) => {
this.user = user;
return this.userService. getSimilarUsers(userId);
})
).subscribe((similarUsers: IUser[]) => {
this.similarUsers = similarUsers;
})
}
...
}
- Now that we have the code refactored a bit, let's try to access the uuid from the route parameters using the ActivatedRoute service, and pass it into our getUserAndSimilarUsers method as follows:
...
import { mergeMap, takeWhile } from 'rxjs/operators';
import { ActivatedRoute } from '@angular/router';
...
export class UserDetailComponent implements OnInit, OnDestroy {
componentIsAlive = false;
constructor(private userService: UserService, private route: ActivatedRoute ) {}
ngOnInit() {
this.componentIsAlive = true;
this.route.paramMap
.pipe(
takeWhile (() => this.componentIsAlive)
)
.subscribe((params) => {
const userId = params.get('uuid');
this.getUserAndSimilarUsers(userId);
})
}
getUserAndSimilarUsers(userId) {...}
ngOnDestroy() {
this.componentIsAlive = false;
}
}
Grrreat!! With this change, you can try refreshing the app on the home page and then click any user. You should see the current user as well as similar users being loaded. To understand all the magic behind the recipe, see the next section.
How it works…
It all begins when we change our route's path to user/:userId. This makes userId a required parameter for our route. The other piece of the puzzle is to retrieve this parameter in UserDetailComponent and then use it to get the target user, as well as similar users. For that, we use the ActivatedRoute service. The ActivatedRoute service holds a lot of necessary information about the current route and, therefore, we were able to fetch the current route's uuid parameter by subscribing to the paramMap Observable, so even if the parameter changes while staying on a user's page, we still execute the necessary operations. Notice that we also create a property named componentIsAlive. As you might have seen in our prior recipes, we use it in conjunction with the takeWhile operator to automatically unsubscribe from the Observable streams as soon as the user navigates away from the page, or essentially when the component is destroyed.
See also
- Tour of Heroes tutorial – sample usage of the ActivatedRoute service (https://angular.io/guide/router-tutorial-toh#route-parameters-in-the-activatedroute-service)
- Link parameters array – Angular docs (https://angular.io/guide/router#link-parameters-array)
Showing a global loader between route changes
Building user interfaces that are snappy and fast is key to winning users. The apps become much more enjoyable for the end users and it could bring a lot of value to the owners/creators of the apps. One of the core experiences on the modern web is to show a loader when something is happening in the background. In this recipe, you'll learn how to create a global user interface loader in your Angular app that shows whenever there is a route transition in the app.
Getting ready
The project that we are going to work with resides in chapter07/start_here/routing-global-loader inside the cloned repository:
- Open the project in Visual Studio Code.
- Open the terminal and run npm install to install the dependencies of the project.
- Once done, run ng serve -o.
This should open the app in a new browser tab and you should see it as follows:

Figure 7.9 – routing-global-loader app running on http://localhost:4200
Now that we have the app running locally, let's see the steps of the recipe in the next section.
How to do it…
For this recipe, we have the bucket app with a couple of routes in it. We also have LoaderComponent already created, which we have to use during the route changes:
- We'll begin showing LoaderComponent by default in the entire app. To do that, add the <app-loader> selector in the app.component.html file right before the div with the content class as follows:
<div class="toolbar" role="banner" id="toolbar">
...
</div>
<app-loader></app-loader>
<div class="content" role="main">
<div class="page-section">
<router-outlet></router-outlet>
</div>
</div>
- Now we'll create a property in the AppComponent class to show the loader conditionally. We'll mark this property as true during the routing and will mark it as false when the routing is finished. Create the property as follows in the app.component.ts file:
...
export class AppComponent {
isLoadingRoute = false;
// DO NOT USE THE CODE BELOW IN PRODUCTION
// IT WILL CAUSE PERFORMANCE ISSUES
constructor(private auth: AuthService, private router: Router) {
}
get isLoggedIn() {
return this.auth.isLoggedIn();
}
logout() {
this.auth.logout();
this.router.navigate(['/auth']);
}
}
- We'll now make sure that <app-loader> is shown only when the isLoadingRoute property is true. To do that, update the app.component.html template file to include an *ngIf statement as follows:
...
<app-loader *ngIf="isLoadingRoute"></app-loader>
<div class="content" role="main">
<div class="page-section">
<router-outlet></router-outlet>
</div>
</div>
- Now that the *ngIf statement is in place, we need to set the isLoadingRoute property to true somehow. To do that, we'll listen to the router service's events property, and take an action upon the NavigationStart event. Modify the code in the app.component.ts file as follows:
import { Component } from '@angular/core';
import { NavigationStart, Router } from '@angular/router';
import { AuthService } from './services/auth.service';
...
export class AppComponent {
isLoadingRoute = false;
// DO NOT USE THE CODE BELOW IN PRODUCTION
// IT WILL CAUSE PERFORMANCE ISSUES
constructor(private auth: AuthService, private router: Router) {
this.router.events.subscribe((event) => {
if (event instanceof NavigationStart) {
this.isLoadingRoute = true;
}
})
}
get isLoggedIn() {...}
logout() {...}
}
If you refresh the app, you'll notice that <app-loader> never goes away. It is now being shown forever. That's because we're not marking the isLoadingRoute property as false anywhere.
- To mark isLoadingRoute as false, we need to check for three different events: NavigationEnd, NavigationError, and NavigationCancel. Let's add some more logic to handle these three events and mark the property as false:
import { Component } from '@angular/core';
import { NavigationCancel, NavigationEnd, NavigationError, NavigationStart, Router } from '@angular/router';
...
export class AppComponent {
...
constructor(private auth: AuthService, private router: Router) {
this.router.events.subscribe((event) => {
if (event instanceof NavigationStart) {
this.isLoadingRoute = true;
}
if (
event instanceof NavigationEnd ||
event instanceof NavigationError ||
event instanceof NavigationCancel
) {
this.isLoadingRoute = false;
}
})
}
get isLoggedIn() {...}
logout() {...}
}
And boom! We now have a global loader that shows during the route navigation among different pages.
Important note
When running the app locally, you experience the best internet conditions possible (especially if you're not fetching remote data). Therefore, you might not see the loader at all or might see it for only a fraction of a second. In order to see it for a longer period, open Chrome DevTools, go to the Network tab, simulate slow 3G, refresh the app, and then navigate between routes.
If the routes have static data, then you'll only see the loader the first time you navigate to that route. The next time you navigate to the same route, it would already have been cached, so the global loader might not show.
Congrats on finishing the recipe. You now can implement a global loader in Angular apps, which will show from the navigation start to the navigation end.
How it works…
The router service is a very powerful service in Angular. It has a lot of methods as well as Observables that we can use for different tasks in our apps. For this recipe, we used the events Observable. By subscribing to the events Observable, we can listen to all the events that the Router service emits through the Observable. For this recipe, we were only interested in the NavigationStart, NavigationEnd, NavigationError, and NavigationCancel events. The NavigationStart event is emitted when the router starts navigation. The NavigationEnd event is emitted when the navigation ends successfully. The NavigationCancel event is emitted when the navigation is canceled due to a route guard returning false, or redirects by using UrlTree due to some reason. The NavigationError event is emitted when there's an error due to any reason during the navigation. All of these events are of the Event type and we can identify the type of the event by checking whether it is an instance of the target event, using the instanceof keyword. Notice that since we had the subscription to the Router.events property in AppComponent, we didn't have to worry about unsubscribing the subscription because there's only one subscription in the app, and AppComponent will not be destroyed throughout the life cycle of the app.
See also
- Router events docs (https://angular.io/guide/router#router-events)
- Router service docs (https://angular.io/api/router/Router)
Preloading route strategies
We're already familiar with how to lazy load different feature modules upon navigation. Although sometimes, you might want to preload subsequent routes to make the next route navigation instantaneous or might even want to use a custom preloading strategy based on your application's business logic. In this recipe, you'll learn about the PreloadAllModules strategy and will also implement a custom strategy to cherry-pick which modules should be preloaded.
Getting ready
The project that we are going to work with resides in chapter07/start_here/route-preloading-strategies inside the cloned repository:
- Open the project in Visual Studio Code.
- Open the terminal and run npm install to install the dependencies of the project.
- Once done, run ng serve -o.
This should open the app in a new browser tab and you should see something like the following:

Figure 7.10 – route-preloading-strategies app running on http://localhost:4200
- Open Chrome DevTools by pressing Ctrl + Shift + C on Windows or Cmd + Shift + C on Mac.
- Navigate to the Network tab and filter on JavaScript files only. You should see something like this:
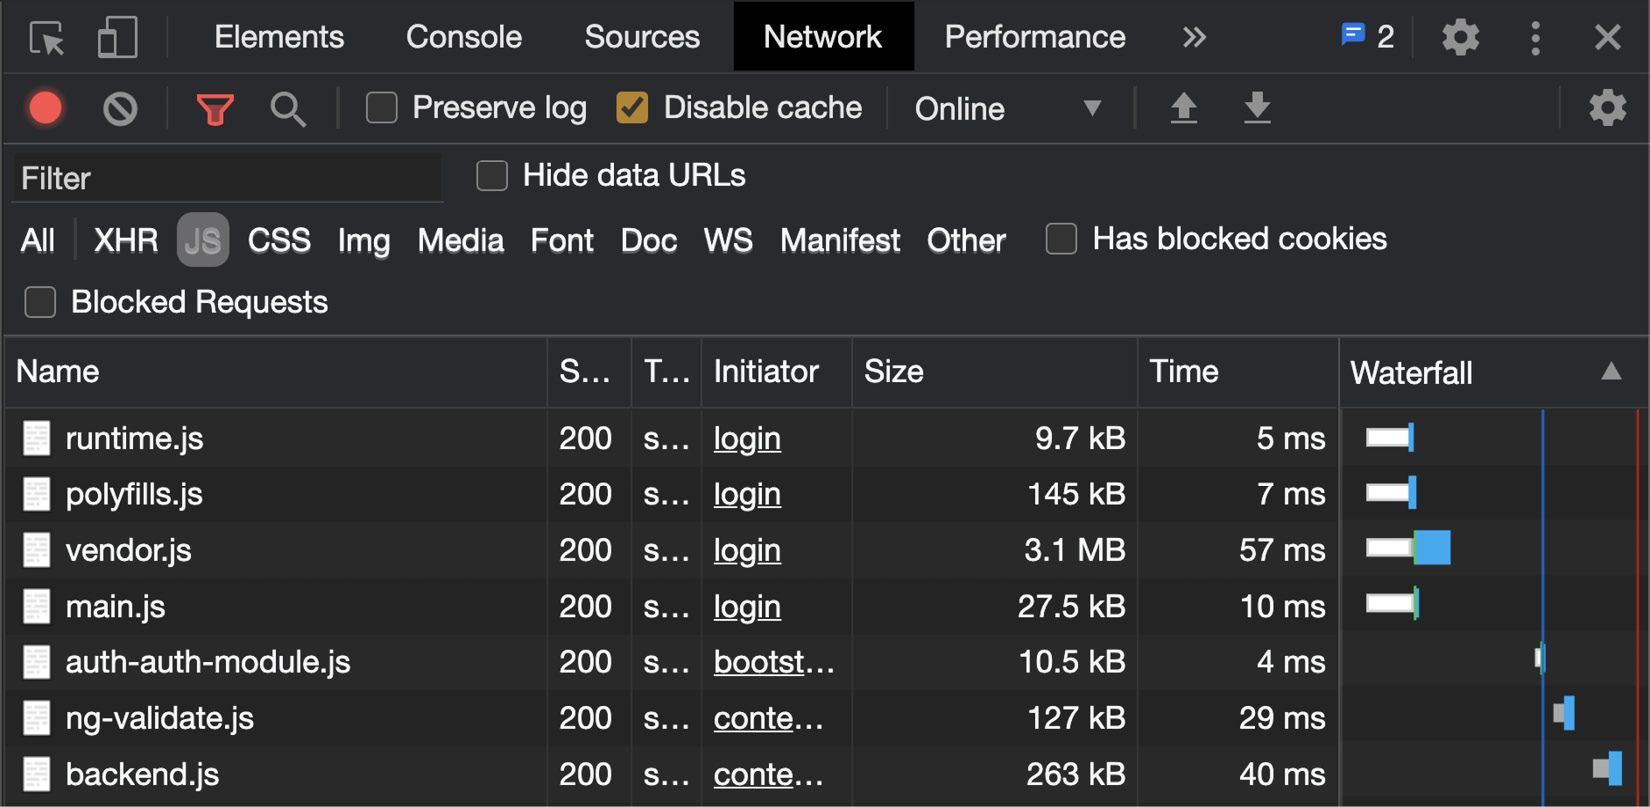
Figure 7.11 – JavaScript files loaded on app load
Now that we have the app running locally, let's see the next section for this recipe
How to do it…
Notice in Figure 7.11 how we're automatically loading the auth-auth-module.js file since we're logged out. Although the routes in AuthModule are all configured to be lazily loaded, we can still look into what happens if we use the PreloadAllModules strategy, and then a custom preload strategy:
- We're going to try out the PreloadAllModules strategy first. To use it, let's modify the app-routing.module.ts file as follows:
import { NgModule } from '@angular/core';
import { Routes, RouterModule, PreloadAllModules } from '@angular/router';
const routes: Routes = [...];
@NgModule({
imports: [RouterModule.forRoot(routes, {
preloadingStrategy: PreloadAllModules
})],
exports: [RouterModule]
})
export class AppRoutingModule { }
If you refresh the app, you should see not only the auth-auth-module.js file but also the module files for Admin and Employee, as follows:
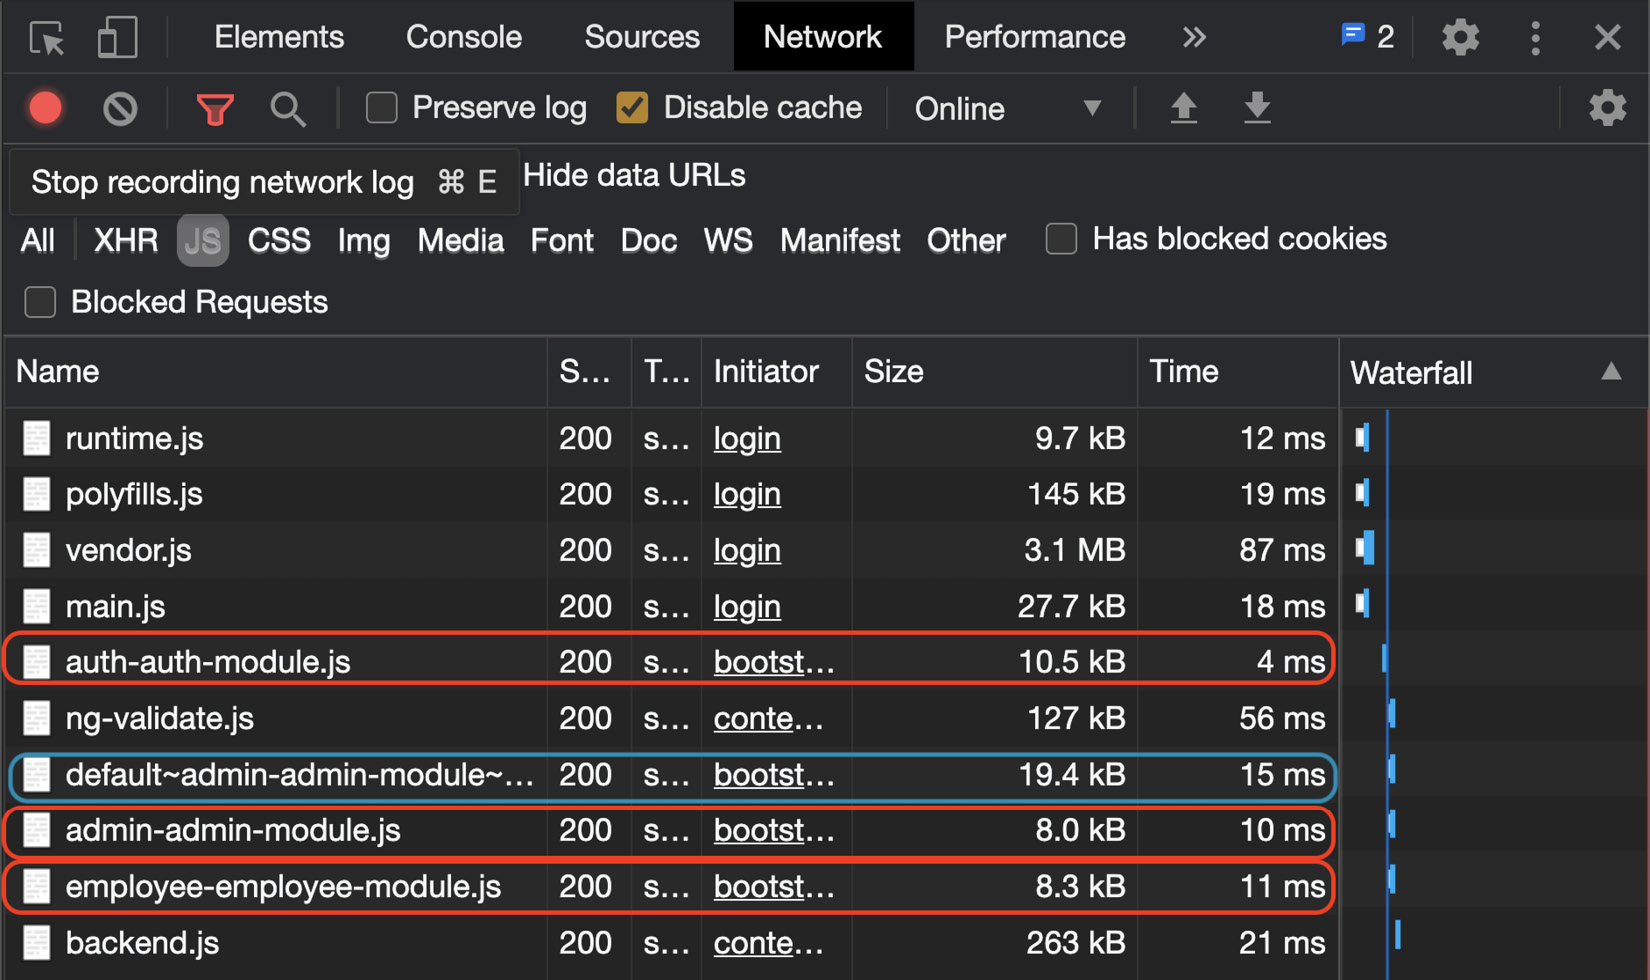
Figure 7.12 – JavaScript files loaded with the PreloadAllModules strategy
So far so good. But what if we wanted to preload only the Admin module, supposing our app is intended for admins mostly? We'll create a custom preload strategy for that.
- Let's create a service named CustomPreloadStrategy by running the following command in our project:
ng g s services/custom-preload-strategy
- In order to use our preload strategy service with Angular, our service needs to implement the PreloadingStrategy interface from the @angular/router package. Modify the newly created service as follows:
import { Injectable } from '@angular/core';
import { PreloadingStrategy } from '@angular/router';
@Injectable({
providedIn: 'root'
})
export class CustomPreloadStrategyService implements PreloadingStrategy {
constructor() { }
}
- Next, we need to implement the preload method from the PreloadingStrategy interface for our service to work properly. Let's modify CustomPreloadStrategyService to implement the preload method, as follows:
import { Injectable } from '@angular/core';
import { PreloadingStrategy, Route } from '@angular/router';
import { Observable, of } from 'rxjs';
@Injectable({
providedIn: 'root'
})
export class CustomPreloadStrategyService implements PreloadingStrategy {
constructor() { }
preload(route: Route, load: () => Observable<any>): Observable<any> {
return of(null)
}
}
- Right now, our preload method returns of(null). Instead, in order to decide which routes to preload, we're going to add an object to our route definitions as the data object having a Boolean named shouldPreload. Let's quickly do that by modifying app-routing.module.ts as follows:
...
const routes: Routes = [{...}, {
path: 'auth',
loadChildren: () => import('./auth/auth.module').then(m => m.AuthModule),
data: { shouldPreload: true }
}, {
path: 'admin',
loadChildren: () => import('./admin/admin.module'). then(m => m.AdminModule),
data: { shouldPreload: true }
}, {
path: 'employee',
loadChildren: () => import('./employee/employee. module').then(m => m.EmployeeModule),
data: { shouldPreload: false }
}];
...
- All the routes with shouldPreload set to true should be preloaded and if they are set to false, then they should not be preloaded. We'll create two methods. One for the case where we want to preload a route and one for the route which we don't want to preload a route. Let's modify custom-preload-strategy.service.ts to add the methods as follows:
export class CustomPreloadStrategyService implements PreloadingStrategy {
...
loadRoute(route: Route, loadFn: () => Observable<any>): Observable<any> {
console.log('Preloading done for route: ${route. path}')
return loadFn();
}
noPreload(route: Route): Observable<any> {
console.log('No preloading set for: ${route.path}');
return of(null);
}
...
}
- Awesome! Now we have to use the methods created in Step 6 inside the preload method. Let's modify the method to use the shouldPreload property of the data object from the route definitions. The code should look as follows:
...
export class CustomPreloadStrategyService implements PreloadingStrategy {
...
preload(route: Route, load: () => Observable<any>): Observable<any> {
try {
const { shouldPreload } = route.data;
return shouldPreload ? this.loadRoute(route, load) : this.noPreload(route);
}
catch (e) {
console.error(e);
return this.noPreload(route);
}
}
}
- The final step is to use our custom preload strategy. In order to do so, modify the app-routing-module.ts file as follows:
import { NgModule } from '@angular/core';
import { Routes, RouterModule, PreloadAllModules ← Remove } from '@angular/router';
import { CustomPreloadStrategyService } from './services/custom-preload-strategy.service';
const routes: Routes = [...];
@NgModule({
imports: [RouterModule.forRoot(routes, {
preloadingStrategy: CustomPreloadStrategyService
})],
exports: [RouterModule]
})
export class AppRoutingModule { }
Voilà! If you refresh the app now and monitor the Network tab, you'll notice that only the JavaScript files for Auth and Admin are preloaded, and there's no preloading of the Employee module, as follows:
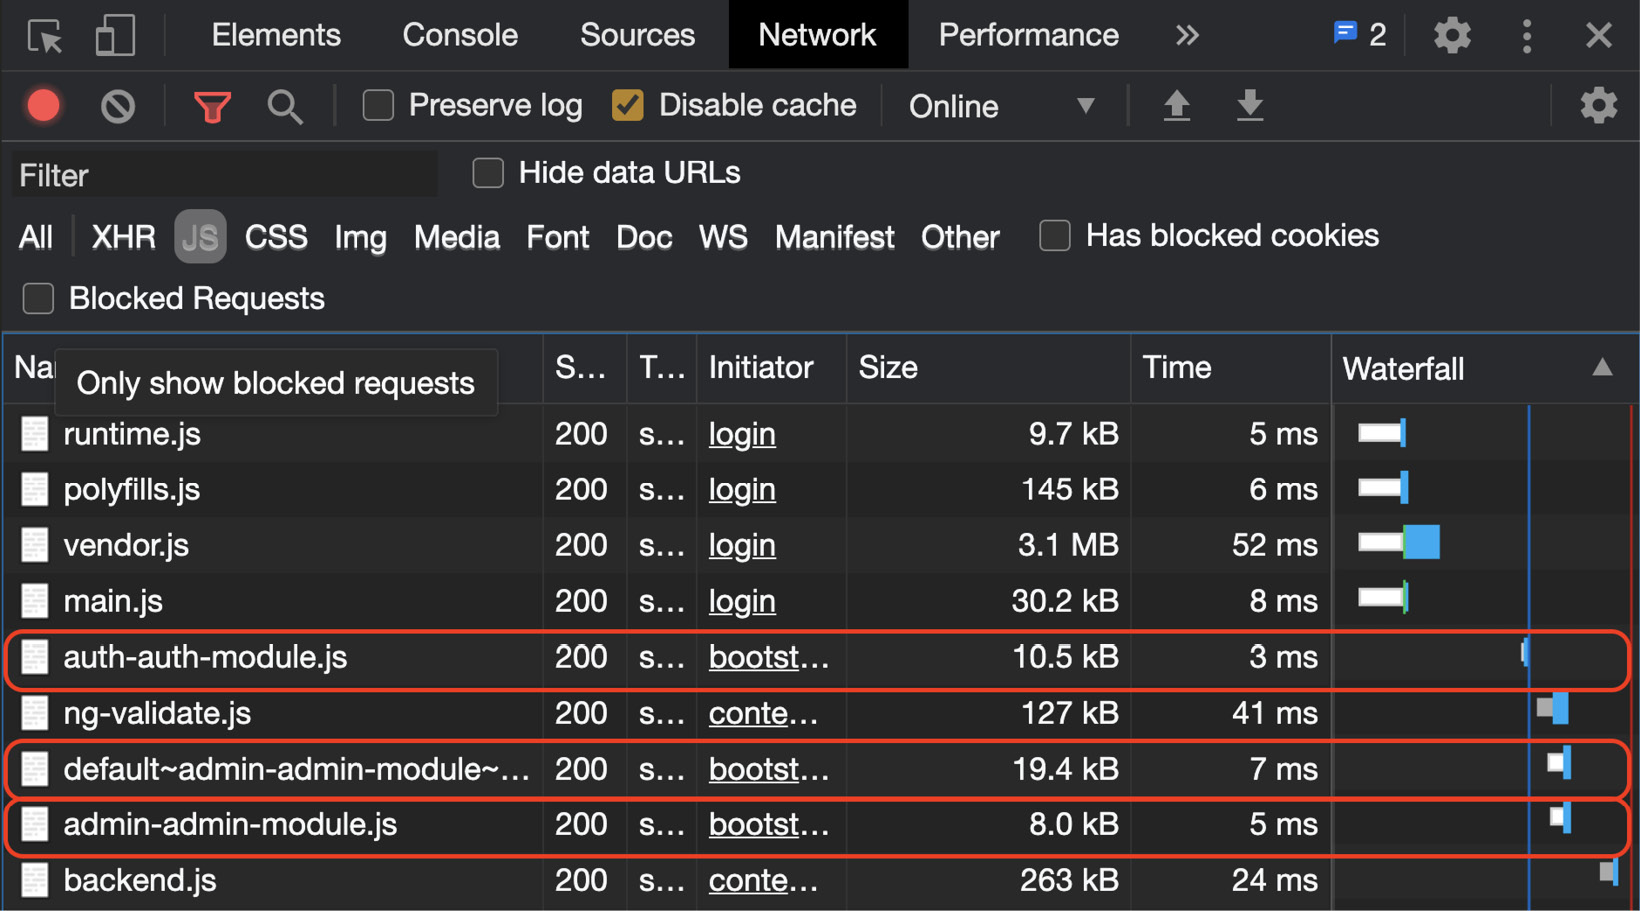
Figure 7.13 – Preloading only the Auth and Admin modules using a custom preload strategy
You can also have a look at the console logs to see which routes were preloaded. You should see the logs as follows:
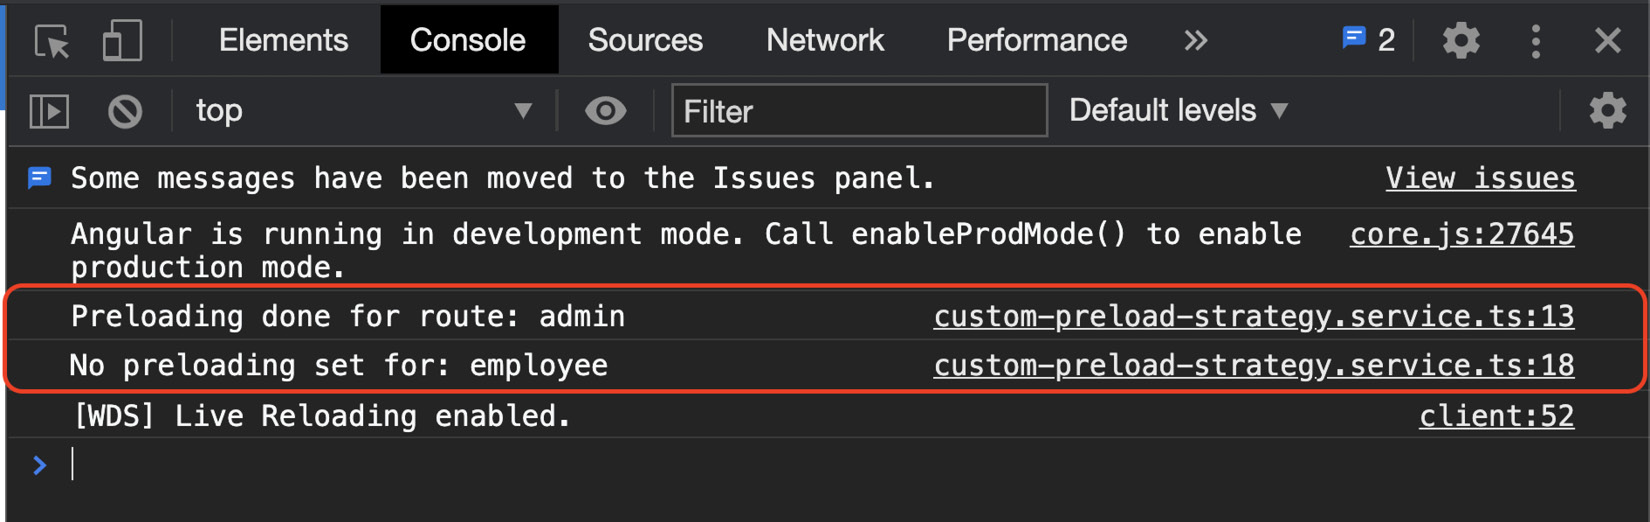
Figure 7.14 – Logs for preloading only the Auth and Admin modules
Now that you've finished the recipe, see the next section on how this works.
How it works…
Angular provides a great way to implement our own custom preloading strategy for our feature modules. We can decide easily which modules should be preloaded and which should not. In the recipe, we learned a very simple way to configure the preloading using the data object of the routes configuration by adding a property named shouldPreload. We created our own custom preload strategy service named CustomPreloadStrategyService, which implements the PreloadingStrategy interface from the @angular/router package. The idea is to use the preload method from the PreloadingStrategy interface, which allows us to decide whether a route should be preloaded. That's because Angular goes through each route using our custom preload strategy and decides which routes to preload. And that's it. We can now assign the shouldPreload property in the data object to any route we want to preload on app start.
See also
- Route preloading strategies article on web.dev (https://web.dev/route-preloading-in-angular/)