
An important part of developing software is writing tests for our code. In this chapter, we will learn how we can run our test code as part of the build process. Gradle supports both JUnit and TestNG testing frameworks. We can even run tests in parallel to shorten the time of the build, resulting in quick builds.
We will also learn how to run a Java application as part of a Gradle build. We can use the application plugin to automatically execute a Java application as part of the build.
After we have written and tested our code, it is time to publish the code so others can use it. We will build a package and deploy our code to a company repository or any other repository.
Gradle has built-in support for running tests for our Java projects. When we add the Java plugin to our project, we get new tasks to compile and run tests. We also get the dependency configurations testCompile and testRuntime. We use these dependencies to set the classpath for running the tests in our code base.
Let's write a simple JUnit test for a sample Java class. The implementation of gradle.sample.Sample has the method
getWelcomeMessage(), where we read a text from a property file and then return the value. The following example contains the code for the Sample class:
// File: src/main/java/gradle/sample/Sample.java
package gradle.sample;

import java.util.ResourceBundle;

/**
 * Read welcome message from external properties file
 * <code>messages.properties</code>.
 */
public class Sample {

    public Sample() {
    }

    /**
     * Get <code>messages.properties</code> file and read
     * value for <em>welcome</em> key.
     *
     * @return Value for <em>welcome</em> key from <code>messages.properties</code>
     */
    public String getWelcomeMessage() {
        final ResourceBundle resourceBundle = ResourceBundle.getBundle("gradle.sample.messages");
        final String message = resourceBundle.getString("welcome");
        return message;
    }
}
Next, we must add the resource property file that is used by the Sample class. We create the file messages.properties in the src/main/resources/gradle/sample directory, with the following contents:
# File: src/main/resources/gradle/sample/messages.properties
welcome = Welcome to Gradle!
Our test is very simple. We create a Sample object and invoke the getWelcomeMessage() method. We compare the returned value with a value we expect to be returned. The following sample contains the test to check the value of the
getWelcomeMessage() method with the expected String value Welcome to Gradle. We need to create the file SampleTest.java in the directory src/test/java/gradle/sample:
// File: src/test/java/gradle/sample/
package gradle.sample;

import org.junit.Assert;
import org.junit.Test;

public class SampleTest {

    @Test
    public void readWelcomeMessage() {
        final Sample sample = new Sample();
        final String realMessage = sample.getWelcomeMessage();

        final String expectedMessage = "Welcome to Gradle.";

        Assert.assertEquals("Get text from properties file", expectedMessage, realMessage);
    }
}
The Gradle build script for these files is very simple. We first apply the Java plugin, and because we are keeping to Gradle's configuration conventions, we don't have to configure or define much else. Our test is written as a JUnit test. JUnit is one of the most used test frameworks for Java projects. To make sure the required JUnit classes are available to compile and run the test class, we must add JUnit as a dependency to our project. The Java plugin adds testCompile and testRuntime configurations we can use. We add the JUnit dependency to the testCompile configuration. All JUnit classes are now available to compile the test classes.
The following sample build file contains all the necessary code to execute the test:
apply plugin: 'java'

repositories {
    mavenCentral()
}

dependencies {
    // Add at least version 4.8 of JUnit as dependency.
    testCompile 'junit:junit:[4.8,)'
}
To run our test, we only have to invoke the test task that is added by the Java plugin, from the command line:
$ gradle test
:compileJava
:processResources
:classes
:compileTestJava
:processTestResources UP-TO-DATE
:testClasses
:test

gradle.sample.SampleTest > readWelcomeMessage FAILED
    org.junit.ComparisonFailure at SampleTest.java:15

1 test completed, 1 failed

FAILURE: Build failed with an exception.

* What went wrong:
Execution failed for task ':test'.
> There were failing tests. See the report at file:///Users/mrhaki/Projects/gradle-book/samples/chapter6/sample/build/reports/tests.

* Try:
Run with --stacktrace option to get the stack trace. Run with --info or --debug option to get more log output.

BUILD FAILED

Total time: 1.629 secs
If we look at the output, we see that the test has failed, but we don't see why. One way to find out is to re-run the test task with extra logging. We can enable the info logging level with --info (or –i) arguments, as shown in the following command:
$ gradle test --info
...
Gradle Worker 1 executing tests.
Test readWelcomeMessage(gradle.sample.SampleTest) FAILED: org.junit.ComparisonFailure: Get text from properties file expected:<Welcome to Gradle[.]> but was:<Welcome to Gradle[!]>
Test gradle.sample.SampleTest FAILED
Gradle Worker 1 finished executing tests.
1 test completed, 1 failure
...
Now we can see why our test failed. In our test, we expected a dot (.) at the end of the String instead of the exclamation mark (!) we got from the property file. To fix our test, we must change the contents of the property file and replace the exclamation mark with a dot. Before we do that, we will use a different way to see the test results. Until now, we looked at the output on the command line after running the test task. In the directory build/reports/test, there is an HTML file report available with the results of our test run.
If we open the file build/reports/test/index.html in a web browser, we get a clear overview of the tests that have run and failed:
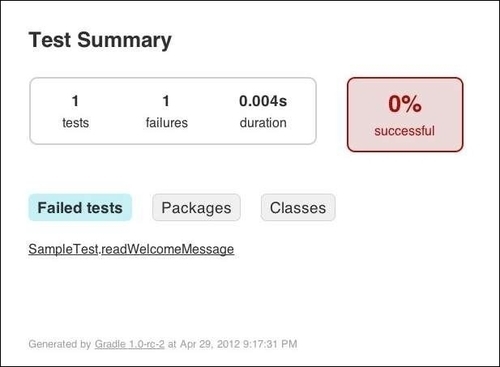
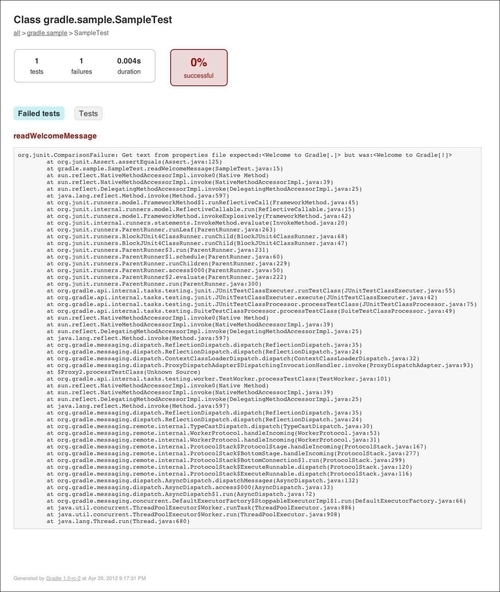
We can click on the method name of a failed test to see the details. Here we see again the message stating that the expected String value had a dot instead of an exclamation mark at the end of the line:
Let's change the contents of the messages.properties file and use a dot instead of an exclamation mark at the end of the line:
# File: src/main/resources/gradle/sample/messages.properties
welcome = Welcome to Gradle.
Now we run the test task again, from the command line:
$ gradle test
:compileJava UP-TO-DATE
:processResources
:classes
:compileTestJava
:processTestResources UP-TO-DATE
:testClasses
:test

BUILD SUCCESSFUL

Total time: 1.714 secs
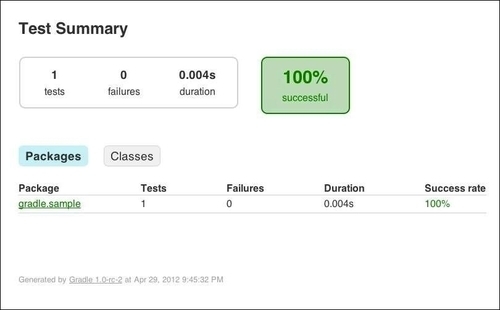
The Gradle build did not fail this time and is successful. Our test has run, and we get the expected result from the
getWelcomeMessage() method.
The following screenshot shows that the tests are 100 percent successful and are also documented in the generated test HTML reports:
We have written a test with the JUnit test framework. Gradle also supports tests that are written with the TestNG test framework. Gradle scans the test classpath for all class files and checks if they have specific JUnit or TestNG annotations. If a test class or super class extends TestCase or GroovyTestCase or is annotated with the @RunWith annotation, the test class is also determined to be a JUnit test.
For Gradle to use either JUnit or TestNG tests when we run the test task, we invoke the useJUnit() or useTestNG() methods, respectively, to force Gradle to use the correct testing framework. Gradle uses JUnit as testing framework by default, so we don't have to use the
useJUnit() method when we use JUnit or JUnit-compatible test frameworks to test our code.
Let's write a new test, but this time we will use TestNG annotations and classes. The following sample class is the same test as we saw before, but written with the TestNG framework:
// File: src/test/java/gradle/sample/SampleTestNG.java
package gradle.sample;

import org.testng.annotations.Test;
import org.testng.AssertJUnit;

public class SampleTestNG {

    @Test
    public void readWelcomeMessage() {
        final Sample sample = new Sample();
        final String realMessage = sample.getWelcomeMessage();

        final String expectedMessage = "Welcome to Gradle.";

        AssertJUnit.assertEquals("Get text from properties file", expectedMessage, realMessage);
    }

}
We need to add the TestNG dependency to the testCompile dependency configuration. Furthermore, we invoke the
useTestNG() method on our test task, so Gradle will pick up our new test. We create a new build file and add the following:
apply plugin: 'java'

repositories {
    mavenCentral()
}

dependencies {
    testCompile 'junit:junit:[4.8,)'
    testCompile 'org.testng:testng:6.5.1'
}

test.useTestNG()
Now we can run the test task again, but this time Gradle will use our TestNG test:
$ gradle test
:compileJava UP-TO-DATE
:processResources UP-TO-DATE
:classes UP-TO-DATE
:compileTestJava UP-TO-DATE
:processTestResources UP-TO-DATE
:testClasses
:test

BUILD SUCCESSFUL

Total time: 0.988 secs
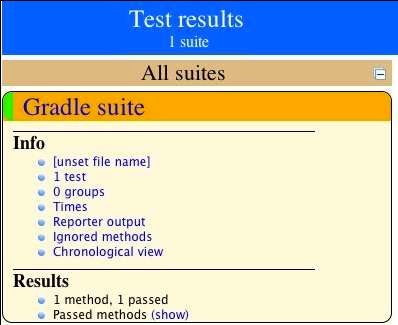
The generated HTML test report is in the directory build/reports/tests. We can open the file index.html in our web browser and see the output that is generated by the TestNG framework. The following screenshot shows an example of the output that we can view:
Gradle cannot use the test task to run both the JUnit and TestNG tests at the same time. If we have both types of tests in our project and we want to run them, we must add a new task of type Test. This new task can run the specific tests for one of the frameworks.
We add a new task of type Test to run the TestNG tests in our build file:
apply plugin: 'java'

repositories {
    mavenCentral()
}

dependencies {
    testCompile 'junit:junit:[4.8,)', 'org.testng:testng:6.5.1'
}

task testNG(type: Test) {
    useTestNG()
}

test.dependsOn testNG
To add configuration options for TestNG, we can pass a closure to the useTestNG() method. The closure has an argument of type org.gradle.api.tasks.testing.testng.TestNGOptions. The following table shows the options we can set:
|
Option name |
Type |
Description |
|---|---|---|
|
|
Set of groups to exclude. | |
|
|
Set of groups to include. | |
|
|
When | |
|
|
Set of qualified classes that are TestNG listeners. | |
|
|
The parallel mode to use for running tests. | |
|
|
Sets the default name of the test suite, if one is not specified in a | |
|
|
| |
|
|
| |
|
|
Sets the default name of the test, if one is not specified in a | |
|
|
List of all directories containing test sources. | |
|
|
The number of threads to use for this run. | |
|
|
Whether the default listeners and reporters should be used. |
The following sample build file uses some of these options to configure TestNG:
apply plugin: 'java'

repositories {
    mavenCentral()
}

dependencies {
    testCompile 'org.testng:testng:6.5.1'
}

test {
    useTestNG { options ->
        options.excludeGroups = ['functional'] as Set
        options.parallel = 'method'
        options.threadCount = 4
    }
}The tests that are executed by the test task run in a separate, isolated JVM process. We can use several properties to control this process. We can set system properties and JVM arguments, and we can configure the Java class that needs to be executed to run the tests.
To debug the tests, we can set the debug property of the test task. Gradle will start the test process in debug mode and will listen on port 5005 for a debug process to attach to. This way, we can run our tests and use an IDE debugger to step through the code.
By default, Gradle will fail the build if any test fails. If we want to change this setting, we must set the ignoreFailures property to true. Our build will then not fail, even if we have errors in our tests. The generated test reports will still have the errors. It is bad practice to ignore failures, but it is good to know the option is there if we need it.
The following build file configures the test task with the properties just discussed:
apply plugin: 'java'

repositories {
    mavenCentral()
}
dependencies {
    testCompile 'junit:junit:[4.8,)'
}

test {
    // Add System property to running tests.
    systemProperty 'sysProp', 'value'

    // Use the following JVM arguments for each test process.
    jvmArgs '-Xms256m', '-Xmx512m'

    // Enable debugging mode.
    debug = true

    // Ignore any test failues and don't fail the build.
    ignoreFailures = true

    // Enable assertions for test with the assert keyword.
    enableAssertions = true
}
Gradle can execute tests in parallel. This means Gradle will start multiple test processes concurrently. A test process only executes a single test at a time. By enabling parallel test execution, the total execution time of the test task can drastically decrease, if we have a lot of tests. We must use the maxParallelForks property to set how many test processes we want to run in parallel. The default value is 1, which means that the tests don't run in parallel.
Each test process sets a system property of the name org.gradle.test.worker with a unique value. We could use this value to generate unique files for a test process.
If we have a lot of tests that are executed by a single test process, we might get heap size or PermGen problems. With the property forkEvery, we can set how many tests need to run in a single test process, before a new test process is started to execute more tests. So, if Gradle sees that the number of tests exceeds the given number assigned to the forkEvery property, the test process is restarted and the following set of tests is executed.
Let's create a new build file and configure it such that we can run four test processes in parallel and relaunch the test process after 10 tests:
apply plugin: 'java'

repositories {
    mavenCentral()
}

dependencies {
    testCompile 'junit:junit:[4.8,)'
}

test {
    forkEvery = 10
    maxParallelForks = 4
}To determine which files are tests, Gradle will inspect the compiled class files. If a class or its methods have the @Test annotation, Gradle will treat it as a JUnit or TestNG test. If the class extends TestCase or GroovyTestCase or is annotated with @RunWith, Gradle will handle it as a JUnit test. Abstract classes are not inspected.
We can disable this automatic inspection with the
scanForTestClasses property of the test task. If we set the property to false, Gradle will use the implicit include rules **/*Tests.class and **/*Test.class and the exclude rule **/Abstract*.class.
We can also set our own include and exclude rules to find tests. We use the include() method of the test task to define our own rule for test classes. If we want to exclude certain class files, we can use the
exclude() method to define the exclude rules.
In the following build file, we disable the automatic class inspection for test classes and set the include and exclude rules for test classes, explicitly:
apply plugin: 'java'

repositories {
    mavenCentral()
}

dependencies {
    testCompile 'junit:junit:[4.8,)'
}

test {
    // Disable automatic inspections.
    scanForTestClasses = false

    // Include test classes.
    include '**/*Test.class', '**/*Spec.class'

    // Exclude test classes.
    exclude '**/Abstract*.class', '**/Run*.class'
}We already noticed that the output that is shown on the command line isn't much if we simply run the test task. We must set the logging level to info or debug, to get more information about the output that is generated by the tests. We can configure the test task to show more output with the testLogging property. This property is of type org.gradle.api.tasks.testing.logging.TestLoggingContainer. We can set different options for each log level. If we don't specify a log level, the lifecyle log level is implied. The property is marked as experimental, which means the features can change in future versions of Gradle.
TestLoggingContainer has the option showStandardStreams, which we can set to true or false. If we set the value of the property to true, we get the output from System.out and System.err when we run the test tasks.
We can also use the
events() method to set which events are logged on the command-line output. For example, we can configure that we also want to see the passed tests with the String value passed as an argument. We can use the arguments standardOut and standardError to get the same effect as with the showStandardStreams property. Other valid arguments are failed, started, and skipped.
If a test fails, we only see the line number of the test that failed. To get more output for a failed test, we can set the option exceptionFormat to full. Then, we get the exception message with, say, the assertion failed message. The default value is short, which only shows the line number. With the property stackTraceFilters, we can determine how much of the stack trace is logged.
We can also set the maximum and minimum granularity of the log messages with the minGranularity and maxGranularity properties. We use the value 0 for the Gradle-generated test suite, 1 for the generated test suite per test JVM, 2 for a test class, and 3 for a test method.
The following sample build file sets some of the options that are available:
apply plugin: 'java'

repositories {
    mavenCentral()
}

dependencies {
    testCompile 'junit:junit:[4.8,)'
}

test {
    // Set exception format to full
    // instead of default value 'short'.
    testLogging.exceptionFormat 'full'

    // We can also a script block to configure
    // the testLogging property.
    testLogging {
        // No log level specified so the
        // property is set on LIFECYCLE log level.
        // We can pass arguments to determine
        // which test events we want to see in the
        // command-line output.
        events 'passed'

        // Show logging events for test methods.
        minGranularity = 3

        // All valid values for the stackTrace output.
        stackTraceFilters 'groovy', 'entry_point', 'truncate'

        // Show System.out and System.err output
        // from the tests.
        showStandardStreams = true

        // Configure options for DEBUG log level.
        debug {
            events 'started'
        }
    }

}We have already seen the HTML reports that are generated when we run the tests, in the build/reports/tests directory. To change the directory name, we can set the testReportDir property as part of the test task.
Besides the generated HTML report, we have XML files that are generated by the test task, with the results of the tests. These XML files are actually the input for the generated HTML report. There are a lot of tools available that can use the XML files generated by JUnit or TestNG and perform an analysis on them. We can find the files in the build/test-results directory. To change this directory, we must change the testResultDir property of the test task.
To disable the generation of the test reports, we set the property testReport to false.
The following build file shows how we can change the report directories and disable the generation of the test reports: