
We can generate the Eclipse project files using the Eclipse plugin. We can also import a Gradle build file in Eclipse and then execute the Gradle tasks from within Eclipse. In this section, we see how to install the Gradle plugin in Eclipse and also how we can use it to import a Gradle build file and execute tasks.
The Gradle plugin is part of SpringSource Tool Suite (STS). SpringSource Tool Suite is based on Eclipse and adds support for building Spring-based applications through already-installed plugins. We can install SprintSource Tool Suite as a standalone IDE. If we want to re-use our existing Eclipse IDE, we can install STS as a plugin. The plugin has an import wizard to import existing Gradle builds. Multi-project builds are also supported by it.
The plugin keeps track of dependencies defined in the Gradle build file as project dependencies. This means that if we change a dependency in the build file, the Eclipse classpath will be updated with the change, so that the compiler can use it.
To execute tasks, the plugin adds an additional view to Eclipse. From the view we can execute tasks. The Eclipse launching framework is used to execute tasks.
If we have installed the Groovy Eclipse plugin, we get Gradle DSL support. This means we get code completion and Javadoc tooltips in the editor when we edit Gradle build files.
To install the Gradle plugin, we use the update site, http://dist.springsource.com/release/TOOLS/gradle. From the Help menu, we select Install New Software...., we then see a new dialog window. Click on the Add... button to add a new update site. In the dialog window that appears, we fill in the correct values shown in the following screenshot:

Eclipse will fetch the information from the update site. In the Install dialog window, all components are shown. We click on the Select All button and continue, as shown in the following screenshot:
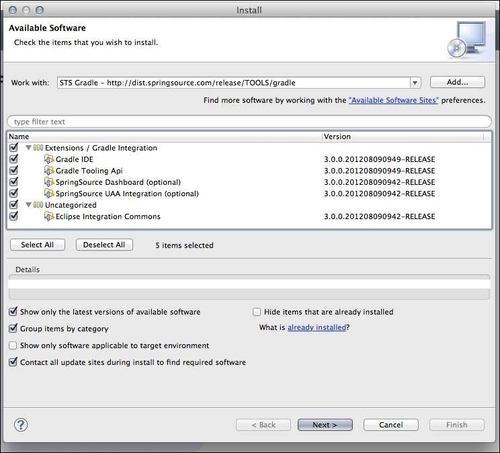
We have to accept the licenses, and Eclipse downloads the plugin components. Restart Eclipse after all the plugin components have been downloaded.
If we want DSL support for the Gradle build files, we must also install the Groovy Eclipse plugin. We go to SpringSource Dashboard and select the Extension tab. In the Find: field, we type in groovy-eclipse and select the Groovy-Eclipse option from the search results, as shown in the following screenshot:

We click on the Install button to install the plugin into Eclipse.
After we have installed the plugin, we can use the import wizard to import a Gradle project. We use a very simple Java project with the following build file:
apply plugin: 'java'
version = '1.0'
group = 'sample.gradle'
description = 'Sample Java project'
repositories {
mavenCentral()
}
dependencies {
testCompile 'junit:junit:4.8'
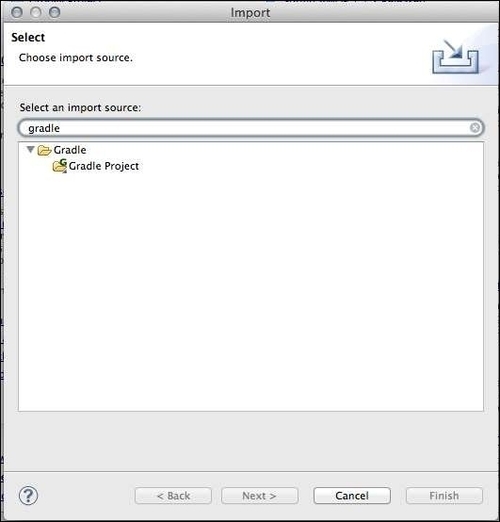
}In Eclipse, we select the Import... option from the File menu. In the Import dialog window, we type gradle in the search field. We select the Gradle Project option before we click on the Next button, as shown in the following screenshot:
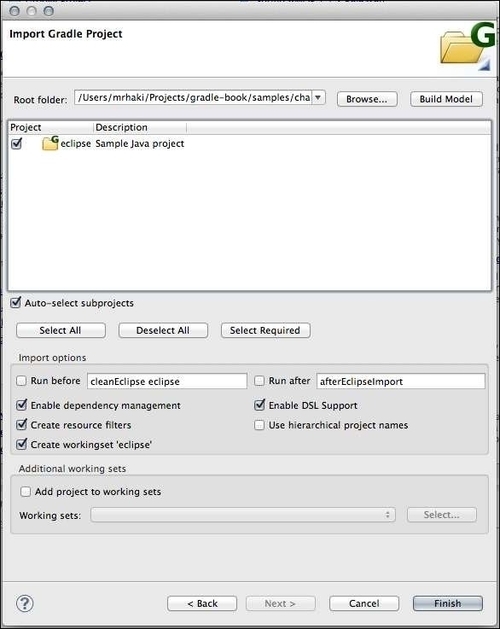
In the next step of the import wizard, we must specify the root folder for our Gradle project. For a multi-project build, we should select the root folder. If we only have a single project, we can then select the project folder. After we have selected the folder, we must click on the Build Model button. The folder is then scanned for information, and after the model is built, we can see our project displayed as shown in the following screenshot:

We can select the project and click on the Finish button to import the project into our Eclipse workspace.
But before we do that, first take a closer look at the Import options. The option Run before allows us to define Gradle tasks to be executed before the import. The default value cleanEclipse eclipse will regenerate the Eclipse project files from the Eclipse plugin in our Gradle build file. We don't need it for Java projects, because the Gradle plugin in Eclipse will make sure everything works. For web or enterprise applications with WTP support, we can still invoke the eclipse tasks.
The Run after option has the default afterEclipseImport task. This task name is a hook for the import process. We must implement the task ourselves in the build file, if we want to do some customization after the import wizard is finished.
With the Enable dependency management option, we instruct Eclipse to build the dependencies based on the Gradle build file contents. The Enable DSL Support is useful if we have also installed the Groovy-Eclipse plugin.
The Create resource filters option can be used for multi-project builds. The Gradle plugin will create linked projects to be able to import multiple projects, but this means a project can occur multiple times in the project view. If we enable this option, a resource filter is created, so that we see the project displayed only once in the project view.
Also, with multi-project build, the option Use hierarchical project names can be used. If we enable this option, the name of the root project is also used in the project name. Finally, if we enable the option Create workingset 'eclipse', a new working set is created with all the projects that we import.
We don't want to execute any Gradle tasks before and after the import, so we must uncheck those options. After unchecking the Run before and Run after options, we are now ready to click on the Finish button, as shown in the following screenshot:
After the import wizard is done, we can see our project in the Package Explorer, as shown in the next screenshot:
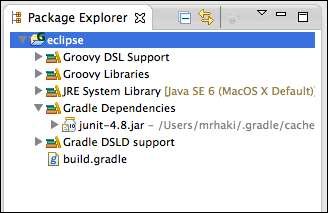
The Gradle Dependencies node has the dependency that we have defined in our Gradle build file. If we add new dependencies, we can update the project by right-clicking on the project name. From the submenu, we select Gradle and Refresh Dependencies.
To execute tasks, we first open the Gradle Tasks view. From the Window menu, we select Show View and then Other.... We type gradle in the search field, to search for the Gradle Tasks view, as shown in following screenshot:
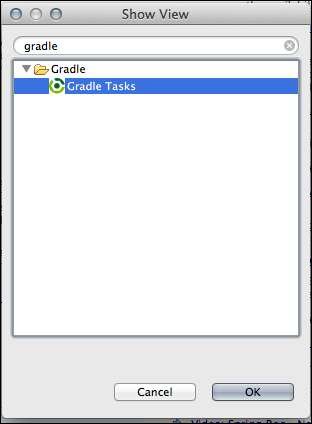
We select the view and click on the OK button.
In our workspace, we now have the Gradle Tasks view. We select a project from the Project selection list. The tasks for that project are then displayed as shown in the following screenshot:
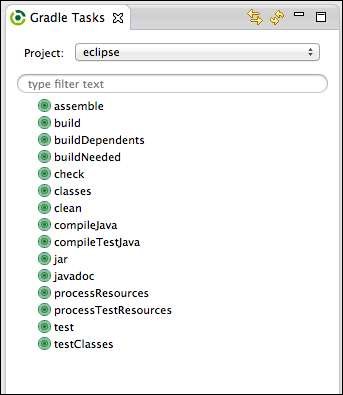
To execute a task, we simply have to double-click on the task name, and in the Console view, we can see the output of the executed task.
We can also use the launch framework of Eclipse to run tasks. We must right-click on the project and select the Gradle Build or Gradle Build...option from the Run As option. The launch configuration is opened, and here we can configure the tasks to be executed, as shown in following screenshot:
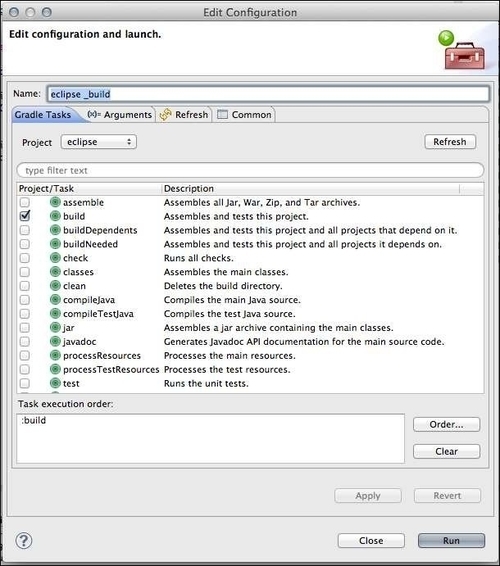
If we have multiple tasks to execute, we can set the order in the Task execution order section.
