
WCF is easy and simple. A large number of APIs are built inside .NET, which provides an easy way to implement a WCF service. Visual Studio provides the appropriate tools to create proxy classes automatically when a service reference is taken into a project such that the user only needs to configure the service with a proper endpoint address and the service will start working. In this recipe, we are going to look at the internal details and the API that you need to consider to create and connect services. We are not going to use the tools of Visual Studio to build this service. We will later explain how to make use of Visual Studio to quickly create services in other recipes.
Building a service with Visual Studio is very easy and automatic but if we consider not using it, we will have to manually perform a lot of plumbing to ensure that everything works correctly. We will use a class library to define our WCF service and host the service in the server; we will then consume the same from the client in this recipe later such that after going through the recipe, you will have a clear idea of what happens underneath.
Now let's create an application using Visual Studio to demonstrate components:
- Open Visual Studio and create a console application. We will name it
SampleFirstServiceServer. This console project will be used to host a WCF Service. - Add a reference
System.ServiceModel.dllfile to the project. This.dllextension references all the important APIs that need to work with WCF. - Create an interface to define a method contract. We will define the most simple contract that takes a string and returns a string, and name it
MyFirstMethod:[ServiceContract] public interface IFirstWCF { [OperationContract] string MyFirstMethod(string inputText); } - Here, you can see that the contract has been annotated using the
ServiceContractattribute. WCF internally uses attributes to find the contract of a service when it is called upon. TheServiceContractattribute defines the main type of contract that the service understands. - The
MyFirstMethodcontract has been annotated usingOperationContract, which defines the contract to a particular operation. Hence, the interface forms a major contract between the client and the server. - Now, let's implement the interface into a concrete type as follows:
public class FirstSimpleWCF : IFirstWCF
{
    public string MyFirstMethod(string inputText)
    {
        Console.WriteLine("Message Received : {0}", inputText);
        Console.WriteLine(OperationContext.Current.RequestContext .RequestMessage.ToString());
        return string.Format("Message from server {0}",  inputText);
    }
}
In the preceding code, we defined the body of
MyFirstMethod. The method actually prints the message received by it and returns the same text with some extra content from the server. - Here,
RequestMessagewill print the entire body of the XML content received by the server, which is parsed to call this method. - Now as our service is ready, we need to host it in our Console Application. WCF services generally need to be hosted somewhere. You have options to host a WCF service in a Console Application, a Windows Service, IIS, Windows Activation Service, and so on.
- To host a service inside a Console Application, we are going to use the
ServiceHostclass present in theServiceModelnamespace. This class takes a URL and hosts the service on it such that any request received at the endpoint will be handled automatically by the server.public static void Main() { BasicHttpBinding binding = new BasicHttpBinding(); Uri serviceUri = new Uri("http://localhost:8000"); ServiceHost host = new ServiceHost(typeof(FirstSimpleWCF), serviceUri); host.AddServiceEndpoint(typeof(IFirstWCF), binding, "OperationService"); host.Open(); Console.WriteLine("Service is hosted to the Server"); Console.ReadLine(); host.Close(); } - As already mentioned, we have to maintain the ABCs of any WCF service. Here, the address is specified using
serviceUrisuch that we will host our service at port8000. - We also need to specify the binding for the service. Here, we use
BasicHttpBinding(which is the same as traditional ASMX services). We add this endpoint toServiceHost, which points to the actual implementation of the service. TheAddServiceEndpointoption connects a binding with the service endpoint. We call our service endpointOperationService. - Finally, we will call
Opento start hosting the service. - If you start the service, you will see the message Service is hosted on the server, and that port
8000is available for the service.Note
Remember that if you are using Visual Studio to run the service, it will require administrative permission to open a port from the console. Please restart Visual Studio using the Run as administrator link on the right-hand side of the screen, and then click on the context menu to run the console service host.
- As the service is already hosted on the server, we now need a way to call the service from the client machines. Let's create another Console Application and call it
SampleFirstWCFClient. - We will create a similar interface such as
IFirstWCFin the Client Application too. The name ofServiceContractandOperationContractshould be the same, as shown in the following code:[ServiceContract] public interface IFirstWCF { [OperationContract] string MyFirstMethod(string inputText); }Here, both the contracts are matched using a common contract document. By the way, the mapping of the interface is only needed to correctly map the data during serialization/deserialization of the objects.
Note
It is also worth mentioning that the serialization is not restricted to exactly match the property names in the classes. You can simply use the
DataContractandDataMemberattributes to assign the exact element names of data with your programmable objects. For example, sayOperationContractlooks like this:string MyFirstMethod(Message Input); [DataContract(Name="ServerMessage", Namespace="http://schemas.com")] public class Message { [DataMember(Name="Message")] public string Text { get; set; } }In the preceding code, the
ServerMessageelement will be mapped toMessage, andMessageis mapped toTexton the client side. TheDataContractandDataMemberattributes are used during serialization/deserialization of a WCF communication. - We will then use this contract to pass data to the server and client. To connect to the service, we are going to use the
ChannelFactoryclass as shown in the following code:static void Main(string[] args) { Console.WriteLine("Press Enter to call Server"); string enteredString = Console.ReadLine(); BasicHttpBinding binding = new BasicHttpBinding(); ChannelFactory<IFirstWCF> factory = new ChannelFactory<IFirstWCF>(binding, new EndpointAddress("http://localhost:8000/OperationService")); IFirstWCF proxy = factory.CreateChannel(); string methodFromServer = proxy.MyFirstMethod(enteredString); Console.WriteLine(methodFromServer); Console.ReadLine(); } - Here, the
ChannelFactoryclass binds the client with the server using a service endpoint and a contract used to connect the service. TheCreateChannelmethod automatically creates a proxy class that can be used to proxy data to the server. - If you run the client and post a message to the server, the server will return the same message to the client.
The preceding example covers the basics of calling methods on a service via WCF, showing both the client and server code. According to the basic configuration, the service contains three main components: the address that states where the service is hosted, the binding that states how the messages need to be sent and received, and the contract that states what needs to be transferred.
In the entire process of hosting from the server side to client side, there are two main classes that I have used to initiate the whole service:
ServiceHost(inside the server)ChannelFactory(inside the client)
A ServiceHost class is instantiated based on the type of service that you have implemented to host your service. This class maps the actual service contract with the binding and address. When the object of ServiceHost is available, you can do anything with the ABCs of the service. In the previous recipe, we used the ServiceHost class to configure our service to handle BasicHttpBinding, which means the transfer format will be XML- and SOAP-based. When a client calls the service, the ServiceHost class parses the messages, creates the context, and calls the service. It is important to note that on every call to the service, the ServiceHost class creates an object of FirstSimpleWCF and removes it from memory whenever the service completes execution. If you want your service object to be reused, you can add a ServiceBehavior option for this. For instance:
[ServiceBehavior(InstanceContextMode=InstanceContextMode.Single)]
public class FirstSimpleWCF : IFirstWCF
{
}
This ServiceBehavior option indicates that the instance of the service needs to be created only once and the object stays in the memory of ServiceHost until the whole service gets disposed. If there is a single service object, it is important to note that for every call to the service, ServiceHost creates a new execution context to handle the request. The execution context may use SynchronizationContext or IO threads or simply threads to support scalability. The object locking and synchronization on WCF is handled automatically.
The ServiceHost class is also capable of handling the metadata of the service from the configuration file. If you have specified a configuration section under <system.serviceModel> inside app.config, the ServiceHost class will automatically load the configuration and configure itself.
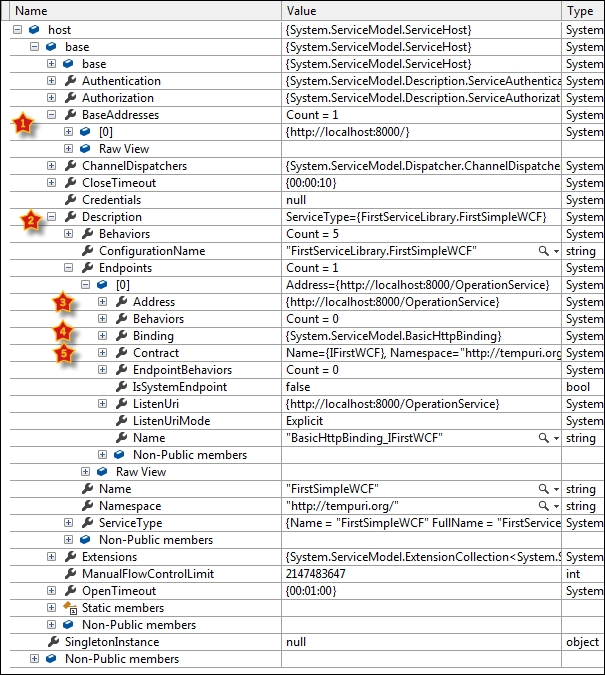
If you look at the whole ServiceHost object in the watch window, you will see that the object exposes a number of properties. It creates an object of ServiceDescription, which maintains the ABCs and different configuration elements of the service. The ServiceHost class also maintains a runtime socket listener that listens to the port created for the service as specified by BaseAddress for any incoming requests. When it receives any requests, it parses the whole message and calls the service object. If you specify the service object to be singleton, it places the initial object in the SingletonInstance property and reuses it every time the service is called. A special XML parser is also built in the ServiceHost class to parse incoming requests and deserialize it into objects.
Just like ServiceHost, for the client side we have instantiated an object of ChannelFactory. Even though the ServiceHost and ChannelFactory classes look almost similar, there is a basic difference between the two. The ChannelFactory class only maps with the contract but not with the actual implementation of the service. It then creates a proxy class that is used to call the service through Listener. The data we pass through the public interface is automatically serialized and sent through the channel. Just like ServiceHost, a ChannelFactory class reads the contracts defined inside the configuration and configures itself.
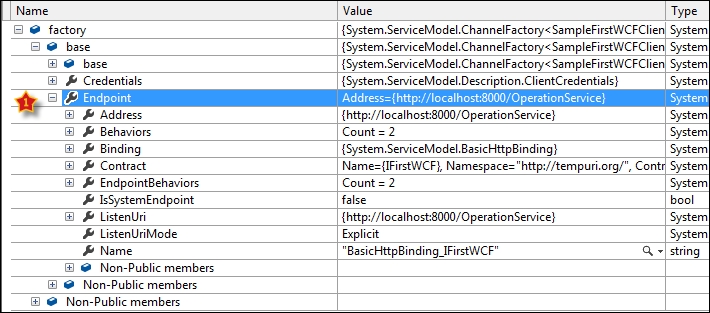
The ChannelFactory class only exposes the endpoint of the service with ABCs configured, and the credentials, if any, that are required to call the service.
One important thing to remember is that the proxy class, which is used to communicate between the client and the server, is based on the contract specified between the server and the client. The server side can contain more than one contract, but WCF does not force you to implement all of them when using the client.
To understand this, let's create another method inside the server interface with its implementation as shown in the following code:
[ServiceContract]
public interface IFirstWCF
{
    [OperationContract]
    string MyFirstMethod(string inputText);
    [OperationContract]
    string MySecondMethod(string inputText);
}
On the server side, we have a service method called MySecondMethod that we get without changing the ServiceContract service on the client side. Now, if you run the same application again, you will see that even though the client side IFirstWCF does not contain a definition of MySecondMethod, it can still call the existing interface MyFirstMethod from it. This is because the ChannelFactory class automatically serializes the request made from it to an XML request object and sends the request through the socket. It does not send the actual object to the server.
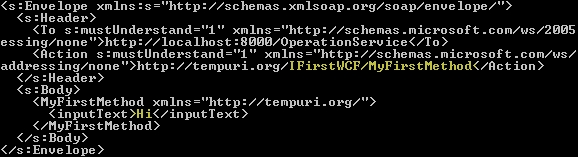
In the case of
BasicHttpBinding, SOAP messages are transferred. The SOAP message contains a well-defined envelope with a header and body of the message inside it. On the server side, as we have printed out RequestMessage, we can see the actual structure of the envelope, which the channelFactory proxy object creates and sends through the channel. The following screenshot shows how the actual envelope is laid out when Hi is sent to the server using the proxy object. The proxy object creates a well-defined contract and sends it to the specified address. The Action option specifies the actual contract name (IFirstWCF/MyFirstMethod).
Now that we know the basics of WCF, let's evaluate a few more things that are worth remembering.
If you like your service endpoint to be discoverable to the external world, the MetadataExchange endpoint is useful. WCF uses the IMetadataExchange interface to return metadata about the service. The metadata can be a Web Services Definition Language (WSDL) document that describes all the methods and data types associated with the service.
A service with proper metadata can be discoverable and there are a number of tools that can automatically create contracts and types associated with the service using the metadata endpoint.
Let's now add a mex endpoint for the service such that the service can be discoverable from the outside:
BasicHttpBinding binding = new BasicHttpBinding();

Uri serviceUri = new Uri("http://localhost:8000");
ServiceHost host = new ServiceHost(typeof(FirstSimpleWCF), serviceUri);
host.AddServiceEndpoint(typeof(IFirstWCF), binding, "OperationService");

ServiceMetadataBehavior smb = new ServiceMetadataBehavior();
smb.HttpGetEnabled = true;
host.Description.Behaviors.Add(smb);
Binding mexBinding = MetadataExchangeBindings.CreateMexHttpBinding();
host.AddServiceEndpoint(typeof(IMetadataExchange), mexBinding, "mex");
host.Open();

Console.WriteLine("Service is hosted to the Server");
Console.ReadLine();

host.Close();
Here, MetadataExchangeBindings.CreateMexHttpBinding is an API to get a binding contract for the IMetadataExchange interface. When ServiceEndpoint is added to IMetadataExchange, the service provides a WSDL, which the tools can use to discover types.
After you run this code and open the server-side console, you can open a web browser and type http://localhost:8000/?wsdl to get the WSDL for the application. The HttpGetEnabled method needs to be enabled to ensure that the browser can request the WSDL using the GET request.
By the way, you need not define the endpoint configuration in code; the configuration can also be done using the configuration file (app.config/web.config). Let's see how the previous configuration can be defined in configuration files so that it can be modified easily without recompiling the project:
 <system.serviceModel>
    <services>
      <service
          name="Microsoft.ServiceModel.Samples.CalculatorService">
        <host>
          <baseAddresses>
            <add baseAddress="http://localhost:8000/"/>
          </baseAddresses>
        </host>
        <endpoint address=""
                  binding="basicHttpBinding"
                  contract="IFirstWCF" />
        <endpoint address="mex"
                  binding="mexHttpBinding"
                  contract="IMetadataExchange" />
      </service>
    </services>
    <behaviors>
      <serviceBehaviors>
        <behavior>
          <serviceMetadata httpGetEnabled="True"/>
        </behavior>
      </serviceBehaviors>
    </behaviors>
  </system.serviceModel>
The previous XML can be placed in the configuration file and can be used later when defining ServiceHost in code.
In the simplest WCF service that we have created in this recipe, we didn't use many of the complex data types. But in real-world scenarios, people generally need complex data types to be transferred between the client and the server. The WCF proxy classes automatically serialize the complex types into XML and post them to the server. Similarly, when received, it desterilizes the content into the appropriate type.
To define a complex data type, we need to use the DataContractAttribute class to annotate the type, and each member that needs to be serialized during the transfer should be annotated using DataMemberAttribute:
    [ServiceContract]
    public interface IFirstWCF
    {
        [OperationContract]
        string MyFirstMethod(string inputText);
        [OperationContract]
        Data MySecondMethod(Data inputText);
    }
    [DataContract]
    public class Data
    {
        [DataMember]
        public string Message { get; set; }
    }
In the preceding IFirstWCF service, we used a complex data type called Data, passed it into MySecondMethod, and got back the same from the server. We then implemented MySecondMethod in the class and hosted the service. Once the service is hosted, you can check the WSDL for it. You can see that DataContract is now defined with ComplexType. You can get the type of the object from http://localhost/?xsd=xsd2 if you have followed this procedure.
The XSD defines the schema of the message body that needs to be sent to the server to call MySecondMethod.
Now, if you run the client without changing the string request and response for the MySecondMethod interface, it will throw an error as the formatter cannot deserialize the string request to complex data (Data), which the server is expecting.

Now, we need to define the complex data type that reads the XSD, which is exposed through the WCF metadata. We need to make sure ComplexType is named Data and has a member called Message in it. The complex types can also be mapped to different element schemas using the properties in the DataContract and DataMember attributes.
Once we define the handwritten data type properly, you will see that the service runs smoothly.
It would be cumbersome if the client needed to write all the complex types and proxy classes by hand. Think about a real-world business service. It could have hundreds of interfaces and thousands of complex types associated with it. Writing each of them manually would require a lot of effort from the client just to start using the service. Microsoft has built a tool called svcutil, which is shipped with Visual Studio. This tool creates a proxy by reading the metadata about the service that is passed into it. The tool uses a configuration file to get the configuration about the service. Let's define a configuration for the client as shown in the following code:
  <system.serviceModel>
        <bindings>
            <basicHttpBinding>
                <binding name="BasicHttpBinding_IFirstWCF" />
            </basicHttpBinding>
        </bindings>
        <client>
            <endpoint address="http://localhost:8000/OperationService" binding="basicHttpBinding"
                bindingConfiguration="BasicHttpBinding_IFirstWCF" contract="IFirstWCF"
                name="BasicHttpBinding_IFirstWCF" />
        </client>
    </system.serviceModel>
The client configuration defines the address, binding, and contract of the service. Let's try creating a file for the service that we have created. Open the Visual Studio 2012 developer console and run the following code:
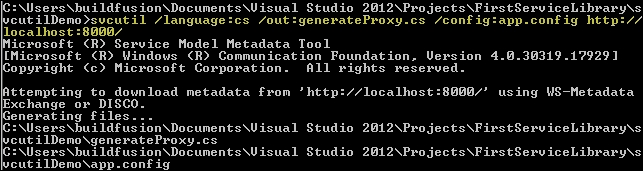
svcutil /language:cs /out:generateProxy.cs /config:app.config http://localhost:8000
If everything is fine and the app.config file is placed in the current directory, the generateProxy.cs file will be created from the service, which acts as a service proxy client. The following console shows the messages when the utility successfully creates the generateProxy.cs file. Similarly, you can also use the svcutil tool to generate classes for VB.NET.
- Refer to the walkthrough on creating and consuming WCF services at http://bit.ly/createwcf
- Refer to the WCF tutorial at http://bit.ly/wcftutorial