Visual Studio supports a number of extension techniques that help in customizing an application or application parts. It is an integrated IDE that provides various ways of tooling, which may often be required by the application developer while creating and/or debugging an application. Many of the features that exist in Visual Studio are merely related to working with Visual Studio or its debugging capabilities. With the versatility of Visual Studio, people use it to develop tools that require two to three lines of .NET code for an application that could spread over one hundred thousand lines of code or even more. People write so much code inside the IDE that many of the IDE features are solely related to writing code in Visual Studio. However, when working with big projects, there are some parts of code that could be automatically generated with a fixed set of data. We often need to rely on external tools that can generate files with source code or write our own. These extensions help in writing iterative code, generating a class from XML/JSON or other data formats, or even writing database-driven classes. Code generation is an important part of day-to-day coding as a large portion of the application may be autogenerated. To customize the code generation process of generating code inside Visual Studio, you have the following two options:
- Write your own customized tool using
ResXFileCodeGeneratorand install it in Visual Studio - Use T4 templates
We are going to cover T4 templates in this section and create some classes on the fly. Let's take a look at the benefits of T4 templates:
- T4 templates are raw text files (with a
.ttextension) that can be directly included inside Visual Studio Solutions TextTemplatingFileGeneratorparses the file automatically- They can work on several project files at a time
- Changes in T4 templates automatically recreates/updates the generated code
- Visual Studio automatically lists the generated file inside the T4 template file
- They can be written in any .NET language (VB.NET or C#)
In this recipe, we are going to create a T4 template inside the Visual Studio IDE and generate some runtime code based on a static XML file.
Although it is worth noting that T4 templates are very easy to write and pretty straightforward, the only catch is to identify the code generation blocks and logic around the generated code. We use a combination of <# and #> inside a .tt file to add logic around a generated file, and directly write the text content to get them printed in the file.
Let's add a console application, for the time being, and a FirstTemplate.tt file to the solution. Once the file is added, it will display a warning message, Running the text template can potentially harm your computer….. At any time the .tt file is saved again, this generation process is executed and the same message is displayed. You can get rid of this warning by clicking on the Don't show this message checkbox.
In this recipe, we are going to create a number of classes dynamically from the database by logging in to the SQL Server and getting the schema details such that every table is mapped with a model class.
- Remove all the content from the file and add the following content in place of the first and second lines of the code:
<#@ template debug="false" hostspecific="false" language="C#" #><#@ output extension=".cs" #>
The first line of the preceding code defines the template header. The template header defines whether the template is created as
hostspecific. Whenhostspecificturnstrue, you can query through the solution and files. Thehostspecificflag defines the language that has been used to write the logic. The output defines the output file. Theextension=".cs" value denotes whether the file that will be generated by the system has a.csextension. - As you already know that we can directly write content to the file, let's add some text using it:
// This file is autogenerated from the T4 template
// Generated on <# Write(DateTime.Now.ToString()); #>
If you save the file now, you will see the generated file that contains the comments with the date of creation.
- The
WriteandWriteLinemethods can be used inside<# -- #>to write the code in the file. Here, theWritemethod is used to write the content directly in the generated file. You can usePushIndentandPopIndentto indent your code and use theErrorandWarningmethods to indicate an error or a warning message when compiling:<# PushIndent(" "); #> //The file is created by Abhishek Sur <# PopIndent(); #> <# Warning("The application automatically includes all the T4 generated classes."); #>In the preceding code, a
PushIndentmethod is invoked, which placestabstopin the editor, such that any line created after that will be tabbed accordingly. ThePopIndentmethod helps in clearing the indent. Just to show a use case scenario, we added a warning message that will display a message in the Error window of the project. - Let's now create a database connection and class files for each table where the column names will act as properties:
CREATE DATABASE Test
GO

Create Table Country
(
   CountryId NVARCHAR(50) PRIMARY KEY,
   CountryName NVARCHAR(100),
   Capital NVARCHAR(100)
)
GO
CREATE TAble States
(
   StateId      NVARCHAR(50) PRIMARY KEY,
   CountryId    NVARCHAR(50),
   StateName    NVARCHAR(100)
)
- Here, we created a
Testdatabase with two tables, a country, and states. To createTableobjects that map with those tables, we create a connection to the database and searchsys.tablesfor tables that will be later mapped with a class, andsys.columnsis used to search the columns present on the table to map the properties. To do such thing, we write the following code:<#@ template debug="false" hostspecific="true" language="C#" #> <#@ assembly name="System.Core" #> <#@ assembly name="System.Data" #> <#@ import namespace="System.Data.SqlClient" #> <#@ output extension=".cs" #> // This file is autogenerated from the T4 template // Generated on <# WriteLine(DateTime.Now.ToString()); #> <# PushIndent(" "); #> //The file is created by Abhishek Sur <# PopIndent(); #> <# Warning("The application automatically includes all the T4 generated classes."); #> <# string connectionstring = "data source=192.168.1.201;Database=Test;User ID=sa;Password=p@ssword;Trusted_Connection=False;Encrypt=True;Connection Timeout=30;"; var strcommandText = "select name, object_id from sys.tables where type = 'U' and name not like 'sys%'"; SqlConnection scon = new SqlConnection(connectionstring); scon.Open(); SqlCommand scmd = new SqlCommand(strcommandText, scon); var reader = scmd.ExecuteReader(); while(reader.Read()) { PushIndent(" "); string name = reader.GetString(0); int objectid = reader.GetInt32(1); WriteLine("public class " + name); WriteLine("{"); PushIndent(" "); string propCmd = "select name from sys.columns where object_id = " + objectid.ToString(); SqlConnection pscon = new SqlConnection(connectionstring); pscon.Open(); SqlCommand pscmd = new SqlCommand(propCmd, pscon); var preader = pscmd.ExecuteReader(); while(preader.Read()) { string pname = preader.GetString(0); WriteLine("public string " + pname + " { get; set; }"); } preader.Dispose(); pscmd.Dispose(); PopIndent(); WriteLine("}"); PopIndent(); } #>In the preceding code, we imported the
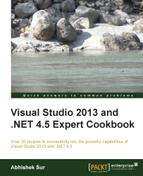
System.CoreandSystem.Dataassemblies. The assembly instructions on the header will load the assembly. The import statement imports theSystem.Data.SqlClientnamespace. The following screenshot shows how the classes Country and States are created using the preceding template: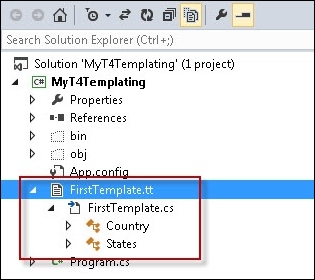
- We then open a new connection to query the
sys.tablesdatabase where the type isU, which indicates the tables in the database, and we neglect the system tables by omitting the tables that start withsys. We then openDataReaderusingExecuteReaderto recursively call thesys.tablesandsys.columnsdatabases to search for the properties and classes. When you save the.ttfile, Visual Studio will create two classes,CountryandStates, as shown in the following code:// This file is autogenerated from the T4 template // Generated on 2/10/2014 1:14:36 AM //The file is created by Abhishek Sur public class Country { public string CountryId { get; set; } public string CountryName { get; set; } public string Capital { get; set; } } public class States { public string StateId { get; set; } public string CountryId { get; set; } public string StateName { get; set; } }Now, you can use the preceding code to create the table objects directly within your project without rewriting the same schema repeatedly.
- You can now go ahead and change the class definitions according to your requirements, such as adding a constructor to the class, adding additional methods, and creating base classes.
The architecture of a T4 template is very simple. Every line of code that you write in a T4 template automatically inherits from a Template class, which has a TransformText method that allows you to convert the text into a valid output file.
Every T4 environment maintains a StringBuilder object, which acts as a writer to write lines in the output files. The <# -- #> combination is used to invoke the Write operation in the T4 template. The StringBuilder object can be referenced anywhere using this.GenerationEnvironment inside the T4 template file. The GenerationEnvironment property will allow you to get the content already written in the output file using the tool. When you save the .tt file, Visual Studio automatically calls the TransformText method, which writes the output data to the file.
In the preceding recipe, we made a connection to the database to get the schema and created the classes that could map the schema using normal ADO.NET classes.
Even though we understand the basics of T4 templates, let's consider some more complex scenarios that we generally come across while creating templates.
T4 templates generally support a single output file, so whatever you write in the templates is copied into a single output file. This makes the T4 templating system unusable as most of the time we may be required to create multiple files and add them to the solution.
As I have already explained that you can use GenerationEnvironment to get a reference to the already written text on the buffer, you can use a normal file writer object to write the files to the location:
<#@ template debug="false" hostspecific="true" language="C#" #>
<#@ import namespace="System.IO" #>
<#@ output extension=".txt" #>
<#
string templateDirectory = Path.GetDirectoryName(Host.TemplateFile);
string outputFilePath = Path.Combine(templateDirectory, "1.txt");
Write("This goes to file1");
File.WriteAllText(outputFilePath, this.GenerationEnvironment.ToString());

this.GenerationEnvironment.Clear();

outputFilePath = Path.Combine(templateDirectory, "2.txt");
Write("This goes to file2");
File.WriteAllText(outputFilePath, this.GenerationEnvironment.ToString());
#>
The preceding code uses Host.TemplateFile to get the directory location path, where the template file exists and write files directly in the same folder. The File.WriteAllText method writes all the output text to the output files 1.txt and 2.txt. Once all the file content is written, we need to remove the content by calling Clear on the StringBuilder object.
After saving the preceding code, if you look at the Solution Explorer pane, as shown in the following screenshot, you will see that two files 1.txt and 2.txt have been created, but the problem is that they are not included in the solution:
Now to include the file in the solution, we need to use multiple template files so that we can pass a parameter to a template file to write the content repeatedly. Thus, the files are generated from another template each time with a new filename.
Let's create a template file, name it FileManager.tt, and add the following code to it:
<#@ template debug="false" hostspecific="true" language="C#" #>
<#@ import namespace="System.IO" #>
<#@ output extension=".txt" #>
<#+
void CreateFile(string fileName)
{
   string templateDirectory = Path.GetDirectoryName(Host.TemplateFile);
   string outputFilePath = Path.Combine(templateDirectory, fileName);
   File.WriteAllText(outputFilePath, this.GenerationEnvironment.ToString());
   this.GenerationEnvironment.Clear();
}
#>
The preceding code looks exactly the same as before. We just created a file with the helper method. The CreateFile function takes a filename as the input, writes the GenerationEnvironment property buffer to the file, and clears the content after writing it.
Note
It is worth noting that <# -- #> is used to write content directly to the output file or <#= -- #> to write a single line, while <#+ -- #> is used to list the helper methods. These short keywords can be ignored using (backslash). Thus, if you want to write <# as the content, you can do so by using the <# or #> syntaxes.
Now to include the file in the project, we need to use the EnvDTE objects for the host project. Let's add the EnvDTE assembly and other Visual Studio Interop assemblies, as shown in the following code:
<#@ assembly name="System.Xml" #>
<#@ assembly name="EnvDTE" #>
<#@ assembly name="Microsoft.VisualStudio.OLE.Interop" #>
<#@ assembly name="Microsoft.VisualStudio.Shell" #>
<#@ assembly name="Microsoft.VisualStudio.Shell.Interop" #>
<#@ assembly name="Microsoft.VisualStudio.Shell.Interop.8.0" #>
<#@ import namespace="System.Collections.Generic" #>
<#@ import namespace="System.Diagnostics" #>
<#@ import namespace="System.IO" #>
<#@ import namespace="System.Text" #>
<#@ import namespace="System.Xml" #>
<#@ import namespace="Microsoft.VisualStudio.Shell" #>
<#@ import namespace="Microsoft.VisualStudio.Shell.Interop" #>
<#@ import namespace="Microsoft.VisualStudio.TextTempating" #>
The following assemblies and imports are added to FileManager.tt. Then, we add two lines at the end of the CreateFile method, as shown in the following code:
void CreateFile(string fileName)
{
   string templateDirectory = Path.GetDirectoryName(Host.TemplateFile);
   string outputFilePath = Path.Combine(templateDirectory, fileName);
   File.WriteAllText(outputFilePath, this.GenerationEnvironment.ToString());
   this.GenerationEnvironment.Clear();
   EnvDTE.ProjectItem templateProjectItem = __getTemplateProjectItem();
    templateProjectItem.ProjectItems.AddFromFile(outputFilePath);
}
Here, we create the ProjectItem object for the currently created file and write the following file inside the project:
IServiceProvider hostServiceProvider = (IServiceProvider)Host;
EnvDTE.DTE dte = (EnvDTE.DTE)hostServiceProvider.GetService(typeof(EnvDTE.DTE));
The hostService method is used to get the ItempContext DTE service and add the file to the project. We have used the article from http://www.codeproject.com/Articles/16515/Creating-a-Custom-Tool-to-Generate-Multiple-Files for reference.
The __getTemplateProjectItem() method is a method that creates the DTE ProjectItem object for a particular project and returns the object reference. Once the ProjectItem object is created, we can use a AddFromFile method to add the item to the project.
Now to test the file, let's add a new template and include the preceding file in the project:
<#@ template debug="false" hostspecific="true" language="C#" #>
<#@ output extension=".txt" #>
<#@ include file="FileManager.tt" #>
<#
Write("File1");
CreateFile("1.txt");
Write("File2");
CreateFile("2.txt");
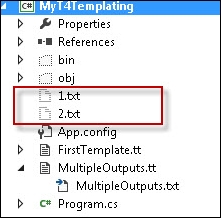
#>The preceding code creates two files and adds them to the project. This can be verified from the following screenshot:
In the preceding screenshot, you can see the files that are already added to the Solution Explorer pane and even listed inside the template file.
As you are already habituated with T4 templates, let me show you another example to demonstrate the power of the templating code generation. Let's take a look at the following code:
<#
   var logVariants = new []
       {
           new { Variant = "Bright"    , Color = "White"   },
           new { Variant = "Normal"    , Color = "Gray"    },
           new { Variant = "Url"       , Color = "Cyan"    },
       };
#>
   using System;

    static partial class MyLogClass
    {
<#
   foreach (var logVariant in logVariants)
   {
#>
       static void Write<#=logVariant.Variant#>Line (string message)
       {
           var color = Console.ForegroundColor;
           Console.ForegroundColor = ConsoleColor.<#=logVariant.Color#>;
           try
           {
               Console.WriteLine (message ?? "");
           }
           finally
           {
               Console.ForegroundColor = color;
           }
       }

<#
   }
#>

}
You can see that the template generates a
Variant method directly inside the code. The variants are created as an array while the methods are created on the fly such that each method will have a separate color to write on the console.
The important thing to understand here is how the code is laid out. You can see that rather than using the template methods Write or WriteLine, we can directly write content to the file outside the <# and #> tags such that the data is written directly to the file.
- You can read more about T4 templates from the official blog at http://bit.ly/msdnt4. Visual Studio does not provide features such as Syntax Highlighting and IntelliSense for T4 editors.
- You can install the Devart T4 editor from http://bit.ly/t4editor.